Danby DDR050BCWDB-ME-6 Le manuel du propriétaire
- Catégorie
- Déshumidificateurs
- Taper
- Le manuel du propriétaire

*
*
Printed in China
Imprimé en Chine
Impreso en China
*Trademark of Danby Products
* Marque de commerce de Danby Products
* Marca comerciales de Danby Products
Danby Products Limited, Guelph, Ontario, Canada N1H 6Z9
Danby Products Inc. Findlay, Ohio, U.S.A. 45840
www.Danby.com
2023.01.19
MODEL • MODÈLE • MODELO
DDR050BCWDB-ME-6
DEHUMIDIFIER
Owner’s Manual.............................1 - 14
DÉSHUMIDIFICATEUR
Manuel du propriétaire.................15 - 28
DESHUMIDIFICADOR
Manual del propietario.................29 - 42

1
Welcome to the Danby family.
We are proud of our quality products and we believe in dependable service. We suggest
that you read this owner’s manual before plugging in your new appliance as it contains
important operation information, safety information, troubleshooting, and maintenance tips
to ensure the reliability and longevity of your appliance.
You are entitled to the warranty coverage as described in the owner’s manual provided with
your new appliance.
1. Please write down your appliance information below. You must keep the original proof
of purchase receipt to validate and receive warranty services.
2. Register your product online and receive a FREE 2 MONTH WARRANTY EXTENSION
after fi lling out a product survey, at www.danby.com/support/product-registration/
Need Help?
1. Read your Owner’s Manual for installation help, troubleshooting, and maintenance
assistance.
2. Visit www.Danby.com to access self-service tools, FAQs and much more by searching
your model number in the search bar.
3. For the Quickest Customer Service, please fi ll out the web form at www.danby.com/
support. Your submission will go directly to an expert on your particular appliance.
Our average response times are between 20 minutes and 2 hours, during EST business
hours.
4. Call 1-800-263-2629 - please note that during peak hours, hold times can exceed one
hour.
Model Number: ____________________________________________________
Serial Number: ____________________________________________________
Date of Purchase: __________________________________________________

SAFETY REQUIREMENTS
This appliance is not intended for use by persons
(including children) whose physical, sensory or
mental capabilities may be different or reduced,
or who lack experience or knowledge, unless such
persons receive supervision or training to operate
the appliance by a person responsible for their
safety.
Children should be supervised to ensure that they
do not play with the appliance.
To avoid risk of electric shock, do not operate this
dehumidifi er in an area that is likely to accumulate
standing water. If this condition develops, disconnect
the power supply before stepping into the water.
Do not store or use combustible materials such as
gasoline or other fl ammable vapors or liquids in the
vicinity of this or any other appliance.
Do not insert fi ngers or other objects into grills or
openings in the appliance.
Do not cover or block the intake and exhaust
openings.
Do not operate the appliance without the fi lter
installed.
Do not operate the appliance near heat sources.
This appliance is intended for indoor, residential
applications only. Do not use this dehumidifi er
outdoors. Do not use this dehumidifi er for
commercial or industrial applications.
GROUNDING INSTRUCTIONS
This appliance must be grounded. Grounding
reduces the risk of electrical shock by providing an
escape wire for the electrical current.
This appliance has a cord that has a grounding
wire with a 3-prong plug. The power cord must be
plugged into an outlet that is properly grounded.
If the outlet is a 2-prong wall outlet, it must be
replaced with a properly grounded 3-prong wall
outlet. The serial rating plate indicates the voltage
and frequency the appliance is designed for.
WARNING - Improper use of the grounding
plug can result in a risk of electric shock.
Consult a qualifi ed electrician or service agent
if the grounding instructions are not completely
understood, or if doubt exists as to whether the
appliance is properly grounded.
Do not connect the appliance to extension cords,
adapters or together with another appliance in the
same wall outlet.
Do not splice the power cord. Do not under any
circumstances cut or remove the third ground prong
from the power cord.
If the power supply cord is damaged, it must be
replaced by the manufacturer, its service agent or
similar qualifi ed person in order to avoid hazard.
Important Safety Information
READ AND FOLLOW ALL SAFETY INSTRUCTIONS
2
SAVE THESE INSTRUCTIONS!

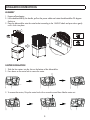
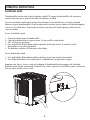
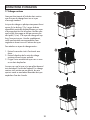
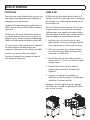
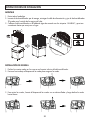
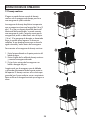
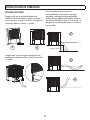
ASSEMBLY
1. Remove all packaging.
2. Lift the dehumidifi er by the handle, pull out the power cable and rotate the dehumidifi er 90 degrees
clockwise.
3. Place the dehumidifi er onto the water bucket according to the “ALIGN” labels and press down gently
until it clicks into place.
INSTALLATION INSTRUCTIONS
3
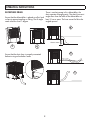
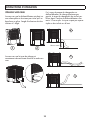
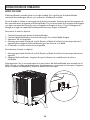
CASTER INSTALLATION
1. Slide the four casters into the slots on the bottom of the dehumidifi er.
2. Press down on the caster lock to secure the caster.
3. To remove the casters, lift up the caster lock with a screwdriver and then slide the caster out.

4
OPERATION
• Place the dehumidifi er on a smooth, level fl oor
that is strong enough to support the appliance
with a full bucket of water.
• Do not place the dehumidifi er on carpeting as
this can block air fl ow around the appliance.
Do not force casters to move over carpeting as
the appliance can become unbalanced and spill
water.
• To maintain effi ciency, operate the appliance
in an enclosed area. Keep nearby doors and
windows closed.
• Maintain a minimum clearance of 40 cm (16
inches) around the air outlets and 20 cm (8
inches) on other sides of the appliance to allow
for proper air circulation.
• The recommended ambient operating
temperature is between 5°C (41°F) and 32°C
(90°F). Low ambient operating temperatures can
cause frost to form on the internal coils which
may affect performance.
• Any time the appliance is placed on its back or
side, it must be allowed to stand upright for 6
hours before plugging in to avoid damage to
internal components.
• For optimal performance, ensure that the
humidity setting is 10% lower than the ambient
humidity. It is normal for the ambient humidity to
vary up to 5% above or below the set humidity.
• It is recommended in normal conditions to set
the humidity between 40-45%.
• It is normal for the dehumidifi er to exhaust warm
air.
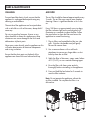
1
2
3
4
5
6
7
3
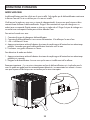
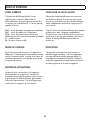
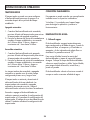
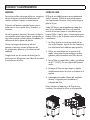
FEATURES
1. Air outlet
2. Control panel
3. Handle
4. Water bucket
5. Casters
6. Air intake
7. Air fi lter (behind the grill)
OPERATING INSTRUCTIONS
DEFAULT SETTING
The default setting is continuous mode and high fan
speed. This means that when the dehumidifi er is
plugged in for the fi rst time it will run in continuous
mode with the fan speed set to high.
Press the mode button to change the mode, if
desired. Press the humidity adjust buttons to set the
desired humidity. Ensure that the set humidity is
lower than the ambient humidity.

5
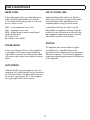
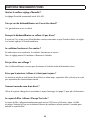
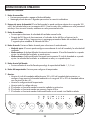
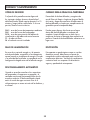
CONTROL PANEL
1. Power button:
• Press to turn the dehumidifi er on or off.
• Press and hold for 3 seconds to activate the wireless connection.
2. Humidity adjust buttons: The humidity level can be set within a range of 35% to 85% relative humidity
in 5% increments. For drier air, set to a lower percentage value. For more damp air, set a higher
percentage value.
3. Fan button:
• Press to select normal or high fan speed.
• After 250 hours of operation, the fi lter light indicator will illuminate on the display. Clean the fi lter
and then press and hold the fan button for 3 seconds to reset the fi lter indicator.
4. Mode button: Press the mode button to select the desired mode.
• Set mode: the humidity level and fan speed can be set manually by the user.
• Continuous mode: the dehumidifi er will run continuously. The humidity level cannot be adjusted.
The fan speed can be adjusted.
• Max mode: the dehumidifi er will run continuously. The humidity level cannot be adjusted. The fan
speed will be set to high and cannot be adjusted.
5. Fill level button:
• Press the fi ll level button to choose the bucket capacity: 1, 2, 3 or 4.
6. Timer button: Press to set the timer.
7. Display:
• Shows the set humidity level between 35% to 85% relative humidity while setting, then shows the
ambient humidity in a range of 30% to 90% relative humidity with an accuracy of ±5%.
• Displays the timer settings.
• Shows all error codes.
A. Indicator will illuminate when the wireless connection is active.
B. Indicator will illuminate when the fi lter needs to be cleaned.
C. Indicator will illuminate when the dehumidifi er is being used without the bucket installed.
OPERATING INSTRUCTIONS
12 3 4 5 6
7A
BC

OPERATING INSTRUCTIONS
6
TIMER
The timer can be used to set the dehumidifi er to turn
off or on after a set period of time.
Auto Off
1. When the dehumidifi er is turned on, press the
timer button to activate the auto off timer.
2. Press the humidity adjust buttons to change the
set time in 0.5 hour increments up to 10 hours
and then in 1 hour increments up to 24 hours.
Auto On
1. When the dehumidifi er is turned off, press the
timer button to activate the auto on timer.
2. Press the humidity adjust buttons to change the
set time in 0.5 hour increments up to 10 hours
and then in 1 hour increments up to 24 hours.
The auto on and auto off timers can be used at the
same time by fi rst setting one and then the other.
The timer will not cycle the dehumidifi er on and off
indefi nitely. The auto on and auto off timers will
function one time and then the dehumidifi er will
return to regular functioning.
Turning the dehumidifi er on or off at any time or
changing the timer setting to 0.0 will cancel the
timer settings. The P2 bucket full bucket error code
will also cancel the timer setting.
WIRELESS CONNECTION
This appliance can be controlled with a wireless
application on your wireless device.
Visit https://www.danby.com/support/apps to
download the application and learn about its
operation.
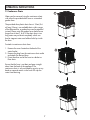
WATER REMOVAL
1. Water Bucket
The dehumidifi er will automatically collect
condensed water in the water bucket. When the
bucket is full, the compressor and fan will turn off
and the full bucket indicator light will turn on. The
display will show “P2”.
To empty the bucket, lift the dehumidifi er handle
and separate the body from the water tank. Put the
dehumidifi er body on a fl at, solid surface. Empty the
bucket but be cautious when moving the bucket, it
will be full and can be heavy.
The dehumidifi er will resume functioning when the
body is reconnected to the water bucket.

2. Continuous Drain
Water can be removed using the continuous drain
with either the provided drain hose or a standard
garden hose.
The provided clear plastic drain hose is 2 feet (0.6
m) long. If there is no available drain within range
of the dehumidifi er, a garden hose can be attached
instead. Please note, the garden hose should be no
longer than 6 feet (1.8 m). If the drain hose is too
long water may not drain completely which can
lead to stagnant water and mildew build up inside
the hose.
To attach to continuous drain hose:
1. Remove the cover located on the back of the
water bucket.
2. Remove the plug from the continuous drain outlet
and attach the desired hose.
3. Direct the other end of the hose to a bucket or
fl oor drain.
Ensure that the hose is not bent and goes straight
down from the back of the appliance. The
continuous drain is only activated by gravity so any
bends or upward motion in the hose will stop the
water from draining.
OPERATING INSTRUCTIONS
7
1
2
3

8
OPERATING INSTRUCTIONS
BUCKETLESS MODE
The dehumidifi er can be used without the bucket installed. This means the dehumidifi er will continue to
remove water from the air and will not check if the bucket is installed.
Do not use bucketless mode without a drain hose attached. Ensure that the hose is securely connected
before turning on the dehumidifi er. Direct the other end of the drain hose to a place with unlimited capacity
such as a sink or fl oor drain. Directing the drain hose to a place with limited capacity could cause the
water to overfl ow.
To turn on bucketless mode:
1. Connect the drain hose to the dehumidifi er.
2. Connect the dehumidifi er to a power source. Do not install the water bucket.
3. “Eb” will show on the display.
4. Press and hold the fi ll level button and the up button at the same time for 3 seconds to set the
dehumidifi er to run without the bucket.
5. The bucketless indicator will illuminate on the display.
To turn off bucketless mode:
1. Press and hold the fi ll level button and the up button at the same time for three seconds.
2. Turn off the dehumidifi er. Ensure the bucket is installed before turning it back on again.
Important note: there is a micro switch on the bottom of the dehumidifi er that engages with the bucket.
Bucketless mode may be automatically turned off if this switch is pressed. Ensure that the space is clear and
that you do not touch the micro switch.

BUCKETLESS DRAIN
Ensure that the dehumidifi er is placed on a fl at, level
surface to prevent toppling or sliding. The tilt angle
needs to be less than 1 degree.
OPERATING INSTRUCTIONS
√
X
√
10cm or more
X
X
Ensure that the drain hose is properly connected
before turning on bucketless mode.
There is no drain pump in this dehumidifi er, the
drain operates through gravity. The drain hose must
angle down from the back of the dehumidifi er at
least 10 cm or more. The hose cannot lie fl at or be
angled upward.
9

CARE & MAINTENANCE
CLEANING
To avoid possible electric shock, ensure that the
appliance is unplugged before performing any
cleaning or maintenance.
The outside of the appliance can be wiped clean
with a soft cloth or with a lukewarm, damp cloth if
necessary.
Do not use gasoline, benzene, thinner or any
other chemicals to clean this appliance as these
substances can cause damage to the fi nish and
deformation of plastic parts.
Never pour water directly onto the appliance as this
will cause deterioration of electrical components
and wiring insulation.
Ensure that the drain ports on the back of the
appliance are free of dirt and calcium build up.
AIR FILTER
The air fi lter should be cleaned approximately every
2 weeks. The air fi lter may require more frequent
cleaning if there is signifi cant dander or fur in the
air.
Every 250 hours or approximately every ten days,
the fi lter indicator light on the control panel will
illuminate as a reminder to clean the fi lter. Follow
the steps below to clean the fi lter and return the
appliance to normal functioning.
1. The air fi lters are located behind the two side
grills. Grip the side handles and pull gently
forward to remove them.
2. Use a vacuum cleaner with a soft brush
attachment to remove any large debris or dust
build up from the air fi lter.
3. Wash the fi lter in lukewarm, soapy water, below
40°C (104°F), or use a neutral cleaning agent.
4. Rinse the fi lter with clean water and dry
thoroughly before reinstalling in the appliance.
5. Press and hold the fan button for 3 seconds to
reset the fi lter indicator.
Note: Do not operate the appliance without the
air fi lter installed. Do not place the fi lters in a
dishwasher.
10

11
ERROR CODES
If the display panel shows any of the below error
codes, unplug the dehumidifi er, let it stand for
5-10 minutes and then plug it back in. If the error
persists, call for service.
EH60 - room temperature sensor error
EH61 - evaporator sensor error
EH0b - display board or master control board
communication error
P2 - bucket is full
Eb - bucket is not installed
POWER FAILURE
In the event of a power failure or if the appliance
is unplugged, it will resume normal functioning
when power is restored. The mode and fan speed
will resume at the settings chosen before the power
failure.
AUTO DEFROST
When frost builds up on the evaporator coils, the
compressor will cycle off and the fan will continue to
run until the frost melts. The dehumidifi er may emit
the sound of running water. This is the refrigerant
moving through the coils and is normal.
CARE & MAINTENANCE
END OF SEASON CARE
Unplug the dehumidifi er and ensure the fi lter is
clean. Ensure the bucket is empty and then allow
both the bucket and the dehumidifi er to dry
completely before storing for the off season.
It could take a few days for water inside the
dehumidifi er to completely evaporate. Wipe the
bucket with a dry cloth and ensure the drain has
been emptied to speed up this process Store the
dehumidifi er covered in a dry location.
DISPOSAL
This appliance may not be treated as regular
household waste, it should be taken to the
appropriate waste collection point for recycling of
electrical components. Check for local regulatory
compliance regarding approved and safe disposal
of this appliance.

12
FREQUENTLY ASKED QUESTIONS
What is the best humidity setting?
The recommend humidity setting is 40-45%.
Is the air that comes out of the dehumidifi er supposed to be hot?
Yes, usually this air feels warm.
Why isn’t the dehumidifi er collecting any water?
There may not be enough humidity in your environment or the relative humidity might be set higher than
ambient humidity.
Does the fan run continuously?
In continuous mode and max mode the fan will run continuously.
In a manual setting the fan will cycle on and off.
Can I use an extension cord?
No, the dehumidifi er is built to operate using the power cord provided.
Does the timer cycle on and off forever?
The on and off timers can be used at the same time however, they will only cycle one time and then resume
normal functioning.
How do I hook up my direct drain?
Use the provided drain hose or purchase a garden hose. See page 7 for more information.
Does the fi lter light turn on when it is dirty?
The fi lter light turns on automatically after about 250 hours of use even if the fi lter is clean. Clean the fi lter
and then hold the fan button for 3 seconds to turn the fi lter light off.

13
TROUBLESHOOTING
Appliance will not operate
• Plug is not fully inserted into the wall outlet
• Blown fuse or circuit breaker
• Ambient humidity is lower than the set humidity
• Bucket is full or is not in the proper position
Insuffi cient dehumidifying
• Air fi lter is dirty
• Blocked air fl ow
• Appliance size is too small for application
• Ambient humidity is lower than the set humidity
Noise
• Air fi lter is dirty
• Bucket is not in proper position
• Floor surface is not level
Odors
• Formation of mold or mildew on internal wet
surfaces
• Place an algaecide tablet in the water bucket
Water on fl oor
• Hose connection is loose
• Drain cover has been removed
Frost build up
• When ambient temperature is below 5°C (41°F)
frost may form
• Switch the appliance to fan only mode until the
frost melts
This equipment has been tested and found to
comply with the limits for a Class B digital device,
pursuant to Part 15 of the FCC Rules. These limits
are designed to provide reasonable protection
against harmful interference in a residential
installation. This equipment generates, uses and can
radiate radio frequency energy and, if not installed
and used in accordance with the instructions, may
cause harmful interference to radio communications.
However, there is no guarantee that interference will
not occur in a particular installation.
If this equipment does cause harmful interference
to radio or television reception, which can be
determined by turning the equipment off and on, the
user is encouraged to try to correct the interference
by one or more of the following measures:
1. Reorient or relocate the receiving antenna
2. Increase the separation between the equipment
and receiver
3. Connect the equipment into an outlet on a
circuit different from that to which the receiver is
connected
4. Consult the dealer or an experienced radio/TV
technician for help
Changes or modifi cations not approved by the
party responsible for FCC and Industry Canada
compliance could void the user’s authority to
operate the equipment. This appliance complies
with Part 15 of the FCC Rules and license-exempt
RSS standards.
Operation is subject to the following conditions:
1. This device may not cause interference.
2. This device must accept any interference
received, including interference that may cause
undesired operation.
This equipment complies with FCC RF and IC
RSS-102 radiation exposure limits set forth for an
uncontrolled environment. This equipment should
be installed and operated with minimum distance
20cm(8 inches) between the radiator and your
body.
This device complies with RSS-247 of Industry
Canada. Operation is subject to the condition that
this device does not cause harmful interference.
This device contains:
FCC ID: 2ADQOMDNA21
IC: 12575A-MDNA21
FCC WIRELESS REQUIREMENTS

LIMITED IN-HOME APPLIANCE WARRANTY
This quality product is warranted to be free from manufacturer’s defects in material and workmanship, provided that the unit is used under the normal operating
conditions intended by the manufacturer.
This warranty is available only to the person to whom the unit was originally sold by Danby Products Limited (Canada) or Danby Products Inc. (U.S.A.) (hereafter
“Danby”) or by an authorized distributor of Danby, and is non-transferable.
TERMS OF WARRANTY
Plastic parts, are warranted for thirty (30) days only from purchase date, with no extensions provided.
First Year
During the rst twelve (12) months, any functional parts of this product found to be defective, will be repaired or replaced, at warrantor’s
option, at no charge to the ORIGINAL purchaser.
To obtain
Danby reserves the right to limit the boundaries of “In Home Service” to the proximity of an Authorized Service Depot. Any app liance
Service
requiring service outside the limited boundaries of “In Home Service” , it will be the consumer’s responsibility to transport the appliance (at
their own expense) to the original retailer (point of purchase) or a service depot for repair. See “Boundaries of In Home Serv ice” below.
Contact your dealer from whom your unit was purchased, or contact your nearest authorized Danby service depot, where service
must be performed by a qualied service technician.
If service is performed on the units by anyone other than an authorized service depot, or the unit is used for commercial appli cation, all
obligations of Danby under this warranty shall be void.
Boundaries of
If the appliance is installed in a location that is 100 kilometers (62 miles) or more from the nearest service center your unit must be
In Home Service
delivered to the nearest authorized Danby Service Depot, as service must only be performed by a technician qualied and certif ied for
warranty service by Danby. Transportation charges to and from the service location are not protected by this warranty and are t he
responsibility of the purchaser.
Nothing within this warranty shall imply that Danby will be responsible or liable for any spoilage or damage to food or other c ontents of this appliance, whether due
to any defect of the appliance, or its use, whether proper or improper.
EXCLUSIONS
Save as herein provided, Danby, there are no other warranties, conditions, representations or guarantees, express or implied, m ade or intended by Danby or its
authorized distributors and all other warranties, conditions, representations or guarantees, including any warranties, conditio ns, representations or guarantees
under any Sale of Goods Act or like legislation or statue is hereby expressly excluded. Save as herein provided, Danby shall no t be responsible for any damages
to persons or property, including the unit itself, howsoever caused or any consequential damages arising from the malfunction o f the unit and by the purchase of
the unit, the purchaser does hereby agree to indemnify and hold harmless Danby from any claim for damages to persons or propert y caused by the unit.
GENERAL PROVISIONS
No warranty or insurance herein contained or set out shall apply when damage or repair is caused by any of the following:
1) Power failure.
2) Damage in transit or when moving the appliance.
3) Improper power supply such as low voltage, defective house wiring or inadequate fuses.
4) Accident, alteration, abuse or misuse of the appliance such as inadequate air circulation in the room or abnormal operating con ditions
(extremely high or low room temperature).
5) Use for commercial or industrial purposes (ie. If the appliance is not installed in a domestic residence).
6) Fire, water damage, theft, war, riot, hostility, acts of God such as hurricanes, oods etc.
7) Service calls resulting in customer education.
8) Improper Installation (ie. Building-in of a free standing appliance or using an appliance outdoors that is not approved for out door application).
Proof of purchase date will be required for warranty claims; so, please retain bills of sale. In the event warranty service is required, present this document to our
AUTHORIZED SERVICE DEPOT.
Danby Products Limited
PO Box 1778, Guelph, Ontario, Canada N1H 6Z9
Telephone: (519) 837-0920 FAX: (519) 837-0449
Danby Products Inc.
PO Box 669, Findlay, Ohio, U.S.A. 45840
Telephone: (419) 425-8627 FAX: (419) 425-8629
04/09
1-800-263-2629
Warranty Service
In-home
Danby reserves the right to limit the boundaries of “In Home Service” to the proximity of an authorized service
depot. Any appliance requiring service outside the limited boundaries of “In Home Service”, will be the consumer’s
responsibility to transport at their own expense to the original point of purchase or a service depot for repair. If the
appliance is installed in a location that is 100 kilometers (62 miles) or more from the nearest service center, it must
be delivered to the nearest authorized Danby Service Depot by the purchaser.
Transportation charges to and from the service location are not protected by this warranty and are the
responsibility of the purchaser.
During the first twenty four (24) months, any functional parts of this product found to be defective, will be repaired
or replaced, at warrantor’s option, at no charge to the original purchaser.
Contact the dealer where the unit was purchased, or contact the nearest authorized Danby service depot, where
service must be performed by a qualified service technician. If service is performed on the unit by anyone other
than an authorized service depot, all obligations of Danby under this warranty shall be void.
First 24 months
To obtain service
Boundaries of
in-home service
LIMITED “IN HOME” WARRANTY
This quality product is warranted to be free from manufacturer’s defects in material and workmanship, provided that the unit is used
under the normal operating conditions intended by the manufacturer.
This warranty is available only to the person to whom the unit was originally sold by Danby Products Limited (Canada) or Danby
Products Inc. (U.S.A.) (hereafter “Danby”) or by an authorized distributor of Danby, and is non-transferable.
TERMS OF WARRANTY
Plastic parts are warranted for thirty (30) days from the date of purchase, with no extensions provided.
Nothing within this warranty shall imply that Danby will be responsible or liable for any spoilage or damage to food or other
contents of this appliance, whether due to any defect of the appliance, or its use, whether proper or improper.
EXCLUSIONS
Save as herein provided, by Danby, there are no other warranties, conditions, representations or guarantees, express or implied, made
or intended by Danby or its authorized distributors and all other warranties, conditions, representations or guarantees, including any
warranties, conditions, representations or guarantees under any Sale of Goods Act or like legislation or statute is hereby expressly
excluded. Save as herein provided, Danby shall not be responsible for any damages to persons or property, including the unit itself,
howsoever caused or any consequential damages arising from the malfunction of the unit and by the purchase of the unit, the
purchaser does hereby agree to indemnify and hold harmless Danby from any claim for damages to persons or property caused by
the unit.
GENERAL PROVISIONS
No warranty or insurance herein contained or set out shall apply when damage or repair is caused by any of the following:
1) Power failure.
2) Damage in transit or when moving the appliance.
3) Improper power supply such as low voltage, defective house wiring or inadequate fuses.
4) Accident, alteration, abuse or misuse of the appliance such as inadequate air circulation in the room or abnormal operating
conditions (ie. extremely high or low room temperature).
5) Use for commercial or industrial purposes (ie. If the appliance is not installed in a domestic residence).
6) Fire, water damage, theft, war, riot, hostility, acts of God such as hurricanes, floods etc.
7) Service calls resulting in customer education.
8) Improper Installation (ie. Building-in of a free standing appliance or using an appliance outdoors that is not approved for outdoor
application, including but not limited to: garages, patios, porches or anywhere that is not properly insulated or climate controlled).
Proof of purchase date will be required for warranty claims; retain bills of sale. In the event that warranty service is required, present
the proof of purchase to our authorized service depot.
Warranty Service
In Home
Danby Products Limited
PO Box 1778, Guelph, Ontario, Canada N1H 6Z9
Telephone: (519) 837-0920 FAX: (519) 837-0449
Danby Products Inc.
PO Box 669, Findlay, Ohio, U.S.A. 45840
Telephone: (419) 425-8627 FAX: (419) 425-8629
1-800-263-2629
04/17

Bienvenue dans la famille Danby.
Nous sommes fi ers de nos produits de qualité et nous croyons en un service fi able. Nous
vous suggérons de lire ce manuel du propriétaire avant de brancher votre nouvel appareil
car il contient des informations de fonctionnement importantes, des informations de
sécurité, des conseils de dépannage et d’entretien pour assurer la fi abilité et la longévité de
votre appareil.
Vous avez droit à la couverture de la garantie décrite dans le manuel du propriétaire fourni
avec votre nouvel appareil.
1. Veuillez noter ci-dessous les informations relatives à votre appareil. Vous devez
conserver la preuve d’achat originale pour valider et bénéfi cier des services de
garantie.
2. Enregistrez votre produit en ligne et recevez une PROLONGATION DE GARANTIE
GRATUITE DE 2 MOIS après avoir rempli une enquête sur les produits, à l’adresse
www.danby.com/support/product-registration/
Besoin d’assistance?
1. Lisez votre manuel du propriétaire pour obtenir de l’aide à l’installation, au dépannage
et à la maintenance.
2. Visitez www.Danby.com pour accéder aux outils en libre-service, aux FAQ et bien plus
encore en recherchant votre numéro de modèle dans la barre de recherche.
3. Pour bénéfi cier du service client le plus rapide, veuillez remplir le formulaire Web à
l’adresse www.danby.com/support. Votre soumission ira directement à un expert de
votre appareil particulier. Nos temps de réponse moyens sont compris entre 20 minutes
et 2 heures, pendant les heures ouvrables EST.
4. Composez le 1-800-263-2629 - veuillez noter que pendant les heures de pointe, les
temps d’attente peuvent dépasser une heure.
Numéro de modèle : _______________________________________________
Numéro de serie : _________________________________________________
Date d’achat : _____________________________________________________
15

EXIGENCES DE SÉCURITÉ
Cet appareil n’est pas destiné à être utilisé par
des personnes (y compris des enfants) dont les
capacités physiques, sensorielles ou mentales
peuvent être différentes ou réduites, ou qui n’ont
pas d’expérience ou de connaissances, à moins
que ces personnes ne soient surveillées ou formées
pour faire fonctionner l’appareil par une personne
responsable de leur sécurité.
Les enfants devraient être surveillés pour s’assurer
qu’ils ne jouent pas avec l’appareil.
Pour éviter tout risque de choc électrique, ne
pas utiliser ce déshumidifi cateur dans une zone
susceptible d’accumuler de l’eau stagnante. Si cette
condition se développe, débranchez l’alimentation
avant de pénétrer dans l’eau.
Ne pas stocker ou utiliser des matériaux
combustibles tels que de l’essence ou d’autres
vapeurs ou liquides infl ammables à proximité de ce
ou d’un autre appareil.
Ne pas insérer de doigts ou d’autres objets dans
des grilles ou des ouvertures dans l’appareil.
Ne pas couvrir ou bloquer les ouvertures
d’admission et d’échappement.
N’utilisez pas l’appareil sans le fi ltre installé.
N’utilisez pas l’appareil à proximité de sources de
chaleur.
Cet appareil est destiné uniquement à des
applications résidentielles et intérieures. N’utilisez
pas ce déshumidifi cateur à l’extérieur. N’utilisez
pas ce déshumidifi cateur pour des applications
commerciales ou industrielles.
INSTRUCTIONS DE MISE À LA TERRE
Cet appareil doit être mis à la terre. La mise à
la terre réduit le risque de choc électrique en
fournissant un câble d’échappement pour le courant
électrique.
Cet appareil possède un cordon doté d’un fi l de
mise à la terre avec une fi che à 3 broches. Le
cordon d’alimentation doit être branché sur une
prise correctement mise à la terre. Si la sortie
est une prise murale à 2 broches, elle doit être
remplacée par une prise murale à 3 broches
correctement mise à la terre. La plaque signalétique
en série indique la tension et la fréquence
auxquelles l’appareil est conçu.
AVERTISSEMENT - L’utilisation incorrecte de la
fi che de mise à la terre peut entraîner un risque
d’électrocution. Consultez un électricien qualifi é
ou un agent de service si les instructions de mise
à la terre ne sont pas complètement comprises, ou
s’il existe un doute quant à savoir si l’appareil est
correctement mis à la terre.
Ne branchez pas l’appareil à des rallonges, des
adaptateurs ou à un autre appareil dans la même
prise murale.
Ne pas épisser le cordon d’alimentation. Ne coupez
ou retirez en aucun cas la troisième broche du
cordon d’alimentation.
Si le cordon d’alimentation est endommagé, il
doit être remplacé par le fabricant, son agent de
maintenance ou une personne qualifi ée similaire
afi n d’éviter tout risque.
Informations importantes de sécurité
LIRE ET SUIVRE TOUTES LES INSTRUCTIONS DE SÉCURITÉ
GARDEZ CES INSTRUCTIONS!
16

INSTRUCTIONS D’INSTALLATION
17
ASSEMBLÉ
1. Retirez tous les emballages.
2. Soulevez le déshumidifi cateur par la poignée, retirez le câble d’alimentation et faites pivoter le
déshumidifi cateur de 90 degrés dans le sens des aiguilles d’une montre.
3. Placez le déshumidifi cateur sur le seau d’eau conformément aux étiquettes «ALIGN» et appuyez
doucement jusqu’à ce qu’il s’enclenche.
INSTALLATION DES ROULETTES
1. Faites glisser les quatre roulettes dans les fentes au bas du déshumidifi cateur.
2. Appuyez sur le verrou de la roulette pour fi xer la roulette.
3. Pour retirer les roulettes, soulevez le verrou des roulettes à l’aide d’un tournevis, puis faites glisser la
roulette vers l’extérieur.

18
OPÉRATION
• Placez le déshumidifi cateur sur un sol plat et plat
suffi samment solide pour supporter l’appareil
avec un seau plein d’eau.
• Ne placez pas le déshumidifi cateur sur de la
moquette car cela peut bloquer le fl ux d’air
autour de l’appareil. Ne forcez pas les roulettes
à se déplacer sur la moquette car l’appareil peut
se déséquilibrer et renverser de l’eau.
• Pour maintenir l’effi cacité, faites fonctionner
l’appareil dans un endroit clos. Gardez les
portes et fenêtres à proximité fermées.
• Maintenez un dégagement minimum de 40 cm
(16 pouces) autour des sorties d’air et de 20 cm
(8 pouces) des autres côtés de l’appareil pour
permettre une bonne circulation de l’air.
• La température ambiante de fonctionnement
recommandée est comprise entre 5°C
(41°F) et 32°C (90°F). Des températures de
fonctionnement ambiantes basses peuvent
provoquer la formation de givre sur les
serpentins internes, ce qui peut affecter les
performances.
• Chaque fois que l’appareil est placé sur le dos
ou sur le côté, il doit rester debout pendant
6 heures avant de le brancher pour éviter
d’endommager les composants internes.
• Pour des performances optimales, assurez-vous
que le réglage d’humidité est inférieur de 10% à
l’humidité ambiante. Il est normal que l’humidité
ambiante varie jusqu’à 5% au-dessus ou en
dessous de l’humidité réglée.
• Il est recommandé dans des conditions normales
de régler l’humidité entre 40 et 45%.
• Il est normal que le déshumidifi cateur évacue
l’air chaud.
1
2
3
4
5
6
7
3
CARACTÉRISTIQUES
1. Sortie d’air
2. Panneau de commande
3. Manipuler
4. Seau d’eau
5. Roulettes
6. Prise d’air
7. Filtre à air (derrière la grille)
INSTRUCTIONS D’UTILISATION
PARAMÈTRES PAR DÉFAUT
Le réglage par défaut est le mode continu et la
vitesse élevée du ventilateur. Cela signifi e que
lorsque le déshumidifi cateur est branché pour la
première fois, il fonctionnera en mode continu avec
la vitesse du ventilateur réglée sur haute.
Appuyez sur le bouton mode pour changer de
mode, si vous le souhaitez. Appuyez sur les boutons
de réglage de l’humidité pour régler l’humidité
souhaitée. Assurez-vous que l’humidité réglée est
inférieure à l’humidité ambiante.

19
PANNEAU DE COMMANDE
1. Bouton d’alimentation:
• Appuyez pour allumer ou éteindre le déshumidifi cateur.
• Appuyez et maintenez pendant 3 secondes pour activer la connexion sans fi l.
2. Boutons de réglage de l’humidité: Le niveau d’humidité peut être réglé dans une plage de 35% à 85%
d’humidité relative par incréments de 5%. Pour un air plus sec, réglez sur un pourcentage inférieur.
Pour un air plus humide, défi nissez un pourcentage plus élevé.
3. Bouton ventilateur:
• Appuyez pour sélectionner une vitesse de ventilateur normale ou élevée.
• Après 250 heures de fonctionnement, le voyant du fi ltre s’allumera sur l’écran. Nettoyez le fi ltre,
puis appuyez sur le bouton du ventilateur et maintenez-le enfoncé pendant 3 secondes pour
réinitialiser l’indicateur de fi ltre.
4. Bouton de mode: Appuyez sur le bouton mode pour sélectionner le mode souhaité.
• Mode réglages: le taux d’humidité et la vitesse du ventilateur peuvent être réglés manuellement
par l’utilisateur.
• Mode continu: le déshumidifi cateur fonctionnera en continu. Le taux d’humidité ne peut pas être
ajusté. La vitesse du ventilateur peut être ajustée.
• Mode maximum: le déshumidifi cateur fonctionnera en continu. Le taux d’humidité ne peut pas être
ajusté. La vitesse du ventilateur sera réglée sur haute et ne peut pas être ajustée.
5. Bouton de niveau de remplissage:
• Appuyez sur le bouton de niveau de remplissage pour choisir la capacité du seau : 1, 2, 3 ou 4.
6. Bouton de minuterie: Appuyez pour régler la minuterie.
7. Affi chage:
• Affi che le niveau d’humidité réglé entre 35% et 85% d’humidité relative pendant le réglage, puis
affi che l’humidité ambiante dans une plage de 30% à 90% d’humidité relative avec une précision
de ±5%.
• Affi che les paramètres de la minuterie.
• Affi che tous les codes d’erreur.
A. L’indicateur s’allumera lorsque la connexion sans fi l est active.
B. L’indicateur s’allumera lorsque le fi ltre doit être nettoyé.
C. L’indicateur s’allumera lorsque le déshumidifi cateur est utilisé sans que le seau soit installé.
INSTRUCTIONS D’UTILISATION
12 3 4 5 6
7A
BC
La page charge ...
La page charge ...
La page charge ...
La page charge ...
La page charge ...
La page charge ...
La page charge ...
La page charge ...
La page charge ...
La page charge ...
La page charge ...
La page charge ...
La page charge ...
La page charge ...
La page charge ...
La page charge ...
La page charge ...
La page charge ...
La page charge ...
La page charge ...
La page charge ...
La page charge ...
La page charge ...
La page charge ...
-
 1
1
-
 2
2
-
 3
3
-
 4
4
-
 5
5
-
 6
6
-
 7
7
-
 8
8
-
 9
9
-
 10
10
-
 11
11
-
 12
12
-
 13
13
-
 14
14
-
 15
15
-
 16
16
-
 17
17
-
 18
18
-
 19
19
-
 20
20
-
 21
21
-
 22
22
-
 23
23
-
 24
24
-
 25
25
-
 26
26
-
 27
27
-
 28
28
-
 29
29
-
 30
30
-
 31
31
-
 32
32
-
 33
33
-
 34
34
-
 35
35
-
 36
36
-
 37
37
-
 38
38
-
 39
39
-
 40
40
-
 41
41
-
 42
42
-
 43
43
-
 44
44


Danby DDR050BCWDB-ME-6 Le manuel du propriétaire
- Catégorie
- Déshumidificateurs
- Taper
- Le manuel du propriétaire
dans d''autres langues
Documents connexes
-
Danby DDR050BLPBDB-ME Le manuel du propriétaire
-
Danby DDR060BMPWDB Le manuel du propriétaire
-
-
-
-
-
-
-
Danby DDR050BLPBDB Le manuel du propriétaire
-