Aiwa ICM8 Le manuel du propriétaire
- Catégorie
- Dictaphones
- Taper
- Le manuel du propriétaire
Ce manuel convient également à

anua
IC”M8
IC RECORDER
GRABADOR EN CIRWTO INTEGRADO
OWNER’SRECORD
For your convenience, record the model number and the serial number (you
will find it inside the battery compartment of your set) inthe space provided
below. Please refer them when you contact your Aiwa dealer in case of
difficulty.
I Model No.lC-M8
I
OPERATING INSTRUCTIONS
INSTRUCCIONES DE MANEJO
MODE D’EMPLOI
88-HT4-901-01
AIWA CO.,LTD.
980203 AYO-H-DO
Printed in Japan
Serial No.
PRECAUTIONS
To maintain good performance
● Do not use the unit in places which are extremely hot, cold, dusty or \
humid.
In particular, do not keep the unit:
● in a high humidity area such as a bathroom
● near a heater
● in an area exposed to dkect sunlight (inside a parked car, where there
could be a considerable rise in temperature)
● Keep cassette tapes, magnetic cards and other magnetic recorded
materials away from the speaker as the recorded information may be
erased or noise may occur on cassette tapes.
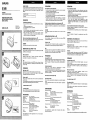
Open the battery compartment and insert a size AA (R6) battery with the 0
and
O marks correctly aligned.
Battery replacement
Replace the battery when Cl flashes in the display. Operation stops
automatically 1 minute after the C2 starts flashing.
Note
After replacing the battery, press the RESET button on the rear of the unit
with a thin rod to reset the unit . Recordings are not erased when you reset
the unit. + El
PREPARATION
HOLDswitch + ❑
Release the HOLD switch before operation to activate the buttons.
When not using the unit, set the HOLD switch to HOLD position.
Accidentally pressed buttons will not function,
Turning on and off
Press one of the operation buttons. Power is turned on automatically and
operation starts.
If no new operations are done within 30 seconds from the last operation, the
power is turned off automatically (Auto Power off function).
To attach the hand strap + ❑
To clean the cabinet
Use a soft cloth lightly moistened with a mild detergent solution.
Do not use strong solvents such as alcohol, benzine or cleaner,
SPECIFICATIONS
Frequency response
350-1,700 Hz (EIAJ)
Microphone
Electret condenser microphone (monaurel)
Maximum output
80 mW (EIAJ 8 ohms)
Spaskar
Dlamater 36 mm, 8 ohms
Power supply
DC 1.5V using a size AA (R6) dry cell batteries
Maximum total recording time
Approx. 4 minutes x 2
Battery life using a size AA (LR6) alkaline battery
Approx.’l3 hours (EIAJ recording)
Approx. 12 hours (EIAJ 10 mW playback)
Maximum dimensions
58.7 (W) x 82.6 (H) x 21 (D) mm
(2’/8x 3’/8x 27/,,h.)
Weight
Approx. 56 g (2 OZ) excluding battery
Accessories
Hand strap (1)
The specifications and external appearance of this unit are subject to
change without notice,
PRECAUCIONES
Para maniener sus buenas prestaciones
● No utilice el aparato en un Iugar muy caliente, frio, con polvo o humedad.
En especiai, no mantenga este aparato:
● en un Iugar muy htimedo, por ejemplo en un bario
● cerca de un aparato de calefacci6n
● en un Iugar expuesto al sol (dentro de un autom6vil estacionado donde
puede subir mucho la temperature)
● No acerque Ias cintas de casete, tarjetas magneticas u otro material
grabado magneticamente al altavoz ya que la information grabada
puede borrarse o puede aparecer ruido en Ias cintas de casete.
Cuando se produce una indicacitm de error o funciona mal + ❑
Reinicialice el aparato presionando el boton RESET en la parte trasera del
aparato con una varilla fins. Las grabaciones no se borran al reinicializar el
aparato.
ATENCION
Las grabaciones pueden borrarse cuando se hate el servicio de este
aparato.
INSTALACION DE LAS PILAS + ❑
Abra el portapilas y coloque una pila AA (R6) con Ias marcas ~ y 0
correctamente alineadas.
Cambio de la piia
Cambie la pila cuando c1 destelle en la pantalla. La operaci6n se detiene
automaticamente 1 minuto despues de que empiece a destellar C2.
Nota
Despues de cambiar la pila, presione el boton RESET en la parte trasera
del aparato con una varilla fina, para reinicializar el aparato. Las
grabaciones nose borran al reinicializar el aparato. +
❑
PREPARATIVES
Interrupter HOLD + •il
Suelte el interruptor HOLD antes de la operation para activar Ios botones,
Cuando no utilice el aparato, mueva el interruptor HOLD a la position
HOLD. El aparato no funcionar& aunque presione accidentalmente un
bot6n.
Conexion y desconexion
Presione uno de Ios botones de funcionamiento. Se conecta
automaticamente y empieza a funcionar automaticamente.
Si no se hate ninguna operaci6n nueva antes de 30 segundos de la ultima
operation, el aparato se desconecta automaticamente (Funci6n de
desconexi6n autom~tica).
Para coiocar una correa de mano + ❑
Para Iimpiar el mueble
Utilice un paiio suave Iigeramente empapado en una soluci6n detergence
neutra,
No utilice disolventes fuertes tales como alcohol, bencina o Iimpiadores
ESPECIFICACIONES
Respuesta de fracuancia
350-1.700 Hz (EIAJ)
Micr6fono
Micr6fono de condensador de elactreto (monoaural)
Salida maxima 80 mW (EIAJ 8 ohmios)
Aftavoz Diamatro 36 mm, 8 ohmios
Alimentacion ef6ctrica
CC de 1,5 V utilizando pitas de tamaiio AA (R6)
Maximo tiempo de grabaci6n total
Aprox. 4 minutes x 2
Longevidad de la pila con una pila alcalina de tamafio AA (LR6)
Aprox. 13 horas (grabaci6n EIAJ)
Aprox. 12 horas (reproducci6n EIAJ 10 mW)
Dimensioned m~ximas
58,7 (An.) x 82,6 (Al.) x 21 (Prof.) mm
Peso
Aprox. 56 g sin pila
Accesorio
Corraa de mano (1)
Las especificaciones y
cambios sin previo aviso.
aspecto exterior del aparato est~n sujetos a
PRECAUTIONS
Pour une performance optimale
● Ne pas utiliser I’appareil clans des Iieux extri3mement chauds, froids,
poussiereux ou humides.
En particulier, ne pas Iaisser I’appareil clans Ies
endroits suivants:
● extr~mement humides, comme une sane de bains
● & proximite d’un appareil de chauffage
● expos6s ~ la Iumiere directe du soleil (par ex. clans une voiture garee en
plein soleil, car I’habitacle peut devenir extr~mement chaud)
● Ne pas poser des cassettes,
cartes magnetiques ou autres
enregistrements magnetiques pres du haut-parleur, car Ies information
enregistrees risquent d’6tre effacees, ou Ies cassettes risquent d’6tre
parasites.
En cas d’anomalie de fonctionnement ou d’affichage + ❑
Reinitialisez I’appareil en appuyant sur Ie bouton RESET a I’arriere de
I’appareil avec une tige fi,ne,
Les enregistrements ne sent pas effac&s quand vous reinitialisez I’appareil.
ATTENTION
En cas de reparation de I’appareil, Ies enregistrements risauent d’t%re
effaces.
INSERTION DE LA PILE SECHE+ H
Ouvrez Ie Iogement de la pile et ins6rez une pile de
dirigeant Ies pales ~ et
O clans Ie bons sens,
Rempiacement de ia pile
Remplacez la pile quand C2 clignote sur I’afficheur,
s’arr6tera automatiquement 1 minute plus tard.
Remarque
taille AA (R6) en
Sinon I’Operation
Apr6s avoir remplace la pile, appuyez sur Ie bouton RESET a I’arriere de
I’appareil avec une tige fine pour reinitialiser I’appareil. Vos enregistrements
ne son! pas effaces quand vous reinitialisez I’appareil. + E!
PREPARATIFS
Commtrtateur HOLD+ ❑
Liberez Ie commutateur HOLD avant d’utiliser I’appareil pour pouvoir
activer Ies touches,
Quand vous n’utilisez pas I’appareil, remettez Ie commutateur HOLD sur la
position HOLD. Les touches ne risqueront pas d’6tre enclenchees par
inadvertence.
Mise sous et hors tension
Appuyez sur une des touches d’exploitation. L’appareil se met
automatiquement sous tension et en marche.
Si vous n’effectuez aucune op6ration clans Ies 30 secondes qui suivent une
operation, I’appareil se mettra automatiquement hors tension (Arr6t
automatique).
Pour attacher la sangle + 13
Pour nettoyer Ie coffret
Utilisez un chiffon doux 16gerement impregnb d’une solution detergence
neutre.
Ne pas utiliser de solvants puissants, comme I’alcool, la benzine
ou un
produit de nettoyage.
SPECIFICATIONS
Reponse en fr6quence
350-1.700 Hz (EIAJ)
Microphone Microphone elactrostalique (monophonique)
Puissance maximale 80 mW (EIAJ 8 ohms)
Haut-parleur
Diam&re 36 mm, 8 ohms
Alimentation
CC 1,5 V avec une pile s&he (R6) de format AA
Temps d’enregistrement maximal
Env. 4 minutes par plage
Autonomic d’une pile alcafine (LR6) de format AA
Env. 13 heures (Enregistrement EIAJ)
Env. 12 hauree (Lecture 10 mW EIAJ)
Dimensions maximales
58,7 (L) x 82,6 (H) x 21 (P) mm
(23/8X33/8X27/32pO)
Poids
Env. 56 g (2 on) saris la pile
Accessoire
Sangfe (1)
I-’aspect ext&ieur et ies specifications peuvent ?+tremodifk% saris pr6avis.

GRABACION + E
Este aparato tiene dos archives de grabacion (A y B). Se puede grabar
hasta unos 4 minutes de 50 grabaciones en cada archivo de grabaci6n.
la
4
2
1
3
■STOP
RECIPLAY
F PLAYISCAN
ENREGISTREMENT + E
Cet appareil a deux fichiers d’enregistrement (A et B). Vous pouvez
enregistrer jusqu’a 4 minutes sur 50 plages d’enregistrement clans chaque
fichier.
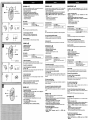
RECORDING + E
This unit has two recording files (A and B). You can record for up to about 4
minutes
in 50 recordincr tracks on each recordirm file.
1
2
3
4
Release the HOLD ;witch.
Set the FILE switch to select a recording file.
Orient
the built-in microphone to the sound source.
Kee~
●REC Dressed for 1 second to start recording.
1
2
3
4
Suelte el interruptor
HOLD.
Mueva el interruptor FILE para seleccionar el archivo de grabaci6n.
Apunte el micr6fono incorporado hacia la fuente de sonido.
Mantenga
●REC presionado durante 1 segundo para empezar a
1 Liberez Ie commutateur HOLD.
2 Reglez Ie commutateur FILE pour selectionner un fichier
d’enregistrement.
3 Orientez Ie microphone integre vers la source sonore.
4 Maintenez
●REC enfoncee pendant 1 seconde pour commencer
I’enregistrement.
L’indicateur REC/PLAY s’allume en rouge,
@ Numero de la plage enregistree
@ Temps d’enregistrement ecoule ‘
The”REC/PLA; indicator lights up in red.
@ Recording track number
@ Elapsed recording time
grabar.
El indicador REC/PLAY se enciende en rojo.
@ Numero de la pista de grabacion
@ Tiempo de grabacion transcurrido
Basic ooeralion
To stop recording Press ■.STOP.
To pause recording
Press *PLAY/SCAN.
To resume. oress
●REC aoain.
Funcionamiento basico
Para parar una grabaci6n
Presione
■STOP.
Para hater una pausa de
Presione bPLAY/SCAN.
grabacion
Para confinuar, vuelva a presionar
●REC.
1
12
HOLD
D
‘$
0
000
000
000
4i!iiij ~=]
A*. B
Fonctionnement de base
Note
You cannot change the recording tile during recording.
Pour arr6ter I’enregistrement
] Appuyez sur
■STOP.
Pour interrom!me l’enra~istrement I Amrvez sur FPLAY/SCAN.
Nota
Nose puede cambiar el archivo de grabacidn en el medio de la grabacion.
I
Pour poursuivre I’enregistrament, appuyez une
nouvelle fois sur
●REC.
I
To see the remaining recording time
PressEPLAY/SCAN while in recording pause mode.
● The remaining recording time is approximate values.
Remarque
Vous ne pouvez pas changer de fichier en tours d’enregistrement.
Para ver el tiempo de grabacion remanente.
Presione>PLAY/SCAN
en el modo de pausa de grabacion.
● El tiempo de grabacion remanente es un valor aproximado.
When FUL is displayed
You cannot record any
more. Erase unnecessary recordings.
Pour contr61er Ie temps d’enregistrement restant
Appuyez sur -PLAY/SCAN pendant la pause d’enregistrement.
● I_’indication de temps d’enregistrement restant est approximative,
Cuando aparece FUL
No puede seguir grabando. Borre ias grabaciones
que no necesite mas.
PLAYBACK + H
Quand FULest aftiche
Vous ne pouvez plus enregistrer. Effacez Ies enregistrements inutiles.
1 Release the HOLD switch .
2 Select a recording file.
3 Press -PLAY/SCAN.
The REC/PLAY indicator lights up in green.
4 Adjust the volume.
REPRODUCTION + E
1 Suelte el interruptor HOLD.
2 Sefeccione un archivo de grabacion.
3 Presione
➤ PLAY/SCAN.
Se enciende el indicador REC/PLAY en verde.
4 Ajuste el volumen.
LECTURE + E
1 Lib&ez Ie commutateur HOLD.
2 Selectionnez un fichier d’enregistrement.
3 Appuyez sur -PLAY/SCAN.
L’indicateur REC/PLAY s’allume en vert.
Basic operation
To stop playback I Press ■STOP.
To Dausa Dlavback ] Press >PLAY/SCAN.
Funcionamiento btisico
4 Ajuatez Ie volume.
Para parar una reproduccitm Presione 9STOP.
Para hater una pausa de Presione >PLAY/SCAN.
reproduction
Para confinuar, vualva a presionar EPLAY/
SCAN.
l“”’ I To resume. mess -PLAYLSCAN aaain. I
Fonctionnement de base
To listen with an earphone
Connect a commercially available earphone wifh a mini-piug.
When an earphone is connected, sound through the speaker is not heard.
To search for a desired point
To search
for the beginning of a recording track
Press 1<< or W.
Press during stop mode to change recording track number faster. Each
pressing changes 5 recording numbers.
Pour arr6ter la lecture.
I Appuyez sur I STOP.
Pour interrompre la lecture
IAppuyez sur -PLAY/SCAN.
2
‘Ki5iiib ~=J
,4.*B
Para escuchar con un auricuiar
Conecte un auricular de venta en Ios comercios, con un mini-enchufe.
Cuando se conecta un auricular, no se escucharA el sonido por el altavoz.
I
Pour poursuivre la Iectura, appuyez une
nouvelle fois sur >PLAY/SCAN.
I
Ecoute au casque
Branchez
un casque equipe d’un minijack (en vente clans Ie commerce).
Quand Ie casque est branche, aucun son n’est fourni par Ie haut-parleur.
Para buscar un punto deseado
Para buscar el principio de una pista de grabacion
Presione 1440 ➤M.
Presione durante et
modo de parada para cambiar m&s rApido el ndmero
de la pista de grabacion. Por cada presion, cambia 5 numeros de
grabaci6n.
Recherche d’un point particuiier
1’4
To locate a desired passage
Keep 1<< or ➤M pressed.
Release the button at the start of desired passage according to the time
counter in the display.
Pour Iocaliser Ie ddbut d’une plage enregistr6e
Appuyez sur l<< ou ➤>1.
Appuyez pendant Ie mode d’arr~t pour changer plus rapidement de plage,
A chaque pression, Ies num&os changent 5 par 5.
Para buscar
un punto deseado
Mantenga presionado 1+ o ➤PI.
Suelte el boton al principio del Iugar deseado, controlando el contador de
tiempo en la pantalla.
To listen to only 5 seconds at the beginning of each track
Keep -PLAY/SCAN pressed for 2 seconds,
Press PPLAY/SCAN again to resume normal playback.
Pour Iocaliser un passage particulier
Appuyez en continu sur }44 ou -1.
Re15.chez la touche au debut
du passage souhaik$ en fonction de
I’indication du compteur sur I’afficheur.
Para escuchar SLVO5 segundos del principio de cada pista
Mantenga presionado -PLAY/SCAN durante 2 segundos.
Presione -PLAY/SCAN nuevamente para continuar con la reproduction
normal.
ERASING + ❑
You can erase recordings by recording track number.
1 Release the HOLD switch.
2 Select the recording file and press
144 or ➤*I to display the
recording track number to be erased.
3 Keep ERASE pressed for 2 seconds.
ERASE flashes for 4 seconds in the display.
4 Press ERASE while ERASE is flaehing.
The recording track number is decreased after the track is erased.
To erase ail recordings
1 Press ERASE and ■ STOP at the same time.
ALL and ERASE flash.
2 Press ERASE again while ALL and ERASE are flashing,
Pour ecouter Ie 5 premieres secondes du debut de chaque plage
Appuyez sur >PLAY/SCAN et maintenez la touche enfoncc$e pendant 2
secondes.
Appuyez sur EPLAY/SCAN pour reprendre la lecture normale.
BORRADO + ❑
Se pueden borrar grabaciones grabando en ese numero de pista.
1 Suelte el interruptor HOLD.
2 Salecciona un archivo de grabacion y presione 1< 0-1 para que
aparezca el nfimero de pista a borrar.
3 Mantenga presionado ERASE durante 2 segundos.
Destella ERASE durante 4 segundos en la pantalla.
4 Presione ERASE cuando ERASE estti destellando.
El numero de pista de grabacion disminuye desprk de borrar la pista.
EFFACEMENT + ❑
Vous pouvez effacer vos enregistrements un a un, en fonction du numdro
de plage.
1 Liberez Ie commutateur HOLD.
2 S61ectionnez Ie fichier et appuyez sur H< ou W pour afficher Ie
numr$ro de plage de I’enregistrement que vous votdez effacer.
3 Appuyez sur ERASE et maintenez la touche enfoncee pendant 2
secondes.
ERASE clignote pendant 4 secondes sur I’afficheur.
4 Appuyez sur ERASE quand ERASE clignote.
Une fois que la plage a eta effacee, Ie numero de plage diminue.
Para borrar todas Ias grabaciones
1 Presione ERASE y ■ STOP al mismo tiempo.
Destellan ALL y ERASE.
2 Presione ERASE nuevamente cuando ALL y ERASE estan
destellando.
Pour effacer tous ies enregistrements
1 Appuyez
en meme temps sur ERASE at ■ STOP.
ALL et ERASE clignotent.
2 Appuyez une nouvelle fois sur ERASE quand ALL et ERASE
clignotent.
-
 1
1
-
 2
2


Aiwa ICM8 Le manuel du propriétaire
- Catégorie
- Dictaphones
- Taper
- Le manuel du propriétaire
- Ce manuel convient également à
dans d''autres langues
- English: Aiwa ICM8 Owner's manual
- español: Aiwa ICM8 El manual del propietario