
1
EN
Départ
différé
Séchage +
Délicat
3h 6h 9h
Filtre de porte
Vider réservoir
Filtre de socle
Antifroissage
Départ Séchage Fin de cycle
B 9
kg
Mix
Prêt à porter
Coton
Prêt à ranger
Prêt à repasser
Prêt à porter
Synthétique
Prêt à ranger
Prêt à repasser
Expert laine
XXL
30min
15min
60min
90min
Temps séchage 0
Eco coton
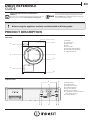
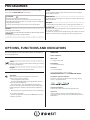
1. Gentle option
2. Dry plus option
3. Programme selector
4. Start/Pause button
5. Start delay button
6. Anti-crease indicator
7. Programme sequence indicator /
Start delay indicators
8. Failure indicators
CONTROL PANEL
1. Worktop
2. Control panel
3. Water tank
4. Door
5. Door handle
6. Door lter (behind door)
7. Bottom lter (behind ap)
8. Adjustable feet (4)
DAILY REFERENCE
GUIDE
PRODUCT DESCRIPTION
APPLIANCE
1.
2.
6.
3.
5. 4.
2.
1.
6.
7.
8.
3.
7.
8.
5.4.
THANK YOU FOR PURCHASING AN INDESIT
PRODUCT
To receive more comprehensive help and support, please
register your product at www. indesit. com / register
WWW
You can download the Safety Instructions and
the Use and Care Guide by visiting our website
docs. indesit. eu and following the instructions
on the back of this booklet.
Before using the appliance carefully read the Health and Safety guide.

2
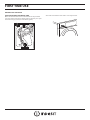
FIRST TIME USE
BEFORE USING THE DRYER
CHECK DRAIN HOSE AND WATER TANK
Make sure that the drain hose on the back of the dryer is xed
correctly, either to the dryer’s water tank (see picture), or to your
domestic sewage system (see Installation guide).
Also make sure that the water tank is correctly inserted.

3
EN
DAILY USE
See Use and Care Guide for more details on functions /
see last page for information on how to obtain the Use and Care Guide
1. LOAD LAUNDRY
Prepare your laundry according to the recommendations in section
HINTS AND TIPS.
Make sure that pockets are empty, fasteners closed and ribbons tied
together.
Open the door and load the laundry. Observe the maximum load
sizes given in the PROGRAMME CHART.
2. CLOSE DOOR
Make sure that no laundry gets stuck between door glass and door
lter.
Close the door so that you can hear it click shut.
3. SET THE DESIRED PROGRAMME
Turn the knob to select the desired programme.
Find more information regarding programmes in the PROGRAMME
CHART.
Select options, if needed
If you want to select additional options, press the respective button
- the indicator lights up.
Refer to section OPTIONS, FUNCTIONS AND INDICATORS for
more information.
4. START PROGRAMME
Press the Start/Pause button; the indicator next to the button lights
up. The drying process starts.
The programme duration mainly depends on the load size and on
the humidity level of the laundry.
5. CHANGE THE SETTINGS OF A RUNNING PROGRAMME, IF
NEEDED
To change the settings of a running programme or start delay:
• press Start/Pause to put the running programme on pause
• change your settings
• press Start/Pause again to continue the programme.
6. RESET A RUNNING PROGRAMME, IF NEEDED
Turn the programme selector to O/O.
WARNING
Immediately open the door and unload the laundry, so that
eventual heat in the laundry can dissipate.
7. SWITCH OFF THE DRYER AFTER PROGRAMME END
At the end of the programme, the end indicator lights up in the
programme sequence indicator. Turn the programme selector to
O/O to switch o the dryer. Open the door and take out your
laundry.
If you do not switch the dryer o after programme end, the dryer
drum rotates from time to time the next 10 minutes after
programme end, to reduce creasing of the laundry. During that
time, the Anti-crease indicator lights up.
The dryer will switch o automatically in about a quarter of an hour
after programme end, to save energy.
8. EMPTY WATER TANK / CLEAN DOOR FILTER / CLEAN
BOTTOM FILTER
Refer to section CARE AND MAINTENANCE.
WARNING
Make sure that no lighters
or matches remain in the
laundry.
Make sure that the laundry
is not soaked with
ammable liquids.

4
Respect the care labels of your laundry; make sure that it is
appropriate for being treated in a dryer.
CARE LABELS
The dots indicate the temperature degree for drying the laundry.
Normal temperature
Reduced temperature
Do not tumble dry
EMPTY ALL POCKETS
Objects like coins or keys can damage your laundry as well as the
drum.
Always dry a full load; this optimizes the relative energy
consumption. The maximum load sizes for the various programmes
are indicated in the programme chart.
To reduce the drying time, make sure that the laundry is spun with
the maximum possible spin speed of the wash programme. This
reduces the moisture content in the laundry.
HINTS AND TIPS
SAVING TIPS
Programme Load
(Kg)
Spin Speed
(rpm)
Humidity
(%)
Energy consumption
(kWh)
Drying Time (min)
ECO COTTON *
9
4.5
1000
1000
60
60
5.28
2.77
145
80
ECO COTTON
9
9
800
1400
70
50
5.88
4.66
164
125
COTTON IRON DRY
9
9
8
800
1000
1400
70
60
50
5.16
4.62
4.08
141
120
105
SYNTHETICS
CUPBOARD DRY
3.5 1000 40 1.44 46
CONSUMPTION DATA
Data can dier in your home, mainly depending on the moisture
content of the laundry load.
*Reference programmes for Energy Label / Regulation 392/2012 / EU
Values are based on the default programme setting, with clean door
and bottom lter. For consumer tests, the door lter and bottom
lter need to be cleaned after each cycle.
The energy consumption and drying time may dier from the values
above. They depend on the operation conditions in your home
(such as voltage uctuation, mixture of textiles, moisture content of
the textiles after spinning, load volume).
The values are determined according to European Norm 61121 and
refer to the default programme setting; changing the setting also
impacts the consumption data.

5
EN
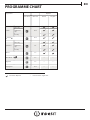
PROGRAMME CHART
Programme Options
Care labels Max load Gentle Dry plus
Cotton
Extra dry
maxCupboard
dry
Iron dry
Cotton max
Synthetics
Extra dry
3.5Cupboard
dry
Iron dry
Mixed 3.0
Wool nish 1.0
— —
Big items 3.0
— —
Drying time max
— —
Selectable / Optional
—
Not Selectable / Applicable

6
PROGRAMMES
Make sure that your laundry is suitable to be treated in a tumble
dryer. Refer to HINTS AND TIPS / Care labels.
ECO COTTON
For drying normally wet cotton laundry.
Standard cotton programme, suitable to dry normal wet cotton
laundry. Most ecient programme in terms of energy consumption
for drying cotton laundry.
The values on the Energy Label are based on this programme.
COTTON
For drying cotton laundry.
SYNTHETICS
For drying laundry made of synthetic bres.
MIXED
For drying mixed laundry loads made of cotton, linen, synthetic
bres and their blends.
WOOL FINISH
For nishing the air-drying process of woolen textiles. Woolens get
uy and smooth.
BIG ITEMS
For drying big laundry items, such as sleeping bags, blankets etc.
DRYING TIME
Time-restricted drying programme. Select programme duration of
15, 30, 60 or 90 minutes.
For all fabrics appropriate for tumble drying. Also suitable to add an
additional short 15 minutes drying phase after programme end.
OPTIONS
Gentle
Enables a more gentle treatment of the laundry by reducing
the drying temperature.
Dry plus
Increases the dryness level of your laundry.
FUNCTIONS
Start delay
Moves the start of your programme to a later time.
Choose a delay of 3, 6 or 9 hours.
• Select programme and options.
• Press the Start delay button repeatedly until the desired
delay time indicator lights up.
• Press Start / Pause - the countdown of the delay time
starts. The start delay indicator blinks and the Start / Pause
button lights up. A sound by activation of the pump may
occur.
• After the delay has expired, the dryer starts automatically.
To cancel the Start delay
• Turn the programme selector to the O/O position, or to
another programme.
INDICATORS
Failure indicators:
Water tank
(=> empty water tank)
Bottom lter
(=> clean bottom lter).
Door lter
(=> clean door lter)
In case of any failures, refer to section
TROUBLESHOOTING in the USE AND CARE GUIDE.
Programme sequence indicator
Shows the current programme phase (sensing / drying
process / programme end).
Start delay indicators
Indicate the selected delay until programme start.
Anticrease
Indicates that the dryer is in the tumbling phase after
programme end, to avoid creasing of the laundry (refer to
DAILY USE / 7.
OPTIONS, FUNCTIONS AND INDICATORS
Refer to the programme chart to check which options are available for
the selected programme.

7
EN
EMPTY WATER TANK AFTER EACH DRYING CYCLE
Hold the handle and carefully pull out the water tank. Hold the full
water tank with both hands.
Empty the water and insert the container by pushing it back into
place. Make sure that it is properly inserted.
CLEAN DOOR FILTER AFTER EACH DRYING CYCLE
Open the door and remove the door lter by pulling it upwards.
Press the button to open the door lter. Remove the lint inside.
Close the lter and reinsert it in the right direction, so that it
completely integrates in the lter chamber.
CLEAN THE BOTTOM FILTER ABOUT EVERY TWO MONTHS
Open the bottom ap. Turn the locking bars right and left on the
bottom lter downwards in horizontal position. Hold the bottom
lter on the handle and pull it out.
Clean the bottom lter under running water; wipe away dust and
lint.
Clean the lter chamber of the dryer with a damp cloth or carefully
with a vacuum cleaner. Insert the bottom lter again. Turn the
locking bars upwards in vertical position. Close the bottom ap.
CARE AND MAINTENANCE
WARNING
Switch o and unplug the
dryer before doing any
cleaning and maintenance.
Caution, the water in the
water tank can still be hot.

8
PRODUCT FICHE
WWW
The product che with energy data of this appliance can be
downloaded from Indesit Website docs. indesit. eu
HOW TO OBTAIN THE USE AND CARE GUIDE
>
WWW
Download the Use and Care Guide from our
website docs. indesit. eu (you can use this QR code),
specifying the product’s commercial code.
> Alternatively, contact our Client After-sales Service
001
CONTACTING OUR AFTER‑SALES
SERVICE
You can nd our contact details in the
warranty manual. When contacting our
Client After-sales Service, please state the
codes provided on your product’s
identication plate.
xxxxxxxxxxxx
Consommation d'énergie à pleine charge ; Edry- kWh 2) 5.28
Consommation d'énergie à demi-charge ; Edry½,- kWh 2) 2.77
Consommation d'électricité : mode arrêt (Po) - Watts 0.07
Pleine charge (Tdry) - minutes 145
Demi-charge (Tdry½) - minutes 80
pondéré (Ct) pleine et demi-charge 3) 85
charge pleine Cdr 84
demi-charge Cdry½ 86
Niveau de bruit aérien - dB(A) re 1 pW 70
2) La consommation annuelle est basée sur la base de 160 cycles de séchage pour
le programme coton standard à pleine charge et à demi-charge, et de la
consommation des modes à faible puissance. La consommation réelle d’énergie
par cycle dépend des conditions d’utilisation de l’appareil.
3) Moyenne pondérée de 3 cycles à pleine charge et de 4 cycles à demi-charge.
Durée du programme - pondérée (Tt) pour pleine et demi-charge
- minutes
108
Classe de taux de condensation sur une échelle allant de G
(appareils les moins efficaces) à A (appareils les plus efficaces)
B
Taux de condensation moyen - %
1) Le « programme coton standard » à charge pleine ou partielle et le « programme
coton standard » à charge partielle sont les programmes standards auxquels se
réfèrent les informations de l'étiquette et de la fiche. Ces programmes sont parfaits
pour sécher du linge en coton au niveau armoire (0%) et ce sont aussi les
programmes les plus efficaces au point de vue consommation d'énergie. La charge
partielle est égale à la moitié de la charge nominale.
Ce sèche-linge domestique à tambour est un sèche-linge Automatique
Consommation d'électricité : mode laissé sur marche (Pl) - Watts
0.81
Durée du mode laissé sur marche pour le système de gestion de
la consommation d’électricité - minutes
15
Ce sèche-linge domestique à tambour est un sèche-linge À condens.
Classe d'efficacité énergétique de A+++ (faible consommation) à
D (consommation élevée)
B
La consommation d’énergie annuelle (AEc)* pondérée Kwh 1) 616
D
onnées techniques - Réglementation 392/2012.
Marque
Indesit
Modèle
IND90111 - IND90110
Capacité nominale de linge en coton pour le « programme coton
standard » à pleine charge - kg
9.0
400010879156
PN 195144290
Printed in Italy
-
 1
1
-
 2
2
-
 3
3
-
 4
4
-
 5
5
-
 6
6
-
 7
7
-
 8
8


Indesit IND90111 Mode d'emploi
- Taper
- Mode d'emploi
- Ce manuel convient également à
dans d''autres langues
- English: Indesit IND90111 User guide