
5.Screwtheheadbackontothe
barrel.
6.Unlocktherodhandlefrom
theendcap.Makesurethat
therodandrubberplunger
assemblyarestillconnected.
(Youshouldfeelsome
resistancewhenyoupushon
therodhandle.)
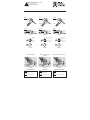
7.Toprimethegreasegun:
Applypressuretotherod
handleby
standingthe
greasegunon
aworkbench
andpulling
downonthe
barrelwhile
pumpingthe
leverhandleat
thesametime.
(seeFigure
5)Ifyourgun
hasanairventvalve,pressit;
ifnot,slightlyloosenthehead
asyoupulldownonthebarrel.
8.Whileapplyingpressure,rotate
handletodisconnectthe
rodfromtherubberplunger
assembly.Thenpressthe
quickreleaseandtherodwill
goallthewayintothebarrel.
9.Pumptheleverhandleseveral
timesuntilgreaseowsfrom
thecoupler.
10.Formoreinformationon
Lucasgreasegunsorto
viewavideoonloadingyour
Lucasgreasegungotowww.
pellindustrial.com.
Figure 5
Figura 5
SPECIAL NOTE: When
greasegunisbeingusedfor
thersttime,removeplunger
assemblyandapplyaheavy
layerofgreaseallaroundthe
outsideoftherubberplunger.
NOTES SPÉCIALES:Lorsque
vousutilisezunepompeà
graissepourlapremièrefois,
retirezIepistonetappliquez
unecoucheépaissedegraisse
autourdelapartieexlerieure
dupistondecaoutchouc.
NOTA ESPECIAL: Cuando
lapistolaengrasadorasea
utilizadaporprimeravez,
retireelconjuntodeémbolo
yapliqueunacapagruesa
degrasaentadoelperimetro
exlernodelémbolodegoma.
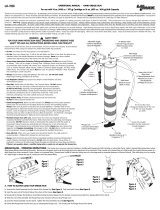
GREASEGUN
OPERATING
INSTRUCTIONS
Thisisageneralinstruction
sheet.Itcoversavarietyof
models.Theillustrationsshown
maynotmatchyourgunexactly.
FOLLOWTHESESTEPS
CAREFULLYBEFOREUSING
THISGUN
MODED’EMPLOIDUPISTOLET
GRAISSEUR
Cemoded’emploigénéral
couvreplusieursmodèles.Ilest
possiblequelesillustrationsne
correspondentpasexactement
aupistoletdontondispose.
AVANTD’UTILISERCE
PISTOLET,SUIVREATTENTIVE
MENTLES
INSTRUCTIONSSUIVANTES
INSTRUCCIONESDEUSODE
LAPISTOLAENGRASADORA
Estaesunahojadeinstrucciones
generalesquedescribeauna
variedaddemodelos.Las
ilustracionespuedenmostrarun
modeladepistoladiferenteal
suyo.
SIGAESTOSPASOS
CUIDADOSMENTEANTESDE
USARLAPISTOLA
HOWTOLOADYOURGREASE
GUNWITHACARTRIDGE:
1.Unscrewtheheadfromthe
barrel.
2.Pullbacktherodhandleand
lockintoposition.
3.Removetheplasticcapfrom
theendofgreasecartridge,
andinsert,openendrst,into
thebarrel.(Seegure3)
Figure 5 Figura 5
Figure3
Plastic
Cap
Grease
Cartridge
Barrel
4.Pushthegreasecartridgeinto
thebarreluntiltherimofthe
pull-tabendcontactstherim
ofthebarrel(seegure4).
Thenremovethepull-tabseal
fromtheendofthegrease
cartridge.
Figure 5 Figura 5
Figure4
Barrel
5.RevisserlapartieavantsurIe
cylindre.
6.Déverrouillerlapoignéedela
tigepourlaséparerducapuchon
d’extrémité.S’assurerquelatige
esttoujoursreliéeaupistonen
caoutchouc.(Unerésistancedoit
sefairesentirquandonappuie
surlapoignéedelatige.)
7.Amorçagedupistolet
graisseur:Exercerunepression
surlapoignée
delatigeen
posantIepistolet
deboutsurun
établietentirant
Iecylindre,tout
enactionnant
Ielevier(voir
gure5).SiIe
pistoletestmun;
d’unevalve
dedecharge
d’air,appu-yer
dessus;dansIecascontraire,
desserrerlégèrementlapartie
avanttoutentirantIecylindre.
8.Déconnecterlatigedupiston
encaoutchouc.Pousseralorsla
tigeàfonddansIecylindre.
9.ActionnerIelevierplusieurs
foisjusqu’àcequedelagraisse
couleparIeraccord.
10.Pourplusd’informationssur
lespistoletsàgraisseLucasou
pourvisionnerunevidéosurle
chargementdevotrepistolet
àgraisseLucas,visitezwww.
pellindustrial.com.
Figure 5
Figura 5
CHARGEMENTD’UNE
CARTOUCHEDANSLE
PISTOLETGRAISSEUR:
1.Dévisserlapartieavantpourla
sépa-rerducylindre.
2.Tirerlapoignéeàfondet
bloquerenposilionverrouillée.
3.RetirerIecapuchonen
plastiquedel’extrémitédela
cartouchedegraisse.lnsérerla
cartouche,extremiteouverteen
premier,dansIecylindre(voir
gure3).
Figure 5 Figura 5
Figure3
Capuchon
en
plastique
Cylindre
4.Pousserlacartouchede
graissedansIecylindrejusqu’à
cequeIebarddeI’extrémitéà
jointàlanguettetoucheIebard
ducylindre(voirgure4).Retirer
alarsIejointàlanguettede
I’extrémitédelacartouche.
Figure 5 Figura 5
Figure4
Cylindre
5.Atornillelatapasuperiorensu
lugarenelcilindro.
6.Desenganchelamanijadela
varilladelatapadelextremo.
Asegúresequelavarillasiga
conectadaalconjuntodel
émbolodecaucho.(Sedebe
sentiralgoderesistenciaal
empujarlamanijadelavarilla.)
7.Paracebarlapistola
engrasadora:Apliquepresiónala
manijadelavarilla
apoyandolapistola
engrasadora
sabreunbancode
trabajoytirando
elcilindrohacia
abajomientrasse
bombealapalanca
(vealaFigura5).Si
lapistolatieneuna
válvuladepurga
deaire,oprímala;si
nolatiene,aojela
tapasuperiorlevementealtirarel
cilindrohaciaabajo.
8.Desconectelavarilladel
conjuntodelémbolodecaucho.
Despuésempujelavarillahasta
insertarlacompletamenteenel
cilindro.
9.Bombeelapalancadela
pistolavariasveceshaslaque
salgagrasaparelacoplador.
10.Paraobtenermásinformación
sobrelaspistolasdegrasaLucas
oparaverunvideosobrelacarga
desupistoladegrasaLucas
visitewww.pellindustrial.com.
Figure 5
Figura 5
COMOCARGARLAPISTOLA
CONUNCARTUCHODEGRASA:
1.Destornillelatapasuperiordel
cilindro.
2.Extraigalamanijayasegúrela
ensuposición.
3.Quitelatapadeplásticodel
extremadelcartuchodegrasae
insértelo,conelextremoabierta
primero,enelcilindro(veala
Figura3).
Figure 5 Figura 5
Figura3
Tapade
plastico
Cartucho
degrasa
Cilindro
4.Empujeelcartuchodegrasa
dentrodelcilindrohastaqueel
bordedesulerigüetaretirable
toqueelrebordedelcilindro
(vealaFigura4).Despuésquite
elselladelengüetaretirabledel
extremodecartuchodegrasa.
Figure 5 Figura 5
Figura4
Cilindro
Cartouche
degraisse

Figure 5 Figura 5
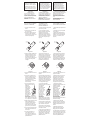
Style1
Style2
Handle
Head
Barrel
EndCap
RodHandle
Extension
PipeorHose
Coupler
Figure1
Figure2
Handle
Barrel
EndCap
RodHandle Head
Coupler
Extension
PipeorHose
LoaderFitting
or
FillerPlug
AirVentValve
or
FillerPlug
-or-
Figure 5 Figura 5
Style1
Style2
Levier
Partieavant
Cylindre
Capuchon
d’extrémité
Poignée
detige
Tuyauou
exible
d’extension
Raccord
Figure1
Figure2
Raccorddechargement
ou
Bouchonderemplissage
Valvededécharged’air
ou
Bouchonderemplissage
-ou-
Raccord
Tuyauou
exible
d’extension
Partieavant
Cylindre
Capuchon
d’extrémité
Poignée
detige
Figure 5 Figura 5
Estilo1
Estilo2
Palanca
Tapasuperior
Cilindro
Tapade
extremo
Manija
devarilla
Tuboo
manguerade
extensión
Acoplador
Figura1
Figura2
Adaptadordecarga
o
Tapóndelienado
Válvuladepurgadeaire
o
Tapóndelienado
-o-
Acoplador
Tuboo
manguerade
extensión
Tapasuperior
Cilindro
Palanca
Levier
Tapade
extremo
Manija
devarilla
Work safely with tools by wearing safety goggles.
Use lentes de seguridad para trabajar de
manera segura con las herramientas.
Travaillez en sécurité. Portez des lunettes de
sécurité lorsque vous utilisez des outils.
Problem:
Couplerwillnotsealordisengage
fromZerktting.
Solution:
•LoosencouplerasperFigure8.
TROUBLE SHOOTING
Loosen coupler before use Desserrer le coupleur avant
de l’utiliser
Aoje el acoplador antes de su uso
Problème:
Coupleurnesontpasétanchesouse
désengagerdeZerkraccord.
Solution:
1.Desserrercoupleurselonlagure8.
DÉPANNAGE
Problema:
AcopladordenosellaroretirarsedeZerk
ajuste.
Solución:
1.AojeacopladorsegúnlaFigura8.
LOCALIZACION DE AVERlAS
Figure8 Figure8 Figura8
Turncouplercounterclockwiseto
loosenbeforeuse.
Tournerlecoupleurdanslesens
antihorairepourdesserreravantutilisation.
Girealaizquierdaparaaojarel
acopladorantesdesuuso.
*DO NOT OVER LOOSEN *NE PAS TROP DESSERRER *NO MÁS NO AFLOJAR
-
 1
1
-
 2
2


dans d''autres langues
- English: Lucas Oil 621-L488 User manual
- español: Lucas Oil 621-L488 Manual de usuario
Autres documents
-
Ega Master 57099 Le manuel du propriétaire
-
Legacy L1325 Manuel utilisateur
-
 Powerbuilt 648755 Mode d'emploi
-
Lumax LX-1161 Manuel utilisateur
-
Power Fist 8264962 Le manuel du propriétaire
-
 Lumax LX-1142 Manuel utilisateur
-
DeWalt DCGG570K Manuel utilisateur
-
 Lumax LX-1153 Manuel utilisateur
-
Lumax LX-1112 Manuel utilisateur


