Date Issued: 6/12/15
IS-49550LED-CB
We’re here to help 866-558-5706
Hrs: M-F 9am to 5pm EST
WARNING:
• This fixture is intended for installation in accordance with the National Electric Code
(NEC) and all local code specifications.
• Supply wires are not intended for use through or concealed behind walls, floors, or
ceilings.
• The LED light output is strong enough to injure human eyes. Precautions must be
taken to prevent looking directly at LED’s with unaided eyes for more than a few
seconds.
DIMMING: This LED fixture is compatible with most standard incandescent dimmers and
LED dimmers.
1) Read and understand all instructions and illustrations completely before proceeding
with assembly and installation of fixture.
2) If you have any doubts about how to install this fixture, or if the fixture fails to
operate completely, please contact a qualified electrician.
3) All parts must be used as indicated in the instructions. Do not substitute any parts,
leave parts out, or use any parts that are worn or broken. Failure to obey this
instruction could invalidate the UL listing, C.S.A. certification, and/or ETL listing of
this fixture.
1) TURN OFF POWER.
IMPORTANT: Before you start, NEVER attempt any work without shutting off the
electricity until the work is done.
a) Go to the main fuse, or circuit breaker, box in your home. Place the main power
switch in the “OFF” position.
b) Unscrew the fuse(s), or switch “OFF” the circuit breaker switch(s), that control
the power to the fixture or room that you are working on.
c) Place the wall switch in the “OFF” position. If the fixture to be replaced has a
switch or pull chain, place those in the “OFF” position.
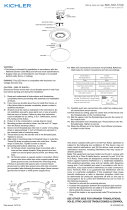
2) Find the appropriate threaded holes on mounting strap. Assemble mounting screws
into threaded holes.
3) Attach mounting strap to outlet box. Mounting strap can be adjusted to suit position
of fixture.
4) Make wire connections. Reference chart below for correct connections and wire
accordingly.
5) Mounting surface should be clean, dry, flat and 1/4” larger than the fixture housing
surface.
6) Any gaps in the mounting surface exceeding 3/16” should be corrected as required.
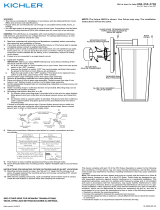
7) Place back plate over mounting strap. Care must be taken not to pinch supply wires.
8) Place star washers onto fixture mounting screws.
9) Screw ball knobs onto fixture mounting screws.
10) Install housing onto back plate. Secure using two #8 flat head screws provided.
11) With silicone RTV caulk, caulk completely around the housing/wall joint on the top
and both sides. Caulk should not be applied to the bottom joint (see figure 2).
Connect Black or
Red Supply Wire to:
Connect
White Supply Wire to:
Black White
*Parallel cord (round & smooth)
*Parallel cord (square & ridged)
Clear, Brown, Gold or Black
without tracer
Clear, Brown, Gold or Black
with tracer
Insulated wire (other than green)
with copper conductor
Insulated wire (other than green)
with silver conductor
*Note: When parallel wires (SPT I & SPT II)
are used. The neutral wire is square shaped
or ridged and the other wire will be round in
shape or smooth (see illus.)
Neutral Wire
This device complies with part 15 of the FCC Rules. Operation is subject to the following
two conditions: (1) This device may not cause harmful interference, and (2) this device
must accept any interference received, including interference that may cause undesired
operation.
Note: This equipment has been tested and found to comply with the limits for a Class B
digital device, pursuant to part 15 of the FCC Rules. These limits are designed to pro-
vide reasonable protection against harmful interference in a residential installation. This
equipment generates, uses and can radiate radio frequency energy and, if not installed
and used in accordance with the instructions, may cause harmful interference to radio
communications. However, there is no guarantee that interference will not occur in a par-
ticular installation. If this equipment does cause harmful interference to radio or television
reception, which can be determined by turning the equipment off and on, the user is
encouraged to try to correct the interference by one or more of the following measures:
• Reorient or relocate the receiving antenna.
• Increase the separation between the equipment and receiver.
• Connect the equipment into an outlet on a circuit different from that to which the receiver
is connected.
• Consult the dealer or an experienced radio/TV technician for help.
SIDE VIEW
TOP VIEW
MOUNTING SCREW
HOUSING
MOUNTING STRAP
BACK PLATE
SIDE VIEW
TOP VIEW
SECTION VIEW TO
SHOW FIXTURE ORIENTATION.
FIXTURE IS TO BE ORIENTED
WITH GLASS ON TOP.
WALL
SILICONE RTV CAULK ON
TOP JOINT AND BOTH
VERTICAL JOINTS.
SEE STEP #11
FIGURE 2
BALL KNOB
STAR WASHER
HOUSING
BACK PLATE
MOUNTING SCREW
HOUSING
MOUNTING STRAP
BACK PLATE
BALL KNOB
STAR WASHER
HOUSING
BACK PLATE
49550 LED
49551 LED
INSTRUCTIONS
For Assembling and Installing Fixtures in Canada
Pour L’assemblage et L’installation Au Canada
SEE OTHER SIDE FOR CANADIAN FRENCH TRANSLATIONS.
VOIR L’AUTRE CÔTÉ POUR LES CANADIENS TRADUCTIONS EN
FRANÇAIS.

Date Issued: 6/12/15
IS-49550LED-CB
We’re here to help 866-558-5706
Hrs: M-F 9am to 5pm EST
Cet appareil est conforme à la section 15 de la réglementation de la FCC. L’exploitation
est soumise aux deux conditions suivantes : (1) Cet équipement ne doit pas causer d’in-
terférences nuisibles, et (2) cet équipement doit accepter toute interférence reçue, y com-
pris les interférences risquant d’engendrer un fonctionnement indésirable.
Remarque: Des tests ont confirmé que ce matériel respecte les limites d’un dispositif
numérique de catégorie B, en vertu de la section 15 de la réglementation de la FCC.
Ces limites ont été conçues pour fournir une protection raisonnable contre le brouillage
nuisible d’une installation résidentielle. Cet équipement génère, utilise et peut rayonner
de l’énergie radiofréquence et, s’il n’est pas installé et utilisé selon les instructions, peut
causer de l’interférence nuisible aux communications de radio. Cependant, il est néan-
moins possible qu’il y ait de l’interférence dans une installation en particulier. Si cet équi-
pement cause du brouillage nuisible à la réception du signal de radio ou de télévision, ce
qui peut être déterminé en éteignant puis en rallumant l’appareil, l’usager peut essayer de
corriger l’interférence en appliquant une des mesures suivantes :
• Réorienter l’antenne de réception ou changer son emplacement.
• Augmenter la distance séparant l’équipement et le récepteur.
• Brancher le matériel dans la prise de courant d’un circuit différent de celui auquel le
récepteur est branché.
• Consulter le revendeur ou un technicien radio/télé d’expérience.
LA VUE DE CÔTÉ
LA VUE DE DESSUS
VIS DE MONTAGE
BOÎTIER
ÉTRIER DE MONTAGE
PLAQUE ARRIÈRE
LA VUE DE CÔTÉ
LA VUE DE DESSUS
LA VUE EN COUPE POUR MONTRER
L’ORIENTATION DU LUMINAIRE.
LE LUMINAIRE DOIT ÊTRE ORIENTÉE AVEC
LE VERRE SUR LE DESSUS.
MURAL
CALFEUTRAGE DE SILICONE
RTV SUR LE JOINT SUPÉRIEUR
ET LES DEUX JOINTS
VERTICAUX. VOIR L’ÉTAPE 11
FIGURE 2
BOUTON
À BILLE
RONDELLE
EN ÉTOILE
BOÎTIER
PLAQUE ARRIÈRE
VIS DE MONTAGE
BOÎTIER
ÉTRIER DE MONTAGE
PLAQUE ARRIÈRE
BOUTON À BILLE
RONDELLE EN ÉTOILE
BOÎTIER
PLAQUE ARRIÈRE
49550 LED
49551 LED
AVERTISSEMENT:
• Ce luminaire doit être installé conformément aux codes d’électricité nationaux (NEC)
et satisfaire toutes les spécifications des codes locaux.
• Les câbles d’alimentation ne doivent pas être utilisés à travers ou derrière des parois,
sols ou plafonds.
• L’intensité de la lumière des LED peut endommager les yeux. Prendre toutes les
précautions nécessaires pour ne pas regarder directement dans les LED sans protection
pendant plusieurs secondes.
GRADATION: Ce luminaire LED est compatible avec les gradateurs standard à incan-
descence, gradateurs LED, et gradateurs électroniques a basse tension. Pour une
performance optimale, utiliser un gradateur électronique à basse tension.
1) Lire et comprendre toutes les instructions et illustrations avant de procéder au montage
et à l’installation du luminaire.
2) En cas de doute sur l’installation de ce luminaire, ou si le luminaire ne fonctionne
pas correctement, prière de contacter un électricien agréé.
3) Utiliser toutes les pièces selon les instructions. Ne pas substituer de pièces, exclure
certaines pièces du montage ou se servir de pièces usées ou endommagées. Le
non-respect de ces instructions risque d’annuler l’homologation UL, le certificat
C.S.A. ainsi que l’homologation ETL de ce luminaire.
1) COUPER LE COURANT.
IMPORTANT: TOUJOURS couper l’électricité avant de commencer le travail.
a) Localiser le coffret à fusibles ou le disjoncteur du domicile. Mettre l’interrupteur
principal en position d’Arrêt.
b) Dévisser le ou les fusibles (ou mettre le disjoncteur sur
Arrêt) qui contrôlent l’alimentation vers le luminaire ou la pièce dans laquelle le
travail est effectué.
c) Mettre l’interrupteur mural en position d’Arrêt. Si le luminaire à remplacer est doté
d’un interrupteur ou d’une chaîne connectée à l‘interrupteur, placer ces éléments
en position d’Arrêt.
2) Trouver les trous filetés appropriés sur l’étrier de montage. Visser les vis de montage
dans les trous taraudés.
3) Fixer l’étrier de montage sur la boîte à prises. L’étrier de montage peut être réglé
pour positionner correctement le luminaire.
4) Connecter les fils (connecteurs non fournis). Se reporter au tableau ci-dessous pour
faire les connexions.
5) La surface de montage doit être propre, sèche, plate et de 0,6 cm plus épaisse que
la surface du boîtier du luminaire.
6) Placer la plaque arrière sur la boîte de sortie, en passant soigneusement la vis de
montage du luminaire à travers les trous de passage dans la plaque arrière.
7) Placer la plaque arrière sur l’étrier de montage. Prendre soin de ne pas coincer les
fils d’alimentation.
8) Placer les rondelles en étoile sur les vis de montage du luminaire.
9) Visser les boutons à bille sur les vis de montage du luminaire.
10) Installer le boîtier sur la plaque arrière. Fixer à l’aide de deux vis à tête plate nº8
(fournies).
11) Avec du calfeutrage de silicone RTV, calfeutrer complètement autour du boîtier/joint
mural en haut et les deux côtés. Le calfeutrage ne doit pas être appliqué au joint
inférieur (voir la figure 2).
Connecter le fil noir ou
rouge de la boite
Connecter le fil blanc de la boîte
A Noir A Blanc
*Au cordon parallèle (rond et lisse)
*Au cordon parallele (à angles droits el strié)
Au bransparent, doré, marron, ou
noir sans fil distinctif
Au transparent, doré, marron, ou
noir avec un til distinctif
Fil isolé (sauf fil vert) avec
conducteur en cuivre
Fil isolé (sauf fil vert) avec
conducteur en argent
*Remarque: Avec emploi d’un fil paralléle
(SPT I et SPT II). Le fil neutre est á angles
droits ou strié et l’autre fil doit étre rond ou
lisse (Voir le schéma).
Fil Neutre
INSTRUCTIONS
For Assembling and Installing Fixtures in Canada
Pour L’assemblage et L’installation Au Canada
SEE OTHER SIDE FOR ENGLISH TRANSLATIONS.
VOIR L’AUTRE CÔTÉ DES TRADUCTIONS EN ANGLAIS.
1/2