
Step 4: Preparing for the
installation of the TV
Disconnect all the cables from the TV.
1
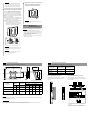
Secure the Mounting Hook to the
rear of the TV.
Referring to the Screw and Hook locations diagram/
table on the reverse page, determine the screw positions,
and secure the Mounting Hook to the rear of the TV.
1 Secure the Mounting Hook to the rear of the
TV temporarily, using the supplied four
screws (+PSW6 × 16).
2
Be sure that both screws are securely tightened
with equal torque strength to the rear of the TV.
Align the tab on the rear of the Mounting Hook
with the square hole on the rear of the TV as in
the illustration below.
Notes
•
Be sure not to use any screws other than the supplied
ones (+PSW6
×
16) when securing the Mounting Hook.
•
If an electric screwdriver is used, set the torque to
tighten at approximately 2.0 N·m {20 kgf·cm}.
Installing the Wall-Mount Bracket
To Customers
For product protection and safety reasons, Sony strongly recommends that installing of your TV be
performed by Sony dealers or licensed contractors. Do not attempt to install it yourself.
Your KDL-40S4100/KDL-46S4100/KDL-52S4100 can be installed using the SU-WL500 Wall-Mount
Bracket (sold separately). Please provide your licensed contractor with this installation supplement as
well as the Instructions (supplied with the SU-WL500 Wall-Mount Bracket). Read these documents
carefully for safety and proper installation.
To Sony Dealers and Contractors
Provide full attention to safety during the installation, periodic maintenance and examination of this product.
Installation du support de fixation murale
À l’attention des clients
Par souci de protection du produit et pour des raisons de sécurité, Sony recommande vivement que
l’installation du support de fixation murale du téléviseur soit confiée à un revendeur Sony ou à un
installateur agréé. Ne pas tenter d’effectuer l’installation soi-même.
Le KDL-40S4100/KDL-46S4100/KDL-52S4100 peut être installé à l’aide du support de fixation
murale SU-WL500 (vendu séparément). Veuillez fournir à l’installateur agréé ce supplément ainsi que
le mode d’emploi (accompagnant le support de fixation murale SU-WL500). Lire attentivement ces
documents qui concernent la sécurité et l’installation correcte du support.
À l’intention des revendeurs Sony et des installateurs
Accorder une attention particulière à la sécurité lors de l’installation, de l’entretien périodique et de la
vérification de ce produit.
KDL-40S4100
KDL-46S4100
KDL-52S4100
Français
English
© 2008 Sony Corporation Printed in Mexico 3-870-415-21(1)
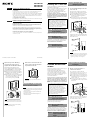
Installing the TV on a wall
The TV can be installed on a wall by attaching a Wall-
Mount Bracket (sold separately).
Verify your TV’s model number and be sure to use the
bracket specified for your model only. Refer to the
Steps on this leaflet along with the Instructions
supplied with the SU-WL500 Wall-Mount Bracket, to
properly carry out the installation.
For product protection and safety reasons, Sony
strongly recommends that you use the Wall-Mount
Bracket model designed for your TV and that the wall-
mounting of your TV is performed by Sony dealers
or licensed contractors.
Sufficient expertise is required in installing this
product, especially to determine the strength of the
wall for withstanding the TV’s weight. Be sure to
entrust the attachment of this product to the wall
to Sony dealers or licensed contractors and pay
adequate attention to safety during the installation.
Sony is not liable for any damage or injury caused
by mishandling or improper installation.
Step 1: Checking the parts required
for the installation
Open the Wall-Mount Bracket package and check the
contents for all required parts along with the Instructions.
Step 2: Deciding on the
installation location
Decide where you want to install your TV. Refer to the
reverse page for the TV installation dimensions table.
Refer to the Instructions for SU-WL500.
Step 3: Installing the Base
Bracket on the wall
Refer to the Instructions for SU-WL500.
English
Hexagon wrench
2
Adjust the angle of the Mounting
Hook using the hexagon wrench
supplied with the Wall-Mount Bracket.
When installing the TV parallel to the wall (0
degrees), adjustment of the Mounting Hook angle
(procedures 1 and 2 below) is not necessary. Make
sure that each arm base X is screwed in securely.
1
Remove the two screws from the arm base
X
of the
Mounting Hook. Choose the holes corresponding to
the desired angle (5, 10, 15 or 20 degrees).
2 Adjust the angles of the top Y and bottom Z
arm to fit the corresponding hole, and firmly
secure each arm using the two screws
removed in the previous procedure 1.
Notes
•
Be sure to adjust the right and left arms to the same angle.
•
Make sure that the two arm bases are screwed in securely.
CAUTION
Be careful not to pinch your fingers when adjusting
the angle of the Mounting Hook.
Français
Fixation du téléviseur
au mur
Le téléviseur peut être fixé au mur à l’aide du support
de fixation mural (vendu séparément).
Vérifier la référence du modèle du téléviseur et
s’assurer à utiliser uniquement le support spécifié
pour ce modèle. Consulter les étapes de ce dépliant
ainsi que le mode d’emploi accompagnant le support
de fixation mural SU-WL500 pour effectuer
correctement l’installation.
Pour des raisons de sécurité et de protection du
téléviseur, Sony recommande fortement que vous
utilisiez le modèle de support de fixation murale
conçu pour votre appareil, et que l’installation soit
effectuée par un détaillant Sony ou un représentant
agréé.
Une certaine expertise est requise pour installer ce
produit, notamment pour déterminer la résistance
du mur par rapport au poids du téléviseur.
S’assurer de confier la fixation de ce produit au
mur à des revendeurs Sony ou à des installateurs
agréés et d’être particulièrement vigilant en
matière de sécurité au cours de l’installation. Sony
ne peut être tenu responsable de tout dommage
ou blessure résultant d’une manipulation ou
d’une installation incorrecte.
Étape 1 :Vérification des pièces
requises pour l’installation
Ouvrez l’emballage du support de fixation murale et
vérifiez que toutes les pièces nécessaires sont
présentes ainsi que le mode d’emploi.
Étape 2 :Choix de l’emplacement
d’installation
Décidez de l’emplacement où vous voulez installer
votre téléviseur. Voir le verso de la page pour consulter
le tableau des dimensions d’installation des téléviseurs.
Reportez-vous au mode d’emploi du SU-WL500.
Étape 3 : Installation au mur du
support de fixation de
la base
Reportez-vous au mode d’emploi du SU-WL500.
3
Remove the screws from the rear
of the TV. Then detach the Table-
Top Stand from the TV.
CAUTION
Make sure that you carry out this task with two or
more people.
Step 5: Installing the TV on the wall
Refer to the instructions for SU-WL500.
Notes
• When you put the TV back on the stand, reverse the above
steps (insert the posts of the stand, aligning with the lines
on the rear of the TV).
• When moving the TV, do not squeeze the bottom of the
front panel too strongly.
• Remove the screws or install the Mounting Hook on a
stable and level surface.
Screw
(+PSW6 × 16)
Mounting Hook
Square
hole
Square
hole
Tab
Étape 4 :Préparation de l’installation
du téléviseur
Débranchez tous les câbles du téléviseur.
1
Fixez le crochet de fixation à
l’arrière du téléviseur.
En vous reportant au schéma/tableau des
emplacements des crochets et des vis au verso de
la page, déterminez les emplacements des vis et
fixez le crochet de fixation à l’arrière du téléviseur.
1 Fixez temporairement le crochet de fixation à
l’arrière du téléviseur à l’aide des quatre vis
fournies (+PSW6 × 16).
2 Assurez-vous que les deux vis sont serrées
convenablement, au même couple, à l’arrière
du téléviseur.
Alignez la patte située à l’arrière du crochet de
fixation sur l’orifice carré au dos du téléviseur,
de la manière illustrée ci-dessous.
Vis
(+PSW6 × 16)
Crochet de
fixation
Orifice
carré
Orifice
carré
Patte

Clé hexagonale
Model Name/
Nom du modèle
Display dimensions/
Dimensions de
l’écran
Screen center
dimensions/Dimension
au centre de l’écran
Length for each mounting angle/
Longueur pour chaque angle de fixation
Angle (0°)/Angle (0˚)
Angle (20°)/Angle (20°)
Screen center point/Point central de l’écran
320 (12
5
/
8
)
Figures in the above table may differ slightly depending on the installation./
Les chiffres repris dans le tableau ci-dessus peuvent varier légèrement selon l’installation.
English TV installation dimensions table
Français Tableau des dimensions d’installation des téléviseurs
Unit: mm (inches)/Unité: mm (pouces)
WARNING
The wall that the TV will be installed on should be capable of supporting a weight of at least four times that of the TV. Refer
to your TV’s instructions for its weight.
AVERTISSEMENT
Le mur sur lequel vous installez le téléviseur doit pouvoir supporter un poids équivalent à au moins quatre fois celui de
l’appareil. Pour connaître son poids, reportez-vous au mode d’emploi du téléviseur.
AB C DEFGH
KDL-40S4100
997 652 122 475 171 352 620 516
(39
3
/
8
)(25
3
/
4
)(4
7
/
8
)(18
3
/
4
)(6
3
/
4
)(13
7
/
8
)(24
1
/
2
)(20
3
/
8
)
KDL-46S4100
1130 746 84 489 176 384 709 531
(44
1
/
2
)(29
3
/
8
)(3
3
/
8
)(19
3
/
8
)(7)(15
1
/
8
)(28)(21)
KDL-52S4100
1274 833 51 502 179 412 791 544
(50
1
/
4
)(32
7
/
8
)(2
1
/
8
)(19
7
/
8
)(7
1
/
8
)(16
1
/
4
)(31
1
/
4
)(21
1
/
2
)
Model Name/ Screw location/ Hook location/
Nom du modèle Emplacement des vis Emplacement du crochet
KDL-40S4100 d, g b
KDL-46S4100 d, g b
KDL-52S4100 d, g b
Screw location/Emplacement des vis
When installing the Mounting Hook on the TV./
En cas d’installation du crochet de fixation sur le
téléviseur.
Hook location/Emplacement du crochet
When installing the TV onto the Base Bracket./
En cas d’installation du téléviseur sur le support de
fixation de la base.
h
j
g
f
e
d
h
j
g
f
e
d
h
j
g
f
e
d
a*
b
c*
English Screw and Hook locations diagram/table
Français Schéma/tableau des emplacements des crochets et des vis
* Hook positions “a” and “c” cannot be used for the models in the
table above./
* Les positions du crochet « a » et « c » ne peuvent pas être
utilisées pour les modèles repris dans le tableau ci-dessus.
Remarques
•Veillez à utiliser exclusivement les vis fournies
(+PSW6
×
16) pour fixer le crochet de fixation.
• Si vous utilisez un tournevis électrique, ajustez
l’effort de serrage à environ 2,0 N·m {20 kgf·cm}.
2
Réglez l’angle du crochet de fixation
à l’aide de la clé hexagonale fournie
avec le support de fixation murale.
Si vous installez le téléviseur parallèlement au
mur (0 degré), il n’est pas nécessaire de régler
l’angle du crochet de fixation (procédures 1 et
2 ci-dessous). Vérifiez que chaque base de bras
X est vissée solidement.
1
Retirez les deux vis de la base du bras
X
du crochet
de fixation. Choisissez les trous correspondant à
l’angle souhaité (5, 10, 15 ou 20 degrés).
2 Réglez les angles du bras supérieur Y et du
bras inférieur Z en fonction du trou
correspondant, puis fixez convenablement
chaque bras à l’aide des deux vis retirées au
cours de la procédure précédente 1.
Remarques
•
Veillez à régler les bras droit et gauche au même angle.
• Vérifiez que les deux bases des bras sont vissées
solidement.
ATTENTION
Veillez à ne pas vous pincer les doigts lorsque vous
réglez l’angle du crochet de fixation.
3
Retirez les vis situées à l’arriére du
téléviseur. Ensuite, détachez le
support de table du téléviseur.
ATTENTION
Pour exécuter cette tâche, vous devez prévoir deux
personnes au moins.
Étape 5 : Installation du
téléviseur sur le mur
Reportez-vous au mode d’emploi du SU-WL500.
Remarques
• Lorsque vous remettez le téléviseur sur le support,
exécutez les étapes ci-dessus dans l’ordre inverse (insérez
les piliers dans le support, en les alignant avec les lignes
qui se trouvent à l’arrière du téléviseur).
• Lorsque vous déplacez le téléviseur, ne serrez pas trop le
bas du panneau avant.
• Déposez les vis ou installez le crochet de fixation sur une
surface stable et de niveau.
-
 1
1
-
 2
2


Sony BRAVIA KDL-52S4100 Le manuel du propriétaire
- Taper
- Le manuel du propriétaire
- Ce manuel convient également à
dans d''autres langues
Documents connexes
-
Sony SU-WL500 Manuel utilisateur
-
-
-
-
Sony KDL-46NX715 Manuel utilisateur
-
-
-
Sony KDL-46NX71 Le manuel du propriétaire
-
Sony KDL-40Z5810 Le manuel du propriétaire
-