Vulcan HEG24E Le manuel du propriétaire
- Catégorie
- Plaques électriques
- Taper
- Le manuel du propriétaire

©ITW Food Equipment Group, LLC
3600 North Point Blvd.
Baltimore, MD 21222
RETAIN THIS MANUAL FOR FUTURE USE
FORM F-38341 (9-15)
INSTALLATION & OPERATION MANUAL
HEAVY DUTY ELECTRIC GRIDDLES
MODELS
HEG24E
HEG36E
HEG48E
HEG60E
HEG72E
WEG24E
WEG36E
WEG48E
WEG60E
WEG72E
HEG36E
WEG36E
For additional information on Vulcan or to locate an authorized parts and
service provider in your area, visit our website at www.vulcanequipment.com
WEG36E

- 2 -
TABLE OF CONTENTS
INSTALLATION………………………………………………………………………………………
3
Installation Codes And Standards……………………………………………………………
3
Unpacking…………………………………………………………………………………………
Leg Assembly…………………………………………………………………………………….
3
4
Leveling……………………………………………………………………………………………
4
Location……………………………………………………………………………………………
4
Electrical Connections………………………………………………………………………….
4
Phase Wiring Connections…………………………………………………………………….
5
Electrical Data……………………………………………………………………………………
6
OPERATION…………………………………………………………………………………………..
6
Before First Use………………………………………………………………………………….
6
Seasoning The Griddle…………………………………………………………………………
7
Controls……………………………………………………………………………………………
7
Using The Griddle……………………………………………………………………………….
7
Zone Cooking……..…………………………………………………………………………….
8
Cleaning The Griddle…………………………………………………………………………...
9
HEG And WEG Griddle Plate………………………………………………………………….
9
SHUTDOWN ………………..……………………………………………..…………………………
10
EXTENDED SHUTDOWN ………………………………………………………………………….
10
MAINTENANCE………………………………………………………………………………………
10
Service And Parts Information………………………………………………………………..
10
TROUBLESHOOTING……………………………………………………………………………….
11
ACCESSORY INSTALLATION…………………………………………………………………….
12

- 3 -
INSTALLATION, OPERATION AND CARE OF
HEAVY DUTY ELECTRIC GRIDDLES
GENERAL
Heavy Duty Electric Griddles are produced with quality workmanship and materials.
Proper installation, usage and maintenance of your griddle will result in many years of
satisfactory performance. Thoroughly read this entire manual and carefully follow all of
the instructions provided.
INSTALLATION
Before installing, check the electrical service to make sure it agrees with the
specifications on the rating plate. If the supply and equipment voltages do not agree, do
not proceed with the installation. Contact your dealer or Vulcan immediately.
INSTALLATION CODES AND STANDARDS
Your Vulcan griddle must be installed in accordance with:
In the United States of America:
1. State and local codes
2. National Electrical Code ANSI/NFPA – 70 (latest edition) available from The National
Fire Protection Association,1 Batterymarch Park,Quincy, MA 02269.
3. NFPA Standard #96 Vapor Removal from Cooking Equipment, (latest edition) available
From the National Fire Protection Association,Batterymarch Park, Quincy, MA 02269.
In Canada:
1. Local code
2. Canadian Electrical Code C22.1 Part 1 (latest edition) available from the Canadian
Standard Association, 5060 Spectrum Way, Suite 100, Mississauga, Ontario, Canada,
L4W 5N6.
UNPACKING
This griddle was inspected before leaving the factory. The carrier assumes full responsibility for the
safe delivery upon acceptance of the shipment. Check for possible shipping damage immediately after
receipt.
If the griddle is found to be damaged, complete the following steps:
1. Carrier must be notified within 5 business days of receipt.
2. Carrier’s local terminal must be notified immediately upon discovery (note time, date, and
who was spoken to), and follow up and confirm with written or electronic communication.
3. All original packing materials must be kept for inspection purposes.
4. The griddle cannot have been moved, installed, or modified.
5. Notify Vulcan Customer Service immediately at 800-814-2028.

- 4 -
LEG ASSEMBLY
Attach the legs to the body by threading the exposed leg stud into the threaded holes
located on the underside of the unit. Tighten each leg so that the top face of the leg is
pressed firmly against the body bottom. Do not operate griddle without legs or integrated
stand as damage will occur.
LEVELING
Position the griddle in the desired location. Level the griddle by using a wrench to turn
the adjustable feet. You must hold the leg while turning the foot so that it’s attachment to
the griddle is not loosened.
LOCATION
The installation location must be kept free and clear of combustibles. Do not permit air to
blow directly at the griddle. Avoid open windows next to the griddle wherever possible.
Avoid wall-type fans which create air cross-currents within the room.
This griddle is Design Certified for installation on a non-combustible counter with 4” legs,
or combustible floor with 24” high stand.
INSTALLATION CLEARANCES
COMBUSTIBLE CONSTRUCTION
NON-COMBUSTIBLE CONSTRUCTION
Back:
1”
0”
Right
Side:
1”
0”
Left Side
1”
0”
ELECTRICAL CONNECTIONS
Electrical and grounding connections must comply with the
applicable portions of the National Electrical Code and/or other local electrical
codes.
Disconnect the electrical power to the griddle and follow lockout /
tagout procedures.
Electrical Connections
1. Remove the junction box cover plate(s) at the back of the unit. This exposes the built-in junction
boxes and griddle line leads.
2. Select a suitable knockout on the rear or bottom of the junction box.
3. Connect the griddle’s line leads to the supply wires with factory supplied wire connectors as shown
in the applicable wiring instructions. Do not disturb the internal griddle wiring.
4. Push the excess wire into the junction box and replace the cover plate. Never operate the griddle
without the junction box covers in place.
Since the griddle is not fused, you must connect it to a fused circuit equipped with a
suitable disconnecting means as required by local authorities.

- 5 -
Phase Wiring Connections
HEG24E/WEG24E
208,240 & 480 VAC 3-PHASE WIRING CONNECTIONS:
1. CONNECT WIRE #5 TO “L1”
2. CONNECT WIRE #6 & #11 TO “L2”
3. CONNECT WIRE #10 TO “L3”
208 & 240 VAC 1-PHASE WIRING CONNECTIONS:
1. CONNECT WIRE #5 & #10 TO “L1”
2. CONNECT WIRE #6 & #11 TO “L2”
HEG36E/WEG36E
208,240 & 480 VAC 3-PHASE WIRING CONNECTIONS:
1. CONNECT WIRE #10 TO “L1”
2. CONNECT WIRE #11 TO “L2”
3. CONNECT WIRE #5 & #6 TO “L3”
208 & 240 VAC 1-PHASE WIRING CONNECTIONS:
1. CONNECT WIRE #5 & #10 TO “L1”
2. CONNECT WIRE #6 & #11 TO “L2”
HEG48E/WEG48E
208,240 & 480 VAC 3-PHASE WIRING CONNECTIONS:
1. CONNECT WIRE #10 & #11 TO “L1”
2. CONNECT WIRE #8, #9 & #13 TO “L2”
3. CONNECT WIRE #12 TO “L3”
208 & 240 VAC 1-PHASE WIRING CONNECTIONS:
1. CONNECT WIRE #8, #12 & #13 TO “L1”
2. CONNECT WIRE #9, #10 & #11 TO “L2”
HEG60E/WEG60E
208,240 & 480 VAC 3-PHASE WIRING CONNECTIONS:
LEFT JUNCTION BOX
1. CONNECT WIRE #18 TO “L1”
2. CONNECT WIRE #16 TO “L2”
3. CONNECT WIRE #15 TO “L3”
RIGHT JUNCTION BOX
1. CONNECT WIRE #8 & #10 TO “L1”
2. CONNECT WIRE #17 TO “L2”
3. CONNECT WIRE #12 TO “L3”
208 & 240 VAC 1-PHASE WIRING CONNECTIONS:
LEFT JUNCTION BOX
1. CONNECT WIRE #15 & #16 TO “L1”
2. CONNECT WIRE #18 TO “L2”
RIGHT JUNCTION BOX
1. CONNECT WIRE #10 & #12 TO “L1”
2. CONNECT WIRE #8 & #17 TO “L2”
HEG72E/WEG72E
208,240 & 480 VAC 3-PHASE WIRING CONNECTIONS:
LEFT JUNCTION BOX
1. CONNECT WIRE #16 & #11 TO “L1”
2. CONNECT WIRE #15 TO “L2”
3. CONNECT WIRE #18 TO “L3”
RIGHT JUNCTION BOX
1. CONNECT WIRE #8 & #10 TO “L1”
2. CONNECT WIRE #17 TO “L2”
3. CONNECT WIRE #19 TO “L3”
208 & 240 VAC 1-PHASE WIRING CONNECTIONS:
LEFT JUNCTION BOX
1. CONNECT WIRE #11 & #18 TO “L1”
2. CONNECT WIRE #16 & #15 TO “L2”
RIGHT JUNCTION BOX
1. CONNECT WIRE #10 & #19 TO “L1”
2. CONNECT WIRE #8 & #17 TO “L2”

- 6 -
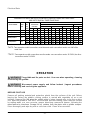
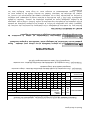
Electrical Data
*NOTE: Two separate conduit connections must be made: each connection carries one-half of the
rated load.
**NOTE: Two separate conduit connections must be made: one connection carries 16.2 KW, the other
connection carries 10.8 KW.
OPERATION
The griddle and its parts are hot. Use care when operating, cleaning
or servicing the griddle.
Disconnect power supply and follow lockout / tagout procedures
before cleaning and servicing the appliance.
BEFORE FIRST USE
Remove all packing material and protective plastic from the surfaces of the unit. Before
leaving the factory the griddle cooking surface is coated with vegetable oil as a rust
inhibitor. Remove this film when the griddle plate is being cleaned prior to its first cooking
use. Heat the griddle to 200-300°F to loosen and melt the coating, then clean the surface
by adding water or a non-corrosive, grease dissolving commercial cleaner, following the
manufacturer’s directions. Scrape the oil residue from the plate with a griddle scraper.
Rinse thoroughly and wipe dry with a soft clean cloth. Clean all accessories.
STANDARD VOLTAGES-208 VOLTS OR 240 VOLTS 50/60 Hz.-SINGLE OR THREE PHASE
480 VOLTS 50/60 Hz.-THREE PHASE ONLY
TOTAL
TOTAL
3 PHASE LOADING
NOMINAL AMPS PER LINE WIRE CONN.
MODEL NUMBER
CONN.
KW
KW PER PHASE
3 PHASE
1 PHASE
KW
PER
PER CONN.*
208 VOLT
240 VOLT
480 VOLT
208
240
CONN
X-Y
Y-Z
X-Z
X
Y
Z
X
Y
Z
X
Y
Z
VOLT
VOLT
HEG24E/WEG24E
10.8
10.8
5.4
5.4
0.0
22.5
45.0
22.5
19.5
39.0
19.5
9.7
19.5
9.7
51.9
45.0
HEG36E/WEG36E
16.2
16.2
5.4
5.4
5.4
45.0
45.0
45.0
39.0
39.0
39.0
19.5
19.5
19.5
77.9
67.5
HEG48E/WEG48E
21.6
21.6
10.8
5.4
5.4
67.4
67.4
45.0
58.5
58.5
39.0
29.2
29.2
19.5
103.8
90.0
HEG60E/WEG60E**
27.0
16.2
5.4
5.4
5.4
45.0
45.0
45.0
39.0
39.0
39.0
19.5
19.5
19.5
77.9
67.5
10.8
5.4
0.0
5.4
45.0
22.5
22.5
39.0
19.5
19.5
19.5
9.7
9.7
51.9
45.0
HEG72E/WEG72E*
32.4
16.2
5.4
5.4
5.4
45.0
45.0
45.0
39.0
39.0
39.0
19.5
19.5
19.5
77.9
67.5
16.2
5.4
5.4
5.4
45.0
45.0
45.0
39.0
39.0
39.0
19.5
19.5
19.5
77.9
67.5

- 7 -
SEASONING THE GRIDDLE
Season the griddle to avoid possible surface corrosion before first use, and after every
cleaning. This will also help reduce the sticking of cooked food product. Heat griddle to a
low temperature (300-350°F) and apply a small amount of cooking oil – about one ounce
per square foot of surface. Use a soft lint-free cloth to spread the oil over the entire
griddle surface to create a thin film. Wipe off any excess oil with a cloth. Repeat the
procedure until the griddle has a slick, mirror-like finish.
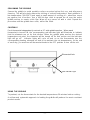
CONTROLS
Each thermostat independently controls a 12” wide griddle section. When each
thermostat is turned ON, the corresponding red indicator light will illuminate to indicate
that the elements are on for that section. When the griddle plate reaches the desired
temperature set point, the elements will be turned off for that section and the indicator
light will go off. Indicator lights will cycle off and on as the thermostats turn the
corresponding heating elements off and on to maintain the set temperatures. At the end
of each day, you must turn all thermostat knobs to the OFF position to turn off the unit.
USING THE GRIDDLE
To preheat, set the thermostats for the desired temperatures 20 minutes before cooking.
A uniform and systematic approach to loading the griddle will produce the most consistent
product results.
Thermostat Knob
Red Indicator Light

- 8 -
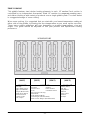
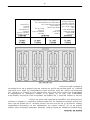
ZONE COOKING
This griddle features two tubular heating elements in each 12” section Each section is
controlled by an independent thermostat. Each 12” section is a separate cooking zo ne,
and allows cooking a wide variety of products over a single griddle plate. The chart below
is a suggested usage of zone cooking.
When zone cooking, it is suggested that you start with your lowest temperature setting at
either side of the griddle, increasing the zone temperature as you move up the zone line.
These zone cooking guidelines will vary depending on product temperatures, size and
shape. This guide should be adjusted to suit your product and operational cooking
preference.
ZONE 1
(300°F)
ZONE 2
(350°F)
ZONE 3
(350°F)
ZONE 4
(400°F)
PRODUCT
Sausage
Eggs (Hard Fried)
Eggs (Scrambled)
Burger (Well Done)
Steak (Well Done)
Chicken Breast
Frozen Foods
Pork Chops
PRODUCT
PRODUCT
Steak (Rare)
Stir Fry
Vegetables
Salmon
Fish Cakes
Lobster
Scampi
Pancakes
French Toast
Bacon
Omelet
Hash Browns
Canadian Bacon
Eggs (Sunny Side Up)
Boiled Ham
Steak (Medium Well)
Fresh Burger (Medium Well)
Small Frozen Burger (Medium Well)
HEG48E/WEG48E

- 9 -
CLEANING THE GRIDDLE
The griddle and its parts are hot. Use care when operating, cleaning
or servicing the griddle.
Clean the griddle regularly. A clean griddle always looks better, lasts longer and performs
better. To produce evenly cooked, perfectly browned griddle products keep the griddle
plate clean and free of carbonized grease. Carbonized grease on the surface hinders the
transfer of heat from the griddle surface to the food, resulting in spotty browning and loss
of cooking efficiency. Carbonized grease tends to cling to griddle foods, giving them a
highly unsatisfactory and unappetizing appearance.
Do not use a water-jet to clean the griddle as this can cause damage to internal electrical
components.
The standard HEG and WEG griddle plates are carbon steel, but can be scored or dented
by careless use of a spatula or scraper. Be careful not to dent, scratch, or gouge the
plate surface. Do not try to knock off loose food that may be on the spatula by tapping the
corner or the edge of the spatula on the griddle surface.
Clean the griddle surface thoroughly. Use a griddle stone, screen, or Scotch Bright™ pad
on the surface as necessary. Rub with the grain of the metal while the griddle is still
warm (not hot). A detergent may be used on the plate surface to help clean it, but be sure
the detergent is thoroughly removed by flushing with clear water. After removal of
detergent the surface of the plate the griddle should be seasoned according to the
instructions in this manual.
AFTER EACH USE
Clean the griddle with a griddle scraper during the work shift. Take care not to vigorously
strike the back or side splashes with the scraper.
ONCE PER DAY
Thoroughly clean the griddle back splash, sides and front. Turn the griddle off and allow it
to cool down between 275°F-300°F, apply some water to the cooking surface and clean it
with a griddle scraper. Remove, empty and wash the grease drawer in the same manner
as an ordinary cooking utensil.
Wipe the griddle exterior clean with a damp cloth to prevent grease accumulation and dry.

- 10 -
ONCE PER WEEK
Clean the griddle cooking surface thoroughly. A detergent may be used on the plate
surface to help clean it, but be sure the detergent is thoroughly removed by flushing with
clear water.
After removal of detergent the surface of the plate the griddle should be seasoned
according to the instructions in this manual.
Clean stainless steel surfaces with a damp cloth and polish with a soft dry cloth. To
remove discoloration, use a griddle cleaner.
If the griddle usage is very high, consider conducting this weekly cleaning procedure
more than once per week.
SHUTDOWN OF GRIDDLE
1. Turn all thermostats to the OFF position. This will shut down the griddle completely.
EXTENDED SHUTDOWN
1. Turn all thermostats to the OFF position.
2. Shut off the main electrical supply.
3. Apply a heavy coat of vegetable oil over the griddle plate to inhibit rust.
MAINTENANCE
The griddle and its parts are hot. Use care when operating, cleaning
or servicing the griddle.
Disconnect power supply and follow lockout / tagout procedures
before cleaning and servicing the appliance.
LUBRICATION
There are no parts on this unit that require lubrication.
SERVICE AND PARTS INFORMATION
Contact the Service Contractor in your area to obtain service and parts information. For a
complete listing of Service and Parts depots refer to or www.vulcanequipment.com
When calling for service the following information should be available from the appliance
serial plate: Model Number, Serial Number and voltage.

- 11 -
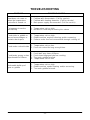
TROUBLESHOOTING
PROBLEM
POSSIBLE CAUSES
Heat does not come on
when the temperature
controller is turned on
1. Problem with thermostats. (Call for service)
2. Problem with heating elements. (Call for service)
3. Main power supply disconnected. (Call for service)
Fat appears to smoke
excessively
1. Temperature set too high.
2. Moisture in food may be turning into steam
Food sticks to griddle or
burned around edges or
contains dark specs
1. Temperature set too high.
2. Griddle surface requires cleaning and/or seasoning.
3. Surface under food not covered with enough cooking oil.
Food under-cooked inside
1. Temperature set too low.
2. Food not cooked for long enough time.
Food tastes greasy or has
objectionable off-flavor
1. Food itself may have off-flavor.
2. Food stored improperly before cooking.
3. Too much griddle fat used.
4. Temperature set too low.
Noticeable build-up of
gum on griddle
1. Temperature set too high.
2. Griddle surface needs cleaning and/or seasoning.
3. Too much griddle fat used.

- 12 -
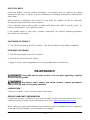
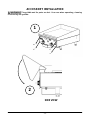
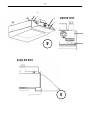
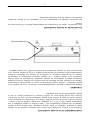
ACCESSORY INSTALLATION
The griddle and its parts are hot. Use care when operating, cleaning
or servicing the griddle.
1
SIDE VIEW
2

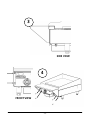
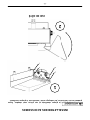
- 13 -
3
4
SIDE VIEW
FRONT VIEW

- 14 -
NOTES

- 14 -
REMARQUES :

- 13 -
3
4
VUE DE CÔTÉ
VUE AVANT

- 12 -
INSTALLATION DES ACCESSOIRES
La plaque chauffante et ses pièces sont chaudes. Soyez
prudent lors de l'utilisation, du nettoyage et de l'entretien de la plaque chauffante.
1
VUE DE CÔTÉ
2

- 11 -
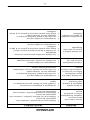
DÉPANNAGE
PROBLÈME
CAUSES POSSIBLES
Aucune chaleur n'est
émise lorsque le
régulateur de température
est mis en position de
marche
1. Problème avec les thermostats. (contactez votre
représentant de service)
2. Problème avec les éléments chauffants. (contactez votre
représentant de service)
3. Alimentation principale débranchée. (contactez votre
représentant de service)
La graisse semble
dégager de la fumée de
façon excessive.
1. Le réglage de la température est trop élevé.
2. L'humidité dans les aliments peut se transformer en
vapeur
Les aliments collent à la
plaque chauffante ou
brûlent sur les bords ou
contiennent des particules
foncées
1. La température est réglée trop haut
2. La surface de la plaque chauffante nécessite un
nettoyage et/ou un conditionnement.
3. La surface sous les aliments n'est pas suffisamment
recouverte d'huile de cuisson.
L'intérieur des aliments
n'est pas bien cuit.
1. La température est réglée trop bas.
2. Les aliments ne sont pas cuits assez longtemps.
Les aliments goûtent le
gras ou ont une saveur
désagréable.
1. Les aliments eux-mêmes peuvent avoir une saveur
désagréable.
2. La nourriture a été mal entreposée avant la cuisson.
3. Usage d'une quantité excessive de graisse sur la plaque
chauffante.
4. La température est réglée trop bas.
Accumulation perceptible
de gomme sur la plaque
chauffante.
1. La température est réglée trop haut.
2. La surface de la plaque chauffante nécessite un
nettoyage et/ou un conditionnement.
3. Usage d'une quantité excessive de graisse sur la plaque
chauffante.

- 10 -
UNE FOIS PAR SEMAINE
Nettoyez soigneusement la surface de cuisson de la plaque chauffante. Un détergent
peut être utilisé sur la surface de la plaque pour faciliter le nettoyage, mais assurez-vous
que le détergent est soigneusement retiré en rinçant à l'eau claire.
Après l'enlèvement du détergent de la surface de la plaque, celle-ci devrait être
conditionnée selon les directives de ce manuel.
Nettoyez les surfaces en acier inoxydable avec un chiffon humide et polissez avec un
chiffon sec et doux. Pour enlever la décoloration, utilisez un nettoyant à plaque
chauffante.
Si l'utilisation de la plaque chauffante est intensive, envisagez d'effectuer cette procédure
de nettoyage plus d'une fois par semaine.
ARRÊT DE LA PLAQUE CHAUFFANTE
1. Placez tous les thermostats la position d'arrêt ("OFF"). Cela éteindra complètement la
plaque chauffante.
ARRÊT PROLONGÉ
1. Placez tous les thermostats la position d'arrêt ("OFF").
2. Coupez l'alimentation électrique principale.
3. Appliquez une couche épaisse d'huile végétale sur la plaque chauffante pour empêcher
la production de rouille.
ENTRETIEN
La plaque chauffante et ses pièces sont chaudes. Soyez
prudent lors de l'utilisation, du nettoyage et de l'entretien de la plaque chauffante.
Débranchez l'alimentation et suivez la procédure de
verrouillage-étiquetage avant tout nettoyage ou entretien de l'appareil.
LUBRIFICATION
Cet appareil ne comporte aucune pièce qui nécessite une lubrification.
RENSEIGNEMENTS SUR LE SERVICE ET LES PIÈCES
Contactez le centre de service de votre région pour obtenir des renseignements sur le
service et les pièces. Pour obtenir la liste complète des centres de services et des dépôts
de pièces, consultez www.vulcanequipment.com
Lors de tout appel de service, veuillez avoir les renseignements suivants habituellement
inscrits sur la plaque signalétique de l'appareil : Numéro de modèle, numéro de série et
tension.

- 9 -
NETTOYAGE DE LA PLAQUE CHAUFFANTE
La plaque chauffante et ses pièces sont chaudes. Soyez
prudent lors de l'utilisation, du nettoyage et de l'entretien de la plaque chauffante.
Nettoyez la plaque chauffante régulièrement. Une plaque chauffante propre paraît
toujours mieux, dure plus longtemps et est plus performante. Pour obtenir des aliments
uniformément cuits et parfaitement rissolés, gardez la plaque chauffante propre et
exempte de graisse carbonisée. La graisse carbonisée sur la surface empêche le
transfert de chaleur de la surface de la plaque chauffante aux aliments, et entraîne un
rôtissage très inégal et une perte d'efficacité énergétique de la cuisson. La graisse
carbonisée tend à s'accrocher aux aliments de la plaque chauffante et à leur donner une
apparence très insatisfaisante et peu appétissante.
REMARQUE
N'utilisez pas un jet d'eau pour nettoyer la plaque chauffante, car cela peut causer
des dommages aux composants électriques internes.
Les plaques chauffantes standards HEG et WEG sont en acier ordinaire, mais peuvent
être rayées ou bosselées par un usage négligent d'une spatule ou un grattoir. Veillez à
ne pas bosseler, rayer ou rainurer la surface de la plaque. N'essayez pas de retirer des
aliments qui peuvent être sur la spatule en tapant le coin ou le bord de la spatule sur la
surface de la plaque chauffante.
Nettoyez soigneusement la surface de la plaque chauffante. Utilisez une pierre à plaque
chauffante, un tampon à récurer ou Scotch Bright sur la surface au besoin. Frottez
suivant le grain du métal tandis que la plaque chauffante est encore tiède (pas chaude).
Un détergent peut être utilisé sur la surface de la plaque pour aider à nettoyer, mais
assurez-vous que le détergent est soigneusement retiré en rinçant à l'eau claire. Après
l'enlèvement du détergent de la surface de la plaque, celle-ci devrait être conditionnée
selon les directives de ce manuel.
APRÈS CHAQUE UTILISATION
Nettoyez la plaque chauffante avec un racloir pour plaque chauffante pendant la période
de travail. Prenez garde de ne pas frapper vigoureusement l'arrière ou les côtés anti-
éclaboussures avec le racloir.
UNE FOIS PAR JOUR
Nettoyez soigneusement la paroi anti-éclaboussures à l'arrière, sur les côtés et à l'avant.
Éteignez la plaque chauffante et laissez-la refroidir à entre 275 °F et 300 °F, appliquez
un peu d'eau sur la surface de cuisson et nettoyez-là à l'aide d'un racloir pour plaque
chauffante. Enlevez, videz et lavez le tiroir à graisse de la même manière qu'un ustensile
de cuisine ordinaire.
Nettoyez l'extérieur de la plaque chauffante avec un chiffon humide pour éviter
l'accumulation de graisse et essuyez-le.
La page est en cours de chargement...
La page est en cours de chargement...
La page est en cours de chargement...
La page est en cours de chargement...
La page est en cours de chargement...
La page est en cours de chargement...
La page est en cours de chargement...
La page est en cours de chargement...
-
 1
1
-
 2
2
-
 3
3
-
 4
4
-
 5
5
-
 6
6
-
 7
7
-
 8
8
-
 9
9
-
 10
10
-
 11
11
-
 12
12
-
 13
13
-
 14
14
-
 15
15
-
 16
16
-
 17
17
-
 18
18
-
 19
19
-
 20
20
-
 21
21
-
 22
22
-
 23
23
-
 24
24
-
 25
25
-
 26
26
-
 27
27
-
 28
28


Vulcan HEG24E Le manuel du propriétaire
- Catégorie
- Plaques électriques
- Taper
- Le manuel du propriétaire
dans d''autres langues
- English: Vulcan HEG24E Owner's manual