Husqvarna 525HE3 Le manuel du propriétaire
- Catégorie
- Jouets
- Taper
- Le manuel du propriétaire

525HE3, 525HE4
EN Operator's manual 2-19
DE Bedienungsanweisung 20-40
FR Manuel d'utilisation 41-60
NL Gebruiksaanwijzing 61-79
SL Navodila za uporabo 80-98

Contents
Introduction..................................................................... 2
Safety..............................................................................4
Assembly........................................................................ 8
Operation........................................................................ 9
Maintenance................................................................. 12
Troubleshooting............................................................ 16
Transportation, storage and disposal........................... 17
Technical data.............................................................. 17
EC Declaration of Conformity....................................... 19
Introduction
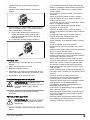
Product description
The product is a hedge trimmer with a combustion
engine.
Intended use
Use the product to cut branches and twigs. Do not use
the product for other tasks.
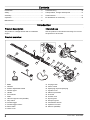
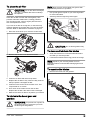
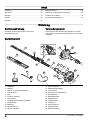
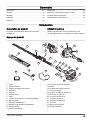
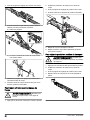
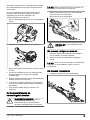
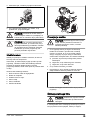
Product overview
18
20
19
23
24
1
2
22
6
7
9
11
13
3
4
5
10
16
15
14
17
21
8
12
25
1. Blade
2. Gearbox
3. Position adjustment handle
4. Grease nipple
5. Handle
6. Front handle
7. Shaft
8. Harness support hook (525HE4)
9. Stop switch
10. Throttle trigger
11. Throttle trigger lockout
12. Rear handle
13. Clutch cover
14. Air purge bulb
15. Choke control
16. Spark plug cap and spark plug
17. Cylinder cover
18. Starter rope handle
19. Fuel tank
20. Air filter cover
21. Impact guard
22. Transport guard
23. Combination wrench
24. Operator’s manual
25. Harness (525HE4)
21173 - 003 - 19.03.2021

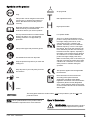
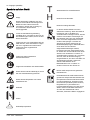
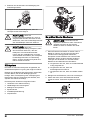
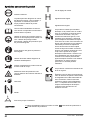
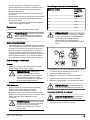
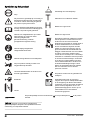
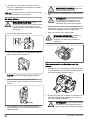
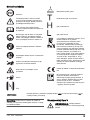
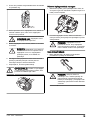
Symbols on the product
Stop.
This product can be dangerous and cause
serious injury or death to the operator or
others. Be careful and use the product
correctly.
Read the operator's manual carefully and
make sure that you understand the
instructions before you use this product.
Use a protective helmet in locations where
objects can fall on you. Use approved
hearing protection. Use approved eye
protection.
Always wear approved protective gloves.
Use stable boots with non-slip soles.
Stop the product fully before you touch the
cutting tool.
Keep all parts of your body away from the
hot surfaces.
Fuel.
Choke.
Air purge bulb.
Idle adjustment screw.
High speed needle.
Low speed needle.
There is no electrical insulation in this
product. If the product touches or comes
near high voltage power lines, it can
cause serious injury or death to the
operator. Electricity can move between
different objects by a curve. The higher
the voltage, the longer the electricity can
move. Electricity can also move through
branches and other objects, especially if
the object is wet. Always keep a distance
at a minimum of 10 m/33 ft between the
product and high voltage power lines.
Make sure that the power is off before you
start the work near the power lines. Keep
a distance at a minimum of 15 m/50 ft to
other persons or animals during the
operation.
This product applies with the applicable
EC Directives.
Noise emissions to the environment
according to European Directive
2000/14/EC and New South Wales
legislation “Protection of the Environment
Operations (Noise Control) Regulation
2017”. Noise emission data can be found
on the machine label and in the Technical
data chapter.
yyyywwxxxxx The rating plate shows the serial number. yyyy is the production year and ww is the
production week.
Note: Other symbols/decals on the product refer to
special certification requirements for some markets.
Euro V Emissions
WARNING: Tampering with the engine
voids the EU type-approval of this product.
1173 - 003 - 19.03.2021 3

Product liability
As referred to in the product liability laws, we are not
liable for damages that our product causes if:
• the product is incorrectly repaired.
• the product is repaired with parts that are not from
the manufacturer or not approved by the
manufacturer.
• the product has an accessory that is not from the
manufacturer or not approved by the manufacturer.
• the product is not repaired at an approved service
center or by an approved authority.
Safety
Safety definitions
Warnings, cautions and notes are used to point out
specially important parts of the manual.
WARNING: Used if there is a risk of
injury or death for the operator or bystanders
if the instructions in the manual are not
obeyed.
CAUTION: Used if there is a risk of
damage to the product, other materials or
the adjacent area if the instructions in the
manual are not obeyed.
Note: Used to give more information that is necessary
in a given situation.
General safety instructions
WARNING: Read the warning
instructions that follow before you use the
product.
• Incorrect or careless use of the product can turn it
into a dangerous tool that can cause serious or even
fatal injury. It is extremely important that you read
and understand the contents of this operator’s
manual.
• This product produces an electromagnetic field
during operation. This field may under some
circumstances interfere with active or passive
medical implants. To reduce the risk of serious or
fatal injury, we recommend persons with medical
implants to consult their physician and the medical
implant manufacturer before operating this product.
• Overexposure to vibration can lead to circulatory
damage or nerve damage in people who have
impaired circulation. Contact your doctor if you
experience symptoms of overexposure to vibration.
Such symptoms include numbness, loss of feeling,
tingling, pricking, pain, loss of strength, changes in
skin color or condition. These symptoms normally
appear in the fingers, hands or wrists. The risk
increases at low temperatures.
• If you encounter a situation where you are uncertain
how to proceed you should ask an expert. Contact
your dealer or your service workshop. Avoid all
usage which you consider to be beyond your
capability.
• Keep in mind that the operator is responsible for
accidents or hazards occurring to other people or
their property.
• Never allow anyone else to use the product without
first ensuring that they have understood the contents
of the operator’s manual.
• Never allow children to use or be in the vicinity of the
product. As the product is equipped with a spring-
loaded stop switch and can be started by low speed
and force on the starter handle, even small children
under some circumstances can produce the force
necessary to start the product. This can mean a risk
of serious personal injury. Therefore remove the
spark plug cap when the product is not under close
supervision.
• Store the product out of reach of children.
• Never use the product if you are tired, if you have
drunk alcohol, or if you are taking medication that
could affect your vision, your judgement or your
coordination.
• Never use a product that is faulty. Carry out the
checks, maintenance and service instructions
described in this manual. Some maintenance and
service measures must be carried out by trained and
qualified specialists. Refer to instructions under the
heading Maintenance.
• Never use a product that has been modified in any
way from its original specification.
Safety instructions for operation
WARNING: Read the warning
instructions that follow before you use the
product.
• Never use the product in extreme weather conditions
such as severe cold, very hot and/or humid climates.
• Faulty blades can increase the risk of accidents.
• Ensure that no people or animals comes closer than
15 m / 50 ft while you work.
41173 - 003 - 19.03.2021

• Observe your surroundings and make sure that there
is no risk of people or animals coming into contact
with the cutting equipment.
• Inspect the working area. Remove any objects that
could be thrown out.
• Always ensure you have a safe and stable working
position.
• Never leave the product unsupervised with the motor
running.
• Make sure that your hands and feet do not come
near the cutting unit when the engine is running.
• If anything jams in the blades while you are working,
switch off the engine and wait until it has stopped
completely before cleaning the blades. Disconnect
the spark plug cap from the spark plug.
• When the engine is switched off, keep your hands
and feet away from the cutting unit until it has
stopped completely.
• Watch out for stumps of branches that can be thrown
out during cutting.
• Listen out for warning signals or shouts when you
are wearing hearing protection. Always remove your
hearing protection as soon as the engine stops.
• Never work from a ladder, stool or any other raised
position that is not fully secured.
• Always use both hands to hold the product. Hold the
product in front of your body.
• If any foreign object is hit or if vibrations occur stop
the product immediately. Disconnect the spark plug
cap from the spark plug. Check that the product is
not damaged. Repair any damage.
• Ensure that the spark plug cap and ignition lead are
undamaged to avoid the risk of electric shock.
• Check that all nuts and screws are tight.
• Make sure the gearbox is lubricated correctly. Refer
to
To lubricate the bevel gear and gearbox on page
15
.
• The gearbox gets hot when the product has been in
use. To avoid burning yourself do not touch the
gearbox.
• All covers and guards must be fitted before starting.
• If the blades get stuck, they can be loosened by
sticking the combination wrench into the gearbox.
Stick the combination wrench into the gearing and
turn it back and forth. Refer to
To examine the
blades on page 15
.
• The transport guard should always be fitted to the
cutting unit when the product is not in use.
Personal protective equipment
WARNING: Read the warning
instructions that follow before you use the
product.
• Always use approved personal protective equipment
when you use the product. Personal protective
equipment cannot fully prevent injury but it
decreases the degree of injury if an accident does
occur. Let your dealer help you select the right
equipment.
• Use approved hearing protection that provides
adequate noise reduction. Long-term exposure to
noise can result in permanent hearing impairment.
• Use approved eye protection. If you use a visor, you
must also use approved protective goggles.
Approved protective goggles must comply with the
ANSI Z87.1 standard in the USAs or EN 166 in EU
countries.
• Always use protective gloves.
• Use sturdy non-slip boots or shoes.
• Use clothing made of a strong fabric. Always use
heavy, long pants and long sleeves. Do not use
loose clothing that can catch on twigs and branches.
Do not wear jewelry, short pants, sandals or go with
bare feet. Put your hair up safely above shoulder
level.
• Keep first aid equipment close at hand.
Safety devices on the product
WARNING: Read the warning
instructions that follow before you use the
product.
1173 - 003 - 19.03.2021 5

• Do not use a product with defective safety devices.
• Do a check of the safety devices regularly. If the
safety devices are defective, speak to your
Husqvarna service agent.
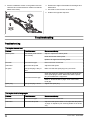
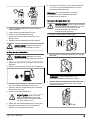
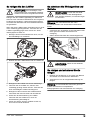
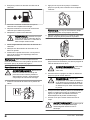
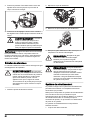
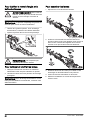
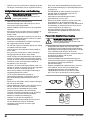
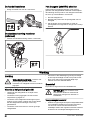
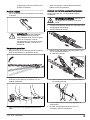
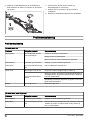
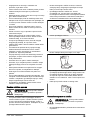
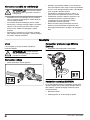
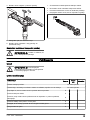
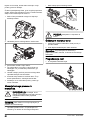
To do a check of the throttle trigger lockout
1. Make sure that the throttle trigger lockout (A) and
throttle trigger (B) move freely and that the return
spring operates correctly.
A
B
2. Make sure that the throttle trigger is locked at the
idle position when the throttle trigger lockout is
released.
3. Push down the throttle trigger lockout and make sure
that it goes back to its initial position when you
release it.
4. Start the product and apply full throttle. Refer to
To
start the engine on page 10
.
5. Release the throttle trigger and make sure that the
blades stop and stay stationary.
WARNING: If the blades move
when the throttle trigger is in the idle
position, adjust the idle speed. Refer to
To adjust the idle speed on page 13
.
To do a check of the stop switch
1. Start the engine.
2. Move the stop switch to the stop position and make
sure that the engine stops.
To do a check of the vibration damping system
WARNING: Use of an incorrect cutting
attachment increases the level of vibration.
The vibration damping system decreases vibration in the
handles to a minimum. The vibration damping system
decreases the vibrations between the engine unit and
the shaft unit.
1. Stop the engine.
2. Do a visual check for deformation and damage, for
example cracks.
3. Make sure that the vibration damping units are
attached correctly.
To do a check of the muffler
The muffler keeps noise levels to a minimum and sends
exhaust fumes away from the operator.
• Do a visual check for damage and deformation.
61173 - 003 - 19.03.2021

• Make sure that the muffler is correctly attached to
the product.
• If the muffler on your product has a spark arrester
screen, do a visual check. Replace the spark
arrester screen if it is damaged.
a) Clean the spark arrester screen if it is blocked. A
blocked spark arrester screen causes the engine
to become too hot which causes damage to the
engine.
b) Make sure that the spark arrestor mesh is
attached correctly.
To do a check of the blades
1. Stop the engine and make sure that the blades stop.
2. Remove the spark plug cap from the spark plug.
3. Put on protective gloves.
4. Make sure that the blades are not damaged or bent.
Always replace a damaged or bent blade.
5. Make sure that the screws to the blades are tight.
To do a check of the bevel gear and gearbox
WARNING: To prevent burn injuries, let
the product become cool before you touch
the bevel gear and gearbox.
• Do a visual check for damage and deformation.
Fuel safety
WARNING: Read the warning
instructions that follow before you use the
product.
• Do not mix the fuel indoor or near a heat source.
• Do not start the product if there is fuel or engine oil
on the product. Remove the unwanted fuel/oil and let
the product dry. Remove unwanted fuel from the
product.
• If you spill fuel on your clothing, change clothing
immediately.
• Do not get fuel on your body, it can cause injury. If
you get fuel on your body, use a soap and water to
remove the fuel.
• Do not start the engine if you spill oil or fuel on the
product or on your body.
• Do not start the product if the engine has a leak.
Examine the engine for leaks regularly.
• Be careful with fuel. Fuel is flammable and the fumes
are explosive and can cause injuries or death.
• Do not breathe in the fuel fumes, it can cause injury.
Make sure that there is sufficient airflow.
• Do not smoke near the fuel or the engine.
• Do not put warm objects near the fuel or the engine.
• Do not add the fuel when the engine is on.
• Make sure that the engine is cool before you refuel.
• Before you refuel, open the fuel tank cap slowly and
release the pressure carefully.
• Make sure there are sufficient airflow when refueling
and mixing fuel (petrol and two-stroke oil) or draining
the fuel tank.
• Fuel and fuel vapor are highly flammable and can
cause serious injury when inhaled or allowed to
come into contact with the skin. For this reason,
observe caution when handling fuel and make sure
there is sufficient airflow.
• Tighten the fuel tank cap carefully or a fire can
occur.
• Move the product at a minimum of 3 m (10 ft) from
the position where you filled the tank before a start.
• Do not put too much fuel in the fuel tank.
• Make sure that a leak cannot occur when you move
the product or fuel container.
• Do not put the product or a fuel container where
there is an open flame, spark or pilot light. Make
sure that the storage area does not contain an open
flame.
• Only use approved containers when you move the
fuel or put the fuel into storage.
• Empty the fuel tank before long-term storage. Obey
the local law on where to dispose fuel.
• Clean the product before long-term storage.
• Remove the spark plug cap before you put the
product into storage to make sure that the engine
does not start accidentally.
Safety instructions for maintenance
WARNING: Read the warning
instructions that follow before you use the
product.
• Stop the engine and make sure that the cutting
equipment stops. Let the product become cool
before you do the maintenance.
• Disconnect the spark plug cap before you do the
maintenance.
1173 - 003 - 19.03.2021 7

• The exhaust fumes from the engine contain carbon
monoxide, an odourless, poisonous and very
dangerous gas that can cause death. Do not run the
product indoors or in closed spaces.
• The exhaust fumes from the engine are hot and can
contain sparks. Do not run the product indoors or
near flammable material.
• Accessories and changes to the product that are not
approved by the manufacturer, can cause serious
injury or death. Do not change the product. Always
use original accessories.
• If the maintenance is not done correctly and
regularly, there is an increased risk of injury and
damage to the product.
• Only do the maintenance as this operator's manual
recommends. Let an approved Husqvarna service
agent do all other servicing.
• Let an approved Husqvarna service agent do
servicing on the product regularly.
• Replace damaged, worn or broken parts.
Assembly
Introduction
This section describes how to assemble and adjust the
product.
WARNING: Before you assemble the
product, read the safety chapter and the
assembly instructions.
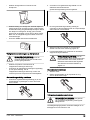
To install the handle
• Install the handle with the 2 screws.
To install the impact guard (optional)
• Install the impact guard with the 3 screws.
To adjust the harness (525HE4)
Always use the harness when you operate the product.
The harness gives maximum control during operation of
the product. The harness decreases the risk of tiredness
in your body.
1. Put on the harness.
2. Attach the product to the harness support hook.
3. Adjust the length of the harness until the support
hook is level with your hip.
81173 - 003 - 19.03.2021

Operation
Introduction
WARNING: Before you operate the
product, you must read and understand the
safety chapter.
To do before you operate the product
• Examine the work area and remove loose objects.
• Do a check of the cutting unit. Refer to
To examine
the blades on page 15
.
• Make sure that the safety devices of the product
operate correctly. Do not use the product without all
safety devices installed correctly.
• Make sure that all screws and nuts are tight.
• Make sure that all covers are attached correctly and
not damaged before you start the product.
• Make sure that the cutting unit stops when the
engine is at idle speed.
Fuel
This product has a two-stroke engine.
CAUTION: Incorrect type of fuel can
result in engine damage. Use a mixture of
gasoline and two-stroke oil.
Premixed fuel
• Use Husqvarna premixed alkylate fuel for best
performance and extension of the engine life. This
fuel contains less harmful chemicals compared to
regular fuel, which decreases harmful exhaust
fumes. The quantity of remains after combustion is
lower with this fuel, which keeps the components of
the engine more clean.
To mix fuel
Gasoline
• Use good quality unleaded gasoline with a maximum
of 10% ethanol contents.
CAUTION: Do not use gasoline with
an octane grade less than 90 RON/87
AKI. Use of a lower octane grade can
cause engine knocking, which causes
engine damages.
Two-stroke oil
• For best results and performance use Husqvarna
two-stroke oil.
• If Husqvarna two-stroke oil is not available, use a
two-stroke oil of good quality for air-cooled engines.
Speak to your servicing dealer to select the correct
oil.
CAUTION: Do not use two-stroke
oil for water-cooled outboard engines,
also referred to as outboard oil. Do not
use oil for four-stroke engines.
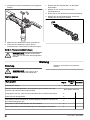
To mix gasoline and two-stroke oil
Gasoline, liter Two-stroke oil,
liter
2% (50:1)
5 0.10
10 0.20
15 0.30
20 0.40
CAUTION: Small errors can influence
the ratio of the mixture drastically when you
mix small quantities of fuel. Measure the
quantity of oil carefully and make sure that
you get the correct mixture.
1. Fill half the quantity of gasoline in a clean container
for fuel.
2. Add the full quantity of oil.
3. Shake the fuel mixture.
4. Add the remaining quantity of gasoline to the
container.
5. Carefully shake the fuel mixture.
CAUTION: Do not mix fuel for more
than 1 month at a time.
1173 - 003 - 19.03.2021 9

To fill the fuel tank
WARNING: Obey the procedure that
follows for your safety.
1. Stop the engine and let the engine become cool.
2. Clean the area around the fuel tank cap.
3. Shake the container and make sure that the fuel is
fully mixed.
4. Remove the fuel tank cap slowly to release the
pressure.
5. Fill the fuel tank.
CAUTION: Make sure that there is
not too much fuel in the fuel tank. The
fuel expands when it becomes hot.
6. Tighten the fuel tank cap carefully.
7. Clean fuel spillage on and around the product.
8. Move the product 3 m/10 ft or more away from the
refueling area and fuel source before you start the
engine.
Note: To see where the fuel tank is on your product,
refer to
Product overview on page 2
.
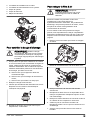
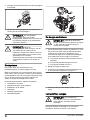
To start the engine
WARNING: Keep a minimum distance
of 15 m/50 ft from persons or animals when
you start the product. There is a risk that the
cutting attachment starts to move.
1. Set the choke control in the choke position.
2. Push the air purge bulb until the bulb starts to fill with
fuel.
Note: It is not necessary to fill the air purge bulb
fully.
3. Hold the body of the product on the ground with your
left hand. Do not put your feet on the product.
4. Pull the starter rope handle slowly until you feel
some resistance, then pull the starter rope handle
with force.
WARNING: Do not wind the starter
rope around your hand.
5. Continue to pull the starter rope handle until the
engine starts.
CAUTION: Do not pull the starter
rope to full extension and do not let go of
the starter rope handle. Release the
starter rope slowly to prevent damage to
the product.
6. When the engine starts, put the choke control in the
run position and apply full throttle. The throttle trigger
automatically disengages from the start position.
7. Make sure that the engine operates smoothly.
WARNING: Do not use the product
with a damaged spark plug cap to prevent
electrical shock.
10 1173 - 003 - 19.03.2021

To prepare a warm engine for start
1. Push the air purge bulb again and again until fuel
starts to fill the bulb. It is not necessary to fill the air
purge bulb fully.
2. Pull the starter rope handle until the engine starts.
Push the throttle trigger slowly to increase the speed
gradually.
CAUTION: Do not pull the starter
rope to full extension. Do not let go of
the starter rope handle when the starter
rope is fully extended. This can cause
damage to the product.
To stop the product
1. Move the stop switch into the stop position to stop
the engine.
CAUTION: The stop switch
automatically goes back to its initial
position. In order to prevent accidental
starting, the spark plug cap must be
removed from the spark plug when
assembling, checking and/or
maintenance is done.
To operate the product
• Start near the ground and move the product up
along the hedge when you cut the sides.
• Make sure that the engine does not touch the hedge.
• Hold the product near your body for a stable work
position.
• Make sure that the cutting unit does not touch the
ground.
• Be careful and work slowly until all the branches are
correctly cut.
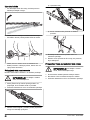
To adjust the angle of the cutting unit
The cutting unit can be adjusted in 10 different positions.
WARNING: Do not operate the cutting
unit when you adjust the angle.
1. Let the engine run at idle speed and make sure the
cutting unit does not move.
2. Pull down the position adjustment handle.
1173 - 003 - 19.03.2021 11

3. Tilt the cutting unit to the correct position. Use 1 of
the procedures that follow.
a) Use the handle.
b) Push the end of the cutting unit against a stable
surface.
4. Release the position adjustment handle to lock the
cutting unit.
5. Push the cutting unit against the hedge to make sure
that it is locked.
To adjust the friction for angle adjustment
WARNING: Do not operate the cutting
unit when you adjust the friction.
1. Push the stop switch to stop the product.
2. Install the transport guard on the cutting unit
3. Pull down the position adjustment handle.
4. Tilt the cutting unit to the applicable position.
5. Adjust the screw to set the friction.
6. Set the cutting unit in different positions to try the
friction.
To set the product in transport position
WARNING: Do not start the product
when the product is in transport position.
1. Push the stop switch to stop the product.
2. Install the transport guard on the cutting unit.
3. Pull down the position adjustment handle.
4. Fold the cutting unit to make it parallel to the shaft.
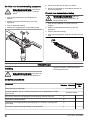
Maintenance
Introduction
WARNING: Read and understand the
safety chapter before you do maintenance
on the product.
12 1173 - 003 - 19.03.2021

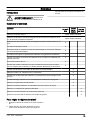
Maintenance schedule
Maintenance Daily Weekly Monthly
Clean the external surface. After each operation.
Clean the muffler, exhaust pipe and engine from leaves, dirt and unwanted lubri-
cant. After each operation.
Make sure that the cutting unit does not move at idle speed. X
Do a check of the stop switch. X
Examine the cutting unit for damages and cracks. Replace if it is damaged. X
Do a check of the throttle trigger lockout and the throttle trigger. X
Examine the engine, the fuel tank and the fuel lines for leaks. X
Tighten nuts and screws. X
Examine the fuel filter for contamination and the fuel hose for cracks and other
defects. Replace if necessary. X
Examine the starter and the starter rope for damages. X
Clean the air filter. Replace if it is necessary. X
Examine the vibration damping units for damages and cracks. X
Examine the spark plug, refer to
Technical data on page 17
. X
Clean the cooling system. X
Clean the external surface of the carburetor and the area around it. X
Clean or replace the spark arrester mesh. X
Clean the inner surface of the fuel tank. X
Make sure that the gearbox is filled with grease. X
To adjust the idle speed
1. Clean the air filter and attach the air filter cover.
2. Start the product. Refer to
To start the engine on
page 10
.
3. Turn the idle adjustment screw T clockwise until the
cutting unit starts to move.
4. Turn the idle adjustment screw counterclockwise
until the cutting unit stops.
WARNING: If the cutting unit does
not stop when you adjust the idle speed,
speak to your nearest servicing dealer.
Do not use the product until it is correctly
adjusted or repaired
Note: The idle speed is correct when the engine
operates smoothly in all positions. Refer to
Technical
data on page 17
for the recommended idle speed.
To do maintenance on the muffler
The muffler decreases the noise level and directs the
exhaust gases away from the operator.
WARNING: Mufflers that have catalytic
converters get very hot during operation and
will stay hot for some time after you stop the
product. This also applies at idle speed. If
1173 - 003 - 19.03.2021 13

you touch the product it can result in burns
to the skin. Think about of the risk of fire.
1. Stop the product and let it cool down.
2. Remove the cover to the muffler.
3. Remove the screw holding the spark arrestor mesh.
4. Clean the spark arrestor mesh if it is blocked or
replace it if it is damaged.
CAUTION: The spark arrestor mesh
must be replaced if it is damaged. Do not
use a product if the spark arrestor mesh on
the muffler is missing or defective.
CAUTION: If the spark arrestor mesh is
frequently blocked it can be a sign that
performance of the catalytic converter is
decreased. Turn to your servicing dealer to
examine the muffler. A blocked spark
arrestor mesh will cause overheating and
result in damage to the cylinder and piston.
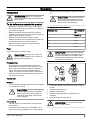
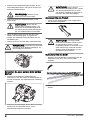
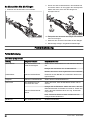
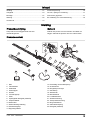
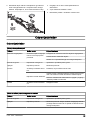
Cooling system
The product has a cooling system to keep the operation
temperature as low as possible.
Clean the components of the cooling system with a
brush weekly or more frequently in rougher conditions. A
dirty or blocked cooling system makes the product too
hot which causes damage to the piston and cylinder.
The cooling system has the following components:
1. Air intake on the starter.
2. Fins on the flywheel.
3. Cooling fins on the cylinder.
4. Cylinder cover.
5. Muffler cover.
6. Muffler plate.
16
3
4
5
2
To do a check of the spark plug
CAUTION: Use the recommended
spark plug. Refer to
Technical data on page
17
. An incorrect spark plug can cause
damage to the product.
1. If the product is not easy to start or to operate or if
the product operates incorrectly at idle speed,
examine the spark plug for unwanted materials. To
decrease the risk of unwanted material on the spark
plug electrodes, do these steps:
a) make sure that the idle speed is correctly
adjusted.
b) make sure that the fuel mixture is correct.
c) make sure that the air filter is clean.
2. Clean the spark plug if it is dirty.
3. Make sure that the electrode gap is correct. Refer to,
Technical data on page 17
.
4. Replace the spark plug monthly or more frequently if
necessary.
14 1173 - 003 - 19.03.2021

To clean the air filter
CAUTION: An air filter that is damaged,
very dirty, or soaked with fuel must always
be replaced.
Clean the air filter from dirt and dust regularly. This
prevents carburetor malfunctions, starting problems,
loss of engine power, wear to engine parts and more
fuel consumption than usual.
If you use an air filter for a long time, it cannot be fully
cleaned. Replace the air filter with a new one at regular
intervals. Refer to
Maintenance schedule on page 13
.
1. Move the choke lever up to close the choke valve.
2. Remove the air filter cover and the air filters.
3. Clean the air filters with warm soap water.
4. Replace the air filters if they cannot be fully cleaned.
Always replace a damaged air filter.
5. Clean the inner surface of the air filter cover. Use
compressed air or a brush.
6. Do a check of the rubber seal on the air filter.
Replace the air filter if the rubber seal is damaged.
7. Make sure that the air filter is dry before you install it.
To lubricate the bevel gear and
gearbox
WARNING: To prevent burn injuries, let
the product become cool before you touch
the bevel gear and gearbox.
Note: New products are first filled with grease after
approximately 20 hours of operation.
• Use special grease. Speak to your servicing dealer
for more information.
• Add the grease through the grease nipple.
CAUTION: Do not fill the gearbox fully.
To clean and lubricate the blades
1. Clean the blades from unwanted materials before
and after you use the product.
2. Lubricate the blades before long periods of storage.
Note: Speak to your servicing dealer for more
information about recommended cleaning agents and
lubricants.
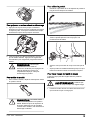
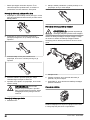
To examine the blades
1. Remove the screw from the gearbox.
1173 - 003 - 19.03.2021 15

2. Put the combination wrench in the gearbox and turn
clockwise and counterclockwise. Make sure that the
blades move freely.
3. Examine the edges of the blades for damages and
deformation.
4. Use a file to remove burrs on the blades.
5. Install in the opposite sequence.
Troubleshooting
Troubleshooting
The engine does not start
Problem Possible cause Recommended step
Starter pawls The starter pawls cannot
move freely.
Adjust or replace the starter pawls.
Clean around the starter pawls.
Speak to an approved servicing dealer.
Fuel tank Incorrect fuel type. Drain it and use correct fuel.
Carburetor Incorrect idle speed. Adjust the idle speed.
No spark The spark plug is dirty or
wet.
Make sure that the spark plug is dry and clean.
Incorrect electrode gap.
Clean the spark plug. Make sure that the electrode gap
of the spark plug is correct. Make sure that the spark
plug is installed with a suppressor.
Refer to
Technical data on page 17
for correct elec-
trode gap.
Spark plug The spark plug is loose. Tighten the spark plug.
The engine starts but stops again
Problem Possible cause Recommended step
Fuel tank Incorrect fuel type. Drain it and use correct fuel.
Carburetor Incorrect idle speed. Adjust the idle speed. Refer to
To adjust the idle speed
on page 13
. Speak to your servicing dealer if it is neces-
sary.
16 1173 - 003 - 19.03.2021

The engine starts but stops again
Problem Possible cause Recommended step
Air filter Clogged air filter. Clean the air filter.
Blade
Problem Possible causes Recommended step
The blade moves slowly or
does not move.
The blade is blocked or it is
damaged.
Clean the blades from unwanted materials. Refer to
To
clean and lubricate the blades on page 15
. Remove
burrs from the blade, refer to
To examine the blades on
page 15
. Replace the blade if it is damaged.
The blade does not cut
easily.
The blade is not sharp or it
is damaged.
Sharpen the blade, refer to
To examine the blades on
page 15
. Replace the blade if it is damaged.
The blade becomes hot. There is friction between
the blades.
Remove burrs from the blade and lubricate the blade.
Refer to
To examine the blades on page 15
.
Transportation, storage and disposal
Transportation and storage
• Always allow the product to cool down before
storage.
• For storage and transportation of the product and
fuel, make sure that there are no leaks or fumes.
Sparks or open flames, for example from electrical
devices or boilers, can start a fire.
• Always use approved containers for storage and
transportation of fuel.
• Empty the fuel before transportation or before long-
term storage. Discard the fuel at an applicable
disposal location.
• Attach the transport guard during transportation and
storage.
• Remove the spark plug cap from the spark plug.
• Attach the product during transportation. Make sure
that it cannot move.
• Clean and do servicing on the product before long-
term storage.
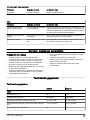
Technical data
Technical data
525HE3 525HE4
Engine
Cylinder displacement, cm325.4 25.4
Idle speed, rpm 2800-3200 2800-3200
Recommended max speed, rpm 11000-12000 11000-12000
Maximum engine power acc. to ISO 8893, kW/hp @ rpm 1.0/1.3@8500 1.0/1.3@8500
Catalytic converter muffler Yes Yes
1173 - 003 - 19.03.2021 17

525HE3 525HE4
Ignition system
Spark plug Husqvarna HQT-2 Husqvarna HQT-2
Electrode gap, mm 0.65 0.65
Fuel
Fuel tank capacity, l/cm30.5 0.5
Weight
Weight, kg 5.9 6.3
Noise emissions 1
Sound power level, measured dB (A) 106 106
Sound power level, guaranteed LWA dB (A) 107 107
Sound levels 2
Equivalent sound pressure level at the operator’s ear,
measured according to EN ISO 10517, dB(A)
96 95
Vibration levels 3
Equivalent vibration levels (ahv,eq) at handles, measured according to EN ISO 10517, m/s2:
Front/Rear, m/s25.6/4.4 4.6/3.9
Blades
Type Double sided Double sided
Cutting length, mm 600 600
Cutting speed, cuts/min 4400 4400
1Noise emissions in the environment measured as sound power (LWA) in conformity with EC directive
2000/14/EC. Reported sound power level for the product has been measured with the original cutting attach-
ment that gives the highest level. The difference between guaranteed and measured sound power is that the
guaranteed sound power also includes dispersion in the measurement result and the variations between dif-
ferent products of the same model according to Directive 2000/14/EC.
2Reported data for noise pressure level has a typical statistical dispersion (standard deviation) of 1 dB (A).
3Reported data for vibration level has a typical statistical dispersion (standard deviation) of 1 m/s2.
18 1173 - 003 - 19.03.2021

EC Declaration of Conformity
EC Declaration of Conformity
Husqvarna AB, SE-561 82 Huskvarna, Sweden, tel:
+46-36-146500, declares that the hedge trimmers
Husqvarna 525HE3, 525HE4 with serial numbers dating
from 2020 onwards (the year is clearly stated on the
rating plate, followed by the serial number), comply with
the requirements of the COUNCIL’S DIRECTIVE:
• of May 17, 2006 ”relating to machinery” 2006/42/EC
• of February 26, 2014 ”relating to electromagnetic
compatibility” 2014/30/EU
• of May 8, 2000 ”relating to the noise emissions in the
environment” 2000/14/EC. Conformity assessment
according to Annex V.
• of June 8, 2011 ”on the restriction of the use of
certain hazardous substances in electrical and
electronic equipment” 2011/65/EU.
The following standards have been applied:
EN ISO 12100:2010, EN ISO 10517:2009/A1:2013, ISO
14982:2009, CISPR 12:2009, EN 50581:2012.
RISE SMP Svensk Maskinprovning AB, Box 7035,
SE-750 07 Uppsala, Sweden, has performed voluntary
type examination on behalf of Husqvarna AB. The
certificate has the number: SEC/20/2543.
In addition, RISE SMP Svensk Maskinprovning AB, Box
7035, SE-750 07 Uppsala, Sweden, has evaluated
conformity with Annex V of Council's Directive of May 8,
2000 "relating to noise emissions in the environment"
2000/14/EC. The certificate has the number:
01/094/030. For information relating to noise emissions,
refer to
Technical data on page 17
.
Huskvarna, 2019-12-15
Per Gustafsson, Development Manager (Authorized
representative for Husqvarna AB and responsible for
technical documentation)
1173 - 003 - 19.03.2021 19

Inhalt
Einleitung...................................................................... 20
Sicherheit......................................................................22
Montage........................................................................27
Betrieb.......................................................................... 28
Wartung........................................................................ 32
Fehlerbehebung............................................................36
Transport, Lagerung und Entsorgung...........................37
Technische Angaben.................................................... 38
EU-Konformitätserklärung............................................ 40
Einleitung
Gerätebeschreibung
Das Gerät ist eine Heckenschere mit einem
Verbrennungsmotor.
Verwendungszweck
Verwenden Sie das Gerät zum Schneiden von Ästen
und Zweigen. Verwenden Sie das Gerät nicht für andere
Aufgaben.
Geräteübersicht
18
20
19
23
24
1
2
22
6
7
9
11
13
3
4
5
10
16
15
14
17
21
8
12
25
1. Glättflügel
2. Getriebe
3. Griff für die Positionseinstellung
4. Schmiernippel
5. Griff
6. Vorderer Handgriff
7. Führungsrohr
8. Aufhänghaken Tragegurt (525HE4)
9. Stoppschalter
10. Gashebel
11. Gashebelsperre
12. Hinterer Handgriff
13. Kupplungsdeckel
14. Kraftstoffpumpenblase
15. Choke-Hebel
16. Zündkappe und Zündkerze
17. Zylinderdeckel
18. Startseilhandgriff
19. Kraftstofftank
20. Luftfilterdeckel
21. Stoßschutz
22. Transportschutz
23. Kombischlüssel
24. Betriebsanleitung
20 1173 - 003 - 19.03.2021
La page est en cours de chargement...
La page est en cours de chargement...
La page est en cours de chargement...
La page est en cours de chargement...
La page est en cours de chargement...
La page est en cours de chargement...
La page est en cours de chargement...
La page est en cours de chargement...
La page est en cours de chargement...
La page est en cours de chargement...
La page est en cours de chargement...
La page est en cours de chargement...
La page est en cours de chargement...
La page est en cours de chargement...
La page est en cours de chargement...
La page est en cours de chargement...
La page est en cours de chargement...
La page est en cours de chargement...
La page est en cours de chargement...
La page est en cours de chargement...
La page est en cours de chargement...
La page est en cours de chargement...
La page est en cours de chargement...
La page est en cours de chargement...
La page est en cours de chargement...
La page est en cours de chargement...
La page est en cours de chargement...
La page est en cours de chargement...
La page est en cours de chargement...
La page est en cours de chargement...
La page est en cours de chargement...
La page est en cours de chargement...
La page est en cours de chargement...
La page est en cours de chargement...
La page est en cours de chargement...
La page est en cours de chargement...
La page est en cours de chargement...
La page est en cours de chargement...
La page est en cours de chargement...
La page est en cours de chargement...
La page est en cours de chargement...
La page est en cours de chargement...
La page est en cours de chargement...
La page est en cours de chargement...
La page est en cours de chargement...
La page est en cours de chargement...
La page est en cours de chargement...
La page est en cours de chargement...
La page est en cours de chargement...
La page est en cours de chargement...
La page est en cours de chargement...
La page est en cours de chargement...
La page est en cours de chargement...
La page est en cours de chargement...
La page est en cours de chargement...
La page est en cours de chargement...
La page est en cours de chargement...
La page est en cours de chargement...
La page est en cours de chargement...
La page est en cours de chargement...
La page est en cours de chargement...
La page est en cours de chargement...
La page est en cours de chargement...
La page est en cours de chargement...
La page est en cours de chargement...
La page est en cours de chargement...
La page est en cours de chargement...
La page est en cours de chargement...
La page est en cours de chargement...
La page est en cours de chargement...
La page est en cours de chargement...
La page est en cours de chargement...
La page est en cours de chargement...
La page est en cours de chargement...
La page est en cours de chargement...
La page est en cours de chargement...
La page est en cours de chargement...
La page est en cours de chargement...
La page est en cours de chargement...
La page est en cours de chargement...
-
 1
1
-
 2
2
-
 3
3
-
 4
4
-
 5
5
-
 6
6
-
 7
7
-
 8
8
-
 9
9
-
 10
10
-
 11
11
-
 12
12
-
 13
13
-
 14
14
-
 15
15
-
 16
16
-
 17
17
-
 18
18
-
 19
19
-
 20
20
-
 21
21
-
 22
22
-
 23
23
-
 24
24
-
 25
25
-
 26
26
-
 27
27
-
 28
28
-
 29
29
-
 30
30
-
 31
31
-
 32
32
-
 33
33
-
 34
34
-
 35
35
-
 36
36
-
 37
37
-
 38
38
-
 39
39
-
 40
40
-
 41
41
-
 42
42
-
 43
43
-
 44
44
-
 45
45
-
 46
46
-
 47
47
-
 48
48
-
 49
49
-
 50
50
-
 51
51
-
 52
52
-
 53
53
-
 54
54
-
 55
55
-
 56
56
-
 57
57
-
 58
58
-
 59
59
-
 60
60
-
 61
61
-
 62
62
-
 63
63
-
 64
64
-
 65
65
-
 66
66
-
 67
67
-
 68
68
-
 69
69
-
 70
70
-
 71
71
-
 72
72
-
 73
73
-
 74
74
-
 75
75
-
 76
76
-
 77
77
-
 78
78
-
 79
79
-
 80
80
-
 81
81
-
 82
82
-
 83
83
-
 84
84
-
 85
85
-
 86
86
-
 87
87
-
 88
88
-
 89
89
-
 90
90
-
 91
91
-
 92
92
-
 93
93
-
 94
94
-
 95
95
-
 96
96
-
 97
97
-
 98
98
-
 99
99
-
 100
100


Husqvarna 525HE3 Le manuel du propriétaire
- Catégorie
- Jouets
- Taper
- Le manuel du propriétaire
dans d''autres langues
- English: Husqvarna 525HE3 Owner's manual
- Deutsch: Husqvarna 525HE3 Bedienungsanleitung
- Nederlands: Husqvarna 525HE3 de handleiding
Documents connexes
-
Husqvarna 522HS75S Manuel utilisateur
-
Husqvarna 522HD60S Manuel utilisateur
-
-
Husqvarna 967329301 Manuel utilisateur
-
-
-
-
Husqvarna 966037320 Mode d'emploi
-
Husqvarna 967650801 Mode d'emploi
-
