Nilfisk GU12H Le manuel du propriétaire
- Catégorie
- Aspirateurs
- Taper
- Le manuel du propriétaire

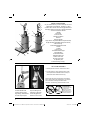
INSTRUCTIONS FOR USE
MODE D'EMPLOI
INSTRUCCIONES DE USO
Spectrum 12S, 12H, 12P, 12D, 15S, 15P, 15D,
18D, GU 12 SMU, GU 15 SMU, GU 12 DMU,
GU 15 DMU, GU 18 DMU
823 0102 020 E
Printed in China
Instruction for use Advance Spectrum 12 15 18 - 823 0102 020 E.indd 1Instruction for use Advance Spectrum 12 15 18 - 823 0102 020 E.indd 1 4/12/2011 2:25:10 PM4/12/2011 2:25:10 PM

2
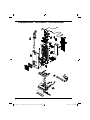
Exploded view - Vue éclatée - Vista detallada
Instruction for use Advance Spectrum 12 15 18 - 823 0102 020 E.indd 2Instruction for use Advance Spectrum 12 15 18 - 823 0102 020 E.indd 2 4/12/2011 2:25:18 PM4/12/2011 2:25:18 PM

3
English 4-13
Français 14-23
Español 24-33
Instruction for use Advance Spectrum 12 15 18 - 823 0102 020 E.indd 3Instruction for use Advance Spectrum 12 15 18 - 823 0102 020 E.indd 3 4/12/2011 2:25:23 PM4/12/2011 2:25:23 PM

4
................................................................. 5
.......................................................................... 6
.......................................................................................... 7
................................................................................. 7
........................................................................................... 7
......................................................................... 7
.........................................................................7
............................................................................... 8
........................................................................... 8
.......................................................................... 9
..................................................................................... 10
.......................................................................................10
......................................................................................... 11
............................................................... 11
................................................................ 11
............................................................................12
......................................................................12
...................................................................13
......................................................13
.......................................................................13
CONTENTS
Important Safety Instructions
Grounding Instructions
Introduction
Parts and Service
Rating plate
Unpacking the Machine
Technical Specifi cations
Know Your Machine
Set-Up and Assembly
Operating the Machine
Using the Wand
Using the Tools
Maintenance
Changing the Paper Dust Bag
Changing the Cloth Dust Bag
Changing the Brush
Changing the HEPA-fi lter
Changing the Exhaust fi lter
Cleaning or changing the Pre-Filter
After Using the Machine
Instruction for use Advance Spectrum 12 15 18 - 823 0102 020 E.indd 4Instruction for use Advance Spectrum 12 15 18 - 823 0102 020 E.indd 4 4/12/2011 2:25:23 PM4/12/2011 2:25:23 PM

5
IMPORTANT SAFETY INSTRUCTIONS
When using an electrical appliance, basic precautions should always be followed, including the following:
Read all instructions before using this appliance.
This machine is for commercial use, for example in hotels, schools, hospitals, factories, shops and offi ces other than
normal residential housekeeping purposes.
THIS APPLIANCE IS INTENDED FOR DRY USE ONLY!
DO NOT USE FOR WET FLOOR OR CARPET!
WARNING!
To reduce the risk of fi re, electric shock, or injury:
* Do not leave the appliance when it is plugged in. Unplug the unit from the outlet when not in use and before servicing.
WARNING!
To reduce the risk of electric shock, do not use outdoors or on wet surfaces.
* Do not allow to be used as a toy. Close attention is necessary when used by or near children.
* Use only as described in this manual. Use only the manufacturer’s recommended attachments.
* If the appliance is not working as it should be, has been dropped, damaged, left outdoors or dropped into water,
return it to a service center. The machine must not be used if the electrical cord shows any sign of damage.
Regularly inspect the cord for damage, particularly if it has been crushed, shut in a door or run over.
* Do not pull or carry by the cord, use the cord as a handle, or pull the cord around sharp edges or corners.
Keep the cord away from heated surfaces.
* Do not unplug by pulling on the cord. To unplug, grasp the plug, not the cord.
* Do not handle the plug, cord or appliance with wet hands.
* Do not put any object into openings. Do not use with any opening blocked.
* Keep loose clothing, hair, fi ngers, and all parts of body away from openings and moving parts.
* Do not pick up anything that is burning or smoking, such as cigarettes or matches. Under no circumstances should
the machine be used for picking up hot material. In particular the machine must not be used for cleaning open and
closed fi replaces, ovens or similar that contain warm or glowing ashes.
* Do not use without dust bag and/or fi lters in place.
* Turn off all controls before unplugging. The plug must always be removed from the socket outlet before starting any
service or repair work of the vacuum cleaner or the cord.
* Avoid vacuuming hard or sharp objects.
* Use extra care when cleaning on stairs.
* The machine must not be used for picking up combustible materials which are health endangering or explosive
materials such as petrol (gasoline), nor should it be used in an explosive atmosphere.
The machine must not be used for picking up water, other liquids or for picking up hazardous - i.e. poisonous dust.
* The machine is not designed for picking up hazardous - i.e. poisonous dust.
* No changes or modifi cations of the mechanical, electrical or thermal safety devices should be made.
* When repairing or replacing the cord, the same type of cord as originally supplied with the machine must be used.
This cord can be supplied by ADVANCE.
SAVE THESE INSTRUCTIONS
Instruction for use Advance Spectrum 12 15 18 - 823 0102 020 E.indd 5Instruction for use Advance Spectrum 12 15 18 - 823 0102 020 E.indd 5 4/12/2011 2:25:23 PM4/12/2011 2:25:23 PM

6
GROUNDING INSTRUCTIONS
This appliance must be grounded. If it should electrically malfunction, grounding provides a path of least resistance for
electric current to reduce the risk of electric shock. This appliance is equipped with a cord having an equipment-ground-
ing conductor and grounding plug. The plug must be plugged into an appropriate outlet that is properly installed and
grounded in accordance with all local codes and ordinances.
DANGER!
Improper connection of the equipment-grounding conductor can result in a risk of electric shock. Check with a qualifi ed
electrician or service person if you are in doubt as to whether the outlet is properly grounded. Do not modify the plug
provided with the appliance.
If it will not fi t the outlet, have a proper outlet installed by a qualifi ed electrician.
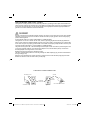
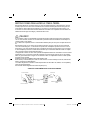
This appliance is for use on a nominal 120-volt circuit, and has a grounding plug that looks like the plug illustrated in
Figure 1 below. A temporary adapter illustrated in Figures 2 and 3 may be used to connect this plug to a 2-pole recepta-
cle as shown in Figure 2 if a properly grounded outlet is not available. The temporary adapter should be used only until
a properly grounded outlet (Figure 1) can be installed by a qualifi ed electrician.
The green-colored rigid ear, tab, or the like extending from the adapter must be connected to a permanent ground such
as a properly grounded outlet box cover. Whenever the adapter is used, it must be held in place by a metal screw.
Grounding adapters are not approved for use in Canada.
Replace the plug if the grounding pin is damaged or broken.
The Green (or Green/Yellow) wire in the cord is the grounding wire. When replacing a plug, this wire must be attached
to the grounding pin only.
Extension cords connected to this machine should be 12 gauge, three-wire cords with three-prong plugs and outlets.
DO NOT use extension cords more than 50 feet (15 meter) long.
GROUNDING PIN
GROUNDED OUTLET
GROUNDED
OUTLET BOX
ADAPTER
METAL
SCREW
Figure 1 Figure 2
Figure 3
PLEASE NOTE: FOR NORTH AMERICA ONLY
TAB FOR GROUNDING SCREW
Instruction for use Advance Spectrum 12 15 18 - 823 0102 020 E.indd 6Instruction for use Advance Spectrum 12 15 18 - 823 0102 020 E.indd 6 4/12/2011 2:25:23 PM4/12/2011 2:25:23 PM

7
INTRODUCTION
This manual will help you get the most from your Advance vacuum cleaner.
Read it thoroughly before operating the machine. This product is intended for commercial use only.
PARTS AND SERVICE
Repairs, when required, should be performed by your Authorized Advance Service Center, who employs factory trained
service personnel, and maintains an inventory of Advance original replacement parts and accessories.
Call the ADVANCE DEALER named below for repair parts or service.
Please specify the Model and Serial Number when discussing your machine.
(Dealer, affi x service sticker here.)
RATING PLATE
The Model Number and Serial Number of your machine are shown on the rating plate on the machine.
This information is needed when ordering spare parts for the machine. Use the space below to note the Model
Number and Serial Number of your machine for future reference.
MODEL NUMBER____________________________________
SERIAL NUMBER ___________________________________
UNPACKING THE MACHINE
When the machine is delivered, carefully inspect the shipping carton and the machine for damage.
If damage is evident, save the shipping carton so that it can be inspected.
Contact the Advance Customer Service Department immediately to fi le a freight damage claim.
USA: Nilfi sk-Advance Inc. 14600 21st Avenue North, Plymouth, MN 55447-3408, Tel.: (763) 745 3500
Canada: Nilfi sk-Advance Canada, 240 Superior Boulevard, Mississauga,
Ontario, L5T 2L2, Tel.: 905-564-1149
For more information visit our web page;
www.nilfi sk-advance.com
TECHNICAL SPECIFICATION
(as installed and tested on the unit)
Model 12H, 12S, 15S
GU 12 SMU,
GU 15 SMU
12P, 12D, 15P, 18D
GU 12 DMU,
GU 15 DMU
GU 18 DMU
Voltage V/Hz 110-120/50-60 110-120/50-60
Rated Power W 1000 1200
Protection class (electrical) I I
Sound Pressure Level dB(A) 69 69
Total weight lbs/Kg 17/7.7 18.7/8.5
Instruction for use Advance Spectrum 12 15 18 - 823 0102 020 E.indd 7Instruction for use Advance Spectrum 12 15 18 - 823 0102 020 E.indd 7 4/12/2011 2:25:26 PM4/12/2011 2:25:26 PM

8
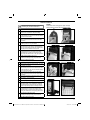
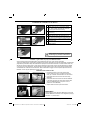
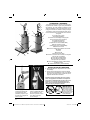
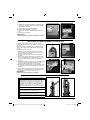
KNOW YOUR MACHINE
As you read this manual, you will occasionally run across
a bold number in parentheses - example: (2). These
numbers refer to an item shown on this page. Refer back
to this page whenever necessary, to pinpoint the location
of an item mentioned in the text.
1 Handle
2 Cord Hook
3 Vacuum Hose
4 Handle Lock Button
5 Dust lid
6 Carrying Handle
7 Light, Green - Only Double Motor Unit (Dual-versions)
8 Light, Red Only Double Motor Unit (Dual-versions)
9 Brush Housing
10 Brush Height Adjustment Knob
11 Pedal
13 Wand
14 Crevice Tool
15 ”Restricted Airfl ow Light”
16 Dust lid button
17 Main Power Switch
18 Exhaust Filter Cover
19 Filter Cover Latch
20 Power Cord Clamp
21 Upholstery Tool
22 Anti strain clip (12H only)
1
2
2
3
4
6
7
8
9
10
11
13
14
5
15
16
17
18 19
20
21
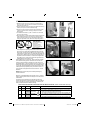
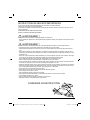
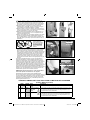
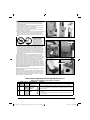
IMPORTANT !
Foot pedal must be used
to release base to
operating/non operation
position. Failure to do so
could result in damage to
the release mechanism.
Insert the handle at the
opening at the top of the
bag housing, until the button
at handle snaps in place.
2
Loop cord through cord
restraint. On 12H model,
connect the pigtail and
extension cord as shown.
3
SET UP AND ASSEMBLY
1. Carefully take out the vacuum cleaner from its carton.
2. Push the Handle (1) into the opening at the top of the
Dust compartment until the button at the rod snaps in
place and secure the handle to the housing.
Never operate the vacuum cleaner without a Dust Bag in
place. These machines are equipped with an "no bag" clip.
This means that if a dust bag not is fi tted or fi tted
uncorrectly - the dust lid (5) would not be able to close.
22
Instruction for use Advance Spectrum 12 15 18 - 823 0102 020 E.indd 8Instruction for use Advance Spectrum 12 15 18 - 823 0102 020 E.indd 8 4/12/2011 2:25:26 PM4/12/2011 2:25:26 PM

9
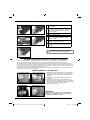
GREEN RED CONDITION FUNCTION
1. ON OFF Normal operation In normal operation, the green light is constantly illuminated.
2. OFF ON -
BLINKING
Brush position too low
(heavy loading)
1. If the condition 2, red light blinking, continues for 10 seconds or more, the control
module will cut out the power supply to the brush motor.
2.. The red light will still be illuminated until you turn off the switch or unplug the cord.
3. OFF ON Brush stalled 1. The red light will be constantly illuminated and the control module will instantly cut
the power supply to the brush motor, if the brush was stalled accidentally.
2. The red light will still be illuminated until you turn off the switch or unplug the cord.
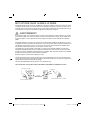
OPERATING THE VACUUM CLEANER
1. Release the power cord from the cord hooks (2) at the backside of
the vacuum cleaner. Turn the lower hook so that the cord is released.
Unwind the whole power cord .
2. Adjust the height of the handle, by pushing at the handle lock button (4)
and then pull or push at handle to comfortable height.
3. Add the cord to the hook and the anti strain clip of the handle in order
to make an anti strain function. Then plug-in the power cord into a
electrical outlet.
4. Turn the Main Power Switch (17) ON. “l” is ON and “O” is OFF. Now
the vacuum motor will start.
5. Step on the Pedal (11) and then tilt the cleaner backwards. Now the brush
motor will start (Dual-versions only). Dual-versions, the green light (7)
at the brush housing (9) will come on to indicate that the brush motor is
running. On single motor versions, the brush is always turning when on.
6. Turn the Height Adjustment Knob (10) to adjust the height that the
brush will operate in - depending on the material at the surface to
be vacuumed. For carpets with short textiles the brush should in the
lower position. Turn the knob to the left (when you are placed in front
of the machine) to lower the brush. For carpets with longer textiles the
brush should in a higher position. Turn the knob to the right (when you
are placed in front of the machine) to set the brush at a higher level. If
the red light comes on, slowly turn the knob in the opposite direction
until the light goes off (Dual-version only).
If the red light (8) stays on continuously, there may be debris wrapped
around the brush, during operation. On double motor units, this can
cause the overload protector for the brush motor to trip. If this occurs,
turn the Main Switch (17) OFF and unplug the power cord. Remove any
debris from the brush and plug in the power cord, turn the Main Switch
(17) back ON. This will automatically reset the overload protector. If the
overload protector trips repeatedly contact your dealer for service. For
more information of the light indicators on the Dual-versions - see the
table below.
NOTE! Always disconnect the power cord before performing any
machine maintenance.
Whenever (15) “Restricted Airfl ow Light” indicator comes on, check the
following: Is the bag full and needs to be changed or is the tube, hose or
nozzle blocked.
For details of dust bag replacement see separate instruction in this
manual. If the light comes on before the bag is full, the inside of the bag
may be coated with very fi ne dust (change the bag), or debris may be
built up somewhere between the brush and the bag.
IMPORTANT !
Foot pedal must be used to
release base to
operating/non operation
position. Failure to do so
could result in damage to the
release mechanism.
LowerLower HigherHigher
On - OffOn - Off
LIGHT INDICATION AND FUNCTION FOR THE BRUSH MOTOR (DUAL - Double Motor Units only!)
45
56
Release Release
basebase
12
1
3
Instruction for use Advance Spectrum 12 15 18 - 823 0102 020 E.indd 9Instruction for use Advance Spectrum 12 15 18 - 823 0102 020 E.indd 9 4/12/2011 2:25:29 PM4/12/2011 2:25:29 PM

10
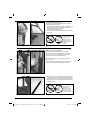
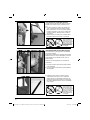
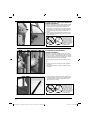
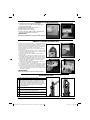
USING THE WAND (OPTIONAL)
The Wand (13) is not supplied as a standard item in all variants
of these machines. To use the wand:
1. Push the machine to upright locked position. The brush motor will
then stop (Dual-version only), and the brush will be lifted up
from the surface on single motor versions.
Then slide the Wand out of its holder.
2. Use the wand for cleaning hard to reach places like fl oor corners,
or furnitures.
12
USING THE TOOLS (OPTIONAL)
These tools are not standard items in all machine variants.
Use these tools for a better cleaning performance at hard to reach
areas. A Crevice Tool (14) and Upholstery Tool (21) is placed
conveniently on the machine, just behind the wand.
Remove the wand from the vacuum cleaner and you will have free
access to the Tools.
1. The Upholstery Tool is placed in the upper section of the cleaner.
2. The crevice tool is placed in the lower section of the cleaner.
IMPORTANT !
Foot pedal must be used
to release base to
operating/non operation
position. Failure to do so
could result in damage to
the release
mechanism.
3. Install the Crevice Tool or Upholstery Tool on the end of the Wand,
or on the end of the hose, which can be detached from the wand, if
desired. Now the vacuum cleaner will have an extended coverage
performance and can be used for cleaning hard to reach areas like
roof strips, or furnitures.
IMPORTANT !
Foot pedal must be used
to release base to
operating/non operation
position. Failure to do so
could result in damage to
the release mechanism.
12
33
Instruction for use Advance Spectrum 12 15 18 - 823 0102 020 E.indd 10Instruction for use Advance Spectrum 12 15 18 - 823 0102 020 E.indd 10 4/12/2011 2:25:30 PM4/12/2011 2:25:30 PM

11
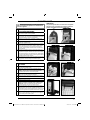
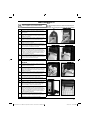
CHANGING THE PAPER DUST BAG
Change the bag whenever the “Bag Full” (15) indica-
tor comes on. To replace the Paper Dust Bag:
1. Disconnect the power cord from the electrical outlet. Pull
the Dust lid button (16) and remove the Dust lid outwards
to remove it from the cleaner.
2. Push downwards at the edge to the left of the plastic
holder, so that the bag loosens from the vacuum inlet of
the machine.
3. Grasp at the cardboard piece of the bag and gently pull
the full bag outwards - away from cleaner.
4. Insert a new paper dust bag into the slot of the bag holder
and push the bag in place. Check so that the paper dust
bag not is jammed in the holder.Only the cardboard piece
of the bag should be attached to the bag holder.
5. Push the bag holder with the new bag upwards, so that
the bag inlet fastens to the inlet of the machine. Make
sure that the bag is unfolded and will fi t in place in the
bag housing. Also check that the ”no bag” clip is placed to
the left so that the lid will be able to close.
6. Fit the two notches of the back cover to the two slots at
the lower part of the bag housing, and push the back
cover back in place at the housing.
EMPTYING THE CLOTH DUST BAG
Empty the Bag whenever the “Bag Full” Light (15) comes
on. To empty or to replace:
1. Remove cloth bag as above in steps 1-3.
Disconnect the power cord from the electrical outlet. Pull
the Dust lid button (16) and remove the Dust lid outwards
to remove it from the cleaner.
2. Push downwards at the edge to the left of the plastic
holder, so that the bag loosens from the vacuum inlet of
the machine.
3. Grasp at the plastic fl ange of the bag and gently pull the
bag outwards - away from cleaner.
4. Remove bag clip and shake out bag contents.
5. Put the bag clip back on the bag.
6. Replace clean/new cloth bag into machine
and close back cover as above in step 4-6.
Insert the cleaned/new cloth bag into the slot of the bag-
holder and push the bag in place so that bag is secured.
7. Push the bag holder with the new bag upwards, so that
the bag inlet fasten to the inlet of the machine. Make
sure that the bag is unfold and will fi t in place at the bag
housing. Also check that the ”no bag” clip is placed to the
left so that the lid will be able to close.
8. Fit the two notches of the back cover to the two slots at
the lower part of the bag housing, and push the back
cover back in place at the housing.
MAINTENANCE
1
2
1
2
3, 4 5
56
NOTE!
Photos belows shows changing of the paper dust bags!
Never operate the machine without a Dust Bag in place.
Always disconnect the power cord before
performing any machine maintenance.
33
44
Instruction for use Advance Spectrum 12 15 18 - 823 0102 020 E.indd 11Instruction for use Advance Spectrum 12 15 18 - 823 0102 020 E.indd 11 4/12/2011 2:25:30 PM4/12/2011 2:25:30 PM

12
12
34
23
46
7
1. Disconnect the power cord from the electrical outlet.
Push the Filter Cover Latch (19) downwards so that the
cover (18) is released. Remove the fi lter cover from cleaner.
2. Grasp at the fi lter frame and remove the used and dirty
HEPA-fi lter
3. Grasp at the fi lter frame and then insert the new HEPA fi lter
to the cleaner by pushing it in place. (Never touch the fi lter
media of a HEPA-fi lter! Doing so may cause a loss of
performance of the HEPA-fi lter).
4. Snap the Filter Cover back in place at the cleaner.
IMPORTANT!
Never operate the cleaner without the HEPA-Filter in place in the
machine. Note! These machines are not designed for picking up
hazardous - i.e. poisonous dust!
FILTERS - type of fi lter may vary from different models
On these machines there are two different fi lters; one pre-fi lter before the vacuum motor and one exhaust fi lter.
There are two different types of exhaust fi lters available to these machines, HEPA-fi lter and a standard exhaust fi lter. The HEPA-fi lter
(High Effi ciency Particulate Air filter) offers better fi ltration capacity then the standard exhaust fi lter. The exhaust fi lters catches any
dirt that may escape from the dust bag, or motor pre fi lter. Replace the motor pre fi lter every 5th time that the dust bag is changed
(more often in very dusty applications). The exhaust fi lters are located at the front side of the machine just above the brush base.
The HEPA fi lter can not be cleaned or washed clean. When the HEPA-fi lter is clogged it must be replaced. Replace the exhaust /
HEPA fi lter 1-2 times per year depending on amount of use.
1. Unplug the power cord from the electrical outlet.
2. Release the brush roller by unlocking the bearing
block. Push the button backwards left towards the
unlocking symbol at the brush housing.
3. Grasp at the bearing block and pull it out from the
brush housing.
4. Remove the used brush.
5. Replace the used brush roller with a new one, or
clean and remove all debris from the present brush.
6. Slide back the brush into the the fi xed bearing block
in the brush house.
7. Push the bearing block in its position. Lock it by
turning clockwise.
CHANGING THE HEPA-FILTER
CHANGING OR CLEANING OF THE BRUSH
Always disconnect the power cord before
performing any machine maintenance.
Instruction for use Advance Spectrum 12 15 18 - 823 0102 020 E.indd 12Instruction for use Advance Spectrum 12 15 18 - 823 0102 020 E.indd 12 4/12/2011 2:25:31 PM4/12/2011 2:25:31 PM

13
12
The pre fi lter catches any dirt spilled from the bag, before it can enter
the vacuum motor. The fi lter is located below the bag.
Clean or replace motor pre fi lter every 5th time that the bag is
changed. (more often in very dusty applications).
To clean/replace the Pre Filter.
1. Disconnect the power cord from the electrical outlet. Then push the
Dust lid button (16) in and remove the dust lid (5).
2 Grasp at the fi lter holder and pull the holder out from the Dust
compartment.
3. Remove the dirty fi lter from the fi lter holder and replace with a
new pre fi lter. The pre fi lter may also be washed. Wash it in warm
water. Let the fi lter dry completely before putting it back into the
fi lter holder.
4. This machine is also equipped with a deodorizer pad. It´s located
in the pre fi lter holder.
Replace it to a new deodorizer pad when the function begins to
fade.
5. Put back the new/washed fi lter into the holder. Then put back the
holder with fi lter in place in the bag housing.
6. Fit the two notches of the back cover to the two slots at the lower
part of the bag housing, and push the back cover back in place at
the housing.
IMPORTANT !
Never operate the machine without the pre-fi lter in place.
1. Disconnect the power cord from the electrical outlet.
Push the Filter Cover Latch (19) downwards so that the Filter
Cover (18) is released.
2. Remove the cover with the fi lter, from the cleaner.
3. Remove the used and dirty exhaust fi lter.
4. Insert a new exhaust fi lter to the fi lter cover.
5. Snap the Filter Cover back in place on the cleaner.
IMPORTANT !
Never operate the machine without the Exhaust Filter in place at
the machine.
CHANGING THE EXHAUST FILTER
1. Unplug the Power Cord from the electrical outlet.
2. If the machine is not cleaning as expected and the “Restricted
Airfl ow light” is not illuminated, open the dust housing to en-
sure that the dust bag is not full, replace it if necessary. See
also separate instructions for replacing the dust bag. Clean
the bag housing if necessary.
3. Wind up the cord (starting from the machine inlet side).
4. Store the cord on the hook at the Dust lid cover and the hook
at the handle.
5. Check the brush house. Remove any built-up carpet fi bers or
debris from the brush and the brush housing.
6. Store the machine indoors in a clean, dry place.
12
35
34
CLEANING OR CHANGING THE PRE FILTER
AFTER USING THE MACHINE
Instruction for use Advance Spectrum 12 15 18 - 823 0102 020 E.indd 13Instruction for use Advance Spectrum 12 15 18 - 823 0102 020 E.indd 13 4/12/2011 2:25:31 PM4/12/2011 2:25:31 PM

14
Consignes de sécurité importantes
Consignes de mise à la masse
Introduction
Pièces et entretien
Plaque signalétique
Déballage de l’appareil
Spécifi cations techniques
Il est indispensable de bien connaître l’appareil
Installation et montage
Utilisation de l’appareil
Utilisation du tube
Utilisation des accessoires
Maintenance
Remplacement du sac à poussière en papier
Remplacement du sac à poussière en tissu
Remplacement de la brosse
Remplacement du fi ltre HEPA
Remplacement du fi ltre d’évacuation
Nettoyage ou remplacement du préfi ltre
Après utilisation
........................................................... 15
...................................................................16
.................................................................................................17
..................................................................................... 17
........................................................................................ 17
.............................................................................. 17
...........................................................................17
........................................ 18
.............................................................................. 18
...............................................................................19
...................................................................................... 20
.........................................................................20
.............................................................................................. 21
........................................... 21
.............................................. 21
......................................................................22
....................................................................22
.........................................................23
.....................................................23
..........................................................................................23
SOMMAIRE
Instruction for use Advance Spectrum 12 15 18 - 823 0102 020 E.indd 14Instruction for use Advance Spectrum 12 15 18 - 823 0102 020 E.indd 14 4/12/2011 2:25:32 PM4/12/2011 2:25:32 PM

15
INSTRUCTIONS DE SÉCURITÉ IMPORTANTES
Toujours suivre certaines précautions élémentaires lors de l’utilisation d’un appareil électrique.
Lire toutes les instructions avant d’utiliser la machine.
Cette machine est adaptée à l’usage commercial, par exemple dans les hôtels, les écoles, les hôpitaux, les usines, les ma-
gasins et les bureaux.
CET APPAREIL NE DOIT ETRE UTILISE QU’A SEC!
NE PAS UTILISER SUR UNE SURFACE HUMIDE!
AVERTISSEMENT !
Pour réduire les risques d’incendie, de décharge électrique ou de blessures:
* Ne pas abandonner l’appareil s’il est branché. Débrancher l’alimentation secteur quand l’appareil n’est pas utilisé ou avant
l’entretien.
AVERTISSEMENT !
Pour réduire les risques de décharges électriques, ne pas utiliser l’appareil en extérieur ou sur des surfaces humides.
* Cet appareil n’est pas un jouet. Rester attentif quand il est utilisé par ou près des enfants.
* Utiliser l’appareil conformément aux instructions de la notice. Utiliser seulement les accessoires préconisés par le fabri-
cant.
* Ne pas utiliser l’appareil si le cable d’alimentation ou la prise est endommagé. Retourner l’appareil au centre de service
aprèsvente s’il ne fonctionne pas correctement, s’il est tombé, s’il a été endommagé, s’il a été laissé à l’extérieur ou s’il est
tombé dans l’eau.
* Ne pas tirer ou porter l’appareil par le cable d’alimentation, ou coincer le cable dans une porte ou tirer le cable sur des angles
vifs ou des coins. Ne pas faire passer l’appareil sur le cable. Eloigner le cable des surfaces chaudes.
* Ne pas débrancher l’appareil en tirant sur le cable d’alimentation, mais en saisissant la prise.
* Ne pas manipuler la prise, le cable d’alimentation ou l’appareil avec les mains humides.
* Ne rien introduire dans les ouvertures de l’appareil. Ne pas utiliser l’appareil si l’une des ouvertures est obstruée; éliminer
la poussière, les peluches, les cheveux et tout corps étranger pouvant gêner le fl ux d’air.
* Eloigner les vêtements amples, cheveux, doigts et toute autre partie du corps des pièces en mouvement et des ouvertures.
* Ne pas aspirer d’objets qui brûlent ou dégagent de la fumée, comme des cigarettes, des allumettes ou des cendres chau-
des, ni de poussières dangereuses pour la santé. Ne pas aspirer d’eau ou des liquides.
* Ne pas utiliser sans sac à poussière et/ou fi ltre en place.
* Placer toutes les commandes en position d’arrêt avant de débrancher l’appareil.
* Eviter d’aspirer des corps durs ou pointus.
* Etre particulièrement prudent en nettoyant les escaliers.
* Ne pas aspirer de liquides infl ammables ou combustibles, telle l’essence, et ne pas utiliser à proximité.
* Eviter d’aspirer des objets durs ou pointus.
* Ne pas modifi er les systèmes électriques, mécaniques ou thermiques.
* Remplacer le cable far un cable identique fourni far Advance.
CONSERVER CES INSTRUCTIONS
Instruction for use Advance Spectrum 12 15 18 - 823 0102 020 E.indd 15Instruction for use Advance Spectrum 12 15 18 - 823 0102 020 E.indd 15 4/12/2011 2:25:32 PM4/12/2011 2:25:32 PM

16 16
INST UCTIONS VISANT LA MISE À LA TERRE
Cet appareil doit être mis à la terre. En cas de défaillance ou de panne éventuelles, la mise a la terre fournit au courant
un chemin de moindre résistance qui réduit le risque de choc électrique. Cet appareil est pourvu d’un cordon muni d’un
conducteur de terre et d’une fi che avec broche de terre. La fi che doit être branchée dans une prise appropriee correcte-
ment installée et mise à la terre conformément aux règlements et ordonnances municipaux.
AVERTISSEMENT !
Un conducteur de terre mal raccordé peut entraîner un risque de choc électrique. Consulter un électricien ou un techni-
cien d’entretien qualifi é si vous n’êtes pas certain que la prise est correctement mise à la terre. Ne pas modifi er la fi che
fournie avec l’appareil - si elle ne peut être insérée dans la prise, faire installer une prise adéquate par un électricien
qualifi é.
Cet appareil est destiné à un circuit de 120 V et est muni d’une fi che de terre semblable à celle illustrée par le croquis 1.
Un adaptateur temporaire semblable à celui illustré par le croquis 2 et C peut être utilisé pour brancher cette fi che à une
prise bipolaire comme l’illustre le croquis 2 si une prise avec mise à la terre n’est pas disponible. L’adaptateur tempo-
raire devrait etre utilisé seulement jusqu’à ce qu’une prise avec mise à la terre
soit installée par un électricien qualifi é. L’oreille rigide ou le crochet ou autre dispositif semblable, de couleur verte,
prolongeant l’adaptateur doit Iêtre raccordé à un élément correctement mis à la terre comme le couvercle d’une boîte
de sortie mise à la terre. L’adaptateur doit être fi xé par une vis métallique. Note: Au Canada, I’utilisation d’un adaptateur
temporaire n’est pas autorisée par le Code canadien de l’électricité.
Remplacez la prise si la prise de terre est abîmée ou cassée.
Le fi l Vert (ou Vert/Jaune) dans la ganse est le fi l de terre. Lors du remplacement d´une prise, ce fi l doit être raccordé
à la prise de terre uniquement. Les ralonges connectées à cette machine doivent avoir 12 mesures, trois ganses de fi l
ayant trois fi ches masculines féminines tree-prong plugs
and outlets. N´UTILISEZ PAS de ralonge de plus de 15 m (50 pieds) de long.
VEUILLEZ NOTER: CES INSTRUCTIONS CONCERNENT UNIQUEMENT L’AMÉRIQUE DU NORD
BROCHE DE MISE À LA TERRE
PRISE MISE À LA TERRE
SORTIES
GROUPÉES
MISES À LA TERRE
ADAPTATEUR
VIS EN
MÉTAL
Figure 1 Figure 2
Figure 3
ONGLET POUR VIS DE MISE À LA TERRE
Instruction for use Advance Spectrum 12 15 18 - 823 0102 020 E.indd 16Instruction for use Advance Spectrum 12 15 18 - 823 0102 020 E.indd 16 4/12/2011 2:25:32 PM4/12/2011 2:25:32 PM

17
Pour en savoir plus, rendez-vous sur notre site Web à l’adresse suivante :
www.mn.nilfisk-advance.com
INTRODUCTION
Ce manuel est destiné à vous aider à tirer le meilleur parti de votre aspirateur.
Lisez-le attentivement avant d’utiliser l’appareil. Ce produit est destiné à un usage professionnel.
PIÈCES ET ENTRETIEN
Les réparations, le cas échéant, doivent être réalisées par votre Centre d’entretien agréé, dont le per-
sonnel est formé en usine et qui utilise exclusivement des accessoires et pièces de rechange d’origine.
Dans tous les cas, n’oubliez pas de préciser le modèle et le numéro de série de votre appareil.
PLAQUE SIGNALÉTIQUE
Le modèle et le numéro de série de votre appareil fi gurent sur sa plaque signalétique.
Ces informations sont indispensables lors de la commande des pièces de rechange. Utilisez l’espace
ci-dessous pour noter le modèle et le numéro de série de votre appareil pour référence.
MODÈLE____________________________________
NUMÉRO DE SÉRIE ___________________________________
DÉBALLAGE DE L’APPAREIL
À la livraison de l’appareil, vérifi ez soigneusement que le carton d’emballage et l’appareil n’ont pas été
endommagés dans le transport.
S’il est évident qu’ils ont subi des dommages, conservez le carton d’emballage en vue d’une inspection
future.
Contactez immédiatement le Service clientèle Advance en cas de dommages consécutifs au transport
de l’appareil.
USA : Nilfi sk-Advance Inc. 14600 21st Avenue North, Plymouth, MN 55447-3408, Tél. : (763) 745 3500
Canada: Nilfi sk-Advance Canada, 240 Superior Boulevard, Mississauga,
Ontario, L5T 2L2, Tel.: 905-564-1149
Pour en savoir plus, rendez-vous sur notre site Web à l’adresse suivante :
www.nilfi sk-advance.com
Modèle 12H, 12S, 15S
GU 12 SMU,
GU 15 SMU
12P, 12D, 15P, 18D
GU 12 DMU,
GU 15 DMU,
GU 18 DMU
Tension V/Hz 120/50-60 120/50-60
Puissance nominale W 1000 1200
Classe de protection (électricité) I I
Niveau de pression sonore dB(A) 69 69
Poids total lbs/kg 17.0 / 7.7 17.0 / 7.7
SPÉCIFICATION TECHNIQUE
(telle qu’installée et testée sur l’unité)
Instruction for use Advance Spectrum 12 15 18 - 823 0102 020 E.indd 17Instruction for use Advance Spectrum 12 15 18 - 823 0102 020 E.indd 17 4/12/2011 2:25:32 PM4/12/2011 2:25:32 PM

18
1
2
2
3
4
6
7
8
9
10
11
13
14
5
15
16
17
18 19
20
21
IL EST INDISPENSABLE DE BIEN
CONNAITRE L’APPAREIL
Lors de la lecture de ce manuel, vous rencontre-
rez parfois des chiffres en gras entre parenthèses,
par exemple : (2). Ces chiffres font référence à un
élément illustré sur cette page. Reportez-vous à
la page mentionnée en référence chaque fois que
nécessaire. Cela vous permettra de situer où se
trouve l’élément dont il est question dans le texte.
1 Poignée
2 Crochet porte cordon
3 Flexible d’aspiration
4 Bouton de verrouillage de la poignée
5 Couvercle du sac à poussière
6 Poignée de transport
7 Témoin lumineux vert
(uniquement sur les modèles DMU)
8 Témoin lumineux rouge
(uniquement sur le modèles DMU)
9 Boîtier de la brosse
10 Bouton de réglage de la hauteur de brosse
11 Pédale
13 Tube
14 Suceur plat
15 Témoin de sac plein
16 Bouton d’ouverture du couvercle du comparti-
ment du sac à poussière
17 Interrupteur d’alimentation
18 Capot du fi ltre d’aspiration
19 Loquet du capot de fi ltre
20 Pince de fi xation du cordon d’alimentation
21 Brosse ronde
22 Attache anti-traction (12H seulement)
INSTALLATION ET MONTAGE
1. Sortez délicatement l’aspirateur de son carton
d’emballage.
2. Insérez la poignée (1) dans l’ouverture située
au-dessus du compartiment du sac à poussière
jusqu’à ce que l’ergot soit en position et que la
poignée soit fi xée dans le boîtier.
N’utilisez jamais l’aspirateur sans sac à pous-
sière. Ces appareils sont dotés d’un clip d’ab-
sence de sac. Autrement dit, si aucun sac n’est
inséré ou s’il n’est pas correctement mis en
place, le couvercle du compartiment du sac à
poussière (5) ne peut pas se fermer.
IMPORTANT !
Utilisez la pédale pour
mettre la base en posi-
tion de fonctionnement/
repos. Le non-respect
de cette procédure peut
endommager le méca-
nisme de libération.
2
Insérez la poignée dans
l’ouverture au-dessus du
compartiment du sac à
poussière, jusqu’à ce que
le bouton sur la poignée se
mette en place.
Faites passer le câble à
travers le bridage de câble.
Sur le modèle 12H, con-
nectez la queue de cochon
et le câble d‘extension
comme indiqué.
3
22
Instruction for use Advance Spectrum 12 15 18 - 823 0102 020 E.indd 18Instruction for use Advance Spectrum 12 15 18 - 823 0102 020 E.indd 18 4/12/2011 2:25:32 PM4/12/2011 2:25:32 PM

19
UTILISATION DE l’ASPIRATEUR
1. Retirez le cordon d’alimentation des crochets porte-cordon (2)
situés à l’arrière de l’aspirateur. Faites pivoter le crochet inférieur
afi n de libérer le cordon. Déroulez tout le cordon d’alimentation.
2. Réglez la hauteur de la poignée en poussant le bouton de
verrouillage de la poignée (4), puis tirez ou poussez la poignée
jusqu’à atteindre une position d’utilisation confortable.
3. Attachez le câble au crochet et à l’attache anti-traction de la poi-
gnée pour éviter que le câble ne soit endommagé. Puis branchez
le cordon d’alimentation sur une prise de courant.
4. Mettez l’interrupteur d’alimentation (17) en position Marche. « l »
correspond à la position Marche et « O » à la position Arrêt. Le
moteur de l’aspirateur démarre.
5. Appuyez sur la pédale (11), puis inclinez l’aspirateur vers l’arrière.
Le moteur de la brosse démarre (modèles DMU uniquement).
Sur les modèles DMU, le voyant vert (7) situé sur le boîtier de la
brosse (9) s’allume pour indiquer que le moteur de la brosse est
opérationnel.
6. Tournez le bouton de réglage de la hauteur de brosse(10) afi n de
régler la hauteur de la brosse en fonction de la surface à aspirer.
Pour les tapis à poils ras, la brosse doit être en position la plus
basse. Tournez le bouton vers la gauche (lorsque vous êtes face
à l’appareil) pour abaisser la brosse. Pour les tapis à poils longs,
la brosse doit être en position la plus haute. Tournez le bouton
vers la droite (lorsque vous êtes face à l’appareil) pour régler
la brosse à son niveau supérieur. Si le voyant rouge s’allume,
tournez lentement le bouton dans le sens opposé jusqu’à ce qu’il
s’éteigne.
Si le voyant rouge (8) reste allumé, il se peut que des débris se
soient enroulés autour de la brosse pendant l’opération. Sur les
modèles bi-moteurs (DMU), cela peut déclencher le protecteur de
surcharge du moteur de la brosse. Si tel est le cas, mettez l’interrup-
teur principal (17) en position Arrêt et débranchez le cordon d’ali-
mentation. Retirez les débris de la brosse, branchez à nouveau le
cordon d’alimentation, mettez l’interrupteur principal (17) sur Marche.
Le protecteur de surcharge est automatiquement réinitialisé. Si le
protecteur de surcharge se déclenche constamment, contactez votre
revendeur. Pour plus d’informations sur les témoins lumineux des
modèles DMU, reportez-vous au tableau ci-dessous.
REMARQUE ! Débranchez toujours le cordon d’alimentation
avant toute opération de maintenance sur l’appareil.
Remplacez le sac lorsque le témoin de sac plein(15) s’allume.
Pour en savoir plus sur le remplacement du sac à poussière, reportez-
vos aux consignes appropriées dans ce manuel. Si le témoin s’allume
avant que le sac soit plein, l’intérieur du sac peut être recouvert de
poussière très fi ne (remplacez le sac), ou des débris peuvent s’être
amassés entre la brosse et le sac.
45
56
12
1
3
IMPORTANT !
Utilisez la pédale pour
mettre la base en position
de fonctionnement/repos.
Le non-respect de cette
procédure peut endom-
mager le mécanisme de
libération.
Position Position
inférieureinférieure
Position Position
supérieuresupérieure
Marche - Marche -
Arrêt Arrêt
TÉMOINS LUMINEUX ET FONCTION POUR LE MOTEUR DE LA BROSSE
(modèles DMU uniquement)
VERT ROUGE ÉTAT FONCTION
1. Allumé Éteint Fonctionnement
normal
En fonctionnement normal, le voyant vert reste allumé.
2. Éteint Allumé -
Cligno-
tant
Position de la brosse
trop basse (surface
d’aspiration
dense)
1. Si la condition 2 (voyant rouge clignotant) persiste pendant 10 secondes ou plus,
le module de commande coupera l’alimentation du moteur de la brosse.
2. Le voyant rouge reste allumé jusqu’à ce que vous éteignez l’aspirateur ou que
vous débranchiez le cordon d’alimentation.
3. Éteint Allumé Brosse bloquée 1. Le voyant rouge reste allumé et le module de commande coupe instantanément
l’alimentation du moteur de la brosse si la brosse est bloquée accidentellement.
2. Le voyant rouge reste allumé jusqu’à ce que vous éteignez l’aspirateur ou que
vous débranchiez le cordon d’alimentation.
Libération Libération
de la basede la base
Instruction for use Advance Spectrum 12 15 18 - 823 0102 020 E.indd 19Instruction for use Advance Spectrum 12 15 18 - 823 0102 020 E.indd 19 4/12/2011 2:25:35 PM4/12/2011 2:25:35 PM

20
12
12
33
UTILISATION DU TUBE (EN OPTION)
Le tube (13) n’est pas fourni en série sur tous les
modèles. Pour utiliser le tube, procédez comme
suit.
1. Poussez l’appareil en position verrouillée verti-
cale. Le moteur de la brosse s’arrête (modèle
DMU uniquement). Sur tous les autres modèles,
la brosse se relève et n’est plus en contact avec
la surface à aspirer. Retirez ensuite le tube de
son support.
2. Utilisez le tube pour nettoyer les surfaces diffi ci-
les d’accès telles que les coins ou le mobilier.
IMPORTANT !
Utilisez la pédale pour
mettre la base en posi-
tion de fonctionnement/
repos. Le non-respect
de cette procédure peut
endommager le méca-
nisme de libération de
de la poignée.
3. Installez le suceur plat ou la brosse ronde à
l’extrémité du tube, selon le cas. L’aspirateur
dispose ainsi d’une capacité de couverture sup-
plémentaire et peut être utilisé pour le nettoyage
de surfaces diffi ciles d’accès comme les plafonds
ou le mobilier.
IMPORTANT !
Utilisez la pédale pour
mettre la base en posi-
tion de fonctionnement/
repos. Le non-respect
de cette procédure peut
endommager le méca-
nisme de libération de
de la poignée.
UTILISATION DES OUTILS (EN OPTION)
Ces accessoires ne sont pas fournis en standard
sur tous les modèles.
Ils facilitent et améliorent le nettoyage des surfaces
diffi ciles d’accès. Un suceur plat (14) et une brosse
ronde (21) se trouvent derrière le tube, pour un
accès pratique.
Retirez le tube de l’aspirateur pour accéder aux
accessoires.
1. La brosse ronde se situe dans la partie supérieu-
re de l’aspirateur.
2. Le suceur plat se trouve dans la partie inférieure
de l’aspirateur
Instruction for use Advance Spectrum 12 15 18 - 823 0102 020 E.indd 20Instruction for use Advance Spectrum 12 15 18 - 823 0102 020 E.indd 20 4/12/2011 2:25:35 PM4/12/2011 2:25:35 PM
La page est en cours de chargement...
La page est en cours de chargement...
La page est en cours de chargement...
La page est en cours de chargement...
La page est en cours de chargement...
La page est en cours de chargement...
La page est en cours de chargement...
La page est en cours de chargement...
La page est en cours de chargement...
La page est en cours de chargement...
La page est en cours de chargement...
La page est en cours de chargement...
La page est en cours de chargement...
La page est en cours de chargement...
La page est en cours de chargement...
La page est en cours de chargement...
-
 1
1
-
 2
2
-
 3
3
-
 4
4
-
 5
5
-
 6
6
-
 7
7
-
 8
8
-
 9
9
-
 10
10
-
 11
11
-
 12
12
-
 13
13
-
 14
14
-
 15
15
-
 16
16
-
 17
17
-
 18
18
-
 19
19
-
 20
20
-
 21
21
-
 22
22
-
 23
23
-
 24
24
-
 25
25
-
 26
26
-
 27
27
-
 28
28
-
 29
29
-
 30
30
-
 31
31
-
 32
32
-
 33
33
-
 34
34
-
 35
35
-
 36
36


Nilfisk GU12H Le manuel du propriétaire
- Catégorie
- Aspirateurs
- Taper
- Le manuel du propriétaire
dans d''autres langues
- English: Nilfisk GU12H Owner's manual
- español: Nilfisk GU12H El manual del propietario