Cafe C7CDAASXXXXX Le manuel du propriétaire
- Catégorie
- Accessoires de préparation de café
- Taper
- Le manuel du propriétaire

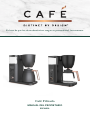
It’s time appliances had a personality. Yours.
Drip Coffee
OWNER’S MANUAL
ENGLISH/FRANÇAIS/ESPAÑOL
ESPAÑOL - Para consultar una version en español de este manual de
instrucciones, visite nuestro sitio de internet cafeappliances.com.

2
THANK YOU FOR MAKING CAFÉ A PART OF YOUR HOME.
We take pride in the craftsmanship, innovation and design that goes
into every Café product, and we think you will too. Among other things,
registration of your appliance ensures that we can deliver important product
information and warranty details when you need them.
Register your Café appliance now online. Helpful websites are available in
the Consumer Support section of this Owner’s Manual. You may also mail in
the pre-printed registration card included in the packing material.

3
Table of Contents
Model: C7CDAASXXXXX, C7CDABSXXXXX
SAFETY INFORMATION ...................................................4
COMPONENTS ...........................................................5
GETTING STARTED .......................................................6
ACCESSORIES ............................................................6
SETUP ...................................................................7
Clock .................................................................7
Strength ...............................................................8
Temperature ...........................................................9
BREWING ............................................................... 10
Auto Brew .............................................................11
WIFI SETUP ............................................................. 12
REGULATORY INFORMATION. . . . . . . . . . . . . . . . . . . . . . . . . . . . . . . . . . . . . . . . . . . . . .13
CARE AND CLEANING .....................................................14
TROUBLESHOOTING TIPS ................................................ 15
LIMITED WARRANTY ..................................................... 16
CONSUMER SUPPORT ....................................................17

4
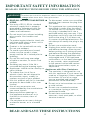
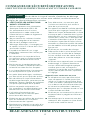
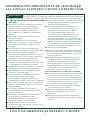
WARNING
To reduce the risk of fire, explosion, electric shock, or injury when using
your coee maker, always follow these basic safety precautions.
■ READ ALL INSTRUCTIONS BEFORE
USING
■ Use only a 120 V, 60 Hz standard
electrical supply that is properly
grounded in accordance with the
National Electric Code and local
codes and ordinances.
■ Do not touch hot surfaces including
glass carafe. Use handles and
knobs.
■ To protect against electric shock, do
not place cord, plug, or base unit in
water or other liquids.
■ Product is for household use only.
Do not use outdoors.
■ To avoid a possible burn hazard,
make sure the carafe is clean,
empty and the lid is locked prior to
brewing.
■ Do not let cord hang over edge
of table or counter, or touch a hot
surface.
■ Scalding may occur if the lid is
removed during the brewing cycle ..
■ Appliances should not be used by or
near children.
■ To reduce the risk of fire or
electric shock, do not attempt to
disassemble, repair, modify, or
replace any part of your product.
■ Use this product only for its intended
purpose as described in this user
manual.
■ Use of any accessories not
recommended by the manufacturer
can cause injuries.
■ Keep ventilation openings in
the appliance enclosures or in
the built-in structure, clear of
obstruction.
■ Do not place on or near a hot gas
or electric burner, or in a heated
oven.
■ To disconnect, make sure no coffee
brewing, then remove the plug from
wall outlet.
■ This appliance has a polarized plug
(one blade is wider than the other).
To reduce the risk of electric shock,
this plug is intended to fit into a
polarized outlet only one way. If the
plug does not fit fully into the outlet,
reverse the plug. If it still does not
fit, contact a qualified electrician. Do
not attempt to modify the plug in any
way.
■ Do not use an extension cord.
■ Unplug from outlet when not in use
and before cleaning. Allow to cool
before putting on or taking off parts,
and before cleaning the appliance.
■ Do not operate any appliance with
a damaged cord, if the appliance
malfunctions, or has been damaged
in any manner, return appliances
to the nearest authorized service
facility for examination, repair, or
adjustment.
Appliances with Glass Containers.
■ The container is designed for use
with this appliance. It must never be
used on a range top. (Unless specific
instructions for use on a range
top are provided and include the
precautions to be observed.)
■ Do not set a hot container on a wet
or cold surface.
■ Do not use a cracked container
or a container having a loose or
weakened handle.
■ Do not clean container with
cleansers, steel wool pads, or other
abrasive material.
IMPORTANT SAFETY INFORMATION
READ ALL INSTRUCTIONS BEFORE USING THE APPLIANCE
READ AND SAVE THESE INSTRUCTIONS

5
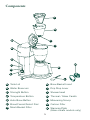
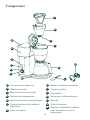
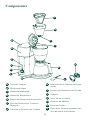
Components
A Tank Lid
B Water Reservoir
C Strength Button
D Temperature Button
E Auto Brew Button
F Brew/Cancel/Select Dial
G Mesh Basket Filter
H Brew Basket Insert
I Drip Stop Lever
J Showerhead
K Thermal / Glass Carafe
L Measuring Scoop
M Carbon Filter
N Warming Plate
(Glass carafe models only)
G
H
I
J
K
L
M
N
F
E
D
C
B
A

6
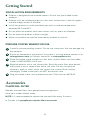
INSTALLATION REQUIREMENTS
■ Product is designed to be installed indoors. Do not use your coffee maker
outdoors.
■ Product must be installed upright on a flat, level surface that is able to support
the total weight when full of water.
■ Install the product in a well-ventilated area with an ambient temperature
between 55°F and 90°F.
■ Do not place the product near heat sources such as ovens or cooktops.
■ Do not place the product in direct sunlight.
■ Make sure product can not be accessed by children or animals.
CHARCOAL FILTER
Reorder charcoal filters from geappliances.com/ge/parts/.
Have your model number ready.
NOTE: It is recommended to replace the charcoal filter every 3 months.
In Canada, visit geappliances.ca/parts-filters-accessories
Getting Started
Accessories
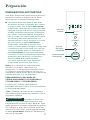
PREPARE COFFEE MAKER FOR USE
1 Carefully remove packing material. Do not use sharp tools that can damage the
box contents.
2 Ensure all components are present. If any item is missing, please contact us at
cafeappliances.com (in Canada, contact us at cafeappliances.ca).
3 Place the coffee maker upright on a flat, level surface. Make sure the coffee
maker is UNPLUGGED at this time.
4 Wipe the exterior with a soft, damp cloth. Wash the mesh filter, brew basket,
and carafe in warm, soapy water and a soft cloth. Do not use abrasive
cleansers, pads or cloths which can scratch the surface. Rinse and dry
thoroughly. Coffee maker parts are NOT dishwasher safe.
5 Plug the coffee maker into an electrical outlet. Clock flashes AM 12:00.

7
SetUp
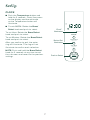
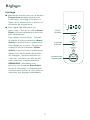
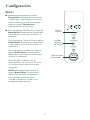
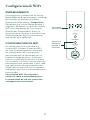
CLOCK
■ Push the Temperature button and
hold for 3 seconds. Clock illuminates
on the display and the white dot
on the Temperature button will
illuminate.
■ To set AM/PM: Rotate the Brew/
Select knob and push to select.
To set Hour: Rotate the Brew/Select
knob and push to select.
To set Minutes: Rotate the Brew/Select
knob and push to select.
After you confirm to quit, the outer
ring will illuminate. The ring will not
illuminate to confirm each selection.
NOTE: Push and hold the Brew/Select
knob for 3 seconds at any time to exit
the sub-menu and revert to the previous
settings.
Auto Brew
Hold to Program
Temperature
Hold to Set Clock
Strength
Hold to Descale
AM
Select
Brew
H
o
l
d
t
o
C
a
n
c
e
l
PM
Clock
Button Dot
Illuminates
“Clock”
Illuminates
Push to Select

8
SetUp
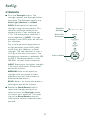
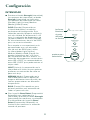
STRENGTH
■ Push the Strength button. The
strength options and Strength button
illuminate. The Strength options are
Gold, Light, Medium, and Bold.
GOLD: Brewing to the optimum
strength using set parameters. This
selection will brew coffee to the
highest quality. Cups available are
1 - 10. The temperature selection is
not changeable in GOLD. If at high
elevation, over 5000 feet, do not use
this selection.
For a more personal experience or
at high elevation (over 5000 feet)
utilize the Light, Medium, or Bold
strength. The cup selection is from 1
to 10 by whole cup increments. The
temperature selection is between 185
to 205°F. Recommendation is from
195-205° for best flavor extraction.
LIGHT: Brewing to the lighter strength
is for those who prefer a little lower
extraction of flavor.
MEDIUM: Brew to the optimum
strength with the option to brew
different cup sizes and to brew at
different temperatures.
BOLD: Bold is for those who prefer a
little higher extraction of flavor.
■ Rotate the Brew/Select knob to
select the strength and push to
select or push the Strength button
to confirm your selection. The outer
ring of the Brew/Select knob will
illuminate to confirm selection when
pushed.
Auto Brew
Temperature
Strength
Select
Brew
Strengths
Illuminate
Push to Select
Button Dot
Illuminates
Light Medium BoldGold
Hold to Program
Hold to Set Clock
Hold to Descale
H
o
l
d
C
a
n
c
e
l
to

9
SetUp
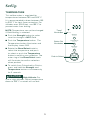
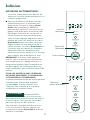
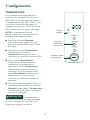
TEMPERATURE
This coffee maker is regulated for
temperatures between 185 and 205° F.
It is recommended to brew between 195
to 205° F for best flavor extraction. For
altitudes over 5000 feet, use 185° F to
prevent water from boiling.
NOTE: Temperature can not be changed
if Gold Setting is selected.
■ Push the Strength button to make
sure the strength is NOT Gold.
■ Push the Temperature button. The
Temperature button illuminates and
the display shows 200.
■ Rotate the Brew/Select knob to
select the temperature and push
to select or push the Temperature
button to confirm your selection. The
outer ring of the Brew/Select knob
will illuminate to confirm selection
when pushed.
■ To switch from Fahrenheit to Celsius,
press and hold the Strength and
Temperature buttons simultaneously
for 3 seconds.
CAUTION High Altitude: For
use in high altitudes, adjust temperature
down to 185° F so water will not boil.
Auto Brew
Temperature
Strength
Select
Brew
°F
Temp
Button Dot
Illuminates
“Temp”
Illuminates
Push to Select
Hold to Program
Hold to Set Clock
Hold to Descale
H
o
l
d
C
a
n
c
e
l
to

10
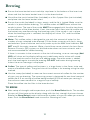
Brewing
■ Ensure the brew basket insert and drip stop lever in the bottom of the insert are
clean and that the brew basket insert is in the brew basket.
■ Use either the mesh basket filter (included) or a No. 4 paper filter (not included)
and place into the brew basket insert.
■ Ensure the carafe (included) is clean, empty, and the lid is locked. Make sure the
carafe is in place before brewing. This coffee maker will NOT brew without the
carafe in place. The top of the carafe MUST be engaged with the drip stop lever
on the bottom of the brew basket. If not, the water won’t flow into the carafe and
the basket may overflow during the brewing cycle. If the carafe is not in place
when the brewing cycle is selected, the display will show “Err” and the coffee
maker will chime.
■ Water: This coffee maker is designed to use only the amount of water for the
number of cups selected to be brewed. Fill the water reservoir with fresh, clean,
and odorless (free of chlorine and sulfur) water up to the MAX level indicator. DO
NOT overfill the water reservoir. Water should have some minerals for best flavor.
Reverse Osmosis (RO) systems or distilled water does not have minerals and is
not recommended for coffee brewing.
If there is no water in the reservoir at the start of brewing, an error message (Add
H2O) will show on the display telling you to add water and a chime will sound.
Push the knob to confirm that you are adding water. Once the water is added,
push the knob again to continue brewing. DO NOT add water during brewing
unless the error message is displayed.
■ Coffee: The type of coffee and freshness is a large factor in the flavor, taste and
aroma of brewed coffee. The grind size of the coffee is for brewing using the drip
method.
■ Use the scoop (included) to measure the correct amount of coffee for the number
of cups you are brewing. The measuring scoop is designed for one level scoop of
coffee per 4.5 oz serving of coffee being brewed (4.5 oz of water per serving is
the common measurement for a regular cup of coffee).
Place the coffee into the filter in the brew basket.
TO BREW:
■ After setup of strength and temperature, push the Brew/Select knob. The number
of cups will illuminate on the display along with the last strength that was chosen.
Rotate the Brew/Select knob to choose the number of cups of coffee you want to
brew. Push the Brew/Select knob to confirm. Brewing will start.

11
Brewing
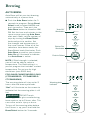
AUTO BREW:
Auto Brew will let you start brewing
automatically at a preset time.
■ Push the Auto Brew button for 3
seconds to program. Rotate Brew/
Select knob to select AM/PM and
push to confirm. Then push the
Auto Brew button to reconfirm AM/
PM. Set the hour and minutes in the
same manner pressing Auto Brew
after each. Next, set the number of
cups by turning the Brew/Select
knob and push to confirm. Set
the strength and temperature in
the same manner. Once all of the
selections have been made, the
Brew/Select knob illuminates. Push
Auto Brew to confirm your choices.
Auto On will illuminate to indicate
that Auto Brew is active.
NOTE: If Gold strength is selected,
you will not be able to select a
temperature. The Gold setting is a
pre-set program that includes a select
temperature. Do not use for high
elevations (over 5000 feet).
FOR GLASS CARAFE MODELS ONLY
(C7CDABS2RS3 / C7CDABS3RD3 /
C7CDABS4RW3)
The warming plate will stay on for 2
hours after the brew cycle ends.
“Hot” will illuminate on the screen to
indicate that the warming plate is still
hot.
WARNING DO NOT touch
warming plate or glass carafe during
brew cycle or up to 2 hours after. This
can cause serious injury or burns.
To turn off the warming plate before
the 2 hours is up, press and hold the
Brew/Select button for 3 seconds.
Auto Brew
Temperature
Strength
Select
Brew
PM
Auto On
“Auto On”
Illuminates
Push to Select
Button Dot
Illuminates
Hold to Program
Hold to Set Clock
Hold to Descale
H
o
l
d
C
a
n
c
e
l
to
Auto Brew
Temperature
Strength
Select
Brew
PM
Hot
Warming plate
indicator
Hold to Program
Hold to Set Clock
Hold to Descale
H
o
l
d
C
a
n
c
e
l
to

12
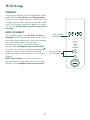
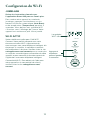
WiFi Setup
PAIRING
To put your device into Pairing Mode, press
and hold the Auto Brew and Temperature
buttons at the same time for 3 seconds. You
should see the WiFi symbol illuminate under
the Time Display. Now your device is ready
for Pairing. Follow the instructions given in
the app.
WIFI CONNECT
Your coffee maker is Café WiFi Connect
Enabled. A WiFi communication card is built
into the product allowing it to communicate
with your Smart Phone for remote
monitoring, control, and notifications.
Please visit cafeappliances.com/connect
to learn more about connected appliance
features, and to learn what connected
appliance App’s will work with your Smart
Phone.
WiFi Connectivity: For assistance with
the appliance or the network connectivity,
please visit cafeappliances.com/connect.
Auto Brew
Temperature
Strength
Select
Brew
PM
Auto On
WiFi symbol
Illuminates
Press and hold
for 3 seconds Hold to Program
Hold to Set Clock
Hold to Descale
H
o
l
d
C
a
n
c
e
l
to

13
Regulatory Information
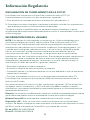
FCC/IC COMPLIANCE STATEMENT:
This device complies with Part 15 of the FCC Rules. Operation is subject to the
following two conditions:
1. This device may not cause harmful interference, and
2. This device must accept any interference received, including interference that
may cause undesired operation.
Any changes or modifications not expressly approved by the party responsible for
compliance could void the user’s authority to operate the equipment.
INFORMATION TO USER
NOTE: This equipment has been tested and found to comply with the limits for
a Class B digital device, pursuant to Part 15 of the FCC Rules. These limits are
designed to provide reasonable protection against harmful interference in a
residential installation. This equipment generates uses and can radiate radio
frequency energy and, if not installed and used in accordance with the instructions,
may cause harmful interference to radio communications. However, there is no
guarantee that interference will not occur in a particular installation. If this equipment
does cause harmful interference to radio or television reception, which can be
determined by turning the equipment off and on, the user is encouraged to try to
correct the interference by one or more of the following measures:
• Reorient or relocate the receiving antenna.
• Increase the separation between the equipment and receiver.
• Connect the equipment to an outlet on a circuit different from that to which the
receiver is connected.
• Consult the dealer or an experienced radio/television technician for help.
This device complies with Industry Canada license-exempt RSS standard(s).
Operation is subject to the following two conditions: (1) This device may not cause
interference, and (2) This device must accept any interference, including interference
that may cause undesired operation of the device.
Labeling: Changes or modifications to this unit not expressly approved by the
manufacturer could void the user’s authority to operate the equipment.
ConnectPlus module only (or similar communication module)
RF Exposure - This device is only authorized for use in mobile applications. At least
20 cm of the separation distance between the ConnectPlus device and the user’s
body must be maintained at all times.
FCC ID: ZKJ-WCATA008
IC ID: 10229A-WCATA008

14
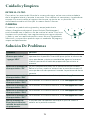
Care and Cleaning
CAUTION
Always unplug your coffee maker before cleaning.
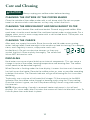
CLEANING THE OUTSIDE OF THE COFFEE MAKER
Clean the outside of the coffee maker with a soft, damp cloth. Do not use paper
towels or abrasive cloths and cleaners as they may scratch the finish.
CLEANING THE BREW BASKET AND MESH BASKET FILTER
Remove the mesh basket filter and brew basket. Discard any ground coffee. After
each brew, rinse the mesh basket filter and brew basket under running water. For a
deeper clean, wash in warm soapy water with a soft bristled brush. These parts are
NOT dishwasher safe.
CLEANING THE CARAFE
After each use, empty the carafe. Rinse the carafe and lid under warm running
water. Letting coffee stand overnight in the carafe can lead to staining. For a deeper
clean, wash regularly in warm, soapy water and a soft
bristled brush. Do not use abrasive cleaners as they may
scratch the finish. Rinse and dry thoroughly. The carafe and
lid are NOT dishwasher safe.
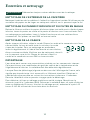
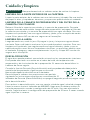
DESCALING
Hard water can cause mineral build-up on internal components. This can cause a
change in taste of the coffee, brewing temperature and brewing flow. The coffee
maker needs to be descaled regularly.
When Descale is flashing under the time display, it means that too much limescale
has built up on the heater. Descale the coffee maker as soon as possible according
to below instruction. The Descale indicator will go off following the first rinse after
descaling.
To descale, use a mixture of half water/half vinegar. Fill the reservoir to the MAX
indicator. Run the coffee maker through a brewing cycle using the 10 cup setting.
Once the mixture is gone, run the 10 cup brew setting 3 times using clear water in
the reservoir.
NOTE: When descaling, if carafe is removed, heater and pump is shut off and
displays “Err” error code, after 2 minutes the screen will return to idle clock state. To
fix error place the carafe back in place.
Descale
PM

15
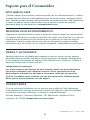
Care and Cleaning
Troubleshooting Tips
CAUTION
Always unplug your coffee maker before cleaning.
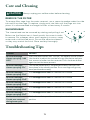
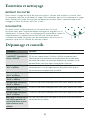
REMOVE THE FILTER
To remove filter cage from the water reservoir, use a spoon to wedge under the side
tab and lift up the cage. To replace, simply push into hole until the cage sets into
place. It is recommended to change the filter at least every 3 months.
SHOWERHEAD
The showerhead can be removed by rotating and pulling it out.
Make sure the Unlock icon is lined up with the arrow in order
to remove. For a deeper clean, wash regularly in warm, soapy
water and a soft bristled brush. Do not use abrasive cleaners
as they may scratch the finish. Rinse and dry thoroughly.
Problem Solution
An error message
shows up saying “add
H2O”
Press the brew button and “10 cups” will appear on the screen.
Use the dial to adjust the number of cups you desire and pour
that amount of water into the reservoir. Press the brew button
again to start the brew process.
An Error message
shows up saying “Err”
The carafe (coffee pot) is not placed correctly. Remove and
then place in the correct position. Error message will go way
once positioned correctly.
An Error message
shows up saying “Err1”
Visit cafeappliances.com for additional assistance
An Error message
shows up saying “Err2”
Visit cafeappliances.com for additional assistance
An Error message
shows up saying “Err3”
Visit cafeappliances.com for additional assistance
An Error message
shows up saying “Err4”
Visit cafeappliances.com for additional assistance
An Error message
shows up saying “Err7”
Visit cafeappliances.com for additional assistance
No Error code, but
Carafe was removed
during brew cycle
Coffee flow will stop until carafe is replaced in the correct
position.

16
Limited Warranty
■ Improper installation, delivery or
maintenance.
■ Failure of the product if it is abused,
misused, or used for other than the
intended purpose or used commercially.
■ Damage caused after delivery.
■ Damage to the product caused by
accident, fire, floods or acts of God.
■ Incidental or consequential damage
caused by possible defects with this
appliance.
■ Software bugs that can be corrected with
an update via the Café App
■ Labor and other charges to install and/or
remove the product
What Café Appliances Will Not Cover:
For the Period of: Café Appliances Covers
One Year
From the date
of the original
purchase
If the Coffee Maker fails due to a defect in materials or workmanship,
during the limited one-year warranty, GE Appliances will either replace or
refurbish your product with a new or remanufactured product, or refund
the purchase price of the product at GE Appliances sole discretion.
If your appliance fails to operate properly while in use under normal household
conditions within the warranty period, visit cafeappliances.com/support for product
care/maintenance self-help.
In Canada, visit service.geappliances.ca/servicio/en_CA/.
To initiate a warranty claim, please visit cafeappliances.com/support/returns/, or call
1-800-430-1757. Please have your model number and serial number available. Return
and packing instruction information will be provided at that time.
In Canada, contact us at cafeappliances.ca
EXCLUSION OF IMPLIED WARRANTIES
Your sole and exclusive remedies are product exchange or refund as provided in
this Limited Warranty. Any implied warranties, including the implied warranties of
merchantability or fitness for a particular purpose, are limited to one year or the
shortest period allowed by law.
For sale in the 50 United States, District of Columbia, and Canada only:
This limited warranty is extended to the original purchaser for products purchased for home
use within the USA. In Alaska and Hawaii, the limited warranty does not include the costs of
shipping units. California residents may gave additional return options. Please ask call center
for additional information.
Some states do not allow the exclusion or limitation of incidental or consequential
damages. This warranty gives you specific legal rights, and you may also have other rights
which vary from state to state. To know what your legal rights are, consult your local or
state consumer affairs office or your state’s Attorney General.
Warrantor: GE Appliances, a Haier company
Louisville, KY 40225
For Customers in Canada: This limited warranty is extended to the original purchaser and
any succeeding owner for products purchased in Canada for home use within Canada.
In-home warrant service will be provided in areas where it is available and deemed
reasonable by Mabe to provide. For extended warranty information, visit geappliances.ca/
purchase-extended-warranty
Warrantor Canada: MC Commercial, Burlington, Ontario, L7R 5B6

17
49-9000019 Rev. 3 04-23 GEA
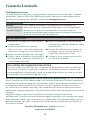
Consumer Support
CONTACT US
If you are not satisfied with the service you receive from Café Appliances, contact
us on our Website with all the details including your phone number, or write to:
General Manager,
General Manager, Customer Relations | GE Appliances, Appliance Park |
Louisville, KY 40225
cafeappliances.com/contact
In Canada: Director, Customer Relations | MC Commercial Inc. | Suite 300,
5420 North Service Road, Burlington | Ontario L7L 6C7
cafeappliances.ca/support/contact-us
CAFÉ WEBSITE
Have a question or need assistance with your appliance? Try the Café Appliances
Website 24 hours a day, any day of the year! You can also shop for more great
Café Appliances products and take advantage of all our on-line support services
designed for your convenience. cafeappliances.com
In Canada: cafeappliances.ca
REGISTER YOUR APPLIANCE
Register your new appliance on-line at your convenience! Timely product
registration will allow for enhanced communication and prompt service under the
terms of your warranty, should the need arise. You may also mail in the pre-printed
registration card included in the packing material. cafeappliances.com/register
In Canada,
service.geappliances.ca/servicio/en_CA/
PARTS AND ACCESSORIES
Individuals qualified to service their own appliances can have parts or accessories
sent directly to their homes
(VISA, MasterCard and Discover cards are accepted). Order on-line today 24
hours every day.
cafeappliances.com/parts
In Canada: geappliances.ca/parts-filters-accessories
Instructions contained in this manual cover procedures to be performed by
any user. Other servicing generally should be referred to qualified service
personnel. Caution must be exercised, since improper servicing may cause
unsafe operation.


Il est temps que les électroménagers se dotent d’une personnalité. La vôtre.
Café filtre
MANUEL D’UTILISATION
FRANÇAIS

2
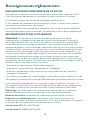
NOUS VOUS REMERCIONS D’ACCUEILLIR CAFE CHEZ VOUS
Que vous ayez grandi avec Cafe ou qu’il s’agisse de votre première acquisition, nous
sommes heureux de vous accueillir dans notre famille.
Nous sommes fiers du savoir-faire, de l’innovation et de l’esthétique qui composent
chaque appareil Cafe, et nous pensons que vous le serez aussi. Dans cette optique,
nous vous rappelons que l’enregistrement de votre électroménager vous assure la
communication de renseignements importants sur le produit et la garantie lorsque
vous en avez besoin.
La page est en cours de chargement...
La page est en cours de chargement...
La page est en cours de chargement...
La page est en cours de chargement...
La page est en cours de chargement...
La page est en cours de chargement...
La page est en cours de chargement...
La page est en cours de chargement...
La page est en cours de chargement...
La page est en cours de chargement...
La page est en cours de chargement...
La page est en cours de chargement...
La page est en cours de chargement...
La page est en cours de chargement...
La page est en cours de chargement...
La page est en cours de chargement...
La page est en cours de chargement...
La page est en cours de chargement...
La page est en cours de chargement...
La page est en cours de chargement...
La page est en cours de chargement...
La page est en cours de chargement...
La page est en cours de chargement...
La page est en cours de chargement...
La page est en cours de chargement...
La page est en cours de chargement...
La page est en cours de chargement...
La page est en cours de chargement...
La page est en cours de chargement...
La page est en cours de chargement...
La page est en cours de chargement...
La page est en cours de chargement...
La page est en cours de chargement...
La page est en cours de chargement...
La page est en cours de chargement...
La page est en cours de chargement...
-
 1
1
-
 2
2
-
 3
3
-
 4
4
-
 5
5
-
 6
6
-
 7
7
-
 8
8
-
 9
9
-
 10
10
-
 11
11
-
 12
12
-
 13
13
-
 14
14
-
 15
15
-
 16
16
-
 17
17
-
 18
18
-
 19
19
-
 20
20
-
 21
21
-
 22
22
-
 23
23
-
 24
24
-
 25
25
-
 26
26
-
 27
27
-
 28
28
-
 29
29
-
 30
30
-
 31
31
-
 32
32
-
 33
33
-
 34
34
-
 35
35
-
 36
36
-
 37
37
-
 38
38
-
 39
39
-
 40
40
-
 41
41
-
 42
42
-
 43
43
-
 44
44
-
 45
45
-
 46
46
-
 47
47
-
 48
48
-
 49
49
-
 50
50
-
 51
51
-
 52
52
-
 53
53
-
 54
54
-
 55
55
-
 56
56


Cafe C7CDAASXXXXX Le manuel du propriétaire
- Catégorie
- Accessoires de préparation de café
- Taper
- Le manuel du propriétaire
dans d''autres langues
- English: Cafe C7CDAASXXXXX Owner's manual
- español: Cafe C7CDAASXXXXX El manual del propietario
Autres documents
-
 GE Cafe C7CDAAS4PW3 Le manuel du propriétaire
-
KitchenAid KCM223AOB0 Le manuel du propriétaire
-
-
-
Breville BDC650 the Grind Control Instruction book
-
Braun KF 7170 Instructions Manual
-
-
Hamilton Beach 49911 Mode d'emploi
-
Braun KF7170SI Manuel utilisateur
