
Write the model and serial
numbers here:
Model # _________________
Serial # _________________
You can find them on a label on
the bottom of the disposer.
GE is a trademark of the General Electric Company. Manufactured under trademark license.
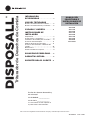
OWNER’S MANUAL
AND INSTALLATION
INSTRUCTIONS
DISPOSALL
®
49-5903-3 12-18 GEA
ENGLISH/FRANÇAIS/
ESPAÑOL
SAFETY INFORMATION ..........3
USING THE DISPOSER
Continuous Feed Models ................5
Batch Feed Models .....................5
CARE AND CLEANING .............6
INSTALLATION INSTRUCTIONS
Preparation ...........................7
Components and Installation ............8
Installation of Sink Flange ..............8
Dishwasher Connection .................9
Attach the Discharge Elbow .............9
Connect Disposer to Sink Flange .......10
Dimensions .......................... 11
Some Typical Installations ............. 11
TROUBLESHOOTING ............12
LIMITED WARRANTY ...........15
CONSUMER SUPPORT ..........16
Food Waste Disposer
GFC320N
GFC325N
GFC520N
GFC525N
GFC530N
GFC535N
GFC720N
GFB760N
GFC1020N

2 49-5903-3
THANK YOU FOR MAKING GE APPLIANCES A PART OF YOUR HOME.
Whether you grew up with GE Appliances, or this is your first, we’re happy to have you in the family.
We take pride in the craftsmanship, innovation and design that goes into every GE Appliances
product, and we think you will too. Among other things, registration of your appliance ensures that we
can deliver important product information and warranty details when you need them.
Register your GE appliance now online. Helpful websites and phone numbers are available in the
Consumer Support section of this Owner’s Manual. You may also mail in the pre-printed registration
card included in the packing material.

49-5903-3 3
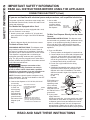
IMPORTANT SAFETY INFORMATION
READ ALL INSTRUCTIONS BEFORE USING THE APPLIANCE
SAFETY INFORMATION
WARNING
For your safety, the information in this manual must be followed to minimize
the risk of fire, explosion, electric shock, and to prevent property damage, personal injury,
or death.
WARNING
WHEN USING YOUR ELECTRICAL APPLIANCES, BASIC SAFETY
PRECAUTIONS SHOULD BE FOLLOWED, INCLUDING THE FOLLOWING:
Ŷ 8VHWKLVDSSOLDQFHRQO\IRULWVLQWHQGHGSXUSRVHDV
described in this Owner’s Manual.
Ŷ 5HDGDOOWKHLQVWUXFWLRQVEHIRUHXVLQJWKHDSSOLDQFH
Ŷ 7RUHGXFHWKHULVNRILQMXU\FORVHVXSHUYLVLRQLV
required when a disposer is used near children.
Ŷ 'RQRWSXWILQJHUVRUKDQGVLQWRDZDVWHGLVSRVHU
Ŷ 7XUQWKHSRZHUVZLWFKWRWKH2))SRVLWLRQEHIRUH
DWWHPSWLQJWRFOHDUDMDPRUUHPRYHDQREMHFWIURP
the disposer.
Ŷ :KHQDWWHPSWLQJWRORRVHQDMDPLQDZDVWH
GLVSRVHUXVHDORQJZRRGHQREMHFWVXFKDVD
wooden spoon or the wooden handle of a broom or
mop.
Ŷ :KHQDWWHPSWLQJWRUHPRYHREMHFWVIURPDZDVWH
disposer, use long-handled tongs or pliers. If
the disposer is magnetically actuated, use only
nonmagnetic tools.
Ŷ 7RUHGXFHWKHULVNRILQMXU\E\PDWHULDOVWKDWPD\
be expelled by a waste disposer, do not put the
following into a disposer:
a. Clam or oyster shells
b. Caustic drain cleaners or similar products
c. Glass, china or plastic
d. Large whole bones
e. Metal, such as bottle caps, tin cans, utensils
or aluminum foil
f. Hot grease or other hot liquids
g. Whole corn husks
Ŷ :KHQQRWRSHUDWLQJDGLVSRVHUOHDYHWKHGUDLQ
VWRSSHULQSODFHWRUHGXFHWKHULVNRIREMHFWVIDOOLQJ
into the disposer.
Ŷ )RUSURSHUJURXQGLQJLQVWUXFWLRQVVHHWKH
CONNECTING ELECTRICITY portion of this
manual.
READ AND SAVE THESE INSTRUCTIONS
If you are not familiar with electrical power and procedures, call a qualified electrician.
WARNING
Improper connection of
the equipment-grounding conductor can
result in a risk of electric shock. Check
with a qualified electrician or serviceman
if you are in doubt as to whether the
appliance is properly grounded. Do
not modify the plug provided with the
appliance if it will not fit the outlet; have
a proper outlet installed by a qualified
electrician.
For Models Equipped with a Grounded Cord:
GROUNDING INSTRUCTIONS: 7KLVGLVSRVHUPXVW
be grounded to reduce the risk of electric shock in
the event of a malfunction or breakdown. Grounding
provides a path of least resistance for electric current.
7KLVGLVSRVHULVHTXLSSHGZLWKDFRUGKDYLQJDQ
equipment-grounding conductor and a grounding
SOXJ7KHSOXJPXVWEHSOXJJHGLQWRDQRXWOHWWKDWLV
properly installed and grounded in accordance with all
local codes and ordinances.
CONNECTING ELECTRICITY

4 49-5903-3
SAFETY INFORMATION
IMPORTANT SAFETY INFORMATION
READ ALL INSTRUCTIONS BEFORE USING THE APPLIANCE
If you are not familiar with electrical power and procedures, call a qualified electrician.
7KHSRZHUFRUGDQGRUFRQQHFWLRQVPXVWFRPSO\ZLWK
WKH1DWLRQDO(OHFWULFDO&RGH6HFWLRQDQGRUORFDO
codes and ordinances.
For Models Not Equipped with a Cord:
If your disposer does not come equipped with a cord,
you can connect it in two ways:
1. Attach a power cord, minimum 18” in length and
QRWWRH[FHHG´LQOHQJWK8VH*($3DUW1XPEHU
30;
or
2. Wire the disposer directly into the house current.
To Attach a Power Cord:
GROUNDING INSTRUCTIONS: 7KLVGLVSRVHUPXVW
be grounded to reduce the risk of electric shock in
the event of a malfunction or breakdown. Grounding
provides a path of least resistance for electric current.
7KLVGLVSRVHULVHTXLSSHGZLWKDFRUGKDYLQJDQ
equipment-grounding conductor and a grounding
SOXJ7KHSOXJPXVWEHSOXJJHGLQWRDQRXWOHWWKDWLV
properly installed and grounded in accordance with all
local codes and ordinances.
WARNING
Improper connection of the
equipment-grounding conductor can result in
a risk of electric shock. Check with a qualified
electrician or serviceman if you are in doubt as to
whether the appliance is properly grounded.
NOTE: 'LVFRQQHFWHOHFWULFSRZHUWRGLVSRVHUFLUFXLW
EHIRUHLQVWDOODWLRQ7XUQWKHFLUFXLWEUHDNHUWRWKH2))
position or remove the fuse.
A. Connect the disposer to 110-120 Volt, 60 Hz AC
current only.
B. If a plug-in cord
is used, use
a three prong
plug. Ground
wire should be
attached to the
ground screw in
the bottom of the
disposer (end
bell).
&8VHDFDEOH
clamp strain relief
connector where
power cord enters
the disposer.
To Wire Your Disposer Directly into the House
Current:
GROUNDING INSTRUCTIONS: 7KLVGLVSRVHUPXVW
be connected to a grounded, metal, permanent wiring
system; or an equipment-grounding conductor must
be run with the circuit conductors and connected
to the equipment-grounding terminal or lead on the
appliance.
$,I\RXXVH%;FDEOH
7KHVHSURGXFWVDUHGHVLJQHGIRUKRXVHKROGXVH
2. Connect white wire to white lead of disposer with
a wire nut. Connect black wire to black lead of
disposer with a wire nut. Connect bare ground
ZLUHWRWKHJURXQGVFUHZ7KHJURXQGZLUHVKRXOG
be clamped and held by a strain relief.
'RQRWXVHDULJLGFRQGXLWIRUWKHZLULQJ
connection.
4. A dedicated acceptable motor switch, with the
off position marked, shall be provided for this
GLVSRVHUDWWKHWLPHRILQVWDOODWLRQ7KHVZLWFK
shall be mounted in sight of the disposer or the
sink opening
for the
disposer.
,I%;FDEOHLVQRW
used, provide a
separate ground
wire to nearest
reliable ground,
using the screw in
the end bell for the
ground wire.
B. If your power
supply does not
include a ground wire, you must provide one unless
metal cable is used. Attach a copper wire securely
to disposer ground screw and attach other end of
ZLUHWRDUHOLDEOHJURXQG8VHRQO\8/DSSURYHG
ground clamp. If plastic pipe is used in your home,
a qualified electrician should install a proper ground.
CONNECTING ELECTRICITY (Cont)
READ AND SAVE THESE INSTRUCTIONS
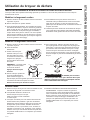
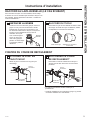
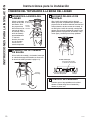
7UDFHOHDGFRQQHFWHG
to this blade and attach
that lead to white wire
on disposer
NOTE: When viewing face of
electrical plug with grounding
pin at top, the larger left blade is
connected to the identified wire.
Ribbed
Side
Strain
Relief
Nut
Heyco Box
Connectors
3DUW1R
Red
Reset
Button
Remove
Bottom Cap
Wire Nuts
Ground Screw
7R+RXVH
Current
RU3RZHU
Cord
%RWWRPRIWKH'LVSRVHUHQGEHOO

49-5903-3
USING THE DISPOSER
Using the Disposer
READ ALL SAFETY INSTRUCTIONS ON PAGES 3 AND 4 BEFORE USING THIS DISPOSER.
7KLVGLVSRVHUXVHVDQWLMDPVZLYHOLPSHOOHUVWKDWPDNHDFOLFNLQJVRXQGDVWKH\VZLQJLQWRSODFH7KLVLQGLFDWHV
normal operation.
Continuous Feed Models
A. Remove the sink stopper and turn on a medium flow
of cold water.
B.7XUQWKHVZLWFKWR21
C.6FUDSHLQIRRGZDVWH7RVSHHGXSIRRGZDVWH
disposal, cut or break up large bones, rinds and
cobs. Large bones and fibrous husks require
considerable grinding time and are more easily
WKURZQDZD\ZLWKRWKHUWUDVK'RQRWEHDODUPHGWKDW
WKHGLVSRVHUVORZVGRZQZKLOHJULQGLQJ7KHGLVSRVHU
is actually increasing torque (grinding power) and is
operating under normal conditions.
D. Before turning the disposer off, let the water and
WKHGLVSRVHUUXQIRUDSSUR[LPDWHO\VHFRQGV
DIWHUVKUHGGLQJVWRSV7KLVDVVXUHVWKDWDOOZDVWHLV
thoroughly flushed through the trap and drain.
E. 'RQRWXVHKRWZDWHUZKLOHUXQQLQJWKHGLVSRVHU&ROG
water will keep food waste and fats solid so they can
be flushed down the drain.
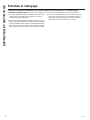
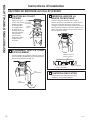
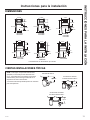
Batch Feed Models
A. Remove the sink stopper and turn on a medium flow
of cold water.
B. Scrape in food waste.
C. Inset the stopper to
start the disposer. One
of the 2 small slots in
the stopper base must
line up with the switch
plunger inside the neck
of the disposer.
NOTE: 7KHRYDOVKDSHG
handle aligns with the 2
small slots in the stopper.
Push down firmly to start.
D.5XQWKHGLVSRVHUIRU
seconds after shredding
VWRSV7KLVDVVXUHVWKDWDOO
waste is thoroughly flushed
through the trap and drain.
Lift the stopper to shut the disposer off.
E. 7RILOOWKHVLQNLQVHUWWKHVWRSSHUVRWKDWWKHODUJHVW
VORWOLQHVXSZLWKWKHVZLWFKSOXQJHU7KHVWRSSHU
can now be pushed down to seal the sink without
starting the disposer. When the medium-sized slot in
the stopper base is lined up with the switch plunger,
water can drain, but tableware, etc., cannot be
accidentally dropped into the disposer.
WARNING
Do not tamper with stopper or use
anything other than the supplied stopper to move
the plunger that actuates the on/off switch inside the
neck of the disposer.
Helpful Hints
A. Be sure the disposer is empty before using the
dishwasher so it can drain properly.
B. You may want to leave the stopper in the drain when
QRWLQXVHWRSUHYHQWXWHQVLOVDQGIRUHLJQREMHFWVIURP
falling into the disposer.
C. 7KHGLVSRVHULVUXJJHGO\EXLOWWRJLYH\RX\HDUVDQG
years of trouble-free service. It will handle all normal
IRRGZDVWHV%87LWZLOOQRWJULQGDQGGLVSRVHVXFK
items as tin cans, bottles and bottle caps, glass,
china, leather, cloth, crockery, rubber, string, feathers,
RUFODPRUR\VWHUVKHOOV7KHVHDUHZDVWHPDWHULDOV
and belong in the trash can or trash compactor.
D.7263(('83)22':$67(',6326$/&XWRU
break up large bones, melon rinds, grapefruit skins
and corn cobs. Items such as large bones, fibrous
husks like lima bean pods and corn husks, require
FRQVLGHUDEOHFXWWLQJWLPH)RUWKLVUHDVRQ\RX
may prefer to place them in the trash can or trash
compactor.
Oval Handle
Small
Small
Medium
Large

6 49-5903-3
Care and Cleaning
CARE AND CLEANING
THE MOTOR IS PERMANENTLY LUBRICATED FOR LIFE. DO NOT ATTEMPT TO LUBRICATE YOUR
DISPOSER. 7KHGLVSRVHULVVHOIFOHDQLQJDQGVFRXUVLWVHOIZLWKHDFKXVH
Ŷ1(9(5SXWO\HRUFKHPLFDOFOHDQHUVLQWRWKHGLVSRVHU
as they cause serious corrosion of metal parts.
Ŷ<RXUGLVSRVHUH[FHSWIRUWKH%DWFK)HHGPRGHOLV
equipped with a removable splash guard for ease of
cleaning or replacement. Remove the splash guard by
SXOOLQJLWRXWIURPWKHWRS7RUHSODFHLQVHUWLQWRWKH
sink flange and push down until it is properly seated.
Ŷ,IDQRGRUGHYHORSVUXQRUDQJHRUOHPRQULQGV
through the disposer. A dozen ice cubes sprinkled with
a little household scouring powder will also work.

49-5903-3 7
STOP
BEFORE YOU BEGIN
Read these instructions completely and
carefully.
IMPORTANT – Observe all governing codes
and ordinances.
• Save these instructions for local inspector’s use.
• Note to Installer – Be sure to leave these
instructions with the Consumer.
• Note to Consumer – Keep these instructions
for future reference.
• Skill level – Installation of this appliance requires
basic mechanical skills.
• Completion time– 1 hour
•3URSHULQVWDOODWLRQLVWKHUHVSRQVLELOLW\RIWKH
installer.
•3URGXFWIDLOXUHGXHWRLPSURSHULQVWDOODWLRQLVQRW
covered under the Warranty.
WARNING
• )253(5621$/6$)(7<5HPRYHKRXVH
fuse or open circuit breaker before beginning
LQVWDOODWLRQ'RQRWXVHDQH[WHQVLRQFRUGRU
adapter plug with this appliance.
• )253(5621$/6$)(7<:KLOHSHUIRUPLQJ
installations described in this booklet, gloves
and eye protection (safety glasses or equivalent)
should be worn.
• )253(5621$/6$)(7<'RQRWSRVLWLRQ\RXU
head or body under disposer; unit could fall during
removal or installation.
• 7KHLPSURSHUFRQQHFWLRQRIWKHHTXLSPHQW
grounding conductor can result in a risk of electric
shock. Check with a qualified electrician or service
representative if you are in doubt that the appliance
is properly grounded.
• If house wiring is not 2-wire with ground, a ground
must be provided by the installer. When house
ZLULQJLVDOXPLQXPEHVXUHWRXVH8//LVWHG
anti-oxidant compound and aluminum-to-copper
connectors.
PREPARATION
'LVFRQQHFWHOHFWULFDOSRZHUVXSSO\WRGLVSRVHU
2. Remove old disposer or sink flange assembly.
3. Inspect drain line. If it is heavily coated with
hardened grease and accumulations, rout out
with a plumber’s snake.
4. Remove old sealing materials and gasketing from
sink opening, both top and bottom.
NOTE:7RSDQGERWWRPRIVLQNVXUIDFHVPXVWEHIUHH
of any materials to prevent leaks.
ADDITIONAL MATERIALS YOU
MAY NEED
ƒ6WHHOSXQFKRUZRRGHQGRZHO
ƒ3HWUROHXPMHOO\RUOLTXLGVRDS
ƒ+RVHFODPS
ƒ'LVKZDVKHUGUDLQFRQQHFWRU
ƒ$GMXVWDEOHSLSHZUHQFK
ƒ3OXPEHU¶VSXWW\IRUFDVWVLQNV
ƒ6WHSSHGUXEEHUGUDLQDGDSWHU
ƒ:LUHQXWV
ƒ&DEOHFRQQHFWRU
ƒ)OH[LEOHGUDLQSLSH
ƒ3RZHUFRUGNLW3DUW1R30;
WHAT YOU WILL NEED
INSTALLATION INSTRUCTIONS
Installation Instructions
Disposer
Questions? Call 800.GE.CARES (800.432.2737) or visit our Website at: GEAppliances.com
In Canada, call 1.800.561.3344 or visit our Website at: GEAppliances.ca
ƒ3KLOOLSVDQGIODWEODGH
screwdriver
ƒ+DPPHU
ƒ1XW'ULYHU
ƒ&KDQQHOORFNSOLHUVVOLS
MRLQW

8 49-5903-3
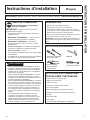
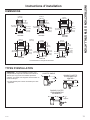
INSTALLATION OF SINK FLANGE
(Read completely before starting.)
Correctly Installed Sink Flange
(shown for proper orientation)
INSTALLATION INSTRUCTIONS
COMPONENTS AND INSTALLATION
Installation Instructions
COMPONENTS
Rubber Gasket
6LQN)ODQJH
Support
Ring
)LEHU
Gasket
Groove
Bottom
Bead
Sink
)ODQJH
Cushion
Mount
Mount Ring should be
free to move up and down
Open Area
No Obstruction
Bottom Bead of
Cushion Mount
Sink
NOTE:3D\FORVHDWWHQWLRQWRWKHRUGHURIWKHVLQN
flange parts, as they have been correctly assembled
by the factory.
A.'LVDVVHPEOHWKHVLQNIODQJHDVVHPEO\IURPWKH
disposer by turning the mount ring to the left
(clockwise) and removing it.
B. Raise the mount ring toward the top of the sink
flange. Remove the cushion mount and the mount
ring. You may want to practice installing the
cushion mount at this point before you are under
the sink.
C.8QVFUHZWKHVXSSRUWULQJIURPWKHVLQNIODQJHDQG
remove the fiber gasket. You are now left with the
sink flange and the rubber gasket.
D. The rubber gasket is used instead of plumbers
putty with stainless steel sinks. Some cast iron
sinks will require putty.
E. If no putty is used, insert the sink flange through
WKHUXEEHUJDVNHWLQWRWKHVLQNRSHQLQJ'RQRW
turn the flange once it is seated.
F. If you use putty instead of the gasket, form a ring
around the underside of the sink flange. Insert the
flange into the sink opening, press down hard to
VTXHH]HRXWH[FHVVSXWW\)RUXQGHUWKHVLQNWULP
off excess putty flush with the bottom edge of the
sink opening.
G.)URPXQGHUQHDWKWKHVLQN
slip the fiber gasket onto the
exposed sink flange. With
arrows pointing up, screw
the support ring onto the sink
flange and hand-tighten until
the sink flange will not move.
At this point you may want to insert the stopper in
the sink and fill with water to check the sink flange
seal and insure there are no leaks.
H.3ODFHWKHPRXQWULQJRYHU
the sink flange and hold
in place while installing
the cushion mount (large
side down). Make sure the
groove on the inside of the
cushion mount fits over the
lip on the sink flange, similar
to putting the lid on a plastic
container. Run your fingers
around the entire cushion
mount with slight pressure.
'RQRWSUHVVWRRKDUG:KHQ
the cushion mount is properly
seated, the mount ring can be pulled downward
over the cushion mount and will be free to turn.
Hand-tighten sink flange
7RSGroove
Bottom Bead
Cushion Mount Detail
*Stopper
*Removable
Splash Guard
6LQN)ODQJH
)LEHU*DVNHW
Mounting Ring
Elbow Gasket
Hopper
Groove
Screws
Elbow
)ODQJH
Rating Label
in this Area
End Bell
(Electrical
Connections)
'LVKZDVKHU
'LVFKDUJH,QOHW
7LJKWHQLQJ
Ears
Cushion
Mount
Support Ring
(Note Arrows
,QGLFDWLQJ8S
Sink
Rubber Sink
)ODQJH*DVNHW
Sink
)ODQJH
Assembly
'LVSRVHU
'LVFKDUJH
Elbow
*Not used with batch feed model

49-5903-3 9
INSTALLATION INSTRUCTIONS
Installation Instructions
DISHWASHER CONNECTION (IF REQUIRED)
ATTACH THE DISCHARGE ELBOW
1
KNOCK OUT PLUG
8VLQJDEOXQWLQVWUXPHQWVWHHOSXQFKRUZRRGHQ
GRZHONQRFNRXWWKHHQWLUHSOXJ'RQRWXVHD
screwdriver or sharp instrument. When knockout
plug falls into disposer, you may remove it or
simply grind it up when
the disposer is used.
7KLVZLOOQRWGDPDJH
the disposer in any
way, but may take
some time to grind,
over the course of
several uses.
1
ATTACH RUBBER GASKET
Slide rubber gasket over drain pipe.
2
CONNECT HOSE
Connect the dishwasher hose using a hose
clamp. If the hose size is different, you will need
a stepped rubber adapter.
2
CONNECT DISCHARGE
ELBOW*
Slide bracket over discharge elbow and connect
to the disposer.** Make sure all plumbing
connections are tight.
If you are connecting to a dishwasher, complete the
following step. If a dishwasher is not to be connected,
JRWR³$WWDFKLQJWKH'LVFKDUJH(OERZ´EHORZ
'LVFKDUJHHOERZPXVWEHLQVWDOOHGE\DSURIHVVLRQDO
** Some installations (see page 11 for example) may
require the use of a flexible drain pipe.
Knock out
plug
Hose Clamp
Stepped Rubber Adapter
Rubber
Gasket
Rubber
Gasket
'LVFKDUJH
Elbow
'LVFKDUJH
Elbow

10 49-5903-3
Installation Instructions
CONNECT DISPOSER TO SINK FLANGE
1
ATTACH TO SINK FLANGE
Line up the disposer
under the sink
flange. Guide the
KRSSHUSURMHFWLRQV
into the mount
ULQJVORWV7XUQWKH
mount ring about
´WRWKHULJKWVR
that the disposer
is temporarily
supported.
4
CHECK FOR LEAKS
Check the unit for leaks 24 hours after
installation and first operation.
3
LOCK MOUNT RING
7XUQWKHPRXQWULQJWRWKHULJKWXQWLOLWORFNVXS
WLJKW+RSSHUSURMHFWLRQVPXVWEHWRWKHH[WUHPH
left of the mounting slots. If the mount ring is
hard to turn, you may add a small amount of
SHWUROHXPMHOO\RUOLTXLGVRDSWRWKHKRSSHU
SURMHFWLRQ5XQZDWHUDQGFKHFNIRUOHDNV
2
LINE UP WITH OUTLET PIPE
7XUQWKHPRXQWULQJDQGWKHGLVSRVHUXQWLOWKH
disposer discharge elbow lines up with the outlet
pipe (see page 11).
INSTALLATION INSTRUCTIONS
Mount Ring
Slot
Hopper
3URMHFWLRQ
'LVFKDUJH
Elbow
2XWHU3LSH
+RSSHU3URMHFWLRQLQ
³6XSSRUWHG´3RVLWLRQ
Locking Detail
+RSSHU3URMHFWLRQLQ
³/RFNHG´3RVLWLRQ
Mount Ring

49-5903-3 11
INSTALLATION INSTRUCTIONS
Installation Instructions
DIMENSIONS
SOME TYPICAL INSTALLATIONS
GFC320N
GFC325N
5-3/16"
8-1/2"
8-1/2"
8-1/2"
5-1/16"
7-3/4"
6-3/16"
7-1/4"
9-3/8"
7-1/4"
6-1/8"
6-15/16"
4-1/2"
4-1/2"
4-1/2"
4-1/2"
4-1/2"
4-1/2"
1-1/2"
1-1/2"
1-1/2"
1-1/2"
1-1/2"
1-1/2"
5-3/8"
5-9/16"
5-9/16"
5-9/16"
5-3/8"
5-3/8"
12-11/16"
14-1/2"
16-5/8"
16-1/6"
12-11/16"
13-7/16"
GFC520N
GFC525N
GFC530N
GFC535N
GFC720N
GFB760N
Batch Feed Operation
GFC1020N
NOTE: It is essential for the proper operation of the
disposer that this dimension be 9”-12”, depending
upon the models listed above, to avoid standing
water in disposer motor housing.
)OH[LEOH GUDLQ SLSH PD\ EH QHFHVVDU\ IRU WKLV
application.
SINGLE BOWL
*Approx.
DOUBLE BOWL
CENTER OUTLET**
*Approx.
DOUBLE BOWL
END OUTLET**
*Approx.

12 49-5903-3
Problem Possible Cause What To Do
Loud noises (other
than those during
grinding of bones
and fruit pits)
Silverware, bottle cap or other foreign
object has fallen into the disposer
Remove the splash guard* and remove
WKHREMHFWZLWKORQJKDQGOHGWRQJV
Replace the splash guard*.
Disposer does not
start
Reset button has been tripped With the splash guard* removed, check
to see if the turntable will move freely
using a broom handle. If the turntable
moves freely, replace the splash guard*
and check the reset button to see if it
KDVEHHQWULSSHG7KHUHVHWEXWWRQLV
red and located opposite the discharge
elbow, near the bottom of the disposer.
3XVKWKHEXWWRQLQXQWLOLWFOLFNVDQG
remains depressed. If the reset button
has not been tripped, check for a
shorted or broken wire connecting to
the disposer. Check the electrical power
switch, fuse box or circuit breaker.
If wiring and electrical components
are intact, the unit may have internal
problems that require service or
replacement.
Turntable cannot rotate. If the turntable does not turn freely,
FKHFNIRUDQREMHFWORGJHGEHWZHHQWKH
WXUQWDEOHDQGWKHJULQGULQJ'LVORGJH
WKHREMHFWE\PRYLQJWKHWXUQWDEOHZLWK
DEURRPKDQGOH7KHQUHPRYHWKH
REMHFW
,IQRIRUHLJQREMHFWLVSUHVHQWWKHUH
may be internal problems.
Disposer leaks If the leak is at the top, it may be caused
by:
1. Improper seating of sink flange (gasket
choice, putty, or tightening.
2. Support ring not tightened properly.
3. Defective cushion mount.
If the leak is at the discharge elbow, leak
may be caused by improper tightening of
elbow flange screws.
TROUBLESHOOTING TIPS
Troubleshooting Tips... Before you call for service
Save time and money! Review the charts below first and you may not need to call for service.
SAFETY NOTE: Before investigating, you must disconnect the power supply.
WARNING
Before resetting, disconnect the power supply-please see SAFETY NOTE
above. The overload control prevents the motor from operating should overloading occur.
This feature protects your house wiring and your disposer. When overloaded, the motor
will stop automatically.
Reset Button
Serial No.
Remove
Splash Guard
7XUQWDEOH
%DWFK)HHGGRHVQRWLQFOXGHVSODVKJXDUG

49-5903-3 13
NOTES
Notes

14 49-5903-3
Notes
NOTES

49-5903-3
GEAppliances.com
$OOZDUUDQW\VHUYLFHLVSURYLGHGE\RXU)DFWRU\6HUYLFH&HQWHUVRUDQDXWKRUL]HG&XVWRPHU&DUH
®
WHFKQLFLDQ7RVFKHGXOH
service online, visit us at geappliances.com/service_and_support/, or call GE Appliances at 800.GE.CARES
3OHDVHKDYH\RXUVHULDOQXPEHUDQG\RXUPRGHOQXPEHUDYDLODEOHZKHQFDOOLQJIRUVHUYLFH
LIMITED WARRANTY
GE Appliances Disposer Limited Warranty
For the period of GE Appliances will replace
One Year
)URPWKHGDWHRIWKH
original purchase
7KHHQWLUHGLVSRVHULIWKHUHLVDGHIHFWLQPDWHULDOVRUZRUNPDQVKLSUHODWLQJWRIXQFWLRQDO
SDUWVRQO\DSSHDUDQFHSDUWVDUHH[FOXGHG'XULQJWKLVlimited one-year warranty,
GE Appliances will also provide, free of charge, all labor charges related to replacing the
original disposer along with the replacement disposer within the first year.
Additional One Year
)URPWKHGDWHRIWKH
original purchase
0RGHOV*)&1*)&1,IWKHUHLVDGHIHFWLQPDWHULDOVRUZRUNPDQVKLSUHODWLQJWR
IXQFWLRQDOSDUWVRQO\DSSHDUDQFHSDUWVDUHH[FOXGHG'XULQJWKHone-year extended
limited warranty period, you will be responsible for all installation charges relating to the
replacement disposer.
Additional Two Years
)URPWKHGDWHRIWKH
original purchase
0RGHOV*)&1*)&1,IWKHUHLVDGHIHFWLQPDWHULDOVRUZRUNPDQVKLSUHODWLQJWR
IXQFWLRQDOSDUWVRQO\DSSHDUDQFHSDUWVDUHH[FOXGHG'XULQJWKLVWwo-year extended
limited warranty period, you will be responsible for all installation charges relating to the
replacement disposer.
Additional Four Years
from the date of the
original purchase
0RGHOV*)&1*)%1,IWKHUHLVDGHIHFWLQPDWHULDOVRUZRUNPDQVKLSUHODWLQJWR
IXQFWLRQDOSDUWVRQO\DSSHDUDQFHSDUWVDUHH[FOXGHG'XULQJWKLVfour-year extended
limited warranty period, you will be responsible for all installation charges relating to the
replacement disposer.
Additional Six Years
)URPWKHGDWHRIWKH
original purchase
0RGHO*)&1,IWKHUHLVDGHIHFWLQPDWHULDOVRUZRUNPDQVKLSUHODWLQJWRIXQFWLRQDO
SDUWVRQO\DSSHDUDQFHSDUWVDUHH[FOXGHG'XULQJWKLVsix-year extended limited
warranty period, you will be responsible for all installation charges relating to the
replacement disposer.
6WDSOH\RXUUHFHLSWKHUH3URRIRIWKHRULJLQDOSXUFKDVH
date is needed to obtain service under the warranty.
What GE Appliances will not cover:
Ŷ Service trips to your home to teach you how to use
the product.
Ŷ Improper installation or maintenance.
Ŷ )DLOXUHRIWKHSURGXFWLILWLVDEXVHGPLVXVHGRUXVHGIRU
other than the intended purpose or used commercially.
Ŷ Replacement of house fuses or resetting of circuit
breakers.
Ŷ 'DPDJHWRWKHSURGXFWFDXVHGE\DFFLGHQWILUH
floods, or acts of God.
Ŷ Incidental or consequential damage caused by
possible defects with this appliance.
Ŷ 3URGXFWQRWDFFHVVLEOHWRSURYLGHUHTXLUHGVHUYLFH
EXCLUSION OF IMPLIED WARRANTIES
Your sole and exclusive remedy is product repair as provided in this Limited Warranty. Any implied warranties, including the implied
warranties of merchantability or fitness for a particular purpose, are limited to one year or the shortest period allowed by law.
7KLVOLPLWHGZDUUDQW\LVH[WHQGHGWRWKHRULJLQDOSXUFKDVHUDQGDQ\VXFFHHGLQJRZQHUIRUSURGXFWVSXUFKDVHGIRUKRPHXVHZLWKLQ
WKH86$,IWKHSURGXFWLVORFDWHGLQDQDUHDZKHUHVHUYLFHE\D*($SSOLDQFHV$XWKRUL]HG6HUYLFHULVQRWDYDLODEOH\RXPD\EH
responsible for a trip charge or you may be required to bring the product to an Authorized GE Appliances Service location for service. In
Alaska, the limited warranty excludes the cost of shipping or service calls to your home.
6RPHVWDWHVGRQRWDOORZWKHH[FOXVLRQRUOLPLWDWLRQRILQFLGHQWDORUFRQVHTXHQWLDOGDPDJHV7KLVOLPLWHGZDUUDQW\JLYHV\RX
VSHFLILFOHJDOULJKWVDQG\RXPD\DOVRKDYHRWKHUULJKWVZKLFKYDU\IURPVWDWHWRVWDWH7RNQRZZKDW\RXUOHJDOULJKWVDUHFRQVXOW
your local or state consumer affairs office or your state’s Attorney General.
Warrantor: GE Appliances, a Haier company
Louisville, KY 40225

16 49-5903-3
Consumer Support
CONSUMER SUPPORT
3ULQWHGLQ&KLQD
GE Appliances Website
+DYHDTXHVWLRQRUQHHGDVVLVWDQFHZLWK\RXUDSSOLDQFH"7U\WKH*($SSOLDQFHV:HEVLWHKRXUVDGD\DQ\GD\
of the year! You can also shop for more great GE Appliances products and take advantage of all our on-line support
VHUYLFHVGHVLJQHGIRU\RXUFRQYHQLHQFH,QWKH86GEAppliances.com
In Canada: GEAppliances.ca
Register Your Appliance
5HJLVWHU\RXUQHZDSSOLDQFHRQOLQHDW\RXUFRQYHQLHQFH7LPHO\SURGXFWUHJLVWUDWLRQZLOODOORZIRUHQKDQFHG
communication and prompt service under the terms of your warranty, should the need arise. You may also mail in the
SUHSULQWHGUHJLVWUDWLRQFDUGLQFOXGHGLQWKHSDFNLQJPDWHULDO,QWKH86GEAppliances.com/register
In Canada: Prodsupport.mabe.ca/crm/Products/ProductRegistration.aspx
Schedule Service
Expert GE Appliances repair service is only one step away from your door. Get on-line and schedule your service at
\RXUFRQYHQLHQFHDQ\GD\RIWKH\HDU,QWKH86GEAppliances.com/service or call 800.432.2737 during normal
business hours.
In Canada: GEAppliances.ca/en/support/service-request RUFDOO
Extended Warranties
3XUFKDVHD*($SSOLDQFHVH[WHQGHGZDUUDQW\DQGOHDUQDERXWVSHFLDOGLVFRXQWVWKDWDUHDYDLODEOHZKLOH\RXU
warranty is still in effect. You can purchase it on-line anytime. GE Appliances Services will still be there after your
ZDUUDQW\H[SLUHV,QWKH86GEAppliances.com/extended-warranty or call 800.626.2224 during normal business
hours.
In Canada: GEAppliances.ca/en/support/purchase-extended-warranty or call 866.277.9842.
Parts and Accessories
Individuals qualified to service their own appliances can have parts or accessories sent directly to their homes
9,6$0DVWHU&DUGDQG'LVFRYHUFDUGVDUHDFFHSWHG2UGHURQOLQHWRGD\KRXUVHYHU\GD\
,QWKH86GEApplianceparts.comRUE\SKRQHDWGXULQJQRUPDOEXVLQHVVKRXUV
In Canada: GEAppliances.ca/en/products/parts-filters-accessories or call 800.661.1616.
Instructions contained in this manual cover procedures to be performed by any user. Other servicing
generally should be referred to qualified service personnel. Caution must be exercised, since improper
servicing may cause unsafe operation.
Contact Us
If you are not satisfied with the service you receive from GE Appliances, contact us on our Website with all the
details including your phone number, or write to:
,QWKH86*HQHUDO0DQDJHU&XVWRPHU5HODWLRQV_*($SSOLDQFHV$SSOLDQFH3DUN_/RXLVYLOOH.<
GEAppliances.com/contact
,Q&DQDGD'LUHFWRU&RQVXPHU5HODWLRQV0&&200(5&,$/,1&_6XLWH)DFWRU\/DQH_0RQFWRQ1%(&0
GEAppliances.ca/en/contact-us

Notez ci-après le modèle et le
numéro de série :
Modèle : ________________
Numéro de série : ________
Ils sont indiqués sur l’étiquette
placée au bas du broyeur.
GE est une marque déposée de General Electric Company. Fabriqué sous licence de marque.
GUIDE D’UTILISATION
ET INSTRUCTIONS
D’INSTALLATION
DISPOSALL
®
49-5903-3 12-18 GEA
GFC320N
GFC325N
GFC520N
GFC525N
GFC530N
GFC535N
GFC720N
GFB760N
GFC1020N
Broyeur de déchets
CONSIGNES DE SÉCURITÉ ......3
UTILISATION DU BROYEUR DE
DÉCHETS
Modèles à chargement continu ..........5
Modèles à chargement discontinu ........5
ENTRETIEN ET NETTOYAGE .......6
INSTALLATION INSTRUCTIONS
Préparation ...........................7
Pièces et installation ...................8
Installation du collet d’évier .............8
raccord au lave-vaisselle ................9
Fixation du coude de refoulement .......9
Raccord du broyeur au collet d’évier ....10
Dimensions .......................... 11
Types d’installations. . . . . . . . . . . . . . . . . . . 11
CONSEILS DE DÉPANNAGE ....12
GARANTIE LIMITÉE .............15
SERVICE À LA CLIENTÈLE .....16

2 49-5903-3
NOUS VOUS REMERCIONS D’ACCUEILLIR GE APPLIANCES CHEZ VOUS
Que vous ayez grandi avec GE Appliances ou qu’il s’agisse de votre première acquisition, nous
sommes heureux de vous accueillir dans notre famille.
Nous sommes fiers du savoir-faire, de l’innovation et de l’esthétique qui composent chaque appareil
GE Appliances, et nous pensons que vous le serez aussi. Dans cette optique, nous vous rappelons
que l’enregistrement de votre électroménager vous assure la communication de renseignements
importants sur le produit et la garantie lorsque vous en avez besoin.
Enregistrez votre électroménager GE en ligne dès maintenant. Des sites Web et des numéros de
téléphone utiles figurent dans la section Soutien au consommateur de ce manuel d’utilisation.
Vous pouvez aussi poster la fiche de garantie pré-imprimée incluse dans l’emballage.

49-5903-3 3
CONSIGNES DE SÉCURITÉ IMPORTANTES
LIRE TOUTES LES CONSIGNES AVANT D’UTILISER L’APPAREIL
INFORMATION DE SÉCURITÉ
AVERTISSEMENT
Pour votre sécurité, veuillez suivre les directives données dans le
présent manuel afin de réduire au minimum les risques d’incendie, d’explosion et de
chocs électriques et prévenir tout dommage et blessure grave ou mortelle.
AVERTISSEMENT
LORS DE L’UTILISATION D’APPAREILS ÉLECTRIQUES,
RESPECTEZ LES PRÉCAUTIONS ÉLÉMENTAIRES DE SÉCURITÉ, NOTAMMENT :
Ŷ1¶XWLOLVH]FHWDSSDUHLOTXHGDQVOHEXWGpFULWSDUOH
présent guide d’utilisation.
Ŷ/LVH]O¶HQVHPEOHGHVLQVWUXFWLRQVDYDQWG¶XWLOLVHU
l’appareil.
Ŷ Afin de réduire le risque de blessure, une surveillance
étroite est requise lorsque le broyeur est utilisé à
proximité d’enfants.
Ŷ1HSODFH]SDVOHVGRLJWVRXOHVPDLQVGDQVOH
broyeur de déchets.
ŶeWHLJQH]O¶DSSDUHLODYDQWGHWHQWHUGHGpERXFKHUOH
broyeur ou d’en retirer un objet.
Ŷ/RUVTXHYRXVWHQWH]GHGpERXFKHUOHEUR\HXUGH
déchets, utilisez un objet long et en bois, comme
une cuillère en bois ou un manche à balai en bois.
Ŷ3RXUWHQWHUGHUHWLUHUGHVREMHWVGXEUR\HXUGH
déchets, utilisez de longues pinces. Si le broyeur
est magnétisé, utilisez des outils amagnétiques.
Ŷ3RXUUpGXLUHOHVULVTXHVGHEOHVVXUHSURYRTXpHSDU
l’expulsion de matériaux du broyeur de déchets, ne
jetez pas les déchets suivants dans le broyeur :
a. coquilles d’huîtres ou de myes;
b. produits de débouchage caustiques
ou similaires;
c. verre, porcelaine ou plastique;
d. gros os entiers;
e. métal, par exemple : boîtes de conserve,
canettes, ustensiles ou papier aluminium;
f. huile chaude ou autres liquides chauds;
g. épis de maïs entiers.
Ŷ/RUVTXHYRXVQ¶XWLOLVH]SDVOHEUR\HXUODLVVH]OH
bouchon du drain en place pour éviter d’y faire
tomber des objets.
Ŷ&RQVXOWH]OHVLQVWUXFWLRQVGpWDLOOpHVGHPLVH
à la terre à la section BRANCHEMENTS
ÉLECTRIQUES du présent guide.
LIRE ET CONSERVER CES INSTRUCTIONS
Si vous n’êtes pas à l’aise avec les procédures et connexions électriques, faites appel
à un électricien qualifié.
AVERTISSEMENT
Une connexion
erronée du connecteur de mise à la terre
de l’appareil peut entraîner des risques
d’électrocution. Consultez un électricien
qualifié en cas de doute sur la mise à
la terre de l’appareil. N’altérez pas la
prise fournie avec l’appareil si elle ne
correspond pas à la prise murale. Le cas
échéant, faites installer une prise murale
adaptée par un électricien qualifié.
Pour les modèles équipés d’un câble de mise à la
terre :
INSTRUCTIONS DE MISE À LA TERRE : Ce broyeur
de déchets doit être mis à la terre afin de réduire
le risque de décharge électrique dans l’éventualité
G¶XQHGpIHFWXRVLWpRXG¶XQHSDQQH/DPLVHjODWHUUH
procure un trajet de moindre résistance pour le courant
électrique. Ce broyeur est équipé d’un cordon doté
G¶XQFRQGXFWHXUGHWHUUHHWG¶XQHILFKHGHWHUUH/D
fiche doit être branchée dans une prise correctement
installée et mise à la terre en conformité avec les
codes et règlements locaux.
BRANCHEMENTS ÉLECTRIQUES

4 49-5903-3
INFORMATION DE SÉCURITÉ
CONSIGNES DE SÉCURITÉ IMPORTANTES
LIRE TOUTES LES CONSIGNES AVANT D’UTILISER L’APPAREIL
Si vous n’êtes pas à l’aise avec les procédures et connexions électriques, faites appel
à un électricien qualifié.
/HFkEOHG¶DOLPHQWDWLRQHWRXOHVFRQQH[LRQVGRLYHQWrWUH
conformes au Code électrique national, section 422, ou aux
normes et réglementations locales.
Pour les modèles non équipés de câble :
VLYRWUHEUR\HXUQ¶HVWSDVpTXLSpGHFkEOHLOH[LVWHGHX[
moyens de le connecter :
IL[HUXQFkEOHG¶DOLPHQWDWLRQG¶XQHORQJXHXUFRPSULVH
entre 45 cm (18 po) et 90 cm (36 po);
8WLOLVHUODSLqFH*(QXPpUR30;
ou
2. relier directement le broyeur au circuit électrique
domestique.
Pour fixer un câble d’alimentation :
INSTRUCTIONS DE MISE À LA TERRE : Ce broyeur de
déchets doit être mis à la terre afin de réduire le risque de
décharge électrique dans l’éventualité d’une défectuosité ou
G¶XQHSDQQH/DPLVHjODWHUUHSURFXUHXQWUDMHWGHPRLQGUH
résistance pour le courant électrique. Ce broyeur est
équipé d’un cordon doté d’un conducteur de terre et d’une
ILFKHGHWHUUH/DILFKHGRLWrWUHEUDQFKpHGDQVXQHSULVH
correctement installée et mise à la terre en conformité avec
les codes et règlements locaux.
AVERTISSEMENT
Une connexion erronée du
connecteur de mise à la terre de l’appareil peut entraîner
des risques d’électrocution. Consultez un électricien
qualifié en cas de doute sur la mise à la terre de
l’appareil.
REMARQUE : déconnectez l’alimentation électrique du
FLUFXLWGXEUR\HXUDYDQWO¶LQVWDOODWLRQeWHLJQH]OHGLVMRQFWHXU
du circuit ou retirez le fusible correspondant.
A. Connectez exclusivement le broyeur à un courant
alternatif 110-120 V, 60 Hz
%(QFDVG¶XWLOLVDWLRQG¶XQFkEOHHQILFKDEOHXWLOLVH]XQH
SULVHjWURLVILFKHV/HILOGHJDUGHGRLWrWUHIL[pjODYLV
de borne de terre au bas le broyeur (plaque-couvercle).
C. Utilisez un connecteur collier de
FkEOHUpGXFWHXUGHFRQWUDLQWHj
O¶HQWUpHGXFkEOHG¶DOLPHQWDWLRQ
dans le broyeur.
Pour raccorder votre broyeur directement au
courant domestique :
INSTRUCTIONS DE MISE À LA TERRE : Ce broyeur doit
être connecté à un circuit électrique permanent, en métal,
et mis à la terre, ou un conducteur de mise à la terre de
l’appareil doit être utilisé avec les conducteurs du circuit
et connecté à un terminal de mise à la terre ou broche sur
l’appareil.
$6LYRXVXWLOLVH]XQFkEOHEOLQGp%;
1. Ces produits sont conçus pour une utilisation
résidentielle.
2. Raccordez le fil blanc au conducteur blanc du broyeur
avec un serre-fils. Raccordez le fil noir au conducteur
noir du broyeur avec un serre-fils. Raccordez le fil de
PDVVHQXjODYLVGHERUQHGHWHUUH/HILOGHWHUUH
GHYUDLWrWUHSLQFpHWUHWHQXHQSODFHSDUXQVHUUHFkEOH
3. N’utilisez pas de conduit rigide pour la connexion du
FkEODJH
4. Un interrupteur de moteur réservé acceptable avec la
position d’arrêt marquée doit être fourni pour ce broyeur
HQO¶LQVWDOODQW/¶LQWHUUXSWHXUGRLWrWUHPRQWpHQYXHGX
broyeur ou de l’ouverture de l’évier pour le broyeur.
6LYRXVQ¶XWLOLVH]SDVGHFkEOHEOLQGp%;IRXUQLVVH]XQILOGH
garde séparé à connecter à la mise à la terre fiable la plus
proche à l’aide de la vis de mise à la terre.
B. Si votre alimentation n’inclut pas de fil de garde, il vous
IDXWHQIRXUQLUXQjPRLQVTX¶XQFkEOHHQPpWDOVRLW
utilisé. Fixez fermement une extrémité d’un fil en cuivre
à la vis de mise à la terre du broyeur et l’autre extrémité
à une mise à
la terre fiable.
N’utilisez que des
FROOLHUVGHFkEOH
de mise à la terre
conformes à la
QRUPH8/6L
votre installation
électrique est
dotée de tubes
en plastique,
faites appel à
un électricien
qualifié pour
installer la mise à
la terre.
BRANCHEMENTS ÉLECTRIQUES (Suite)
LIRE ET CONSERVER CES INSTRUCTIONS
Suivez le fil de sortie
connecté à cette
broche et fixez-le au fil
blanc sur le broyeur.
REMARQUE : en regardant la prise
électrique de face, avec la broche
de mise à la terre en haut, la broche
de gauche, la plus grande, est
connectée au fil identifié.
Côté
nervuré
Réducteur
de contrainte
eFURX
3LqFHSRXUFRQQH[LRQVj
la boîte HEYCO. No.3043
Bouton rouge de
réinitialisation
Retirer le
capuchon
en plastique
Serre-fils
Vis de mise à
la terre
Circuit
domestique
RXFkEOH
d’alimentation
Bas du broyeur (plaque-couvercle)
La page est en cours de chargement...
La page est en cours de chargement...
La page est en cours de chargement...
La page est en cours de chargement...
La page est en cours de chargement...
La page est en cours de chargement...
La page est en cours de chargement...
La page est en cours de chargement...
La page est en cours de chargement...
La page est en cours de chargement...
La page est en cours de chargement...
La page est en cours de chargement...
La page est en cours de chargement...
La page est en cours de chargement...
La page est en cours de chargement...
La page est en cours de chargement...
La page est en cours de chargement...
La page est en cours de chargement...
La page est en cours de chargement...
La page est en cours de chargement...
La page est en cours de chargement...
La page est en cours de chargement...
La page est en cours de chargement...
La page est en cours de chargement...
La page est en cours de chargement...
La page est en cours de chargement...
La page est en cours de chargement...
La page est en cours de chargement...
-
 1
1
-
 2
2
-
 3
3
-
 4
4
-
 5
5
-
 6
6
-
 7
7
-
 8
8
-
 9
9
-
 10
10
-
 11
11
-
 12
12
-
 13
13
-
 14
14
-
 15
15
-
 16
16
-
 17
17
-
 18
18
-
 19
19
-
 20
20
-
 21
21
-
 22
22
-
 23
23
-
 24
24
-
 25
25
-
 26
26
-
 27
27
-
 28
28
-
 29
29
-
 30
30
-
 31
31
-
 32
32
-
 33
33
-
 34
34
-
 35
35
-
 36
36
-
 37
37
-
 38
38
-
 39
39
-
 40
40
-
 41
41
-
 42
42
-
 43
43
-
 44
44
-
 45
45
-
 46
46
-
 47
47
-
 48
48


GE GFC720N Le manuel du propriétaire
- Taper
- Le manuel du propriétaire
dans d''autres langues
- español: GE GFC720N El manual del propietario
Documents connexes
-
GE GREEN05P Le manuel du propriétaire
-
GE GDF510PMDSA Guide d'installation
-
GE Profile UCG1680LSS Le manuel du propriétaire
-
GE UCG1680LSS Le manuel du propriétaire
-
GE GFC501VSS Le manuel du propriétaire
-
GE AFC111V Guide d'installation
-
-
GE GFC320V Mode d'emploi
-
-


