
Model Line Series
GFC320V
GFC325V
GFC520V
GFC525V
GFC530V
GFC535V
GFC720V
GFB760V
GFC1020V
Disposall
www.GEAppliances.com
Food Waste Disposer
Safety Information
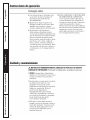
Connecting Electricity . . . . . . .2, 3
Safety Precautions . . . . . . . . . . . .2
Installation Instructions
Attaching the Discharge
Elbow . . . . . . . . . . . . . . . . . . . . . .6
Components and Installation
of Sink Flange. . . . . . . . . . . . . . . .5
Connecting Disposer to
Sink Flange . . . . . . . . . . . . . . . . . .7
Dimensions/Typical
Installations . . . . . . . . . . . . . . . . .8
Dishwasher Connection . . . . . . . .6
Operating Instructions
Batch Feed Models . . . . . . . . . . . .9
Care and Maintenance . . . . . . .10
Continuous Feed Models. . . . . . .9
Troubleshooting Tips
Before You Call for
Service . . . . . . . . . . . . . . . . . . . . .11
Customer Service
Warranty . . . . . . . . . . . . . . . . . . .12
Write the model and serial numbers
for your Disposall here:
Model # _____________________
Serial # _____________________
You can nd them on a label on
the bottom of the disposer.
PC71868
Owner’s Manual
& Installation
Instructions
Pub. No. 49-5903-2
01/13

2
Installation Instructions
Operating Instructions
Troubleshooting tips
Consumer Support
Safety Instructions

3
Installation Instructions
Operating Instructions Troubleshooting tips
Consumer Support
Safety Instructions
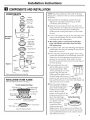
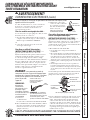
IMPORTANT SAFETY INSTRUCTIONS.
READ ALL INSTRUCTIONS BEFORE USING.
The power cord and/or connections must comply
with the National Electrical Code, Section 422
and/or local codes and ordinances.
For Models Not Equipped with a Cord:
If your disposer does not come equipped with a
cord, you can connect it in two ways:
1. Attach a power cord, minimum 18” in length
and not to exceed 36” in length. Use GE Part
Number PM3X215.
or
2. Wire the disposer directly into the house
current.
To Attach a Power Cord:
GROUNDING INSTRUCTIONS: This appliance
must be grounded. In the event of malfunction
or breakdown, grounding provides a path of least
resistance for electric current to reduce the risk of
electric shock. The power cord (to be installed)
must have an equipment-grounding conductor and
a grounding plug. The plug must be plugged into
an appropriate outlet that is properly installed and
grounded in accordance with all local codes and
ordinances.
DANGER: Improper connection of the
equipment-grounding conductor can result in
a risk of electric shock. Check with a qualifi ed
electrician or serviceman if you are in doubt as to
whether the appliance is properly grounded.
NOTE:
Disconnect electric power to disposer circuit before
installation. Turn the circuit breaker to the OFF
position or remove the fuse.
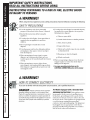
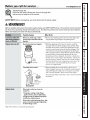
A. Connect the disposer to 110-120 Volt, 60 Hz AC
current only.
B. If a plug-in
cord is used,
use a three-
prong plug.
Ground wire
should be
attached to
the ground
screw in the
bottom of
the disposer
(end bell).
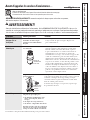
WARNING!
▲
!
HOW TO CONNECT ELECTRICITY (cont.)
SAVE THESE INSTRUCTIONS
READ AND FOLLOW THIS SAFETY INFORMATION CAREFULLY
C. Use a cable clamp
strain relief
connector where
power cord enters
the disposer.
To Wire Your
Disposer Directly into the House Current:
GROUNDING INSTRUCTIONS:
This appliance
must be connected to a grounded, metal,
permanent wiring system; or an equipment-
grounding conductor must be run with the circuit
conductors and connected to the equipment-
grounding terminal or lead on the appliance.
A. If you use BX cable:
1. These products are designed for household use.
2. Connect white wire to white lead of disposer
with a wire nut. Connect black wire to black
lead of disposer with a wire nut. Connect bare
ground wire to the ground screw. The ground
wire should be clamped and held by a strain
relief.
3. Do not use a rigid conduit for the wiring
connection.
4. A dedicated acceptable motor switch, with the
off position marked, shall be provided for this
disposer at the time of installation. The switch
shall be mounted in sight of the disposer or the
sink opening for the disposer.
If BX cable is not used, provide a separate ground
wire to nearest reliable ground, using the screw in
the end bell for the ground wire.
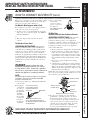
www.GEAppliances.com
Strain Relief
Nut
Red Reset Button
Ground Screw
Wire Nuts
Remove
Bottom Cap
To House Current
or Power Cord
Bottom of the Disposer (end bell)
B. If your power supply does not include a
ground wire, you must provide one unless
metal cable is used. Attach a copper wire
securely to disposer ground screw and attach
other end of wire to a reliable ground. Use
only UL approved ground clamp. If plastic
pipe is used in your home, a quali ed
electrician should install a proper ground.
If you are not familiar with electrical power and procedures, call a qualifi ed electrician.
Heyco Box Connectors
Part No. 30403
NOTE: When viewing face of
electrical plug with grounding pin at
top, the larger left blade is connected to
the identifi ed wire.
Trace lead connected
to this blade and attach
that lead to white wire
on disposer. Ribbed Side

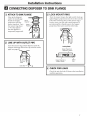
4
• Phillips and at blade screwdriver
Installation
Instructions
Disposer
If you have questions, call 1-800-GECARES or visit our Website at: www.GEAppliances.com
BEFORE YOU BEGIN
Read these instructions completely and carefully.
• IMPORTANT – Save these
instructions for local inspector’s use.
• IMPORTANT – Observe all
governing codes and ordinances.
• Note to Installer – Be sure to leave these
instructions with the Consumer.
• Note to Consumer – Keep these instructions
for future reference.
• Skill level – Installation of this appliance
required basic mechanical skills.
• Completion time – 1 hour
• Proper installation is the responsibility of the
installer.
• Product failure due to improper installation is not
covered under the Warranty.
PREPARATION
1. Disconnect electrical power supply to disposer.
2. Remove old disposer or sink ange assembly.
3. Inspect drain line. If it is heavily coated with
hardened grease and accumulations, rout out
with a plumber’s snake.
4. Remove old sealing materials and gasketing from
sink opening, both top and bottom.
NOTE: Top and bottom of sink surfaces must be free
of any materials to prevent leaks.
WHAT YOU WILL NEED
• Channel lock pliers, slip joint
• Hammer
• Nut driver
ADDITIONAL MATERIALS YOU
MAY NEED
• Steel punch or wooden dowel
• Petroleum jelly or liquid soap
• Hose clamp
• Dishwasher drain connector
• Adjustable pipe wrench
• Plumber’s putty (for cast sinks)
• Stepped rubber drain adapter
• Wire nuts
• Cable connector
• Flexible drain pipe
• Power cord kit (Part Number PM3X215)
4

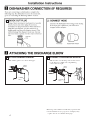
5

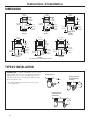
6
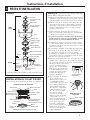
1 ATTACH RUBBER GASKET
Slide rubber gasket over elbow drain pipe.
2 CONNECT DISCHARGE ELBOW*
Slide bracket over discharge elbow and connect
to the disposer.** Make sure all plumbing
connections are tight.
*Discharge elbow must be installed by a professional.
** Some installations (see page 8 for examples) may
require the use of a exible drain pipe.
Rubber
Gasket
Discharge
Elbow
Rubber
Gasket
Discharge
Elbow
Rubber
Gasket
Discharge
Elbow
Rubber
Gasket
Discharge
Elbow

7

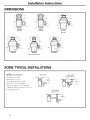
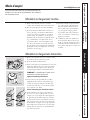
8
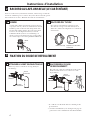
NOTE: It is essential for
the proper operation of
the disposer that this
dimension be 9”–12”,
depending upon the models
listed above, to avoid standing
in water in disposer motor housing.
**Flexible drain pipe may be necessary
for this application.
GFC320V
GFC325V
GFC520V
GFC525V
GFC530V
GFC535V
GFC720V GFC1020VGFB760V
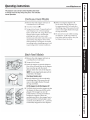
Batch Feed Operation

9
Installation Instructions
Operating Instructions
Troubleshooting tips
Consumer Support
Safety Instructions

10
Installation Instructions
Operating Instructions
Troubleshooting tips
Consumer Support Safety Instructions

11
Installation Instructions
Operating Instructions
Troubleshooting tips
Consumer Support
Safety Instructions

12
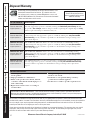
For The Period of: GE Will Replace:
One Year
From the date of the
original purchase
The entire disposer if there is a defect in materials or workmanship relating to functional
parts only (appearance parts are excluded). During this limited one-year warranty, GE will
also provide, free of charge, all labor charges related to replacing the original disposer along
with the replacement disposer within the rst year.
Additional One Year
From the date of the
original purchase
Models GFC520V, GFC525V: If there is a defect in materials or workmanship relating
to functional parts only (appearance parts are excluded). During the one-year extended
limited warranty period, you will be responsible for all installation charges relating to the
replacement disposer.
Additional Two Years
From the date of the
original purchase
Models GFC530V, GFC535V: If there is a defect in materials or workmanship relating
to functional parts only (appearance parts are excluded). During this two-year extended
limited warranty period, you will be responsible for all installation charges relating to the
replacement disposer.
Additional Four Years
from the date of the
original purchase
Models GFC720V, GFB760V: If there is a defect in materials or workmanship relating
to functional parts only (appearance parts are excluded). During this four-year extended
limited warranty period, you will be responsible for all installation charges relating to the
replacement disposer.
Additional Six Years
From the date of the
original purchase
Model GFC1020V: If there is a defect in materials or workmanship relating to functional
parts only (appearance parts are excluded). During this six-year extended limited warranty
period, you will be responsible for all installation charges relating to the replacement
disposer.
What GE Will Not Cover”
■ Service trips to your home to teach you how to
use the product.
■ Improper installation or maintenance.
■ Failure of the product if it is abused, misused,
or used for other than the intended purpose or
used commercially.
■ Replacement of house fuses or resetting of
circuit breakers.
■ Damage to the product caused by accident, re,
oods or acts of God.
■ Incidental or consequential damage caused by
possible defects with this appliance.
■ Product not accessible to provide required service.
Staple your receipt here.
Proof of the original purchase
date is needed to obtain service
under the warranty.
All warranty service provided by our Factory Service Centers, or an
authorized Customer Care® technician. To schedule service on-
line, 24 hours a day, contact us at www.GEAppliances.com, or call
800-GE-CARES (800-432-2737). Please have serial number and model
number available when call for service.
This warranty is extended to the original purchaser and any succeeding owner for products purchased for home use within
the USA. If the product is located in an area where service by a GE Authorized Servicer is not available, you may be responsible
for a trip charge or you may be required to bring the product to an Authorized GE Service location for service. In Alaska the
warranty excludes the cost of shipping or service calls to your home.
Some states do not allow the exclusion or limitation of incidental or consequential damages. This warranty gives you specifi c
legal rights, and you may also have other rights which vary from state to state. To know what your legal rights are, consult
your local or state consumer affairs offi ce or your state’s Attorney General.
Warrantor: General Electric Company. Louisville, KY 40225
Printed in China
Disposer Warranty.
EXCLUSION OF IMPLIED WARRANTIES – Your sole and exclusive remedy is product repair as provided in the Limited
Warranty. Any implied warranties, including the implied warranties of merchantability or fi tness for a particular purpose,
are limited to one year or the shortest period allowed by law.
Installation Instructions
Operating Instructions
Troubleshooting tips
Consumer Support Safety Instructions

Línea de Modelos Serie
GFC320V
GFC325V
GFC520V
GFC525V
GFC530V
GFC535V
GFC720V
GFB760V
GFC1020V
PC71868

2
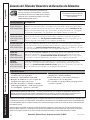
Instalación
Operación
Solucionar problemas
Servicio al consumidor
Seguridad

3
Instalación
Operación Solucionar problemas
Servicio al consumidor
Seguridad
IMPORTANTE INSTRUCCIONES DE SEGURIDAD.
LEA TODAS LAS INSTRUCCIONES ANTES DEL USO.
El cable eléctrico y/ o las conexiones deben
cumplir con el código National Electric, Sección
422 y/ o códigos locales y ordenanzas.
Para modelos no equipados con un cable:
Si su triturador no viene equipado con un cable,
usted puede conectarlo de dos maneras:
1. Adhiera un cable eléctrico, de una longitud
mínima de 18” y que no exceda 36”. Usar la
pieza GE número PM3X215.
2. Conecte el triturador directamente al sistema
eléctrico de la casa.
Para conectar un cable eléctrico:
INSTRUCCIONES DE CONEXÍON A TIERRA: Este
aparato debe ser conectado a tierra. En el caso de
una avería o daño, la conexión a tierra suministra
una vía de menor resistencia para la corriente
eléctrica a n de reducir el riesgo de una descarge
eléctrica. El cable eléctrico (a instalar) debe tener un
conductor y un enchufe de conexión a tierra. El
enchufe debe conectarse a un tomacorriente
apropiado que esté instalado correctamente y con
conexión a tierra de acuerdo con todos los códigos y
regulaciones locales.
PELIGRO: La conexión incorrecta del
sistema de polo a tierra puede resultar en el
riesgo de descarga eléctrica. Consulte con un
electricista califi cado o con un proveedor de
servicios si tiene dudas de que el aparato esté
correctamente conectado a tierra.
NOTA:
Desconecte la energía eléctrica hacia el circuito del
triturador antes de la instalación. Fije el interruptor del
circuito en la posición de apagado (OFF) o retire el fusible.
A. Conecte el triturador únicamente a una corriente de
110-120 voltios, 60 Hz de corriente alterna (AC).
B. Si se utiliza un
enchufe con
cable, use un
enchufe de tres
patas. Se debe
agregar una
línea de tierra
al tornillo de
conecxión a
tierra en la
parte inferior
del triturador
(campana extremo).
¡ADVERTENCIA!
▲
!
CÓMO CONECTAR LA CORRIENTE ELÉCTRICA (Continuación)
CONSERVE ESTAS INSTRUCCIONES
LEA Y SIGA CUIDADOSAMENTE ESTA INFORMACIÓN DE SEGURIDAD.
C. Utilice un conectador
de alivio de presión
de la abrazadera del
cable donde el cable
de corriente entra al
triturador.
Si está conectando el triturador directamente
a la corriente de la casa:
INSTRUCCIONES DE CONEXIÓN A TIERRA: Este aparato
se debe conectar a un sistema de cableado permanente,
metálico conectado a tierra, o se debe correr un conductor
de conexión a tierra para equipos con los conductores del
circuito y conectarse al terminal de conexión a tierra para
equipos o al conductor en el aparato.
A. Si utiliza un cable BX:
1. Estos productos están diseñados para uso doméstico.
2. Conecte el cable blanco al conductor blanco del
triturador con una tuerca para alambre. Conecte el
cable negro al conductor negro del triturador con una
tuerca para alambre. Conecte el cable a tierra sin forro
al tornillo de conexión a tierra. El cable de conexión a
tierra debe sujetarse y sostenerse con un liberador de
tensión.
3. No use un conducto rígido para la conexión del
cableado.
4. Debe proporcionarse un interruptor de motor
aceptable exclusivo para el triturador en el momento
de la instalación. El interruptor debe montarse a la vista
cerca del triturador o en la abertura del fregadero para
el triturador.
Si no se utiliza un cable BX, instale un cable por separado
de conexión a tierra a una conexión a
tierra con able más cercana, utilizando el tornillo en la
campana extremo para el cable de conexión a tierra.
www.GEAppliances.com
NOTA: Al ver el costado del enchufe eléctrico
con el dispositivo de conexión a tierra en la
parte superior, la hoja izquierda más larga se
conecta con el cable identifi cado.
Busque el conductor conectado
a esta hoja y una ese conductor
al cable blanco del triturador.
Lado con
costura
Liberación
de presión
Tuerca
Botón rojo para
reposición
Tornillo de conexión
a tierra
Tuercas del
cable
Retire la tapa
Hacia la corriente de
la casa o cable de
corriente
Fondo del triturador (campana extremo)
B. Si su suministro de corriente no incluye un cable de conexión
a tierra, debe adquirir uno a menos que se utilice un cable
metálico. Conecte rmemente un cable de cobre al tornillo
de polo a tierra del triturador y conecte el otro extremo
del cable a una conexión a tierra con able. Use solamente
abrazaderas de conexión a tierra aprobadas por UL. Si en su
casa se utilizan tuberías de plástico, un electricista cali cado
debe instalar una conexión a tierra adecuada.
Si no está familiarizado con la parte eléctrica y sus procedimientos, llame a un electricista califi cado.
Pieza de conexión de la
caja HEYCO. NO.30403

4
• Destornilladsor de estrella
y con hoja plana
Instrucciones para la
instalación
Triturador
Si tiene preguntas, llame al 1-800-GECARES o visite nuestra página en la red: www.GEAppliances.com
ANTES DE EMPEZAR
Lea estas instrucciones completa y cuidadosamente.
• IMPORTANTE – Guarde estas
instrucciones para uso del inspector local.
• IMPORTANTE – Observe todos los
códigos y órdenes de ley.
• Nota al instalador – Asegúrese de dejar estas
instrucciones con el consumidor.
• Nota al consumidor – Conserve estas
instrucciones para referencia futura.
• Nivel de destreza – La instalación de este
aparato requiere de destrezas mecánicas básicas.
• Tiempo de ejecución – 1 hora
• La instalación apropiada es la responsabilidad del
instalador.
• La falla del producto debido a una instalación
inadecuada no está cubierta por la garantía.
PREPARACIÓN
1. Desconecte el suministro del cable eléctrico hacia el
triturador.
2. Remueva el triturador viejo o la ensambladura de la
brida del lavaplatos.
3. Inspeccione la línea de drenaje. Si la línea de
drenaje se encuentra muy cubierta con grasa
endurecida y acumulaciones, serpentee con una
serpiente de plomero.
4. Remueva los materiales de sellado viejos y los
pedazos de juntas de la abertura del lavaplatos,
tanto arriba como abajo.
NOTA: Las super cies superiores e inferiores del
lavaplatos deben estar libres de materiales para
prevenir fugas.
QUÉ NECESITA
• Alicates de cierre de canal,
de juntas deslizantes
• Martillo
• Llave
MATERIALES ADICIONALES QUE
USTED PODRÍA NECESITAR
• Punzón de acero o clavija de madera
• Petrolato o jabón liquido
• Abrazadera de manguera
• Conectador de drenaje para lavadora de platos
• Llave de tubos ajustable
• Masilla de plomero (para sellado del lavaplatos)
• Adaptador de drenaje de caucho escalonado
• Tuercas de alambre
• Cable conectador
• Tubería de drenaje exible
• Kit del cable eléctrico (Parte No. PM3X215)

5

6
* El codo de descarga debe ser instalado por un
profesional.
** Algunas instalaciones (ver la página 8 para ejemplos)
puede que requieran el uso de una tubería de
drenaje exible.
1 CONECTE LA JUNTA DE CAUCHO
Deslice la junta de caucho sobre el codo de drenaje.
2 CONECTE EL CODO DE DESCARGA*
Conecte el codo de descarga al triturador.**
Asegúrese de que todas las conexiones de la
tubería estén apretadas
Rubber
Gasket
Discharge
Elbow
Empaque
de caucho
Codo de
descarga
Rubber
Gasket
Discharge
Elbow
Empaque
de caucho
Codo de
descarga

7

8
NOTA: Para lograr una operación del
triturador apropiada, es esencial que esta
dimensión sea 9”–12”. dependiendo de
los modelos enumerados anteriormente,
para evitar agua estancada en el
alojamiento del motor del triturdaor.
**Una tubería de drenaje exible podría
ser necesaria para esta aplicación.
GFC320V
GFC325V
GFC520V
GFC525V
GFC530V
GFC535V
GFC720V GFC1020V
GFB760V
Operación de alimentación
por lote
La page est en cours de chargement...
La page est en cours de chargement...
La page est en cours de chargement...
La page est en cours de chargement...
La page est en cours de chargement...
La page est en cours de chargement...
La page est en cours de chargement...
La page est en cours de chargement...
La page est en cours de chargement...
La page est en cours de chargement...
La page est en cours de chargement...
La page est en cours de chargement...
La page est en cours de chargement...
La page est en cours de chargement...
La page est en cours de chargement...
La page est en cours de chargement...
-
 1
1
-
 2
2
-
 3
3
-
 4
4
-
 5
5
-
 6
6
-
 7
7
-
 8
8
-
 9
9
-
 10
10
-
 11
11
-
 12
12
-
 13
13
-
 14
14
-
 15
15
-
 16
16
-
 17
17
-
 18
18
-
 19
19
-
 20
20
-
 21
21
-
 22
22
-
 23
23
-
 24
24
-
 25
25
-
 26
26
-
 27
27
-
 28
28
-
 29
29
-
 30
30
-
 31
31
-
 32
32
-
 33
33
-
 34
34
-
 35
35
-
 36
36


GE GFC525V Manuel utilisateur
- Taper
- Manuel utilisateur
- Ce manuel convient également à
dans d''autres langues
- español: GE GFC525V Manual de usuario
- português: GE GFC525V Manual do usuário