SCOPREGA GE10-3 Electric Inflator Air Pump Manuel utilisateur
- Taper
- Manuel utilisateur

1
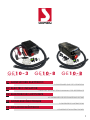
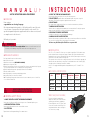
GE10-3 GE10-8 GE10-B
K6131800 K6131830 k6131860
CONSERVARE QUESTE ISTRUZIONI
GONFIATORE ELETTRICOIT
SAVE THIS INSTRUCTIONS MANUAL FOR REFERENCE
ELECTRIC INFLATOREN
BITTE BEWAHREN SIE DIESE ANLEITUNG GUT AUF
ELEKTRISCHE LUFTPUMPEDE
CONSERVER CES INSTRUCTIONS
GONFLEUR ÉLECTRIQUEFR
CONSERVE ESTAS INSTRUCCIONES
INFLADOR ELÉCTRICOES

2
3
INDICE
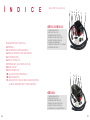
1. DESCRIZIONE FUNZIONALE
2. PREMESSA
3. AVVERTENZE PRELIMINARI
4. REGOLE DI SICUREZZA GENERALI
5. INTRODUZIONE
6. DATI TECNICI
7. PRIMO UTILIZZO (SOLO PER GE10-B)
8. PER GONFIARE
9. PER SGONFIARE
10. SOLUZIONE DEI PROBLEMI
10.1. ACCESSORI
11. DIAGNOSTICA A LED PER STATO BATTERIA,
ALLARME TEMPERATURA E CARICA BATTERIA
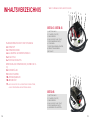
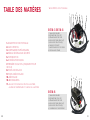
1. DESCRIZIONE FUNZIONALE
1. TUBO DI GONFIAGGIO
2. INTERRUTTORI (ON-OFF)
3. REGOLATORE DI PRESSIONE
4. BOCCA DI GONFIAGGIO (OUT)
5. BOCCA DI SGONFIAGGIO (IN)
6. FUSIBILE DI SICUREZZA
7. ADATTATORE A COCCODRILLO
8. PRESA ACCENDISIGARI
GE10-3 GE10-8
1. TUBO DI GONFIAGGIO
2. INTERRUTTORI (ON-OFF)
3. REGOLATORE DI PRESSIONE
4. BOCCA DI GONFIAGGIO (OUT)
5. BOCCA DI SGONFIAGGIO (IN)
6. CARICATORE CON ADATTATORI
GE10-B
5 6
13
4
782
5
162
3
4

4
5
ISTRUZIONI
MANUALEDI
CONSERVARE QUESTE ISTRUZIONI
2. PREMESSA
Gentile cliente,
congratulazioni per aver scelto Scoprega.
Progettiamo e fabbrichiamo prodotti della massima qualità secondo le
esigenze della nostra clientela. Scoprega ore la massima qualità anche
nell’assistenza. I nostri uci dedicati garantiscono consulenza e istruzioni in
caso di bisogno, oltre a un’assistenza tecnica completa.
La ringraziamo per la fiducia.
4. CONTROLLARE CHE NON VI SIANO PARTI DANNEGGIATE.
Prima di usare il gonfiatore, ispezionare con attenzione le pareti esterne e i suoi componenti.
5. NON AVVIARE i gonfiatori portatili nei pressi di liquidi infiammabili o atmosfere gassose o
esplosive. I motori di questi gonfiatori producono scintille che possono rilasciare fumi.
6. ATTENZIONE A NON INALARE!
L’aria compressa proveniente dal gonfiatore non è pura. Non inalare mai aria dal gonfiatore.
7. ATTENZIONE! PERICOLO DI SCOPPIO.
Gonfiare l’unità gonfiabile solo seguendo le raccomandazioni del costruttore. Una pressione
eccessiva può causare l’esplosione del gonfiabile, che può cagionare lesioni personali.
8. NON LASCIARE MAI IL DISPOSITIVO SENZA SORVEGLIANZA.
Il gonfiaggio eccessivo può causare gravi lesioni e danni materiali.
9. ATTENZIONE! PERICOLO DI FUNZIONAMENTO NON SICURO
Non modificare o tentare di riparare l’unità. Non forare o apportare modifiche al gonfiatore o ai suoi
accessori. Qualunque modifica al prodotto comporta la decadenza della garanzia.
10. Non trasportare mai il gonfiatore dal tubo flessibile né dal cavo di
alimentazione.
4. REGOLE DI SICUREZZA GENERALI
1. CONSIDERARE SEMPRE L’AMBIENTE DI LAVORO.
Non esporre il gonfiatore alla pioggia. Non utilizzare in presenza di liquidi o gas infiammabili.
2. EVITARE L’AVVIO ACCIDENTALE.
Non avviare il gonfiatore con la bocca di ingresso in contatto con polvere o acqua.
3. PRESTARE ATTENZIONE.
Prestare attenzione a quello che si sta facendo. Usare il buon senso.
5. INTRODUZIONE
I GE10-3, GE10-8 e GE10-B sono gonfiatori a due stadi di facile utilizzo. Il primo stadio a turbina
fornisce alte portate d’aria a bassa pressione (circa 50 mbar; 0,8 psi). Quando la turbina raggiunge
la pressione massima, si spegne e avvia il automaticamente il compressore bicilindrico. In questo
caso, si avrà meno volume di aria, ma molta più pressione.
Questo passaggio è percepibile dal fatto che il secondo modulo (a pistoni) è più rumoroso. In caso
di rabbocco del gonfiabile, il modulo della turbina si avvia immediatamente. Essendo la pressione
dell’unità gonfiabile superiore ai 50 mbar (0,8 psi) la turbina si spegne e si attiva il modulo a pistoni.
A dierenza del GE 10-3 e GE 10-8, il GE10-B è dotato di una batteria ricaricabile incorporata.
7. PRIMO UTILIZZO (SOLO PER GE10-B)
Leggere queste istruzioni prima di utilizzare il gonfiatore. La mancata osservanza di
tutte le istruzioni elencate di seguito può provocare danni al prodotto e/o causare lesioni
gravi alle persone.
ATTENZIONE
NON ALIMENTARE IL GONFIATORE AD UNA
TENSIONE PIÙ ALTA DI QUELLA NOMINALE.
1. Attenersi a tutte le istruzioni presenti su questo documento.
2. Conservare le presenti istruzioni.
3. Non ostruire le bocchette di aerazione (VEDI FIGURA 1 A PAG. 3).
4. Proteggere sempre il cavo di alimentazione.
5. Non aprire il gonfiatore. Far eseguire tutte le attività di manutenzione a manutentori qualificati
autorizzati da Scoprega. La manutenzione è necessaria quando l’apparecchio risulta in qualche
modo danneggiato o non funzionante.
6. Non manomettere il prodotto. L’apertura del gonfiatore comporta la decadenza della garanzia.
7. Fornire una ventilazione adeguata
8. Evitare di posizionare oggetti nelle vicinanze del prodotto durante il suo funzionamento.
9. Tenere il presente prodotto fuori dalla portata dei bambini.
10. Il gonfiatore in moto produce vibrazioni per cui, per evitare cadute accidentali, ne consigliamo
l’utilizzo a pavimento.
3. AVVERTENZE PRELIMINARI
Per evitare avvii accidentali durante il
trasporto, la batteria viene scollegata. Prima
dell’uso, aprire il vano batterie svitando le 4
viti “A” (Figura 1) e collegare il cavo rosso al
polo positivo della batteria e il cavo nero al
polo negativo. Quindi richiudere avvitando.
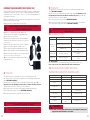
6. DATI TECNICI
ARTICOLO TENSIONE
(V)
PORTATA
(L/minuto) FUNZIONI
GE 10-3 11-13 Vdc
PRESSIONE
MAX
(mbar)
300 (4,4 PSI)
450 GONFIA/
SGONFIA
CONSUMO
CORRENTE
(A)
13 A
GE 10-8 11-13 Vdc 800 (11,7 PSI)
450 13 A GONFIA/
SGONFIA
GE 10-B 11-13 Vdc 800 (11,7 PSI)
450 13 A GONFIA/
SGONFIA
A

6
7
IMPORTANTI NOTE DI RICARICA (SOLO PER GE 10-B)
1. Una vita più lunga e prestazioni migliori del gonfiatore possono essere ottenute se la batteria
viene ricaricata quando la temperatura dell’aria è compresa tra 18° - 24°C (65°F e 75°F). NON
caricare la batteria ad una temperatura dell’aria inferiore a +4.5°C (+40°F) o superiore a +40.5°C
(+105°F). Questo è importante e impedirà gravi danni alla batteria.
2. Il caricabatterie e la batteria possono risultare caldi al tatto durante la carica. Si tratta di una
condizione normale e non indica un malfunzionamento.
3. NON immergere il caricatore in acqua o altri liquidi.
4. NON tentare di caricare la batteria con caricabatterie diversi
da quelli di cui al presente manuale. Il caricatore e la batteria sono
specificamente progettati per lavorare insieme.
5. Il caricabatterie non è destinato ad un uso diverso da quello
di caricare la batteria del gonfiatore. Qualsiasi altro uso può
comportare il rischio di incendi, scosse elettriche o elettrocuzione.
6. Assicurarsi che il cavo si trovi in modo che non venga
calpestato, non ci sia pericolo di inciampo o comunque non si
danneggi e non sia sottoposto a stress.
7. Non usare il caricabatterie se il cavo o la spina sono
danneggiati.
8. Non utilizzare il caricabatterie se risulta danneggiato.
9. Non smontare il caricabatterie. Un riassemblaggio non corretto
può comportare un rischio di scosse elettriche, folgorazione o
incendi.
10. Non usare mai un altro caricabatterie per caricare il presente
prodotto. Usare sempre solo pezzi di ricambio originali.
NON CONSENTIRE A NESSUN LIQUIDO DI PENETRARE ALL’INTERNO
DEL CARICABATTERIE. POSSONO VERIFICARSI SCOSSE ELETTRICHE.
8. PER GONFIARE
9. PER SGONFIARE
1. Collegare il gonfiatore all’alimentazione elettrica (escluso il GE10-B) mediante i cavi forniti.
2. Collegare il tubo dell’aria alla bocca di uscita, nel senso della freccia direzionata verso l’esterno
del gonfiatore (VEDI FIGURA 1 A PAG. 3).
3. Collegare il tubo alla valvola di gonfiaggio dell’unità gonfiabile tramite i raccordi forniti in
dotazione. È importante scegliere il raccordo adatto alla valvola e verificare che non ci siano
perdite di aria. Accertarsi che non vi siano strozzature, impedimenti o perdite nel percorso dell’aria.
4. Impostare il regolatore della pressione al valore raccomandato dal costruttore dell’unità
gonfiabile.
5. Avviare il gonfiaggio premendo il tasto di accensione (VEDI FIGURA 1 A PAG. 3).
6. Il gonfiatore si arresterà automaticamente al raggiungimento della pressione impostata.
1. Collegare il tubo alla bocca di aspirazione nel senso della freccia direzionata verso l’interno del
gonfiatore (VEDI FIGURA 1 A PAG. 3).
2. Collegare il tubo alla valvola dell’unità gonfiabile tramite i raccordi forniti in dotazione. È
importante scegliere il raccordo adatto alla valvola e verificare che non ci siano perdite di
aria. Accertarsi che non vi siano strozzature, impedimenti o perdite nel percorso dell’aria.
3. Avviare lo sgonfiaggio premendo il tasto di accensione (VEDI FIGURA 1 A PAG. 3).
4. Raggiunta una pressione di -40/-50 mbar il gonfiatore si arresta automaticamente. E’
comunque possibile interrompere lo sgonfiaggio premendo il pulsante di spegnimento (VEDI
FIGURA 1 A PAG. 3).
ATTENZIONE, IN CASO DI SURRISCALDAMENTO DOVUTO ALL’USO PROLUNGATO, IL GONFIATORE
SI ARRESTERA’ AUTOMATICAMENTE PER EVITARE DANNI AI SUOI COMPONENTI.
CONSIDERARE LA PRESSIONE DI GONFIAGGIO MASSIMA E ADEGUATA DEL GONFIABILE.
IMPOSTARE SEMPRE LA PRESSIONE MASSIMA RACCOMANDATA TRAMITE IL REGOLATORE DELLA
PRESSIONE. NON GONFIARE ECCESSIVAMENTE.
IL GONFIATORE SI PUÒ DANNEGGIARE A CAUSA DI SABBIA, POLVERE O ACQUA CHE PENETRANO
ALL’INTERNO DELLA PORTA DI INGRESSO. CIÒ CAUSERÀ IL SURRISCALDAMENTO E DANNEGGERÀ LA
TURBINA. IN TAL CASO SPEGNERE IMMEDIATAMENTE IL GONFIATORE.
10. SOLUZIONE DEI PROBLEMI
PROBLEMA POSSIBILE CAUSA POSSIBILE SOLUZIONE
Il gonfiatore non
si avvia
Il gonfiatore non
gonfia/sgonfia
Cavo non collegato
adeguatamente.
Batteria non carica (solo per GE10-B)
Errato collegamento del tubo.
Cavo danneggiato.
Collegare il cavo.
Ispezionare la batteria.
Collegare il tubo dell’aria alla
bocca corretta.
Rivolgersi a un centro di
assistenza SCOPREGA.
Probabile problema elettronico. Rivolgersi a un centro di
assistenza SCOPREGA.
Pressione bassa
11. DIAGNOSTICA A LED PER STATO BATTERIA,
ALLARME TEMPERATURA E CARICA BATTERIA
LED SIGNIFICATO STATO
OFF
Stand By - Batteria CARICA
Stand By - Batteria
al 50%
Batteria in ricarica
Stand By - Batteria
in esaurimento
Stand By - Batteria
ESAURITA
Voltaggio della batteria
insuciente Il gonfiatore si spegne
Sovratemperatura interna
alla pompa
Si consiglia di ricaricare la batteria prima
di procedere.
Il gonfiatore si spegne
Il gonfiatore non si accende
SPENTO
VERDE fisso
ARANCIONE lampeggiante
GIALLO
ARANCIONE
lampeggiante veloce
ARANCIONE fisso
ARANCIONE fisso (5 secondi di
funzionamento)
ROSSO fisso
Gli accessori raccomandati nell’utilizzo del gonfiatore sono quelli originali SCOPREGA.
L’uso di qualsiasi accessorio non raccomandato per questo gonfiatore può essere pericoloso.
10.1 ACCESSORI
Durante il caricamento della batteria il gonfiatore non deve lavorare. L’alimentatore
della batteria funziona solo se il gonfiatore non è azionato.
ATTENZIONE

8
9
INDEX
1. FUNCTIONAL DESCRIPTION
2. FOREWORD
3. PRELIMINARY WARNINGS
4. GENERAL SAFETY RULES
5. INTRODUCTION
6. TECHNICAL SPECIFICATIONS
7. FIRST USE (ONLY FOR GE10-B)
8. TO INFLATE
9. TO DEFLATE
10. TROUBLESHOOTING
10.1. Accessories
11. LED DIAGNOSTICS FOR BATTERY STATUS,
TEMPERATURE AND BATTERY CHARGE
1. FUNCTIONAL DESCRIPTION
1. INFLATION HOSE
2. SWITCHES (ON-OFF)
3. PRESSURE SETTING KNOB
4. INFLATION PORT (OUT)
5. DEFLATION PORT (IN)
6. SAFETY FUSE
7. ALLIGATOR ADAPTER
8. CIGAR LIGHTER SOCKET
GE10-3 GE10-8
1. INFLATION HOSE
2. SWITCHES (ON-OFF)
3. PRESSURE SETTING KNOB
4. INFLATION PORT (OUT)
5. DEFLATION PORT (IN)
6. CHARGER WITH ADAPTERS
GE10-B
5 6
13
4
782
5
162
3
4

10
11
MANUALOF
SAVE THIS INSTRUCTIONS MANUAL FOR REFERENCE
2. FOREWORD
Dear customer,
congratulations on choosing Scoprega.
We design and manufacture products of the highest quality to meet the needs
of our customers. Scoprega oers the highest quality in service as well. Our
specialised departments provide support and instructions when needed, as well
as comprehensive technical service.
We thank you for your trust.
4. GENERAL SAFETY RULES
1. ALWAYS TAKE INTO ACCOUNT THE WORKING ENVIRONMENT.
Do not expose the inflator to rain. Do not use in the presence of flammable liquids or gases.
2. AVOID UNINTENTIONAL STARTING.
Do not start the inflator with the inlet in contact with dust or water.
3. PAY ATTENTION.
Pay attention to what you are doing. Use common sense.
Read these instructions before using the inflator. Failure to follow all the instructions listed
below may result in damage to the product and/or cause serious injury to persons.
WARNING
DO NOT POWER THE INFLATOR WITH A
VOLTAGE HIGHER THAN THE RATED ONE.
1. Comply with all instructions in this document.
2. Keep these instructions.
3. Do not block the air vents (SEE FIGURE 1 ON PAGE 9).
4. Always protect the power cable.
5. Do not open the inflator. Refer all servicing to qualified service personnel authorised by Scoprega.
Servicing is required when the device is damaged or not working in any way.
6. Do not tamper with the product. Opening the inflator will void its warranty.
7. Provide suitable ventilation
8. Avoid placing objects near the product during operation.
9. Keep this product out of the reach of children.
10. The operating inflator produces vibrations: therefore, we recommend you to use it on the floor,
so as to avoid accidental falls.
3. PRELIMINARY WARNINGS
INSTRUCTIONS
4. CHECK THAT THERE ARE NO DAMAGED PARTS.
Before using the inflator, carefully check its outer sides and components.
5. DO NOT OPERATE portable inflators near flammable liquids or in gaseous or explosive
atmospheres. The inflator motors produce sparks that can release fumes.
6. DO NOT INHALE!
The compressed air coming from the inflator is not clean. Never inhale air from your inflator.
7. WARNING! RISK OF EXPLOSION.
Inflate the unit only complying with the manufacturer’s recommendations. Exceeding the pressure
rating could cause the inflator to explode, resulting in personal injury.
8. NEVER LEAVE THE DEVICE UNATTENDED.
Overinflation could result in serious injury and property damage.
9. WARNING! RISK OF UNSAFE OPERATION
Do not modify or attempt to repair the unit. Do not drill into or make any modifications to the inflator
or its accessories. Any modification to the product will void its warranty.
10. Never carry the inflator by the flexible hose or power cable.
5. INTRODUCTION
The GE10-3, GE10-8, and GE10-B are easy-to-use double-stage inflators. The first turbine stage
provides high air flow rates at low pressure (approx. 50 mbar; 0.8 psi). When the turbine reaches
maximum pressure, it switches o and automatically starts the twin cylinder compressor. In this case,
there will be less air volume, but much more pressure.
This step can be detected since the second (piston) module is noisier. If the inflator is topped up, the
turbine module starts immediately. As the pressure of the inflatable unit exceeds 50 mbar (0.8 psi),
the turbine switches o and the piston module is enabled.
Only GE10-B is equipped with an integrated rechargeable battery, not GE 10-3 and GE 10-8
models.
7. FIRST USE (ONLY FOR GE10-B)
To prevent accidental start-up during
transport, the battery is disconnected. Before
operating, open the battery compartment
by unscrewing the 4 screws “A” (Figure 1) and
connect the red cable to the battery positive
terminal and the black cable to the negative
one. Then close by screwing.
6. TECHNICAL SPECIFICATIONS
ITEM VOLTAGE
(V)
FLOW RATE
(L / minute) FUNCTIONS
GE 10-3 11-13 Vdc
MAX.
PRESSURE
(mbar)
300 (4.4 PSI)
450 INFLATION/
DEFLATION
POWER
CONSUMPTION
(A)
13 A
GE 10-8 11-13 Vdc 800 (11.7 PSI)
450 13 A INFLATION/
DEFLATION
GE 10-B 11-13 Vdc 800 (11.7 PSI)
450 13 A INFLATION/
DEFLATION
A

12
13
IMPORTANT CHARGING NOTES (ONLY FOR GE 10-B)
1. Inflator longer life and better performance can be obtained if the battery is charged when the
air temperature is between 18° - 24°C (65°F and 75°F). DO NOT charge the battery with an air
temperature below +4.5°C (+40°F), or above +40.5°C (+105°F). This is important and will prevent
serious damage to the battery.
2. The charger and battery may become warm to touch while charging. This is a normal condition,
and does not indicate any possible failure.
3. DO NOT immerse the charger in water or any other liquids.
4. DO NOT try to charge the battery with any chargers other
than those indicated in this manual. The charger and battery are
specifically designed to work together.
5. The charger is not intended for any use other than charging the
inflator battery. Any other use may result in risk of fire, electric shock
or electrocution.
6. Make sure the cable is located so that it will not be stepped on,
tripped over, or otherwise subjected to damage or stress.
7. Do not operate the charger with a damaged cable or plug.
8. Do not operate the charger if it has been damaged in any way.
9. Do not disassemble the charger. Incorrect reassembly may result
in a risk of electric shock, electrocution or fire.
10. Never use another charger to charge this product. Always use
original spare parts only.
DO NOT ALLOW ANY LIQUID TO GET INSIDE THE CHARGER.
ELECTRIC SHOCK MAY RESULT.
8. TO INFLATE
1. Connect the inflator to the power supply (except GE10-B) using the cables provided.
2. Connect the air hose to the outlet port, in the direction of the arrow pointing outwards from the
inflator (SEE FIGURE 1 ON PAGE 9).
3. Connect the hose to the inflation valve of the inflatable unit using the fittings supplied. It is
important to choose the right fitting for the valve and to check that no air leaks are detected.
Make sure that there are no kinks, obstructions or leaks in the air path.
4. Set the pressure knob to the value recommended by the inflatable unit manufacturer.
5. Start inflating by pressing the power button (SEE FIGURE 1 ON PAGE 9).
6. The inflator will automatically stop when the set pressure is reached.
WARNING, IN THE EVENT OF OVERHEATING DUE TO AN EXTENDED USE, THE INFLATOR WILL STOP
AUTOMATICALLY TO AVOID DAMAGE TO ITS COMPONENTS.
TAKE INTO ACCOUNT THE MAXIMUM AND SUITABLE INFLATION PRESSURE OF THE INFLATABLE
UNIT. ALWAYS SET THE MAXIMUM RECOMMENDED PRESSURE USING THE PRESSURE SETTING
KNOB. DO NOT OVER INFLATE.
9. TO DEFLATE
1. Connect the hose to the suction port, in the direction of the arrow pointing inwards from the
inflator (SEE FIGURE 1 ON PAGE 9).
2. Connect the hose to the inflatable unit valve using the fittings supplied. It is important to choose
the right fitting for the valve and to check that no air leaks are detected. Make sure that there
are no kinks, obstructions or leaks in the air path.
3. Start deflating by pressing the power button (SEE FIGURE 1 ON PAGE 9).
4. The inflator stops automatically when a pressure of -40/-50 mbar is reached. However, deflation
can be stopped by pressing the shutdown button (SEE FIGURE 1 ON PAGE 9).
THE INFLATOR CAN BE DAMAGED BY SAND, DUST OR WATER GETTING INSIDE THE INLET PORT. THIS
WILL CAUSE OVERHEATING AND WILL DAMAGE THE TURBINE. SHOULD THIS BE THE CASE, IMMEDIATELY
SWITCH THE INFLATOR OFF.
10. TROUBLESHOOTING
PROBLEM POSSIBLE CAUSE POSSIBLE SOLUTION
The inflator does
not start
The inflator does
not inflate/deflate
Cable not connected properly.
Battery not charged (GE10-B only)
Hose wrong connection.
Damaged cable.
Connect the cable.
Check the battery.
Connect the air hose to the
correct port.
Contact a SCOPREGA service
centre.
Possible electronic fault. Contact a SCOPREGA service
centre.
Low pressure
11. LED DIAGNOSTICS FOR BATTERY STATUS,
TEMPERATURE AND BATTERY CHARGER ALARM
LED MEANING STATUS
OFF
Standby - CHARGED battery
Standby - 50% battery
Batterie en charge
Standby - Battery running low
Standby - LOW battery
Low battery voltage The inflator goes OFF
Overtemperature inside the
pump
We recommend you to charge the battery
before operating.
The inflator goes OFF
The inflator does not start
OFF
Steady GREEN
Flashing ORANGE
YELLOW
Flashing fast ORANGE
Steady ORANGE
Steady ORANGE (5 seconds of
operation)
Steady RED
The recommended accessories when using the inflator are the original SCOPREGA ones.
The use of any accessory not recommended for this inflator can be dangerous.
10.1 ACCESSORIES
The inflator should not operate while the battery is being charged. The battery power
supply unit only works if the inflator is not operated.
WARNING

14
15
INHALTSVERZEICHNIS
1. BESCHREIBUNG DER FUNKTIONSWEISE
2. VORWORT
3. VORWARNUNGEN
4. ALLGEMEINE SICHERHEITSREGELN
5. EINLEITUNG
6. TECHNISCHE DATEN
7. ERSTMALIGE VERWENDUNG (NUR BEI GE10-
B)
8. ZUM BEFÜLLEN
9. ZUM ENTLEEREN
10. PROBLEMABHILFE
10.1 ZUBEHÖR
11. LED-DIAGNOSE DES LADEZUSTANDS DER BATTERIE,
ALARM TEMPERATUR UND BATTERIELADUNG
1. BESCHREIBUNG DER FUNKTIONSWEISE
1. LUFTSCHLAUCH
2. SCHALTER (ON-OFF)
3. DRUCKREGLER
4. AUSLASSANSCHLUSS (OUT)
5. ENTLEERUNGSHAFEN (IN)
6. SICHERUNG
7. KROKODILKLEMMEN-ADAPTER
8. ZIGARETTENANZÜNDER-
ANSCHLUSS
GE10-3 GE10-8
1. LUFTSCHLAUCH
2. SCHALTER (ON-OFF)
3. DRUCKREGLER
4. AUSLASSANSCHLUSS (OUT)
5. ENTLEERUNGSHAFEN (IN)
6. LADEGERÄT MIT ADAPTERN
GE10-B
5 6
13
4
782
5
162
3
4

16
17
BETRIEBSANLEITUNG
BITTE BEWAHREN SIE DIESE ANLEITUNG GUT AUF
2. VORWORT
Sehr geehrte/r Kundin/Kunde,
herzlichen Glückwunsch zur Wahl von Scoprega.
Wir entwickeln und fertigen hochwertige Produkte, die den Bedürfnissen unserer
Kunden gerecht werden. Scoprega bietet auch einen hochqualitativen Kundendienst.
Unsere dafür zuständigen Abteilungen sichern Ihnen Beratung und vollständige
technische Unterstützung zu und geben im Bedarfsfall die erforderlichen
Anweisungen.
Wir danken Ihnen für Ihr Vertrauen.
4. ALLGEMEINE SICHERHEITSREGELN
1. BERÜCKSICHTIGEN SIE IMMER DAS ARBEITSUMFELD.
Setzen Sie die Luftpumpe nie dem Regen aus. Nie bei Vorhandensein von entzündlichen Flüssigkeiten oder
Gasen verwenden.
2. VERMEIDEN SIE EIN UNBEABSICHTIGTES EINSCHALTEN.
Starten Sie die Luftpumpe nicht, wenn die Einlassönung mit Staub oder Wasser in Berührung kommt.
3. GEHEN SIE ACHTSAM VOR.
Üben Sie bei der Handhabung der Luftpumpe höchste Achtsamkeit. Verwenden Sie den
gesunden Menschenverstand.
Lesen Sie diese Anleitung vor der Verwendung der Luftpumpe. Die Nichtbeachtung
aller nachstehenden Anweisungen kann zu Schäden am Produkt und/oder zu schweren
Verletzungen von Personen führen.
ACHTUNG
VERSORGEN SIE DIE LUFTPUMPE NIE MIT EINER
SPANNUNG, DIE HÖHER ALS DIE NENNSPANNUNG IST.
1. Befolgen Sie alle in diesem Dokument enthaltenen Anweisungen.
2. Bewahren Sie diese Anleitungen gut auf.
3. Versperren Sie die Einlassönungen nicht (SIEHE ABB. 1 AUF S. 15)
4. Schützen Sie stets das Netzkabel.
5. Önen Sie die Luftpumpe nie. Lassen Sie alle Wartungsarbeiten vom autorisierten, qualifizierten
Wartungspersonal von Scoprega ausführen. Die Wartung ist notwendig, wenn das Gerät in
irgendeiner Weise beschädigt ist oder nicht funktioniert.
6. Nehmen Sie keine Manipulationen am Produkt vor. Das Önen der Luftpumpe hat den Verfall der
Garantie zur Folge.
7. Gewährleisten Sie eine angemessene Belüftung.
8. Vermeiden Sie es Gegenstände in der Nähe des Produkts abzustellen, während es in Betrieb
steht.
9. Bewahren Sie das Produkt außerhalb der Reichweite von Kindern auf.
10. Die laufende Luftpumpe erzeugt Vibrationen. Um zu verhindern, dass sie herunterfällt,
empfehlen wir sie am Boden stehend zu verwenden.
3. VORWARNUNGEN
ANLEITUNG
4. ÜBERPRÜFEN SIE, DASS KEINE BESCHÄDIGTEN TEILE VORHANDEN SIND.
Prüfen Sie vor der Verwendung der Luftpumpe sorgfältig ihre Außenwände und Komponenten.
5. VERWENDEN Sie die tragbaren Luftpumpen nicht in der Nähe von entzündlichen Flüssigkeiten
oder von gasförmigen oder in explosionsgefährdeten Atmosphären. Die Motoren dieser Luftpumpen
erzeugen Funken, die Rauch und Dämpfe entzünden können.
6. ACHTUNG, NICHT EINATMEN!
Die aus der Luftpumpe austretende Druckluft ist keine reine Luft. Atmen Sie nie die aus der Luftpumpe
austretende Luft ein.
7. ACHTUNG! BERSTGEFAHR.
Befüllen Sie den aufblasbaren Gegenstand ausschließlich gemäß den Herstellerempfehlungen. Ein
übermäßiger Druck kann zum Bersten des aufblasbaren Gegenstands und damit einhergehend zu
Verletzungen von Personen führen.
8. LASSEN SIE DAS GERÄT NIEMALS UNBEAUFSICHTIGT.
Übermäßiges Befüllen kann zu schweren Verletzungen und Sachschäden führen.
9. ACHTUNG! GEFAHR EINER UNSICHEREN FUNKTIONSWEISE
Nehmen Sie keine Änderungen oder Reparaturversuche vor. Bohren Sie die Luftpumpe nicht an und
nehmen Sie keine Änderungen daran oder an ihrem Zubehör vor. Jede Änderung am Produkt hat den
Verfall der Garantie zur Folge.
10. Transportieren Sie die Luftpumpe niemals am Schlauch oder am Netzkabel.
5. EINLEITUNG
Die Modelle GE10-3, GE10-8 und GE10-B sind benutzerfreundliche zweistufige Luftpumpen. Die erste
Turbinenstufe liefert hohe Luftdurchsätze bei niedrigem Druck (ca. 50 mbar; 0,8 psi). Erreicht die Turbine
den maximalen Druck, schaltet sie sich ab und startet automatisch den Zweizylinder-Verdichter. In
diesem Fall hat man weniger Luftvolumen zur Verfügung stehen, jedoch viel mehr Druck.
Dieser Übergang ist daran zu erkennen, dass das zweite Modul (mit Kolben) lauter ist. Wird ein
aufblasbarer Gegenstand nachgefüllt, startet das Turbinenmodul sofort. Da der Druck der aufblasbaren
Einheit über 50 mbar (0,8 psi) liegt, schaltet die Turbine ab und das Kolbenmodul wird aktiviert.
Im Gegensatz zu den Modellen GE 10-3 und GE 10-8 verfügt das GE10-B über eine eingebaute
nachladbare Batterie.
7. ERSTMALIGE VERWENDUNG (NUR BEI
GE10-B)
Um eine versehentliche Inbetriebnahme während
des Transports zu verhindern, wird die Batterie
abgeklemmt. Önen Sie vor dem Gebrauch
das Batteriefach, indem Sie die 4 Schrauben „A“
(Abbildung 1) lösen und das rote Kabel dann
an den Pluspol und das schwarze Kabel an den
Minuspol der Batterie anschließen. Schließen Sie es
dann durch Einschrauben der Schrauben wieder.
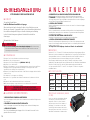
6. TECHNISCHE DATEN
ARTIKEL SPANNUNG
(V)
DURCHSATZ
(l/Minute) FUNKTIONEN
GE 10-3 11-13 Vdc
MAX. DRUCK
(mbar)
300 (4,4 PSI)
450 BEFÜLLEN/
ENTLEEREN
STROM-
VERBRAUCH
(A)
13 A
GE 10-8 11-13 Vdc 800 (11,7 PSI)
450 13 A BEFÜLLEN/
ENTLEEREN
GE 10-B 11-13 Vdc 800 (11,7 PSI)
450 13 A BEFÜLLEN/
ENTLEEREN
A

18
19
WICHTIGE HINWEISE ZUM LADEVORGANE (NUR FÜR GE 10-B)
1. Eine längere Lebensdauer und bessere Leistung der Luftpumpe können erreicht werden, wenn
die Batterie bei einer Lufttemperatur zwischen 18 °C - 24 °C (65 °F und 75 °F) geladen wird. Laden
Sie die Batterie NICHT bei einer Lufttemperatur unter +4,5 °C (+40 °F) oder über +40,5 °C (+105 °F)
auf. Dies ist eine wichtige Voraussetzung und verhindert schwere Schäden an der Batterie.
2. Das Ladegerät und die Batterie können sich beim Aufladen warm anfühlen. Dies ist normal und
ist kein Anzeichen einer Betriebsstörung.
3. Tauchen Sie das Ladegerät NIE in Wasser oder andere Flüssigkeiten.
4. Versuchen Sie NICHT, die Batterie mit anderen Ladegeräten
als den in dieser Bedienungsanleitung genannten Modellen
aufzuladen. Das Ladegerät und die Batterie wurden speziell
entwickelt, um im Verbund verwendet zu werden.
5. Das Ladegerät ist nicht für andere Zwecke, also ausschließlich
zum Aufladen der Batterie der Luftpumpe bestimmt. Bei jeder
anderen Verwendung besteht Brand- oder Stromschlaggefahr.
6. Achten Sie darauf, dass das Kabel so liegt, dass nicht darauf
getreten wird, es keine Stolpergefahr darstellt bzw. dass es auf
keinen Fall beschädigt oder in irgendeiner Weise belastet wird.
7. Verwenden Sie das Ladegerät nicht, wenn das Kabel oder der
Stecker beschädigt ist.
8. Verwenden Sie das Ladegerät nicht, wenn es beschädigt ist.
9. Zerlegen Sie das Ladegerät nie in seine Einzelteile. Ein falscher
Zusammenbau kann einen Stromschlag oder einen Brand
auslösen.
10. Verwenden Sie nie ein anderes Ladegerät, um dieses Produkt
aufzuladen. Verwenden Sie stets nur Original-Ersatzteile.
ES DARF KEINE FLÜSSIGKEIT IN DAS BATTERIELADEGERÄT
EINDRINGEN. ES KÖNNTE ZU STROMSCHLÄGEN KOMMEN.
8. ZUM BEFÜLLEN
1. Schließen Sie die Luftpumpe über die mitgelieferten Kabel an das Stromnetz (ausgenommen
das Modell GE10-B) an.
2. Schließen Sie den Luftschlauch in Richtung des Pfeils, der zur Außenseite der Luftpumpe zeigt
(SIEHE ABB. 1 AUF S. 15), an der Auslassönung an.
3. Schließen Sie den Luftschlauch über die mitgelieferten Anschlüsse an das Füllventil des
aufblasbaren Gegenstands an. Es ist wichtig, den für das Ventil geeigneten Anschluss zu
wählen und zu überprüfen, dass anderweitig keine Luft austritt. Stellen Sie sicher, dass keine
Verengungen, Hindernisse oder Lecks im Luftweg vorhanden sind.
4. Stellen Sie den Druckregler auf den vom Hersteller des aufblasbaren Gegenstands empfohlenen
Wert ein.
5. Starten Sie den Füllvorgang durch Drücken auf die Taste ON (SIEHE ABB. 1 AUF S. 15).
6. Die Luftpumpe stoppt automatisch aus, wenn der eingestellte Druck erreicht ist.
ACHTUNG, BEI EINER ÜBERHITZUNG DURCH LÄNGERE VERWENDUNG WIRD DIE LUFTPUMPE
AUTOMATISCH AUSSER BETRIEB GESETZT, UM SCHÄDEN AN IHREN BAUTEILEN ZU VERMEIDEN.
BERÜCKSICHTIGEN SIE DEN FÜR DEN ZU BEFÜLLENDEN GEGENSTAND MAXIMAL ZULÄSSIGEN UND
ANGEMESSENEN FÜLLDRUCK. STELLEN SIE STETS DEN EMPFOHLENEN MAXIMALDRUCK ÜBER DEN
DRUCKREGLER EIN. BEFÜLLEN SIE DEN GEGENSTAND NICHT ÜBERMÄSSIG.
9. ZUM ENTLEEREN
1. Schließen Sie den Luftschlauch in Richtung des Pfeils, der zur Außenseite der Luftpumpe zeigt, an
den Absauganschluss an (SIEHE ABB. 1 AUF S. 15).
2. Schließen Sie den Luftschlauch mit den mitgelieferten Anschlüssen an das Ventil des
aufblasbaren Gegenstands an. Es ist wichtig, den für das Ventil geeigneten Anschluss zu wählen
und zu überprüfen, dass anderweitig keine Luft austritt. Stellen Sie sicher, dass keine Verengungen,
Hindernisse oder Lecks im Luftweg vorhanden sind.
3. Starten Sie das Entleeren durch Drücken auf die Taste ON (SIEHE ABB. 1 AUF S. 15).
4. Bei Erreichen eines Drucks von -40/-50 mbar stoppt die Luftpumpe automatisch. Das Entleeren
kann jedoch durch das Drücken der Taste OFF unterbrochen werden (SIEHE ABB. 1 AUF S. 15).
DIE LUFTPUMPE KANN DURCH SAND, STAUB ODER WASSER BESCHÄDIGT WERDEN, DIE DURCH DIE
LUFTEINLASSKLAPPE EINDRINGEN. DIES VERURSACHT EINE ÜBERHITZUNG UND BESCHÄDIGT DIE TURBINE.
IN DIESEM FALL MUSS DIE LUFTPUMPE SOFORT AUSGESCHALTET WERDEN.
10. PROBLEMABHILFE
PROBLEM MÖGLICHE URSACHE MÖGLICHE ABHILFE
Die Luftpumpe
startet nicht
Die Luftpumpe
befüllt/entleert nicht
Kabel nicht angemessen
angeschlossen.
Batterie entladen (nur bei GE10-B)
Falsch angeschlossener Schlauch.
Kabel beschädigt.
Das Kabel anschließen.
Die Batterie überprüfen.
Schließen Sie den Luftschlauch
an der richtigen Önung an.
Wenden Sie sich an eine autorisierte
SCOPREGA Kundendienststelle.
Wahrscheinlich ein Problem am
elektronischen Teil. Wenden Sie sich an eine autorisierte
SCOPREGA Kundendienststelle.
Niedriger Druck
11. LED-DIAGNOSE DES LADEZUSTANDS DER BATTERIE,
ALARM TEMPERATUR UND BATTERIELADUNG
LED BEDEUTUNG STATUS
OFF
Stand By – Batterie GELADEN
Stand By – Batterie auf 50 %
Batterie wird
gelanden
Stand By – Batterie fast
entladen
Stand By – Batterie ENTLADEN
Unzureichende
Batteriespannung Luftpumpe schaltet sich aus
Übertemperatur in der Pumpe
Es wird empfohlen, die Batterie
nachzuladen, bevor Sie fortfahren.
Luftpumpe schaltet sich aus
Luftpumpe schaltet sich nicht ein
AUSGESCHALTET
GRÜN leuchtet permanent
ORANGE blinkend
GELB
ORANGE schnell blinkend
ORANGE leuchtet permanent
ORANGE leuchtet permanent (5
Sekunden Betrieb)
ROT leuchtet permanent
Das für die Verwendung der Luftpumpe empfohlene Zubehör ist das Original-Zubehör von
SCOPREGA.
Das Verwenden von nicht für diese Luftpumpe empfohlenem Zubehör kann gefährlich sein.
10.1 ZUBEHÖR
Während dem Laden der Batterieladung darf die Luftpumpe nicht in Betrieb stehen.
Das Netzteil der Batterie funktioniert nur, wenn die Luftpumpe nicht in Betrieb steht.
ACHTUNG

20
21
TABLE DES MATIÈRES
1. DESCRIPTION FONCTIONNELLE
2. AVANT-PROPOS
3. AVERTISSEMENTS PRÉLIMINAIRES
4. RÈGLES GÉNÉRALES DE SÉCURITÉ
5. INTRODUCTION
6. DONNÉES TECHNIQUES
7. PREMIÈRE UTILISATION (UNIQUEMENT POUR
GE10-B)
8. POUR LE GONFLAGE
9. POUR LE DÉGONFLAGE
10. DÉPANNAGE
10.1 ACCESSOIRES
11. DIAGNOSTIC PAR LED DE L’ÉTAT DE LA BATTERIE,
ALARME DE TEMPÉRATURE ET CHARGE DE LA BATTERIE
1. DESCRIPTION FONCTIONNELLE
1. TUYAU DE GONFLAGE
2. INTERRUPTEURS (ON-OFF)
3. RÉGULATEUR DE PRESSION
4. BOUCHE DE GONFLAGE (OUT)
5. BOUCHE DE DÉFLATION (IN)
6. FUSIBLE DE SÉCURITÉ
7. ADAPTATEUR PINCE CROCODILE
8. PRISE ALLUME-CIGARE
GE10-3 GE10-8
1. TUYAU DE GONFLAGE
2. INTERRUPTEURS (ON-OFF)
3. RÉGULATEUR DE PRESSION
4. BOUCHE DE GONFLAGE (OUT)
5. BOUCHE DE DÉFLATION (IN)
6. CHARGEUR AVEC ADAPTATEURS
GE10-B
5 6
13
4
782
5
162
3
4

22
23
MANUELD’
CONSERVER CES INSTRUCTIONS
2. AVANT-PROPOS
Cher client,
félicitations pour avoir choisi Scoprega.
Nous concevons et fabriquons des produits de qualité supérieure qui répondent
aux besoins de nos clients. Scoprega ore également un service d’assistance
de la plus haute qualité. Nos bureaux dédiés vous fournissent tous conseils et
instructions au besoin, en plus d’un service complet d’assistance technique.
Nous vous remercions de votre confiance.
4. RÈGLES GÉNÉRALES DE SÉCURITÉ
1. TOUJOURS CONSIDÉRER L’ENVIRONNEMENT DE TRAVAIL.
Ne pas exposer le gonfleur à la pluie. Ne pas utiliser en présence de liquides ou de gaz
inflammables.
2. ÉVITER TOUT DÉMARRAGE ACCIDENTEL.
Ne pas démarrer le gonfleur avec la bouche d’entrée en contact avec de la poussière ou de l’eau.
3. FAIRE ATTENTION.
Faire attention aux gestes eectués. Faire preuve de bon sens.
Lire ces instructions avant d’utiliser le gonfleur. Le non-respect de l’ensemble des
instructions énumérées ci-dessous peut endommager le produit et/ou causer des blessures
graves.
ATTENTION
NE PAS ALIMENTER LE GONFLEUR À UNE
TENSION SUPÉRIEURE À CELLE NOMINALE.
1. Suivre toutes les instructions de ce document.
2. Conserver ces instructions.
3. Ne pas obstruer les bouches d’aération (VOIR FIGURE 1 À LA PAGE 21).
4. Toujours protéger le câble d'alimentation.
5. Ne pas ouvrir le gonfleur. Tout entretien doit être eectué par du personnel d'entretien qualifié et
autorisé par Scoprega. L'entretien est nécessaire lorsque l’appareil est endommagé de quelque
façon que ce soit ou ne fonctionne pas.
6. Ne pas altérer le produit. L'ouverture du gonfleur annule la garantie.
7. Fournir une ventilation adéquate.
8. Éviter de placer des objets à proximité du produit pendant son fonctionnement.
9. Garder ce produit hors de portée des enfants.
10. Le gonfleur en mouvement produit des vibrations; pour éviter les chutes accidentelles, nous
recommandons de l'utiliser sur le sol.
3. AVERTISSEMENTS PRÉLIMINAIRES
INSTRUCTIONS
4. VÉRIFIER QU’IL N’Y A AUCUNE PIÈCE ENDOMMAGÉE.
Avant d'utiliser le gonfleur, examiner attentivement les parois extérieures et les composants.
5. NE PAS DÉMARRER les gonfleurs portables à proximité de liquides inflammables ou
d’atmosphères gazeuses ou explosives. Les moteurs de ces gonfleurs produisent des étincelles qui
peuvent libérer des fumées.
6. VEILLER À NE PAS INHALER!
L’air comprimé du gonfleur n’est pas pur. Ne jamais inhaler l'air provenant du gonfleur.
7. ATTENTION! DANGER D'ÉCLATEMENT.
Ne gonfler l'unité gonflable que conformément aux recommandations du fabricant. Une pression
excessive peut provoquer l'explosion du gonflable, ce qui peut entraîner des blessures corporelles.
8. NE JAMAIS LAISSER LE DISPOSITIF SANS SURVEILLANCE.
Le surgonflage peut provoquer des blessures graves et des dommages matériels.
9. ATTENTION! DANGER DE FONCTIONNEMENT NON SÛR
Ne pas modifier ou tenter de réparer l'unité. Ne pas percer ou modifier le gonfleur ou ses
accessoires. Toute modification du produit annule la garantie.
10. Ne jamais transporter le gonfleur par le tuyau flexible ou le câble
d'alimentation.
5. INTRODUCTION
Les GE10-3, GE10-8 et GE10-B sont des gonfleurs à deux étages faciles à utiliser. Le premier étage
de turbine fournit un débit d'air élevé à basse pression (environ 50 mbar; 0,8 psi). Lorsque la turbine
atteint la pression maximale, elle s'arrête et démarre automatiquement le compresseur à deux
cylindres. Dans ce cas, le volume d'air sera moins important, mais la pression beaucoup plus élevée.
Cette commutation est perceptible par le fait que le deuxième module (à pistons) est plus bruyant.
Si le gonflable est rempli, le module de turbine démarre immédiatement. Lorsque la pression de
l'unité gonflable dépasse 50 mbar (0,8 psi), la turbine s'arrête et le module à pistons se met en
marche.
Contrairement au GE 10-3 et au GE 10-8, le GE10-B possède une batterie rechargeable intégrée.
7. PREMIÈRE UTILISATION (UNIQUEMENT
POUR GE10-B)
Pour éviter tout démarrage accidentel pendant
le transport, la batterie est déconnectée. Avant
toute utilisation, ouvrir le compartiment de la
batterie en desserrant les 4 vis «A» (Figure 1) et
connecter le câble rouge à la borne positive de
la batterie et le câble noir à la borne négative.
Ensuite, fermer en vissant.
6. DONNÉES TECHNIQUES
ARTICLE TENSION
(V)
CAPACITÉ
(l/minute) FONCTIONS
GE 10-3 11-13 Vcc
PRESSION
MAXI
(mbar)
300 (4,4 PSI)
450 GONFLE /
DÉGONFLE
CONSOMMATION
ÉLECTRIQUE
(A)
13 A
GE 10-8 11-13 Vcc 800 (11,7 PSI)
450 13 A GONFLE /
DÉGONFLE
GE 10-B 11-13 Vcc 800 (11,7 PSI)
450 13 A GONFLE /
DÉGONFLE
A

24
25
NOTES IMPORTANTES SUR LA RECHARGE (UNIQUEMENT POUR GE 10-B)
1. La durée de vie et les performances du gonfleur sont meilleures si la batterie est rechargée
lorsque la température de l'air est comprise entre 18°C et 24°C (65°F et 75°F). NE PAS charger
la batterie à une température de l'air inférieure à +4,5°C (+40°F) ou supérieure à +40,5°C
(+105°F). Ceci est important et évitera d'endommager sérieusement la batterie.
2. Le chargeur et la batterie peuvent être chauds au toucher pendant la charge. Ceci est normal et
n'indique pas un dysfonctionnement.
3. NE PAS immerger le chargeur dans l'eau ou tout autre liquide.
4. NE PAS tenter de charger la batterie avec un chargeur autre
que ceux spécifiés dans ce manuel. Le chargeur et la batterie sont
spécialement conçus pour fonctionner ensemble.
5. Le chargeur n'est pas prévu pour une utilisation autre que
la charge de la batterie du gonfleur. Toute autre utilisation
peut présenter un risque d'incendie, de choc électrique ou
d'électrocution.
6. S'assurer que le câble est placé de manière à ce qu'il ne soit
pas piétiné, qu'il ne constitue pas un risque de trébuchement et
qu'il ne soit pas endommagé ou soumis à des contraintes.
7. Ne pas utiliser le chargeur si le câble ou la fiche sont
endommagés.
8. Ne pas utiliser le chargeur s'il est endommagé.
9. Ne pas démonter le chargeur. Un remontage incorrect peut
entraîner un risque de choc électrique, d'électrocution ou
d'incendie.
10. Ne jamais utiliser un autre chargeur pour charger ce produit.
Toujours utiliser uniquement des pièces de rechange d'origine.
NE PAS LAISSER DE LIQUIDE PÉNÉTRER À L'INTÉRIEUR DU CHARGEUR.
UN CHOC ÉLECTRIQUE POURRAIT SURVENIR.
8. POUR LE GONFLAGE
1. Connecter le gonfleur à l’alimentation électrique (sauf le GE10-B) à l’aide des câbles fournis.
2. Raccorder le tuyau à air à la bouche de sortie, dans le sens de la flèche pointant vers l'extérieur
du gonfleur (VOIR FIGURE 1 À LA PAGE 21).
3. Raccorder le tuyau à la vanne de gonflage de l'unité gonflable à l'aide des raccords fournis. Il
est important de choisir le bon raccord pour la vanne et de vérifier l'absence de fuite d'air.
S'assurer de l'absence de goulots d'étranglement, d'obstructions ou de fuites sur le trajet de l'air.
4. Régler le régulateur de pression à la valeur recommandée par le fabricant de l'unité gonflable.
5. Démarrer le gonflage en appuyant sur le bouton d'allumage (VOIR FIGURE 1 À LA PAGE 21).
6. Le gonfleur s'arrête automatiquement lorsque la pression réglée est atteinte.
ATTENTION, EN CAS DE SURCHAUFFE DUE À UNE UTILISATION PROLONGÉE, LE GONFLEUR
S'ARRÊTERA AUTOMATIQUEMENT POUR ÉVITER D'ENDOMMAGER SES COMPOSANTS.
CONSIDÉRER LA PRESSION DE GONFLAGE MAXIMALE ET ADÉQUATE DU GONFLABLE. TOUJOURS
RÉGLER LA PRESSION MAXIMALE RECOMMANDÉE À L’AIDE DU RÉGULATEUR DE PRESSION. NE PAS
TROP GONFLER.
9. POUR LE DÉGONFLAGE
1. Raccorder le tuyau à la bouche d'aspiration, dans le sens de la flèche pointant vers l'intérieur du
gonfleur (VOIR FIGURE 1 À LA PAGE 21).
2. Raccorder le tuyau à la vanne de l'unité gonflable à l'aide des raccords fournis. Il est important
de choisir le bon raccord pour la vanne et de vérifier l'absence de fuite d'air. S'assurer de
l'absence de goulots d'étranglement, d'obstructions ou de fuites sur le trajet de l'air.
3. Démarrer le dégonflage en appuyant sur le bouton d'allumage (VOIR FIGURE 1 À LA PAGE
21).
4. Lorsqu'une pression de -40/-50 mbar est atteinte, le gonfleur s'arrête automatiquement.
Cependant, il est possible d'arrêter le dégonflage en appuyant sur le bouton d'extinction (VOIR
FIGURE 1 À LA PAGE 21).
LE GONFLEUR PEUT ÊTRE ENDOMMAGÉ PAR DU SABLE, DE LA POUSSIÈRE OU DE L'EAU PÉNÉTRANT DANS
LA BOUCHE D’ENTRÉE. CELA ENTRAÎNERA UNE SURCHAUFFE ET ENDOMMAGERA LA TURBINE. DANS CE
CAS, ARRÊTER IMMÉDIATEMENT LE GONFLEUR.
10. DÉPANNAGE
PROBLÈME CAUSE POSSIBLE SOLUTION POSSIBLE
Le gonfleur ne
démarre pas.
Le gonfleur ne gonfle /
dégonfle pas.
Câble non connecté correctement.
Batterie non chargée (uniquement
pour GE10-B)
Mauvais branchement du tuyau.
Câble endommagé.
Connecter le câble.
Inspecter la batterie.
Raccorder le tuyau à air à la
bouche correcte.
Contacter un centre
d’assistance SCOPREGA.
Problème électronique probable. Contacter un centre
d’assistance SCOPREGA.
Basse pression
11. DIAGNOSTIC PAR LED DE L'ÉTAT DE LA BATTERIE,
ALARME DE TEMPÉRATURE ET CHARGE DE LA BATTERIE
LED SIGNIFICATION ÉTAT
OFF
Stand-by - Batterie CHARGÉE
Stand-by - Batterie à 50%
Batterie en charge
Stand-by - Batterie faible
Stand-by - Batterie ÉPUISÉE
Tension insusante de la
batterie Le gonfleur s'arrête
Surchaue à l'intérieur de la
pompe
Il est recommandé de recharger la batterie
avant de poursuivre.
Le gonfleur s'arrête
Le gonfleur ne se met pas en marche
ÉTEINTE
VERTE fixe
ORANGE clignotante
JAUNE
ORANGE clignotante en mode
rapide
ORANGE fixe
ORANGE fixe (5 secondes de
fonctionnement)
ROUGE fixe
Les accessoires recommandés lors de l'utilisation du gonfleur sont les accessoires d’origine
SCOPREGA.
L’utilisation de tout accessoire non recommandé pour ce gonfleur peut être dangereuse.
10.1 ACCESSOIRES
Le gonfleur ne doit pas fonctionner pendant la charge de la batterie. L'alimentateur
de la batterie ne fonctionne que si le gonfleur n'est pas utilisé.
ATTENTION

26
27
ÍNDICE
1. DESCRIPCIÓN FUNCIONAL
2. PREMISA
3. ADVERTENCIAS PRELIMINARES
4. REGLAS GENERALES DE SEGURIDAD
5. INTRODUCCIÓN
6. DATOS TÉCNICOS
7. PRIMER USO (SOLO PARA GE10-B)
8. PARA INFLAR
9. PARA DESINFLAR
10. SOLUCIÓN DE PROBLEMAS
10.1 ACCESORIOS
11. DIAGNÓSTICO DE LED PARA ESTADO BATERÍA,
ALARMA TEMPERATURA Y CARGA BATERÍA
1. DESCRIPCIÓN FUNCIONAL
1. TUBO DE INFLACIÓN
2. BOTONES (ON-OFF)
3. REGULADOR DE PRESIÓN
4. PUERTO DE INFLACIÓN (OUT)
5. PUERTO DE DEFLACIÓN (IN)
6. FUSIBLE DE SEGURIDAD
7. ADAPTADOR PINZA DE COCODRILO
8. TOMA DE MECHERO
GE10-3 GE10-8
1. TUBO DE INFLACIÓN
2. BOTONES (ON-OFF)
3. REGULADOR DE PRESIÓN
4. PUERTO DE INFLACIÓN (OUT)
5. PUERTO DE DEFLACIÓN (IN)
6. CARGADOR CON ADAPTADORES
GE10-B
5 6
13
4
782
5
162
3
4

28
29
MANUALD E
CONSERVE ESTAS INSTRUCCIONES
2. PREMISA
Estimado cliente:
Felicitaciones por elegir Scoprega.
Diseñamos y fabricamos productos de máxima calidad según las exigencias
de nuestros clientes. Scoprega ofrece la máxima calidad también en
la asistencia. Nuestras oficinas específicas garantizan asesoramiento e
instrucciones en caso de necesidad, así como una completa asistencia
técnica.
Le agradecemos por la confianza manifestada.
4. REGLAS GENERALES DE SEGURIDAD
1. CONSIDERE SIEMPRE EL ENTORNO DE TRABAJO.
No exponga el inflador a la lluvia. No utilice en presencia de líquidos o gases inflamables.
2. EVITE LA PUESTA EN MARCHA ACCIDENTAL.
No encienda el inflador con el puerto de entrada en contacto con polvo o agua.
3. PRESTE ATENCIÓN.
Preste atención a lo que está haciendo. Use el sentido común.
Lea estas instrucciones antes de utilizar el inflador. El incumplimiento de las
instrucciones mencionadas a continuación podría resultar en daños al producto y/o causar
lesiones graves.
ATENCIÓN
NO ALIMENTE EL INFLADOR A UNA TENSIÓN
SUPERIOR A LA NOMINAL.
1. Respete todas las instrucciones presentes en este documento.
2. Conserve las presentes instrucciones.
3. No bloquee las salidas de aireación (VER FIGURA 1 EN LA PÁG. 27).
4. Proteja siempre el cable de alimentación.
5. No abra el inflador. Asegúrese de que todas las actividades de mantenimiento sean efectuadas
por personal de mantenimiento cualificados autorizados por Scoprega. El mantenimiento es
necesario cuando el dispositivo resulta dañado en alguna medida o no funciona.
6. No altere el producto. La apertura del inflador implica la nulidad de la garantía.
7. Asegúrese de proporcionar una ventilación adecuada
8. Evite colocar objetos en proximidad del producto durante su funcionamiento.
9. Mantenga el presente dispositivo fuera del alcance de los niños.
10. El inflador en movimiento produce vibraciones por tanto, para evitar caídas accidentales,
recomendamos el uso en el suelo.
3. ADVERTENCIAS PRELIMINARES
INSTRUCCIONES
4. COMPRUEBE QUE NO HAYA PIEZAS DAÑADAS.
Antes de usar el inflador, inspeccione atentamente las paredes externas y sus componentes.
5. NO PONGA EN MARCHA los infladores portátiles en proximidad de líquidos inflamables o
atmósferas gaseosas o explosivas. Los motores de estos infladores producen chispas que pueden
generar humo.
6. ¡NO INHALAR!
El aire comprimido que sale del inflador no es puro. No inhalar nunca aire del inflador.
7. ¡ATENCIÓN! PELIGRO DE EXPLOSIÓN.
Infle la unidad hinchable solo siguiendo las recomendaciones del fabricante. Una presión excesiva
puede causar la explosión del hinchable, provocando lesiones personales.
8. NO DEJE NUNCA EL DISPOSITIVO SIN LA SUPERVISIÓN DE ALGUIEN.
Una inflación excesiva puede provocar graves lesiones y daños materiales.
9. ¡ATENCIÓN! PELIGRO DE FUNCIONAMIENTO NO SEGURO
No modifique ni intente reparar la unidad. No perfore ni efectúe modificaciones al inflador o a sus
accesorios. Cualquier modificación al producto implica la nulidad de la garantía.
10. No trasporte nunca el inflador del tubo flexible ni del cable de alimentación.
5. INTRODUCCIÓN
Los GE10-3, GE10-8 y GE10-B son infladores de dos etapas fáciles de usar. La primera etapa
de turbina ofrece caudales elevados de aire a baja presión (aprox. 50 mbar; 0,8 psi). Cuando la
turbina alcanza la presión máxima, se apaga y pone en marcha automáticamente el compresor
bicilíndrico. En este caso, el volumen de aire será menor, pero la presión será mucho mayor.
Este paso es evidente por el hecho de que el segundo módulo (de pistones) es más ruidoso. En
caso de llenado del hinchable, el módulo de la turbina se pone inmediatamente en marcha.
Debido a que la presión de la unidad hinchable es superior a 50 mbar (0,8 psi), la turbina se apaga
y se activa el módulo de pistones.
A diferencia del GE 10-3 y GE 10-8, el GE10-B está dotado de una batería recargable incorporada.
7. PRIMER USO (SOLO PARA GE10-B)
Para evitar puestas en marcha accidentales
durante el transporte, se desconecta la batería.
Antes del uso, abra el compartimiento baterías
desatornillando los 4 tornillos “A” (Figura 1)
y conecte el cable rojo al polo positivo de la
batería y el cable negro al polo negativo. Luego
cierre el compartimiento atornillando.
6. DATOS TÉCNICOS
ARTÍCULO VOLTAJE
(V)
CAPACIDAD
(L/minuto) FUNCIONES
GE 10-3 11-13 Vdc
PRESIÓN
MÁXIMA
(mbar)
300 (4,4 PSI)
450 INFLA/
DESINFLA
CONSUMO
CORRIENTE
(A)
13 A
GE 10-8 11-13 Vdc 800 (11,7 PSI)
450 13 A INFLA/
DESINFLA
GE 10-B 11-13 Vdc 800 (11,7 PSI)
450 13 A INFLA/
DESINFLA
A

30
31
NOTAS IMPORTANTES DE RECARGA (SOLO PARA GE 10-B)
1. Se puede obtener una vida útil más prolongada y mejores prestaciones del inflador si la batería
se recarga cuando la temperatura del aire se encuentra entre 18 °C - 24 °C (65 °F y 75 °F). NO
cargue la batería a una temperatura del aire inferior a +4.5 °C (+40 °F) o superior a +40.5 °C
(+105 °F). Esto es importante e impedirá graves daños a la batería.
2. El cargador de baterías y la batería pueden resultar calientes al tacto durante la carga. Se trata
de una condición normal y no indica un funcionamiento anómalo.
3. NO sumerja el cargador en agua o en otros líquidos.
4. NO intente cargar la batería con cargador de baterías diferente
de los descritos en el presente manual. El cargador y la batería han
sido diseñados específicamente para funcionar juntos.
5. El cargador de baterías no está destinado a un uso diferente de
la carga de la batería del inflador. Cualquier otro uso puede implicar
el riesgo de incendios, descargas eléctricas o electrocución.
6. Asegúrese de que el cable esté colocado de manera que no se
pueda pisar, que no exista peligro de tropiezo; en definitiva que no
se dañe no esté sujeto a tensión.
7. No utilice el cargador de baterías si el cable o el enchufe están
dañados.
8. No utilice el cargador de baterías si resulta dañado.
9. No desmontar el cargador de baterías. Un montaje incorrecto
puede implicar un riesgo de descargas eléctricas, electrocución o
incendios.
10. No use nunca otro cargador de baterías para cargar el
presente producto. Utilice siempre exclusivamente piezas de
recambio originales.
NO PERMITA LA PENETRACIÓN DE NINGÚN LÍQUIDO EN DEL CARGADOR
DE BATERÍAS. PUEDEN GENERARSE DESCARGAS ELÉCTRICAS.
8. PARA INFLAR
1. Conecte el inflador a la alimentación eléctrica (excepto el GE10-B) utilizando los cables suministrados.
2. Conecte el tubo del aire al puerto de salida, en el sentido de la flecha orientada hacia el exterior del
inflador (VER FIGURA 1 EN LA PÁG. 27).
3. Conecte el tubo a la válvula de inflación de la unidad hinchable mediante los accesorios suministrados.
Es importante elegir el accesorio adecuado a la válvula y comprobar que no haya pérdidas de
aire. Asegúrese de que no haya estrangulamientos, obstáculos o pérdidas en el recorrido del aire.
4. Configure el regulador de la presión al valor recomendado por el fabricante de la unidad hinchable.
5. Inicie la inflación presionando el botón de encendido (VER FIGURA 1 EN LA PÁG. 27).
6. El inflador se detendrá de forma automática cuando alcance la presión configurada.
ATENCIÓN, EN CASO DE SOBRECALENTAMIENTO DEBIDO AL USO PROLONGADO, EL INFLADOR SE
DETENDRÁ DE FORMA AUTOMÁTICA PARA EVITAR DAÑOS A SUS COMPONENTES.
CONSIDERE LA PRESIÓN DE INFLACIÓN MÁXIMA Y ADECUADA PARA EL HINCHABLE. CONFIGURE
SIEMPRE LA PRESIÓN MÁXIMA RECOMENDADA UTILIZANDO EL REGULADOR DE LA PRESIÓN. NO
INFLE DEMASIADO.
9. PARA DESINFLAR
1. Conecte el tubo al puerto de aspiración en el sentido de la flecha orientada hacia el interior del
inflador (VER FIGURA 1 EN LA PÁG. 27).
2. Conecte el tubo a la válvula de la unidad hinchable mediante los accesorios suministrados. Es
importante elegir el accesorio adecuado a la válvula y comprobar que no haya pérdidas de
aire. Asegúrese de que no haya estrangulamientos, obstáculos o pérdidas en el recorrido del aire.
3. Inicie la deflación presionando el botón de encendido (VER FIGURA 1 EN LA PÁG. 27).
4. Una vez que ha alcanzado una presión de -40/-50 mbar el inflador se detiene de forma
automática. De todos modos se puede interrumpir la deflación presionando el botón de apagado
(VER FIGURA 1 EN LA PÁG. 27).
EL INFLADOR SE PUEDE DAÑAR DEBIDO A LA PENETRACIÓN DE ARENA, POLVO O AGUA EN EL PUERTO
DE ENTRADA. ESTO PROVOCARÁ EL SOBRECALENTAMIENTO Y DAÑARÁ LA TURBINA. EN DICHO CASO
APAGAR INMEDIATAMENTE EL INFLADOR.
10. SOLUCIÓN DE PROBLEMAS
PROBLEMA POSIBLE CAUSA SOLUCIÓN POSIBLE
El inflador no
se pone en
marcha
El inflador no
infla/desinfla
Cable no conectado
adecuadamente.
Batería no cargada (solo para
GE10-B)
Conexión incorrecta del tubo.
Cable dañado.
Conecte el cable.
Inspeccione la batería.
Conecte el tubo del aire al puerto
correcto.
Póngase en contacto con un
centro de asistencia SCOPREGA.
Probable problema electrónico. Póngase en contacto con un
centro de asistencia SCOPREGA.
Presión baja
11. DIAGNÓSTICO DE LED PARA ESTADO BATERÍA,
ALARMA TEMPERATURA Y CARGA BATERÍA
LED SIGNIFICADO ESTADO
OFF
Stand By - Batería CARGADA
Stand By - Batería al 50%
Batería en carga
Stand By - Batería
agotándose
Stand By - Batería AGOTADA
Tensión insuficiente de la
batería El inflador se apaga
Sobretemperatura dentro de
la bomba
Se recomienda recargar la batería antes
de continuar.
El inflador se apaga
El inflador no se enciende
APAGADO
VERDE fijo
NARANJA intermitente
AMARILLO
NARANJA intermitente rápido
NARANJA fijo
NARANJA fijo (5 segundos de
funcionamiento)
ROJO fijo
Los accesorios recomendados para el uso del inflador son los originales SCOPREGA.
El uso de cualquier accesorio no recomendado para este inflador puede resultar peligroso.
10.1 ACCESORIOS
Durante la carga de la batería el inflador no debe funcionar. El alimentador de la
batería funciona solo si el inflador no está accionado.
ATENCIÓN

32
-
 1
1
-
 2
2
-
 3
3
-
 4
4
-
 5
5
-
 6
6
-
 7
7
-
 8
8
-
 9
9
-
 10
10
-
 11
11
-
 12
12
-
 13
13
-
 14
14
-
 15
15
-
 16
16
-
 17
17


SCOPREGA GE10-3 Electric Inflator Air Pump Manuel utilisateur
- Taper
- Manuel utilisateur
dans d''autres langues
Documents connexes
-
 SCOPREGA GE 1800 ROMA Manuel utilisateur
-
 SCOPREGA GE 22 RC Electronic Inflator Remote Compressor Guide d'installation
-
SCOPREGA G E BTP-2 Manuel utilisateur
-
 SCOPREGA 6130650 Electric Inflator Manuel utilisateur
-
 SCOPREGA GE20-2 Electric Inflator Manuel utilisateur
-
 SCOPREGA GE2000 ARS Electric Inflator Manuel utilisateur


