KitchenAid KUWL214KSB Manuel utilisateur
- Catégorie
- Boissons glacées
- Taper
- Manuel utilisateur
Ce manuel convient également à

For questions about features, operation/performance, parts, accessories, or service, call: 1-800-422-1230
or visit our website at... www.kitchenAid.com
In Canada, call: 1-800-807-6777, or visit our website at... www.KitchenAid.ca
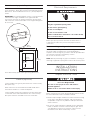
UNDER COUNTER WINE CELLAR
Use and Care Guide and Installation Instruction
TABLE OF CONTENTS
WINE CELLAR SAFETY .................................................. 2
Proper Disposal of Your Old Wine Cellar ....................... 3
INSTALLATION REQUIREMENTS ................................... 3
Tools and Parts .............................................................. 3
Location Requirements .................................................. 3
Product Dimensions ....................................................... 4
Custom Overlay Panel ................................................... 4
Handle (Optional) .......................................................... 5
Electrical Requirements ................................................. 5
INSTALLATION INSTRUCTIONS ..................................... 5
Unpack the Wine Cellar ................................................. 5
Custom Overlay Panel Installation ................................. 6
Installation and Door Closing ......................................... 7
USING WINE CELLAR ..................................................... 7
Controls ......................................................................... 7
Normal Sounds .............................................................. 8
Stocking the Wine Cellar ................................................ 9
Wine Racks .................................................................... 9
CARE AND CLEANING .................................................. 10
Cleaning ...................................................................... 10
Removing Base Grille .................................................. 10
Vacation Care .............................................................. 11
Moving Care ................................................................ 11
TROUBLESHOOTING .....................................................11
ASSISTANCE ................................................................. 13
In the U.S.A .................................................................. 13
In Canada .................................................................... 13
Accessories ................................................................. 13
W11515230A

2
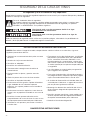
Your safety and the safety of others are very important.
We have provided many important safety messages in this manual and on your appliance. Always read and obey all
safety messages.
You can be killed or seriously injured if you don’t immediately follow
instructions.
You can be killed or seriously injured if you don’t follow instructions.
All safety messages will tell you what the potential hazard is, tell you how to reduce the chance of injury, and tell you
what can happen if the instructions are not followed.
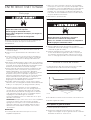
IMPORTANT SAFETY INSTRUCTIONS
WARNING:
To reduce the risk of fire, electric shock, or injury when using your wine cellar, follow these basic
precautions:
This is the safety alert symbol.
This symbol alerts you to potential hazards that can kill or hurt you and others.
All safety messages will follow the safety alert symbol and either the word “DANGER” or “WARNING.”
These words mean:
WINE CELLAR SAFETY
Plug into a grounded 3 prong outlet.
Do not remove ground prong.
Do not use an adapter.
Do not use an extension cord.
Disconnect power before servicing.
Replace all parts and panels before operating.
Remove doors from your old wine cellar.
Use non flammable cleaner.
Do not store or use petrol, flammable liquids or gas
in the vicinity of this or other electrical appliances.
The fumes can cause fires or explosions.
Do not store explosive substances such as aerosol
cans with a flammable propellant in this wine cellar.
Do not use or place electrical devices inside the
wine cellar compartments if they are not of the type
expressly authorized by the manufacturer.
Use two or more people to move and install wine
cellar
.
This appliance is not intended for use by persons
(including childr
en) with reduced physical, sensory
or mental capabilities, or lack of experience and
knowledge, unless they have been given supervision
or instruction concerning use of the appliance by a
person responsible for their safety.
Children should be supervised to ensure that they
do not play with the appliance.
To avoid the risk of children becoming trapped and
suffocating, do not allow them to play or hide inside
the wine cellar.
If the power supply cord is damaged, it must be
replaced by the manufacturer or its service agent or
a similarly qualified person.
Keep ventilation openings, in the appliance
enclosure or in the built-in structure, clear of
obstruction.
Do not use mechanical devices or other means to
accelerate the defrosting process, other than those
recommended by the manufacturer
Do not damage the refrigerant circuit.
SAVE THESE INSTRUCTIONS

3
Suffocation Hazard
Remove doors or lid from your old appliance.
Failure to do so can result in death or brain damage.
Proper Disposal of your Old Wine Cellar
WARNING: Risk of child entrapment. Before you
throw away your old Wine Cellar:
Take off the door.
Leave the shelves in place so that children may not easily
climb inside.
IMPORTANT: Child entrapment and
suffocation are not problems of the past.
Junked or abandoned wine cellars are still
dangerous – even if they will sit for “just a
few days.”
If you are getting rid of your old wine
cellar, please follow these instructions to
help prevent accidents.
Important information to know about disposal of
refrigerants:
Dispose of refrigerator in accordance with Federal and
Local regulations. Refrigerants must be evacuated by a
licensed, EPA certified refrigerant technician in
accordance with established procedures.
INSTALLATION
REQUIREMENTS
Tools and Parts
Gather the required tools and parts before starting
installation.
Tools and parts needed:
Phillips screwdriver.
Custom Overlay Door Panel - Refer “Custom Overlay
Panel Pr
eparation”.
Custom handle and mounting hardware (optional).
Parts supplied:
M4 x 30 flathead screws (8).
IMPORTANT: This appliance is intended to be used in
household and similar applications such as:
Staff kitchen areas in shops, offi ce and other working
environments;
Far
m houses and by clients in hotels, motels and other
residential type envir
onments;
Bed and breakfast type environments;
Catering and similar non-retail applications.
NOTES:
For the wine cellar to be fl
ush with the front of the base
cabinets, remove any baseboar
ds or moldings from the rear
of the opening. See “Product Dimensions” and later in this
section, “Opening Dimensions.”
It is recommended that you do not install the wine cellar near
an oven, radiator, or other heat sour
ce.
Do not install in a location where the temperature will fall
below 55 °F (13 °C). For best performance, do not install the
wine cellar behind a cabinet door or block the base grille.
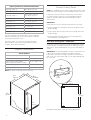
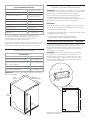
Opening dimensions:
Height dimensions are shown with the leveling legs extended
to the minimum height.
NOTE: When leveling legs are fully extended, add 5/8”
(15 mm) to the height dimensions. See “Product Dimensions.”
If the fl oor of the opening is not level with the kitchen
fl
oor, shim the opening to make it level with the kitchen fl oor.
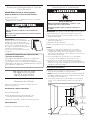
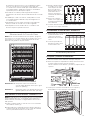
Location Requirements
Explosion Hazard
Keep flammable materials and vapors, such as gasoline,
away from wine cellar.
Failure to do so can result in death, explosion, or fire.
A
B
C
D
E
F
F
G
H
G
I
Recessed
receptacle
locations
Utility
opening

4
Opening and utility location dimensions
Opening width - A
24” (60.96 cm) min.
Opening depth - B
24” (60.96 cm) min.
Opening height - C
34
1
/2” (87.6 cm) min.
35” (88.9 cm) max.
Dimension - D
12
1
/16” (30.64 cm)
Dimension - E 21
3
/4” (55.16 cm)
Dimension - F 1
3
/4” (4.44 cm)
Dimension - G 3” (7.55 cm)
Dimension - H 4
1
/2” (11.37 cm)
Dimension - I 9
1
/4” (23.47 cm)
For fl ush installation, the power outlet can be installed in
adjacent cabinetry with a cutout on the power cord side
for routing of the power cord.
The power outlet can also be recessed on the back
wall behind the unit as per recommended receptacle
locations in the above illustration.
Depth
(no handle)
23
7
/8”
(60.72 cm)
34
3
/8”
(87.32 cm)
30
5
/8”
(77.5 cm)
NOTE: The power cord is 60” (152.4 cm) long.
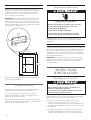
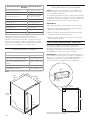
Custom Overlay Panel
NOTE: For standard stainless steel or glass door models, skip
these instructions and go to “Electrical Requirements” section.
If you plan to install a custom overlay panel, you will need
to create the panel yourself or consult a qualifi ed cabinet
maker or carpenter. Refer dimension drawings for panel
specifi cations.
IMPORTANT:
The thickness of the overlay panel must be 3/4” (19 mm).
Custom solid door overlay panel must not weigh more than
20 lb (9.07 kg).
Custom glass door overlay panel must not weigh more than
10 lb (4.54 kg).
Overlay panels weighing more than recommended may
cause damage to your appliance.
Solid door overlay panel - Preparation:
Create the custom overlay panel using the dimensions shown
in the illustration “Solid door overlay panel and hinge routing
dimensions”. Route shaded areas to a 1/2” (12 mm) depth as
shown.
IMPORTANT: The following graphic shows a custom panel for
a door with the hinges installed on the right-hand side.
If your wine cellar has the hinges installed on the left-hand
side, rotate the custom frame 180° so the hinge markings will
be on the left.
2"
(53 mm)
1/4"
(7 mm)
1/8"
(3 mm)
1/2"
(12 mm)
4
15
/16”
(125 mm)
23
3
/4”
(60.3 cm)
30
5
/8”
(77.75 cm)
Solid door overlay panel and hinge routing dimensions
Width (up to hinge cover)
23
7
/8” (60.72 cm)
Height (up to hinge cover) 34
3
/8” (87.32 cm)
Panel ready models depth
(with 3/4” panel and no handle)
23
13
/16” (60.5 cm)
Raw Door Height
Depth (no handle)
30
5
/8” (77.75 cm)
23
5
/8” (60.01 cm)
Overall product
Product Dimensions

5
Glass door overlay panel - Preparation:
Create the custom overlay panel using the dimensions shown
in the illustration “ Glass door overlay panel and hinge routing
dimensions”. Route shaded areas to a 1/2” (12 mm) depth as
shown.
IMPORTANT: The following graphic shows a custom panel for
a door with the hinges installed on the right-hand side.
If your wine cellar has the hinges installed on the left-hand
side, rotate the custom frame 180° so the hinge markings will
be on the left.
Handle (optional)
Custom handles are typically attached to the custom overlay
door panel only.
Refer instructions received with KitchenAid handle kits to
install these handles on custom wood panels.
Custom handle needs to be installed on the door panel with
countersunk holes and installed before the custom overlay
door panel has been installed on the wine cellar door.
2"
(53 mm)
1/4"
(7 mm)
1/8"
(3 mm)
1/2"
(12 mm)
4
15
/16”
(125 mm)
23
3
/4”
(60.3 cm)
17
1
/16”
(43.3 cm)
21
13
/16”
(55.4 cm)
30
5
/8”
(77.75 cm)
Glass door overlay panel and hinge routing dimensions
Electrical Requirements
Electrical Shock Hazard
Plug into a grounded 3 prong outlet.
Do not remove ground prong.
Do not use an adapter.
Do not use an extension cord.
Failure to follow these instructions can result in death,
fire, or electrical shock.
Before you move your wine cellar into its fi nal location, it
is important to make sure you have the proper electrical
connection.
Recommended grounding method:
A 115 V, 60 Hz, AC only, 15 A or 20 A fused, grounded
electrical supply is required. It is recommended that a
separate circuit serving only your wine cellar be provided. Use
an outlet that cannot be turned off by a switch.
Do not use an extension cord.
NOTE: Before performing any type of installation, cleaning, or
removing a light bulb, unplug wine cellar or disconnect power.
INSTALLATION
INSTRUCTIONS
Unpack the Wine Cellar
Excessive Weight Hazard
Use two or more people to move and install or
uninstall appliance.
Failure to do so can result in back or other injury.
Before using your wine cellar, all packaging materials should
be removed and the interior should be cleaned.
Remove tape and glue residue from surfaces before turning
on the wine cellar. With your fi ngers, rub a small amount
of liquid dish soap over any adhesive and wipe with warm
water to remove.
Do not use sharp instruments, rubbing alcohol, fl ammable
fl uids, or abrasive cleaners to remove tape or glue. These
can damage the surfaces of your wine cellar. For more
information, refer “Wine Cellar Safety” section.

6
Dispose of and/or recycle all packaging materials.
After all packaging materials have been removed, clean the
inside of your wine cellar. Refer the cleaning instructions in
“Cleaning” section.
NOTE: For standard stainless steel or glass door models,
skip to “Door Closing” section.
Custom Overlay Panel Installation
IMPORTANT:
Create custom overlay panel according to the specifi cations
in the “Custom Overlay Panel” section.
KitchenAid is not responsible for the removal or addition of
molding or decorative panels that would not allow access to
the wine cellar for service.
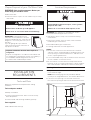
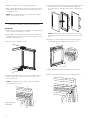
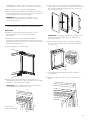
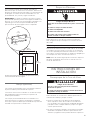
1. Open the door completely to 90°.
90°
2. Remove the gasket from the corners of the door, pulling
gently until the two screw holes in each corner of the
door can be seen.
NOTE: The gasket does not have to be removed from
the door, only the corners.
3. Using two people, hold the custom overlay panel against
the door. Be sure that the top and bottom hinges fit
accurately into the routing on back of the custom wood
panel.
NOTE: Handle needs to be installed before the custom
overlay door panel has been installed on the wine cellar
door.
4. Fasten the custom panel to the door using two wood
screws (provided in installation kit) at each corner.
A. Screw holes
B. Gasket
A. M4 x 30 fl athead screws (provided in installation kit)
A
A
B
A
A
5. Press the gasket firmly back into it’s original position.

7
Installation and Door Closing
Your wine cellar has four leveling legs. If your wine cellar
seems unsteady or you want the door to close more easily,
adjust the wine cellar’s tilt using the instructions below.
Excessive Weight Hazard
Use two or more people to move and install or uninstall
appliance.
Failure to do so can result in back or other injury.
Electrical Shock Hazard
Plug into a grounded 3 prong outlet.
Do not remove ground prong.
Do not use an adapter.
Do not use an extension cord.
Failure to follow these instructions can result in death,
fire, or electrical shock.
1. Plug into a grounded 3 prong outlet.
When moving your Wine Cellar:
Your wine cellar is heavy. When moving the wine cellar for
cleaning or service, be sure to cover the oor with
cardboard or hardboard to avoid door damage.
Always pull the wine cellar straight out when moving it.
Do not wiggle or “walk” the wine cellar when trying to
move it, as oor damage could occur.
2. Move the wine cellar into its final location.
3. Turn the leveling legs to the right to lower the wine cellar, or
turn the leveling legs to the left to raise it.
It may take several turns of the leveling legs to adjust the
tilt of the wine cellar.
NOTE: Having someone push against the top of the wine
cellar takes some weight off the leveling legs.
This makes it easier to adjust the leveling legs.
4. Open the door and check that it closes as easily as you
like. If not, tilt the wine cellar slightly more to the rear by
turning both front leveling screws to the right.
It may take several more turns, and you should turn both
leveling legs the same amount.
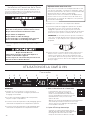
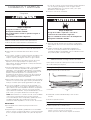
USING WINE CELLAR
Controls
NOTES:
When the wine cellar is turned On for the fi rst time, the
temperature defaults to the recommended setting.
There are two adjustable temperature controls, one for
each compartment.
The left temperature and preset touch pads control the
temperature of the upper compartment.
The right temperature and preset touch pads control the
temperature of the lower compartment.
1 2 3 4 45 6 7 85
1. Turning Control On/Off
The first time that the wine cellar is plugged
in, the control will be in Cool Off mode. Cool
On and Cool Off will be the only options that
display.
Press COOL ON for 3 seconds to turn on the wine cellar.
All menus and recommended temperature settings will be
displayed.
2. Auto Light Option
Features a proximity sensor in the base grille
that automatically ramps on the LED interior
display lighting when motion is detected.

8
When motion is no longer detected, the interior display light
will turn off after 2 minutes.
Press the AUTO LIGHT option to activate this feature.
When the AUTO LIGHT is not activated, the interior display
light will only turn on when the door is opened.
NOTE: Leaving the light on for an extended period of time
will slightly increase the temperature of the wine cellar.
3. Control Lock
Avoids unintended temperature changes and
makes it easy to clean the controls.
To activate Lock Mode, press and hold
LOCK for 3 seconds. After the countdown,
all other displays will turn off and become unavailable
except Cool On, Cool Off and Lock.
4. Using Presets
For your convenience, your wine cellar also has controls
that are preset to recommended storage temperature for
specific wines. Pressing any preset option will set the
temperature to the recommended temperature for the
specified wine:
Assorted: 54 °F (12 °C)
Champagne: 46 °F (7 °C)
Red wine: 64 °F (17 °C)
Sweet wine: 42 °F (5 °C)
White wine: 50 °F (10 °C)
5. Adjusting the Temperatures
To adjust set point
temperatures, press “+” (plus)
or “-” (minus) until the desired
temperature setting is
reached. The control is set
correctly when the wine is as cold as you like it.
NOTES:
The set point for the wine cellar is 50 °F (10 °C) for both the
upper and lower compartments. The set point range for the
upper compartment is 42 °F to 54 °F (5 °C to12 °C) and
42 °F to 64 °F (5 °C to 17 °C) for the lower compartment.
Wait at least 24 hours between adjustments for the product
to acclimate. Recheck the temperatures before making
further adjustments.
6. Viewing Celsius/Fahrenheit Temperatures
Press the F/C touch pad to toggle between
displaying the temperature in degrees
Fahrenheit and degrees Celsius.
The corresponding indicator will illuminate.
7. Sabbath Mode
Allows the door of the wine cellar to be
opened or closed on the Sabbath or other
religious holidays without directly turning on
or off any lights, digital readouts, fans,
valves, tones or alarms. By selecting this
feature, the temperature set points remain unchanged,
but the control panel lights, interior lights, and control
audio turn off. For most efficient wine cellar operation,
it is recommended to exit the Sabbath Mode when it is
no longer required.
Press and hold SABBATH for 3 seconds to turn on the
feature. After the 3 second countdown, the feature will
activate and all other displays will turn Off.
Press and hold SABBATH for 3 seconds to turn off the
feature and turn on the display.
8. Over Temp Alarm
The Over Temperature feature is designed
to let you know when the wine cellar
temperature rises above 70 °F (21 °C) for 4
hours or longer. The audio alarm will shut
off automatically when the temperature
returns to normal. To let you know an Over
Temperature condition occurred, the indicator light will
continue to flash until the Reset Alarm touch pad is
pressed.
If the over temperature condition is still present when an
Over Temp reset is performed, the indicator light will
continue to reactivate every 4 hours until the wine cellar
temperature is below 70 °F (21 °C).
NOTE: These features will not appear on your control
unless your wine cellar is above 70 °F (21 °C) and the
alarm requires a reset.
9. Door Open Alarm
Helps avoid wine from spoiling by giving an audio and
visual alert if the door is left open for 5 minutes.
If the door is open longer than 5 minutes, an alarm will
sound every 2 minutes until the door is closed or any
control is pressed.
10. Showroom Mode
This mode is used only when the wine cellar is on
display in a retail store. To activate Showroom Mode,
press and hold both Cool On and Sabbath for 3
seconds. If you unintentionally turn on Showroom Mode,
Cool Off will light up on the display, and the controls will
appear to work. Exit Showroom Mode by pressing and
holding COOL ON and SABBATH at the same time for 3
seconds.
Normal Sounds
Your new wine cellar may make sounds that your old one
didn’t make. Because the sounds are new to you, you might
be concerned about them. Most of the new sounds are
normal. Hard surfaces, such as the fl ooring and surrounding
structures, can make the sounds seem louder. The following
describes the kinds of sounds and what may be making them.
Your wine cellar is designed to run more effi ciently to keep
your wine at the desired temperatures and to minimize
energy usage. The high effi ciency compressor and fans may

9
cause your wine cellar to run longer than your old one.
You may also hear a pulsating or high-pitched sound from
the compressor or fans adjusting to optimize performance.
Rattling noises may come from the fl ow of refrigerant or items
stored inside the wine cellar.
As each cycle ends, you may hear a gurgling sound due to
the refrigerant fl owing in your wine cellar.
You may hear water running into the drain pan when the wine
cellar is defrosting.
You may hear clicking sounds when the wine cellar starts or
stops running.
Stocking the Wine Cellar
NOTE: For optimum wine storage, place white wines at the
top of the wine cellar, light red wines in the center and
champagne/larger diameter wine bottles at the bottom.
Racks 1-5: For storing up to eight 750 ml wine bottles
[diameter less than or equal to 3
1
/8” (80 mm)].
Rack 6: For storing up to five larger wine bottles
[diameter up to 3
3
/4” (95 mm)].
To stock the Wine Cellar - Racks 1 to 5:
NOTE: The wine rack can be stocked with the bottles facing
either direction, however, to optimize storage adjacent bottles
should be facing in opposite.
1. Start stocking the wine cellar with the bottom display
rack (5).
2. Starting on the left-hand side, place the first bottle on the
bottom of the rack with the neck of the bottle facing the
front of the wine cellar.
3. Place the next bottle
on its side with the
neck of the bottle
facing the back of the
wine cellar.
Alternate the direction
of the bottles, in this
manner, until the
display rack is full.
1
2
3
4
5
6
4. Slide the bottom rack
into place and pull the
next rack (4) forward.
5. Continue stocking each remaining rack as described in the
above steps.
To stock the Wine Cellar - Rack 6:
1. Starting from left-hand
side of the bottom
rack, place the first
bottle with the neck of
the bottle facing the
front of the wine cellar.
2. Continue to place the
remaining bottles
facing in the same
direction.
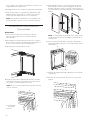
Wine Racks
Remove and replace the racks:
1. Pull the rack forward until it stops.
2. Press down on the left-hand lever while lifting up on the
right-hand lever to release the rack. Pull the rack forward
and lift it up and out of the rack supports.
A
A. Lever
3. Replace the rack by inserting the rack into the supports
and sliding it in until it locks.

10
CARE AND CLEANING
Cleaning
Explosion Hazard
Risk of fire or explosion.
Flammable refrigerant used.
Do not use mechanical devices to defrost refrigerator.
Do not puncture refrigerant tubing.
dispenser covers or door gaskets. If unintentional contact
does occur, clean plastic part with a sponge and mild
detergent in warm water. Dry immediately with a soft, dry
cloth to absorb any remaining water.
5. Replace the racks.
Condenser cleaning
Clean the wine cellar once a month to avoid buildup of odors.
Wipe up spills immediately.
To clean your Wine Cellar:
1. Unplug wine cellar or disconnect power.
2. Remove all racks from inside the wine cellar.
3. Hand wash, rinse, and dry removable parts and interior
surfaces thoroughly. Use a clean sponge or soft cloth and a
mild detergent in warm water.
To avoid damaging wooden tines and trim pieces, wipe them
off with a clean sponge or soft cloth and warm water. Do not
use detergent or immerse the entire rack into water when
cleaning.
Do not use abrasive or harsh cleaners such as window
sprays, scouring cleansers, fl ammable fl uids, cleaning
waxes, concentrated detergents, bleaches or cleansers
containing petroleum products on plastic parts, interior and
door liners or gaskets. Do not use paper towels, scouring
pads, or other harsh cleaning tools.
These can scratch or damage materials.
To help remove odors, you can wash interior walls with a
mixture of warm water and baking soda [2 tbs to 1 qt (26 g to
0.95 L) of water].
4. Wash stainless steel and painted metal exteriors with a
clean sponge or soft cloth and a mild detergent in warm
water. Do not use abrasive or harsh cleaners, or cleaners
containing chlorine. These can scratch or damage
materials. Dry immediately with a soft, dry cloth to absorb
any remaining water..
NOTE: To keep your stainless steel wine cellar looking like
new and to remove minor scuffs or marks, it is
recommended that you use the manufacturer’s approved
Stainless Steel Cleaner and Polish. To order the cleaner,
refer “Accessories” section.
IMPORTANT:
This cleaner is for stainless steel parts only!
Do not allow the Stainless Steel Cleaner and Polish to come
into contact with any plastic parts such as the trim pieces,
Removing Base Grille
You must remove the base grille to access the condenser
coils for cleaning.
To remove the base grille:
1. Open the wine cellar door.
A
A. Screws
2. Using a Phillips screwdriver, remove the two screws.
3. Remove the base grille.
To replace the base grille:
1. Open the wine cellar door.
2. Position the base grille so that both tabs align and the base
grille snaps into place. Replace two screws.
Tighten the screws.
1. Remove the base grille to access condenser for cleaning.
Refer “Removing Base Grille” section.
2. Clean the condenser coils regularly. They are located
behind the base grille. Coils may need to be cleaned as
often as every other month. This may help save energy.
Explosion Hazard
Risk of fire or explosion due to puncture of refrigerant
tubing.
Follow handling instructions carefully.
Flammable refrigerant used.

11
Vacation Care
If you choose to turn the wine cellar off before you leave,
follow these steps.
1. Remove all wine bottles from the wine cellar.
2. Unplug the wine cellar.
3. Clean the wine cellar. Refer “Cleaning” section.
4. Tape a rubber or wood block to the top of the door to prop
it open far enough for air to get in. This stops odor and
mold from building up.
Moving Care
When you are moving your wine cellar to a new home, follow
these steps to prepare it for the move.
1. Remove all wine bottles from the wine cellar.
2. Unplug the wine cellar.
3. Clean, wipe, and dry it thoroughly.
4. Take out all removable parts, wrap them well, and tape them
together so they don’t shift and rattle during the move.
5. Tape the doors shut and tape the power cord to the wine
cellar.
When you get to your new home, put everything back and
refer to the “Installation Instructions” received with the wine
cellar.
TROUBLESHOOTING
GENERAL OPERATION Possible Causes and/or Recommended Solutions
Wine Cellar will not operate
The motor seems to run too much
Try the solutions suggested here first in order to avoid the cost of an unnecessary service call.
Electrical Shock Hazard
Plug into a grounded 3 prong outlet.
Do not remove ground prong.
Do not use an adapter.
Do not use an extension cord.
Failure to follow these instructions can result in death,
fire, or electrical shock.
Power supply cord unplugged? Plug into a grounded 3 prong outlet.
Is outlet working? Plug in a lamp to see if the outlet is working.
Household fuse blown, or a circuit breaker tripped? Replace the fuse or reset the
circuit. If the problem continues, call an electrician.
Are controls on? Be sure that the wine cellar controls are on. Refer “Controls”
section.
Is the temperature outside hotter than normal? Expect the motor to run longer
under warm conditions. At normal temperatures, expect your motor to run about
40 % to 80 % of the time. Under warmer conditions, expect it to run even more of
the time.
Is the door opened often? Expect the motor to run longer when this occurs. In
order to conserve energy, try to get everything you need out of the wine cellar at
once. Keep wine bottles positioned label side up so that they are easy to fi nd, and
close the door as soon as the wine is removed.

12
GENERAL OPERATION
TEMPERATURE AND MOISTURE`
DOOR
Possible Causes and/or Recommended Solutions
Possible Causes and/or Recommended Solutions
Possible Causes and/or Recommended Solutions
The motor seems to run too much
Temperature is too warm
The door is difficult to open
The door will not close completely
There is interior moisture buildup:
Is the control set correctly for the surrounding conditions? Refer “Controls”
section.
Is the door closed completely? Push the door fi rmly shut. If it will not shut all the
way, refer “The door will not close completely” later in this section.
Are the condenser coils dirty? This obstructs air transfer and makes the motor
work harder. Clean the condenser coils. Refer “Cleaning” section.
Is the door opened often? Be aware that the wine cellar will warm when this
occurs. In order to keep the wine cellar cool, try to get everything you need out of
the wine cellar at once. Keep wine bottles positioned label side up so that they are
easy to fi nd, and close the door as soon as the wine is removed.
Is the control set correctly for the surrounding conditions? Refer “Controls”
section.
Is the base grille blocked? For best performance, do not install the wine cellar
behind a cabinet door or block the base grille.
Is the door opened often? To avoid humidity buildup, try to get everything you
need out of the wine cellar at once, keep wine bottles positioned label side up so
that they are easy to fi nd, and close the door as soon as the wine is removed. When
the door is opened, humidity from the room air enters the wine cellar. The more
often the door is opened, the faster humidity builds up, especially when the room
itself is very humid.
Is it humid? It is normal for moisture to build up inside the wine cellar when the air
is humid.
Is the control set correctly for the surrounding conditions? Refer “Controls”
section.
Is the gasket dirty or sticky? Clean the gasket and the surface that it touches. Rub
a thin coat of paraffi n wax on the gasket following cleaning.
Are the racks out of position? Put the racks back into their correct positions. Refer
“Wine Racks” section for more information.
Is the gasket sticking? Clean the gasket and the surface that it touches. Rub a thin
coat of paraffi n wax on the gasket following cleaning.
Explosion Hazard
Use nonflammable cleaner.
Failure to do so can result in death, explosion, or fire.

13
If you need service:
Before calling for assistance or service, please check
“Troubleshooting.” It may save you the cost of a service call.
If you still need help, follow the instructions below.
When calling, please know the purchase date and the
complete model and serial number of your appliance.
This information will help us to better respond to your
request. Please refer to the warranty page in this manual for
more information on service.
If you need replacement parts:
Component parts should be replaced with like components
and servicing should be done by factory authorized service
personnel, so as to minimize the risk of possible ignition due
to incorrect parts or improper service.
In the U.S.A.
Call the KitchenAid Customer eXperience Center
toll free: 1-800-422-1230.
Our Consultants Provide Assistance With:
Features and specifi cations on our full line of appliances.
Installation information.
Use and maintenance procedures.
Accessory and repair parts sales.
Specialized customer assistance (Spanish speaking,
hearing impaired, limited vision, etc.).
Referrals to local dealers, repair parts distributors, and
service companies. KitchenAid designated service
technicians are trained to fulfi ll the product warranty and
provide after-warranty service, anywhere in the United
States.
To locate the KitchenAid designated service company in
your area, you can also look in your telephone directory
Yellow Pages.
For Further Assistance
If you need further assistance, you can write to KitchenAid
with any questions or concerns at:
KitchenAid Brand Home Appliances
Customer eXperience Center
553 Benson Road
Benton Harbor, MI 49022-2692
Please include a daytime phone number in your
correspondence.
In Canada
Call the KitchenAid Canada Customer eXperience Centre toll
free: 1-800-807-6777.
Our Consultants Provide Assistance With:
Features and specifi cations on our full line of appliances.
Use and maintenance procedures.
Accessory and repair parts sales.
Referrals to local dealers, repair parts distributors, and
services companies. KitchenAid Canada designated service
technicians are trained to fulfi ll the product warranty and
provide after-warranty service, anywhere in Canada.
For Further Assistance
If you need further assistance, you can write to KitchenAid
Canada with any questions or concerns at:
KitchenAid Canada
Customer eXperience Centre
200 – 6750 Century Ave.
Mississauga, Ontario L5N 0B7
Please include a daytime phone number in your
correspondence.
Accessories
The following accessories are available for your wine cellar.
To order an accessory, contact us and ask for the Part
Number.
In the U.S.A., visit our webpage
www.kitchenaid.com/accessories
or call 1-800-442-9991.
In Canada, visit our webpage www.whirlpoolparts.ca
or call 1-800-807-6777.
Stainless Steel Cleaner and Polish
Order Part #4396095
ASSISTANCE

Pour des questions sur les fonctionnalités, fonctionnement/performance, pièces, accessoires ou service, appelez le: 1-800-422-1230
ou visitez notre site Web à ... www.kitchenAid.com
Au Canada, pour assistance, installation ou service, composez le 1-800-807-6777 ou visitez notre site web à... www.KitchenAid.ca
CAVE À VIN
Guide d’Utilisation et d’Entretien et Instructions d’Installation
TABLE DES MATIÈRES
SÉCURITÉ DE LA CAVE À VIN ...................................... 15
Mise au Rebut de Votre Vieille Cave à Vin ................... 16
EXIGENCES D’INSTALLATION ..................................... 16
Outils et Pièces ............................................................ 16
Exigences d’Emplacement .......................................... 16
Dimensions du Produit ................................................. 17
Panneau Décoratif Personnalisé .................................. 17
Poignées (Facultatif) .................................................... 18
Spécifi cations Électriques............................................ 18
INSTRUCTIONS D’INSTALLATION ............................... 18
Déballage de la Cave à Vin ......................................... 18
Installation du Panneau Personnalisé .......................... 19
Installation et Fermeture de la Porte ............................ 20
UTILISATION DE LA CAVE À VIN .................................. 20
Commandes ................................................................ 20
Sons Normaux ............................................................. 21
Stockage dans la Cave à Vin ....................................... 22
Porte-Bouteilles ............................................................ 22
ENTRETIEN ET NETTOYAGE ........................................ 23
Nettoyage .................................................................... 23
Enlever la Grille de la Base .......................................... 23
Entretien Avant les Vacances....................................... 24
Précautions à Prendre Avant un Déménagement ........ 24
DÉPANNAGE .................................................................. 24
ASSISTANCE ................................................................. 26
Aux États-Unis. ............................................................ 26
Au Canada ................................................................... 26
Accessoires ................................................................. 26
14

15
SÉCURITÉ DE LA CAVE À VIN
Votre sécurité et celle des autres est très importante.
Nous donnons de nombreux messages de sécurité importants dans ce manuel et sur votre appareil ménager.
Assurez-vous de toujours lire tous les messages de sécurité et de vous y conformer.
Risque possible de décès ou de blessure grave si vous ne suivez pas
immédiatement les instructions.
Risque possible de décès ou de blessure grave si vous ne suivez pas
les instructions.
Tous les messages de sécurité vous diront quel est le danger potentiel et vous disent comment réduire le risque de
blessure et ce qui peut se produire en cas de non-respect des instructions.
IMPORTANTES INSTRUCTIONS DE SÉCURITÉ
AVERTISSEMENT: Pour réduire les risques d’incendie, de décharge électrique ou de blessures lors de l’utilisation
du cave à vin, prendre quelques précautions fondamentales, y compris les suivantes:
Voici le symbole d’alerte de sécurité.
Ce symbole d’alerte de sécurité vous signale les dangers potentiels de décès et de blessures graves à
vous et à d’autres.
Tous les messages de sécurité suivront le symbole d’alerte de sécurité et le mot “DANGER” ou
“AVERTISSEMENT”. Ces mots signifient:
Brancher sur une prise de courant à 3 alvéoles,
reliée à la terre.
Ne pas enlever la prise de liaison à la terre.
Ne pas utiliser d’adaptateur.
Ne pas utiliser de rallonge.
Déconnecter la source de courant électrique avant
l’entretien.
Replacer pièces et panneaux avant de faire la mise
en marche.
Enlever les portes de votre ancien cave à vin.
Utiliser un produit de nettoyage ininflammable.
Ne pas utiliser ou conserver d’essence ni de
liquides ou gaz inflammables à pr
oximité de cet ou
d’autres appareils électriques. Les fumées peuvent
causer des incendies ou des explosions.
Ne pas conserver de substances explosives, par
exemple des bombes aérosols contenant un agent
propulseur, dans ce cave à vin.
Ne pas utiliser ni placer dans les compartiments
du cave à vin des dispositifs électriques d’un type
autre que celui expressément autorisé par le
fabricant.
Utiliser deux personnes ou plus pour déplacer
et installer le cave à vin.
Cet appareil ne convient pas à une utilisation par
des personnes (y compris des enfants) à capacités
physiques, sensorielles ou mentales réduites, ou
possédant un manque d’expérience et de
connaissances, à moins qu’elles ne soient placées
sous supervision ou qu’elles aient reçu des
instructions concernant l’utilisation de l’appareil par
une personne responsable de leur sécurité.
Les enfants doivent être placés sous surveillance
afin de s’assurer qu’ils ne jouent pas avec l’appareil.
Pour éviter le risque que des enfants restent
enfermés à l’intérieur et s’asphyxient, ne pas les
laisser jouer ou se cacher dans le cave à vin.
Si le cordon d’alimentation est endommagé, il doit
être remplacé par le fabricant ou son technicien
d’entretien ou une personne possédant une
qualification similaire.
Les prises d’air de l’enceinte de l’appareil ou de la
structur
e encastré doivent être dégagées en tout
temps.
Ne pas utiliser d’appareils mécaniques ou d’autres
moyens pour accélér
er le dégivrage que ceux
recommandés par le fabricant.
Ne pas endommager le circuit frigorigène.
CONSERVER CES INSTRUCTIONS

16
Mise au Rebut du Votre Vieille Cave à Vin
AVERTISSEMENT: Risque de coincement de l’enfant.
Avant de jeter votre ancien Cave à Vin:
Enlevez les portes.
Laissez les étagères en place afin que les enfants ne
puissent pas facilement grimper à l’intérieur.
IMPORTANT: Le risque qu’un enfant
puisse se retrouver coincé et suffoquer
n’est pas chose du passé. Les caves à
vin jetés ou abandonnés restent
dangereux, même s’ils ne restent à
l’extérieur que pour “quelques jours
seulement”. Si l’ancien cave à vin doit
être mis au rebut, suivre les instructions
suivantes afin d’éviter les accidents.
Renseignements importants à propos de la mise au
rebut des uides réfrigérants:
Mettre le réfrigérateur au rebut conformément à la
réglementation fédérale et locale. Les fluides réfrigérants
doivent être évacués par un technicien certifié et agréé par
l’EPA conformément aux procédures établies.
EXIGENCES
D’INSTALLATION
Outils et Pièces
Rassembler les outils et pièces nécessaires avant
d’entreprendre l’installation.
Outils et pièces nécessaires:
Tournevis à tête cruciforme.
Panneau de porte décoratif personnalisé – voir la section
“Dimensions du panneau décoratif personnalisé”.
Poignée personnalisée et matériel de fi
xation (facultatif).
Pièces fournies:
8 vis fraisées de M4 x 30.
IMPORTANT: Cet appareil est destiné à un usage domestique
et à d’autres usages similaires comme:
Espace de cuisine pour personnel de boutiques, bureaux
et autr
es environnements professionnels.
Fermes et par les clients des hôtels, motels et autres
environnements de type r
ésidentiel.
Environnements de type chambres d’hôtes.
Banquets et autres utilisations non commerciales semblables.
REMARQ
UES:
Lorsqu’on souhaite placer la cave à vin en af
fl eurement avec la
façade des armoir
es inférieurs, enlever toutes les moulures et
plinthes à l’arrière de l’ouverture. Voir “Dimensions du produit”
et plus loin dans cette section “Dimensions de l’ouverture”.
Il est conseillé de ne pas installer la cave à vin près d’un four,
d’un radiateur ou de toute autre sour
ce de chaleur.
Ne pas installer l’appareil dans un endroit où la température
pourrait descendre sous 55 °F (13 °C). Pour le meilleur
rendement, ne pas installer la cave à vin derrière une porte
d’armoire ni obstruer la grille de la base.
Dimensions de l’ouverture:
Les dimensions de hauteur indiquées correspondent à la
confi guration selon laquelle les pieds de nivellement sont
déployés à la hauteur minimale.
REMARQUE: Lorsque les pieds de nivellement sont
complètement déployés, ajouter 5/8” (15 mm) aux dimensions
de hauteur. Voir la section “Dimensions du produit”.
Si le plancher de l’ouverture n’est pas au même niveau que le
plancher de la cuisine, installer des cales pour établir un
niveau unifor
me avec le plancher de la cuisine.
Exigences d’Emplacement
A
B
C
D
E
F
F
G
H
G
I
Emplacements
de prises
encastrées
Risque de Suffoquer
Enlever les portes ou le couvercle de votre vieil appareil.
Le non-respect de cette instruction peut causer un
décès ou des lésions cérébrales.
Risque d’Explosion
Garder les matériaux et les vapeurs inflammables, telle
que l’essence, loin la cave à vin.
Le non-respect de cette instruction peut causer un décès,
une explosion ou un incendie.
Ouverture pour
raccordement
électrique

17
Dimensions de l’ouverture et de l’emplacement
pour raccordement électrique
Largeur de l’ouverture - A
24” (60.96 cm) min.
Profondeur de l’ouverture - B
24” (60.96 cm) min.
Hauteur de l’ouverture - C
34
1
/2” (87.6 cm) min.
35” (88.9 cm) max.
Dimension - D
12
1
/16” (30.64 cm)
Dimension - E 21
3
/4” (55.16 cm)
Dimension - F 1
3
/4” (4.44 cm)
Dimension - G 3” (7.55 cm)
Dimension - H 4
1
/2” (11.37 cm)
Dimension - I 9
1
/4” (23.47 cm)
Pour une installation en affl eurement, la prise de courant
peut être installée dans des armoires adjacentes avec
une découpe du côté du cordon d’alimentation pour
l’acheminement du cordon d’alimentation.
La prise de courant peut également être encastrée sur le mur
arrière derrière l’appareil, conformément aux emplacements
recommandés pour les prises dans l’illustration ci-dessus.
Profondeur
(aucune poignée)
23
7
/8”
(60.72 cm)
34
3
/8”
(87.32 cm)
30
5
/8”
(77.5 cm)
REMARQUE: La longueur du cordon d’alimentation est de 60”
(152,4 cm).de largo.
Panneau Décoratif Personnalisé
REMARQUE: Pour les modèles standards en acier inoxydable
ou avec porte en verre, passer ces instructions et commencer
directement à la section “Spécifications électriques”.
Pour l’installation d’un panneau décoratif personnalisé,
l’installateur devra fabriquer lui-même le panneau ou
consulter un ébéniste ou menuisier qualifi é. Consulter le dessin
des dimensions pour les spécifi cations du panneau.
IMPORTANT:
L’épaisseur du panneau décoratif doit être de 3/4” (19 mm).
Le poids du panneau décoratif plein personnalisé ne doit
pas dépasser 20 lb (9,07 kg).
Le poids du panneau décoratif en verre personnalisé ne doit
pas dépasser 10 lb (4,54 kg).
Un panneau décoratif pesant plus que la limite
recommandée risque d’endommager l’appareil.
Panneau décoratif plein personnalisé - Préparation:
Fabriquer le panneau décoratif personnalisé en utilisant
les dimensions indiquées dans l’illustration dimensions
du panneau décoratif plein personnalisé et position des
charnières. Les zones foncées doivent être creusées de
1/2” (12 mm) comme indiqué.
IMPORTANT: L’illustration suivante présente un panneau
personnalisé pour une porte dont les charnières sont
installées du côté droit. Si les charnières de votre cave à
vin sont installées du côté gauche, faire tourner le cadre
personnalisé de 180° pour que les marques de charnière
se retrouvent du côté gauche.
2"
(53 mm)
1/4"
(7 mm)
1/8"
(3 mm)
1/2"
(12 mm)
4
15
/16”
(125 mm)
23
3
/4”
(60.3 cm)
30
5
/8”
(77.75 cm)
Dimensions du panneau décoratif plein personnalisé et
position des charnières.
Dimensions du Produit
Largeur (jusqu’au cache charnière)
23
7
/8” (60.72 cm)
Hauteur (jusqu’au cache charnière)
34
3
/8” (87.32 cm)
Profondeur des modèles compatibles
avec les panneaux (avec panneau de
3/4” et sans poignée)
23
13
/16” (60.5 cm)
Hauteur de porte
Profondeur (sans poignée)
30
5
/8” (77.75 cm)
23
5
/8” (60.01 cm)
Produit entier

18
Panneau décoratif en verre personnalisé - Préparation:
Fabriquer le panneau décoratif personnalisé en utilisant
les dimensions indiquées dans l’illustration dimensions du
panneau décoratif en verre personnalisé et position des
charnières. Les zones foncées doivent être creusées
de 1/2” (12 mm) comme indiqué.
IMPORTANT: L’illustration suivante présente un panneau
personnalisé pour une porte dont les charnières sont
installées du côté droit. Si les charnières de votre cave à
vin sont installées du côté gauche, faire tourner le cadre
personnalisé de 180° pour que les marques de charnière
se retrouvent du côté gauche.
Poignées (facultatif)
Des poignées personnalisées sont habituellement fi xées
seulement sur le panneau de porte personnalisé.
Consulter les instructions reçues avec la trousse de
poignée KitchenAid pour installer ces poignées sur les
panneaux de bois personnalisés.
Les poignées personnalisées doivent être installées sur le
panneau de porte à l’aide de trous fraisés, avant d’installer
le panneau sur la porte du cave à vin.
2"
(53 mm)
1/4"
(7 mm)
1/8"
(3 mm)
1/2"
(12 mm)
4
15
/16”
(125 mm)
23
3
/4”
(60.3 cm)
17
1
/16”
(43.3 cm)
21
13
/16”
(55.4 cm)
30
5
/8”
(77.75 cm)
Dimensions du panneau décoratif en verre personnalisé
et position des charnières.
Spécifi cations Électriques
Avant de placer la cave à vin à son emplacement fi nal, il
est important de s’assurer d’avoir la connexion électrique
appropriée.
Méthode recommandée de mise à la terre:
Chaque appareil doit être alimenté par un circuit à 115 VAC à
60 Hz relié à la terre et protégé par un fusible de 15 A ou 20 A.
Il est recommandé d’utiliser un circuit distinct pour alimenter
uniquement la cave à vin. Utiliser une prise de courant dont
l’alimentation ne peut pas être interrompue par un interrupteur.
Ne pas utiliser de rallonge.
REMARQUE: Avant d’exécuter tout type d’installation, de
nettoyage ou de remplacement d’une ampoule d’éclairage,
débrancher la cave à vin ou déconnecter la source de
courant électrique.
INSTRUCTIONS
D’INSTALLATION
Déballage de la Cave à Vin
Avant d’utiliser la cave à vin, tous les matériaux d’emballage
doivent être enlevés et l’intérieur doit être nettoyé.
Enlever tout résidu de ruban adhésif et de colle des
surfaces avant de mettre en marche la cave à vin.
Frotter une petite quantité de savon à vaisselle liquide avec
ses doigts sur tout adhésif et essuyer avec de l’eau chaude
pour enlever.
Ne pas utiliser d’instruments coupants, d’alcool à friction,
de liquides infl ammables ou de nettoyants abrasifs pour
enlever le ruban adhésif ou la colle. Ces produits peuvent
Risque de Décharge Électrique
Brancher sur une prise à 3 alvéoles reliée à la terre.
Ne pas enlever la broche de liaison à la terre.
Ne pas utiliser un adaptateur.
Ne pas utiliser un câble de rallonge.
Le non-respect de ces instructions peut causer
un décès, un incendie ou un décharge électrique.
Risque du Poids Excessif
Utiliser deux personnes ou plus pour déplacer et
installer ou désinstaller l’appareil.
Le non-respect de cette instruction peut causer une
blessure au dos ou d’autre blessure.

19
endommager les surfaces de la cave à vin. Pour plus de
renseignements, voir la section “Sécurité de la cave à vin”.
Jeter ou recycler tous les matériaux d’emballage.
Une fois que tous les matériaux d’emballage ont été retirés,
nettoyer l’intérieur de la cave à vin. Consulter les instructions
de nettoyage dans la section “Nettoyage”.
REMARQUE: Pour les modèles standards en acier
inoxydable ou avec porte en verre, passer la section
“Fermeture de la porte”.
Installation du Panneau Personnalisé
IMPORTANT:
Réaliser le panneau décoratif personnalisé selon les
spécifi cations de la section “Panneau décoratif
personnalisé”.
KitchenAid n’est pas responsable des opérations
d’enlèvement et de réinstallation des moulures ou panneaux
décoratifs qui entraveraient l’accès au cave à vin lors d’une
intervention de réparation.
1. Ouvrir complètement la porte à 90°.
90°
2. Retirer le joint d’étanchéité des coins de la porte en
tirant doucement jusqu’à ce que les deux trous de vis dans
chaque coin de la porte soient visibles.
REMARQUE: Le joint d’étanchéité n’a pas besoin d’être
enlevé de la porte, seulement les coins.
3. À deux personnes, maintenir le panneau personnalisé
contre la porte. S’assurer que les charnières du haut et du
bas s’insèrent parfaitement dans les fentes au dos du
panneau personnalisé.
REMARQUE: Les poignées doivent être installées sur le
panneau de porte avant d’installer ce dernier sur la
porte du cave à vin.
4. Fixer le panneau personnalisé sur la porte à l’aide de
deux vis à bois (fournies dans l’ensemble d’installation)
à chaque coin.
A. Trous de vis
B. Joint d’étanchéité
A. Vis à tête fraisée M4 x 30 (incluses dans la trousse
d’installation)
A
A
B
A
A
5. Appuyer fermement sur le joint pour le remettre à sa
place.

20
Installation et Fermeture de la Porte
La cave à vin dispose de quatre pieds de nivellement. Si la
cave à vin semble instable ou si vous désirez que la porte se
ferme plus facilement, ajuster l’inclinaison de la cave à vin en
observant les instructions ci-dessous.
1. Brancher l’appareil sur une prise à 3 alvéoles reliée à
la terre.
Déplacement de votre Cave à Vin:
Votre cave à vin est lourd. Lors du déplacement de la cave
à vin pour un nettoyage, un entretien ou réparation, veiller à
recouvrir le plancher avec du carton ou un panneau de fibre
dur pour éviter qu’il ne subisse tout dommage.
Toujours tirer la cave à vin tout droit lors du déplacement.
Ne pas incliner la cave à vin d’un côté ou de l’autre ni la
“faire marcher” en essayant de le déplacer, car le plancher
pourrait être endommagé.
2. Déplacer la cave à vin à son emplacement définitif.
3. Tourner les pieds de réglage de l’aplomb vers la droite
pour abaisser la cave à vin ou tourner les pieds de
réglage de l’aplomb vers la gauche pour la soulever.
Il peut être nécessaire de tourner les pieds de nivellement
plusieurs fois pour ajuster l’inclinaison de la cave à vin.
REMARQUE: Si une autre personne pousse le haut de la
cave à vin, le poids devient moins lourd sur les pieds de
nivellement, ce qui rend plus facile l’ajustement des pieds
d’aplomb.
4. Ouvrir la porte et s’assurer qu’elle ferme comme vous le
désirez. Sinon, incliner la cave à vin un peu plus vers
l’arrière en tournant les deux vis de nivellement avant
vers la droite. Plusieurs tours peuvent être nécessaires et
il convient de tourner les deux vis de réglage de l’aplomb
de façon égale.
UTILISATION DE LA CAVE À VIN
Commandes
REMARQUE:
Lorsque l’on met en marche la cave à vin pour la
première fois, la température est réglée par défaut sur
le réglage recommandé.
Il y a deux commandes réglables de la température,
une pour chaque compartiment.
Le clavier tactile de température et de préréglage gauche
commande la température du compartiment supérieur.
Le clavier tactile de température et de préréglage droit
commande la température du compartiment inférieur.
1 2 3 4 45 6 7 85
1. Mise en Marche/arrêt de la Commande
La première fois que la cave à vin est
branchée, la commande est réglée en
mode Cool Off (refroidissement désactivé).
Cool On (refroidissement activé) et Cool Off
(refroidissement activé) sont les seules
options affichées.
Appuyer sur COOL ON (refroidissement activé) pendant
3 secondes pour mettre en marche la cave à vin.
Tous les menus et les réglages de température
recommandés s’affichent.
2. Option d’Éclairage Automatique
Comporte un capteur de proximité dans la
grille de base qui augmente automatiquement
l’éclairage de l’afficheur intérieur à DEL
lorsqu’un mouvement est détecté. Lorsque
Risque de Décharge Électrique
Brancher sur une prise à 3 alvéoles reliée à la terre.
Ne pas enlever la broche de liaison à la terre.
Ne pas utiliser un adaptateur.
Ne pas utiliser un câble de rallonge.
Le non-respect de ces instructions peut causer un
décès, un incendie ou un décharge électrique.
Risque du Poids Excessif
Utiliser deux personnes ou plus pour déplacer et
installer ou désinstaller l’appareil.
Le non-respect de cette instruction peut causer une
blessure au dos ou d’autre blessure.
La page charge ...
La page charge ...
La page charge ...
La page charge ...
La page charge ...
La page charge ...
La page charge ...
La page charge ...
La page charge ...
La page charge ...
La page charge ...
La page charge ...
La page charge ...
La page charge ...
La page charge ...
La page charge ...
La page charge ...
La page charge ...
La page charge ...
La page charge ...
-
 1
1
-
 2
2
-
 3
3
-
 4
4
-
 5
5
-
 6
6
-
 7
7
-
 8
8
-
 9
9
-
 10
10
-
 11
11
-
 12
12
-
 13
13
-
 14
14
-
 15
15
-
 16
16
-
 17
17
-
 18
18
-
 19
19
-
 20
20
-
 21
21
-
 22
22
-
 23
23
-
 24
24
-
 25
25
-
 26
26
-
 27
27
-
 28
28
-
 29
29
-
 30
30
-
 31
31
-
 32
32
-
 33
33
-
 34
34
-
 35
35
-
 36
36
-
 37
37
-
 38
38
-
 39
39
-
 40
40


KitchenAid KUWL214KSB Manuel utilisateur
- Catégorie
- Boissons glacées
- Taper
- Manuel utilisateur
- Ce manuel convient également à
dans d''autres langues
- English: KitchenAid KUWL214KSB User manual
- español: KitchenAid KUWL214KSB Manual de usuario
Documents connexes
Autres documents
-
JennAir JUWFL242HL Guide d'installation
-
Jenn-Air JUW24FLECX00 Le manuel du propriétaire
-
Haier HWS49GA(UK) Manuel utilisateur
-
Haier HWS84GA Le manuel du propriétaire
-
JennAir JUWFR242HL Mode d'emploi
-
-
-
Dometic CS52DV Manuel utilisateur
-