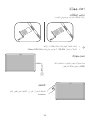
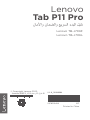
Lenovo Tab P11 Pro Manuel utilisateur
- Catégorie
- Comprimés
- Taper
- Manuel utilisateur

Lenovo
Tab P11 Pro
Safety, Warranty
& Quick Start Guide
Lenovo TB-J706F
Lenovo TB-J706L
English/Français

Contents
English ............................................................................................................1
Français .......................................................................................................19
.............................................................................................................. 37

Read this guide carefully before using your device.
All information labeled with * in this guide only refers to the WLAN + LTE model.
https://support.lenovo.com
https://forums.lenovo.com
1
Reading before using your device
Reading first - regulatory information
Device models equipped with wireless communications comply with the radio
frequency and safety standards of any country or region in which it has been approved
for wireless use. In addition, if your product contains a telecom modem, it complies with
the requirements for connection to the telephone network in your country.
Be sure to read the Regulatory Notice for your country or region before using
the wireless devices contained in your device. To obtain a PDF version of the
Regulatory Notice, go to https://support.lenovo.com.
Getting support
To get support on network services and billing, contact your wireless network
operator. To learn how to use your device and view its technical specifications, go
to https://support.lenovo.com.
Accessing your User Guide
Your User Guide contains detailed information about your device. To download
the publications for your device, go to https://support.lenovo.com and follow the
instructions on the screen.
Legal notices
Lenovo and the Lenovo logo are trademarks of Lenovo in the United States, other
countries, or both.
Other company, product, or service names may be trademarks or service marks of
others.
Dolby, Dolby Audio, Dolby Vision, Dolby Atmos, and the double-D symbol are
trademarks of Dolby Laboratories. Manufactured under license from Dolby
Laboratories. Confidential unpublished works. Copyright © 1992-2020 Dolby
Laboratories. All rights reserved.
LIMITED AND RESTRICTED RIGHTS NOTICE: If data or software is delivered
pursuant a General Services Administration “GSA” contract, use, reproduction, or
disclosure is subject to restrictions set forth in Contract No. GS-35F-05925.
English

2
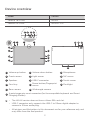
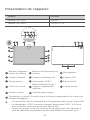
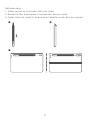
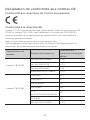
Device overview
Model Version
Lenovo TB-J706F WLAN
Lenovo TB-J706L WLAN + LTE
1
Volume up button
2
Volume down button
3
Microphones
4
Front camera
5
Light sensor
6
ToF sensor
7
Speakers
8
USB-C connector
9
Touch screen
10
Card tray
11
Power button/Fingerprint
sensor
12
Flashlight
13
Rear camera
14
Wide-angle camera
15
4-point pogo-pin smart connector (for the compatible keyboard and Smart
Charging Station)
• The WLAN version does not have a Nano-SIM card slot.
• USB-C connector only supports the USB-C to 3.5mm digital adapter to
connect a 3.5mm audio plug.
• All pictures and illustrations in this document are for your reference only and
may differ from the final product.
4 5 6 4
1 2 3 3
7
8
9
7
7
10
7
11
12 13 14
15

3
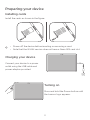
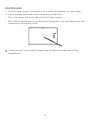
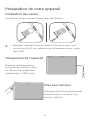
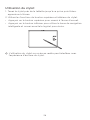
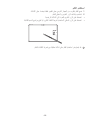
Preparing your device
Installing cards
Install the cards as shown in the figure.
• Power o the device before inserting or removing a card.
• Note that the WLAN version does not have a Nano-SIM card slot.
Charging your device
Connect your device to a power
outlet using the USB cable and
power adapter provided.
microSD
microSD
SIM
Turning on
Press and hold the Power button until
the Lenovo logo appears.

4
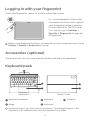
Logging in with your fingerprint
Touch the fingerprint sensor to quickly unlock the screen.
It is recommended to follow the
onscreen instructions and register
your fingerprint when powering
on your device for the first time.
You can also go to Settings >
Security > Fingerprint to register
a fingerprint.
Before using fingerprint functions, you need to set a lock screen password. Go to
Settings > Security > Screen lock to set up.
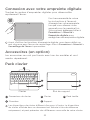
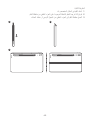
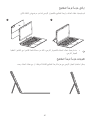
Accessories (optional)
The accessories do not come with all models, and are sold separately.
Keyboard pack
Keyboard Stand Cover
Keyboard layouts vary from country to country. The Keyboard layout in this
document is for reference only and your Keyboard may differ.
1
2
4
5
3
1
Keyboard connector
2
Keyboard
3
Trackpad
4
Hinge
5
Kickstand

5
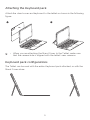
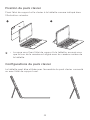
Attaching the Keyboard pack
Keyboard pack configurations
Attach the stand cover and keyboard to the tablet as shown in the following
figure.
The Tablet can be used with the entire Keyboard pack attached, or with the
Stand Cover alone.
1 2
• When you are attaching the Stand Cover to the Tablet, make sure
that the camera hole is aligned with the tablet’s rear cameras.

6
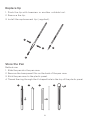
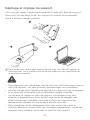
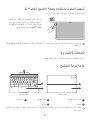
Opening and adjusting the Kickstand
You can adjust the Tablet angle using the Stand Cover. Grasp either side of
the kickstand and gently open it until you reach the desired angle.
1
2 3
To prevent damage, do not apply excessive pressure to the Stand Cover or force
the Kickstand beyond its natural range of motion.
• Do not overtilt or apply excessive pressure to the Stand Cover,
doing so may damage the hinges.
• Adjust the tablet angle by opening the Kickstand and changing the
position of the tablet until the desired angle is found.
• The Tablet, Keyboard, and Stand Cover all contain magnetic
materials. To avoid loss of magnetism, avoid exposing the Tablet,
Keyboard, and Stand Cover to high temperatures or direct sunlight.
• To prevent demagnetization of credit cards and other items with magnetic
data, keep them away from the Tablet, Keyboard, and Stand Cover.

7
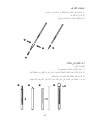
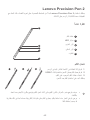
Overview
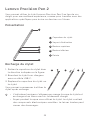
Charging the pen
Lenovo Precision Pen 2
You can use the Lenovo Precision Pen 2 in place of your fingers for a better
experience, such as working with specific applications to write or draw on
the screen.
1. Remove the pen cap in the direction
shown in the figure.
2. Connect the pen to a charger with a
USB-C cable.
3. Replace the pen cap on the pen.
You can start to use the pen after
charging.
• The indicator light will have an amber glow while charging the pen
and a white glow after it is fully charged.
• Please be cautious when using the pen. The pen contains sensitive
electronic components. Dropping it may cause damage.
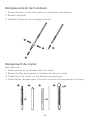
1
Pen cap
2
Indicator LED
3
Upper button
4
Lower button
5
Tip
2
1
3
4
5
1 2 3

8
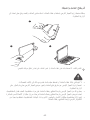
Replace tip
1. Pinch the tip with tweezers or another suitable tool.
2. Remove the tip.
3. Install the replacement tip (supplied).
1
1
2
3
Store the Pen
Method one:
1. Slide the pen into the pen case.
2. Remove the transparent film on the back of the pen case.
3. Stick the pen case to the plastic panel.
4. Thread the ring through the X-shaped hole in the top of the plastic panel.
1 2 3 4

9
Method two:
1. Slide the pen into the pen case.
2. Remove the transparent film on the back of the pen case.
3. Stick the pen case to the back of the tablet or stand cover.
3
21

10
Use the pen
1. Hold the pen close to the tablet until a white dot appears on the screen.
2. Use the upper and lower button functions of the pen.
• Press the upper button to return to the home screen.
• Press the lower button to use the Smart Navigation Bar, and then open the
supporting software to write.
Using the pen on a coated screen may interfere with the pen-writing
experience.

11
Important safety and handling information
Plastic bag notice
Danger: Plastic bags can be dangerous. Keep plastic bags away from babies and
children to avoid danger of suocation.
Caution about high volume usage
Warning: Exposure to loud noise from any source for extended periods of time
may aect your hearing. The louder the sound, the less time is required before your
hearing could be aected. To protect your hearing:
• Limit the amount of time you use headsets or headphones at high volume.
• Avoid turning up the volume to block out noisy surroundings.
• Turn the volume down if you can’t hear people speaking near you.
If you experience hearing discomfort, including the sensation of pressure or fullness
in your ears, ringing in your ears or mued speech, you should stop listening to the
device through your headset or headphones and have your hearing checked.
To prevent possible hearing damage, do not listen at high volume levels for long
periods.
Safety instructions for parents and adult supervisors
Your mobile device is not a toy. As with all electrical products, precautions should
be observed during handling and using of electrical products to reduce the risk of
electric shock. If parents choose to allow children to use the device, they should
caution his or her child about the potential hazard while using and handling the
mobile device.
Parents should inspect the mobile device (including the ac power adapter and
the small part, as applicable) periodically for damage. Routinely check this mobile
device to ensure that the device is working properly and is safe for children to use.
Internal rechargeable battery warning
Danger: Do not attempt to replace the internal rechargeable lithium ion battery.
Replacing the original battery with an incompatible type may result in an increased
risk of personal injury or property damage due to explosion, excessive heat, or other
risks. Do not attempt to disassemble or modify the battery pack. Attempting to do
so can cause a harmful explosion or battery fluid leakage.

12
EurAsia compliance mark
When disposing of the battery, comply with all relevant local ordinances or
regulations. Do not dispose the battery pack in municipal waste. Dispose used
batteries according to the instructions.
The battery pack contains a small amount of harmful substances.
To avoid injury:
•Keepthebatterypackawayfromopenamesorotherheatsources.
•Donotexposethebatterypacktowater,rain,orothercorrosiveliquids.
•Donotleavethebatteryinanenvironmentwithextremelyhightemperature.
•Avoidshort-circuitingthebatterypack.
•Keepthebatterypackoutofreachofsmallchildrenandpets.
•Donotleavethebatteryinanenvironmentwithextremelylowairpressure.Itmay
result in an explosion or the leakage of flammable liquid or gas from the battery.
To extend battery life, we recommend charging the battery to at least 30% to 50%
capacity each time, and recharging it every three months to prevent over discharge.
Eye Protection and Safety Information
This product carries a TÜV Rheinland Full Care Display certification and combines
software and hardware solutions to provide a comfortable and healthy user
experience.
•Thescreenhasexcellentimagequalityandcanaccuratelyrepresentanycolor.
•ThescreensurfaceAGcoatingandsmartambientlightsensorcanworktogether
to reduce ambient light reflection and adjust the screen brightness eectively.
•ThescreenachievesDCmodulationthroughthefullrangeofluminance
adjustment, reduces hazardous blue light impact to your vision health, and can
eectively reduce eye fatigue.
To learn more details, please refer to http://support.lenovo.com.cn.

13
Service and support information
Lenovo Limited Warranty notice
This product is covered by the terms of the Lenovo Limited Warranty (LLW),
version L5050010-02 08/2011. Read the LLW at https://www.lenovo.com/
warranty/llw_02. You can view the LLW in a number of languages from this
website.
Warranty information
Lenovo provides a warranty period for your device. To check the warranty status of
your device purchase upgrades, go to https://support.lenovo.com/warrantylookup,
and then select the product and follow the on-screen instructions.
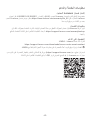
Get support
To download Lenovo service tool - LMSA:
https://support.lenovo.com/downloads/lenovo-moto-smart-assitant
Visit the website above for information on devices compatible with LMSA.
Visit Lenovo’s support website (https://support.lenovo.com) with the device serial
number to get more Lenovo support options, or scan the QR code, and then follow
the on-screen instructions.

14
Battery recycling marks
Battery recycling information for Taiwan
Battery recycling information for the United States and Canada
Environmental, recycling, and disposal information
General recycling statement
Lenovo encourages owners of information technology (IT) equipment to
responsibly recycle their equipment when it is no longer needed. Lenovo oers a
variety of programs and services to assist equipment owners in recycling their IT
products. For information on recycling Lenovo products, go to
http://www.lenovo.com/recycling.
Important battery and WEEE information
Recycling information for Japan
Recycling and disposal information for Japan is available at:
http://www.lenovo.com/recycling/japan
Additional recycling statements
Additional information about recycling device components and batteries is in your
User Guide. See “Accessing your User Guide” for details.
Batteries and electrical and electronic equipment marked with the
symbol of a crossed-out wheeled bin may not be disposed as unsorted
municipal waste. Batteries and waste of electrical and electronic
equipment (WEEE) shall be treated separately using the collection
framework available to customers for the return, recycling, and
treatment of batteries and WEEE. When possible, remove and isolate
batteries from WEEE prior to placing WEEE in the waste collection
stream. Batteries are to be collected separately using the framework
available for the return, recycling, and treatment of batteries and
accumulators.
Country-specific information is available at:
http://www.lenovo.com/recycling

15
Battery recycling information for the European Union
Restriction of Hazardous Substances Directive (RoHS)
Turkey
Lenovo products sold in Turkey, on or after June 1, 2009, meet the requirements of
the former Republic of Turkey Restriction of Hazardous Substances legislation from
30th of May 2008 and the Control of Waste Electrical and Electronic Equipment
Regulations from 22nd of May 2012 (“Turkey RoHS”).
Ukraine
Lenovo products sold in Ukraine, on or after January 1, 2011, meet the requirements
of the Technical Directive on Restriction of Hazardous Substances in Electric
and Electronic Equipment enforced by the Government, Decision No 1057 dated
2008/12/03” (“Ukraine TR on RoHS”).
India
Lenovo products sold in India, on or after May 1, 2012, meet the requirements of the
India E-waste (Management) Rules (“India RoHS”).
Vietnam
Lenovo products sold in Vietnam, on or after September 23, 2011, meet the
requirements of the Vietnam Circular 30/2011/TT-BCT (“Vietnam RoHS”).
European Union
Lenovo Products meet the requirement of Directive 2011/65/EC on the restriction of
the use of the certain hazardous substances in electrical and electronic equipment
(“RoHS 2”). Lenovo products sold in the European Union, from the 21st July 2019,
meet the requirement of Commission Delegated Directive (EU 2015/863) amending
Directive 2011/65/EU. For more information about Lenovo progress on RoHS, go to:
https://www.lenovo.com/us/en/social_responsibility/RoHS-Communication.pdf
Singapore
Lenovo products sold in Singapore, on or after June 1, 2017, meet the requirements
of Government Gazette order No. S 263/2016 Restriction of Hazardous Substances
in Electrical and Electronic Equipment in Singapore (“SG-RoHS”).

16
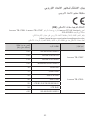
European Union compliance statement
European Union conformity
Compliance with the RE Directive
Lenovo PC HK Limited declares that the radio equipment type Lenovo TB-J706F,
Lenovo TB-J706L are in compliance with Directive 2014/53/EU.
The full text of the EU declaration of conformity is available at the following internet
address:
https://www.lenovo.com/us/en/compliance/eu-doc
This radio equipment operates with the following frequency bands and maximum
radio-frequency power:
Model Name Frequency Bands Maximum Power (dBm)
Lenovo TB-J706F
WLAN 2400-2483.5 <20
WLAN 5150-5725 <20
WLAN 5725-5850 <14
Bluetooth 2400-2483.5 <20
Lenovo TB-J706L
GSM 900 35
GSM 1800 31
UMTS B1/B5 25
UMTS B8 26
LTE
B1/3/5/7/8/20/28/38/41
25
LTE B40 24
WLAN 2400-2483.5 <20

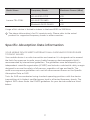
Specific Absorption Rate information
YOUR MOBILE DEVICE MEETS INTERNATIONAL GUIDELINES FOR EXPOSURE
TO RADIO WAVES.
Your mobile device is a radio transmitter and receiver. It is designed not to exceed
the limits for exposure to radio waves (radio frequency electromagnetic fields)
recommended by international guidelines. The guidelines were developed by an
independent scientific organization (ICNIRP) and include a substantial safety margin
designed to assure the safety of all persons, regardless of age and health. The
radio wave exposure guidelines use a unit of measurement known as the Specific
Absorption Rate, or SAR.
Tests for SAR are conducted using standard operating positions with the device
transmitting at its highest certified power level in all tested frequency bands. The
highest SAR values under the ICNIRP guidelines for your device model are listed
below:
17
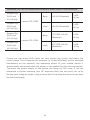
The above information is for EU countries only. Please refer to the actual
product for supported frequency bands in other countries.
Model Name Frequency Bands Maximum Power (dBm)
Lenovo TB-J706L
WLAN 5150-5725 <20
WLAN 5725-5850 <14
Bluetooth 2400-2483.5 <20
Usage of this device is limited to indoor in the band 5150 to 5350MHz.

During use, the actual SAR values for your device are usually well below the
values stated. This is because, for purposes of system eciency and to minimize
interference on the network, the operating power of your mobile device is
automatically decreased when full power is not needed for the data connection.
The lower the power output of the device, the lower its SAR value. If you are
interested in further reducing your RF exposure then you can easily do so by
limiting your usage or simply using a hands-free kit to keep the device away from
the head and body.
Maximum SAR for this model and conditions under which it was recorded.
Europe 10g
SAR Limit
(2.0 W/kg)
Lenovo TB-J706F
Body WLAN, Bluetooth
1.409
W/kg
Europe 10g
SAR Limit
(4.0 W/kg)
Limb WLAN, Bluetooth
1.409
W/kg
Europe 10g
SAR Limit
(2.0 W/kg)
Lenovo TB-J706L
Body
LTE B28, WLAN,
Bluetooth
1.546
W/kg
Europe 10g
SAR Limit
(4.0 W/kg)
Limb
LTE B28, WLAN,
Bluetooth
1.546
W/kg
18
La page est en cours de chargement...
La page est en cours de chargement...
La page est en cours de chargement...
La page est en cours de chargement...
La page est en cours de chargement...
La page est en cours de chargement...
La page est en cours de chargement...
La page est en cours de chargement...
La page est en cours de chargement...
La page est en cours de chargement...
La page est en cours de chargement...
La page est en cours de chargement...
La page est en cours de chargement...
La page est en cours de chargement...
La page est en cours de chargement...
La page est en cours de chargement...
La page est en cours de chargement...
La page est en cours de chargement...
La page est en cours de chargement...
La page est en cours de chargement...
La page est en cours de chargement...
La page est en cours de chargement...
La page est en cours de chargement...
La page est en cours de chargement...
La page est en cours de chargement...
La page est en cours de chargement...
La page est en cours de chargement...
La page est en cours de chargement...
La page est en cours de chargement...
La page est en cours de chargement...
La page est en cours de chargement...
La page est en cours de chargement...
La page est en cours de chargement...
La page est en cours de chargement...
La page est en cours de chargement...
La page est en cours de chargement...
La page est en cours de chargement...
-
 1
1
-
 2
2
-
 3
3
-
 4
4
-
 5
5
-
 6
6
-
 7
7
-
 8
8
-
 9
9
-
 10
10
-
 11
11
-
 12
12
-
 13
13
-
 14
14
-
 15
15
-
 16
16
-
 17
17
-
 18
18
-
 19
19
-
 20
20
-
 21
21
-
 22
22
-
 23
23
-
 24
24
-
 25
25
-
 26
26
-
 27
27
-
 28
28
-
 29
29
-
 30
30
-
 31
31
-
 32
32
-
 33
33
-
 34
34
-
 35
35
-
 36
36
-
 37
37
-
 38
38
-
 39
39
-
 40
40
-
 41
41
-
 42
42
-
 43
43
-
 44
44
-
 45
45
-
 46
46
-
 47
47
-
 48
48
-
 49
49
-
 50
50
-
 51
51
-
 52
52
-
 53
53
-
 54
54
-
 55
55
-
 56
56
-
 57
57


Lenovo Tab P11 Pro Manuel utilisateur
- Catégorie
- Comprimés
- Taper
- Manuel utilisateur
dans d''autres langues
- English: Lenovo Tab P11 Pro User manual
Documents connexes
-
Mode d'Emploi pdf Lenovo Tab P11 Mode d'emploi
-
Lenovo Tab M8 4th Generation Quick Start
-
-
-
-
-
-
Mode d'Emploi pdf Lenovo Yoga Book C930 Mode d'emploi
-
Lenovo Yoga Smart Tab Guide de démarrage rapide
-