Maytag MDB7749SAB0 User Instructions
- Catégorie
- Lave-vaisselle
- Taper
- User Instructions

THANK YOU for purchasing this high-quality product. If you should experience a problem not covered in TROUBLESHOOTING,
please visit our website at www.maytag.com for additional information. If you still need assistance, call us at 1-800-688-9900.
InCanada, visit our website at www.maytag.ca or call us at 1-800-807-6777.
You will need your model and serial number located near the door on the right-hand or left-hand side of the dishwasher interior.
Para obtener acceso a "lnstrucciones para el usuario de la lavavajillas" en espafiol, o para informaci6n adicional de su producto
visite : www.maytag.com
Tenga listo su nOmerode modelo completo. Puede encontrar su nOmerode modelo y de serie en la etiqueta ubicada cerca de la
puerta al lado derecho o izquierdo del interior de la lavavajillas.
_a_}_ o_¸Co_
DISHWASHER SAFETY ............................................................. 1
QUICK STEPS ............................................................................ 3
DISHWASHER USE .................................................................... 3
CYCLE AND OPTION DESCRIPTIONS .................................... 5
DISHWASHER FEEDBACK SECTION ...................................... 7
DISHWASHER FEATURES ........................................................ 8
DISHWASHER CARE ................................................................. 9
TROUBLESHOOTING .............................................................. 10
WAR RANTY .............................................................................. 12
Your safety and the safety of others are very important.
We have provided many important safety messages in this manual and on your appliance. Always read and obey all safety
messages.
This is the safety alert symbol.
This symbol alerts you to potential hazards that can kill or hurt you and others.
All safety messages will follow the safety alert symbol and either the word "DANGER" or "WARNING."
These words mean:
You can be killed or seriously injured if you don't immediately
follow instructions.
You can be killed or seriously injured if you don't follow
instructions.
All safety messages will tell you what the potential hazard is, tell you how to reduce the chance of injury, and tell you what can
happen if the instructions are not followed.
W10401491A

iMPORTANT SAFETY iNSTRUCTiONS
WARNING: When using the dishwasher, follow basic precautions, including the following:
[] Read all instructions before using the dishwasher. [] Do not tamper with controls.
[] Use the dishwasher only for its intended function.
[] Use only detergents or rinse agents recommended for use in
a dishwasher, and keep them out of the reach of children.
[] When loading items to be washed:
1) Locate sharp items so that they are not likely to damage
the door seal; and
2) Load sharp knives with the handles up to reduce the risk
of cut-type injuries.
[] Do not wash plastic items unless they are marked
"dishwasher safe" or the equivalent. For plastic items not so
marked, check the manufacturer's recommendations.
[] Do not touch the heating element during or immediately after
use.
[] Do not operate the dishwasher unless all enclosure panels
are properly in place.
[] Do not abuse, sit on, or stand on the door, lid, or dish racks
of the dishwasher.
[] To reduce the risk of injury, do not allow children to play in
or on the dishwasher.
[] Under certain conditions, hydrogen gas may be produced in
a hot water system that has not been used for two weeks or
more. HYDROGEN GAS IS EXPLOSIVE. If the hot water
system has not been used for such a period, before using
the dishwasher turn on all hot water faucets and let the
water flow from each for several minutes. This will release
any accumulated hydrogen gas. As the gas is flammable,
do not smoke or use an open flame during this time.
[] Remove the door or lid to the washing compartment
when removing an old dishwasher from service or
discarding it.
SAVE THESE iNSTRUCTiONS
State of California Proposition 65 Warnings:
WARNING: This product contains one or more chemicals known to the State of California to cause cancer.
WARNING: This product contains one or more chemicals known to the State of California to cause birth defects or other
reproductive harm.
GROUNDING iNSTRUCTiONS
For a grounded, cord-connected dishwasher:
The dishwasher must be grounded. In the event of a
malfunction or breakdown, grounding will reduce the risk of
electric shock by providing a path of least resistance for
electric current. The dishwasher is equipped with a cord
having an equipment-grounding conductor and a grounding
plug. The plug must be plugged into an appropriate outlet
that is installed and grounded in accordance with all local
codes and ordinances.
WARNING: Improper connection of the equipment-
grounding conductor can result in a risk of electric shock.
[]
Check with a qualified electrician or service representative
if you are in doubt whether the dishwasher is properly
grounded. Do not modify the plug provided with the
dishwasher; if it will not fit the outlet, have a proper outlet
installed by a qualified electrician.
For a permanently connected dishwasher:
The dishwasher must be connected to a grounded metal,
permanent wiring system, or an equipment-grounding
conductor must be run with the circuit conductors and
connected to the equipment-grounding terminal or lead on
the dishwasher.
SAVE THESE iNSTRUCTiONS
Tip Over Hazard
Do not use dishwasher until completely installed.
Do not push down on open door.
Doing so can result in serious injury or cuts.

Prepare and load _f'_
dishwasher. _J_
Add detergent _
and rinse aid.
Select a cycle and option (cycles and options vary
by model.)
cyc|es soil sensing technology
I " steam delay 1scrub_._t°ughI hwiatehmP I dhre_ted I_r)/ra I san,tize I h.... I lCo°cr_r°'
options
Start dishwasher.
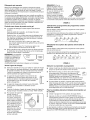
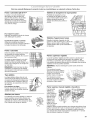
Prepare and Load the Dishwasher
IMPORTANT: Remove leftover food, bones, toothpicks and other
hard items from the dishes. Remove labels from containers before
washing.
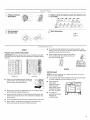
To avoid thumping/clattering noises during operation: Load
dishes so they do not touch one another. Make sure lightweight
load items are secured in the racks.
When loading silverware, always place sharp
items pointing. Mix other items pointing up
and some pointing down.
Upper rack Lower rack
Make sure nothing keeps spray arm(s) from
spinning freely. It is important for the water
spray to reach all soiled surfaces.
) ._
• Make sure that when the dishwasher door is closed no items
are blocking the detergent dispenser.
• Items should be loaded with soiled surfaces facing down and
inward to the spray as shown. This will improve cleaning and
drying results.
• Avoid overlapping items like bowls or plates that may trap food.
• Place plastics, small plates and glasses in the upper rack.
Wash only plastic items marked "dishwasher safe."
Add Detergent
NOTE: If you do not plan to run a wash cycle soon, run a rinse
cycle. Do not use detergent.
• Use automatic dishwasher detergent only. Add powder, liquid
or tablet detergent just before starting a cycle.
• Fresh automatic
dishwasher
detergent results in
better cleaning.
Store tightly closed
detergent container
in a cool, dry place.
• For optimum
performance, tablet
detergent is
recommended.

Premeasured Detergents
Many detergents now come in premeasured forms (gel packs,
tablets, or powder packs). These forms are suitable for all hardness
and soil levels. Always place premeasured detergents in the main
compartment and close the lid.
Using dishwasher detergent tablets and packs have been proven
better than powder, liquid or gel detergents to reduce filming on
your dishes. By using these tablets and packs, over time this will
start to reduce or eliminate white film. Also, by using a rinse aid you
can minimize repeat buildup of white film.
Powder and Gels
• The amount of detergent to use depends on:
How much soil remains on the items - Heavily soiled loads
require more detergent.
The hardness of the water - Ifyou use too little in hard water,
dishes won't be clean. If you use too much in soft water,
glassware will etch.
Soft to Medium Water (0-6 grains per U.S. gallon)
[typical water softener water and some city water]
Medium to Hard Water (7-12 grains per U.S. gallon)
[well water and some city water]
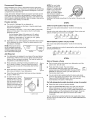
• Depending on your water hardness, fill the Main Wash section
of the dispenser as shown. Fill the Pre-Wash section to the
level shown, if needed.
NOTE: Fill amounts shown
are for standard powdered
detergent. Follow instructions
on the package when using
other dishwasher detergent.
Add Rinse Aid
HardWater
SoftWater
HerdWater
SoftWater
MainWash Pro-Wash
Your dishwasher is designed to use rinse aid for good drying
performance. Without rinse aid your dishes and dishwasher
interior will have excessive moisture. The heat dry option will
not perform as well without rinse aid.
Rinse aid keeps water from forming droplets that can
dry as spots or streaks. They also improve drying by
allowing water to drain off of the dishes after the final
rinse.
Rinse aid helps to reduce excess moisture on the
dish racks and interior of your dishwasher.
Full
Add
Check the rinse aid indicator. Add rinse aid when indicator
drops to "Refill" level.
To add rinse aid, turn the
dispenser cap to "Open"
and lift off. Pour rinse aid
into the opening until the
indicator level is at "Full."
Replace the dispenser cap
and turn to "Lock." Make
sure cap is fully locked.
USERINSEAIDFOR
BETTERDRYINGLock i
Open_ Add
1/4turn to lock
NOTE: For most water
conditions, the factory
setting of 2 will give good
results. If you have hard
water or notice rings or
spots, try a higher setting.
Turn the arrow adjuster
inside the dispenser by either
using your fingers or
inserting a flat-blade screwdriver into the center of the arrow and
turning.
STEP3
Select a Cycle (cycles vary by model)
See "Cycle and Option Descriptions" charts in the following
section.
Heavier cycles and options affect cycle length. Some cycles and
options will take up to 31/2hours to complete.
R m m m m m
cycles soil sensing technology
Select Options (options vary by model)
See "Cycle and Option Descriptions" charts in the following
section.
You can customize your cycles by pressing the options desired and
pressing Start/Resume.
[too..I.os.I t':°° r° Isao,t,.oI".... to')scrub/_s hi temp steam delay
options
STEP4
Start or Resume a Cycle
• Run hot water at the sink nearest your dishwasher until the
water is hot. Turn off water.
• Push door firmly closed. The door latches
automatically. Select the wash cycle and options Istart [
desired and press START/RESUME OR press START/
RESUME to repeat the same cycle and options as in
the previous wash cycle.
• You can add an item anytime before the main wash starts.
Open the door slowly and add the item. Close the door firmly.
Press the START/RESUME button, the cycle resumes
automatically at the point of interruption.
For fully intergrated models (controls on top of console)
• Select the wash cycle and options desired.
• Press the START/RESUME button once and close the door.
After a brief pause, the cycle will begin. The door must be
closed within 3 seconds after pushing START/RESUME or the
lights will flash, and the dishwasher will not begin. Press the
START/RESUME button again and shut the door within
3 seconds.
You can add an item anytime before the main wash starts. Open
the door slowly and add the item. Press the START/RESUME then
close the door.

[] [] [] [] [] []
cycles soft sen5ing technology
2 4 8 @
[] [] [] [] [] [][][] [] [] !
options
[] wash [] 4ry
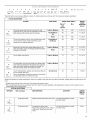
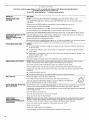
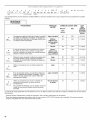
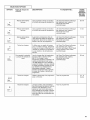
This information covers several different models. Your dishwasher may not have all of the cycles and options described.
[] clean []sanitized
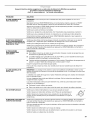
CYCLES
This cycle senses the load sizel soil amount, and
SOIL LEVEL WASH TIME* (MINS.)
Typical** Max
W/O
Options
Light to Medium I 250
WATER
USAGE
GALLONS
(Liters)
4,2 (16:i)
[] toughness of soil. This cycle is optimized to achieve the
i_l_.% best cleaning with minimal water and energy., Tough/Baked-95 I 255 7'1(26'7)
, 0n . .
I 255 ' 711(26,7)
This is the toughest cycle for your toughest food soils. Tough/Baked- 135 295 12.7 (48.1)
[] Use for hard-to-clean, heavily soiled pots, pans, On/Heavy
etclean casseroles, and regular tableware.
sensesthe soil level and makes adjustments inthe Lightto Medium I 90 125014;3 (16,2)
[] water and energy used. The Energy Guide information
[ ..... [ is based °n this cycle 90
i I I i
Use for lightly soiled items. Light to Medium 70 115 4.2 (16.1)
[]
light
For fast resu!tsl this cycle will Clean your dishes using I Light to Medium 35 7;1(26:7)
[] more water and energy.For fast resu!ts, this cyc!e will
q._ clean y0u[ dishes using more water and energy For I I I I
wash , ,
__ improved drying, select the heated dry 0pt!0n: I I [ I
Use for rinsing dishes, glasses, and silverware that will All soil levels 20 20 1.8 (6.9)
[] not be washed right away.
_J,_e DOnot use detergent. During the wash, the wash action
will repeatedly pause for several seconds.
Wash times depend on water temperature, heavy soil condition, dish load size and options selected. Adding options will add time to the
cycle.
*Adding options will add time to the cycle. See options information section.
**This is the approximate cycle time obtained with 120°F (49°C) hot water available at the dishwasher. Increase in time results from low
_te_erature of the incomin water.
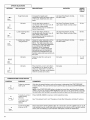
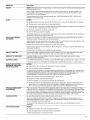
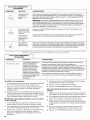
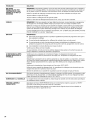
OPTIONS dish load types DESCRIPTIONS USE WITH:
ADDED
TIMETO
CYCLE
Tough food Soils Adds heat and wash time to the cYCle
Tough food soils Increases the target water Jet Clean Plus Steam, Normal, 5 min.
[] temperature during the wash portions and Auto Clean
tough of the cycle. Adds heat, time, and
water.

OPTION SELECTIONS
OPTIONS dish load types
DESCRIPTIONS USE WITH: ADDED
TIME TO
CYCLE
Increases the target Water Jet Clean Plus Steam, Normal,' 10 min,
" I temperature during the wash portions and Auto Clean
I
hi temp
)wa,h of the cyclel Adds heat, time, and
' water. I I
All loads
[]
heated
dry
All loads
2 4 8
___
delay
hours
Use for best drying results in Jet Clean Plus Steam, Normal, 45 min.
combination with rinse aid. Turn off Light, Quick Wash and Auto Clean
when loads contain plastic
dinnerware that may be sensitive to
higher temperatures.
Use for best drying results in Jet Clean Plus Steam, Normal, I 90 min.
combination with rinse aid. Turn off Light Quick Wash and Auto Clean I
when loads contain plastic I
d nnerware that may be suns t ve to
higher temperatures. _
Raises the water temperature inothe I Jet Clean Plus Steam, Normal, I 30 min.
final rinse to approximately 154 F I and Auto Clean I
(68 C). This high temperature rinse
sanitizes your dishes and glassware
in accordance with NSF/ANSI I I
Standard 184 for Residential I I
Dishwashers. Certified residential
dishwashers are not intended for
licensed food establishments.The I
San t ze opt on adds heat and t me to
the cycle. _
Delays the start of a cycle up to All cycles 2, 4, 8
8 hours, hours
All loads When Control Lock is lit, all buttons
are disabled. Ifyou press any pad
while your dishwasher is locked, the
light flashes. The door can be opened
while the controls are locked.
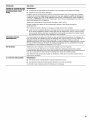
CONTROL PURPOSE COMMENTS
To start or resume a If the door is opened during a CYcle or the power is interrupted, the START/RESUME
[] wash cyc!e indicator flashes. The cycle w IInot resume unt I the door is closed and START/RESUME is
pressed.
NOTE: Ifthe START/RESUME button iS located on top of doorl puShdoor firmly clOSed
Within 3 seconds of pressing START/RESUME. Ifthe door is not closed within 3 seconds,
the start button LED wil! flash, an audible tone wi!! be heard, and the cycle wi!! not start,
[]
Icancet I
To reset any cycle or
options during
selection.
To cancel a wash
cycle after it's
started.
Press CANCEL/DRAIN to reset any control selections made.
See "Canceling A Cycle" and "Changing a Cycle After Dishwasher Is Started" sections.
To tuin the audible Press and h01dtheHi Temp Wash button for 3 seconds to turn the audible tones on oroff_
[] tones on croft. Only audible tones for confirming button presses can be turned on/off, Important audible
temp tones, such as indicating a cYCle has been interrupted, cannot be deactivated.

CONTROL PURPOSE COMMENTS
[] wash I dry I clean I sanitized
The Cycle Status Indicator Clean indicator glows when a cycle is finished.
Ligh2s areused _°o_ll°wh_e If you select the Sani Rinse option, when the Sani Rinse cycle is finished,
•,_u,_?o ,_.L,'7 "'_,' vv_o,'Z' the Sanit zed indicator glows. If your dishwasher did not properly sanitize
cyc,Je.Located, on t nejrom your dishes, the light flashes at the end of the cycle. This can happen if the
of tne alsnwasner for Tront
c;'ntr'_luu m_dels,uand 12_atedU,_ cycle is interrupted, or the water could not be heated to the required
on the top of the door for temperature.
hidden control models. The Clean and Sanitized lights go off when you open and close the door or
press CANCEL.
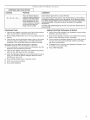
Canceling A Cycle
1. Open the door slightly to stop the cycle. Wait for the spraying
action to stop before completely opening the door.
2. Press CANCEL/DRAIN button once. The Cancel/Drain light will
light up.
3. Close the door and the dishwasher starts a drain cycle (ifwater
remains in bottom of dishwasher). Let the dishwasher drain
completely. The Cancel/Drain light turns off after 2 minutes.
Changing A Cycle After Dishwasher Is Started
1. You can interrupt a cycle and restart your dishwasher from the
beginning using the following procedure.
2. Open the door slightly to stop the cycle. Wait for the spraying
action to stop, then open the door completely.
3. Check that detergent dispenser cover is still closed. If cover is
open, you will need to refill the detergent dispenser before
restarting your new cycle.
4. Press CANCEL!DRAIN twice to reset the control.
5. Select new cycles and options.
6. Press START/RESUME.
Adding A Dish After Dishwasher Is Started
1. Check if Add a Dish indicator is lit. (Available on some models.
Otherwise, proceed to Step 2.)
2. Open the door slightly to stop the cycle. Wait for the spraying
action to stop, then open the door completely.
3. Check whether the detergent dispenser cover is still closed. If
it is open, the wash cycle has already started and adding a
dish is not recommended.
4. If detergent has not yet been used (detergent dispenser cover
is closed), you may add a dish.
5. Press START/RESUME.

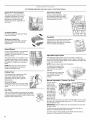
Your Maytag dishwasher may have some or all of these features.
Split & FitTM Utensil Basket
The split silverware basket can be
separated and placed in various
locations in the lower rack. Load
flatware and utensils into both
sections or just one, depending on
your load.
Stack-Rack Shelves
Increase loading flexibility - items
like casserole dishes stay stable
while the folding shelf allows you to
load smaller items on top.
To split the basket:
Hold the basket firmly along the sides.
Unlock the baskets.
Silverware basket lids:
Use silverware basket lids to provide
optimal spacing and best cleaning
performance.
Utensil Basket
Use the utensil basket to hold specialty
cooking utensils (serving spoons,
spatulas, and similar items), or overflow
silverware items.
The basket hangs on the bottom rack in
the right-hand corner. Load the basket
while it is on the bottom rack or remove
the basket for loading on a counter or
table.
NOTE: Spin the spray arms. Be sure
items in the basket do not stop the
rotation of the spray arms.
Folding Tines
The Folding Tines located in the front
right corner (lower rack) provide
convenient loading space for large,
bulky items such as pots, pans and
mixing bowls.
To lower the tines:
Gently push the tines out of each holder
toward the center rack and lay the tines
down.
Cup Clips
The Cup Clips located in the center of the upper
rack can be used to hold lightweight plastic items,
cooking utensils and knives in place. Clip the item
between the tine and the clip.
Cup Shelf
Fold down the extra shelf on the left-hand or
right-hand side of the top rack to hold
additional cups, stemware, or long items
such as utensils and spatulas.
i_! _ !_i!i! TM /" ;iijiii!ii;iii!i......
Adjustable Upper Racks
The Adjustable Upper Rack and can be raised or lowered to
accommodate taller plates, platters, pots or pans, in the upper or
lower racks. Full size dinner plates can be loaded in the upper rack
if it is in the lower position.
NOTE: Always unload racks before adjusting.
To raise the rack, press both
rack adjusters and lift the rack
until it is in the Up position
and level.
To lower the rack, press both
rack adjusters and slide the
rack back to its lower
position.
Manual Adjustable 2-Position Top Rack
You can raise or
lower the top I_L_Y,r_/y _
rack to fit tall
items in either the
top or bottom
rack. Adjusters
are located on _
each side of the
top rack. Raise
the top rack to
accommodate
items up to 9"
(22 cm) inthe top rack and 13" (33 cm) in the bottom rack, or lower
the top rack to accommodate items up to 11" (28 cm) in both the
top and bottom racks.
IMPORTANT: Remove dishes prior to removing the top rack from
the dishwasher.
To raise, remove rack and slide lower wheels into the rails as
directed in "Removable Top Rack" section.
To lower, remove rack and slide upper wheels into the rails as
directed in "Removable Top Rack" section.

Removable Upper Rack
The removable rack allows you to wash larger items such as stock
pots, roasters, and cookie sheets in the lower level rack.
IMPORTANT: Remove dishes prior to removing the upper rack
from the dishwasher.
To remove the rack (push tab rack stop):
1. Roll the rack 1/3to 1/2of the way out.
2. Remove each plastic push tab rack stop from the end of each
track by pushing inward toward the rack on the ridged area of
the rack stop. The rack stop will snap open and can be easily
removed by pulling straight out. Be sure to support the track
while removing rack stops.
3. Roll the rack all the way out of the track and remove from the
dishwasher.
To replace the rack:
Reverse the above steps 1-3 to replace the rack into the
dishwasher.
CLEANING THE DISHWASHER
s) vs.!as)e__
1.
Cleaning the exterior
Clean the exterior of the dishwasher with a soft, damp cloth and
mild detergent. Ifyour dishwasher has a stainless steel exterior, a
stainless steel cleaner is recommended - Stainless Steel Cleaner
and Polish Part Number 31464.
Cleaning the interior
Clean the interior of the dishwasher, with a paste of powdered
dishwasher detergent and water or use liquid dishwasher detergent
on a damp sponge to clean the cooled-down interior.
A white vinegar rinse may remove white spots and film. Vinegar is
an acid, and using it too often could damage your dishwasher.
Put 2 cups (500 mL) white vinegar in a glass or dishwasher-safe
measuring cup on the bottom rack. Run the dishwasher through a
complete washing cycle using an air-dry or an energy-saving dry
option. Do not use detergent. Vinegar will mix with the wash water.
Dishwasher Maintenance Procedure
To help avoid odor or odor-causing residue in your dishwasher, use
affresh ®dishwasher and disposer cleaner (recommended) once a
month as part of routine maintenance. Affresh ®dishwasher and
disposer cleaner is effective in all dishwasher brands.
IMPORTANT:
• Read these instructions and the instructions found on the
affresh®product package completely before beginning the
cleaning process.
• Use foil wrapper or gloves when handling the tablet.
2.
Ca , e
Remove all dishware from the dishwasher. Open the
dishwasher and place 1 affresh ®dishwasher and disposer
tablet in the main detergent tray and close the tray. Place
another tablet in the prewash tray or simply place 1 tablet in
the bottom of the dishwasher. Close the dishwasher. Run the
dishwasher on the most aggressive cycle - heavy duty scrub,
heated water, etc.
Place 1 affresh ®tdishwasher and disposal tablet into the
garbage disposal. Turn on hot water to slow flow. Run the
disposal and water for 15 seconds. Turn off disposal and
water. Do not flush disposal completely with water. Water from
the dishwasher will clean out the disposal. If no garbage
disposal, skip this step.
Drain air gap
If you have a drain air gap,
check and clean it if the
dishwasher isn't draining
well.
Storing the Dishwasher
If you will not be using the dishwasher during the summer months,
turn off the water and power supply to the dishwasher. In the
winter, if the dishwasher could be exposed to near freezing
temperatures or is left in aseasonal dwelling such as a second
home or vacation home, avoid water damage by having your
dishwasher winterized by authorized service personnel.
to AFFRESH is a Trademark of Whirlpool, U.S.A.

First try the solutions suggested here or visit our website and reference FAQs (Frequently Asked Questions)
to possibly avoid the cost of a service call.
In the U.S.A., www.maytag.com In Canada, www.maytag.ca
PROBLEM SOLUTION _
DISHWASHER DOES NOTE: It is normal for the dishwasher to repeatedly pause several times during a cycle.
NOT RUN If the START/RESUME light is blinking, press START/RESUME and close the door firmly within
3 seconds.
Press and hold HI TEMP WASH for 3 seconds to turn the audible tones on or off.
Be sure the door is closed and latched.
Be sure you have selected a cycle. (See "Cycles and Options Descriptions.")
Be sure there is power to the dishwasher. A circuit breaker or fuse may have tripped.
If lights other than START/RESUME blink and the unit will not run, you will need to call for service.
DETERGENT REMAINS IN THE Check for dishware such as cookie sheets, cutting boards, or large containers, etc., that may be
DISPENSER OR blocking the detergent dispenser from opening properly.
TABLET IS ON BOTTOM
OFTUB Be sure your detergent is fresh and lump free.
Be sure the cycle has completed (green light is on). If it has not completed, you will need to resume
the cycle by pressing START/RESUME and closing the door within 3 seconds.
CYCLE RUNS TOO LONG NOTES:
• To use less water and reduce energy consumption you will encounter cycles that typically run
for up to 3 hours.
• A water heater setting of 120°F (49°C) is best. The dishwasher will delay longer while heating
cooler water.
• Some options will add time to the cycle. (See "Cycles and Options Descriptions" section.) The
Heated Dry option adds 1/2hour.
Try the Quick Wash cycle.
Run the hot water at a faucet close to the dishwasher before starting the cycle.
DISHWASHER NOT DRYING NOTE: Plastic and items with nonstick surfaces are difficult to dry because they have a porous
surface which tends to collect water droplets. Towel drying may be necessary.
Use of rinse aid along with the Heated Dry option is needed for proper drying.
Proper loading of items can affect drying. (See specific loading instructions within this guide.)
Glasses and cups with concave bottoms hold water. This water may spill onto other items when
unloading.
• Unload the bottom rack first.
• Locate these items on the more slanted side of the rack for improved results.
WILL NOT FILL Be sure the water is turned on to the dishwasher.
Check that the float is free from obstructions. (See "Parts and Features.")
Check for suds in the dishwasher. If foam or suds are detected, the dishwasher
may not operate properly or may not fill with water.
WATER REMAINS IN THE TUB/
WILL NOT DRAIN
HARD WATER
(WHITE RESIDUE ON
DISHWASHER INTERIOR OR
G LASSWAR E)
Be sure the cycle has completed (the green light is on). If the cycle has not completed, you will need
to resume the cycle by pressing START/RESUME and closing the door within 3 seconds.
If dishwasher is connected to afood waste disposer, be sure the knockout plug has been removed
from the disposer inlet.
Check for kinks in the drain hose.
Check for food obstructions in the drain or disposer.
Check your house fuse or circuit breaker.
NOTE: Extremely hard water mineral deposits can cause damage to your dishwasher and make it
difficult to achieve good cleaning. A water softener is strongly recommended if your hardness is
15 grains or more. If a water softener is not installed, the following steps may help:
Use a commercial cleaner designed for dishwashers once per month.
Always use a rinse aid.
Always use a high-quality, fresh detergent.
Use a detergent booster/water softener additive designed for dishwashers.
10

PROBLEM SOLUTION
ODORS
NOISY
FOOD SOILS REMAIN
ON DISHES
DID NOT SANITIZE
DAMAGE TO DISHWARE
BLINKING LIGHTS
CLOUDY OR SPOTTED
DISHWARE (AND HARD
WATER SOLUTION)
ETCHING (PERMANENT
CLOUDINESS)
LEAKING WATER
TUB IS DISCOLORED
NOTE: If the dishwasher is not used daily, you can run a rinse cycle with the partial load daily until a
full load is ready to run.
Run a vinegar rinse through the dishwasher by putting 2 cups (500 mL) of white vinegar in an
upright glass measuring cup in the lower rack. Run a normal cycle with the Heated Dry option
turned off. Do not use detergent.
The dishwasher may not be draining properly, see "WATER REMAINS IN THE TUB/WILL NOT
DRAIN" in "Troubleshooting."
NOTES:
• Surging sounds can occur periodically throughout the cycle while the dishwasher is draining.
• Normal water valve hissing may be heard periodically.
• A normal snap sound may be heard when the detergent dispenser opens during the cycle and
when the door is opened at the end of the cycle.
• Improper installation will affect noise levels.
Be sure the filters are properly installed.
A thumping sound may be heard if items extend beyond the racks and interfere with the wash arms.
Readjust the dishware and resume the cycle.
Be sure the dishwasher is loaded correctly. Improper loading can greatly decrease the washing
performance (see "Prepare and Load the Dishwasher").
Select the proper cycle and option for the type of soils. The Jet Clean/Jet Clean Plus Steam cycle
with the Steam Sanitize option can be used for tougher loads.
Be sure the incoming water temperature is at least 120°F (49°C).
Use the proper amount of fresh detergent. More detergent is needed for heavier-soiled loads and
hard water conditions.
Scrape food from dishes prior to loading (do not prerinse).
If the sanitized light is blinking, the load is NOT sanitized. The cycle was interrupted in the final
rinse, or your water heater is set too low. Set your water heater to 120°F (49°C).
Improper loading can cause dishes to become chipped or damaged. (See specific loading
instructions within this guide.)
Ifthe START/RESUME light is blinking, press START/RESUME and close the door within 3 seconds.
If the Clean light or any other lights are blinking and the dishwasher will not run, call for service.
NOTES:
• Liquid rinse aid is necessary for drying and to reduce spotting.
• Use the correct amount of detergent.
Confirm that the cloudiness is removable by soaking the item in white vinegar for 5 minutes. If the
cloudiness disappears, it is due to hard water. Adjust the amount of detergent and rinse aid. See
("HARD WATER [WHITE RESIDUE ON DISHWASHER INTERIOR OR GLASSWARE]") in
"Troubleshooting." If it does not come clear, it is due to etching (see below).
Be sure the incoming water temperature is set at 120°F (49°C).
Try using the Hi Temp and Sani Rinse options.
To remove spotting, run a vinegar rinse through the dishwasher.
• Wash and rinse the affected dishware and load into dishwasher. Remove all silverware and
metal items. Put 2 cups (500 mL) of white vinegar in a glass measuring cup in the lower rack.
Run a normal cycle with the Heated Dry option turned off. No detergent is needed.
This is an erosion of the surface of the glassware and can be caused by a combination of: water
that is too hot, from using too much detergent with soft water or by pre-washing. Detergent needs
food soil to act upon. If etching has occurred, the glassware is permanently damaged. To avoid
further etching, adjust the detergent amount to match the water hardness, stop pre-washing, and
use water heating options only when incoming water temperature is below 120°F (49°C).
Be sure dishwasher has been installed properly and is level.
Suds can cause the dishwasher to overflow. Measure the detergent accurately and use only
detergents designed for use in a dishwasher. Less detergent is needed in soft water. Try another
brand of detergent if sudsing continues.
To avoid rinse aid leaking from the dispenser, be sure the lid is securely attached and avoid
overfilling.
NOTES:
• High iron content in the water can discolor the tub.
• Tomato-based foods can discolor the tub or dishware.
A citrus-based cleaner can be used to clean.
11

FIRST YEAR LIMITED WARRANTY (PARTS AND LABOR)
For one year from the date of purchase, when this major appliance is installed, operated and maintained according to instructions
attached to or furnished with the product, Maytag brand of Whirlpool Corporation or Whirlpool Canada, LP (hereafter "Maytag") will pay
for factory specified replacement parts and repair labor to correct defects in materials or workmanship that existed when this major
appliance was purchased.
SECOND THROUGH TENTH YEAR LIMITED WARRANTY (CERTAIN COMPONENT PARTS ONLY - LABOR NOT INCLUDED)
In the second through tenth years from the date of original purchase, when this major appliance is installed, operated and maintained
according to instructions attached to or furnished with the product, Maytag will pay for factory specified parts for the following
components to correct non-cosmetic defects in materials or workmanship in these parts that prevent function of the dishwasher and that
existed when this major appliance was purchased. This is a limited 10-year warranty on the below named parts only and does not include
repair labor.
• Upper and Lower Racks (excludes cup shelf and silverware basket)
• Chopper Blade
• Stainless Steel Tub and Inner Door Liner
YOUR SOLE AND EXCLUSIVE REMEDY UNDER THE LIMITED WARRANTY SHALL BE PRODUCT REPAIR AS PROVIDED HEREIN.
Service must be provided by a Maytag designated service company. This limited warranty is valid in the United States or Canada and
applies only when the major appliance is used in the country in which it was purchased. This limited warranty is effective from the date of
the original consumer purchase. Proof of original purchase date is required to obtain service under this limited warranty.
ITEMS EXCLUDED FROM WARRANTY
This limited warranty does not cover:
1. Replacement parts or repair labor if this major appliance is used for other than normal, single-family household use or when it is used
in a manner that is inconsistent to published user or operator instructions and/or installation instructions.
2. Service calls to correct the installation of your major appliance, to instruct you on how to use your major appliance, to replace or repair
house fuses, or to correct house wiring or plumbing.
3. Service calls to repair or replace appliance light bulbs, air filters or water filters. Consumable parts are excluded from warranty
coverage.
4. Damage resulting from accident, alteration, misuse, abuse, fire, flood, acts of God, improper installation, installation not in accordance
with electrical or plumbing codes, or use of products not approved by Maytag.
5. Cosmetic damage, including scratches, dents, chips or other damage to the finish of your major appliance, unless such damage
results from defects in materials or workmanship and is reported to Maytag within 30 days from the date of purchase.
6. Pickup and delivery. This major appliance is intended to be repaired in your home.
7. Repairs to parts or systems resulting from unauthorized modifications made to the appliance.
8. Expenses for travel and transportation for product service if your major appliance is located in a remote area where service by an
authorized Maytag servicer is not available.
9. The removal and reinstallation of your major appliance if it is installed in an inaccessible location or is not installed in accordance with
Maytag published installation instructions.
10. Replacement parts or repair labor on major appliances with original model/serial numbers that have been removed, altered or cannot
be easily determined.
11. Discoloration, rust, or oxidation of stainless steel surfaces.
The cost of repair or replacement under these excluded circumstances shall be borne by the customer.
DISCLAIMER OF IMPLIED WARRANTIES
IMPLIED WARRANTIES, INCLUDING ANY IMPLIED WARRANTY OF MERCHANTABILITY OR IMPLIED WARRANTY OF FITNESS FOR A
PARTICULAR PURPOSE, ARE LIMITED TO ONE YEAR OR THE SHORTEST PERIOD ALLOWED BY LAW. Some states and provinces do
not allow limitations on the duration of implied warranties of merchantability or fitness, so this limitation may not apply to you. This
warranty gives you specific legal rights, and you also may have other rights that vary from state to state or province to province.
LIMITATION OF REMEDIES; EXCLUSION OF INCIDENTAL AND CONSEQUENTIAL DAMAGES
YOUR SOLE AND EXCLUSIVE REMEDY UNDER THIS LIMITED WARRANTY SHALL BE PRODUCT REPAIR AS PROVIDED HEREIN.
MAYTAG SHALL NOT BE LIABLE FOR INCIDENTAL OR CONSEQUENTIAL DAMAGES. Some states and provinces do not allow the
exclusion or limitation of incidental or consequential damages, so these limitations and exclusions may not apply to you. This warranty
gives you specific legal rights, and you also may have other rights that vary from state to state or province to province.
If outside the 50 United States and Canada, contact your authorized Maytag dealer to determine if another warranty applies.
Ifyou think you need repair service, first see the "Troubleshooting" section of the Use & Care Guide. If you are unable to resolve the
problem after checking "Troubleshooting," additional help can be found by checking the "Assistance or Service" section or by calling
Maytag. In the U.S.A., call 1-800-688-9900. In Canada, call 1-800-807-6777. 7/10
12

For additional product information, in the U.S.A., visit www.maytag.com
In Canada, visit www.maytag.ca
Ifyou do not have access to the Internet and you need assistance using your product or you would like to schedule service, you may
contact Maytag at the number below.
Have your complete model number ready. You can find your model number and serial number on the label located near the door on the
right-hand or left-hand side of the dishwasher interior.
For assistance or service in the U.S.A., call 1-800-688-9900. In Canada, call 1-800-807-6777.
Ifyou need further assistance, you can write to Maytag with any questions or concerns at the address below:
In the U.S.A.:
Maytag Brand Home Appliances
Customer eXperience Center
553 Benson Road
Benton Harbor, MI 49022-2692
Please include a daytime phone number in your correspondence.
In Canada:
Maytag Brand Home Appliances
Customer eXperience Centre
200 - 6750 Century Ave.
Mississauga, Ontario L5N 0B7
Please keep this User Instructions and model number information for future reference.
W10401491A
SP W10401492A
© 2012
All rights reserved. ®Registered trademarkF MTrademark of Maytag Properties, LLC, or its related companies.
1/12
Printed in U.S.A.
13

NousvousREMERCIONSd'avoiracheteceproduitdehautequalite.Sivousrencontrezunproblemenonmentionnedansla
sectionDI_PANNAGE,veuillezvisiternotresiteWebwww.maytag.compourdesinformationssupplementaires.Sivousavez
toujoursbesoind'assistance,veuilleznoustel6phonerau1-800-688-9900.AuCanada,visiteznotresiteWebwww.maytag.caou
tel6phonez-nousau1-800-807-6777.
Vousaurezbesoindevosnum@osdemodeleetdes@iesituespresdelaportesurlec6tedroitougauche,AI'int@ieurdulave-
vaisselle.
SI_CURITI_ DU LAVE-VAISSELLE ........................................... 14
I_TAPES RAPIDES .................................................................... 16
UTILISATION DU LAVE-VAISSELLE ...................................... 16
DESCRIPTION DES PROGRAMMES ET OPTIONS .............. 18
SECTION COMMENTAIRES SUR L'UTILISATION
DU LAVE-VAISSELLE .............................................................. 20
CARACTI_RISTIQUES DU LAVE-VAISSELLE ........................ 21
ENTRETIEN DU LAVE-VAISSELLE ......................................... 22
DI_PANNAGE ............................................................................ 23
GARANTIE ................................................................................. 26
Votre securite et celle des Buttes est tres importante.
Nous donnons de nombreux messages de s_curit_ importants dans ce manuel et sur votre appareil m_nager. Assurez-vous de
toujours lire tousles messages de s_curit_ et de vous y conformer.
Voici le symbole d'alerte de s_curit_.
Ce symbole d'alerte de s_curit_ vous signale les dangers potentiels de d_c_s et de blessures graves &vous
et & d'autres.
Tousles messages de s_curit_ suivront le symbole d'alerte de s_curit_ et le mot "DANGER" ou
"AVERTISSEMENT". Ces mots signifient •
Risque possible de d_cbs ou de blessure grave si vous ne
suivez pas imm_diatement les instructions.
Risque possible de d_cbs ou de blessure grave si vous
ne suivez pas les instructions.
Tousles messages de s_curit_ vous diront quel est le danger potentiel et vous disent comment r_duire le risque de blessure et
ce qui peut se produire en cas de non-respect des instructions.
14

IMPORTANTES INSTRUCTIONS DE SI_CURITI_
AVERTISSEMENT : Lors de I'utilisation du lave-vaisselle, suivre les precautions el6mentaires dont lessuivantes :
m Lire la totalite des instructions avant d'utiliser le
lave-vaisselle.
m N'utiliser le lave-vaisselle que pour laver la vaisselle.
m Utiliser uniquement les detersifs ou agents de rin(;age
recommandes pour lave-vaisselle et les garder hors de la
portee des enfants.
m Lorsque vous chargez le lave-vaisselle :
1) Placer les objets coupants de fa(;on qu'ils ne puissent
endommager le joint de la porte; et
2) Placer les couteaux le manche vers le haut de fa(;on & ne
pas vous couper.
m Ne pas laver d'articles en plastique & moins qu'ils ne soient
marques "Peut aller au lave-vaisselle" ou I'equivalent. Si
I'article ne porte aucune indication, verifier aupr_s du
fabricant.
m Ne pas toucher I'el6ment chauffant pendant le
fonctionnement ou immediatement apr_s.
[] Ne pas faire fonctionner le lave-vaisselle si tous les
panneaux de I'enceinte ne sont pas en place.
[] Ne pas jouer avec les commandes.
[] Ne pas abuser, vous asseoir ni monter sur la porte,
le couvercle ou les paniers du lave-vaisselle.
[] Pour eviter tout risque d'accident, ne pas laisser les
enfants jouer dans ou sur le lave-vaisselle.
[] Sous certaines conditions, de I'hydrogene peut se former
dans un reseau d'eau chaude inutilise depuis deux
semaines ou plus. L'HYDROG#NE EST UN GAZ
EXPLOSIBLE. Si le systeme d'eau chaude n'a pas et6
utilise depuis un certain temps, laisser couler I'eau chaude
des robinets pendant quelques minutes avant de faire
fonctionner le lave-vaisselle. Cette mesure permettra &
I'hydrogene de s'evaporer. Ce gaz etant inflammable, ne
pas fumer ni utiliser de flamme nue pendant cette periode.
[] Enlever la porte ou le couvercle du compartiment de lavage
Iorsque vous remplacez ou mettez au rebut un vieux
lave-vaisselle.
CONSERVEZ CES INSTRUCTIONS
Avertissements de la proposition 65 de I'¢:tat de Californie :
AVERTISSEMENT : Ce produit contient au moins un produit chimique connu par I'¢:tat de Californie pour 6tre & I'origine de
cancers.
AVERTISSEMENT : Ce produit contient au moins un produit chimique connu par I'¢:tat de Californie pour 6tre & I'origine de
malformations et autres d6ficiences de naissance.
iNSTRUCTIONS DE MISE A LA TERRE
[] Pour un lave=vaisselle reli6 & la terre, branch6 avec un
cordon :
Le lave-vaisselle doit etre relie A la terre. En cas d'un
mauvais fonctionnement ou d'une panne, la mise #,terre
reduira le risque d'un choc electrique en fournissant le moins
de resistance pour le courant electrique. Le lave-vaisselle est
equipe d'un cordon avec un conducteur pour relier les
appareils #,la terre et d'une fiche de mise #,la terre. La fiche
doit etre branchee sur une prise appropriee, installee et reliee
& la terre conformement aux codes et reglements Iocaux.
AVERTiSSEMENT : La connexion incorrecte du
conducteur pour relier les appareils &la terre peut causer le
risque de choc electrique. Verifier avec un electricien
[]
competent ou un representant de service si vous avez
des doutes si le lave-vaisselle est correctement relie& la
terre. Ne pas modifier la fiche fournie avec le lave-
vaisselle; si elle n'entre pas dans la prise, faire installer
une prise appropriee par un electricien competent.
Pour un lave=vaisselle branch_ en permanence :
Le lave-vaisselle doit etre branche & un syst_me
d'installation electrique permanent en metal relie& la
terre, ou un conducteur pour relier les appareils & laterre
doit etre relie avec les conducteurs du circuit et branche
&une borne pour relier les appareils & la terre ou au
cordon d'alimentation electrique avec le lave-vaisselle.
CONSERVEZ CES INSTRUCTIONS
Risque de bascuJement
Ne pas utiliser le lave=vaisselle jusqu'a ce qu'il soit compl_tement installS.
Ne pas appuyer sur la porte ouverte.
Le non=respect de ces instructions peut causer des blessures graves ou des coupures.
15

pidcs
Preparer et Y'_
charger le lave- _
vaisselle.
Verser le
d_tergent et
I'agent de
ringage.
S_lectionner un programme et une option (les
programmes et options varient selon le module.)
cycles soil sensing technology
B I m m m _R
I .... ]scrU_u5 hi temp steam delay
options
_ Mettre en marche
le lave-vaisselle.
€:TAP E 1
Preparation et chargement du lave-vaisselle
IMPORTANT : Enlever les restes alimentaires, os, cure-dents et
autres articles durs de la vaisselle. Enlever les etiquettes des
recipients avant de les laver.
g ,
Panier sup#rieur Panierinf#rieur
S'assurer que rien n'emp_che le(s) bras
d'aspersion de tourner librement. II est
important que le jet d'eau atteigne toutes
les surfaces sales.
• Verifier qu'aucun article ne bloque le distributeur de detergent
Iorsque la porte du lave-vaisselle est fermee.
• Charger dans le panier les articles en orientant lasurface sale
vers I'interieur, vers le bras d'aspersion, tel qu'illustr& Ceci
ameliorera les resultats de nettoyage et de sechage.
• 12viterle chevauchement d'articles tels que bols ou assiettes
pouvant retenir les aliments.
• Placer les articles de plastique, les petites assiettes et les
verres dans le panier superieur. Ne laver au lave-vaisselle que
les articles de plastique identifies comme "lavable au lave-
vaisselle".
Pour eviter les bruits de choc et d'entrechoc durant le
fonctionnement : Charger la vaisselle de fa(_on ace que les
articles ne se touchent pas les uns les autres. S'assurer que les
articles legers sont bien retenus dans les paniers.
• Pour le chargement des couverts, les articles /__
pointus doivent toujours _tre orientes vers le
bas. Orienter certains articles vers le haut et
d'autres vers le bas Iorsqu'on les place
ensemble.
lit ..........
ETAPE 2
Verser le d_tergent
REMARQUE : Si vous n'avez pas I'intention d'effectuer un
programme de lavage dans I'immediat, executer un programme de
rin£;age. Ne pas utiliser de detergent.
• Utiliser uniquement du detergent pour lave-vaisselle
automatique. Verser le detergent en poudre, liquide ou en
pastille juste avant de demarrer un programme.
• Pour de meilleurs
resultats de lavage,
il est recommande
d'utiliser un
detergent &lave-
vaisselle
automatique frais.
Conserver le
recipient du
detergent bien
ferme dans un lieu
sec et frais.
• Pour une performance optimale, on recommande I'utilisation
d'un detergent en pastille.
16

D_tergents pr_-mesur_s
Beaucoup de detergents sont vendus en format pre-mesur6
(sachets de gel, pastilles ou sachets de poudre). Ces formats sont
ideaux quelle que soit la durete de I'eau et de salet& Toujours
placer les detergents pre-mesur6s dans le compartiment principal
et fermer le couvercle.
IIest prouve que les detergents pour lave-vaisselle en pastilles ou
en sachet reduisent plus efficacement la formation de pellicule sur
la vaisselle que les detergents liquides, en poudre ou en gel. Gr&ce
I'utilisation reguliere de ces pastilles et sachets, la pellicule
blanche commencera & diminuer ou & disparaitre. L'utilisation d'un
agent de rin£;age peut aussi vous aider a reduire la frequence de
formation de cette pellicule blanche.
Produits sous forme de poudre ou de gel
• La quantite de detergent & utiliser depend des elements
suivants :
Degre de salete de la vaisselle - les charges tres sales
necessitent plus de detergent.
Durete de I'eau - si I'on n'utilise pas assez de detergent avec
une eau dure, la vaisselle ne sera pas parfaitement lavee. Si
I'on utilise trop de detergent avec une eau douce, la solution
attaquera les articles en verre.
Eau douce & moyenne (0 a 6 grains par gallon U.S.)
[eau venant d'adoucisseur d'eau general et eau du service
d'eau de la ville]
Eau moyenne a dure (7 a 12 grains par gallon U.S.)
[eau de puits et du service d'eau de la ville]
• Selon la durete de I'eau, remplir la section de lavage principal
du distributeur tel qu'illustr& Remplir la section de prelavage
jusqu'au niveau indique, si necessaire.
REMARQUE :Les quantites X Jt
indiquees correspondent & X HardWater
I'emploi d'un detergent en softwater HardWater
SoftWater
poudre standard. Lors de .
I'utilisation d'un autre Lavagaprincipal Prelavage
detergent, proceder
conformement aux instructions indiquees sur I'emballage.
Verser I'agent de ringage
Votre lave-vaisselle est con(_u pour utiliser un agent de rin(_age
afin d'obtenir un sechage satisfaisant. Sans agent de rin£;age,
la vaisselle et I'interieur du lave-vaisselle seront trop humides.
L'option de sechage avec chaleur ne fonctionnera pas de
maniere optimale sans agent de rin(_age.
• Un agent de rin£;age empeche I'eau de former des _ Full
gouttelettes qui peuvent laisser des taches ou des
coulees en sechant. IIameliore egalement le sechage
en permettant a I'eau de s'ecouler de la vaisselle
apres le rin£;age final.
• Un agent de rin(_age aide a reduire I'exces d'humidite kW_JAdd
sur les paniers a vaisselle et & I'interieur du lave-
vaisselle.
Contr61er I'indicateur d'agent de rin(_age. Ajouter de I'agent de
rin£;age Iorsque I'indicateur tombe au niveau "Refill" (remplir).
Pour ajouter de I'agent de
rin£;age, tourner le
bouchon du distributeur
sur "Open" (ouvrir) et le
soulever pour le degager.
Verser I'agent de rin£;age
dans I'ouverture jusqu'a ce
que I'indicateur soit sur
"Full" (plein). Remettre en
place le bouchon du
distributeur et le tourner
jusqu'a ce qu'il soit sur
"Lock" (verrouillage).
S'assurer que le bouchon
est bien verrouill&
USERINSEAIDFOR Full
BETrERDRYINGLock
o
¼ de tour pour verrouiller
REMARQUE : Pour la
plupart des types d'eau, le
reglage 2 effectue & I'usine
donnera de bons resultats.
Si I'eau du domicile est dure
ou si I'on remarque la
presence d'anneaux ou de
taches, essayer un reglage
plus elev& Tourner I'ajusteur
&fleche & I'interieur du distributeur soit & la main, soit en inserant
un tournevis & lame plate au centre de la fleche et en tournant.
ETAPE 3
S_lectionner un programme (les programmes varient
selon les modules)
Voir les tableaux "Descriptions des programmes et des options"
dans la section qui suit.
Les programmes plus intenses etles options modifient la duree du
programme. L'execution de certains programmes et options
prendra jusqu'& 31/2heures.
cycles soil sensing technology
S_lectionner des options (les options varient selon le
module)
Voir les tableaux "Descriptions des programmes et des options"
dans la section qui suit.
On peut personnaliser les programmes en appuyant sur les options
desirees et sur Start/Resume (mise en marche/reprise).
B _ q m _ _ a8 €_
crub hi ternp steam delay
options
F:TAPE4
D_marrer ou reprendre un programme
• Laisser couler I'eau du robinet le plus proche du lave-vaisselle
jusqu'& ce qu'elle soit chaude. Fermer le robinet.
• Bien fermer la porte. Le verrou de la porte s'engage
automatiquement. Selectionner le programme de Istart I
lavage et les options souhaites et appuyer sur START/
RESUME (mise en marche/reprise) OU appuyer sur
START/RESUME pour repeter le meme programme etles
memes options que le programme de lavage precedent.
• On peut ajouter un article a n'importe quel moment avant le
debut du lavage principal. Ouvrir la porte doucement et ajouter
I'article. Bien fermer la porte. Appuyer sur le bouton START/
RESUME (mise en marche/reprise); le programme reprend alors
automatiquement I&oQil a eta interrompu.
Pour les modules pleinement int_gr_s (commandes sur
la console)
• Choisir le programme et les options de lavage desires.
• Appuyer une fois sur le bouton START/RESUME (mise en
marche/reprise) et fermer la porte. Apres une courte pause, le
programme commence. La porte doit etre fermee dans les
3 secondes qui suivent la selection de START/RESUME. A
defaut, les temoins clignotent et le lave-vaisselle ne se met pas
en marche. Appuyer a nouveau sur le bouton START/RESUME
et fermer la porte dans les 3 secondes.
On peut ajouter un article a n'importe quel moment avant le debut
du lavage principal. Ouvrir la porte doucement et ajouter I'article.
Appuyer sur START/RESUME puis refermer la porte.
17

[] [] [] [] [] []
cyc[es soft sensing t_M_olo_y
2 _ s _
m [] [] [] [] ___ [] [] []
options
wash [] dry [] clean [] sanitized
Ces renseignements couvrent plusieurs modeles differents. Votre lave-vaisselle peut ne pas comporter tousles programmes et options
indiqu6s.
PROGRAMMES NIVEAU DE
SALETI_
Ce programme d6tecte la taille de la chargel la quantit6
DURI_E DE LAVAGE* (MIN) CON-
SOM-
Normal** Max MATION
sans D'EAU EN
options GALLONS
(Litres)
[] de salet6s et I,adh6rence des sa!et6s. Ce programme I .........
est opt m s6 pour atte ndre un nettoyage max ma avec Dffce/ 95 255 7il (26,7)
un minimum dleau et di6nergie. Adh_rantaux I I
surfaces apr_s I
I CUlSSOn I I
I I I I
, Intense i 1(26,7)
IIs'agit du programme le plus puissant pour nettoyer Tenace/ 135 295 12,7 (48,1)
[] les saletes les plus tenaces. Utiliser ce programme Adh_rant aux
JLetdean pour les casseroles, les po_les et la vaisselle ordinaire surfaces apr_s
.......... difficiles & nettoyer et tr_s sales, cuisson/Difficile
D6teCte le niveau de salet6 et effectue les ajustements
[] de consommation d,eau et d,6nergie n6cessaires,
I..... i L,6t quette de consommat on d'_nerg e est bas_e sur _ Intense .... , 90 .... I 250 ..... 7,1 (26,7)
ce programme, I I I I
Utiliser ce programme pour les articles legerement L_ger 71 115 7,1 (26,7)
[] sales.
light
I I I I
Pour des r6sultats rapides, ce programme utilise plus L_ger _ mod_r_ 35 65 7;! (26,7)
[] d eau et d _nergie pour nettoyer la vaissel!e. Pour un
_,_k mei eur s_chage s_!ect onner ! opt on Heated Dry
.... _ I I I
(s_chage avec chaleur),
[]
Utiliser ce programme pour rincer la vaisselle, les
verres et les couverts qui ne seront pas laves
immediatement.
Ne pas utiliser de detergent. Lors du lavage, I'action de
lavage fera des pauses repetees pendant quelques
secondes.
Tous les niveaux
de salet_
2O 2O
1,8 (6,9)
Les durees de lavage dependent de la temperature de I'eau, du degre de salete, de la taille de la charge de vaisselle ainsi que des options
selectionnees.
*Certaines options augmenteront la duree du programme. Voir la section d'information sur les options.
**Duree de programme approximative obtenue avec de I'eau chaude a 120°F (49°C) fournie au lave-vaisselle. Siles durees sont plus
Iongues, cela signifie que I'eau d'arrivee est moins chaude.
18

OPTIONS Types de charges de DESCRIPTIONS
vaisselle
.&,UTILISER AVEC : DURI_E
SUPPLI_-
MENTAIRE
DU PRO-
GRAMME
I Residus alimentaires Ceci augmente le niveau de cha!eur Jet Clean Plus Steam (nettoyage 30min
[]
Residus alimentaires
tenaces
Ceci augmente le niveau de chaleur
et la duree de lavage du programme
! I
Residus alimentaires Augmente la temperature cib!e de
Jet Clean Plus Steam (nettoyage 5 min
par aspersion avec vapeur),
Normal et Auto Clean
(autonettoyage)
I
Jet Clean Plus Steam (nettoyage 10 min
[] tenaces I,eau durant les 6tapes de lavage du par aspersion avec vapeur)
_h_tom I programmel Ajoute de la chaleur, du Normal et Auto Clean I
P
! tempset deleau au programme: ,. (aut°nettoyage) !
steam
I san t ze
_ii i ii i I
Toutes les charges
Pour assainir la Vaisselle,
y compris les articles en
verre
i i ¸
il _i iii i i_ i
Toutes les charges
2 4 8
___
A utiliser avec un agent de ringage
pour un meilleur sechage. Desactiver
Iorsque les charges contiennent de la
vaisselle en plastique susceptible de
ne pas resister a des temperatures
elevees.
Lots du iingage finai, la temperature
de I'eau s'61_ve & environ 1540C
(68°C). Ce ringage & haute
Jet Clean Plus Steam (nettoyage
par aspersion avec vapeur),
Normal, Light (leger), Quick Wash
(lavage rapide) et Auto Clean
(autonettoyage)
45 min
Jet Clean Plus Steam (nettoyage
pal aspersion avec vapeur), ........
Normal et Auto Clean
delay
hours
30 min
temperature assainit la vaisselle et la (autone_oyage)
verrerie conformement & la norme I
! 84 NSF/ANSI pour lave-vaisselle &
usage domestique. Les lavewaisselle I
&usage domestique certifies ne sont I
pas destines aux 6tab!issements
alimentaires autofises. L option
Sanitize (assainissement)augmente
le niveau de cha!eur et la duree du
programme.
Differe le demarrage d'un programme Tous les programmes 2, 4, 8,
jusqu'& 8 heures, heures
des co••andes) est allume, tou_
boutons so_
Tousles programmes
19

COMMANDE FONCTION COMMENTAIRES
Pour d6marrer ou Si I'on ouVre la porte durant un programme ou si une panne de courant se produit, le
[] poursuivre un t6moin lumineux START/RESUME (mise en marche!reprise) clignote. Le programme ne
lstart I programme de reprend pas tant que la porte n'est pas fermee et que I,on n'a Pas appuy6 sur START/
lavage RESUME (m se en marche!reprise).
REMARQUE : Si le bouton START/RESUME (mise en marche!repfise) se !rouve sur le
dessus de la porte, bien fermer la porte dans les 3 secondes qui suivent I appui sur la
touche START/RESUME (mise en marche!reprise), Si la porte n,est pas ferm6e dans les
3 secondes qui suivent, le bouton de mise en marche DEL clignotel un signal sonore
retentit et !e programme ne d6marre pas.
[]
Icancet I
Pour revenir &tout
programme/option
initial au cours de la
selection.
Pour annuler un
programme de
lavage apres son
demarrage.
Appuyer sur CANCEL/DRAIN (annulation/vidange) pour revenir a toute selection de
commande initiale.
Voir les sections "Annulation d'un programme apres le demarrage du lave-vaisselle" et
"Modification d'un programme apres le demarrage du lave-vaisselle".
Pour activer ou Appuyer sUr ie b0Uton Hi Temp Wash (laVage & haute temperature) pendant 3 sec0ndes
[] desactiver es pour activer ou d6sactiver less gnaux sonores. Seuls les signaux sonores de confirmation
signaux sonores, d'activation de boutons sont activables/desactivables. Les signaux sonores im
COMMANDE FONCTION COMMENTAIRES
Les indicateurs !umineux de Uindicateur C!ean (propre)slallume !0rsqu un programme est termin&
•w,_h •d,y •d_° •,,o_t_d '_tat d'avancementdu. . Lors que I on s'lectionne e Io ption Sani ,Rinse (ringag eave c
programme us_rent a
• , assainissement), I indicateur Sanitized (assainissement) s a!!ume des que
progress on au programme
, , . .; .. leprogrammeesttermin&Silelavewaissel!enapasbienassainila
au ave valsse e s sore
....-., :,' , vaisselle, let6moinclignote&lafinduprogramme, Cecipeutseproduiresi
slues a avant au ave
.... i.. _ le programme a 6te interrompu ou si I eau n a pas pu 6tre suffisamment
va ssel e sur es moae es
u, _ . chauff6e pour atteindre la temperature requisel
a!sposan_ aes commanaes a
'avant et sur e dessus de a Le voyant Clean and Sanitized (propre et assaini) s #teint Iorsque I on
porte pour !es modeles dont ouvre et ferme la porte ou que I,onappu e sur CANCEL (annu!ation)_
les commandes sont
dissimUleesl
Annulation d'un programme
1. Ouvrir legerement la porte pour arr_ter le programme• Attendre
que I'action d'arrosage s'arr_te avant d'ouvrir la porte•
2. Appuyer une fois sur le bouton CANCEL!DRAIN (annulation/
vidange). Le temoin lumineux Cancel/Drain (annulation/
vidange) s'allume.
3. Fermer la porte et le lave-vaisselle entame un programme de
vidange (s'il reste de I'eau au fond du lave-vaisselle). Laisser le
lave-vaisselle evacuer I'eau completement. Le temoin Cancel/
Drain (annulation/vidange) s'eteint apres 2 minutes•
Modification d'un programme apr_s la mise en marche
du lave-vaisselle
1. On peut interrompre un programme et redemarrer le lave-
vaisselle depuis le debut en suivant la procedure suivante.
2. Ouvrir legerement la porte pour arr_ter le programme• Attendre
que I'action d'arrosage s'arr_te avant d'ouvrir la porte•
3. Verifier que le couvercle du distributeur de detergent est bien
ferm& Si le couvercle est ouvert, remplir & nouveau le
distributeur de detergent avant de redemarrer un nouveau
programme•
4. Appuyer deux fois sur CANCEL!DRAIN (annulation/vidange)
pour reinitialiser le module de commande.
5. Choisir un nouveau programme et les options•
6. Appuyer sur START/RESUME (mise en marche/reprise).
Ajout d'un plat apr_s la mise en marche du lave-
vaisselle
1. Verifier que le temoin lumineux Add a Dish (ajouter un plat) est
bien allum& (sur certains modeles. Sinon, passer a I'etape 2).
2. Ouvrir legerement la porte pour arr_ter le programme• Attendre
que I'action d'arrosage s'arr_te avant d'ouvrir la porte•
3. Verifier que le couvercle du distributeur de detergent est
toujours ferm& S'il est ouvert, cela signifie que le programme
de lavage a dej& commence et il n'est pas conseille d'ajouter
un plat.
4. Si I'on n'a pas encore utilise de detergent (couvercle du
distributeur de detergent ferme), on peut ajouter un plat.
5. Appuyer sur START/RESUME (mise en marche/reprise).
20
La page charge ...
La page charge ...
La page charge ...
La page charge ...
La page charge ...
La page charge ...
La page charge ...
La page charge ...
La page charge ...
La page charge ...
La page charge ...
La page charge ...
-
 1
1
-
 2
2
-
 3
3
-
 4
4
-
 5
5
-
 6
6
-
 7
7
-
 8
8
-
 9
9
-
 10
10
-
 11
11
-
 12
12
-
 13
13
-
 14
14
-
 15
15
-
 16
16
-
 17
17
-
 18
18
-
 19
19
-
 20
20
-
 21
21
-
 22
22
-
 23
23
-
 24
24
-
 25
25
-
 26
26
-
 27
27
-
 28
28
-
 29
29
-
 30
30
-
 31
31
-
 32
32


Maytag MDB7749SAB0 User Instructions
- Catégorie
- Lave-vaisselle
- Taper
- User Instructions
dans d''autres langues
- English: Maytag MDB7749SAB0
Documents connexes
-
Maytag MDB4409PAB User Instructions
-
-
-
Maytag W10199658A Le manuel du propriétaire
-
Maytag MDB7709AWQ2 Le manuel du propriétaire
-
Maytag MDBS469PAW0 User Instructions
-
-
-
-
Autres documents
-
Jenn-Air JDB3650AWR5 Le manuel du propriétaire
-
Jenn-Air JDB9200CWS1 Le manuel du propriétaire
-
Jenn-Air JDB8700AWP0 Manuel utilisateur
-
Jenn-Air JDB8000AWB1 Le manuel du propriétaire
-
KitchenAid KUDE40FXPA0 User Instructions
-
KitchenAid KDTE204E Mode d'emploi
-
IKEA IUD9750WS4 Le manuel du propriétaire
-
-
Magic Chef CDB4000AWW0 Le manuel du propriétaire