Midea MU53DSWBR1RCM Manuel utilisateur

Catégorie
Équipement musical supplémentaire
Taper
Manuel utilisateur

Ce manuel convient également à

USER MANUAL
MODEL: MU53DSWBR1RCM
FREEZER
Upright
EN
www.midea.comversion:001
Please read the Manual carefully
before use.
The Manual shall be kept in good
custody for later reference
2
Contents
Introduction . . . . . . . . . . . . . . . . . . . . . . . . . . . . . . . . . . . . . . . . . . . . . . . . . . . . . . . . . . . . . . . . . . . . . . . . . . . . . . . . . . . . . . . . . . 3
Important Safety Instructions . . . . . . . . . . . . . . . . . . . . . . . . . . . . . . . . . . . . . . . . . . . . . . . . . . . . . . . . . . . . . . . . . . . . . . . . . 3
Grounding requirement . . . . . . . . . . . . . . . . . . . . . . . . . . . . . . . . . . . . . . . . . . . . . . . . . . . . . . . . . . . . . . . . . . . . . . . . . . . . . . . . . . . . . . . . . . 4
Features. . . . . . . . . . . . . . . . . . . . . . . . . . . . . . . . . . . . . . . . . . . . . . . . . . . . . . . . . . . . . . . . . . . . . . . . . . . . . . . . . . . . . . . . . . . . . . 5
Package contents. . . . . . . . . . . . . . . . . . . . . . . . . . . . . . . . . . . . . . . . . . . . . . . . . . . . . . . . . . . . . . . . . . . . . . . . . . . . . . . . . . . . . . . . . . . . . . . . . 5
Dimensions. . . . . . . . . . . . . . . . . . . . . . . . . . . . . . . . . . . . . . . . . . . . . . . . . . . . . . . . . . . . . . . . . . . . . . . . . . . . . . . . . . . . . . . . . . . . . . . . . . . . . . . 5
Interior . . . . . . . . . . . . . . . . . . . . . . . . . . . . . . . . . . . . . . . . . . . . . . . . . . . . . . . . . . . . . . . . . . . . . . . . . . . . . . . . . . . . . . . . . . . . . . . . . . . . . . . . . . . 6
Setting up your freezer. . . . . . . . . . . . . . . . . . . . . . . . . . . . . . . . . . . . . . . . . . . . . . . . . . . . . . . . . . . . . . . . . . . . . . . . . . . . . . . . 6
Before using your freezer . . . . . . . . . . . . . . . . . . . . . . . . . . . . . . . . . . . . . . . . . . . . . . . . . . . . . . . . . . . . . . . . . . . . . . . . . . . . . . . . . . . . . . . . . 6
Finding a suitable location . . . . . . . . . . . . . . . . . . . . . . . . . . . . . . . . . . . . . . . . . . . . . . . . . . . . . . . . . . . . . . . . . . . . . . . . . . . . . . . . . . . . . . . . 7
Leveling your freezer . . . . . . . . . . . . . . . . . . . . . . . . . . . . . . . . . . . . . . . . . . . . . . . . . . . . . . . . . . . . . . . . . . . . . . . . . . . . . . . . . . . . . . . . . . . . . 8
Reversing the freezer door . . . . . . . . . . . . . . . . . . . . . . . . . . . . . . . . . . . . . . . . . . . . . . . . . . . . . . . . . . . . . . . . . . . . . . . . . . . . . . . . . . . . . . . . 9
Providing the correct power source . . . . . . . . . . . . . . . . . . . . . . . . . . . . . . . . . . . . . . . . . . . . . . . . . . . . . . . . . . . . . . . . . . . . . . . . . . . . . . 12
Using your freezer . . . . . . . . . . . . . . . . . . . . . . . . . . . . . . . . . . . . . . . . . . . . . . . . . . . . . . . . . . . . . . . . . . . . . . . . . . . . . . . . . . .12
Cleaning your freezer . . . . . . . . . . . . . . . . . . . . . . . . . . . . . . . . . . . . . . . . . . . . . . . . . . . . . . . . . . . . . . . . . . . . . . . . . . . . . . . . 13
Defrosting your freezer . . . . . . . . . . . . . . . . . . . . . . . . . . . . . . . . . . . . . . . . . . . . . . . . . . . . . . . . . . . . . . . . . . . . . . . . . . . . . . 13
Storing your freezer. . . . . . . . . . . . . . . . . . . . . . . . . . . . . . . . . . . . . . . . . . . . . . . . . . . . . . . . . . . . . . . . . . . . . . . . . . . . . . . . . . 13
Moving your freezer . . . . . . . . . . . . . . . . . . . . . . . . . . . . . . . . . . . . . . . . . . . . . . . . . . . . . . . . . . . . . . . . . . . . . . . . . . . . . . . . . 13
Tips on saving energy. . . . . . . . . . . . . . . . . . . . . . . . . . . . . . . . . . . . . . . . . . . . . . . . . . . . . . . . . . . . . . . . . . . . . . . . . . . . . . . .13
Troubleshooting. . . . . . . . . . . . . . . . . . . . . . . . . . . . . . . . . . . . . . . . . . . . . . . . . . . . . . . . . . . . . . . . . . . . . . . . . . . . . . . . . . . . . 14
3
Introduction
Congratulations on your purchase of a high-quality MIDEA product. Your represents the state of the art in
upright freezer design and is designed for reliable and trouble-free performance.
Important Safety Instructions
WARNING
1 Read these instructions.
2 Keep these instructions.
3 Heed all warnings.
4 Follow all instructions.
5 Do not use this appliance near water.
6 Clean only with a damp cloth or sponge using a non-corrosive, neutral detergent. Remove residual detergent with
clear water.
7 Do not block any ventilation openings.
8 Install in accordance with the manufacturer’s instructions.
9 Do not install near any heat sources, such as radiators, heat registers, stoves, or other apparatus that produce heat.
10 Do not defeat the safety purpose of the polarized or grounding-type plug. A polarized plug has two blades with one
wider than the other. A grounding type plug has two blades and a third grounding prong. The wide blade or the
third prong are provided for your safety. If the provided plug does not fit into your outlet, consult an electrician for
replacement of the obsolete outlet.
11 Protect the power cord from being walked on or pinched, particularly at plugs, convenience receptacles, and the
point where it exits from the appliance.
12 Do not attempt to modify or extend the power cord of your freezer.
13 Unplug your freezer during lightning storms or when it will not be used for long periods of time.
14 Make sure that the available AC power matches the voltage requirements of your freezer.
15 Do not handle the plug with wet hands. This could result in an electric shock.
16 Unplug the power cord by holding the plug, never by pulling the cord.
17 Refer all servicing to qualified service personnel. Servicing is required when your freezer has been damaged in any
way, such as the power-supply cord or plug is damaged, liquid has been spilled or objects have fallen into your
freezer, your freezer has been exposed to rain or moisture, does not operate normally, or has been dropped.
18 To reduce the risk of fire or electric shock, do not expose your freezer to rain, moisture, dripping, or splashing, and no
objects filled with liquids should be placed on top of it.
19 Do not use extension cords or ungrounded (two prong) adapters. If the power cord is too short, have a qualified
electrician install an outlet near your freezer. Use of an extension cord can negatively affect your freezer’s
performance.
20 Your freezer is not intended for use by persons (including children) with reduced physical, sensory, or mental
capabilities, or lack of experience and knowledge, unless they have been given supervision or instruction
concerning use of your freezer by a person responsible for their safety.
21 Children should be supervised to ensure that they do not play with your freezer.
22 If the power cord is damaged, it must be replaced by the manufacturer, its service agent, or similarly qualified
person, in order to avoid a hazard.
CAUTION
RISK OF ELECTRIC SHOCK
DO NOT OPEN
This symbol indicates that dangerous voltage constituting a
risk of electric shock is present within your freezer.
This symbol indicates that there are important operating
and maintenance instructions in the literature
accompanying your freezer.
4
WARNING
Electric Shock Hazard
Failure to follow these instructions can result in electric shock, fire, or death.
1 WARNING–Keep ventilation openings, in both your freezer and the built-in structure, clear of obstruction.
2 WARNING–Do not touch the interior of your freezer with wet hands. This could result in frostbite.
3 WARNING–Do not use mechanical devices or other means to accelerate the defrosting process, other than those
recommended by the manufacturer.
4 WARNING–Do not damage the refrigerant circuit.
5 WARNING–Do not damage the refrigerant tubing when handling, moving, or using your freezer.
6 WARNINGDANGER—Never allow children to play with, operate, or crawl inside your freezer.
Risk of child entrapment. Before you throw away your old freezer:
Take off the doors.
Leave the shelves in place so that children may not easily climb inside.
7 Unplug your freezer before carrying out user maintenance on it.
8 If a component part is damaged, it must be replaced by the manufacturer, its service agent, or similar qualified
persons in order to avoid a hazard.
9 Follow local regulations regarding disposal of your freezer due to flammable refrigerant and gas. All refrigeration
products contain refrigerants, which under the guidelines of federal law must be removed before disposal. It is the
consumer's responsibility to comply with federal and local regulations when disposing of this product.
10 Your freezer is intended to be used in household and similar environments.
11 Do not store or use gasoline or any flammable liquids inside or in the vicinity of your freezer.
12 WARNING - Do not use mechanical devices or other means to accelerate the defrosting process, other than those
recommended by the manufacturer.
Grounding requirement
Your freezer must be grounded. Your freezer is equipped with a cord having a grounding wire with a grounding plug.
The plug must be inserted into an outlet that is correctly installed and grounded.
Incorrect use of the grounding plug can result in a risk of electric shock. Consult a qualified electrician or service person
if the grounding instructions are not completely understood, or if doubt exists as to whether your freezer is correctly
grounded.
5
Features
Package contents
5.3 cubic foot upright freezer
User Guide
Dimensions
21.5" (54.5 cm)
35.9" (91.1 cm)
36.7" (93.1 cm)
19.2"
(48.7 cm)
135°
21.7" (55 cm)
55.9" (142 cm)
Top of Freezer
6
Interior
Setting up your freezer
Before using your freezer
Remove the exterior and interior packing including the bottom cushions, foam pads, and tape inside your freezer.
Remove the plastic film from the door and sides.
Let your freezer stand upright for approximately 30 minutes before connecting it to power. This reduces the possibility
of a malfunction in the cooling system from incorrect handling during transportation.
Before putting any fresh or frozen foods, let your freezer run for two to three hours. If the ambient temperature is high,
for example in summer, wait for four or more hours.
Wash the inside with a damp, warm cloth and a baking soda solution (two tablespoons in a quart of water), then wipe
dry with a dry cloth. Do this periodically to keep your freezer looking new.
For correct operation, you should level your freezer using the leveling feet. If you do not level your freezer, the door
may not close or seal correctly, causing cooling, frost, and moisture problems. Turn the leveling feet clockwise to raise
or counterclockwise to lower a side. The leveling feet are easier to adjust if you have someone push against the top of
your freezer to take some weight off.
When moving your freezer, do not tilt it beyond 45° from upright.
Note
The illustrations shown in this user guide are only for reference. The actual
product may differ slightly.
Notes
The four upper shelves measure 14.9 × 12.6" (37.8 × 32.1 cm) (W × D)
The bottom shelf measures 15.2 × 6.6" (38.5 × 16.8 cm) (W × D)
You can remove the bottom shelf.
Control knob
7
Finding a suitable location
Place your freezer on a floor that is strong enough to support your freezer when it is fully loaded.
Do not install your freezer on carpeting or a rug.
Your freezer is designed to be free standing and should not be recessed or built-in.
If you use your freezer in a garage, make sure that the ambient temperature is between 5°F and 190°
F
(-15°C and 43°C).
Allow 3.9 inches (20 cm) of space between the sides of your freezer and the surrounding walls, 3.9 inches (10 cm)
between the back of your freezer and the wall, and 11.8 inches (30 cm) between the top of your freezer and the
ceiling. This allows for correct air ventilation. Adjust the feet to keep your freezer level.
If you locate your freezer next to a fixed wall, allow sufficient space on the hinge side for the door to swing open.
Position your freezer away from direct sunlight and sources of heat, such as a stove, heater, or radiator. Direct sunlight
may affect the acrylic coating and heat sources may increase electrical consumption. Extremely cold temperatures
may also prevent your freezer from performing correctly.
Avoid locating your freezer in moist areas.
11.8" (30 cm)
3.9"
(10 cm)
3.9"
(10 cm)
Front view Side view
3.9"
(10 cm)
8
Leveling your freezer
Leveling your freezer is important. If you do not level your freezer during installation, the doors may not close or seal
correctly which can cause cooling, frost, or moisture problems.
To level your freezer, rotate the leveling feet clockwise (to raise) your freezer or counter-clockwise (to lower).
Note
To make it easier to adjust the feet, have someone push against the top of
your freezer to tilt it slightly.
Lower
Raise
9
Reversing the freezer door
You will need the following tools to reverse the freezer door:
1 Unplug your freezer.
2 Remove the hinge cover, then remove the top hinge screws and hinge from your freezer. Remove the pin from the
top edge of the door, then remove the hole cover from the other side of the freezer.
Warnings
Unplug your freezer before you reverse the door. Failure to unplug your
freezer may result in serious injury or death from electrical shock.
To avoid personal injury and property damage, get another person to
help you reverse the door.
Flat-blade
screwdriver
Phillips
screwdriver
Putty knife
5/16" socket
wrench
Tape
Hole cover
Top hinge
Hinge cover
10
3 While one person tilts your freezer backwards, remove the bottom hinge screws and hinge and the two leveling feet.
Install the bottom hinge and leveling feet on the other side.
4 Remove the door stopper, then install it on the other side.
5 Align the door bottom so that the pin on the hinge slides into the hole in the door bottom.
Tip
You can lay your freeze flat on the floor to make removing and installing the
bottom hinge easier. If you do lay it flat, when you return it to the upright
position, wait two hours before you plug it in.
Bottom hinge and screws
Leveling foot
Door stopper
11
6 Align the hinge with the screw holes on the door and the hole in the top edge of the door. Slide the pin through the
hole in the hinge and into the hole on the top edge of the door. Use the screws to attach the hinge to your freezer.
Place the hole cover over the hinge opening on the other side of the door.
Hinge
Pin
12
Providing the correct power source
Check your local power source. Your freezer requires a 115V, 60Hz power supply.
Using your freezer
The storage life of frozen foods varies. You should use the food before the recommended storage time expires.
Place frozen food into your freezer as quickly as possible after purchase. If there are instructions on the packaging,
carefully follow these instructions regarding storage times.
Prepackaged, commercially-frozen food should be stored in accordance with the frozen food manufacturer's
instructions for a three-star frozen food storage compartment or home freezer.
Shelves are provided for the organization of odd-shaped items.
1 Plug in your freezer. Wait for 30 minutes, then open the freezer door to determine if your freezer is working correctly.
When your freezer is plugged into a power outlet, it runs continuously.
2 Wait two to four hours before putting food into your freezer. If the room temperature is high, wait four or more
hours.
3 Turn the Control knob to adjust the temperature. Your freezer has three marked temperature settings:
MIN: 10.4°F ~ 5°F (-12°C ~ -15°C)
MID: -0.4°F ~ -4°F (-18°C ~ -20°C)
MAX” -7.6°F ~ -11.2°F (-22°C ~ -24°C)
You can set the temperature to one of the setting positions or to a setting position between the marked settings.
Warnings
Make sure that:
The power outlet accepts a 3-prong grounding plug. The third prong on
the power cord plug grounds your freezer to minimize the possibility of
electric shock. Do not modify the power plug.
You do NOT plug anything else into the same power outlet as your
freezer. You may overload the circuit which can cause a fire.
You do NOT use an extension cord. If your freezer is too far from th
e
power outlet, move your freezer or have a electrician install a plug closer
to your freezer.
The power outlet cannot be turned off with a switch or pull string.
Note
If the power fails, food in your freezer will stay frozen for several hours, even
in summer. During a power failure, do not open the door more than you
have to and do not add new food.
Notes
You may need to adjust the temperature based on the ambient room temperature. If the room temperature
is high, (for example, in summer) lower the freezer temperature. If the room temperature is low, (for
example, in winter) raise the freezer temperature.
You may need to adjust the temperature based on how much food is in your freezer.
If your freezer is unplugged or loses power, you must wait three to five minutes before restarting it. Your
freezer will not start if you attempt to restart it sooner.
If the power fails, unplug your freezer, then wait until the power is back to normal before you plug it in.
Large amounts of food lower the cooling efficiency of your freezer.
Do not put bottled food or drinks in your freezer.
3-prong
outlet
Outlet
cover
3-prong
plug
Grounding lead
Grounding
adapter
Outlet
cover
Screw
Outlet
Using a 3-prong plug and outlet Using a grounding adapter
13
Cleaning your freezer
Your freezer is designed for year-round use with only minimal cleaning and maintenance. We recommend that you do
the following every time you clean it to keep your freezer running odor-free and efficiently:
1 Unplug your freezer from the power outlet.
2 Remove all food.
3 Wash the shelves with a mild detergent solution.
4 Wash the inside and outside with a cloth dampened with a non-corrosive, neutral detergent. If you use a detergent,
remove the residual detergent with a cloth dampened with clear water. Do not use excessive detergent or water. Too
much liquid may damage the electrical insulation.
5 Dry the inside and outside with a soft cloth or towel.
6 Make sure that you keep the door gasket (seal) clean so that the door seals tightly. This helps your freezer run
efficiently.
Defrosting your freezer
1 Unplug your freezer.
2 Remove all food from your freezer, and place the food into containers that will prevent it from melting.
3 To speed the defrosting, you can:
Place a fan blowing on its highest speed right at the freezer. The ice will melt faster. After the ice melts, use towe
ls
to wipe up excess water, then use the fan to speed drying.
Place containers with hot water inside the freezer.
Use a plastic or wooden ice shovel (like a spatula) to remove thick layers of ice or frost. Do not use a sharp utensil
(like a knife) because you may damage your freezer.
4 Use a cloth dampened with water or a mild cleaning solution to clean the inside of your freezer.
5 When you finish defrosting, wipe the inside with a dry towel.
6 Close your freezer, plug it into the power outlet, then put the food back into your freezer.
Storing your freezer
1 Unplug your freezer from the power outlet.
2 Remove all food.
3 Clean your freezer.
4 Take off the doors, and leave the shelves in place so that children may not easily climb inside.
Moving your freezer
1 Unplug your freezer from the power outlet.
2 Remove all food.
3 Securely tape down all loose items inside your freezer.
4 Tape the door shut.
5 Make sure that your freezer does not tilt more than 45° from the upright position during transportation.
Tips on saving energy
Locate your freezer in the coolest area of the room, away from heat producing appliances or heating ducts and out of
direct sunlight.
Let hot foods cool to room temperature before placing them in your freezer. Overloading your freezer forces the
compressor to run longer. Foods that freeze too slowly may lose quality or spoil.
Wrap foods correctly and wipe containers dry before placing them in your freezer. This cuts down on frost build-up
inside your freezer.
Caution
To prevent damage to the finish, do not use gasoline, benzine, thinner, or
other solvents, and do not use abrasive cleaners.
Tip
To avoid standing water when you defrost, place some towels on the floor in
front of your freezer.
Caution
Use extreme caution with children. Make sure that children cannot access
your freezer.
14
Do not line the freezer storage shelves with aluminum foil, wax paper, or paper toweling. Liners interfere with cold air
circulation and make your freezer less efficient.
Organize and label food to reduce door openings and extended searches. Remove as many items as needed at one
time, and close the door as soon as possible.
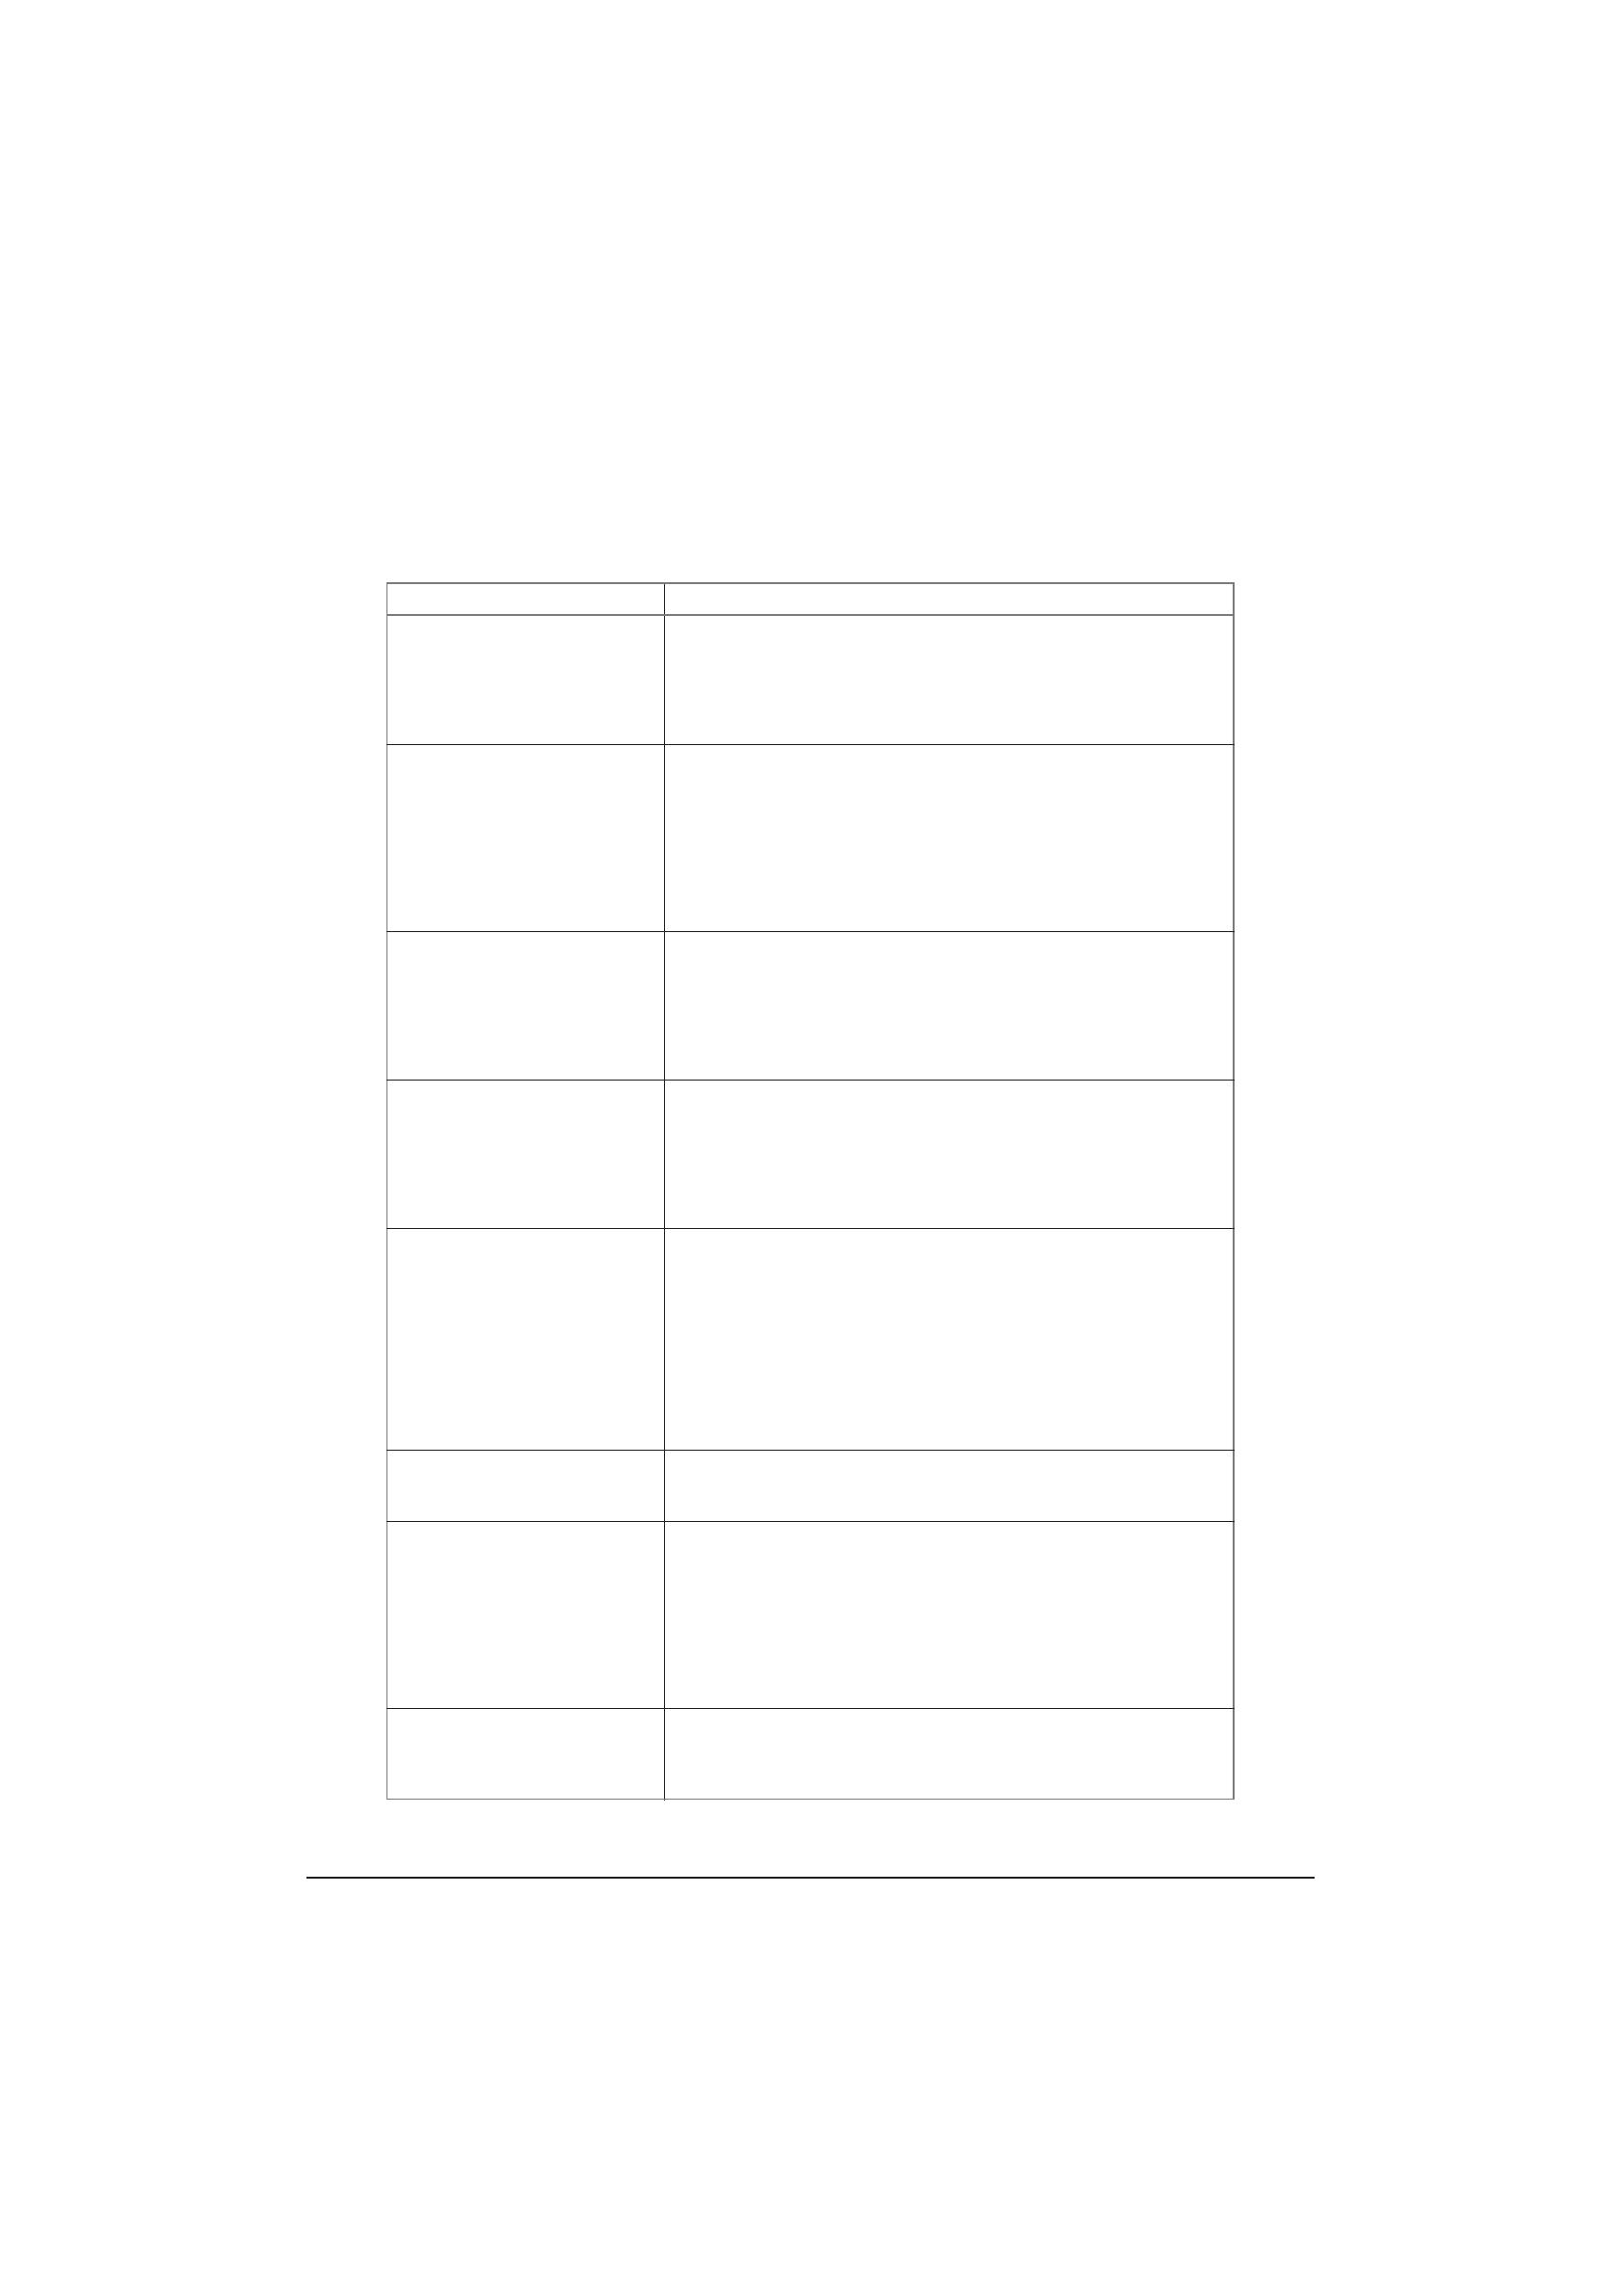
Troubleshooting
PROBLEM SOLUTION
My freezer does not work.
Make sure that your freezer is securely plugged into a working
outlet.
Make sure that your power source has the correct voltage. Your
freezer’s voltage rate is on a label on the back of your freezer.
Check the house fuse or circuit breaker box and replace the fuse
or reset the circuit breaker.
The freezer has a bad odor.
Make sure that all food with a strong odor (like onions) is
wrapped or stored in airtight packaging.
Certain containers and wrapping materials (such as paper, foil
,
o
r plastic) can cause odors. If you think this might be the case,
try using different containers or a different brand of wrapping
materi
al.
Check for spoiled food and remove it.
Clean the inside of your freezer. See Cleaning your freezer on
page 13.
The freezer door does not close
completely.
Make sure that no food packages are in the way.
Make sure that the door gasket (seal) is clean. See Cleaning yo
ur
f
reezer on page 13.
If the door gasket does not seal, try heating then cooling th
e
s
eal. You can use an electric hair dryer to heat the seal.
Make sure that your freezer is level. See Leveling your freezer on
page 8.
The freezer door is hard to open.
When you open the freezer door, warm air rushes inside. When
you close the door, the warm air rushes to the condenser which
causes a vacuum. This causes the door to be hard to open for
about 10 to 15 seconds after closing.
If the door is hard to open at other times, try rubbing paraffin
wax or petroleum jelly along the edges of the entire gasket.
Paraffin wax is used for canning and is safe for use around food.
The compressor runs for a long
time or turns on and off
frequently.
The compressor runs longer if:
The room temperature is high.
You just added a large amount of food. Wait for the food to
freeze, then check again.
You open and close the door frequently.
The door gasket is dirty. Clean the gasket. See Cleaning your
freezer on page 13.
Your freezer has been disconnected for a period of time. Wait for
your freezer to cool (about four hours) before adding food.
You have the temperature set too low. Set the Control knob to a
higher temperature.
The light inside the freezer does
not turn on.
Make sure that your freezer is plugged into a working outlet.
Check to see if the light is damaged. If the light is damaged, have
it replaced by a qualified service technician.
The freezer makes unusual noises
or vibrations.
Metal parts expand and contract as the temperature changes.
This is normal.
When the refrigerant is circulating throughout the system, your
freezer may make noises. This is normal.
Remove items from the top of your freezer.
Make sure that your freezer is level. See Leveling your freezer on
page 8.
If your freezer is touching walls, move it away from the walls.
Make sure that the shelves are installed correctly.
The water pan overflows.
You have too much food in your freezer or stored food contains
too much water which results in heavy defrosting.
The doors are not closed correctly, resulting in increased
defrosting.
15
The outside of the freezer is hot.
Heat dissipation from the condenser may make the outside feel hot.
This is normal and happens if:
The room temperature is high.
You have too much food in your freezer.
You open and close the door excessively.
Water condenses on the outside
of the freezer.
Condensation on the exterior surface and door seal is normal
when the room humidity is high.
When you open the door, warm, moist outside air meets th
e
cold dry air inside your freezer.
These are normal. Just wipe off the condensation with a clean towel.
PROBLEM SOLUTION
16
Midea replacement parts shall be used and will be warranted only for the period remaining on the
original warranty.
1-866-646 4332.
The date on the bill established the warranty period should service be required.
MANUEL D'UTILISATEUR
MODELE: MU53DSWBR1RCM
FR
www.midea.comversion:001
Veuillez lire ce manuel
attentivement avant de l'utiliser
et conserver ce manuel pour
consultation ultérieure.
Congélateur
vertical
2
Table des matières
Introduction . . . . . . . . . . . . . . . . . . . . . . . . . . . . . . . . . . . . . . . . . . . . . . . . . . . . . . . . . . . . . . . . . . . . . . . . . . . . . . . . . . . . . . . . . . 3
Instructions de sécurité importantes. . . . . . . . . . . . . . . . . . . . . . . . . . . . . . . . . . . . . . . . . . . . . . . . . . . . . . . . . . . . . . . . . . . 3
Exigences de la mise à la terre . . . . . . . . . . . . . . . . . . . . . . . . . . . . . . . . . . . . . . . . . . . . . . . . . . . . . . . . . . . . . . . . . . . . . . . . . . . . . . . . . . . . . 4
Caractéristiques . . . . . . . . . . . . . . . . . . . . . . . . . . . . . . . . . . . . . . . . . . . . . . . . . . . . . . . . . . . . . . . . . . . . . . . . . . . . . . . . . . . . . . 5
Contenu de l'emballage. . . . . . . . . . . . . . . . . . . . . . . . . . . . . . . . . . . . . . . . . . . . . . . . . . . . . . . . . . . . . . . . . . . . . . . . . . . . . . . . . . . . . . . . . . . 5
Dimensions. . . . . . . . . . . . . . . . . . . . . . . . . . . . . . . . . . . . . . . . . . . . . . . . . . . . . . . . . . . . . . . . . . . . . . . . . . . . . . . . . . . . . . . . . . . . . . . . . . . . . . . 5
Intérieur. . . . . . . . . . . . . . . . . . . . . . . . . . . . . . . . . . . . . . . . . . . . . . . . . . . . . . . . . . . . . . . . . . . . . . . . . . . . . . . . . . . . . . . . . . . . . . . . . . . . . . . . . . 6
Mise en service du congélateur. . . . . . . . . . . . . . . . . . . . . . . . . . . . . . . . . . . . . . . . . . . . . . . . . . . . . . . . . . . . . . . . . . . . . . . . 6
Avant l’utilisation du congélateur . . . . . . . . . . . . . . . . . . . . . . . . . . . . . . . . . . . . . . . . . . . . . . . . . . . . . . . . . . . . . . . . . . . . . . . . . . . . . . . . . 6
Trouver un emplacement approprié. . . . . . . . . . . . . . . . . . . . . . . . . . . . . . . . . . . . . . . . . . . . . . . . . . . . . . . . . . . . . . . . . . . . . . . . . . . . . . . 7
Mise de niveau du congélateur. . . . . . . . . . . . . . . . . . . . . . . . . . . . . . . . . . . . . . . . . . . . . . . . . . . . . . . . . . . . . . . . . . . . . . . . . . . . . . . . . . . . 8
Inversion de la porte du congélateur . . . . . . . . . . . . . . . . . . . . . . . . . . . . . . . . . . . . . . . . . . . . . . . . . . . . . . . . . . . . . . . . . . . . . . . . . . . . . . 9
Accès à une source d'alimentation appropriée . . . . . . . . . . . . . . . . . . . . . . . . . . . . . . . . . . . . . . . . . . . . . . . . . . . . . . . . . . . . . . . . . . . . 11
Utilisation du congélateur. . . . . . . . . . . . . . . . . . . . . . . . . . . . . . . . . . . . . . . . . . . . . . . . . . . . . . . . . . . . . . . . . . . . . . . . . . . . 12
Nettoyage du congélateur . . . . . . . . . . . . . . . . . . . . . . . . . . . . . . . . . . . . . . . . . . . . . . . . . . . . . . . . . . . . . . . . . . . . . . . . . . . 12
Dégivrage du congélateur . . . . . . . . . . . . . . . . . . . . . . . . . . . . . . . . . . . . . . . . . . . . . . . . . . . . . . . . . . . . . . . . . . . . . . . . . . . 13
Entreposage du congélateur . . . . . . . . . . . . . . . . . . . . . . . . . . . . . . . . . . . . . . . . . . . . . . . . . . . . . . . . . . . . . . . . . . . . . . . . . 13
Déplacement du congélateur . . . . . . . . . . . . . . . . . . . . . . . . . . . . . . . . . . . . . . . . . . . . . . . . . . . . . . . . . . . . . . . . . . . . . . . . 13
Conseils pour économiser de l’énergie . . . . . . . . . . . . . . . . . . . . . . . . . . . . . . . . . . . . . . . . . . . . . . . . . . . . . . . . . . . . . . . 13
Problèmes et solutions. . . . . . . . . . . . . . . . . . . . . . . . . . . . . . . . . . . . . . . . . . . . . . . . . . . . . . . . . . . . . . . . . . . . . . . . . . . . . . . 13
3
Introduction
Félicitations d’avoir acheté ce produit MIDEA de haute qualité. Le modèle représente la dernière avancée
technologique dans la conception de congélateur vertical et a été conçu pour des performances et une fiabilité
exceptionnelles.
Instructions de sécurité importantes
AVERTISSEMENT
1 Lire ces instructions.
2 Conserver ces instructions.
3 Respecter tous les avertissements.
4 Observer toutes les instructions.
5 Ne pas utiliser cet électroménager près de l’eau.
6 Nettoyer uniquement avec un chiffon ou une éponge humide à l'aide d'un détergent non corrosif, neutre. Retirer les
résidus de détergent avec de l'eau.
7 Ne pas obstruer les ouvertures d'aération.
8 Installer le produit conformément aux instructions du fabricant.
9 Installer l’appareil à l’écart de sources de chaleur, telles que radiateurs, bouches de chaleur, fours ou autres appareils
qui produisent de la chaleur.
10 Ne pas chercher à modifier le dispositif de sécurité de la prise polarisée ou de type mise à la terre. Une prise polarisée
comporte deux plots, un plus large que l'autre. Une prise de type mise à la terre est composée de deux plots et d’un
troisième de mise à la terre. La lame large ou le troisième plot ont été prévus pour la sécurité de l'utilisateur. Si la
prise fournie ne rentre pas dans la prise secteur, faire appel à un électricien pour qu’il remplace cette dernière qui est
obsolète.
11 Protéger le cordon d’alimentation afin d’éviter qu’on ne marche dessus ou qu’il ne soit pincé, en particulier au niveau
des prises secteur, des plaques multiprises et à l’endroit où il est raccordé à l’appareil.
12 Ne pas essayer de modifier ou de prolonger le cordon d'alimentation de cet appareil.
13 Débrancher cet électroménager pendant les orages ou quand il n'est pas utilisé pendant une période prolongée.
14 rifier que l'alimentation c.a. disponible correspond aux exigences de tension de ce congélateur.
15 Ne pas manipuler la prise avec les mains humides. Ce qui présenterait des risques de chocs électriques.
16 Débrancher le cordon d’alimentation en tenant la prise, jamais en le tirant.
17 Toutes les réparations doivent être réalisées par un personnel qualifié. Faire réparer l’appareil s’il a été endommagé,
qu’il s’agisse du cordon d’alimentation ou de la prise qui seraient détériorés, d'infiltration de liquide dans l’appareil
ou de chute d’objets, d’une exposition à la pluie ou à l’eau, d’un fonctionnement anormal ou d'une chute.
18 Afin de réduire le risque d’incendie et de choc électrique, ne pas exposer ce congélateur à la pluie, à l’humidité, aux
éclaboussures ou à des gouttes d’eau et ne pas placer de récipients remplis de liquide sur l'appareil.
19 Ne pas utiliser de rallonge électrique ou d'adaptateurs non mis à la terre (deux plots). Si le cordon d'alimentation est
trop court, contacter un technicien qualifié pour installer une prise à côté du congélateur. L'utilisation d'une rallonge
peut avoir des effets négatifs sur le fonctionnement du congélateur.
20 Cet appareil n'est pas conçu pour être utilisé par des personnes (y compris des enfants) à capacités physiques,
sensorielles ou intellectuelles réduites ou sans expérience et connaissances, à moins qu'elles ne soient sous
surveillance ou bien qu'elles aient été informées quant à l'utilisation de l'appareil de manière sûre, par une personne
responsable de leur sécurité.
ATTENTION
RISQUE DE CHOC ÉLECTRIQUE
NE PAS OUVRIR
Ce symbole indique qu'une tension dangereuse, constituant
un risque de choc électrique, est présente dans ce
congélateur.
Ce symbole indique que d'importantes instructions
concernant le fonctionnement et l'entretien figurent dans la
documentation qui accompagne cet appareil.
4
21 Les enfants doivent être surveillés pour s'assurer qu'ils ne jouent pas avec l'appareil.
22 Si le cordon d'alimentation a été endommagé, il doit être remplacé par le fabricant, son service d'assistance
technique ou d'autres personnes disposant des qualifications requises, afin d'éviter tout danger.
AVERTISSEMENT
Risque de choc électrique
L'inobservation de ces instructions peut être source de chocs électriques, d'incendies ou de blessures
mortelles.
1 AVERTISSEMENT : Maintenir les ouvertures d'aération du congélateur et de la structure intégrée à l'abri de toute
obstruction.
2 AVERTISSEMENT : Ne pas toucher l'intérieur du congélateur avec des mains humides. Une engelure pourrait
s'ensuivre.
3 AVERTISSEMENT : Ne pas utiliser d'appareils mécaniques ou d'autres méthodes pour accélérer le processus de
décongélation, hormis celles indiquées par le fabricant.
4 AVERTISSEMENT : Ne pas endommager le circuit du réfrigérant.
5 AVERTISSEMENT : Ne pas endommager le tuyau du réfrigérant lors de la manipulation, du déplacement ou de
l'utilisation du congélateur.
6 AVERTISSEMENTDANGER : Ne jamais laisser les enfants jouer avec le congélateur, le faire fonctionner ni y grimper.
Un enfant risque d'être piégé à l'intérieur. Avant de mettre au rebut l'ancien congélateur :
Enlever les portes
Laisser les étagères en place pour éviter que les enfants ne puissent grimper à l'intérieur facilement
7 Débrancher le congélateur avant d'en effectuer l'entretien.
8 Si une pièce ou un élément a été endommagé, il doit être remplacé par le fabricant, son service d'assistance
technique ou d'autres personnes disposant des qualifications requises, afin d'éviter tout danger.
9 Observer la réglementation locale concernant la mise au rebut du congélateur en raison du gaz et du réfrigérant
inflammables. Tous les appareils de réfrigération contiennent des réfrigérants qui doivent être, sous les directives de
la loi fédérale, enlevés avant la mise au rebut. C'est la responsabilité du consommateur de se conformer à la
réglementation fédérale et locale lors de la mise au rebut de cet électroménager.
10 Ce congélateur est prévu pour une utilisation à domicile et dans d'autres environnements similaires.
11 Ne pas entreposer ou utiliser de l'essence ou autres liquides inflammables à l'intérieur ou à proximité du
congélateur.
12 AVERTISSEMENT : Ne pas utiliser d'appareils mécaniques ou d'autres méthodes pour accélérer le processus de
décongélation, hormis les recommandations du fabricant.
Exigences de la mise à la terre
Cet appareil doit être mis à la terre. Ce congélateur est muni d'un cordon électrique comportant un fil et une prise de
mise à la terre. La prise doit être insérée dans une prise secteur qui est correctement installée et mise à la terre.
L'utilisation incorrecte de la prise de mise à la terre pourrait présenter un risque d’incendie ou de choc électrique.
Vérifier avec un technicien qualifié ou un professionnel d'entretien si les instructions de mise à la terre ne sont pas
totalement comprises ou en cas de doute sur la mise à la terre correcte du congélateur.
  • Page 1 1
  • Page 2 2
  • Page 3 3
  • Page 4 4
  • Page 5 5
  • Page 6 6
  • Page 7 7
  • Page 8 8
  • Page 9 9
  • Page 10 10
  • Page 11 11
  • Page 12 12
  • Page 13 13
  • Page 14 14
  • Page 15 15
  • Page 16 16
  • Page 17 17
  • Page 18 18
  • Page 19 19
  • Page 20 20
  • Page 21 21
  • Page 22 22
  • Page 23 23
  • Page 24 24
  • Page 25 25
  • Page 26 26
  • Page 27 27
  • Page 28 28
  • Page 29 29
  • Page 30 30
  • Page 31 31
  • Page 32 32
  • Page 33 33

Midea MU53DSWBR1RCM Manuel utilisateur

Catégorie
Équipement musical supplémentaire
Taper
Manuel utilisateur
Ce manuel convient également à

dans d''autres langues