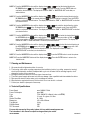
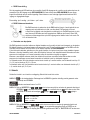
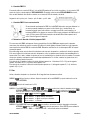
HQ Power EXCALIBOR I Manuel utilisateur
- Catégorie
- Stroboscopes
- Taper
- Manuel utilisateur
Ce manuel convient également à

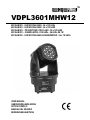
VDPL3601MHW12
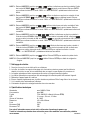
EXCALIBOR I - LED MOVING HEAD - 36 x 1W LEDs
EXCALIBOR I - LED MOVING HEAD - 36 x 1W LEDS
EXCALIBOR I – PROJECTEUR LYRE À LED - 36 x 1W LEDS
EXCALIBOR I – CABEZA MÓVIL CON LEDs - 36 LEDs DE 1W
EXCALIBOR I - LED MOVING-HEAD-SCHEINWERFER - 36 x 1W LEDs
USER MANUAL
GEBRUIKERSHANDLEIDING
NOTICE D’EMPLOI
MANUAL DEL USUARIO
BEDIENUNGSANLEITUNG

VDPL3601MHW12 HQPOWER
2

VDPL3601MHW12 HQPOWER
3
VDPL3601MHW12 – EXCALIBOR I - LED MOVING HEAD - 36 x 1W LEDs
1. Introduction
To all residents of the European Union
Important environmental information about this product
This symbol on the device or the package indicates that disposal of the device after its lifecycle could harm
the environment.
Do not dispose of the unit (or batteries) as unsorted municipal waste; it should be taken to a specialized
company for recycling.
This device should be returned to your distributor or to a local recycling service.
Respect the local environmental rules.
If in doubt, contact your local waste disposal authorities.
Thank you for choosing HQPOWER! This is a LED wash effect featuring 12 channels, RGB colour mixing, independent
dimming, and strobe and other effects. Please read the manual thoroughly before bringing this device into service. If the
device was damaged in transit, don't install or use it and contact your dealer.
2. Safety Instructions
• Damage caused by disregard of certain guidelines in this manual is not covered by the warranty and the dealer
will not accept responsibility for any ensuing defects or problems.
• A qualified technician should install and service this device.
• Do not switch the device on immediately after it has been exposed to changes in temperature. Protect the device
against damage by leaving it switched off until it has reached room temperature.
• This device falls under protection class I. It is therefore essential that the device be earthed. Have a qualified
person carry out the electric connection.
• Make sure that the available voltage does not exceed the voltage stated in the specifications of this manual.
• Do not crimp the power cord and protect it against damage. Have an authorized dealer replace it if necessary.
• Disconnect the device from the mains to clean it or when it is not in use. Handle the power cord by the plug only.
• Do not look directly at the light source as sensitive people may go into epileptic seizure if they do.
• Mechanical wear is not covered by the warranty.
• Note that damage caused by user modifications to the device is not covered by the warranty.
• Keep the device away from children and unauthorized users.
3. General Guidelines
• This device is designed for professional use on stage, in discos, theatres, etc. The VDPL3601MHW12 should
only be used indoors and connected to an alternating current of max. 230VAC / 50Hz.
• Lighting effects are not designed for permanent operation: regular operation breaks will prolong their lives.
• Do not shake the device. Avoid brute force when installing or operating the device.
• Do not cover the ventilation vents with any object.
• Select a location where the device is protected against extreme heat, dust and moisture. Respect a minimum
distance of 0.5m between the device’s light output and any illuminated surface.
• Use an appropriate safety cable to fix the device (e.g. VDLSC7 or VDLSC8).
• Familiarize yourself with the functions of the device before actually using it. Do not allow operation by unqualified
people. Any damage that may occur will most probably be due to unprofessional use of the device.
Be very careful during the installation: touching live wires can cause life-threatening electroshocks.
Keep this device away from rain and moisture.
Unplug the mains lead before opening the housing.
LED Class 2M
–
Do not stare into the beam at a distance of less than 0.5m or view directly through
optical instruments.

VDPL3601MHW12 HQPOWER
4
• Use the original packaging if the device is to be transported.
• All modifications of the device are forbidden for safety reasons.
• Only use the device for its intended purpose. All other uses may lead to short circuits, burns, electroshocks,
crash, etc. Using the device in an unauthorized way will void the warranty.
4. Mounting the Device
• Have the device installed by a qualified person, respecting EN 60598-2-17 and all other applicable norms.
• The carrying construction must be able to support 10 times the weight of the device for 1 hour without deforming.
• The installation must always be secured with a secondary attachment e.g. a safety cable.
• Never stand directly below the device when it is being mounted, removed or serviced. Have a qualified technician
check the device once a year and once before you bring it into service.
• Install the device in a location with few passers-by that is inaccessible to unauthorized persons.
• Overhead mounting requires extensive experience: calculating workload limits, determining the installation
material to be used… Have the material and the device itself checked regularly. Do not attempt to install the
device yourself if you lack these qualifications as improper installation may result in injuries.
• Adjust the desired inclination angle via the mounting bracket and tighten the bracket screws.
• Make sure there is no flammable material within a 0.5m radius of the device.
• Have a qualified electrician carry out the electric connection.
• Connect the device to the mains with the power plug. Do not connect it to a dimming pack.
• The installation has to be approved by an expert before the device is taken into service.
5. Configuration
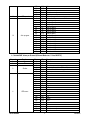
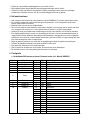
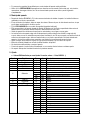
a. Detailed DMX Values per Channel (12-Channel Mode, see “6. Use, MODE 6”)
Channel Function From To Description
1 Pan 0 255 540°
2 Pan 16 bits 0 255 Pan fine
3 Tilt 0 255 270°
4 Tilt 16 bits 0 255 Tilt fine
5 Speed 0 255 Pan / tilt speed from 100% ~ 0%
0 7 Closed
8 134 Electronic dimmer from 100% ~ 0%
135 239 Strobe effect with increasing speed
6 Shutter
240 255 Open
7 Red LED 0 255 Dimmer
8 Green LED 0 255 Dimmer
9 Blue LED 0 255 Dimmer
0 7 No function
8 21 White
22 35 Red
36 49 Green
50 63 Blue
64 77 Cyan
78 91 Magenta
92 105 Yellow
106 119 Purple
120 133 Orange
134 147 Chartreuse
148 161 Pink
162 175 Brown
10 LED macro
176 189 Gold

VDPL3601MHW12 HQPOWER
5
190 203 Crimson
204 217 Violet
218 231 Grape
232 244 Movable macro 1
245 255 Movable macro 2
11 LED speed 0 255 Colour change with decreasing speed
0 7 No function
8 22 Auto program 1
23 37 Auto program 2
38 52 Auto program 3
53 67 Auto program 4
68 82 Auto program 5
83 97 Auto program 6
98 112 Auto program 7
113 127 Auto program 8
128 142 Sound control 1
143 157 Sound control 2
158 172 Sound control 3
173 187 Sound control 4
188 202 Sound control 5
203 217 Sound control 6
218 232 Sound control 7
12 Auto program
233 255 Sound control 8
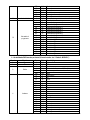
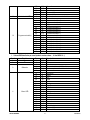
b. Detailed DMX Values per Channel (4-Channel Mode, see “6. Use, MODE 6”)
Channel Function From To Description
1 Pan 0 255 540°
2 Tilt 0 255 270°
0 7 Closed
8 134 Electronic dimmer from 100% ~ 0%
135 239 Strobe effect with increasing speed
3 Shutter
240 255 Open
0 7 No function
8 21 White
22 35 Red
36 49 Green
50 63 Blue
64 77 Cyan
78 91 Magenta
92 105 Yellow
106 119 Purple
120 133 Orange
134 147 Chartreuse
148 161 Pink
162 175 Brown
176 189 Gold
190 203 Crimson
204 217 Violet
218 231 Grape
232 244 Movable macro 1
4 LED macro
245 255 Movable macro 2

VDPL3601MHW12 HQPOWER
6
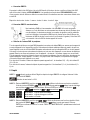
c. DMX512 Connection
Connect the provided XLR cable to the female 3-pin XLR output of your controller and the other side to the male 3-
pin XLR input of the VDPL3601MHW12. Multiple VDPL3601MHW12s can be linked through serial linking. The
linking cable should be a two-core screened cable with XLR input and output connectors.
Pin assignment: pin 1: shield – pin 2: data+ – pin 3: data-
d. DMX-512 Chain with Termination
A DMX terminator is recommended for installations where the DMX cable has to run a
long distance or is in an electrically noisy environment (e.g. discos). The terminator
prevents corruption of the digital control signal by electrical noise. The DMX terminator is
simply an XLR plug with a 120Ω resistor between pins 2 and 3, which is then plugged into
the XLR output socket of the last device in the chain.
Please see illustrations.
e. Projector DMX Start Address Selection
All DMX-controlled devices need a digital start address so that the correct device responds to the signals. This start
address is the channel number from which the device starts to “listen” to the DMX controller. Enter the correct
number and read it from the display located on the base of the VDPL3601MHW12.
You can use the same starting address for a whole group of devices or enter an individual one for every device.
When all devices have the same address, all the VDPL3601MHW12 will “listen” to the control signal on one
particular channel. In other words: changing the settings of one channel will affect all devices simultaneously. If you
set different addresses, each device will “listen” to a separate channel number. Changing the settings of one channel
will only affect the device in question.
In 12-channel mode, you will have to set the start address of the first VDPL3601MHW12 to 1, the second
VDPL3601MHW12 to 13 (1 + 12), the third to 25 (13 + 12) and so on.
In 4-channel mode, you will have to set the start address of the first VDPL3601MHW12 to 1, the second
VDPL3601MHW12 to 5 (1 + 4), the third to 9 (5 + 9) and so on.
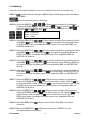
6. Use
Switch the device on and off by means of the power plug. Do not operate the device continuously.
MODE 1: is the default mode. Receive the DMX512 signal and set the desired address via the UP/DOWN
buttons.
Select channel between 1 and 512.
MODE 2: Press the MODE/ESC button until the displays shows and select the desired function via
the UP/DOWN buttons. is the master auto mode, is the controller mode and is the slave
mode. Press the ENTER button to confirm the function; will change to , will change to
and will change to .
MODE 3: Press the MODE/ESC button until the display shows and select the desired function via the
UP/DOWN buttons.
is the pan mode and is the invert pan mode. Press the ENTER button to
confirm the desired function. The display will indicate the “DMX” or “MASTER/SLAVE” mode that you
selected before.
master mode => master auto mode
master mode => controller mode
slave mode => slave

VDPL3601MHW12 HQPOWER
7
MODE 4: Press the MODE/ESC button until the display shows and set the desired function via
UP/DOWN buttons. is the tilt mode and is the invert tilt mode. Press the ENTER button to
confirm the desired function. The display will show the “DMX” or “MASTER/SLAVE” mode that you
selected before.
MODE 5: Press the MODE/ESC button until the display shows and select the desired function via the
UP/DOWN buttons. is the normal mode and means the display is inverted. Press the ENTER
button to confirm the desired function. The display will indicate the “DMX” or “MASTER/SLAVE” mode that
you selected before.
MODE 6: Press the MODE/ESC button until the display shows and select the desired function via the
UP/DOWN buttons. is the 12-channel mode and is the 4-channel mode. Press the ENTER
button to confirm the desired function. The display will indicate the “DMX” or “MASTER/SLAVE” mode that
you selected before.
MODE 7: Press the MODE/ESC button until the display shows and select the desired function via
the UP/DOWN buttons. means a pan rotation of 540°, means a pan rotation of 360° and
means a pan rotation of 180°. Press the ENTER button to confirm the desired function. The display will
indicate the “DMX” or “MASTER/SLAVE” mode that you selected before.
MODE 8: Press the MODE/ESC button until the display shows and select the desired function via
the UP/DOWN buttons. means a tilt of 270°, means a tilt of 180° and means a tilt of 90°.
Press the ENTER button to confirm the desired function. The display will indicate the “DMX” or
“MASTER/SLAVE” mode that you selected before.
MODE 9: Press the MODE/ESC button until the display shows . Press the ENTER button to reset the system.
MODE 10: Press the MODE/ESC button until the display shows . Press the ENTER button to return to the
default mode.
7. Cleaning and Maintenance
1. All screws should be tightened and free of corrosion.
2. The housing, visible parts, mounting supports and the installation location (e.g. ceiling, suspension, trussing)
should not be deformed, modified or tampered with e.g. do not drill extra holes in mounting supports, do not
change the location of the connections.
3. Moving mechanic parts must not show any signs of wear and tear.
4. The electric power supply cables must not show any damage. Have a qualified technician maintain the device.
5. Disconnect the device from the mains prior to maintenance activities.
6. Wipe the device regularly with a moist, lint-free cloth. Do not use alcohol or solvents.
7. Contact your dealer for spare parts if necessary.
8. Technical Specifications
Power Supply max. 230VAC / 50Hz
Power Consumption max. 50W
Fuse F 5A, 250VAC (5 x 20mm) (order code FF5N)
LEDs 12 x red; 12 x green; 12 x blue
Shutter Flash Rate 0 ~ 10Hz
Dimensions 415 x 395 x 654mm
Total Weight 9.4kg
PAN Movement 540°
TILT Movement 270°
For more info concerning this product, please visit our website www.hqpower.com.
The information in this manual is subject to change without prior notice.

VDPL3601MHW12 HQPOWER
8
VDPL3601MHW12 – EXCALIBOR I - LED MOVING HEAD - 36 x 1W LEDS
1. Inleiding
Aan alle ingezetenen van de Europese Unie
Belangrijke milieu-informatie betreffende dit product
Dit symbool op het toestel of de verpakking geeft aan dat, als het na zijn levenscyclus wordt weggeworpen,
dit toestel schade kan toebrengen aan het milieu.
Gooi dit toestel (en eventuele batterijen) niet bij het gewone huishoudelijke afval; het moet bij een
gespecialiseerd bedrijf terechtkomen voor recyclage.
U moet dit toestel naar uw verdeler of naar een lokaal recyclagepunt brengen.
Respecteer de plaatselijke milieuwetgeving.
Hebt u vragen, contacteer dan de plaatselijke autoriteiten inzake verwijdering.
Dank u voor uw aankoop! De VDPL3601MHW12 is een 12-kanaals wash ledeffect met RGB kleurmenging,
afzonderlijk dimeffect, stroboscoop en andere effecten. Lees deze handleiding grondig voor u het toestel in gebruik
neemt. Werd het toestel beschadigd tijdens het transport, installeer het dan niet en raadpleeg uw dealer.
2. Veiligheidsinstructies
• De garantie geldt niet voor schade door het negeren van bepaalde richtlijnen in deze handleiding en uw dealer zal
de verantwoordelijkheid afwijzen voor defecten of problemen die hier rechtstreeks verband mee houden.
• Laat dit toestel installeren en onderhouden door een geschoolde technicus.
• Om beschadiging te vermijden, zet u het toestel best niet aan onmiddellijk nadat het werd blootgesteld aan
temperatuurschommelingen. Wacht tot het toestel op kamertemperatuur gekomen is.
• Dit toestel valt onder beschermingsklasse I, wat wil zeggen dat het toestel geaard moet zijn. Een geschoolde
technicus moet de elektrische aansluiting verzorgen.
• De beschikbare netspanning mag niet hoger zijn dan de spanning in de specificaties achteraan de handleiding.
• De voedingskabel mag niet omgeplooid of beschadigd zijn. Laat uw dealer zo nodig een nieuwe kabel plaatsen.
• Trek de stekker uit het stopcontact (trek niet aan de kabel!) voordat u het toestel reinigt en als u het niet gebruikt.
• Kijk niet rechtstreeks in de lichtbron. De lichtbron kan bij gevoelige mensen leiden tot een aanval van epilepsie.
• Mechanische slijtage valt niet onder de garantie.
• Schade door wijzigingen die de gebruiker heeft aangebracht aan het toestel vallen niet onder de garantie.
• Houd dit toestel uit de buurt van kinderen en onbevoegden.
3. Algemene richtlijnen
• Dit toestel is ontworpen voor professioneel gebruik op podia, in disco's, enz. U mag dit toestel enkel binnenshuis
gebruiken en aansluiten op een wisselspanning van maximum 230VAC / 50Hz.
• Lichteffecten zijn niet ontworpen voor continue werking: regelmatige onderbrekingen doen ze langer meegaan.
• Schud het toestel niet dooreen. Vermijd brute kracht tijdens de installatie en de bediening van dit toestel.
• Bedek nooit de ventilatieopeningen.
• Installeer het toestel weg van extreme temperaturen, vochtigheid en stof. Zorg voor een minimumafstand van
0.5m tussen de lichtuitgang van het toestel en het belichte oppervlak.
• Maak het toestel vast met een geschikte veiligheidskabel (bv. VDLSC7 of VDLSC8).
• Leer eerst de functies van het toestel kennen voor u het gaat gebruiken. Ongeschoolde personen mogen dit
toestel niet gebruiken. Meestal is beschadiging het gevolg van onprofessioneel gebruik.
Wees voorzichtig bij de installatie: raak geen kabels aan die onder stroom staan om dodelijke elektros
hocks
te vermijden.
Bescherm dit toestel tegen regen en vochtigheid.
Verzeker u ervan dat het toestel niet aangesloten is op een stroombron alvorens het te openen.
LED Klasse 2M
–
Kijk niet in de laserstraal op een afstand van minder dan 0.5m of
door optische
instrumenten.

VDPL3601MHW12 HQPOWER
9
• Gebruik de oorspronkelijke verpakking wanneer u het toestel vervoert.
• Om veiligheidsredenen mag de gebruiker geen wijzigingen aanbrengen aan het toestel.
• Gebruik het toestel enkel waarvoor het gemaakt is. Andere toepassingen kunnen leiden tot kortsluitingen,
brandwonden, elektrische schokken, enz. Bij onoordeelkundig gebruik vervalt de garantie.
4. Het toestel monteren
• Laat een geschoolde technicus dit toestel installeren conform EN 60598-2-17 en andere toepasselijke normen.
• De constructie waaraan het toestel wordt bevestigd, moet gedurende 1 uur 10 x het gewicht van dit toestel
kunnen dragen zonder te vervormen.
• Maak het toestel ook vast met een veiligheidskabel.
• Sta nooit recht onder het toestel wanneer u het monteert, verwijdert of schoonveegt. Laat het toestel controleren
door een geschoolde technicus voor u het in gebruik neemt en laat het 1 x per jaar volledig nakijken.
• Installeer dit toestel op een plaats waar niemand langs moet lopen, kan neerzitten of het toestel kan aanraken.
• Een degelijke praktijkervaring is vereist voor de plaatsing van dit toestel. U moet de maximumbelasting van de
draagconstructie kunnen berekenen, weten welk constructiemateriaal u kunt gebruiken en u moet het gebruikte
materiaal en het toestel af en toe laten nakijken. Monteer het toestel niet zelf indien u er geen ervaring mee heeft.
Een slechte montage kan leiden tot verwondingen.
• Regel de gewenste invalshoek door middel van de montagebeugel en draai de regelschroeven stevig aan.
• Verwijder alle brandbaar materiaal in een straal van 0.5m rond het toestel.
• Een geschoolde elektricien moet het toestel aansluiten.
• Sluit het toestel via de stekker aan op het lichtnet. Sluit het niet aan op een dimmerpack.
• De installatie moet voor het eerste gebruik gekeurd worden door een expert.
5. Configuratie
a. Gedetailleerde DMX-waarden per kanaal (12-kanaals modus, zie ‘6. Gebruik, MODUS 6’)
Kanaal Functie Van Tot Omschrijving
1 Pan 0 255 540°
2 Pan 16 bits 0 255 Pan fijnafstelling
3 Tilt 0 255 270°
4 Tilt 16 bits 0 255 Tilt fijnafstelling
5 Snelheid 0 255 Pan-/ tiltsnelheid van 100% ~ 0%
0 7 Gesloten
8 134 Elektronische dimmer van 100% ~ 0%
135 239 Stroboscoop met toenemende snelheid
6 Sluiter
240 255 Open
7 Rode led 0 255 Dimmer
8 Groene led 0 255 Dimmer
9 Blauwe led 0 255 Dimmer
0 7 Geen functie
8 21 Wit
22 35 Rood
36 49 Groen
50 63 Blauw
64 77 Cyaan
78 91 Magenta
92 105 Geel
106 119 Purper
120 133 Oranje
134 147 Groengeel
148 161 Roze
10 Ledmacro
162 175 Bruin

VDPL3601MHW12 HQPOWER
10
176 189 Goud
190 203 Karmozijn
204 217 Violet
218 231 Donkerblauw paars
232 244 Beweegbare macro 1
245 255 Beweegbare macro 2
11 Ledsnelheid 0 255 Kleurverandering met afnemende snelheid
0 7 Geen functie
8 22 Automatisch programma 1
23 37 Automatisch programma 2
38 52 Automatisch programma 3
53 67 Automatisch programma 4
68 82 Automatisch programma 5
83 97 Automatisch programma 6
98 112 Automatisch programma 7
113 127 Automatisch programma 8
128 142 Muzieksturing 1
143 157 Muzieksturing 2
158 172 Muzieksturing 3
173 187 Muzieksturing 4
188 202 Muzieksturing 5
203 217 Muzieksturing 6
218 232 Muzieksturing 7
12
Automatisch
programma
233 255 Muzieksturing 8
b. Gedetailleerde DMX-waarden per kanaal (4-kanaals modus, zie ‘6. Gebruik, MODUS 6’)
Kanaal Functie Van Tot Omschrijving
1 Pan 0 255 540°
2 Tilt 0 255 270°
0 7 Gesloten
8 134 Elektronische dimmer van 100% ~ 0%
135 239 Stroboscoop met toenemende snelheid
3 Sluiter
240 255 Open
0 7 Geen functie
8 21 Wit
22 35 Rood
36 49 Groen
50 63 Blauw
64 77 Cyaan
78 91 Magenta
92 105 Geel
106 119 Purper
120 133 Oranje
134 147 Groengeel
148 161 Roze
162 175 Bruin
176 189 Goud
190 203 Karmozijn
204 217 Violet
218 231 Wijnrood
232 244 Beweegbare macro 1
4 Ledmacro
245 255 Beweegbare macro 2

VDPL3601MHW12 HQPOWER
11
c. DMX512-aansluiting
Sluit de meegeleverde XLR-kabel aan de vrouwelijke 3-pin XLR-uitgang van de controller en de andere kant van de
mannelijke 3-pin XLR-ingang van de VDPL3601MHW12. U kunt verscheidene VDPL3601MHW12’s aan elkaar
koppelen met behulp van een seriële koppeling. Gebruik daarvoor een 2-aderige afgeschermde kabel met XLR
ingang- en uitgangaansluitingen.
Pinverdeling: pin 1: aarding – pin 2: data+ – pin 3: data-
d. DMX512-keten met terminator
Een DMX terminator is aanbevolen als de DMX-kabel vrij lang is of wordt gebruikt in een
omgeving met veel elektrische ruis (bvb. een discotheek). De terminator voorkomt
corruptie van het digitale controlesignaal door elektrische ruis. De DMX terminator is niets
meer dan een XLR-stekker met een weerstand van 120Ω van pin 2 naar 3. Deze XLR-
stekker wordt dan aangesloten op de XLR uitgang van het laatste toestel in de reeks. Zie
de illustraties links.
e. Startadres van de projector
Alle DMX-gestuurde toestellen hebben een digitaal startadres nodig, zodat het juiste toestel reageert op de signalen.
Dit digitale startadres is het kanaalnummer van waarop het toestel “luistert” naar het signaal van de DMX controller.
Geef het correcte nummer in en lees het af op de display onderaan uw VDPL3601MHW12.
U kunt één enkel startadres gebruiken voor een groep toestellen of u kunt per toestel een nieuw startadres ingeven.
Wanneer u één enkel startadres instelt, zullen alle toestellen “luisteren” naar hetzelfde kanaal. Met andere woorden:
wanneer u de instellingen voor 1 kanaal verandert, zullen alle toestellen er tegelijk op reageren.
Wanneer u verschillende adressen instelt, dan luistert elk toestel naar een ander kanaal. Met andere woorden:
wanneer u de instellingen van een kanaal verandert, zal enkel het toestel op dat kanaal reageren.
In 12-kanaals modus zult u het startadres van het eerste toestel op 1 moeten instellen, van het tweede toestel op 13
(1 + 12), van het derde op 25 (13 + 12) enz.
In 4-kanaals modus zult u het startadres van het eerste toestel op 1 moeten instellen, van het tweede toestel op 5 (1
+ 4), van het derde op 9 (5 + 5) enz.
6. Gebruik
Schakel het toestel in en uit met de voedingsplug. Gebruik het toestel niet continu.
MODUS 1: is de standaardmodus. Ontvangst van het DMX512-signaal en instelling van het gewenste adres
met behulp van UP/DOWN.
Selecteer een kanaal tussen 1 en 512.
MODUS 2: Druk op MODE/ESC tot op het scherm verschijnt en selecteer de gewenste functie met
UP/DOWN. is de master auto-modus, is de controllermodus en is de slave-modus. Druk
op ENTER om de functie te bevestigen; wijzigt in , wijzigt in en wijzigt in
.
MODUS 3: Druk op MODE/ESC tot op het scherm verschijnt en selecteer de gewenste functie met
UP/DOWN.
is de panregeling en is de omgekeerde panregeling. Druk op ENTER om de
functie te bevestigen. De display geeft de eerder geselecteerde ‘DMX’ of ‘MASTER/SLAVE’-modus weer.
master => master auto
master => controller
slave
=> slave

VDPL3601MHW12 HQPOWER
12
MODUS 4: Druk op MODE/ESC tot op het scherm verschijnt en selecteer de gewenste functie met
UP/DOWN. is de tiltmodus en is de omgekeerde tiltmodus. Druk op ENTER om de functie te
bevestigen. De display geeft de eerder geselecteerde ‘DMX’ of ‘MASTER/SLAVE’-modus weer.
MODUS 5: Druk op MODE/ESC tot op het scherm verschijnt en selecteer de gewenste functie met
UP/DOWN. is de normale modus is de omgekeerde weergave. Druk op ENTER om de functie
te bevestigen. De display geeft de eerder geselecteerde ‘DMX’ of ‘MASTER/SLAVE’-modus weer.
MODUS 6: Druk op MODE/ESC tot op het scherm verschijnt en selecteer de gewenste functie met
UP/DOWN. is de 12-kanaals modus en is de 4-kanaals modus. Druk op ENTER om de functie
te bevestigen. De display geeft de eerder geselecteerde ‘DMX’ of ‘MASTER/SLAVE’-modus weer.
MODUS 7: Druk op MODE/ESC tot op het scherm verschijnt en selecteer de gewenste functie met
UP/DOWN. Kies voor een horizontale rotatie van 540°, kies voor een horizontale rotatie van
360° en kies voor een horizontale rotatie van 180°. Druk op ENTER om de functie te bevestigen. De
display geeft de eerder geselecteerde ‘DMX’ of ‘MASTER/SLAVE’-modus weer.
MODUS 8: Druk op MODE/ESC tot op het scherm verschijnt en selecteer de gewenste functie met
UP/DOWN. Kies voor een verticale rotatie van 270°, kies voor een verticale rotatie van 180°
en kies voor een verticale rotatie van 90°. Druk op ENTER om de functie te bevestigen. De display
geeft de eerder geselecteerde ‘DMX’ of ‘MASTER/SLAVE’-modus weer.
MODUS 9: Druk op MODE/ESC tot op het scherm verschijnt. Druk op ENTER om het systeem te resetten.
MODUS 10: Druk op MODE/ESC tot op het scherm verschijnt. Druk op ENTER om naar de
standaardinstellingen terug te keren.
7. Reiniging en onderhoud
1. Alle gebruikte schroeven moeten goed zijn aangespannen en mogen geen sporen van roest vertonen.
2. De behuizing, de lenzen, de montagebeugels en de montageplaats (bv. het plafond of het gebinte) mogen niet
vervormd zijn of aangepast worden (geen extra gaten in montagebeugels, aansluitingen niet verplaatsen etc.)
3. Mechanisch bewegende delen mogen geen sporen van slijtage vertonen en mogen niet onregelmatig bewegen.
4. De voedingskabels mogen niet beschadigd zijn. Laat het toestel onderhouden door een geschoolde technicus.
5. Ontkoppel het toestel van het lichtnet voor u aan onderhoudswerkzaamheden begint.
6. Maak het toestel geregeld schoon met een vochtige, niet pluizende doek. Gebruik geen alcohol of solvent.
7. De gebruiker mag geen onderdelen vervangen.
8. Bestel eventuele reserveonderdelen bij uw dealer.
8. Technische specificaties
Voeding max. 230VAC / 50Hz
Verbruik max. 50W
Zekering F 5A, 250VAC (5 x 20mm) (ordercode FF5N)
Leds 12 x rood; 12 x groen; 12 x blauw
Flitssnelheid sluiter 0 ~ 10Hz
Afmetingen 415 x 395 x 654mm
Gewicht 9.4kg
PAN-beweging 540°
TILT-beweging 270°
Voor meer informatie omtrent dit product, zie www.hqpower.com.
De informatie in deze handleiding kan te allen tijde worden gewijzigd zonder voorafgaande kennisgeving.

VDPL3601MHW12 HQPOWER
13
VDPL3601MHW12 – EXCALIBOR I – PROJECTEUR LYRE À LED - 36 x 1W LEDS
1. Introduction
Aux résidents de l'Union européenne
Des informations environnementales importantes concernant ce produit
Ce symbole sur l'appareil ou l'emballage indique que l’élimination d’un appareil en fin de vie peut polluer
l'environnement.
Ne pas jeter un appareil électrique ou électronique (et des piles éventuelles) parmi les déchets municipaux
non sujets au tri sélectif ; une déchèterie traitera l’appareil en question.
Renvoyer les équipements usagés à votre fournisseur ou à un service de recyclage local.
Il convient de respecter la réglementation locale relative à la protection de l’environnement.
En cas de questions, contacter les autorités locales pour élimination.
Nous vous remercions de votre achat ! Le VDPL3601MHW12 est un effet « wash » à 12 canaux avec mixage de
couleurs RGB, variateur indépendant, stroboscope et autres effets. Lire la présente notice attentivement avant la mise
en service de l’appareil. Si l’appareil a été endommagé pendant le transport, ne pas l’installer et consulter votre
revendeur.
2. Prescriptions de sécurité
• La garantie ne s’applique pas aux dommages survenus en négligeant certaines directives de cette notice et votre
revendeur déclinera toute responsabilité pour les problèmes et les défauts qui en résultent.
• Confier l’installation et l’entretien à un personnel qualifié.
• Ne pas brancher l’appareil après exposition à des variations de température. Afin d’éviter des dommages,
attendre jusqu’à ce que l’appareil ait atteint la température ambiante avant de l’utiliser.
• Cet appareil ressort à la classe de protection I, ce qui implique que l’appareil doit être mis à la terre. Un technicien
qualifié doit établir la connexion électrique.
• La tension réseau ne peut pas dépasser la tension mentionnée dans les spécifications à la fin de cette notice.
• Le câble d’alimentation ne peut pas être replissé ou endommagé. Demander à votre revendeur de renouveler le
câble d’alimentation si nécessaire.
• Débrancher l’appareil s’il n’est pas utilisé ou pour le nettoyer. Tirer la fiche pour débrancher l'appareil ; non pas le câble.
• Ne pas regarder directement la source lumineuse comme ceci peut entraîner des crises d’épilepsie chez certains gens.
• L’usure mécanique ne tombe pas sous la garantie.
• Les dommages occasionnés par des modifications à l’appareil par le client, ne tombent pas sous la garantie.
• Garder votre VDPL3601MHW12 hors de la portée de personnes non qualifiées et de jeunes enfants.
3. Directives générales
• Cet appareil a été développé pour usage professionnel dans des discothèques, des théâtres, etc. Employer cet
appareil à l’intérieur et le brancher à une source de courant CA de max. 230VCA / 50Hz.
• Un effet lumineux n’est pas conçu pour une opération continue. Des pauses régulières prolongeront sa vie.
• Éviter de secouer l’appareil et traiter l’appareil avec circonspection pendant l’installation et l’opération.
• Choisir un endroit où l’appareil est protégé contre la poussière, l’humidité et des températures extrêmes.
Respecter une distance minimum de 0.5m entre la sortie lumière de l’appareil et la surface illuminée.
• Fixer l’appareil à l’aide d’un câble de sécurité adéquat (p.ex. VDLSC7 ou VDLSC8).
• Se familiariser avec le fonctionnement de l’appareil avant de l’utiliser. Ne pas permettre pas aux personnes non
qualifiées d’opérer cet appareil. La plupart des dégâts sont causés par un usage non professionnel.
Être prudent lors de l’installation : toucher un câble sous tension peut causer des électrochocs mortels.
Protéger l’appareil contre la pluie et l’humidité.
Débrancher le câble d'alimentation avant d'ouvrir le boîtier.
LED Classe 2M
–
Ne pas regarder da
ns le faisceau laser à une distance inférieure à 0.5m ou à
travers des instruments optiques.

VDPL3601MHW12 HQPOWER
14
• Transporter l’appareil dans son emballage originel.
• Toute modification de l’appareil est interdite pour des raisons de sécurité.
• N’utiliser votre VDPL3601MHW12 qu’à sa fonction prévue. Tout autre usage peut causer des courts-circuits, des
brûlures, des électrochocs etc. Un usage impropre annule d'office la garantie.
4. Montage de l’appareil
• Un technicien qualifié doit installer l’appareil en respectant EN 60598-2-17 et toute autre norme applicable.
• La construction portante de l’appareil doit être capable de supporter 10 x le poids de l’appareil pendant une
heure, sans qu’une déformation de la construction en résulte.
• Fixer votre VDPL3601MHW12 à l’aide d’un câble de sécurité (sécurité supplémentaire).
• Éviter de vous positionner en dessous de l’appareil pour l’enlever ou lors du montage ou du nettoyage. Un
technicien qualifié doit réviser l’appareil avant la mise en service. Organiser une révision minutieuse annuelle.
• Installer l’appareil à un endroit où personne ne peut passer ou s’asseoir et où personne ne peut le toucher.
• L’installation de cet appareil exige une solide expérience pratique : le calcul de la charge max. de la construction,
les matériaux d’installation requis etc. De temps en temps, un technicien qualifié doit vérifier la construction
portante et l’appareil même. Ne pas essayer d’installer cet appareil vous-même si vous n’avez pas les
qualifications requises ; une installation incorrecte peut entraîner des blessures.
• Déterminer l’angle d’inclinaison au moyen de l’étrier de montage et serrez les vis de montage.
• Enlever tout matériau inflammable dans un rayon de 0.5m autour de l’appareil.
• Un électricien qualifié doit établir la connexion électrique.
• Brancher l’appareil sur le réseau électrique par la fiche d’alimentation. Ne pas le brancher sur un bloc de puissance.
• Un expert doit approuver l’installation avant qu’elle puisse être prise en service.
5. Configuration
a. Valeurs DMX détaillées par canal (mode 12 canaux, voir « 6. Emploi, MODE 6 »)
Canal Fonction De À Description
1 Pan 0 255 540°
2 Pan 16 bits 0 255 Réglage fin du mouvement pan
3 Tilt 0 255 270°
4 Tilt 16 bits 0 255 Réglage fin du mouvement tilt
5 Vitesse 0 255 Vitesse du mouvement pan / tilt de 100% ~ 0%
0 7 Fermé
8 134 Gradateur électronique de 100% ~ 0%
135 239 Stroboscope avec fréquence croissante
6 Obturateur
240 255 Ouvert
7 LED rouge 0 255 Gradateur
8 LED verte 0 255 Gradateur
9 LED bleue 0 255 Gradateur
0 7 Pas de fonction
8 21 Blanc
22 35 Rouge
36 49 Vert
50 63 Bleu
64 77 Cyan
78 91 Magenta
92 105 Jaune
106 119 Pourpre
120 133 Orange
134 147 Vert chartreuse
148 161 Rose
10 Macro LED
162 175 Marron

VDPL3601MHW12 HQPOWER
15
176 189 Or
190 203 Cramoisi
204 217 Violet
218 231 Lie-de-vin
232 244 Macro mobile 1
245 255 Macro mobile 2
11 Vitesse de la LED 0 255 Transition de couleur à vitesse décroissante
0 7 Pas de fonction
8 22 Programme automatique 1
23 37 Programme automatique 2
38 52 Programme automatique 3
53 67 Programme automatique 4
68 82 Programme automatique 5
83 97 Programme automatique 6
98 112 Programme automatique 7
113 127 Programme automatique 8
128 142 Pilotage par le son 1
143 157 Pilotage par le son 2
158 172 Pilotage par le son 3
173 187 Pilotage par le son 4
188 202 Pilotage par le son 5
203 217 Pilotage par le son 6
218 232 Pilotage par le son 7
12
Programme
automatique
233 255 Pilotage par le son 8
b. Valeurs DMX détaillées par canal (mode 4 canaux, voir « 6. Emploi, MODE 6 »)
Canal Fonction De À Description
1 Pan 0 255 540°
2 Tilt 0 255 270°
0 7 Fermé
8 134 Gradateur électronique de 100% ~ 0%
135 239 Stroboscope avec fréquence croissante
3 Obturateur
240 255 Ouvert
0 7 Pas de fonction
8 21 Blanc
22 35 Rouge
36 49 Vert
50 63 Bleu
64 77 Cyan
78 91 Magenta
92 105 Jaune
106 119 Pourpre
120 133 Orange
134 147 Vert chartreuse
148 161 Rose
162 175 Marron
176 189 Or
190 203 Écarlate
204 217 Violet
218 231 Lie de vin
232 244 Macro mobile 1
4 Macro LED
245 255 Macro mobile 2

VDPL3601MHW12 HQPOWER
16
c. Connexion DMX512
Connectez le câble à fiche XLR inclus à la sortie XLR femelle à 3 broches de votre contrôleur et l’autre fiche XLR
mâle à 3 broches à l’entrée du VDPL3601MHW12. Il est possible de reliez plusieurs VDPL3601MHW12 à partir
d’une connexion sérielle. Utilisez un câble de connexion blindé à 2 conducteurs avec des connecteurs d’entrée et de
sortie XLR.
Disposition des broches : broche 1 : masse – broche 2 : data+ – broche 3 : data-
d. Connexion DMX512 avec terminaison
Une terminaison DMX est à recommander si le câble DMX doit couvrir une grande
distance ou s’il est utilisé dans un environnement avec beaucoup de bruit électrique (p.ex.
une discothèque). La terminaison prévient la corruption du signal de contrôle numérique
par le bruit électrique. La terminaison DMX n’est rien d’autre qu’une fiche XLR avec une
résistance de 120Ω de broche 2 vers broche 3 (voir illustration à gauche). Cette fiche XLR
est connectée à la sortie XLR du dernier appareil de la série.
e. Sélection de l’adresse DMX du projecteur
Tous les appareils pilotés par un signal DMX demandent une adresse de départ DMX pour assurer que les appareils
corrects réagissent sur les signaux de contrôle. Cette adresse de départ numérique indique le numéro de canal sur
lequel l’appareil écoute le contrôleur DMX. Déterminez cette adresse avec les interrupteurs DIP au dos de l’appareil.
Vous avez le choix entre une seule adresse de départ pour toute une série d’appareils ou une adresse de départ par
appareil. Dans le cas d’une seule adresse, tous les appareils « écouteront » les mêmes signaux, sur un seul canal.
Tous les appareils seront donc influencés lorsque vous changez les réglages d’un seul canal. Avec des adresses de
départ individuelles, chaque appareil « écoutera » son propre canal. Par conséquent, un ajustement des réglages
d’un canal n’influence que l'appareil sur ce canal.
Pour le mode à 12 canaux, l’adresse de départ du premier appareil est 1, du deuxième 13 (1 + 12), du troisième 25
(13 + 12), etc.
Pour le mode à 4 canaux, l’adresse de départ du premier appareil est 1, du deuxième 5 (1 + 4), du troisième 9 (5 +
4), etc.
6. Emploi
MODE 1 : indique le mode par défaut. Régler la réception du signal DMX512 et configurer l’adresse à l’aide
des touches UP/DOWN.
Sélection du canal entre 1 et 512.
MODE 2 : Enfoncer MODE/ESC jusqu’à ce que s’affiche et sélectionner ma fonction souhaitée à
l’aide des touches UP/DOWN. indique le mode maître automatique, indique le mode à pilotage
par contrôleur et indique le mode esclave. Enfoncer ENTER pour confirmer la sélection ;
commutera en , commutera en et commutera en .
MODE 3 : Enfoncer MODE/ESC jusqu’à ce que s’affiche et sélectionner ma fonction souhaitée à l’aide
des touches UP/DOWN. indique le mode pan et indique le mode pan inversé. Enfoncer
ENTER pour confirmer la sélection. Le mode « DMX » ou « MASTER/SLAVE » préalablement sélectionné
sera affiché.
Mode maître => Mode maître automatique
Mode maître => Mode pilotage par contrôleur
Mode esclave => Esclave

VDPL3601MHW12 HQPOWER
17
MODE 4 : Enfoncer MODE/ESC jusqu’à ce que s’affiche et sélectionner ma fonction souhaitée à l’aide
des touches UP/DOWN. indique le mode tilt et indique le mode tilt inversé. Enfoncer ENTER
pour confirmer la sélection. Le mode « DMX » ou « MASTER/SLAVE » préalablement sélectionné sera
affiché.
MODE 5 : Enfoncer MODE/ESC jusqu’à ce que s’affiche et sélectionner ma fonction souhaitée à l’aide
des touches UP/DOWN. indique le mode normal et indique un affichage inversé. Enfoncer
ENTER pour confirmer la sélection. Le mode « DMX » ou « MASTER/SLAVE » préalablement sélectionné
sera affiché.
MODE 6 : Enfoncer MODE/ESC jusqu’à ce que s’affiche et sélectionner ma fonction souhaitée à l’aide
des touches UP/DOWN. indique le mode 12 canaux et indique le mode 4 canaux. Enfoncer
ENTER pour confirmer la sélection. Le mode « DMX » ou « MASTER/SLAVE » préalablement sélectionné
sera affiché.
MODE 7 : Enfoncer MODE/ESC jusqu’à ce que s’affiche et sélectionner ma fonction souhaitée à
l’aide des touches UP/DOWN. Sélectionner pour une rotation horizontale de 540°, sélectionner
pour une rotation horizontale de 360° et sélectionner pour une rotation horizontale de 180°. Enfoncer
ENTER pour confirmer la sélection. Le mode « DMX » ou « MASTER/SLAVE » préalablement sélectionné
sera affiché.
MODE 8 : Enfoncer MODE/ESC jusqu’à ce que s’affiche et sélectionner ma fonction souhaitée à
l’aide des touches UP/DOWN. Sélectionner pour une rotation horizontale de 180° et sélectionner
pour une rotation horizontale de 90°. Enfoncer ENTER pour confirmer la sélection. Le mode
« DMX » ou « MASTER/SLAVE » préalablement sélectionné sera affiché.
MODE 9 : Enfoncer MODE/ESC jusqu’à ce que s’affiche. Enfoncer ENTER pour remettre le système à zéro.
MODE 10 : Enfoncer MODE/ESC jusqu’à ce que s’affiche. Enfoncer ENTER pour rétablir la configuration
d’origine.
7. Nettoyage et entretien
1. Serrer les écrous et les vis et vérifier qu’ils ne rouillent pas.
2. Le boîtier, les lentilles, les supports de montage et la construction portante ne peuvent pas être déformés,
adaptés ou bricolés p.ex. pas de trous additionnels dans un support, ne pas déplacer les connexions etc.
3. Les parties mécaniques mobiles ne peuvent pas être usées ou bouger de manière irrégulière.
4. Les câbles d'alimentation ne peuvent pas être endommagés. Un technicien qualifié doit entretenir l’appareil.
5. Débrancher l’appareil avant de le nettoyer.
6. Essuyer l’appareil régulièrement avec un chiffon humide non pelucheux. Éviter l’usage d’alcool et de solvants.
7. Il n’y a aucune pièce maintenable par l’utilisateur.
8. Commander des pièces de rechange éventuelles chez votre revendeur.
8. Spécifications techniques
Alimentation max. 230VCA / 50Hz
Consommation max. 50W
Fusible F 5A, 250VCA (5 x 20mm) (référence FF5N)
LED 12 x rouge ; 12 x vert ; 12 x bleu
Vitesse de l’obturateur 0 ~ 10Hz
Dimensions 415 x 395 x 654mm
Poids 9.4kg
Mouvement PAN 540°
Mouvement TILT 270°
Pour plus d’information concernant cet article, visitez notre site web www.hqpower.com.
Toutes les informations présentées dans cette notice peuvent être modifiées sans notification préalable.

VDPL3601MHW12 HQPOWER
18
VDPL3601MHW12 – EXCALIBOR I – CABEZA MÓVIL CON LEDs - 36 LEDs DE 1W
1. Introducción
A los ciudadanos de la Unión Europea
Importantes informaciones sobre el medio ambiente concerniente este producto
Este símbolo en este aparato o el embalaje indica que, si tira las muestras inservibles, podrían dañar el
medio ambiente.
No tire este aparato (ni las pilas eventuales) en la basura doméstica; debe ir a una empresa especializada
en reciclaje. Devuelva este aparato a su distribuidor o a la unidad de reciclaje local.
Respete las leyes locales en relación con el medio ambiente.
Si tiene dudas, contacte con las autoridades locales para residuos.
¡Gracias por haber comprado la VDPL3601MHW12! Es un efecto « wash » con 12 canales, mezcla de colores RGB,
dimmer independiente, estroboscopio y otros efectos. Lea atentamente las instrucciones del manual antes de usar el
aparato. Si el aparato ha sufrido algún daño en el transporte no lo instale y póngase en contacto con su distribuidor.
2. Instrucciones de seguridad
• Daños causados por descuido de las instrucciones de seguridad de este manual invalidarán su garantía y su
distribuidor no será responsable de ningún daño u otros problemas resultantes.
• La instalación y el mantenimiento deben ser realizados por personal especializado.
• No conecte el aparato si ha estado expuesto a grandes cambios de temperatura. Espere hasta que el aparato
llegue a la temperatura ambiente.
• Este aparato pertenece a la clase de protección I, Por lo tanto, es esencial que el aparato esté puesto a tierra. La
conexión eléctrica debe llevarla a cabo un técnico cualificado.
• Asegúrese de que la tensión de red no sea mayor que la tensión indicada en las especificaciones.
• No aplaste el cable de alimentación y protéjalo contra posibles daños causados por algún tipo de superficie
afilada. Si es necesario, pida a su distribuidor reemplazar el cable de alimentación.
• Desconecte siempre el aparato si no va a usarlo durante un largo período de tiempo o antes de limpiarlo. Tire
siempre del enchufe para desconectar el cable de red, nunca del propio cable.
• No mire directamente a la fuente de luz. Esto puede causar un ataque epiléptico.
• El desgaste mecánico no está cubierto por la garantía.
• Los daños causados por modificaciones no autorizadas, no están cubiertos por la garantía.
• Mantenga la VDPL3601MHW12 lejos del alcance de personas no capacitadas y niños.
3. Normas generales
• Este aparato ha sido diseñado para un uso profesional en una discoteca, un teatro, etc. Utilice este aparato en
interiores y conéctelo a una fuente de corriente CA de máx. 230VCA / 50Hz.
• Un efecto luminoso no ha sido diseñado para un uso ininterrumpido. Introduzca frecuentemente una pausa para
prolongar la vida del aparato.
• No agite el aparato. Evite usar excesiva fuerza durante la instalación y la reparación.
• Seleccione un lugar de montaje donde el aparato no esté expuesto a polvo, humedad y calor extremo (véase
« Especificaciones »). Respete una distancia de mín. 0.5m entre la salida de luz y el área iluminada.
• Fije el aparato con un cable de seguridad adecuado (p.ej. VDLSC7 o VDLSC8).
• Familiarícese con el funcionamiento del aparato. Sólo personas cualificadas pueden manejar este aparato. La
mayoría de los daños son causados por un uso inadecuado.
• Transporte el aparato en su embalaje original.
Cuidado durante la instalación: puede sufrir una peligrosa descarga eléctrica al tocar los cables con un
voltaje peligroso.
No exponga este equipo a lluvia
ni
humedad.
Desconecte el cable de alimentación de la red antes de abrir la caja.
LED Clase 2M
–
¡Nunca mire al haz luminoso, ni directamente, ni por instrumentos ópticos!

VDPL3601MHW12 HQPOWER
19
• Por razones de seguridad, las modificaciones no autorizadas del aparato están prohibidas.
• Utilice sólo la VDPL3601MHW12 para aplicaciones descritas en este manual a fin de evitar p.ej. cortocircuitos,
quemaduras, descargas eléctricas, etc. Un uso desautorizado puede causar daños y anula la garantía
completamente.
4. Montaje del aparato
• Respete la directiva EN 60598-2-17 y toda norma nacional antes de instalar el aparato. La instalación debe ser
realizada por un técnico especializado.
• El soporte donde irá el aparato, debe ser capaz de sostener 10 veces el peso de éste durante una hora, sin que
se produzca una deformación de dicho soporte.
• Fije la VDPL3601MHW12 con un cable de seguridad (seguridad adicional).
• Evite ponerse debajo del aparato durante el montaje, la limpieza, etc. Un técnico especializado debe revisar el
aparato antes de la puesta en marcha. Después, debe revisarlo una vez al año.
• Instale el aparato fuera del alcance de personas no autorizadas y en un lugar con poca gente.
• La instalación de este aparato exige una sólida experiencia práctica: debe poder calcular la carga máx. del
soporte, debe conocer los materiales necesarios para la instalación, etc. De vez en cuando, una verificación de la
estructura y del aparato mismo debe ser llevada a cabo por un técnico especializado. No intente instalar este
aparato si no tiene las cualificaciones requeridas; una instalación incorrecta puede causar lesiones.
• Ajuste el ángulo de inclinación a su gusto con un soporte de montaje y fije los tornillos del soporte.
• Quite todo material inflamable en un radio de 0.5m alrededor del aparato.
• Un electricista cualificado debe conectar el aparato.
• Conecte el aparato a la red eléctrica. Normalmente, no se conectan efectos luminosos a dimmer packs.
• Un experto debe probar la instalación antes de la puesta en marcha.
5. Ajuste
a. Valores DMX detallados por canal (modo 12 canales, véase « 6. Uso, MODO 6 »)
Canal Función De A Descripción
1 Pan 0 255 540°
2 Pan 16 bits 0 255 Ajuste fino del movimiento pan
3 Tilt 0 255 270°
4 Tilt 16 bits 0 255 Ajuste fino del movimiento tilt
5 Velocidad 0 255 Velocidad del movimiento pan / tilt de 100% ~ 0%
0 7 Cerrado
8 134 Dimmer electrónico de 100% ~ 0%
135 239 Estroboscopio con velocidad creciente
6 Obturador
240 255 Abierto
7 LED rojo 0 255 Dimmer
8 LED verde 0 255 Dimmer
9 LED azul 0 255 Dimmer
0 7 Sin función
8 21 Blanco
22 35 Rojo
36 49 Verde
50 63 Azul
64 77 Cianógeno
78 91 Magenta
92 105 Amarillo
106 119 Púrpura
120 133 Naranja
134 147 Amarillo verdoso
148 161 Rosa
162 175 Marrón
10 Macro LED
176 189 Oro

VDPL3601MHW12 HQPOWER
20
190 203 Carmesí
204 217 Violeta
218 231 Color del vino
232 244 Macro móvil 1
245 255 Macro móvil 2
11 Velocidad del LED 0 255 Cambio de colores con velocidad decreciente
0 7 Sin función
8 22 Programa automático 1
23 37 Programa automático 2
38 52 Programa automático 3
53 67 Programa automático 4
68 82 Programa automático 5
83 97 Programa automático 6
98 112 Programa automático 7
113 127 Programa automático 8
128 142 Control por la música 1
143 157 Control por la música 2
158 172 Control por la música 3
173 187 Control por la música 4
188 202 Control por la música 5
203 217 Control por la música 6
218 232 Control por la música 7
12 Programa automático
233 255 Control por la música 8
f. Valores DMX detallados por canal (modo 4 canales, véase « 6. Uso MODO 6 »)
Canal Función De A Descripción
1 Pan 0 255 540°
2 Tilt 0 255 270°
0 7 Cerrado
8 134 Dimmer electrónico de 100% ~ 0%
135 239 Estroboscopio con velocidad creciente
3 Obturador
240 255 Abierto
0 7 Sin función
8 21 Blanco
22 35 Rojo
36 49 Verde
50 63 Azul
64 77 Cianógeno
78 91 Magenta
92 105 Amarillo
106 119 Púrpura
120 133 Naranja
134 147 Amarillo verdoso
148 161 Rosa
162 175 Marrón
176 189 Oro
190 203 Carmesí
204 217 Violeta
218 231 Color del vino
232 244 Macro móvil 1
4 Macro LED
245 255 Macro móvil 2
La page est en cours de chargement...
La page est en cours de chargement...
La page est en cours de chargement...
La page est en cours de chargement...
La page est en cours de chargement...
La page est en cours de chargement...
La page est en cours de chargement...
La page est en cours de chargement...
-
 1
1
-
 2
2
-
 3
3
-
 4
4
-
 5
5
-
 6
6
-
 7
7
-
 8
8
-
 9
9
-
 10
10
-
 11
11
-
 12
12
-
 13
13
-
 14
14
-
 15
15
-
 16
16
-
 17
17
-
 18
18
-
 19
19
-
 20
20
-
 21
21
-
 22
22
-
 23
23
-
 24
24
-
 25
25
-
 26
26
-
 27
27
-
 28
28


HQ Power EXCALIBOR I Manuel utilisateur
- Catégorie
- Stroboscopes
- Taper
- Manuel utilisateur
- Ce manuel convient également à
dans d''autres langues
- English: HQ Power EXCALIBOR I User manual
- español: HQ Power EXCALIBOR I Manual de usuario
- Deutsch: HQ Power EXCALIBOR I Benutzerhandbuch
- Nederlands: HQ Power EXCALIBOR I Handleiding
Documents connexes
-
 HQ Power VDPL2201MHW10 Manuel utilisateur
-
 HQ Power AERON 575 I Manuel utilisateur
-
 HQ Power VDPL121RGB Manuel utilisateur
-
 HQ Power VDPLP2401RGB Manuel utilisateur
-
HQ Power VDPL300SC Manuel utilisateur
-
 HQ Power VDPLW2300 Manuel utilisateur
-
 HQ Power VDPLW1440 Manuel utilisateur
-
 HQ Power VDPL3615MHZ Manuel utilisateur
-
 HQ Power VDPLW460 Manuel utilisateur
-
 HQ Power VDPLW810 Fiche technique


