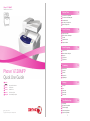
Xerox 6128MFP Mode d'emploi
- Catégorie
- Imprimantes laser / LED
- Taper
- Mode d'emploi
Ce manuel convient également à
La page est en cours de chargement...
La page est en cours de chargement...

54
www.xerox.com/office/6128MFPsupport
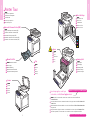
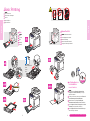
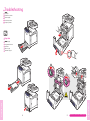
Printer Tour
Printer Tour
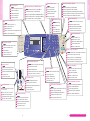
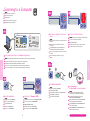
OK
Ready
C M Y K
OK
Redial/
Pause
PQRS
GHI
ABC
JKL
TUV
DEF
MNO
WXYZ
Speed Dial
@:./
1
2
3
4
5
6
7
8
9
0
C
#
-_
~
Job Status
System
Address Book
Manual Dial
Clear All
Wake Up
Stop
Start
Job in Memory
Color
B & W
Color Mode
Scan
Email
Fax
Copy
1
2
3
4
5
6
7
8
OK
Permet de sélectionner le mode couleur
Seleziona la modalità di colore
Farbmoduswahl
Selecciona el modo de color
Seleciona o modo de cores
EN
FR
IT
DE
ES
PT
Selects the color mode
Remonte d'un niveau dans le menu
Passa al menu di livello superiore
Wechsel zu nächsthöherer Menüebene
Asciende un nivel
Sobe um nível no menu
EN
FR
IT
DE
ES
PT
Goes up one level
Permet de faire défiler vers le haut
ou vers le bas
Scorre verso l'alto o verso il basso
Blättern nach oben und unten
Desplaza hacia arriba o hacia abajo
Rola para cima ou para baixo
EN
FR
IT
DE
ES
PT
Scrolls up or down
Remonte d'un niveau dans le menu
Passa al menu di livello superiore
Wechsel zu nächsthöherer Menüebene
Asciende un nivel de menú
Sobe um nível no menu
EN
FR
IT
DE
ES
PT
Goes up one menu level
Carnet d'adresses électroniques et de télécopie
Rubrica indirizzi e-mail e fax
E-Mail- und Faxadressbuch
Libreta de direcciones de correo electrónico y fax
Catálogo de endereços de e-mail e fax
EN
FR
IT
DE
ES
PT
Email and fax address book
Descend d'un niveau dans le menu
Passa al menu di livello inferiore
Wechsel zu nächstniedrigerer Menüebene
Desciende un nivel
Desce um nível no menu
EN
FR
IT
DE
ES
PT
Goes down one level
Permet d'entrer les numéros de télécopie
Inserisce numeri di fax
Eingabe von Faxnummern
Introduce el número de fax
Insere números de fax
EN
FR
IT
DE
ES
PT
Enters fax numbers
Supprime les caractères alphanumériques
Cancella i caratteri alfanumerici
Löschen eingegebener Zeichen
Elimina los caracteres alfanuméricos
Exclui os caracteres alfanuméricos
EN
FR
IT
DE
ES
PT
Deletes alphanumeric characters
Donne accès aux numéros de télécopie
Accede a numeri di fax
Aufrufen von Faxnummern
Accede a los números de fax
Acessa os números de fax
EN
FR
IT
DE
ES
PT
Accesses fax numbers
Lance un travail de copie, de numérisation ou de télécopie
Avvia un lavoro di copia, scansione o fax
Starten von Kopier-, Scan- und Faxaufträgen
Inicia un trabajo de copia, exploración o fax
Inicia um trabalho de cópia, digitalização ou fax
EN
FR
IT
DE
ES
PT
Starts a copy, scan, or fax job
Insère des pauses dans les numéros de télécopie
Inserisce pause nei numeri di fax
Einfügen von Wählpausen in Faxnummern
Inserta pausas en números de fax
Insere pausas em números de fax
EN
FR
IT
DE
ES
PT
Inserts pauses in fax numbers
Annule le travail en cours
Annulla il lavoro corrente
Abbrechen des aktuellen Auftrags
Cancela el trabajo actual
Cancela o trabalho atual
EN
FR
IT
DE
ES
PT
Cancels the current job
Activation du mode d'économie d'énergie
Attivazione risparmio energetico
Aktivierung aus der Energiesparfunktion
Salir del modo de ahorro de energía
Sair do modo de economia de energia
EN
FR
IT
DE
ES
PT
Power Saver wake up
Rétablit les paramètres par défaut du travail
Ripristina le impostazioni di lavoro predefinite
Wiederherstellung der Standardeinstellungen für den Auftrag
Restaura los parámetros del trabajo a los valores predeterminados
Restaura as configurações do trabalho para os padrões
EN
FR
IT
DE
ES
PT
Resets the job settings to defaults
Pavé alphanumérique
Tastiera alfanumerica
Tastatur
Teclado alfanumérico
Teclado alfanumérico
EN
FR
IT
DE
ES
PT
Alphanumeric keypad
Ouvre le menu Système
Accede al menu Config
Aufrufen des Menüs "System"
Entra al menú Sistema
Acessa o menu Sistema
EN
FR
IT
DE
ES
PT
Enters the System menu
Affiche les travaux actifs ou les fonctions Walk-Up
Visualizza i lavori attivi o le funzioni Walk-Up
Anzeige von aktiven Aufträgen und Walk-Up-Funktionen
Muestra los trabajos activos o Características de Walk-Up
Exibe os trabalhos ativos ou os Recursos Walk-Up
EN
FR
IT
DE
ES
PT
Displays the active jobs or Walk-Up Features
Permet de sélectionner une fonction
Seleziona una funzione
Auswahl der Betriebsart
Selecciona una función
Seleciona uma função
EN
FR
IT
DE
ES
PT
Selects a function
Numéros de télécopie directs 1 – 8
Numeri di fax one-touch 1 – 8
Zielwahlnummern 1-8
Números de marcación de un toque para faxes 1 a 8
Números de fax de um toque 1 - 8
EN
FR
IT
DE
ES
PT
One touch Fax numbers 1 – 8
La page est en cours de chargement...
La page est en cours de chargement...

1110
www.xerox.com/office/6128MFPsupport
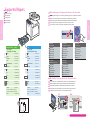
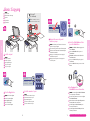
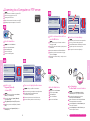
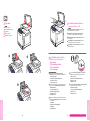
Copying
Copying
65 – 120 g/m
2
(17 – 32 lb. Bond)
H
W
W: 148 – 216 mm (4.1 – 8.5 in.)
H: 210 – 355.6 mm (8.3 – 14 in.)
ABC
GHI
PQRS
-_~
TUV WXYZ
JKL MNO
@:./ DEF
1 2 3
4
5 6
7
8
0
#
9
Color Mode
B&W
Color
Ready to Copy Set 5
Paper Supply... Tray : Letter
Reduce/Enlarge.... 100%
Document Type... Text&Photo
Ready to Copy Set 5
Paper Supply... Tray: Letter
Reduce/Enlarge.... 100%
Document Type... Text&Photo
Start
Copy
5.1
5.2
Phaser
®
6128MFP
Software and Documentation
OK
EN
FR
IT
DE
ES
PT
Basic Copying
Copie de base
Nozioni di base sulla copia
Kopieren
Copia básica
Cópia básica
1
4
5
2
3
Chargez l'original.
Caricare l'originale.
Das Original einlegen.
Coloque el original.
Coloque o original.
EN
FR
IT
DE
ES
PT
Load the original.
Appuyez sur le bouton Copier.
Premere il pulsante Copia.
Taste Kopieren drücken.
Pulse el botón Copia.
Pressione o botão Copiar.
EN
FR
IT
DE
ES
PT
Press the Copy button.
Sélectionnez le nombre de copies.
Selezionare il numero di copie.
Kopienanzahl angeben.
Seleccione el número de copias.
Selecione o número de cópias.
EN
FR
IT
DE
ES
PT
Select the number of copies.
Parcourez les menus pour sélectionner les fonctions
spéciales ou le type de papier.
Esplorare i menu per trovare carta e funzioni speciali.
Papiersorte und -format sowie Sondereinstellungen
in den Menüs auswählen.
Navegue por los menús para seleccionar papel o
características especiales.
Navegue pelos menus para selecionar papel ou
recursos especiais.
EN
FR
IT
DE
ES
PT
Sélectionnez le Mode couleur et appuyez sur le
bouton Démarrer.
Selezionare Modalità colore e premere il
pulsante Avvio.
Farbmodus auswählen und anschließend die
Taste Start drücken.
Seleccione el Modo de color y luego pulse el
botón Iniciar.
Selecione o Modo de cores e pressione o botão
Iniciar.
EN
FR
IT
DE
ES
PT
Navigate the menus for special
features or paper.
Select the Color Mode and then
press the Start button.
Consultez la section Copie du Guide d'utilisation
pour de plus amples informations.
Per ulteriori informazioni, vedere la sezione Copia
nella Guida dell'utente.
Weitere Hinweise sind dem Kapitel Kopieren des
Benutzerhandbuchs zu entnehmen.
Consulte Copia en la Guía del usuario para
obtener más información.
Consulte Cópia no Guia do Usuário para obter
informações adicionais.
EN
FR
IT
DE
ES
PT
See Copying in the
User Guide for more information.

1312
www.xerox.com/office/6128MFPsupport
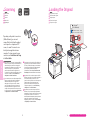
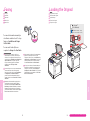
Scanning
Scanning
USB
Ethernet
65 – 120 g/m
2
(17 – 32 lb. Bond)
H
W
W: 148 – 216 mm (4.1 – 8.5 in.)
H: 210 – 355.6 mm (8.3 – 14 in.)
Phaser
®
6128MFP
Software and Documentation
Depending on the printer’s connection
(USB or Ethernet), you can send
scanned files directly from the printer’s
control panel to a computer, an FTP
server, or to email. You can also scan
directly into an application from a
computer. To set up scanning for your
connection, see Installation and Setup
in the User Guide.
En fonction de la connexion de l'imprimante (USB ou
Ethernet), vous pouvez envoyer les travaux numérisés
directement depuis le panneau de commande de
l'imprimante à un ordinateur, un serveur FTP ou une
adresse électronique. Vous pouvez également
numériser directement dans une application de
l'ordinateur. Pour configurer la numérisation de votre
connexion, consultez la section Installation et
configuration du Guide d'utilisation.
A seconda della connessione della stampante (USB o
Ethernet), sarà possibile inviare file digitalizzati
direttamente dal pannello di controllo della
stampante a un computer, server FTP o indirizzo
e-mail. È possibile anche eseguire la scansione di
immagini direttamente in un'applicazione da un
computer. Per impostare la funzione di scansione per
la connessione in uso, vedere la sezione Installazione
e configurazione nella Guida dell'utente.
Je nachdem, ob der Drucker über USB oder Ethernet
angeschlossen ist, können Scandateien direkt, über
FTP oder per E-Mail an Computer gesendet werden.
Scans können auch direkt an eine Anwendung auf
dem Computer gesendet werden. Weitere
Informationen sind dem Kapitel Installation und
Einrichtung des Benutzerhandbuchs zu entnehmen.
Dependiendo de la conexión de la impresora (USB o
Ethernet), puede explorar los archivos directamente a
una estación de trabajo, servidor FTP o correo
electrónico desde el panel de control de la impresora.
También puede explorar directamente a una
aplicación desde una estación de trabajo. Para
configurar la exploración, consulte Instalación y
configuración en la Guía del usuario.
Dependendo da conexão da impressora (USB ou
Ethernet), você pode enviar arquivos digitalizados
diretamente do painel de controle da impressora para
um computador, servidor FTP ou e-mail. Pode
também digitalizar diretamente para um aplicativo a
partir de um computador. Para configurar a
digitalização para sua conexão, consulte Instalação
e Configuração no Guia do Usuário.
EN
FR
IT
DE
ES
PT
Scanning
Numérisation
Scansione
Scannen
Exploración
Digitalização
EN
FR
IT
DE
ES
PT
Loading the Original
Chargement de l'original
Caricamento dell'originale
Vorlage einlegen.
Colocación del original
Colocação do original
FR
IT
DE
ES
PT

1514
www.xerox.com/office/6128MFPsupport
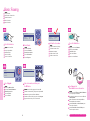
Scanning
Scanning
USB
Mac
Mac
Mac
PC
PC
PC
EN
FR
IT
DE
ES
PT
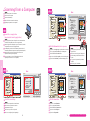
Scanning from a Computer
Numérisation à partir d'un ordinateur
Scansione da un computer
Scannen in Anwendung
Exploración desde una estación de trabajo
Digitalização a partir de um computador
1
2
3
4
Ouvrez l'application à partir de laquelle vous souhaitez numériser
(la méthode d'importation varie selon les applications).
Avviare l'applicazione dalla quale eseguire la scansione (il metodo
di importazione varia in base all'applicazione).
Die Anwendung, in welche die Scandatei importiert werden soll,
starten (Importmethode hängt von der jeweiligen Anwendung ab).
Abra la aplicación a la que desea explorar (los métodos de
importación varían según la aplicación).
Inicie o aplicativo no qual você irá digitalizar (o método de
importação varia de acordo com o aplicativo).
EN
FR
IT
DE
ES
PT
Launch the scan application
(import method varies by application).
Sélectionnez les paramètres de numérisation.
Selezionare le impostazioni di scansione.
Scanparameter festlegen.
Seleccione las opciones de exploración.
Selecione as configurações de digitalização.
EN
FR
IT
DE
ES
PT
Select the scan settings.
Cliquez sur le bouton Aperçu pour prévisualiser le document.
Fare clic sul pulsante Prescansione per un'anteprima.
Auf die Schaltfläche Vorschau klicken.
Haga clic en el botón Pres. prelim. para ver una vista previa.
Clique no botão Visualizar para uma visualização prévia.
EN
FR
IT
DE
ES
PT
Click the Preview button for a preview.
Il est impossible de prévisualiser le document
à partir du CAD.
L'ADF non consente di eseguire l'anteprima.
Bei Verwendung des AVE ist keine Vorschau
möglich.
No se puede ver la presentación preliminar
en el ADF.
O ADF não pode ser visualizado.
EN
FR
IT
DE
ES
PT
The ADF cannot preview.
Cliquez sur le bouton Numériser.
Fare clic sul pulsante Scansione.
Auf die Schaltfläche Scannen klicken.
Haga clic en el botón Explorar.
Clique no botão Digitalizar.
EN
FR
IT
DE
ES
PT
Click the Scan button.

1716
www.xerox.com/office/6128MFPsupport
Scanning
Scanning
OK
OK
USB
Start
PC
Mac
Scan
Service
Computer (Network)...
Server (FTP)...
Computer (USB)...
File Format
TIFF
JPEG
PDF
BMP
File Format
TIFF
JPEG
PDF
BMP
x2
OK
6.1
6.2
OK
Phaser
®
6128MFP
Software and Documentation
EN
FR
IT
DE
ES
PT
Scanning to a Computer
Numérisation vers un ordinateur
Scansione su un computer
Scanausgabe: PC
Exploración a una estación de trabajo
Digitalização para um computador
1
2 3
4
6
5
Sélectionnez les paramètres souhaités dans le Gestionnaire de numérisation express (application).
Selezionare le impostazioni in Gestione scansioni espresse (applicazione).
Einstellungen in Express-Scanmanager (Anwendung) vornehmen.
Seleccione las opciones en el Administrador de exploración Express (aplicación)
Selecione as configurações do Gerenciador de Digitalização Expressa (aplicativo).
EN
FR
IT
DE
ES
PT
Select settings in the Express Scan Manager (application).
Appuyez sur le bouton Numériser.
Premere il pulsante Scansione.
Taste Scannen drücken.
Pulse el botón Exploración.
Pressione o botão Digitalizar.
EN
FR
IT
DE
ES
PT
Press the Scan button.
Faites défiler la liste et sélectionnez Ordinateur (USB)...
Scorrere per selezionare Computer (USB)...
Computer (USB) auswählen.
Desplácese para seleccionar PC (USB)...
Role para selecionar Computador (USB)...
EN
FR
IT
DE
ES
PT
Scroll to select Computer (USB)...
Appuyez deux fois pour afficher les options de format
du fichier.
Premere due volte per visualizzare le opzioni di
formato file.
Die Pfeil-Nach-Rechts-Taste zum Einblenden der
auswählbaren Dateiformate zweimal drücken.
Pulse dos veces para mostrar las opciones de formato
de archivo.
Pressione duas vezes para exibir as opções de
formato.
EN
FR
IT
DE
ES
PT
Press twice to display the file format
options.
Faites défiler la liste pour sélectionner le format du fichier.
Scorrere per selezionare il formato file.
Dateiformat auswählen.
Desplácese para seleccionar el formato de archivo.
Role para selecionar o formato de arquivo.
EN
FR
IT
DE
ES
PT
Scroll to select the file format.
Appuyez sur OK, puis sur Démarrer.
Premere OK, quindi Avvio.
Taste OK und anschließend die Taste Start drücken.
Pulse Aceptar, y luego Iniciar.
Pressione OK e depois Iniciar.
EN
FR
IT
DE
ES
PT
Press OK, and then Start.
Consultez la section Numérisation du Guide
d'utilisation pour de plus amples informations.
Per ulteriori informazioni, vedere la sezione
Scansione nella Guida dell'utente.
Weitere Informationen sind dem Kapitel Scannen
des Benutzerhandbuchs zu entnehmen.
Consulte Exploración en la Guía del usuario para
obtener más información.
Consulte Digitalização no Guia do Usuário para
obter informações adicionais.
EN
FR
IT
DE
ES
PT
See Scanning in
the User Guide for more information.

1918
www.xerox.com/office/6128MFPsupport
Scanning
Scanning
Ethernet
Start
Scan
Service
Computer (Network)...
Server (FTP)...
Computer (USB)...
Service
Computer (Network)...
Server (FTP)...
Computer (USB)...
[ ] Detail, [Enter]: Save
01 MyComputer
02 Jack Computer
03 Lab Computer
[ ] Detail, [Enter]: Save
05 ftp.mycolor.com
09 ftp.maxserver
Ready to Scan: 01 MyComputer
Scan to: 01 MyComput...
File Format... MultipageTIFF
Resolution... 150 x 150
Ready to Scan: 05 ftp,mycolor.com
Scan to: 05 ftp.mycolo...
File Format... MultipageTIFF
Resolution... 150 x 150
Ready to Scan: 01 MyComputer
Scan to: MyComput...
File Format... MultipageTIFF
Resolution... 150 x 150
Ready to Scan: 05 ftp,mycolor
Scan to: 05 ftp.mycol...
File Format... MultipageTIFF
Resolution... 150 x 150
OK
OK
OK OK
Phaser
®
6128MFP
Software and Documentation
EN
FR
IT
DE
ES
PT
Scanning to a Computer or FTP server
Numérisation vers un ordinateur ou un serveur FTP
Scansione su un computer o server FTP
Scanausgabe: PC/FTP-Server
Exploración a una estación de trabajo o servidor FTP
Digitalização para um computador ou servidor FTP
1
3
4
6
5
2
Consultez la section Numérisation du Guide
d'utilisation pour de plus amples informations.
Per ulteriori informazioni, vedere la sezione
Scansione nella Guida dell'utente.
Weitere Informationen sind dem Kapitel Scannen
des Benutzerhandbuchs zu entnehmen.
Consulte Exploración en la Guía del usuario para
obtener más información.
Consulte Digitalização no Guia do Usuário para
obter informações adicionais.
EN
FR
IT
DE
ES
PT
See Scanning in
the User Guide for more information.
Appuyez sur le bouton Numériser.
Premere il pulsante Scansione.
Taste Scannen drücken.
Pulse el botón Explorar.
Pressione o botão Digitalizar.
EN
FR
IT
DE
ES
PT
Press the Scan button.
Faites défiler pour sélectionner d'autres paramètres.
Scorrere per selezionare altre impostazioni.
Mit den Pfeiltasten weitere Einstellungen vornehmen.
Desplácese para seleccionar otras opciones.
Role para selecionar outras configurações.
EN
FR
IT
DE
ES
PT
Scroll to select other settings.
Appuyez sur le bouton Démarrer.
Premere il pulsante Avvio.
Taste Start drücken.
Pulse el botón Iniciar.
Pressione o botão Iniciar.
EN
FR
IT
DE
ES
PT
Press the Start button.
Appuyez une fois pour afficher le menu Adresse.
Premere una volta per visualizzare il menu degli indirizzi.
Pfeil-Nach-Rechts-Taste zum Einblenden des
Adressmenüs einmal drücken.
Pulse una vez para mostrar el menú de direcciones.
Pressione uma vez para exibir o menu de endereços.
EN
FR
IT
DE
ES
PT
Press once to display the address menu.
Faites défiler la liste pour sélectionner une adresse,
puis appuyez sur OK.
Scorrere per selezionare un indirizzo, quindi premere il
pulsante OK.
Eine Adresse auswählen und die Taste OK drücken.
Desplácese para seleccionar una dirección y luego
pulse el botón Aceptar.
Role para selecionar um endereço e então pressione o
botão OK.
EN
FR
IT
DE
ES
PT
Scroll to select an address, and then
press the OK button.
Faites défiler la liste et sélectionnez Ordinateur
(Réseau)... ou Serveur (FTP)...
Scorrere per selezionare Computer (Network)...
oppure Server (FTP)...
Comp. (Netzwerk) bzw. Server (FTP) auswählen.
Desplácese para seleccionar PC (red)... o Servidor
(FTP)...
Role para selecionar Computador (Rede)... ou
Servidor (FTP)...
EN
FR
IT
DE
ES
PT
Scroll to select
Computer (Network)...
or Server (FTP)...

2120
www.xerox.com/office/6128MFPsupport
Scanning
Scanning
Ethernet
ABC
GHI
PQRS
-_~
TUV WXYZ
JKL MNO
@:./ DEF
1 2 3
4
5 6
7
8
0
#
9
Start
Enter Recipient
Email to... xybusiness@xyz
From Setting....
File Format... MultiPage TIFF
E-mail
Enter Recipient
Email to...
From Setting...
File Format... MultiPageTIFF
Recipient
Keypad...
Address Book...
Email Group...
Enter Email, [OK]: Save
xybusiness@xy_
3.1
3.2
OK
OK
OK
Phaser
®
6128MFP
Software and Documentation
EN
FR
IT
DE
ES
PT
Scanning to Email
Numérisation vers un courrier électronique
Scansione su e-mail
Scanausgabe: E-Mail
Exploración a correo electrónico
Digitalização para e-mail
Consultez la section Numérisation du Guide
d'utilisation pour de plus amples informations.
Per ulteriori informazioni, vedere la sezione
Scansione nella Guida dell'utente.
Weitere Informationen sind dem Kapitel Scannen
des Benutzerhandbuchs zu entnehmen.
Consulte Exploración en la Guía del usuario para
obtener más información.
Consulte Digitalização no Guia do Usuário para
obter informações adicionais.
EN
FR
IT
DE
ES
PT
See Scanning in
the User Guide for more information.
1
3
4
5
2
Appuyez sur le bouton Courriel.
Premere il pulsante E-mail.
Taste E-Mail drücken.
Pulse el botón Correo electrónico.
Pressione o botão E-mail.
EN
FR
IT
DE
ES
PT
Press the E-mail button.
Faites défiler pour sélectionner d'autres paramètres.
Scorrere per selezionare altre impostazioni.
Mit den Pfeiltasten weitere Einstellungen vornehmen.
Desplácese para seleccionar otras opciones.
Role para selecionar outras configurações.
EN
FR
IT
DE
ES
PT
Scroll to select other settings.
Appuyez sur le bouton Démarrer.
Premere il pulsante Avvio.
Taste Start drücken.
Pulse el botón Iniciar.
Pressione o botão Iniciar.
EN
FR
IT
DE
ES
PT
Press the Start button.
Faites défiler la liste et sélectionnez Courriel vers...,
puis appuyez sur le bouton OK.
Scorrere per selezionare Invia e-mail a..., quindi
premere il pulsante OK.
Mit den Pfeiltasten E-Mail senden an auswählen und
die Taste OK drücken.
Desplácese para seleccionar Enviar correo
electrónico a..., y luego pulse el botón Aceptar.
Role para selecionar E-mail para..., e pressione o
botão OK.
EN
FR
IT
DE
ES
PT
Scroll to select Email to..., and then
press the OK button.
Faites défiler la liste et sélectionnez le type d'adresse,
puis appuyez sur le bouton OK.
Scorrere per selezionare un tipo di indirizzo, quindi
premere il pulsante OK.
Mit den Pfeiltasten den Adresstyp auswählen und die
Taste OK drücken.
Desplácese para seleccionar un tipo de dirección y
luego pulse el botón Aceptar.
Role para selecionar um tipo de endereço e pressione
o botão OK.
EN
FR
IT
DE
ES
PT
Scroll to select an address type, and
then press the OK button.
Entrez une adresse électronique si nécessaire, puis
appuyez sur le bouton OK.
Se richiesto, immettere un indirizzo e-mail, quindi
premere il pulsante OK.
Gegebenenfalls eine E-Mail-Adresse eingeben und
dann die Taste OK drücken.
Si es preciso, introduzca una dirección de correo
electrónico y luego pulse el botón Aceptar.
Digite um endereço de e-mail, se necessário, e
pressione o botão OK.
EN
FR
IT
DE
ES
PT
Enter an Email address if required,
and then press the OK button.

2322
www.xerox.com/office/6128MFPsupport
Faxing
Faxing
65 – 120 g/m
2
(17 – 32 lb. Bond)
H
W
W: 148 – 216 mm (4.1 – 8.5 in.)
H: 210 – 355.6 mm (8.3 – 14 in.)
Phaser
®
6128MFP
Software and Documentation
You can enter fax numbers manually or
store them in an address book. To set up
faxing, see Installation and Setup in
the User Guide.
You can send a fax directly from a
computer. See Faxing in the User Guide.
Vous pouvez entrer les numéros de télécopie
manuellement ou les mémoriser dans un carnet
d'adresses. Pour configurer la fonction de télécopie,
consultez la section Installation et configuration du
Guide d'utilisation. Vous pouvez envoyer une
télécopie directement à partir d'un ordinateur.
Consultez la section Télécopie du Guide
d'utilisation.
I numeri di fax possono essere inseriti manualmente
o memorizzati in una rubrica. Per impostare la
funzione di invio fax, vedere la sezione Installazione
e configurazione nella Guida dell'utente. È
possibile inviare un fax direttamente dal proprio
computer. Vedere la sezione Invio di fax nella Guida
dell'utente.
Puede introducir los números de fax manualmente o
guardarlos en la libreta de direcciones. Para
configurar el envío de faxes, consulte Instalación y
configuración en la Guía del usuario. Puede enviar
faxes directamente desde la estación de trabajo.
Consulte Envío de faxes en la Guía del usuario.
Você pode inserir números de fax manualmente ou
armazená-los em um catálogo de endereços. Para
configurar o envio de fax, consulte Instalação e
Configuração no Guia do Usuário. Você pode enviar
fax diretamente de um computador. Consulte Envio
de fax no Guia do Usuário.
Faxnummern können manuell eingegeben oder in
einem Adressbuch gespeichert werden. Weitere
Informationen sind dem Kapitel Installation und
Einrichtung des Benutzerhandbuchs zu entnehmen.
Faxmitteilungen können direkt vom Computer aus
gesendet werden. Weitere Hinweise sind dem Kapitel
Fax des Benutzerhandbuchs zu entnehmen.
EN
FR
IT
DE
ES
PT
Faxing
Télécopie
Invio di fax
Faxversand
Envío de fax
Envio de fax
EN
FR
IT
DE
ES
PT
Loading the Original
Chargement de l'original
Caricamento dell'originale
Original einlegen.
Colocación del original
Colocação do original
ES
PT
FR
IT
DE
La page est en cours de chargement...
La page est en cours de chargement...
La page est en cours de chargement...

www.xerox.com/office/6128MFPsupport
www.xerox.com/msds (U.S./Canada)
www.xerox.com/environment_europe
www.xerox.com/office/businessresourcecenter
www.xerox.com/office/6128MFPsupport
www.xerox.com/msds (U.S./Canada)
www.xerox.com/environment_europe
www.xerox.com/office/businessresourcecenter
www.xerox.com/office/6128MFPsupport
'UXFNHUWUHLEHUXQG'LHQVWSURJUDPPH
6FKQHOOVWDUWOHKUJlQJH
%HQXW]HUKDQGEFKHUXQG$QOHLWXQJHQ
2QOLQH6XSSRUW$VVLVWHQW
6LFKHUKHLWVKLQZHLVH(im %HQXW]HUKDQGEXFK)
9RUODJHQ7LSSVXQG/HKUJlQJH
0RGHORVGLFDVHWXWRULDLV
0RGHOOLVXJJHULPHQWLHGHVHUFLWD]LRQL
VRORLQOLQJXDLQJOHVH
3LORWHVGLPSULPDQWHHWXWLOLWDLUHV
'LGDFWLFLHOVGHGpPDUUDJHUDSLGH
0DQXHOVGXWLOLVDWLRQHWLQVWUXFWLRQV
$VVLVWDQWGHVXSSRUWHQOLJQH
6SpFL¿FDWLRQVGHVpFXULWp(dans le Guide
GXWLOLVDWLRQ)
0RGqOHVFRQVHLOVHWGLGDFWLFLHOV
'ULYHUHXWLOLWjGLVWDPSD
(VHUFLWD]LRQLLQWURGXWWLYH
0DQXDOLGHOOXWHQWHHLVWUX]LRQL
6XSSRUWRLQOLQHD
6SHFL¿FKHGLVLFXUH]]D(nella *XLGDGHOOXWHQWH)
&RQWURODGRUHV\XWLOLGDGHVGHODLPSUHVRUD
7XWRULDOHVGHLQLFLRUiSLGR
0DQXDOHVGHXVXDULRHLQVWUXFFLRQHV
$VLVWHQWHGH$\XGDHQOtQHD
(VSHFL¿FDFLRQHVGHVHJXULGDG(en la *XtDGHO
XVXDULR)
3ODQWLOODVFRQVHMRV\OHFFLRQHVSUiFWLFDV
'ULYHUVHXWLOLWiULRVGDLPSUHVVRUD
7XWRULDLVGHLQtFLRUiSLGR
0DQXDLVGRXVXiULRHLQVWUXo}HV
$VVLVWHQWHGHVXSRUWHRQOLQH
(VSHFL¿FDo}HVGHVHJXUDQoD(no *XLDGR8VXiULR)
3ULQWHUGULYHUVDQGXWLOLWLHV
4XLFN6WDUW7XWRULDOV
8VHUPDQXDOVDQGLQVWUXFWLRQV
2QOLQH6XSSRUW$VVLVWDQW
6DIHW\VSHFL¿FDWLRQVLQ8VHU*XLGH
0DWHULDO6DIHW\'DWD6KHHWV
7HPSODWHVWLSVDQGWXWRULDOV
(1
FR
,7
'(
(6
37
More Information
Informations supplémentaires
Ulteriori informazioni
Weitere Informationen
Más información
Mais informações
FR
(1
,7
'(
(6
37
FR
,7
'(
(6
37
(1
(1
6LFKHUKHLWVGDWHQEOlWWHU
)ROKDVGHGDGRVGHVHJXUDQoDGRPDWHULDO
6FKHGHVXOODVLFXUH]]DGHLPDWHULDOL
)LFKHVGHVpFXULWpGXPDWpULHO
,QIRUPHVGHVHJXULGDGGHPDWHULDOHV
FR
,7
'(
(6
37
-
 1
1
-
 2
2
-
 3
3
-
 4
4
-
 5
5
-
 6
6
-
 7
7
-
 8
8
-
 9
9
-
 10
10
-
 11
11
-
 12
12
-
 13
13
-
 14
14
-
 15
15
-
 16
16


Xerox 6128MFP Mode d'emploi
- Catégorie
- Imprimantes laser / LED
- Taper
- Mode d'emploi
- Ce manuel convient également à
dans d''autres langues
- italiano: Xerox 6128MFP Guida utente
- English: Xerox 6128MFP User guide
- español: Xerox 6128MFP Guía del usuario
- Deutsch: Xerox 6128MFP Benutzerhandbuch
Documents connexes
-
Xerox 6280 Le manuel du propriétaire
-
Xerox 6140 Mode d'emploi
-
Xerox WorkCentre 6505 Le manuel du propriétaire
-
Xerox WorkCentre 6015 Le manuel du propriétaire
-
Xerox 6027 Le manuel du propriétaire
-
Xerox PHASER 6115MFP Le manuel du propriétaire
-
-
Xerox WORKCENTRE 3615 Le manuel du propriétaire
-
Xerox 6605 Le manuel du propriétaire
-
Xerox 4265 Le manuel du propriétaire