Cafe CDE06RP2NS1 Le manuel du propriétaire

Catégorie
Frigos
Taper
Le manuel du propriétaire

Ce manuel convient également à

Owners Manual
Pub No. 49-1000129 Rev. 2 08-19 GEA
Write the model and serial numbers here:
Model # _______________________________
Serial # _______________________________
Find these numbers on a label on the outer,
left-hand side of the upper drawer.
Undercounter Dual-Drawer Refrigerator
CDE06RP****
Contents
Safety Information ...............................3
Using the Refrigerator
Features ......................................6
Controls ......................................7
Crisper .......................................8
Adjustable Divider ..............................8
Lights ........................................8
Care And Cleaning ..............................9
Vacation and Moving ............................9
Installation Instructions
Location Requirements .........................10
Dimensions ..................................11
Prepare Dual-Drawer Refrigerator for Installation .....11
Installing the Refrigerator ........................12
Complete Installation ...........................13
Reinstalling and Reuse .........................13
Troubleshooting Tips ...........................14
Limited Warranty ...............................15
Consumer Support .............................16
Owner's Manual and Installation Instructions
ENGLISH/FRANÇAIS/ESPAÑOL
TM
2 49-1000129 Rev. 2
THANK YOU FOR MAKING CAFÉ A PART OF YOUR HOME.
We take pride in the craftsmanship, innovation and design that goes into every Café product, and
we think you will too. Among other things, registration of your appliance ensures that we can deliver
important product information and warranty details when you need them.
Register your Café appliance now online. Helpful websites are available in the Consumer Support
section of this Owner’s Manual. You may also mail in the pre-printed registration card included in the
packing material.
TM
49-1000129 Rev. 2 3
CAUTION
To reduce the risk of injury when using your refrigerator, follow these basic safety precautions.
Ŷ .HHSILQJHUVRXWRIWKH³SLQFKSRLQW´DUHDVFOHDUDQFHVEHWZHHQWKHGRRUVDQGEHWZHHQWKHGRRUVDQGFDELQHW
are necessarily small. Be careful closing doors when children are in the area.
SAFETY INFORMATION
READ AND SAVE THESE INSTRUCTIONS
IMPORTANT SAFETY INFORMATION
READ ALL INSTRUCTIONS BEFORE USING THE APPLIANCE
WARNING
To reduce the risk of fire, explosion, electric shock, or injury when using your refrigerator, follow
these basic safety precautions:
Ŷ 7KLVUHIULJHUDWRUPXVWEHSURSHUO\LQVWDOOHG
and located in accordance with the Installation
Instructions before it is used.
Ŷ 8QSOXJWKHUHIULJHUDWRUEHIRUHPDNLQJUHSDLUV
replacing a light bulb, or cleaning.
NOTE: Power to the refrigerator cannot be
disconnected by any setting on the control panel.
NOTE: Repairs must be performed by a qualified
Service Professional.
Ŷ 5HSODFHDOOSDUWVDQGSDQHOVEHIRUHRSHUDWLQJ
Ŷ 'RQRWXVHDQH[WHQVLRQFRUG
Ŷ .HHSIODPPDEOHPDWHULDOVDQGYDSRUVDZD\IURPWKH
refrigerator.
Ŷ 'RQRWVWRUHH[SORVLYHVXEVWDQFHVVXFKDVDHURVRO
cans with a flammable propellant in this appliance.
Ŷ 7RSUHYHQWVXIIRFDWLRQDQGHQWUDSPHQWKD]DUGVWR
children, remove the doors from any refrigerator
before disposing of it or discontinuing its use.
Ŷ 7RDYRLGVHULRXVLQMXU\RUGHDWKFKLOGUHQVKRXOGQRW
stand on, or play in or with the appliance.
Ŷ &KLOGUHQDQGSHUVRQVZLWKUHGXFHGSK\VLFDOVHQVRU\
or mental capabilities or lack of experience and
knowledge can use this appliance only if they are
supervised or have been given instructions on safe
XVHDQGXQGHUVWDQGWKHKD]DUGVLQYROYHG
Ŷ 7KLVDSSOLDQFHLVLQWHQGHGWREHXVHGLQKRXVHKROG
and similar applications such as: staff kitchen areas
LQVKRSVRIILFHVDQGRWKHUZRUNLQJHQYLURQPHQWV
IDUPKRXVHVE\FOLHQWVLQKRWHOVPRWHOVEHG
EUHDNIDVWDQGRWKHUUHVLGHQWLDOHQYLURQPHQWV
catering and similar non-retail applications.
Ŷ 'RQRWDSSO\KDUVKFOHDQHUVWRWKHUHIULJHUDWRU
Certain cleaners will damage plastic which may
cause parts such as the door or door handles to
detach unexpectedly. See the Care and Cleaning
section for detailed instructions.
WARNING
Fire or Explosion Hazard
.HHSIODPPDEOHPDWHULDOVDQGYDSRUVDZD\IURPDSSOLDQFH)DLOXUHWRGRVRFDQUHVXOWLQILUHH[SORVLRQRU
death.
WARNING
To reduce the risk associated with choking, do not allow children under 3 years of age to have
access to small parts during the installation of this product.
WARNING
EXCESS WEIGHT HAZARD
8VHWZRRUPRUHSHRSOHWRPRYHDQGLQVWDOOGXDOGUDZHUUHIULJHUDWRU
Failure to do so can result in back or other injury.
WARNING
TIP OVER HAZARD
These appliances are top heavy, especially with any doors open, and must be secured to prevent tipping forward
which could result in death or serious injury. Read and follow the entire installation instructions for securing the
appliance with the anti-tip system.
4 49-1000129 Rev. 2
SAFETY INFORMATION
IMPORTANT SAFETY INFORMATION
READ ALL INSTRUCTIONS BEFORE USING THE APPLIANCE
READ AND SAVE THESE INSTRUCTIONS
Do not, under any circumstances, cut or remove the third (ground) prong from the power cord. For
personal safety, this appliance must be properly grounded.
The power cord of this appliance is equipped with a
3-prong (grounding) plug which mates with a standard
SURQJJURXQGLQJZDOORXWOHWWRPLQLPL]HWKH
SRVVLELOLW\RIHOHFWULFVKRFNKD]DUGIURPWKLVDSSOLDQFH
Have the wall outlet and circuit checked by a qualified
electrician to make sure the outlet is properly
grounded.
Where a standard 2-prong wall outlet is encountered, it
is your personal responsibility and obligation to have it
replaced with a properly grounded 3-prong wall outlet.
Do not use an adapter.
The refrigerator should always be plugged into its own
individual electrical outlet which has a voltage rating
that matches the rating plate.
$9ROW$&+]RUDPSIXVHGJURXQGHG
electrical supply is required. This provides the best
performance and also prevents overloading house
ZLULQJFLUFXLWVZKLFKFRXOGFDXVHDILUHKD]DUGIURP
overheated wires.
Never unplug your refrigerator by pulling on the power
cord. Always grip plug firmly and pull straight out from
the outlet.
Immediately discontinue use of a damaged supply
cord. If the supply cord is damaged, it must be
replaced by a qualified service professional with an
DXWKRUL]HGVHUYLFHSDUWIURPWKHPDQXIDFWXUHU
When moving the refrigerator away from the wall, be
careful not to roll over or damage the power cord.
CONNECTING ELECTRICITY
WARNING
ELECTRICAL SHOCK HAZARD
Plug into a grounded 3-prong outlet
Do not remove the ground prong
Do not use an adapter
Do not use an extension cord.
Failure to follow these instructions can result in death, fire, or electrical shock.
PROPER DISPOSAL OF YOUR OLD REFRIGERATOR
WARNING
SUFFOCATION AND ENTRAPMENT HAZARD
Failure to follow these disposal instructions can result in death or serious injury
IMPORTANT: Child entrapment and suffocation
are not problems of the past. Junked or abandoned
refrigerators are still dangerous even if they will sit
IRU³MXVWDIHZGD\V´,I\RXDUHJHWWLQJULGRI\RXUROG
refrigerator, please follow the instructions below to help
prevent accidents.
Before You Throw Away Your Old Appliance
Ŷ7DNHRIIWKHGRRUV
Ŷ Leave the drawers in place so that children may not
easily climb inside.
Refrigerant and Foam Disposal:
Dispose of appliance in accordance with Federal and Local Regulations. Flammable refrigerant and insulation
material used requires special disposal procedures. Contact your local authorities for the environmentally safe
disposal of your appliance.
WARNING
CUT HAZARD
Cabinet edges along stamp/cut-out areas may be sharp. Avoid placing hands, fingers or other appendages near
these areas.
Failure to do so can result in cuts.
49-1000129 Rev. 2 5
IMPORTANT SAFETY INFORMATION
READ ALL INSTRUCTIONS BEFORE USING THE APPLIANCE
SAFETY INFORMATION
READ AND SAVE THESE INSTRUCTIONS
WARNING
FIRE OR EXPLOSION HAZARD Flammable Refrigerant
This appliance contains isobutane refrigerant, also known as R600a, a natural gas with high environmental
compatibility. However, it is also combustible. Adhere to the warnings below to reduce the risk of injury or
property damage.
1.
When handling, installing and operating the appliance,
care should be taken to avoid damage to the refrigerant
tubing.
2. 6HUYLFHVKDOORQO\EHSHUIRUPHGE\DXWKRUL]HGVHUYLFH
SHUVRQQHO8VHRQO\PDQXIDFWXUHUDXWKRUL]HGVHUYLFH
parts.
3. Dispose of refrigerator in accordance with Federal
and Local Regulations. Flammable refrigerant and
insulation material used require special disposal
procedures. Contact your local authorities for the
environmentally safe disposal of your refrigerator.
4. .HHSYHQWLODWLRQRSHQLQJVLQWKHDSSOLDQFH
enclosures or in the built-in structure clear of
obstruction.
5. To remove frost, scrape with a plastic or wood
spatula or scraper. Do not use an ice pick, metal,
or sharp-edged instrument as it may puncture the
IUHH]HUOLQHUDQGWKHQWKHIODPPDEOHUHIULJHUDQW
tubing behind it.
6. Do not use electrical appliances inside the food
storage compartment of the appliance.
7.
Do not use any electrical device in defrosting your
IUHH]HU
6 49-1000129 Rev. 2
Using the Refrigerator
Hole Cover
Crisper
8SSHU'UDZHU'LYLGHU
Control Panel
Handle
Lower Drawer Divider
Leveling Legs
Accessory Package (Anti-tip
brackets and screws)
The dual-drawer refrigerator is designed to hold up to 88.2 lbs (40 kg) total or 44.1 lbs (20 kg) per drawer. The
XSSHUGUDZHUZLOOKROGLWHPVWKDWDUHXSWR´FPLQKHLJKW7KHORZHUGUDZHULVGLYLGHGE\DVWHS,WHPVZLWK
DKHLJKWJUHDWHUWKDQ´FPFDQEHVWRUHGLQWKHVHFWLRQZLWKRXWWKHVWHS
FEATURES
USING THE REFRIGERATOR: Features
49-1000129 Rev. 2 7
USING THE REFRIGERATOR: Controls
Temperature Setting
The temperature range of the dual-drawer refrigerator is
34°F to 45°F (1.1°C to 7.2°C).
If you want to change temperature, press Set Temp for 3
seconds. The control will beep, and the temperature will
flash in control panel. Adjust the temperature using the +
and - buttons. When the desired temperature appears in
the display, press Set Temp to confirm. The control will
beep, and the temperature will no longer flash.
°C and °F Conversion
Press and hold °C/°F for 3 seconds. The Temperature
display will change from degrees Fahrenheit to degrees
Celsius. The control will beep once.
Press and hold °C/°F for 3 seconds. The Temperature
display will change from degrees Celsius to degrees
Fahrenheit. The control will beep once.
Turn On/Off Cooling
Press and hold Power for 3 seconds to turn off cooling.
This does not disconnect power to the dual-drawer
refrigerator.
To turn off the dual-drawer for an extended period
of time:
Turn off dual drawer, and unplug from outlet.
Remove food, and clean dual-drawer.
Leave drawers ajar to prevent odors.
Sabbath Mode
This feature is available for the observance of certain
religious holidays. In Sabbath mode, the dual-drawer
refrigerator continues to operate (compressor, magnetic
valve, fan, heater strip), but all lights, including the
display panel and the LEDs, will be off whether or not the
door is open.
Press and hold the + and - buttons at the same time for
3 seconds. The control will beep once, and the display
panel will flash 5 times and then stop, to indicate that the
dual-drawer has entered Sabbath mode.
Press and hold the + and - buttons at the same time for
3 seconds to turn off the Sabbath Mode feature. The
display panel flashes 5 times, to indicate the exit from
Sabbath mode.
Door Ajar Alarm
If a drawer is ajar for more than 3 minutes, the control
panel will beep. If you want to stop the alarm without
closing the drawer, press Set Temp.
CONTROLS
Using the Refrigerator
7HPSHUDWXUH8S
LED Screen
Temperature Down
Set Temperature
°C/°F Conversion
Power Switch
8 49-1000129 Rev. 2
Using the Refrigerator
CRISPER
The crisper is a convenient location to store fresh
vegetables.
A crisper with cover is located in the upper drawer.
The crisper is removable when not in use.
ADJUSTABLE DIVIDER
There is a divider in each drawer. For flexibility in food
storage, you can adjust or remove the dividers.
Adjust the Divider in the Upper
Compartment:
The upper drawer is separated by dividers fastened to
the bin cradle. The two dividers can be adjusted from
either left to right, or back to front, as shown.
For ease in cleaning the drawer, you can remove the
GLYLGHUV6HH³3UHSDUH'XDO'UDZHU5HIULJHUDWRU´
Adjust the divider in lower compartment:
For storage flexibility, the divider in the lower drawer can
be inserted between any of the ridges in the front and
back walls of the drawer.
LIGHTS
IMPORTANT: Your dual-drawer refrigerator is equipped
with LED lighting. These lights are designed to last for
the life of your dual-drawer refrigerator. However, if the
lights stop operating, contact a qualified technician for
replacement.
An LED is located at the top of both the upper and
lower drawers. The LED lights are controlled by drawer
openings and closings. When a drawer is open, the LED
is on. When the drawer is closed the LED is off.
IMPORTANT: There are magnets attached to the interior,
left-hand side of the upper drawer, and to the bottom of
lower drawer door. Do not remove the magnets because
they are required for proper functioning of the light
system.
USING THE REFRIGERATOR: Crispers/Adjustable Divider/Lights
49-1000129 Rev. 2 9
CARE AND CLEANING
CLEANING
The dual-drawer refrigerator defrosts automatically. The
water on back wall drains into the water tank and is
evaporated by the condenser.
IMPORTANT: Do not use harsh chemicals, ammonia,
chlorine bleach, concentrated detergent, solvents,
abrasives or metal scouring pads to clean your product
inside or out. They can damage and/or discolor the
finish.
WARNING
ELECTRICAL SHOCK
HAZARD
Unplug your appliance or disconnect power
before cleaning.
Failure to do so can result in death, electric shock
or personal injury.
General
8QSOXJRUGLVFRQQHFWSRZHU
2. Wash interior surfaces, accessories, and outer frame
with a solution of warm water mixed with 3 - 4
tablespoons of baking soda.
NOTE: Before using cleaning products, always read and
follow manufacturer’s instructions and warnings to avoid
personal injury or product damage.
3. Rinse with clean, warm water.
4. Dry thoroughly with a soft cloth.
5. Plug in or reconnect power.
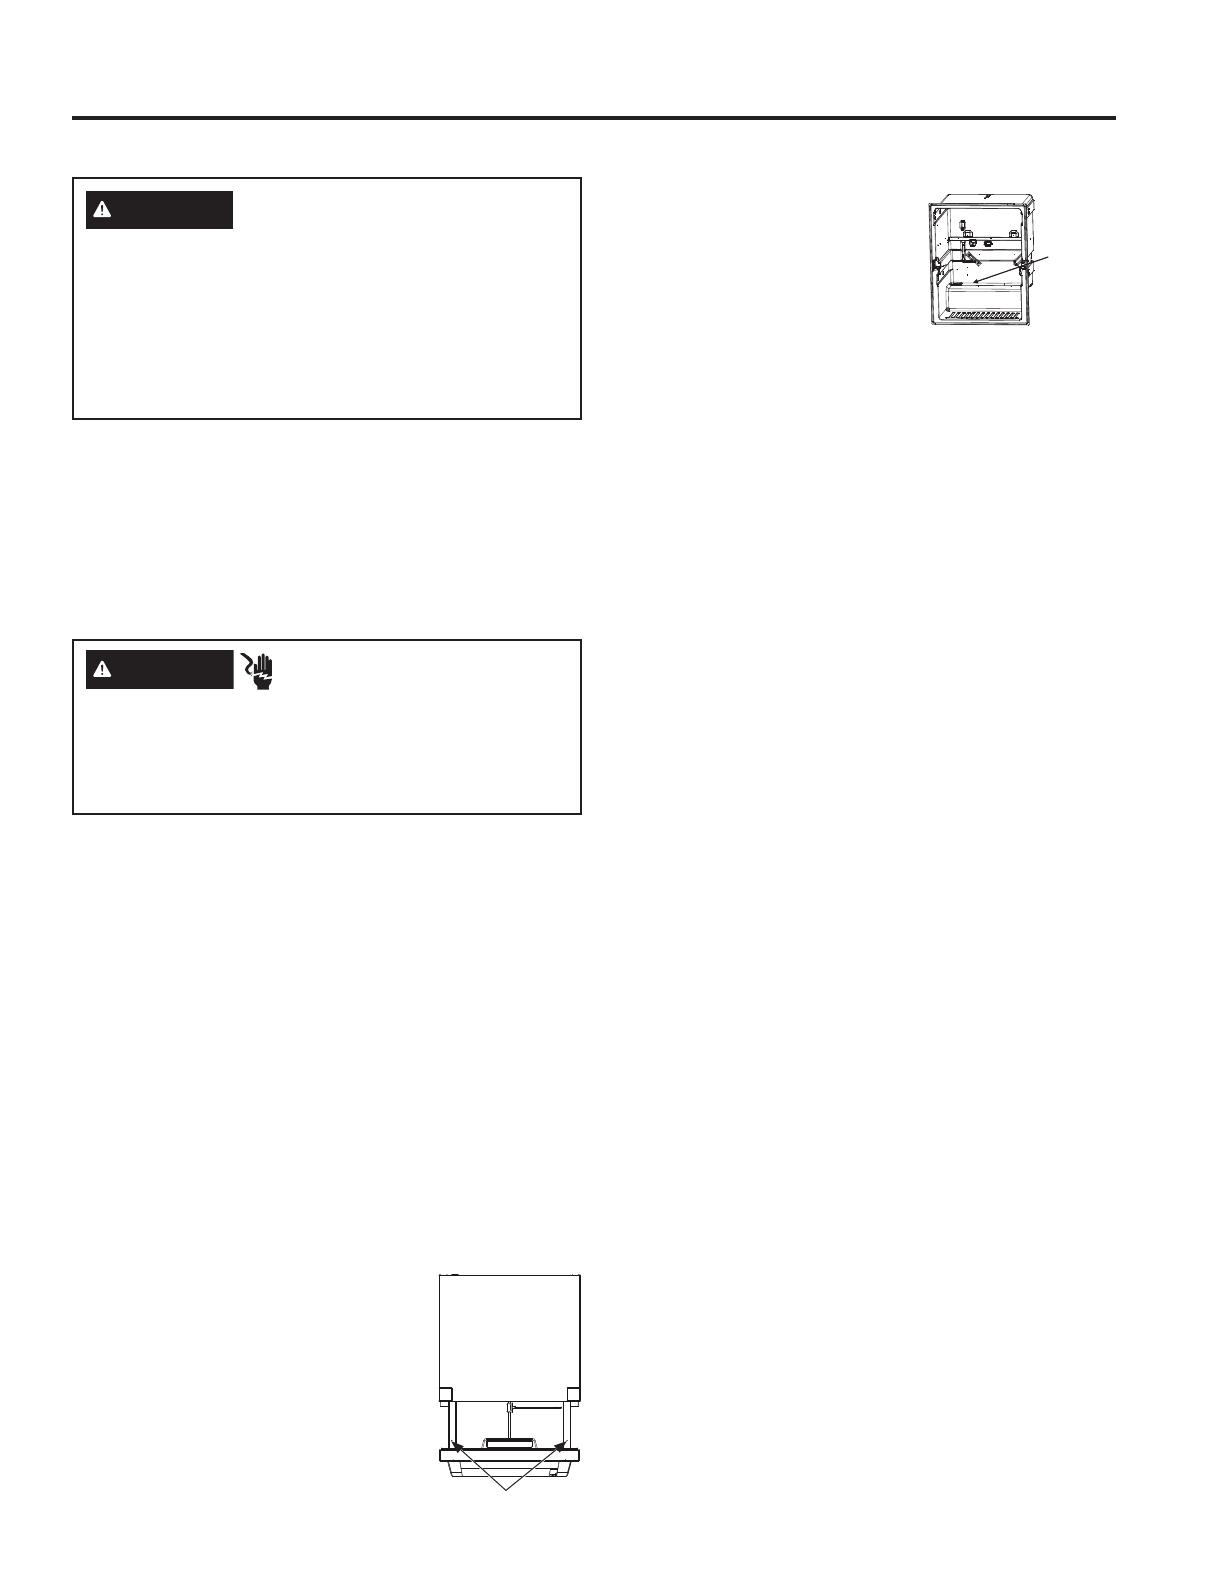
6. Clean the drain hole using a small, soft material such
as a cotton swab. To access the drain hole, you must
first remove the lower drawer.
To remove the lower drawer:
1. Slide out the lower drawer completely.
8VLQJDVFUHZGULYHUUHPRYHWKH
screws fastening the lower drawer to
the drawer glides.
3. Remove the lower drawer.
4. Clean the drain hole illustrated
below with a soft material such
as cotton swab, then install the
lower drawer according to the
reverse procedure as above.
Door Gaskets
Gaskets must be kept clean and pliable to ensure a
proper seal.
Ŷ&OHDQGRRUJDVNHWVHYHU\PRQWKVZLWKVROXWLRQRI
baking soda and warm water.
Ŷ3HWUROHXPMHOO\DSSOLHGOLJKWO\WRWKHKLQJHVLGHJDVNHW
will keep the gasket pliable and ensure a good seal.
VACATION AND MOVING
Vacation
If you will be away for an extended period of time and do
not want to leave the appliance on while you are gone,
prepare it for your absence.
1. Remove all items.
2. Press and hold POWER on the control panel for 3
seconds to turn off cooling.
8QSOXJRUGLVFRQQHFWSRZHU
&OHDQWKHLQWHULRU6HH³&OHDQLQJ´
&OHDQOLGGRRUJDVNHWV6HH³&OHDQLQJ´
6. Prop drawers open, so air can circulate inside.
Moving
If you are moving your dual-drawer refrigerator to a new
home, prepare the appliance for the move.
IMPORTANT:
Ŷ+DQGOHZLWKFDUHZKHQPRYLQJWRDYRLGHLWKHU
damaging the refrigerant tubing or increasing the risk
of a leak.
Ŷ:KHQPRYLQJWKHUHIULJHUDWRUQHYHUWLOWLWPRUHWKDQ
a 45° angle. This could damage the compressor and
the sealed system.
1. Complete vacation preparation steps 1 through 5. See
³9DFDWLRQ´
2. Take out all removable parts, wrap them well, and
tape them together so they don’t shift and rattle during
the move.
3. Tape the drawers closed and tape the power cord to
the back of the refrigerator.
Care and Cleaning
Location
of drain
hole
Location of screws
WARNING
Risk of fire or explosion.
Flammable refrigerant used.
To remove frost, scrape with a plastic or wood
spatula or scraper. Do not use an ice pick or a metal
or sharp-edged instrument as it may puncture the
IUHH]HUOLQHUDQGWKHQWKHIODPPDEOHUHIULJHUDQWWXELQJ
behind it.
Do not use any electrical device to defrost your
IUHH]HU
10 49-1000129 Rev. 2
TOOLS NEEDED
Phillips Screwdriver
Measuring Tape
Carpenter’s Level
PARTS SUPPLIED
Anti-tip Brackets
Screws
1/8Ǝ Allen Wrench
BEFORE YOU BEGIN
Read these instructions completely and carefully.
IMPORTANT Observe all governing codes
and ordinances. Save these instructions for local
inspector’s use.
Note to Installer Be sure to leave these
instructions with the Consumer.
Note to Consumer .HHSWKHVHLQVWUXFWLRQVIRU
future reference.
Skill level Installation of this appliance requires
basic mechanical skills.
Completion time Refrigerator Installation
can vary
Proper installation is the responsibility of the
installer.
Product failure due to improper installation is not
covered under the Warranty.
LOCATION REQUIREMENTS
IMPORTANT: This dual-drawer refrigerator is
designed for built-in use only. Before use, this
dual-drawer refrigerator must be installed properly.
NOTE: Allow the dual drawer to sit upright on its
base for at least one hour before installation.
Do not install the dual-drawer refrigerator where
the temperature will go below 55°F (13°C) because
it will not run often enough to maintain proper
temperatures.
Do not install the dual-drawer refrigerator where the
temperature will go above 110°F (43°C) because it
will not perform properly.
Install it on a floor strong enough to support it fully
loaded.
Do not install the dual-drawer refrigerator in a
location exposed to water (rain, etc.) or direct
sunlight.
Installation
Instructions
Dual-Drawer Refrigerator
Questions? Visit our Website at: cafeappliances.com
In Canada, visit cafeappliances.ca
IMPORTANT: Handle with care when moving dual-
drawer refrigerator to avoid either damaging the
refrigerant tubing or increasing the risk of a leak.
IMPORTANT: When moving the dual-drawer refrigerator,
never tilt it more than a 45° angle. This could damage the
compressor and the sealed system. If the dual-drawer
UHIULJHUDWRUKDVEHHQSODFHGLQDKRUL]RQWDOSRVLWLRQIRU
any period of time, wait one hour before plugging in the
refrigerator to allow the refrigerant to settle.
WARNING
EXCESS WEIGHT HAZARD
Use two or more people to move and install dual-
drawer refrigerator.
Failure to do so can result in back or other injury.
WARNING
CUT HAZARD
Cabinet edges along stamp/cut-out areas may
be sharp. Avoid placing hands, fingers or other
appendages near these areas.
Failure to do so can result in cuts.
INSTALLATION INSTRUCTIONS
49-1000129 Rev. 2 11
INSTALLATION INSTRUCTIONS
DUAL-DRAWER REFRIGERATOR DIMENSIONS
Installation Instructions
REMOVE PACKAGING
NOTE: The drawer handles are included in the
packaging which covers the top of the unit. A wrench
for the handle installation is included in the accessory
bag located in the upper drawer.
Remove tape and glue residue from surfaces before
turning on the dual-drawer refrigerator. Rub a small
amount of liquid dish soap over the adhesive with
your fingers. Wipe with warm water and dry.
NOTE: Do not use sharp instruments, rubbing
alcohol, flammable fluids, or abrasive cleaners to
remove tape or glue. These products can damage
the surface of your dual-drawer refrigerator. For
PRUHLQIRUPDWLRQVHH³'XDO'UDZHU5HIULJHUDWRU
6DIHW\´
Dispose of/recycle all packaging materials.
CLEAN BEFORE USING
After you remove all of the packaging materials,
clean the inside of the dual-drawer refrigerator before
XVLQJLW6HHWKHFOHDQLQJLQVWUXFWLRQVLQ³'XDO'UDZHU
5HIULJHUDWRU&DUH´
PREPARE DUAL-DRAWER
REFRIGERATOR FOR INSTALLATION
1. Pull open the upper drawer. Remove the crisper
bins and set aside.
8VLQJWZRKDQGVOLIWXSRQWKHPHWDOGUDZHUGLYLGHU
rod to remove it from the slots in the front and rear
of the drawer.
3. Once the drawer divider rod is out of the slots,
turn the rod so that it is at an angle to the front of
the drawer. Lift the rod slowly out of the drawer to
avoid bumping into the control panel, and then set
aside the divider assembly.
4. Close the upper drawer to avoid damage during
installation.
Ǝ
(60.6 cm)
Ǝ
(87 cm)
Ǝ
(60.3 cm)
Ǝ
(107.4 cm)
12 49-1000129 Rev. 2
Installation Instructions
INSTALLING THE REFRIGERATOR
Remove all protective film from the drawer fronts
before installing handles.
METHOD 1 - INSTALL TO COUNTERTOP
Attach the Anti-Tip Brackets
1. Pry hole covers from the top of the refrigerator
cabinet to reveal the holes used to install the
anti-tip brackets.
2. Open the upper drawer and leave it open to install
the anti-tip brackets.
3. Remove the anti-tip brackets and screws from the
accessory bag.
4. With the screws provided, fasten the anti-tip
brackets to both sides of the top of the cabinet.
Level the dual-drawer refrigerator
Adjustment of the leveling legs under the dual-drawer
may be necessary for a proper fit in the cabinet
opening.
1. Adjust the height of the rear of the dual-drawer
by raising or lowering the rear leveling legs, and
then begin to slide the dual-drawer into the under
counter opening.
2. Adjust the front of the dual-drawer, by raising or
lowering the leveling legs, until it fits under the
countertop, with enough space to install the anti-tip
bracket to the underside of the countertop.
3. Raise the front leveling legs until the anti-tip bracket
is flush with the underside of the countertop.
8VLQJDVFUHZSURYLGHGLQVWDOOGXDOGUDZHU
refrigerator to countertop.
HANDLE INSTALLATION
1. Remove the handle allen wrench from the
accessory bag located in the upper drawer.
2. Remove the handles from the top piece of the
packaging material. The handle with the badge
goes on the upper drawer, and the handle without a
badge goes on the lower drawer.
3. Loosen the set screw using the allen wrench.
Place the handle caps over the fasteners of the
door. Take care to support the handle so it doesn’t
fall and scratch the appliance finish. Make sure
both handle caps are resting on the face of the
door.
4. Lock one end of the handle into position by
tightening the set screw in the handle cap with the
allen wrench provided. DO NOT over-tighten.
.HHSVXSSRUWLQJWKHKDQGOHDV\RXORFNWKHRWKHU
end of the handle into position by tightening the set
screw in the handle cap. DO NOT over-tighten.
Repeat these instructions for the second handle.
WARNING
TIP OVER HAZARD
These appliances are top heavy, especially with
any doors open, and must be secured to prevent
tipping forward which could result in death
or serious injury. Read and follow the entire
installation instructions for securing the appliance
with the anti-tip system.
Anti-Tip
Bracket
Screw
LOOSEN
set screw
set screw
fastener
handle cap
set screw
set screw
INSTALLATION INSTRUCTIONS
49-1000129 Rev. 2 13
INSTALLATION INSTRUCTIONS
Installation Instructions
COMPLETE INSTALLATION
Ŷ3OXJLQWRDJURXQGHGSURQJRXWOHW
REINSTALLING/USING
DUAL-DRAWER REFRIGERATOR
AGAIN
IMPORTANT: If the dual-drawer refrigerator has been
SODFHGLQDKRUL]RQWDORUWLOWHGSRVLWLRQIRUDQ\SHULRGRI
time, wait one hour before plugging in the dual-drawer
refrigerator to allow the refrigerant to settle.
1. Clean dual-drawer refrigerator. See Cleaning.
2. Place refrigerator in desired location and level. See
Location Requirements.
3. Plug into a grounded 3 prong outlet.
INSTALLING THE REFRIGERATOR (Cont.)
WARNING
ELECTRICAL SHOCK
HAZARD
Plug into a grounded 3 prong outlet.
Do not remove the ground prong from the
power cord plug.
Do not use an adapter.
Do not use an extension cord.
Failure to do so can result in death, fire or
electrical shock.
WARNING
ELECTRICAL SHOCK
HAZARD
Plug into a grounded 3 prong outlet.
Do not remove the ground prong from the
power cord plug.
Do not use an adapter.
Do not use an extension cord.
Failure to do so can result in death, fire or
electrical shock.
METHOD 2 - INSTALL TO ADJACENT
CABINETS
Attach the Anti-Tip Brackets
1. Pry hole covers from the top of the refrigerator
cabinet to reveal the holes used to install the
anti-tip brackets.
2. Open the upper drawer and leave it open to install
the anti-tip brackets.
3. Remove the anti-tip brackets and screws from the
accessory bag.
4. With the screws provided, fasten an anti-tip bracket
to each side of the top of the cabinet.
Level the dual-drawer refrigerator
Adjustment of the leveling legs under the dual-drawer
refrigerator may be necessary for a proper fit in the
cabinet opening.
1. Adjust the height of the rear of the dual-drawer
by raising or lowering the rear leveling legs, and
then begin to slide the dual-drawer into the under
counter opening.
2. Adjust the front of the dual-drawer, by raising or
lowering the leveling legs, until it fits under the
countertop.
3. Install dual-drawer refrigerator to cabinets.
Right Side
Left Side
14 49-1000129 Rev. 2
Problem Possible Causes What to Do
Dual-drawer refrigerator
does not run
Dual-drawer Refrigerator is
unplugged.
Plug power cord into power source.
Breaker is tripped or turned off/Fuse
is blown.
Reset/Turn on breaker or replace fuse.
Dual-drawer refrigerator
compressor runs frequently
or for long periods of time
Normal when first plugged in Allow 24 hours for the dual-drawer refrigerator to
cool completely
Warm or large amounts of food added This is normal
Door is left ajar Ensure that door is not being held open by an item
Hot weather or frequent openings This is normal to maintain constant temperature
during hot and humid days
Gasket is not sealing properly Clean the gasket
Dual-drawer refrigerator has
an odor
Food is not sealed or packaged
properly
Reseal packaging. Place an opened box of
baking soda in the dual-drawer refrigerator,
replace every 3 months
Interior needs to be cleaned &OHDQWKHLQWHULRU6HH³&OHDQLQJ´
Food stored too long Dispose of spoiled food.
Light does not come on Dual-drawer refrigerator is unplugged. Plug into power source.
LED light is burned out. Contact a qualified technician to replace the
burned out LED.
Drawers do not close
properly
Dual-drawer refrigerator is not level 6HH³/HYHOLQJ´
Something is obstructing door closure Check for and remove obstructions eg. bottles,
food, spills, etc.
Vibration or rattling Dual-drawer refrigerator is not resting
firmly on floor
6HH³/HYHOLQJ´
Normal Sounds It sounds like water is flowing from
the dual-drawer refrigerator
Refrigerant flowing in the lines will make this
sound when the compressor starts and stops.
The dual-drawer refrigerator has an automatic
defrosting system. The defrosted water will make
this sound.
Humming or buzzing sounds The compressor and fans can make this sound. If
the dual-drawer refrigerator is not level, the sound
will be louder.
Cracking or clicking sounds The interior parts will make this sound as they
contract and expand in response to temperature
changes.
TEMPERATURE AND MOISTURE
Dual-drawer refrigerator is
too warm
Temperature control is not set low
enough
$GMXVWWKHWHPSHUDWXUHWRDFROGHUVHWWLQJDOORZ
24 hours for the temperature to adjust
Doors opened frequently or left open .HHSGRRUFORVHG&KHFNWKDWDSDFNDJHLVQRW
preventing door from closing
Warm food added recently Allow time for food and dual-drawer refrigerator
to cool
Gasket is not sealing properly. Clean the gasket
Dual-drawer refrigerator is
too cold
Temperature control is set too low Adjust temperature in the compartment to the
QH[WZDUPHUVHWWLQJDOORZKRXUVWRDGMXVW
Moisture on exterior/
interior of the dual-drawer
refrigerator
High humidity This is normal. Dry surface and adjust
temperature to slightly colder setting
Doors opened frequently or left open .HHSGRRUFORVHG&KHFNWKDWDSDFNDJHLVQRW
preventing door from closing
Gasket is not sealing properly Clean the gasket
Troubleshooting Tips... Before you schedule service
Save time and money! Review the charts on the following pages first and you may not need to schedule service.
TROUBLESHOOTING TIPS
49-1000129 Rev. 2 15
Ŷ Service trips to your home to teach you how to use
the product.
Ŷ,PSURSHULQVWDOODWLRQGHOLYHU\RUPDLQWHQDQFH
Ŷ)DLOXUHRIWKHSURGXFWLILWLVDEXVHGPLVXVHGRU
used for other than the intended purpose or used
commercially.
Ŷ/RVVRIIRRGGXHWRVSRLODJH
Ŷ5HSODFHPHQWRIKRXVHIXVHVRUUHVHWWLQJRIFLUFXLW
breakers.
Ŷ'DPDJHWRILQLVKVXFKDVVXUIDFHUXVWWDUQLVKRU
small blemishes not reported within 48 hours of
delivery.
Ŷ5HSODFHPHQWRIWKHOLJKWEXOEVLILQFOXGHGRU
water filter cartridge, if included, other than as
noted above.
Ŷ'DPDJHWRWKHSURGXFWFDXVHGE\DFFLGHQWILUH
floods or acts of God.
Ŷ,QFLGHQWDORUFRQVHTXHQWLDOGDPDJHFDXVHGE\
possible defects with this appliance.
Ŷ3URGXFWQRWDFFHVVLEOHWRSURYLGHUHTXLUHGVHUYLFH
What Café Will Not Cover:
For the Period of: Café Will Replace
One Year
From the date of the
original purchase
Any part of the refrigerator which fails due to a defect in materials or workmanship.
During the limited one-year warranty, Café will also provide, free of charge, all labor
and related service to replace the defective part.
Staple your receipt here. Proof of the original purchase
date is needed to obtain service under the warranty.
cafeappliances.com
$OOZDUUDQW\VHUYLFHLVSURYLGHGE\RXU)DFWRU\6HUYLFH&HQWHUVRUDQDXWKRUL]HGVHUYLFHWHFKQLFLDQ7RVFKHGXOHVHUYLFH
online, visit us at cafeappliances.com/service. Please have your serial number and your model number available when
scheduling service. In Canada, visit cafeappliances.ca/service.
LIMITED WARRANTY
Café Refrigerator Limited Warranty
EXCLUSION OF IMPLIED WARRANTIES
Your sole and exclusive remedy is product repair as provided in this Limited Warranty. Any implied warranties,
including the implied warranties of merchantability or fitness for a particular purpose, are limited to one year or the
shortest period allowed by law.
For US Customers: This limited warranty is extended to the original purchaser and any succeeding owner for products
SXUFKDVHGIRUKRPHXVHZLWKLQWKH86$,IWKHSURGXFWLVORFDWHGLQDQDUHDZKHUHVHUYLFHE\D&DIp$XWKRUL]HG6HUYLFHU
LVQRWDYDLODEOH\RXPD\EHUHVSRQVLEOHIRUDWULSFKDUJHRU\RXPD\EHUHTXLUHGWREULQJWKHSURGXFWWRDQ$XWKRUL]HG
Café
Service location for service. In Alaska, the limited warranty excludes the cost of shipping or service calls to your
home.
Some states do not allow the exclusion or limitation of incidental or consequential damages. This limited warranty
gives you specific legal rights, and you may also have other rights which vary from state to state. To know what your
legal rights are, consult your local or state consumer affairs office or your state’s Attorney General.
Warrantor: GE Appliances, a Haier company
Louisville, KY 40225
For Customers in Canada: This limited warranty is extended to the original purchaser and any succeeding owner
for products purchased in Canada for home use within Canada. In-home warrant service will be provided in areas
where it is available and deemed reasonable by Mabe to provide.
Warrantor Canada: MC Commercial, Inc., Burlington, Ontario, L7R 5B6
16 49-1000129 Rev. 2
3ULQWHGLQ8QLWHG6WDWHV
CONSUMER SUPPORT
Consumer Support
Café Website
Have a question or need assistance with your appliance? Try the Café website 24 hours a day, any day of the year! You can also
shop for more great Café products and take advantage of all our on-line support services designed for your convenience. In the
86cafeappliances.com
Register Your Appliance
Register your new appliance on-line at your convenience! Timely product registration will allow for enhanced communication and
prompt service under the terms of your warranty, should the need arise. You may also mail in the pre-printed registration card
LQFOXGHGLQWKHSDFNLQJPDWHULDO,QWKH86cafeappliances.com/register
Schedule Service
Expert Café repair service is only one step away from your door. Get on-line and schedule your service at your convenience any
GD\RIWKH\HDU,QWKH86cafeappliances.com/service
Extended Warranties
Purchase a Café extended warranty and learn about special discounts that are available while your warranty is still in effect. You
can purchase it on-line anytime. Café Service will still be there after your warranty expires.
,QWKH86cafeappliances.com/extended-warranty
Parts and Accessories
Individuals qualified to service their own appliances can have parts or accessories sent directly to their homes
(VISA, MasterCard and Discover cards are accepted). Order on-line today 24 hours every day.
,QWKH86cafeappliances.com/parts
Instructions contained in this manual cover procedures to be performed by any user. Other servicing generally should
be referred to qualified service personnel. Caution must be exercised, since improper servicing may cause unsafe
operation.
Contact Us
If you are not satisfied with the service you receive from Café, contact us on our website with all the details including your phone
number, or write to:
,QWKH86*HQHUDO0DQDJHU&XVWRPHU5HODWLRQV_&DIp$SSOLDQFHV$SSOLDQFH3DUN_/RXLVYLOOH.<
cafeappliances.com/contact
Pub No. 49-1000129 Rev. 2 08-19 GEA
Transcrivez les numéros de modèle et de série ici :
Numéro de modèle : _____________________
Numéro de série : _______________________
Ces numéros se trouvent sur l’étiquette apposée
sur le côté gauche extérieur du tiroir supérieur.
Réfrigérateur encastré à deux tiroirs
CDE06RP***
Contenu
Consignes de sécurité ...........................3
Utilisation du réfrigérateur
Fonctions .....................................6
Commandes ...................................7
Bac à légumes .................................8
Séparateur réglable .............................8
Éclairage .....................................8
Entretien et nettoyage ............................9
Vacances ou le déménagement ...................9
Instructions d’installation
Exigences d’emplacement .......................10
Dimensions ..................................11
Préparer le réfrigérateur à deux tiroirs ..............11
Installation du réfrigérateur ......................12
Fin de l’installation .............................13
Réinstallation et réutilisation .....................13
Conseils de dépannage .........................14
Garantie limitée ................................15
Assistance à la clientèle .........................16
Manuel d’utilisation et d’installation
FRANÇAIS
TM
2 49-1000129 Rev. 2
NOUS VOUS REMERCIONS D’ACCUEILLIR CAFÉ CHEZ VOUS
Nous sommes fiers du savoir-faire, de l’innovation et de l’esthétique qui composent chaque
appareil Café, et nous pensons que vous le serez aussi. Dans cette optique, nous vous rappelons
que l’enregistrement de votre électroménager vous assure la communication de renseignements
importants sur le produit et la garantie lorsque vous en avez besoin.
Enregistrez votre électroménager Café en ligne dès maintenant. Des sites Web utiles figurent dans
la section Soutien au consommateur de ce manuel d’utilisation. Vous pouvez aussi poster la fiche de
garantie pré-imprimée incluse dans l’emballage.
TM
49-1000129 Rev. 2 3
ATTENTION
Pour réduire le risque de blessures lorsque vous utilisez votre réfrigérateurde , veuillez suivre ces
consignes de sécurité.
Ŷ eORLJQH]OHVGRLJWVGHVSDUWLHVGXFRQJpODWHXURO¶RQSHXWIDFLOHPHQWVHSLQFHUOHVHVSDFHVHQWUHOHVSRUWHVHWHQWUHOHV
portes et les placards sont toujours étroits. Soyez prudent lorsque vous fermez les portes en présence d’enfants.
LIRE ET CONSERVER CES INSTRUCTIONS
AVERTISSEMENT
RISQUE DE BASCULEMENT
Ces électroménagers sont lourds du haut, notamment lorsqu’une porte est ouverte, de sorte qu’ils doivent être fixés pour
prévenir un basculement vers l’avant susceptible d’occasionner des blessures graves ou la mort. Lisez et observez la totalité
des instructions d’installation pour connaître la façon de fixer l’électroménager sur le dispositif antibasculement.
INFORMATION DE SÉCURITÉ
INFORMATION DE SÉCURITÉ IMPORTANTES
LISEZ TOUTES LES DIRECTIVES AVANT D'UTILISER L'APPAREIL
AVERTISSEMENT
Pour réduire le risque d’incendie, d’explosion, de choc électrique ou de blessures lorsque vous
utilisez votre réfrigérateurde , veuillez suivre ces consignes de sécurité :
Ŷ &HUpIULJpUDWHXUGRLWrWUHFRUUHFWHPHQWLQVWDOOp
conformément aux Consignes d’Installation avant toute
utilisation.
Ŷ 'pEUDQFKH]OHUpIULJpUDWHXUDYDQWG¶HIIHFWXHUXQH
réparation, de remplacer une ampoule ou de le nettoyer.
Remarque : L’alimentation du réfrigérateur ne peut être
déconnectée par aucune des fonctions sur le panneau de
commande.
Remarque : Les réparations doivent être effectuées par
un professionnel qualifié.
Ŷ 5HPHWWH]WRXWHVOHVSLqFHVHWSDQQHDX[HQSODFHDYDQW
d’utiliser l’appareil.
Ŷ
N’utilisez pas un cordon de rallonge.
Ŷ*DUGH]OHVPDWpULDX[HWYDSHXUVLQIODPPDEOHVORLQGX
réfrigérateur.
Ŷ1¶HQWUHSRVH]SDVGDQVFHWpOHFWURPpQDJHUGHVVXEVWDQFHV
explosives telles que des bombes aérosols qui contiennent
un gaz propulseur.
Ŷ 3RXUpYLWHUOHVULVTXHVG¶DVSK\[LHHWG¶HQIHUPHPHQWSRXU
les enfants. Démontez les portes avant de le mettre au
rebut ou d’interrompre son utilisation.
Ŷ $ILQGHSUpYHQLUOHVDFFLGHQWVJUDYHVRXODPRUWOHV
enfants ne doivent pas se tenir ni jouer dans ou sur
l’électroménager.
Ŷ/HVHQIDQWVHWOHVSHUVRQQHVGRQWOHVFDSDFLWpVVRQW
réduites sur le plan physique, sensoriel ou mental, ou qui
manquent d’expérience ou de connaissances, peuvent
utiliser cet électroménager seulement si elles sont
surveillées ou ont reçues des consignes de sécurité sur
son usage et les risques y sont associés.
Ŷ&HWpOHFWURPpQDJHUHVWFRQoXSRXUXQHXWLOLVDWLRQ
domestique et applications similaires : salle du personnel
dans une usine, un bureau ou d’autres lieux de travail;
maison de ferme; clients dans un hôtel, un motel, un gîte
touristique et d’autres lieux résidentiels; approvisionnement
et applications similaires non reliées au commerce de
détail.
Ŷ 1¶DSSOLTXH]SDVGHQHWWR\DQWVFRUURVLIVVXUOHUpIULJpUDWHXU
Certains nettoyants endommagent le plastique et peuvent
ainsi causer le détachement inopiné de pièces telles que
porte ou poignées de porte. Voyez la section Entretien et
nettoyage pour des instructions détaillées.
AVERTISSEMENT
RISQUE D’INCENDIE OU D’EXPLOSION
Gardez les matières et les vapeurs inflammables à distance de l’électroménager. L’omission de prendre cette précaution peut
entraîner un incendie, une explosion ou la mort.
AVERTISSEMENT
Pour réduire le risque d’étouffement pendant l’installation de ce produit, ne pas laisser les petites
pièces à la portée des enfants âgés de moins de 3 ans.
AVERTISSEMENT
RISQUE DU POIDS EXCESSIF
Utiliser au moins deux personnes pour déplacer et installer le réfrigérateur à deux tiroirs.
Le non-respect de cette instruction peut causer une blessure au dos ou
d’autre blessure.
  • Page 1 1
  • Page 2 2
  • Page 3 3
  • Page 4 4
  • Page 5 5
  • Page 6 6
  • Page 7 7
  • Page 8 8
  • Page 9 9
  • Page 10 10
  • Page 11 11
  • Page 12 12
  • Page 13 13
  • Page 14 14
  • Page 15 15
  • Page 16 16
  • Page 17 17
  • Page 18 18
  • Page 19 19
  • Page 20 20
  • Page 21 21
  • Page 22 22
  • Page 23 23
  • Page 24 24
  • Page 25 25
  • Page 26 26
  • Page 27 27
  • Page 28 28
  • Page 29 29
  • Page 30 30
  • Page 31 31
  • Page 32 32
  • Page 33 33
  • Page 34 34
  • Page 35 35
  • Page 36 36
  • Page 37 37
  • Page 38 38
  • Page 39 39
  • Page 40 40
  • Page 41 41
  • Page 42 42
  • Page 43 43
  • Page 44 44
  • Page 45 45
  • Page 46 46
  • Page 47 47
  • Page 48 48
  • Page 49 49

Cafe CDE06RP2NS1 Le manuel du propriétaire

Catégorie
Frigos
Taper
Le manuel du propriétaire
Ce manuel convient également à