Yamaha S08 Le manuel du propriétaire
- Catégorie
- Pianos numériques
- Taper
- Le manuel du propriétaire
Ce manuel convient également à

1
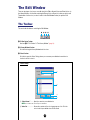
Contents
Introduction. . . . . . . . . . . . . . . . . . . 2
Starting Up . . . . . . . . . . . . . . . . . . . 3
Menu Bar . . . . . . . . . . . . . . . . . . . . 3
The Library Window . . . . . . . . . . . . 6
The Toolbar . . . . . . . . . . . . . . . . . . . 8
The Edit Window . . . . . . . . . . . . . 14
The Toolbar . . . . . . . . . . . . . . . . . . . 14
Normal Voice Edit Window. . . . . . . . 15
Drum Voice Edit Window . . . . . . . . . 21
OMS Settings (Macintosh) . . . . . . . . 23
An Example of Voice Editor in Use
. . 25
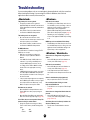
Troubleshooting . . . . . . . . . . . . . . 26
• Click on the red-colored text to jump to the related item in this manual.
• The software and this owner’s manual are exclusive copyrights of Yamaha Corporation.
• Copying of the software or reproduction of this manual in whole or in part by any means is expressly
forbidden without the written consent of the manufacturer.
•Yamaha makes no representations or warranties with regard to the use of the software and
documentation and cannot be held responsible for the results of the use of this manual and the software.
• Copying of the commercially available music sequence data and/or digital audio files is strictly prohibited
except for your personal use.
• OMS
®
and are trademarks of Opcode Systems, Inc.
• The company names and product names in this Owner’s Manual are the trademarks or registered
trademarks of their respective companies.
• The screen displays as illustrated in this Owner’s Manual are for instructional purposes, and may appear
somewhat different from the screens which appear on your computer.
This owner’s manual assumes that you are already familiar with basic Windows/Macintosh operation. If
you are not, please refer to the owner’s manual which came with your Windows/Mac OS software before
using Voice Editor.
For information about hardware requirements, the interconnection of devices and the installation of the
Voice Editor software, refer to the separate “Installation Guide” as well as the Owner’s Manual for the
respective MIDI device.
© 2002 Yamaha Corporation. All rights reserved.

2
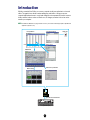
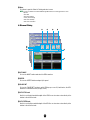
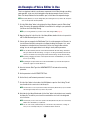
Introduction
With the convenient Voice Editor, you can use a computer to edit your synthesizer's voices and
effects. The graphical user interface makes editing easy and intuitive - letting you use your
computer keyboard and mouse to control and change the various parameters from the onscreen
sliders, switches, buttons, and so on. What's more, all changes you make to the voices can be
saved to your computer.
n Voice Editor for Windows is a plug-in software. To use it, you'll need to install an appropriate compatible host
application (sequencer, etc.).
Transmit / Receive bulk data
Your synthesizer(S08)
Library Window Save the Library file
Import a voice
Edit Window
Voice
Element dialog
Set the effects parameters
MUSIC SYNTHESIZER
EXITENTER
KEYBOARD
–
0
1
2
3
4
56
7
89
PRESET
USER
GM2/XG
DRUM
MUTE
+–
COMMON
INC/YESDEC/NO
DEMO
UTILITYCONTROLLER CARD
EDIT
JOB
STORE
COMPARE
VOICE
MULTI SEQ PLAY
PART/
COMMON
VOICE
MIX
GENERAL
TONE
CONTROLLER
EFFECT
ELEMENT
OSC/MIX
PITCH
FILTER
AMP
LFO
EFFECT
TG
MIDI CHANNEL
MIDI FILTER
SEQ SETUP
MIDI SETUP
EFFECT
CTRL ASSIGN
KEYBOARD
VELOCITY
CTRL SETUP
SAVE
LOAD
RENAME
DELETE
FORMAT
IMPORT
VOLU
M
E
PITC
H
M
ODULATION
PHONES
L/MONO
OUTPUT
R DC IN ON
STANDBY
FOOT
CONTROLLER
FOOT
SWITCH
IN OUT THRU
MIDI
CARD
3.3V
USB
GUITARORGANPIANO
CATEGORY
SEARCH
BASS STRINGS BRASS
REED/PIPE
SYN LEAD
SYN COMP
DRUM/PERC
SE
OTHER
CHROMATIC
PERCUSSION
SYN PAD
UTILITY
CARD
CONTROLLER
CARDUTILITYEDIT
CONTROLLER
PART/ELEMENT/KEY
MODE
DATA
Library file

3
Starting Up
After installing the Voice Editor and making the required connections, follow the instructions below
to start the Voice Editor.
Windows
Start Voice Editor by starting the host application (refer to the Installation Guide) and choosing
“Voice Editor for S08” from the “Plug-in” menu.
n This is an example of the included sequence software. The operation described here differs depending on
your host application.
n In order to use the Voice Editor, you’ll need to install the USB MIDI driver (page 10).
Macintosh
n If you are using Voice Editor on a Macintosh computer, open the “Chooser” from the Apple menu and turn
off “Apple Talk.”
Open the “Voice Editor for S08” folder in the “YAMAHA Tools” folder and double-click the
“VoiceEditorforS08” icon.
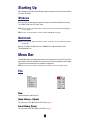
Menu Bar
The Menu Bar holds various editing and setup functions/commands in its menus. Click each of the
menu names to open their pull-down menu, and choose the function/command you wish to apply.
Those functions/commands which are unavailable are grayed out.
n The most commonly-used menus in the Menu Bar are available as buttons in Voice Editor’s toolbar.
File
New
Creates and opens a new Library file.
Open Library... (Open)
This is the same as the “Open” button in the Toolbar (page 8).
Save Library (Save)
This is the same as the “Save” button in the Toolbar (page 9).
Windows Macintosh

4
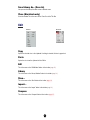
Save Library As... (Save As)
Lets you save the Library file under a new or different name.
Close (Macintosh only)
Close the window. This is the same as the “Close” box in the Title Bar.
Edit
Copy
Copies the selected voice to the clipboard. If nothing is selected, this item is grayed out.
Paste
Copies the voice from the clipboard to Voice Editor.
Edit
This is the same as the “Edit Window” button in the toolbar (page 12).
Library
This is the same as the “Library Window” button in the toolbar (page 14).
Store...
This is the same as the “Store” button in the toolbar (page 14).
Import...
This is the same as the “Import” button in the toolbar (page 13).
Compare
This is the same as the “Compare” button in the toolbar (page 15).
Windows Macintosh

5
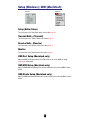
Setup (Windows) / MIDI (Macintosh)
Setup (Editor Setup)
This is the same as the “Editor Setup” button in the toolbar (page 10).
Transmit Bulk... (Transmit)
This is the same as the “Transmit” button in the toolbar (page 11).
Receive Bulk... (Receive)
This is the same as the “Receive” button in the toolbar (page 12).
Monitor
This is the same as the “Monitor” button in the toolbar (page 12).
OMS Port Setup (Macintosh only)
Opens the OMS Port Setup window for Voice Editor. Refer to the section “OMS Port Setup”
(page 24) for further details.
OMS MIDI Setup (Macintosh only)
Opens the OMS MIDI Setup window. Refer to the documentation that came with OMS for further
details.
OMS Studio Setup (Macintosh only)
Opens the OMS Studio Setup window. Refer to the documentation that came with OMS for further
details.
Windows Macintosh

6
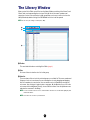
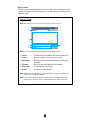
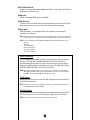
The Library Window
When you start Voice Editor, you will first see the Library Window consisting of the “Normal” and
“Drums” tabs, each representing the voice type. Each tab lists all the names, numbers and
categories of voices in the selected voice type group. When you choose to edit a voice from the
Library Window by double-clicking it, the Edit Window for that voice will be opened.
n You can save your settings as a Library file (*.S6V).
1 Toolbar
This area holds the buttons controlling Voice Editor (page 8).
2 Tabs
Click one of these to view the voice list for that group.
3 Voice list
This area shows all the voices in the selected group as a scrollable list. The name, number and
Category of each voice are shown. You can rearrange the voices by dragging-and-dropping
their voice numbers to a new location. You can rename a voice in Windows by selecting the
voice name, then clicking on it again to enter a new name. On the Macintosh, you click on the
voice name while holding down [Control], choose “Edit Voice Name” from the pull-down menu
and enter the new name in the dialog.
n To select a continuous block of voices, click the number of the first voice, hold down the [Shift] key, then
click the last number.
n Voice names can consist of up to 8 characters.
1
2
3

7
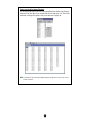
Viewing Just the Voice Names (Windows)
You can view just the names of all voices in the group without their “Number” and “Category”
information. To do this, right-click on any part of the voice list and choose “List.” This may be
useful when choosing voices quickly, since you will have less scrolling to do.
n To switch back to the full Voice Name/Number/Category list, right-click on any part of the voice list
and choose “Details.”

8
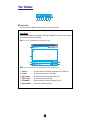
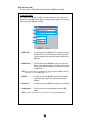
The Toolbar
1 “Open” button
Click this to open the “Open File” dialog and select a Library file to open.
“Open Dialog
Select the desired Library file (extension: .S6V) and click [Open]. The contents of the selected
file are indicated in the Library Window.
n You can also load S03 Library files (with extension: .S3V).
n If you are using a Macintosh, the typical Macintosh “Open” dialog will appear.
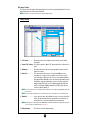
1 “Look in:” .................Click this and choose the folder containing the Voice Editor files.
2 List box .....................Shows the contents of the current folder.
3 [Open] button ...........Click this to open the file selected from the List.
4 “Files of type:” .........Click this and choose the file type.
5 “File name:” ...........Shows the name of the files selected from the List.
6 [Cancel] button.........Click this to cancel the operation.
12 345678
1
2
3
4
5
6

9
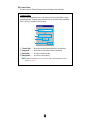
2 “Save” button
Click this to save the existing Library file with your new settings. If you are working on a new file,
this button will open the “Save As” dialog, where you can name and save your settings as a new
Library file (*.S6V).
“Save As…” Dialog
n Library file names can consist of up to 8 characters plus a 3-character extension.
n If you are using a Macintosh, the typical Macintosh “Save As” dialog will appear.
1 “Save in:”..................Click this and choose the folder in which to save the Library file.
2 List box .....................Shows the contents of the folder you wish to save to.
3 [Save] button ............Click this to save the Library file with the name specified in the
“File name:”.
4 “File name:”..............Specify the name of the Library file to be saved here.
5 “Files of type:” .........Click this and choose the file type.
6 “Cancel”....................Click this to cancel the operation.
n S08 Library files can be imported to your synthesizer directly by saving them to the Memory card.
For details, refer to the S08 Owner’s Manual.
n If you save a file to a Macintosh computer, the extension “.S6V” is not added automatically. Before
loading such files to the S08, you’ll need to manually add the extension “.S6V” to the file names.
1
2
4
5
3

10
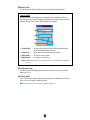
3 “Editor Setup” button
Click this to open the “Editor Setup” dialog and specify the MIDI Out port settings.
“Editor Setup”
Dialog
This is where you set up the Voice Editor to allow the transmission of voice data to your
synthesizer. Click the [OK] button to apply the settings and quit the dialog. Click the [Cancel]
button to quit without applying the settings.
1 “MIDI In Port:” ..........Click this and choose the MIDI In port. This allows you to receive
data from a device connected to this port. Select the port which
has been assigned to your particular synthesizer within the host
application.
2 “MIDI Out Port:” .......Click this and choose the MIDI Out port. You can use the Voice
Editor to control and edit the device connected to this port. Select
the port which has been assigned to your synthesizer within the
host application.
n If you are using a Macintosh, the MIDI Out Port setting is assigned in the OMS Port Setup. For
further details, see section “OMS Settings.” (page 23)
3 “MIDI Ch:”.................Click this and choose the MIDI Out channel. This is used when
monitoring sounds using the on-screen keyboard in the Edit
Windows.
4 “Device No.:”............Click this and choose the MIDI device number of your synthesizer.
5 “Dump Interval:” ......Click this and choose the interval between successive MIDI
dumps.
n If you set too short an interval, you may encounter errors when transmitting MIDI data.
1
2
3
4
5

11
4 “Transmit” button
Click this to open the “Transmit” dialog to transmit all settings to your synthesizer.
“T
ransmit” Dialog
Voice data can be transmitted in bulk to your synthesizer. Click the [Start] button to begin
transmitting the data. The progress bar shows how much of the data has been transmitted.
Finally, click the [Close] button to quit the dialog.
1 “Transmit Type”........Shows the voice data (Normal/Drum/All) to be transmitted.
2 Progress bar.............Shows how much of the data has been transmitted.
3 [Start] button ............Click this to transmit the data.
4 [Close] button...........Click this to close this dialog.
n The MIDI Device Number has to be set correctly in order to transmit bulk data. For further
details, see page 10.
1
2
3
4

12
5“Receive” button
Click this to open the “Receive” dialog to receive all settings from your synthesizer.
“Receive”
Dialog
Voice data can be received in bulk from your synthesizer. Select the bulk voice data you
wish to receive, then click the [Start] button. The progress bar shows how much of the data
has been received. Finally, click the [Close] button to quit the dialog.
1 “Receive Type” .........Click this and choose the Voice data (User Normal/User Drum/
Preset Normal/Preset Drum) to receive.
2 Progress bar.............Shows how much of the data has been received.
3 [Start] button ............Click this to receive the data.
4 [Close] button...........Click this to close this dialog.
n The MIDI Device Number has to be set correctly in order to receive bulk data. For further details,
see page 10.
6 “Edit Window” button
Click this to open the Edit Window (Common) for the selected voice in the list. For further
details, see page 14.
7 “Monitor” button
If you click this, bulk voice data will be sent for monitoring on your synthesizer each time you
select a voice. Click it again to disable monitoring.
n To monitor the voice, you need to play your synthesizer’s keyboard.
1
2
3
4

13
8 “Import” button
Click this to open the “Import” dialog and import voices from an existing Library file. You can
drag-and-drop voices to the Library Window.
n More than one of these dialogs can be opened simultaneously.
“Import” Dialog
1 “File name:”..............Shows the name of the Library file from which you will import
voice data.
2 “Open File” button ...Click this to open the “Open File” dialog and select a Library file to
open.
3 “Memory:” ................Click this and choose the voice type group from which you will
import voice data.
4 Voice list....................This area shows all the voices in the selected Memory as a
scrollable list, in order of voice number. You can select a voice
here and import it directly to the voice list in the Library Window
by drag-and-drop. (Multiple voices can also be imported this way.)
In Windows, you can alternatively copy the voice by selecting it
and pressing [CTRL]+[C] on the computer keyboard, and then
switch to the Library Window and press [CTRL]+[V] at the new
location to paste (import) it.
n To select a block of voices, click the number of the first voice, hold down the [Shift] key, then click
the last voice.
n You cannot import a Drum Voice to a Normal Voice list or a Normal Voice to a Drum Voice list.
5 “Monitor” ..................If you check this box, the bulk data for each voice you select from
the list will be transferred to your synthesizer for monitoring. To
monitor the voice, use the keyboard of your synthesizer.
n Monitoring will not be possible if the MIDI Out port and other parameters in the Editor Setup are
not set correctly. For further details, see page 12.
6 [Close] button...........Click this to close the Import dialog.
1
2
3
4
6
5

14
The Edit Window
There are two types of voices you can edit using Voice Editor: Normal Voices and Drum Voices. In
the Library Window, click the tab containing the Normal Voice or Drum Voice that you wish to edit.
Then double-click the voice (or select it and click the “Edit Window” button) to open the Edit
Window.
The Toolbar
This area holds the buttons controlling the Edit Window.
1 “Editor Setup” button
See item 3 in “The Toolbar” of “The Library Window” (page 14).
2 “Library Window” button
Click this to bring the Library Window back into view.
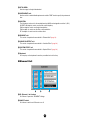
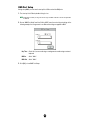
3 “Store” button
Click this to open the “Store” dialog, where you can name your edited voice and select a
location in which to store it.
“Store” Dialog
1 “Voice Name:” ..........Specify a name for your edited voice.
n Voice names can consist of up to 8 characters.
2 Voice list....................Shows the contents of the voice type group as a list. Click the
voice in which your edited voice will be stored.
1 2 3 4
1
2
4
3

15
3 [Store] button ...........Click this to store your edited voice in the location specified
above.
After storing to a Library file, the data for the original voice will be overwritten when you save the
Library file. It is recommended that you back up important data.
The “Store” dialog is used to temporarily store your Library file. After storing, save your Library
file. If you do not save your Library file after storing, your edits will not be saved.
4 [Cancel] button.........Click this to quit the dialog without storing.
4 “Compare” button
If you click this, bulk data for the original voice (prior to editing) will be sent to on your
synthesizer. Click it again to send the bulk data for your edited voice. This button is useful for
making A/B comparisons between the original and edited voices.
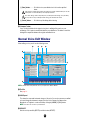
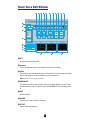
Normal Voice Edit Window
When editing a voice, you will see the following screen:
n For details about each parameter, refer to your synthesizer's Owner’s Manual.
1 Tool Bar
See page 14.
2 VOICE panel
This shows the name and instrument category of the voice. You can also rename your edited
voice and change the instrument category from the “Voice Category” pull-down menu.
Monophonic or Polyphonic can be selected by clicking the [MONO] or [POLY] button.
n Voice names can consist of up to 8 characters.
3 VELOCITY
Sets the velocity sensitivity (DEPTH) and offset value (OFFSET).
3
4
5
6
7
2
1
9
8
)

16
4 PITCH BEND
Sets the range for the pitch bend wheel.
5 PORTAMENTO unit
Use the switch to enable/disable portamento and the “TIME” knob to specify the portamento
time.
6 CONTROL
The followings can be set for the modulation wheel (MW) and assignable controller 1 (AC1).
CUTOFF: the depth of control over the filter cutoff frequency
PM: the depth of control over the pitch modulation
FM: the depth of control over the filter cutoff modulation
EF: the depth of control over the variation effect
7 ELEMENT unit
This section is explained in more detail in “Element Unit” (page 16).
8 VARIATION EFFECT unit
This section is explained in more detail in “Variation Effect” (page 20).
9 SYSTEM EFFECT unit
This section is explained in more detail in “System Effects” (page 20).
) Keyboard
Click any key on the keyboard to monitor your edited voice in that key.
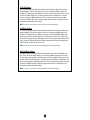
■ Element Unit
1 EL (Element) 1 to 4 buttons
Click these to open their “ELEMENT” dialogs.
2 ON/OFF switch
Click these to switch each Element on or off.
1 32

17
3 Wave
Click these to open the “Wave List” dialog and select a wave.
n For waves in the Wave List numbered 001 through 029 and 521, the following parameters can be
adjusted:
• Note Shift
• Note Limit Low/High
• Velocity Limit Low/High
• Pitch Scale Sensitivity
• Pitch Scale Center Note
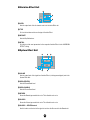
● Element Dialog
1 LFO WAVE
Click on the “WAVE” text box and select the LFO’s waveform.
2 SPEED
Click on the “SPEED” text box and specify its speed.
3 PHASE INIT
Click on the “PHASE INIT” text box to switch LFO key sync on or off. (If switched on, the LFO
waveform is restarted each time you play a note.)
4 LFO PITCH knob
Use this to set the pitch modulation depth of the LFO. You can also enter a value directly in the
text box to the left of the knob.
5 LFO FILTER knob
Use this to set the filter modulation depth of the LFO. You can also enter a value directly in the
text box to the left of the knob.
4
1
2
3
567
8
9

18
6 LFO AMPLITUDE knob
Use this to set the amplitude modulation depth of the LFO. You can also enter a value directly in
the text box to the left of the knob.
7 MIX knobs
Sets the output level (LEVEL) and pan setting (PAN).
8 [DETAIL] button
Click this to open the “EL Detail” dialog and enter the parameters for each Element. You have
wider and more accurate control over the parameters than with the editor graphs.
9 Editor graphs
Within these graphs, click and drag the square marks (handles) to visually adjust the
parameters for each Element.
n Sometimes, not all the square marks are visible as they may be layered on top of each other at the same
position. In which case, click the visible square mark and drag it away to reveal the next square mark.
n For waves in the Wave List numbered 001 through 029 and 521, the following parameters can be
adjusted:
• Note Shift
• Note Limit Low/High
• Velocity Limit Low/High
• Pitch Scale Sensitivity
• Pitch Scale Center Note
OSCILLATOR Settings
Click on the “WAVE” text box and choose the source waveform. One of the square marks is
used to set “VEL LIMIT LOW” and “NOTE LIMIT LOW.” Set the lowest note velocity
response by dragging this square mark vertically. Set the lowest note in the key range by
dragging it horizontally. Similarly, set the highest note velocity (“VEL LIMIT HIGH”) and key
range note (“NOTE LIMIT HIGH”) using the other square mark.
n When dragging the square marks, values are given as (X,Y) co-ordinates, where X is the NOTE
LIMIT (given as a MIDI note number) and Y is the VEL LIMIT. To view the note name instead of the
note number, select the “OSCILLATOR” tab of the “EL Detail” dialog.
FILTER Settings
Drag the square mark vertically to set the Filter Gain. Drag the square mark horizontally to
set the Filter Cutoff frequency.
n Parameter values are shown when dragging the square marks. To set these values directly, select
the “FILTER EG” tab of the “EL Detail” dialog.
PITCH LFO Settings
Click and drag the square marks (handles) to set the time-dependent behavior of the PITCH
LFO. The left square mark controls the “LFO Delay.” The right controls the “LFO Fade.”
n To set these values directly, select the “LFO” tab of the “EL Detail” dialog.

19
PITCH EG Settings
The PITCH EG (Envelope Generator) determines the transition in pitch while the key is
being held down. There are five square marks, each controlling a different stage in the
envelope. The first square mark (furthest to the left) controls the “Initial Level.” The second
controls the “Attack Rate/Level.” The third controls the “Decay 1 Rate/Level.” The fourth
controls the “Decay 2 Rate/Sustain Level.” The last square mark (furthest to the right)
controls the “Release Rate/Level.” Drag the square marks vertically to adjust levels, and
horizontally to adjust the transition times.
n To set these values directly, select the “PITCH” tab of the “EL Detail” dialog.
FILTER EG Settings
The FILTER EG (Envelope Generator) determines the transition in timbre while the key is
being held down. There are five square marks, each controlling a different stage in the
envelope. The first square mark (furthest to the left) controls the “Hold Rate/Initial Level.”
The second controls the “Attack Rate/Level.” The third controls the “Decay 1 Rate/Level.”
The fourth controls the “Decay 2 Rate/Sustain Level.” The last square mark (furthest to the
right) controls the “Release Rate/Level.” Drag the square marks vertically to adjust levels,
and horizontally to adjust the transition rates.
n To set these values directly, select the “FILTER EG” tab of the “EL Detail” dialog.
AMPLITUDE EG Settings
The AMPLITUDE EG (Envelope Generator) determines the transition in amplitude over
time. There are five the square marks, each controlling a different stage in the envelope.
The first square mark (furthest to the left) controls the “Key-on Delay” and “Init Level.” The
second controls the “EG Attack Rate.” The third controls the “EG Decay 1 Rate/Level.” The
fourth controls the “Decay 2 Rate/Sustain Level.” The last square mark (furthest to the right)
controls the “EG Release Rate.” Drag the square marks vertically to adjust levels, and
horizontally to adjust the transition rates.
n To set these values directly, select the “AMP EG” tab of the “EL Detail” dialog.

20
■ Variation Effect Unit
1 LEVEL
Sets the output level of the all elements sent to the Variation Effect unit.
2 TYPE
Click on the text box and choose the type of Variation Effect.
3 DRY/WET
Sets the Dry/Wet balance.
4 DETAIL
Click this to set the exact parameters for the respective Variation Effect via the “VARIATION
EFFECT” dialog.
■ System Effect Unit
1 VOLUME
Sets the output level of the signal from Variation Effect (or the by-passed signal) sent to the
System Effect Unit.
2 SEND (REVERB)
Sets the Reverb Send Level.
3 SEND (CHORUS)
Sets the Chorus Send Level.
4 REVERB
Shows the Reverb type used for the voice. This is fixed for each voice.
5 CHORUS
Shows the Chorus type used for the voice. This is fixed for each voice.
6 CHORUS ➝ REVERB control
Use this knob to set the level of the signal of sent from the Chorus unit to the Reverb unit.
2
4
3
1
2 6
3 5
1
4
La page charge ...
La page charge ...
La page charge ...
La page charge ...
La page charge ...
La page charge ...
-
 1
1
-
 2
2
-
 3
3
-
 4
4
-
 5
5
-
 6
6
-
 7
7
-
 8
8
-
 9
9
-
 10
10
-
 11
11
-
 12
12
-
 13
13
-
 14
14
-
 15
15
-
 16
16
-
 17
17
-
 18
18
-
 19
19
-
 20
20
-
 21
21
-
 22
22
-
 23
23
-
 24
24
-
 25
25
-
 26
26


Yamaha S08 Le manuel du propriétaire
- Catégorie
- Pianos numériques
- Taper
- Le manuel du propriétaire
- Ce manuel convient également à
dans d''autres langues
- italiano: Yamaha S08 Manuale del proprietario
- English: Yamaha S08 Owner's manual
- español: Yamaha S08 El manual del propietario
- Deutsch: Yamaha S08 Bedienungsanleitung
- русский: Yamaha S08 Инструкция по применению
- Nederlands: Yamaha S08 de handleiding
- português: Yamaha S08 Manual do proprietário
- dansk: Yamaha S08 Brugervejledning
- polski: Yamaha S08 Instrukcja obsługi
- čeština: Yamaha S08 Návod k obsluze
- svenska: Yamaha S08 Bruksanvisning
- Türkçe: Yamaha S08 El kitabı
- suomi: Yamaha S08 Omistajan opas
- română: Yamaha S08 Manualul proprietarului
Documents connexes
-
Yamaha CS6X Le manuel du propriétaire
-
Yamaha S90 Le manuel du propriétaire
-
Yamaha MOTIF8 Voice Editor Le manuel du propriétaire
-
-
-
-
Yamaha PLG150-AN Le manuel du propriétaire
-
-
-