Whirlpool WUW55X24HS Mode d'emploi
- Catégorie
- Boissons glacées
- Taper
- Mode d'emploi


222222222222
TABLE OF CONTENTS
WINE CELLAR SAFETY.................................................................3
INSTALLATION REQUIREMENTS................................................4
Tools.............................................................................................4
Location Requirements................................................................4
Opening Dimensions....................................................................4
Electrical Requirements ...............................................................4
INSTALLATION INSTRUCTIONS..................................................5
Unpack the Wine Cellar ...............................................................5
Door Closing.................................................................................5
Wine Cellar Doors ........................................................................6
Base Grille ....................................................................................7
Handle Assembly .........................................................................7
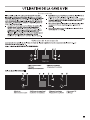
WINE CELLAR USE........................................................................8
Normal Sounds ............................................................................8
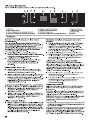
Using the Control .........................................................................8
Wine Racks..................
...............................................................10
Stocking the Wine Cellar............................................................10
Lighting the Wine Cellar .............................................................11
WINE CELLAR CARE ...................................................................11
Cleaning......................................................................................11
Vacation and Moving Care.........................................................12
TROUBLESHOOTING ..................................................................12
ASSISTANCE OR SERVICE.........................................................14
In the U.S.A. ...............................................................................14
In Canada ...................................................................................14
Accessories................................................................................14
WARRANTY ..................................................................................15
ÍNDICE
SEGURIDAD DE LA BODEGA.....................................................16
REQUISITOS DE INSTALACIÓN.................................................17
Herramientas..............................................................................17
Requisitos de ubicación.............................................................17
Medidas de la abertura ..............................................................17
Requisitos eléctricos..................................................................18
INSTRUCCIONES DE INSTALACIÓN.........................................18
Desempaque de la bodega........................................................18
Cierre de la puerta......................................................................18
Puertas de la bodega.................................................................19
Rejilla de la base ........................................................................20
Ensamblaje de la manija ............................................................20
USO DE LA BODEGA...................................................................21
Sonidos normales ......................................................................21
Uso del control
...........................................................................21
Portabotellas ..............................................................................23
Cómo almacenar en la bodega..................................................23
Cómo iluminar la bodega...........................................................24
CUIDADO DE LA BODEGA..........................................................24
Limpieza .....................................................................................24
Cuidado durante las vacaciones y mudanzas...........................25
SOLUCIÓN DE PROBLEMAS......................................................25
AYUDA O SERVICIO TÉCNICO...................................................27
En los EE.UU. .............................................................................27
En Canadá..................................................................................27
Accesorios..................................................................................27
GARANTÍA.....................................................................................28
TABLE DES MATIÈRES
SÉCURITÉ DE LA CAVE À VIN....................................................30
EXIGENCES D’INSTALLATION...................................................31
Outillage .....................................................................................31
Exigences d’emplacement.........................................................31
Dimensions de l’ouverture .........................................................31
Spécifications électriques..........................................................32
INSTRUCTIONS D’INSTALLATION ...........................................32
Déballage de la cave à vin .........................................................32
Fermeture de la porte.................................................................32
Portes de la cave à vin...............................................................33
Grille de la base..........................................................................34
Manette ......................................................................................34
UTILISATION DE LA CAVE À VIN ...............................................35
Sons normaux............................................................................35
Utilisation de la commande........................................................35
Casiers à vin ...............................................................................37
Stockage dans la cave à vi
n ......................................................37
Éclairage de la cave à vin...........................................................38
ENTRETIEN DE LA CAVE À VIN..................................................38
Nettoyage ...................................................................................38
Précautions à prendre pour les vacances et avant un
déménagement ..........................................................................39
DÉPANNAGE.................................................................................39
ASSISTANCE OU SERVICE.........................................................41
Aux États-Unis............................................................................41
Au Canada..................................................................................41
Accessoires................................................................................41
GARANTIE.....................................................................................42

333333333333
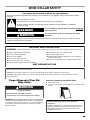
WINE CELLAR SAFETY
Proper Disposal of Your Old
Wine Cellar
IMPORTANT: Child entrapment and suffocation are not problems
of the past. Junked or abandoned wine cellars are still dangerous
– even if they will sit for “just a few days.” If you are getting rid of
your old wine cellar, please follow these instructions to help
prevent accidents.
Before You Throw Away Your Old Wine Cellar:
■ Take off the door.
■ Leave the racks in place so that children may not easily climb
inside.
You can be killed or seriously injured if you don't immediately
You
can be killed or seriously injured if you don't
follow
All safety messages will tell you what the potential hazard is, tell you how to reduce the chance of injury, and tell you what can
happen if the instructions are not followed.
Your safety and the safety of others are very important.
We have provided many important safety messages in this manual and on your appliance. Always read and obey all safety
messages.
This is the safety alert symbol.
This symbol alerts you to potential hazards that can kill or hurt you and others.
All safety messages will follow the safety alert symbol and either the word “DANGER” or “WARNING.”
These words mean:
follow instructions.
instructions.
DANGER
WARNING
IMPORTANT SAFETY INSTRUCTIONS
WARNING:
To reduce the risk of fire, electric shock, or injury when using your wine cellar, follow these basic precautions:
SAVE THESE INSTRUCTIONS
■
Plug into a grounded 3 prong outlet.
■
Do not remove ground prong.
■
Do not use an adapter.
■
Do not use an extension cord.
■
Disconnect power before servicing.
■
Replace all parts and panels before operating.
■
Remove doors from your old wine cellar.
■
Use nonflammable cleaner.
■
Keep flammable materials and vapors, such as gasoline,
away from
wine cellar.
■
Use two or more people to move and install wine cellar.
State of California Proposition 65 Warnings:
WARNING: This product contains one or more chemicals known to the State of California to cause cancer.
WARNING: This product contains one or more chemicals known to the State of California to cause birth defects or other
reproductive harm.
WARNING
Suffocation Hazard
Remove door from your old wine cellar.
Failure to do so can result in death or brain damage.
Important information to know about disposal of
refrigerants:
Dispose of refrigerator in accordance with Federal and Local
regulations. Refrigerants must be evacuated by a licensed,
EPA certified refrigerant technician in accordance with
established procedures.

H
H
H
is
is
H

555555555555
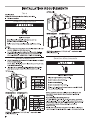
INSTALLATION
INSTRUCTIONS
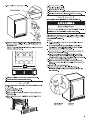
Unpack the Wine Cellar
Remove the Packaging
Remove tape and glue residue from surfaces before turning
on the wine cellar. Rub a small amount of liquid dish soap
over the adhesive with your fingers. Wipe with warm water
and dry.
Do not use sharp instruments, rubbing alcohol, flammable
fluids, or abrasive cleaners to remove tape or glue. These
products can damage the surface of your wine cellar. For
more information, see “Wine Cellar Safety.”
Dispose of/recycle all packaging materials.
Clean Before Using
After you remove all of the packaging materials, clean the inside
of your wine cellar before using it. See the cleaning instructions in
“Wine Cellar Care.”
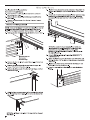
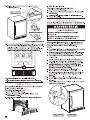
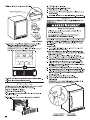
Door Closing
Your wine cellar has four leveling legs. If your wine cellar seems
unsteady or you want the door to close more easily, adjust the
wine cellar’s tilt using the instructions below.
1. Plug into a grounded 3 prong outlet.
2. Move the wine cellar into its final location.
3. Turn the leveling legs to the right to lower the wine cellar or
turn the leveling legs to the left to raise it. It may take several
turns of the leveling legs to adjust the tilt of the wine cellar.
NOTE: Having someone push against the top of the wine
cellar takes some weight off the leveling legs. This makes it
easier to adjust the leveling legs.
4. Open the door and check that
it closes as easily as you like. If
not, tilt the wine cellar slightly more to the rear by turning both
front leveling screws to the left. It may take several more
turns, and you should turn both leveling legs the same
amount.
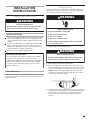
WARNING
Excessive Weight Hazard
Use two or more people to move and install wine cellar.
Failure to do so can result in back or other injury.
When Moving Your Wine Cellar:
Your wine cellar is heavy. When moving the wine cellar for
cleaning or service, be sure to cover the floor with
cardboard or hardboard to avoid floor damage. Always pull
the wine cellar straight out when moving it. Do not wiggle
or “walk” the wine cellar when trying to move it, as floor
damage could occur.
Electrical Shock Hazard
Plug into a grounded 3 prong outlet.
Do not remove ground prong.
Do not use an adapter.
Do not use an extension cord.
Failure to follow these instructions can result in death,
fire, or electrical shock.
WARNING
WARNING
Excessive Weight Hazard
Use two or more people to move and install wine cellar.
Failure to do so can result in back or other injury.

H
H

H
H
H
H

H

H
H
H

101010101010101010101010
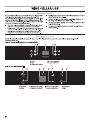
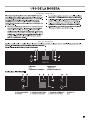
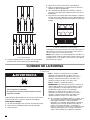
Stocking the Wine Cellar
NOTE: For optimum wine storage, place white wines at the
top
of the wine cellar, light red wines in the center, and red wines at
the bottom.
To Stock the Wine Cellar
1. Start stocking the wine cellar with the bottom display rack.
2. Starting on the left-hand side, place the first bottle in the rack
on its side with the neck of the bottle facing the front of the
wine cellar.
3. Place the next bottle on its side with the neck of the bottle
facing the back of the wine cellar.
4. Alternate in this manner until the display rack is full.
5. Push the rack all the way in before pulling the next one
forward.
6. Pull the next rack forward and repeat steps 2 through 4;
repeat for remaining racks.
Recommended Storing Locations (on some models)
For best storing and serving temperatures for your bottle of wine,
use the wine producer's recommended temperature setting. See
the wine’s label for details. It is recommended to store wine for
short-term (few months) at 55°F (13°C).
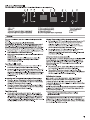
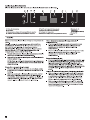
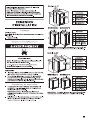
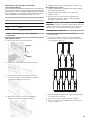
Wine Racks
Remove and Replace the Top and Middle Racks
To Remove Racks:
1. Pull the rack forward until it stops.
WINES COMPARTMENT
White Wine Upper compartment
Lighter Red Wine Lower compartment
Red Wine Lower compartment
1.
Insert the rack into the compartment and slide it toward
the rear of the wine cellar.
Front of rack
2. Lift up one side of the rack and hold onto the rack.
3. Pull the slide rail forward and push the rack toward the
compartment the same time. The bracket support pins
will move forward.
4. Lift the rack up again to clear the shelf brackets
from the bracket support pins.
5. Remove the racks other side and repeat steps 1 through 4.
To Replace Racks:
2.
Align the bracket support pins with the holes in the shelf
brackets.
Pull the rack forward and push the slide rail toward the
compartment at the same time until the bracket support
pins are properly in place.
3.

111111111111111111111111
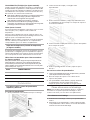
7. To stock the bottom of the wine cellar, place bottles in the
grooves on the bottom of the wine cellar with the necks of
the bottles facing the back of the wine cellar.
Lighting the Wine Cellar
The refrigerator has an interior light that comes on any time the
door is opened. Refer to the “Using the Controls” section for
options on controlling the interior light.
NOTE: The light is an LED which does not need to be replaced. If
the LED does not illuminate when the door is opened, call Service
to replace the light. See “Assistance or Service” for contact
information.
WINE CELLAR CARE
Cleaning
Clean the wine cellar about once a month to avoid buildup of
odors. Wipe up spills immediately.
To Clean Your Wine Cellar:
1. Unplug wine cellar or disconnect power.
2. Remove all racks from inside the wine cellar.
3. Clean the interior.
Style 1 - Models with stainless steel trim
Using a clean sponge or soft cloth and a mild detergent
dissolved in warm water, hand wash and rinse thoroughly the
removable parts and interior surfaces. Dry with a soft cloth.
Style 2 - Models with wooden trim
IMPORTANT: To avoid damaging wooden trim pieces, wipe
the trim with a clean sponge or soft cloth and warm water. Do
not use detergent or immerse the entire rack into water when
cleaning.
Using a clean sponge or soft cloth and a mild detergent
dissolved in warm water, hand wash and rinse thoroughly the
removable parts and interior surfaces. Dry with a soft cloth.
■ Do not use abrasive or harsh cleaners such as window
sprays, scouring cleansers, flammable fluids, cleaning
waxes, concentrated detergents, bleaches or cleansers
containing petroleum products on plastic parts, interior
and door liners or gaskets. Do not use paper towels,
scouring pads, or other harsh cleaning tools. These can
scratch or damage materials.
■ To help remove odors, you can wash interior walls with
a mixture of warm water and baking soda (2 tbs to 1 qt
[26 g to 0.95 L] of water).
WARNING
Explosion Hazard
Use nonflammable cleaner.
Failure to do so can result in death, explosion, or fire.

121212121212121212121212
4. Wash stainless steel and painted metal exteriors with a clean
sponge or soft cloth and a mild detergent in warm water. Do
not use abrasive or harsh cleaners or cleaners containing
chlorine. These can scratch or damage materials. Dry
thoroughly with a soft cloth.
NOTE: To keep your stainless steel wine cellar looking like
new and to remove minor scuffs or marks, it is suggested that
you use the manufacturer’s approved Stainless Steel Cleaner
and Polish. To order the cleaner, see “Accessories.”
IMPORTANT: This cleaner is for stainless steel parts only. Do
not allow the Stainless Steel Cleaner and Polish to come into
contact with any plastic parts such as the trim pieces,
dispenser covers, or door gaskets. If unintentional contact
does occur, clean plastic part with a sponge and mild
detergent in warm water. Dry thoroughly with a soft cloth.
5. Replace the racks.
6. Clean the condenser coils regularly. They are located behind
the base grille. Coils may need to be cleaned as often as
every other month. This may help save energy.
■ Remove the base grille. See “Base Grille.”
■ Use a vacuum cleaner with an extended attachment to
clean the condenser coils when they are dusty or dirty.
■ Replace the base grille.
7. Plug in wine cellar or reconnect power.
Vacation and Moving Care
Vacations
If you choose to turn the wine cellar off before you leave, follow
these steps.
1. Remove all wine bottles from the wine cellar.
2. Unplug the wine cellar.
3. Clean the wine cellar. See “Cleaning.”
4. Tape a rubber or wood block to the top of the door to prop it
open far enough for air to get in. This stops odor and mold
from building up.
Moving
When you are moving your wine cellar to a new home, follow
these steps to prepare it for the move.
1. Remove all wine bottles from the wine cellar.
2. Unplug the wine cellar.
3. Clean, wipe, and dry it thoroughly.
4. Take out all removable parts, wrap them well, and tape them
together so they don’t shift and rattle during the move.
5. Tape the doors shut and tape the power cord to the wine
cellar.
When you get to your new home, put everything back and refer to
the “Installation Instructions” section for preparation instructions.
TROUBLESHOOTING
Try the solutions suggested here first in order to avoid the cost of an unnecessary service call.
Your wine cellar will not operate
■ Is the power supply cord unplugged? Plug into a grounded
3 prong outlet.
■ Has a household fuse blown or has a circuit breaker
tripped? Replace the fuse or reset the circuit.
■ Is the Wine Cellar Control turned to the Off position? See
“Using the Control.”
The lights do not work
■ Is the power supply cord unplugged? Plug into a grounded
3 prong outlet.
■ Your wine cellar is equipped with LED lighting which does not
need to be replaced. If there is power to the wine cellar and
the lights do not illuminate when the door is opened, call for
service or assistance.
The motor seems to run too much
■ Is the temperature outside hotter than normal? Expect
the motor to run longer under warm conditions. At normal
temperatures, expect your motor to run about 40% to 80%
of the time. Under warmer conditions, expect it to run even
more of the time.
■ Is the door opened often? Expect the motor to run longer
when this occurs. In order to conserve energy, try to get
everything you need out of the wine cellar at once, keep wine
bottles positioned label side up so that they are easy to find,
and close the door as soon as the wine is removed.
■ Is the control set correctly for the surrounding
conditions? See “Using the Control.”
■ Is the door closed completely? Push the door firmly shut.
If it will not shut all the way, see “The door will not close
completely” later in this section.
■ Are the condenser coils dirty? This obstructs air transfer
and makes the motor work harder. Clean the condenser coils.
See “Cleaning.”
Electrical Shock Hazard
Plug into a grounded 3 prong outlet.
Do not remove ground prong.
Do not use an adapter.
Do not use an extension cord.
Failure to follow these instructions can result in death,
fire, or electrical shock.
WARNING

131313131313131313131313
Temperature is too warm
■ Is the door opened often? Be aware that the wine cellar will
become warm when this occurs. In order to keep the wine
cellar cool, try to get everything you need out of the wine
cellar at once, keep wine bottles positioned label side up so
that they are easy to find, and close the door as soon as the
wine is removed.
■ Is the control set correctly for the surrounding
conditions? See “Using the Control.”
■ Is the base grille blocked? For best performance, do not
install the wine cellar behind a cabinet door or block the
base grille.
There is interior moisture buildup
■ Is the door opened often? To avoid humidity buildup, try to
get everything you need out of the wine cellar at once, keep
wine bottles positioned label side up so that they are easy to
find, and close the door as soon as the wine is removed.
When the door is opened, humidity from the room air enters
the wine cellar. The more often the door is opened, the faster
humidity builds up, especially when the room itself is very
humid.
■ Is it humid? It is normal for moisture to build up inside the
wine cellar when the air is humid.
■ Is the control set correctly for the surrounding
conditions? See “Using the Control.”
The door is difficult to open
■ Is the gasket dirty or sticky? Clean the gasket and the
surface that it touches. Rub a thin coat of paraffin wax on
the gasket following cleaning.
The door will not close completely
■ Are the racks out of position? Put the racks back into their
correct positions. See “Wine Cellar Use” for more
information.
■ Is the gasket sticking? Clean the gasket and the surface
that it touches. Rub a thin coat of paraffin wax on the gasket
following cleaning.
■ Is the door installed properly? If the door was reversed
improperly, re-installation may be required. See “Reverse
Door Swing.”
WARNING
Explosion Hazard
Use nonflammable cleaner.
Failure to do so can result in death, explosion, or fire.
WARNING
Explosion Hazard
Use nonflammable cleaner.
Failure to do so can result in death, explosion, or fire.

141414141414141414141414
ASSISTANCE OR SERVICE
Before calling for assistance or service
, please check
“Troubleshooting.” It may save you the cost of a service call.
If you still need help, follow the instructions below.
When calling, please know the purchase date and the complete
model and serial numbers of your appliance. This information
will help us to better respond to your request.
If You Need Replacement Parts
If you need to order replacement parts, we recommend that you
only use factory specified replacement parts. Factory specified
replacement parts will fit right and work right because they are
made with the same precision used to build every new Whirlpool
®
appliance.
To locate factory specified replacement pa
rts in your area, call us
or your nearest designated service center.
In the U.S.A.
Call the Whirlpool Customer eXperience Center toll free:
1-800-253-1301.
Our Consultants Provide Assistance With:
Features and specifications on our full line of appliances.
Installation information.
Use and maintenance procedures.
Accessory and repair parts sales.
Specialized customer assistance (Spanish speaking, hearing
impaired, limited vision, etc.).
Referrals to local dealers, repair parts distributors, and
service companies. Whirlpool designated service technicians
are trained to fulfill the product warranty and provide after-
warranty service, anywhere in the United States.
To locate the Whirlpool designated service company in your area,
you can also look in your telephone directory Yellow Pages.
For Further Assistance
If you need further assistance, you can write to Whirlpool with
any questions or concerns at:
Whirlpool Brand Home Appliances
Customer eXperience Center
553 Benson Road
Benton Harbor, MI 49022-2692
Please include a daytime phone number in your correspondence.
In Canada
Call the W
hirlpool Canada Customer eXperience Centre toll
free: 1-800-807-6777 or visit our website at www.whirlpool.ca.
Our Consultants Provide Assistance With:
Scheduling of Service. Whirlpool designated service
technicians are trained to fulfill the product warranty and
provide after-warranty service anywhere in Canada.
Features and specifications on our full line of appliances.
Referrals to local dealers.
Use and maintenance procedures.
Accessory and repair parts sales.
For Further Assistance
If you need further assistance, you can write to Whirlpool Canada
with any questions or concerns at:
Whirlpool Brand Home Appliances
Customer eXperience Centre
200 - 6750 Century Ave.
Mississauga, Ontario L5N 0B7
Please include a daytime phone number in your correspondence.
Accessories
The following accessory is available for your wine cooler. To order
accessory, contact us and ask for the part number.
In the U.S,A., visit our webpage
www.whirlpool.com/accessories
or call
1-800-253-1301
.
In Canada, visit our webpage www.whirlpoolparts.ca or call
1-800-807-6777.
Stainless Steel Cleaner & Polish
Order Part #4396095

515151
6/15
IF YOU NEED SERVICE:
1. Before contacting us to arrange service, please determine whether your product requires repair. Some
questions can be addressed without service. Please take a few minutes to review the Troubleshooting or
Problem Solver section of the Use and Care Guide, scan the QR code on the right to access additional
resources, or visit www.whirlpool.com/product_help.
2. All warranty service is provided exclusively by our authorized Whirlpool Service Providers. In the U.S. and
Canada, direct all requests for warranty service to:
Whirlpool Customer eXperience Center
In the U.S.A., call 1-800-253-1301. In Canada, call 1-800-807-6777.
If outside the 50 United States or Canada, contact your authorized Whirlpool dealer to determine whether another warranty applies.
WHIRLPOOL
®
REFRIGERATION LIMITED
WARRANTY
ATTACH YOUR RECEIPT HERE. PROOF OF PURCHASE IS REQUIRED
TO OBTAIN WARRANTY SERVICE.
Please have the following information available when you call the
Customer eXperience Center:
Name, address and telephone number
Model number and serial number
A clear, detailed description of the problem
Proof of purchase including dealer or retailer name and address
FIVE YEAR LIMITED WARRANTY
WHAT IS COVERED
WHAT IS NOT COVERED
LIMITED WARRANTY
For one year from the date of purchase, when this major
appliance is installed, operated and maintained according to
instructions attached to or furnished with the product, Whirlpool
Corporation or Whirlpool Canada LP (hereafter “Whirlpool”) will
pay for Factory Specified Replacement Parts and repair labor to
correct defects in materials or workmanship that existed when
this major appliance was purchased, or at its sole discretion
replace the product. In the event of product replacement, your
appliance will be warranted for the remaining term of the original
unit’s warranty period.
SECOND THROUGH FIFTH YEAR LIMITED WARRANTY ON
CAVITY LINER AND SEALED REFRIGERATION SYSTEM
In the second through fifth years from the date of purchase,
when this major appliance is installed, operated and maintained
according to the instructions attached to or furnished with
the product, Whirlpool brand will pa
y for factory specified
replacement parts and repair labor for the following components
to correct non-cosmetic defects in materials and workmanship in
this part that prevent function of the refrigerator and that existed
when this major appliance was purchased:
Refrigerator/freezer cavity liner if the part cracks due to
defective materials or workmanship.
Sealed Refrigeration system (includes compressor,
evaporator, condenser, dryer and connecting tubing).
YOUR SOLE AND EXCLUSIVE REMEDY UNDER THIS LIMITED
WARRANTY SHALL BE PRODUCT REPAIR AS PROVIDED
HEREIN. Service must be provided by a Whirlpool designated
service company. This limited warranty is valid only in the United
States or Canada and applies only when the major appliance
is used in the country in which it was purchased. This limited
warranty is effective from the date of original consumer purchase.
Proof of original purchase date is required to obtain service under
this limited warranty.
1. Commercial, non-residential or multiple-family use, or use inconsistent with
published user, operator or installation instructions.
2. In-home instruction on how to use your product.
3. Service to correct improper product maintenance or installation, installation
not in
accordance with electrical or plumbing codes or correction of
household electrical or plumbing (i.e. house wiring, fuses
or water inlet hoses).
4. Consumable parts (i.e. light bulbs, batteries, air or water filters, preservation
solutions, etc.).
5. Defects or damage caused by the use of non-genuine Whirlpool parts
or accessories.
6. Damage from accident, misuse, abuse, fire, floods, acts of God or use with
products not approved by Whirlpool.
7. Repairs to parts or systems to correct product damage or defects caused
by unauthorized service, alteration or modification of the appliance.
8. Cosmetic damage including scratches, dents, chips, and other damage to
the appliance finishes unless such damage results from defects in materials
and workmanship and is reported to Whirlpool within 30 days.
9. Discoloration, rust or oxidation of surfaces resulting from caustic
or co
rrosive
environments including but not limited to high salt concentrations, high
moisture or humidity or exposure to chemicals.
10. Food or medicine loss due to product failure.
11. Pick-up or delivery. This product is intended for in-home repair.
12. Travel or transportation expenses for service in remote locations where an
authorized Whirlpool servicer is not available.
13. Removal or reinstallation of inaccessible appliances or built-in fixtures
(i.e. trim, decorative panels, flooring, cabinetry, islands, countertops, drywall,
etc.) that interfere with servicing, removal or replacement of the product.
14. Service or parts for appliances with original model/serial numbers removed,
altered or not easily determined.
The cost of repair or replacement under these excluded circumstances
shall be borne by the customer.
DISCLAIMER OF IMPLIED WARRANTIES
IMPLIED WARRANTIES, INCLUDING ANY IMPLIED WARRANTY OF MERCHANTABILITY OR IMPLIED WARRANTY OF FITNESS FOR A
PARTICULAR PURPOSE, ARE LIMITED TO ONE YEAR OR THE SHORTEST PERIOD ALLOWED BY LAW. Some states and provinces do not allow
limitations on the duration of implied warranties of merchantability or fitness, so this limitation may not apply to you. This warranty gives you specific
legal rights, and you also may have other rights that vary from state to state or province to province.
DISCLAIMER OF REPRESENTATIONS OUTSIDE OF WARRANTY
Whirlpool makes no representations about the quality, durability, or need for service or repair of this major appliance other than the representations
contained in this warranty. If you want a longer or more comprehensive warranty than the limited warranty that
comes with this major appliance, you
should ask Whirlpool or your retailer about buying an extended warranty.
LIMITATION OF REMEDIES; EXCLUSION OF INCIDENTAL AND CONSEQUENTIAL DAMAGES
YOUR SOLE AND EXCLUSIVE REMEDY UNDER THIS LIMITED WARRANTY SHALL BE PRODUCT REPAIR AS PROVIDED HEREIN. WHIRLPOOL
SHALL NOT BE LIABLE FOR INCIDENTAL OR CONSEQUENTIAL DAMAGES. Some states and provinces do not allow the exclusion or limitation of
incidental or consequential damages, so these limitations and exclusions may not apply to you. This warranty gives you specific legal rights, and you
also may have other rights that vary from state to state or province to province.
www.whirlpool.com/product_help

616161616161616161616161
SEGURIDAD DE LA BODEGA
Cómo deshacerse adecuadamente
de su bodega vieja
IMPORTANTE:
El atrapamiento y asfixia de niños no es un
problema del pasado. Las bodegas tiradas y abandonadas
son un peligro, aún si van a quedar ahí “por unos pocos días”.
Si Ud. está por deshacerse de su bodega vieja, por favor siga las
instrucciones que se dan a continuación para prevenir accidentes.
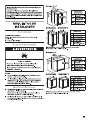
Antes de descartar su vieja bodega:
Saque la puerta.
Deje los portabotellas en su lugar así los niños no pueden
meterse adentro con facilidad.
Si no sigue las instrucciones de inmediato, usted puede
morir o sufrir una lesión grave.
Si no sigue las instrucciones, usted puede morir o sufrir
una lesión grave.
Todos los mensajes de seguridad le dirán el peligro potencial, le dirán cómo reducir las posibilidades de sufrir una lesión y lo que
puede suceder si no se siguen las instrucciones.
Su seguridad y la seguridad de los demás es muy importante.
Hemos incluido muchos mensajes importantes de seguridad en este manual y en su electrodoméstico. Lea y obedezca siempre
todos los mensajes de seguridad.
ADVERTENCIA
PELIGRO
Este es el símbolo de alerta de seguridad.
Este símbolo le llama la atención sobre peligros potenciales que pueden ocasionar la muerte o una lesión a
usted y a los demás.
Todos los mensajes de seguridad irán a continuación del símbolo de advertencia de seguridad y de la palabra
“PELIGRO” o “ADVERTENCIA”. Estas palabras significan:
INSTRUCCIONES IMPORTANTES DE SEGURIDAD
ADVERTENCIA:
Para reducir el riesgo de incendio, choque eléctrico, o lesiones personales al usar su bodega, siga estas
GUARDE ESTAS INSTRUCCIONES
Conecte a un contacto de pared de conexión a tierra de
3 terminales.
No quite la terminal de conexión a tierra.
No use un adaptador.
No use un cable eléctrico de extensión.
Desconecte el suministro de energía antes de darle servicio.
Vuelva a colocar todos los componentes y paneles antes de
hacerlo funcionar.
Remueva las puertas de su bodega vieja.
Use un limpiador no inflamable.
Mantenga los materiales y vapores inflamables, tales como
gasolina, alejados de la bodega.
Use dos o más personas para mover e instalar la bodega.
precauciones básicas:
Advertencias de la Proposición 65 del estado de California:
ADVERTENCIA: Este producto contiene una o más sustancias químicas identificadas por el estado de California como
causantes de cáncer.
ADVERTENCIA: Este producto contiene una o más sustancias químicas identificadas por el estado de California como
causantes de defectos congénitos o algún otro tipo de daños en la función reproductora.
ADVERTENCIA
Peligro de Asfixia
Remueva las puertas de su bodega vieja.
No seguir esta instrucción puede ocasionar la muerte
o daño al cerebro.

is
H
H
H
H

181818181818181818181818
INSTRUCCIONES
DE INSTALACIÓN
Desempaque de la bodega
Cómo quitar los materiales de empaque
Quite los residuos de cinta y goma de las superficies antes
de encender la bodega. Frote un poco de detergente líquido
para vajillas sobre el adhesivo con los dedos. Limpie con
agua tibia y seque.
No use instrumentos filosos, alcohol para fricciones, líquidos
inflamables o productos de limpieza abrasivos para eliminar
los restos de cinta o goma. Estos productos pueden dañar
la superficie de su bodega. Para más información, vea
“Seguridad de la bodega”.
Deshágase de todos los materiales de embalaje o recíclelos.
ADVERTENCIA
Peligro de Peso Excesivo
Use dos o más personas para mover e instalar
la bodega.
No seguir esta instrucción puede ocasionar una
lesión en la espalda u otro tipo de lesiones.
Cuando mueva su bodega:
Su bodega es muy pesada. Cuando mueva la bodega para
limpiarla o darle servicio, cerciórese de cubrir el piso con
cartón o madera para evitar daños en el mismo. Al mover la
bodega, siempre tire directamente hacia afuera. No menee la
bodega de lado a lado ni la haga “caminar” cuando la trate
de mover ya que podría dañar el piso.
Limpieza antes del uso
Una vez que usted haya quitado todos los materiales de
empaque, limpie el interior de su bodega antes de usarla. Vea
las instrucciones de limpieza en “Cuidado de su bodega”.
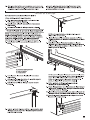
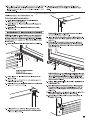
Cierre de la puerta
Su bodega tiene cuatro patas niveladoras. Si su bodega parece
inestable o usted quiere que la puerta se cierre con mayor
facilidad, ajuste la inclinación de la bodega usando las
instrucciones a continuación.
1. Conecte a un contacto de pared de conexión a tierra de
3 terminales.
2. Mueva la bodega hacia su posición final.
ADVERTENCIA
Peligro de Choque Eléctrico
Conecte a un contacto de pared de conexión a tierra de
3 terminales.
No quite la terminal de conexión a tierra.
No use un adaptador.
No use un cable eléctrico de extensión.
No seguir estas instrucciones puede ocasionar
la muerte, incendio o choque eléctrico.
ADVERTENCIA
Peligro de Peso Excesivo
Use dos o más personas para mover e instalar
la bodega.
No seguir esta instrucción puede ocasionar una
lesión en la espalda u otro tipo de lesiones.
Requisitos eléctricos
Antes de mover la bodega a su ubicación final, es importante
asegurarse de que tiene la conexión eléctrica adecuada.
Método de conexión a tierra recomendado
Se requiere una fuente de energía eléctrica de 115 Voltios, 60 Hz.,
CA solamente y con fusibles de 15 ó 20 amperios, debidamente
conectada a tierra. Se recomienda que use un circuito separado sólo
para su bodega. Use un tomacorriente que no se pueda apagar con
un interruptor. No use un cable eléctrico de extensión.
NOTA: Antes de realizar cualquier tipo de instalación, limpieza o
de quitar un foco de luz, desenchufe la bodega o
desconecte la
fuente de energía.
ADVERTENCIA
Peligro de Choque Eléctrico
Conecte a un contacto de pared de conexión a tierra de
3 terminales.
No quite la terminal de conexión a tierra.
No use un adaptador.
No use un cable eléctrico de extensión.
No seguir estas instrucciones puede ocasionar
la muerte, incendio o choque eléctrico.
3. Gire las patas niveladoras hacia la derecha para bajar la
bodega o gírelas hacia la izquierda para levantarla. Puede
precisar darle varias vueltas a las patas niveladoras para
ajustar la inclinación de la bodega.
NOTA: Para quitar un poco de peso de las patas niveladoras,
haga que alguien empuje la parte superior de la bodega. Esto
facilita el ajuste de las patas niveladoras.

H H

H
H
H H
La page est en cours de chargement...
La page est en cours de chargement...
La page est en cours de chargement...
La page est en cours de chargement...
La page est en cours de chargement...
La page est en cours de chargement...
La page est en cours de chargement...
La page est en cours de chargement...
La page est en cours de chargement...
La page est en cours de chargement...
La page est en cours de chargement...
La page est en cours de chargement...
La page est en cours de chargement...
La page est en cours de chargement...
La page est en cours de chargement...
La page est en cours de chargement...
La page est en cours de chargement...
La page est en cours de chargement...
La page est en cours de chargement...
La page est en cours de chargement...
La page est en cours de chargement...
La page est en cours de chargement...
La page est en cours de chargement...
La page est en cours de chargement...
-
 1
1
-
 2
2
-
 3
3
-
 4
4
-
 5
5
-
 6
6
-
 7
7
-
 8
8
-
 9
9
-
 10
10
-
 11
11
-
 12
12
-
 13
13
-
 14
14
-
 15
15
-
 16
16
-
 17
17
-
 18
18
-
 19
19
-
 20
20
-
 21
21
-
 22
22
-
 23
23
-
 24
24
-
 25
25
-
 26
26
-
 27
27
-
 28
28
-
 29
29
-
 30
30
-
 31
31
-
 32
32
-
 33
33
-
 34
34
-
 35
35
-
 36
36
-
 37
37
-
 38
38
-
 39
39
-
 40
40
-
 41
41
-
 42
42
-
 43
43
-
 44
44


Whirlpool WUW55X24HS Mode d'emploi
- Catégorie
- Boissons glacées
- Taper
- Mode d'emploi
dans d''autres langues
- English: Whirlpool WUW55X24HS User guide
- español: Whirlpool WUW55X24HS Guía del usuario