Sharp FP-N25CX Manuel utilisateur
- Catégorie
- Purificateurs d'air
- Taper
- Manuel utilisateur
Ce manuel convient également à

ENGLISH
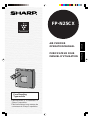
FP-N25CX
AIR PURIFIER
OPERATION MANUAL
PURIFICATEUR D’AIR
MANUEL D’UTILISATION
R
ENGLISH
FRANÇAIS
Free Standing
Type mobile
*Plasmacluster is a trademark of
Sharp Corporation.
*Plasmacluster est une marque de
commerce de Sharp Corporation.

Please read before operating your new Air Purifier
The air purifier draws in room air from its air intake, lets the air pass through a
Active Carbon Filter (deodorization filter) and a True HEPA Filter (dust collec-
tion filter) inside of the unit, then discharges the air from its air outlet. The air
purifier unit repeats this process by moving its internal fan.
As air passes through, the True HEPA Filter can remove 99.97% of dust par-
ticles, of as small as 0.3 microns. The Active Carbon Filter gradually absorbs
odor elements as they repeatedly pass through the filter. (Odor elements are
absorbed by True HEPA Filter as well.)
Some odor ingredients absorbed by the filters may become separated and
may be discharged through the air outlet and result in additional odor. De-
pending on the usage environment, especially when the product is used in a
condition significantly more severe than household use, this odor may be-
come strong in a shorter period than expected. In this case, clean the Active
Carbon Filter (Refer to E-14)
If the odor persists, then the filters are fully expended and it is necessary to
purchase the optional replacement filter kit FZ-N25HFU.

ENGLISH
FEATURES
Plasmacluster Ion Control
Your new air purifier will control the
ratio of negative ions and positive ions
depending on the condition of the
room.
• Clean Mode
Approximately the same numbers of
positive and negative ions are dis-
charged.
• Ion Control Mode
Plenty of negative ions exist in natu-
ral surroundings such as waterfalls or
forests. In this mode, negative ions
will be released in an increased rate.
• AUTO Plasmacluster Ion Mode
The unit will switch between Clean
Mode and Ion Control Mode automati-
cally depending on the amount of im-
purities in the air detected by the odor
sensor.
• Filters
1) Active Carbon Filter
Absorbs odor elements.
2) True HEPA (High Efficiency
Particulate Air) Filter with
anti-bacterial filter
High-efficiency particle collection
including pollen and dust.
CONTENTS
• FOR CUSTOMER ASSISTANCE (U.S.) ......E-2
• CONSUMER LIMITED WARRANTY (U.S.) .E-3
•
FOR CUSTOMER ASSISTANCE (CANADA) .
E-4
• LIMITED WARRANTY (CANADA) ...............E-5
IMPORTANT SAFETY INSTRUCTIONS....
E-6
•WARNING....................................................E-6
• CAUTIONS CONCERNING OPERATION ...E-7
• REMOTE CONTROL LIMITATIONS ............E-7
• INSTALLATION GUIDELINES .....................E-7
• FILTER GUIDELINES ..................................E-7
PART NAMES.......................................... E-8
• MAIN UNIT DISPLAY ...................................E-8
• BACK ...........................................................E-8
• INCLUDED...................................................E-8
PREPARATION........................................E-9
• INSERTING BATTERIES
IN THE REMOTE CONTROL ......................E-9
• FILTER INSTALLATION............................ E-10
OPERATION .......................................... E-12
• MAIN UNIT OPERATION.......................... E-12
• REMOTE CONTROL USE........................ E-13
• REMOTE CONTROL OPERATION .......... E-14
CARE AND MAINTENANCE.................E-15
• MAIN UNIT................................................ E-15
• ODOR SENSOR ....................................... E-15
• FILTER CLEANING................................... E-15
• FILTER REPLACEMENT
GUIDELINES ............................................ E-16
TROUBLE SHOOTING.......................... E-17
SPECIFICATIONS ................................. E-18
E-1
ENGLISH
Thank you for purchasing the SHARP FP-N25CX. Please read this manual carefully for the correct
usage information. Before using this product, be sure to read the section: “Important Safety In-
structions.”
After reading this manual, retain it in a convenient location for future reference.

E-2
FOR CUSTOMER ASSISTANCE
(the United States)
To aid in answering questions if you call for service or for reporting loss or theft, please
record below the model and serial number located on the back side of the unit.
MODEL NUMBER
SERIAL NUMBER
DATE OF PURCHASE
Dealer Name
Address
City
State
Zip
Telephone
TO PHONE: Dial 1-800-BE-SHARP (237-4277) for:
SERVICE (for your nearest Sharp Authorized Servicer)
PARTS (for your Authorized Parts Distributor)
ACCESSORIES
ADDITIONAL CUSTOMER INFORMATION
TO WRITE: For service problems, warranty information, missing items and other assistance:
Sharp Electronics Corporation
Customer Assistance Center
1300 Naperville Drive
Romeoville, IL 60446-1091
TO ACCESS THE INTERNET: www.sharpusa.com
Please provide the following information when you write or call: model number, serial number,
date of purchase, your complete mailing address (including zip code), your daytime telephone
number (including area code) and description of the problem.

ENGLISH
CONSUMER LIMITED WARRANTY
CONSUMER LIMITED WARRANTY FOR THE UNITED STATES
SHARP ELECTRONICS CORPORATION warrants to the first consumer purchaser that this Sharp brand product (the
“Product”), when shipped in its original container, will be free from defective workmanship and materials, and agrees that
it will, at its option, either repair the defect or replace the defective Product or part thereof with a new or remanufactured
equivalent at no charge to the purchaser for parts or labor for the period(s) set forth below.
This warranty does not apply to any appearance items of the Product nor to the additional excluded item(s) set forth below
nor to any Product the exterior of which has been damaged or defaced, which has been subjected to improper voltage or
other misuse, abnormal service or handling, or which has been altered or modified in design or construction.
In order to enforce the rights under this limited warranty, the purchaser should follow the steps set forth below and provide
proof of purchase to the servicer.
The limited warranty described herein is in addition to whatever implied warranties may be granted to purchasers by law.
ALL IMPLIED WARRANTIES INCLUDING THE WARRANTIES OF MERCHANTABILITY AND FITNESS FOR USE ARE
LIMITED TO THE PERIOD(S) FROM THE DATE OF PURCHASE SET FORTH BELOW. Some states do not allow limita-
tions on how long an implied warranty lasts, so the above limitation may not apply to you.
Neither the sales personnel of the seller nor any other person is authorized to make any warranties other than those
described herein, or to extend the duration of any warranties beyond the time period described herein on behalf of Sharp.
The warranties described herein shall be the sole and exclusive warranties granted by Sharp and shall be the sole and
exclusive remedy available to the purchaser. Correction of defects, in the manner and for the period of time described
herein, shall constitute complete fulfillment of all liabilities and responsibilities of Sharp to the purchaser with respect to the
Product, and shall constitute full satisfaction of all claims, whether based on contract, negligence, strict liability or other-
wise. In no event shall Sharp be liable, or in any way responsible, for any damages or defects in the Product which were
caused by repairs or attempted repairs performed by anyone other than an authorized servicer. Nor shall Sharp be liable
or in any way responsible for any incidental or consequential economic or property damage. Some states do not allow the
exclusion of incidental or consequential damages, so the above exclusion may not apply to you.
THIS WARRANTY GIVES YOU SPECIFlC LEGAL RIGHTS. YOU MAY ALSO HAVE OTHER RIGHTS WHICH VARY
FROM STATE TO STATE.
Your Product Model Number & Description:
Warranty Period for this Product:
Additional Item(s) Excluded From Warranty
Coverage (If any):
Where to Obtain Service:
What to Do to Obtain Service:
FP-N25CX Air Purifier. Be sure to have this information available when
you need service for your Product.
One (1) year parts and labor from date of purchase.
Appearance items of the Product, filters, or accessories, or any printed
materials.
From a Sharp Authorized Servicer located in the United States. To find
the location of the nearest Sharp Authorized Servicer, call Sharp Toll
Free at 1-800-BE-SHARP.
Ship prepaid or carry in your Product to a Sharp Authorized Servicer.
Be sure to have Proof of Purchase available. If you ship the Product,
be sure it is insured and packaged securely.
TO OBTAIN SUPPLY, ACCESSORY OR PRODUCT INFORMATION, CALL 1-800-BE-SHARP, OR VISIT OUR WEBSITE AT
www.sharpusa.com
SHARP ELECTRONICS CORPORATION
Sharp Plaza, Mahwah, New Jersey 07430-2135
R
E-3

FOR CUSTOMER ASSISTANCE
(Canada)
To aid in answering questions if you call for service or for reporting loss or theft, please
record below the model and serial number located on the back side of the unit.
MODEL NUMBER
SERIAL NUMBER
DATE OF PURCHASE
Dealer Name
Address
City
Province
Postal Code
Telephone
TO PHONE: Dial 1-905-568-7140 for:
SERVICE (for your nearest Sharp Authorized Servicer)
PARTS (for your Authorized Parts Distributor)
ACCESSORIES
ADDITIONAL CUSTOMER INFORMATION
TO WRITE: For service problems, warranty information, missing items and other assistance:
Sharp Electronics of Canada Ltd.
Customer Care
335 Britannia Road East
Mississauga, Ontario L4Z 1W9
TO ACCESS THE INTERNET: www.sharp.ca
Please provide the following information when you write or call: model number, serial number,
date of purchase, your complete mailing address (including Postal Code), your daytime tel-
ephone number (including area code) and description of the problem.
E-4

ENGLISH
E-5
LIMITED WARRANTY
Consumer Electronics Products
Congratulations on your purchase!
Sharp Electronics of Canada Ltd. (hereinafter called “Sharp”) gives the following express warranty to the first con-
sumer purchaser for this Sharp brand product, when shipped in its original container and sold or distributed in Canada
by Sharp or by an Authorized Sharp Dealer:
Sharp warrants that this product is free, under normal use and maintenance, from any defects in material and work-
manship. If any such defects should be found in this product within the applicable warranty period, Sharp shall, at its
option, repair or replace the product as specified herein.
This warranty shall not apply to:
(a) Any defects caused or repairs required as a result of abusive operation, negligence, accident, improper installa-
tion or inappropriate use as outlined in the owner’s manual.
(b) Any Sharp product tampered with modified, adjusted or repaired by any party other than Sharp, Sharp’s Author-
ized Service Centres or Sharp’s Authorized Servicing Dealers.
(c) Damage caused or repairs required as a result of the use with items not specified or approved by Sharp, including
but not limited to head cleaning tapes and chemical cleaning agents.
(d) Any replacement of accessories, glassware, consumable or peripheral items required through normal use of the
product including but not limited to earphones, remote controls, AC adapters, batteries, temperature probe, stylus,
trays, filters, belts, ribbons, cables and paper.
(e) Any cosmetic damage to the surface or exterior that has been defaced or caused by normal wear and tear.
(f) Any damage caused by external or environmental conditions, including but not limited to transmission line/power
line voltage or liquid spillage.
(g) Any product received without appropriate model, serial number and CSA/cUL markings.
(h) Any products used for rental or commercial purposes.
(i) Any installation, setup and/or programming charges.
Should this Sharp product fail to operate during the warranty period, warranty service may be obtained upon delivery
of the Sharp product together with proof of purchase and a copy of this LIMITED WARRANTY statement to an Author-
ized Sharp Service Centre or an Authorized Sharp Servicing Dealer. In home warranty service may be provided at
Sharp’s discretion on any Sharp television with the screen size of 27” or larger and on any Sharp Over-the-Range
Microwave Oven.
This warranty constitutes the entire express warranty granted by Sharp and no other dealer, service centre or their
agent or employee is authorized to extend, enlarge or transfer this warranty on behalf of Sharp. To the extent the law
permits, Sharp disclaims any and all liability for direct or indirect damages or losses or for any incidental, special or
consequential damages or loss of profits resulting from a defect in material or workmanship relating to the product,
including damages for the loss of time or use of this Sharp product or the loss of information. The purchaser will be
responsible for any removal, reinstallation, transportation and insurance costs incurred. Correction of defects, in the
manner and period of time described herein, constitute complete fulfillment of all obligations and responsibilities of
Sharp to the purchaser with respect to the product and shall constitute full satisfaction of all claims, whether based on
contract, negligence, strict liability or otherwise.
WARRANTY PERIODS: Parts & Labour (exceptions noted)
Audio Products 1 year
Camcorder 1 year
DVD Products 1 year
LCD Projector 1 year (lamp 90 days)
LCD TV 1 year
Microwave Oven 2 years (magnetron component-3 additional years)
Television Products 1 year (picture tube component-1 additional year)
VCR Products 1 year
Vacuum Cleaner 1 year
Air Purifier 1 year (except filters)
R
To obtain the name and address of the nearest Authorized Sharp Service Centre or Dealer, please contact:
SHARP ELECTRONICS OF CANADA LTD. 335 Britannia Road East Mississauga, Ontario L4Z 1W9
For more information on this Warranty, Sharp Canada Products,
Accessory Sales, Dealer or Service Locations, please call (905)
568-7140
Visit our Web site: www.sharp.ca
T
O
B
E
T
H
E
B
E
S
T
T
H
R
O
U
G
H
C
U
S
T
O
M
E
R
S
A
T
I
S
F
A
C
T
I
O
N
SERVICE
(VALID IN CANADA ONLY)

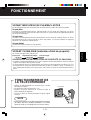
IMPORTANT SAFETY INSTRUCTIONS
E-6
When using electrical appliances, basic safety precautions should be followed, including the
following:
WARNING - To reduce the risk of electrical shock, fire or injury to persons:
• Read all instructions before using the air purifier.
• Use only a 120-volt outlet with a polarized receptacle.
• The air purifier has a polarized plug (one blade is wider than the other is). This plug will fit in a
polarized outlet only one way. Initially, if the plug does not fit into the outlet, reverse it. If it still does not
fit, contact a qualified electrician or service person.
• Do not use the air purifier if the power cord or plug is damaged or the connection to the wall
outlet is loose.
• Periodically remove dust from the power plug.
• Do not insert fingers or foreign objects into the intake or air outlet.
When removing the power plug, always hold the plug and never pull the cord.
Electrical shock and/or fire from short circuit may occur as result.
• Do not use this air purifier near gas appliances or fireplaces.
• Remove the power plug from the wall outlet before cleaning the unit and when not using the
unit.
Electrical shock from bad insulation and / or fire from short circuit may occur as a result.
• If the power cord is damaged, it must be replaced by the manufacturer, its service agent,
Sharp authorized service or similarly qualified person in order to avoid a hazard.
• Do not operate when using aerosol insecticides or in rooms where there is oily residue, incense,
sparks from lit cigarettes, chemical fumes in the air or a humidity condition.
• Use care when cleaning the air purifier. Strong corrosive cleansers may damage the exterior.
• Only Sharp Authorized Servicers should service this air purifier. Contact the nearest Servicer for any
problems, adjustments, or repairs.
• The batteries must be removed from the remote control before disposal, and the batteries must be
disposed of safely.
NOTE
This equipment has been tested and found to comply with the limits for a Class B digital device, pursu-
ant to 15 of the FCC and Industry Canada ICES-003 Rules. These limits are designed to provide
reasonable protection against harmful interference in a residential installation. This equipment gener-
ates, uses and can radiate radio frequency energy and, if not installed and used in accordance with the
instructions, may cause harmful interference to radio communications. However, there is no guarantee
interference will not occur in a particular installation.
If this equipment does cause harmful interference to radio or television reception, which can be deter-
mined by turning the equipment off and on, the user is encouraged to try to correct the interference by
one or more of the following measures:
• Reorient or relocate the receiving antenna.
• Increase the separation between the equipment and receiver.
• Connect the equipment into an outlet on a circuit different from that to which the receiver is con-
nected.
• Consult the dealer or an experienced radio/TV technician for help.

ENGLISH
CAUTIONS CONCERNING OPERATION
• Do not block the intake and air outlet.
• Do not use the unit near or on hot objects, such as range or where it may come into contact with
steam.
• Do not use the unit on its side.
• Always hold the handle on the back of the unit when moving it.
• Holding the front panel when carrying may cause it to detach, thus dropping the unit and resulting in
bodily injury.
• Do not operate the unit without the filter.
• Do not wash and reuse HEPA filter and Active Carbon Filter.
• Clean outside with a damp cloth only.
The unit surface may become damaged or cracked.
In addition, the sensor may malfunction as a result.
REMOTE CONTROL LIMITATIONS
DO NOT USE THE REMOTE CONTROL IN THE FOLLOWING LOCATIONS:
• Any location where there is inverter lighting equipment or electronic spontaneous lighting
equipment
The remote control may become inoperative. In this case, move away from such lighting equipment
or change direction.
• Location exposed to direct sunlight
The unit may not receive signals from the remote control.
The unit may not respond to the signals of the remote control if there is a problem with the fluorescent
lighting.
INSTALLATION GUIDELINES
• Leave at least 7 feet (2m) of space from equipments which involve radio wave such as televi-
sions, radios or wave clocks.
Electrical interference may occur.
• Leave at least 2 feet (60cm) of space from the wall.
The motor may overheat, causing a malfunction.
•Avoid a location where the sensor is exposed to direct wind.
The unit may not operate properly.
•Avoid a location where curtains, etc., come into contact with the intake or air outlet.
Curtains, etc., may become dirty or a malfunction may occur.
• The wall behind the air outlet may become dirty as time passes. When using the unit for extensive
period in the same location, use a vinyl sheet, etc., to prevent the wall from becoming dirty. In addi-
tion, periodically clean the wall, etc.
• Place on a stable surface with sufficient air circulation.
FILTER GUIDELINES
• Follow the instructions in this manual for correct care and maintenance of the filters.
E-7
IMPORTANT SAFETY INSTRUCTIONS

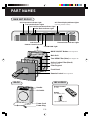
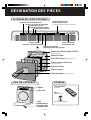
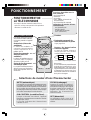
PART NAMES
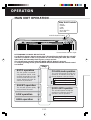
MAIN UNIT DISPLAY
AUTO Operation Indicator Light
Quick AUTO operation Indicator Light
Pollen Mode Indicator Light
OFF Timer Display Indicator Lights
(set using remote control)
Odor Sensor
Remote Control Receiver
CLEAN-SIGN Light
MODE-ON/OFF Button See Page E-12
Main Unit
True HEPA Filter (blue) See Page E-16
Active Carbon Filter (black)
See Page E-16
Filter Support
Front Panel
Remote Control
See Page E-14
Handle
Air Outlet
Power Cord
Power Plug
E-8
Fan Speed Indicator Lights
Plasmacluster Indicator Light
BACK
INCLUDED
Remote Control
(1 unit)
Battery
(AA battery X 2 )
• Operation manual
AUTO SILENT LOW HIGH
POLLEN
CLEAN SIGN OFF TIMER h
QUICK AUTO
Plasmacluster

ENGLISH
E-9
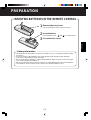
Battery Information
• The batteries for this remote control are for initial use only . Change the batteries when
necessary.
• Incorrect usage of the batteries may cause battery fluid leakage and/or damage.
Take care of the following when handling:
•When replacing the batteries, replace both batteries with new ones of the same type.
(Use 2 AA manganese batteries.)
•When not using the unit or remote control for an extended period, remove the batteries.
• The batteries are for initial use only and may be depleted within 1 year.
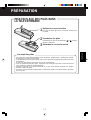
INSERTING BATTERIES IN THE REMOTE CONTROL
1
Remove the back cover
Press and slide the back cover to remove.
2
Insert batteries
Insert batteries with and as shown below.
3
Close the back cover
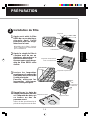
PREPARATION

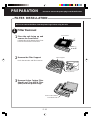
PREPARATION
Be sure to remove the filters from the plastic bags before using the unit.
1
Filter Removal
1
Place the unit facing up and
remove the Front Panel.
Lift both sides of the bottom of the Front
Panel to remove the Front Panel.
3
Remove Active Carbon Filter
(black) and True HEPA Filter
(blue) from the plastic bags.
E-10
Be sure to remove the power plug from the wall outlet.
FILTER INSTALLATION
2
Remove the Filter Support.
Pinch the two tabs and lift to remove.
Tabs
Front Panel
Filter Support
Tabs (2 places)
Active Carbon Filter
True HEPA Filter

ENGLISH
Tab
E-11
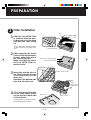
outlet.
2
Filter Installation
1
After the True HEPA Filter
is removed from the plas-
tic bag, place it in the main
unit with the tabs facing
up.
Do not install the filter backwards
or the unit will not operate prop-
erly.
2
After removing the Active
Carbon Filter from the plas-
tic bag, place it on top of
the True HEPA Filter.
Make sure that the tab of
the True HEPA Filter re-
mains visible.
3
Insert the upside tabs of
the Filter Support into the
associated holes of the
main unit.
Next push the bottom side
tabs into the main unit.
4
Fill in the usage start date
on the Date Label, which
can be found on back side
of Front Panel.
Use the date as a guide for the Fil-
ter Replacement schedule.
PREPARATION
True HEPA Filter
Active Carbon Filter
Holes in the
main unit
Tabs of the up side
Filter Support
Date Label
Tabs of the
bottom side
Tab of the True HEPA Filter

OPERATION
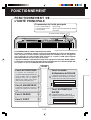
MAIN UNIT OPERATION
DETERMINING THE BASE IMPURITY RATE
For the first 2 minutes after the power plug is inserted into the wall outlet, the unit will
check the conditions of the air. If operation is set to ON during this time, the CLEAN-
SIGN LIGHT will alternately flash in green, orange and red.
The unit will start operating when the MODE-ON/OFF Button is pressed.
To change operating modes, press the MODE-ON/OFF Button until the desired control
is activated.
Plasmacluster Indicator Light
Main Unit Controls
E-12
MODE-ON/OFF Button
• AUTO
• SILENT
•LOW
• HIGH
• QUICK AUTO
• POLLEN
AUTO operation
The fan speed is automati-
cally switched (HIGH, LOW,
SILENT) depending on the
amount of odor in the air. The
sensor detects the odor for
efficient air purification.
SILENT operation
The unit will operate quietly
using minimal air intake.
Stop
POLLEN mode operation
The unit will operate at High fan
speed for 10 minutes, then will al-
ternate between LOW and HIGH.
10 minutes: High fan speed
20 minutes:
Low fan speed
20 minutes: High fan speed
QUICK AUTO operation
The unit will operate at High fan
speed for 10 minutes, then will
operate in AUTO operation.
LOW operation
Plasmacluster
AUTO SILENT LOW HIGH
POLLEN
CLEAN SIGN OFF TIMER h
QUICK AUTO
HIGH operation
10 minutes: High fan speed
AUTO operation

ENGLISH
PLASMACLUSTER INDICATOR LIGHT
Plasmacluster ion operation is selected using the remote control.
Blue light
When the Plasmacluster ion operation is in Clean Mode, or in AUTO Plasmacluster Ion Mode
and the air in the room is impure, the light will activate and the unit will operate in Clean Mode.
Green light
When the Plasmacluster ion operation is in the Ion Control Mode, or in AUTO Plasmacluster
Ion Mode and the air in the room is clean, this light will activate and the unit will operate in Ion
Control Mode.
Light off
There are no Plasmacluster ions being generated.
E-13
CLEAN-SIGN LIGHT
The color changes according to the air condition.
Clean (Green) Slightly Impure (Orange) Very Impure (Red)
ABOUT THE CLEAN-SIGN
• The condition of the CLEAN-SIGN depends on the Odor Sensor’s reading of the room environ-
ment when the plug is inserted into the wall outlet.
• It is possible to have a green CLEAN-SIGN with impurities in the air if the air purifier was just
introduced to the room environment. After a while, however, the base impurity rate will be
adjusted to read room environment correctly.
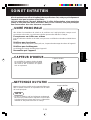
REMOTE CONTROL USE
• Operate with the remote control facing the main unit
receiver.
• The signal range is about 23 feet (7m).
•Make sure there are no objects blocking the path of
the signal.
•A beep sound will be heard from the main unit when a
signal is received.
NOTE
•Avoid dropping or damaging the remote control, using
in a high humidity condition, in direct sunlight or near a
heat source.
Receiver
Transmitter
OPERATION

Plasmacluster
AUTO
MANUAL
Fan Control
POLLEN
OFF
TIMER
QUICK AUTO
POWER ON/OFF
CLEAN
ION CONTROL
OFF
AUTO
Plasmacluster Ion mode Selections
Auto
When pressed, the unit will switch between
Clean Mode and the Ion Control Mode auto-
matically depending on the amount of impuri-
ties in the air as detected by the odor sensor.
Clean Mode will operate for 1 minute when
the Auto function is selected.
Ion Control
When pressed, the unit will constantly oper-
ate in Ion Control Mode.
The Plasmacluster Ion Indicator Light is green.
Clean
When pressed, the unit will con-
stantly operate in the Clean Mode,
in which the same numbers of posi-
tive and negative ions are dis-
charged. The Plasmacluster Indica-
tor Light is blue.
Off
The generation of ions will cease
and the Plasmacluster Indicator
Light will go out.
E-14
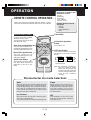
REMOTE CONTROL OPERATION
OPERATION
Operations available with
the Remote Control
• AUTO
• MANUAL
• POLLEN
• OFF TIMER
• QUICK AUTO
Plasmacluster Ion mode
selections
• AUTO
• CLEAN
• ION CONTROL
• OFF
•When you press the POWER ON/OFF Button, a short
beep will sound and operation will start in AUTO Mode.
Transmitter
Pollen Mode Operation
Button
See Page E-12
Off Timer Button
The set time switches every time
the button is pressed as shown
below.
1 hour 4 hours
Cancel 8 hours
• The indicator light shows the
remaining time.
POWER ON/OFF Button
To stop, press the POWER
ON/OFF Button again.
A long beep will sound and
operation will stop.
Auto (Fan Speed) Button
The fan speed switches au-
tomatically depending on the
amount of impurities in the air.
Manual (Fan Speed) Button
The fan speed can be
switched among Silent, Low,
and High settings.
Quick Auto Button
The operation mode is effec-
tive when quick removal of
impurities in the air is de-
sired.
Note: By manually selecting ei-
ther Ion Control or Clean
Mode, this will lock the unit
into the selected mode and
will not change to the other
even if room condition
changes.

ENGLISH
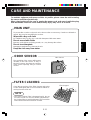
FILTER CLEANING
Clean the top surface of the Filter Support and Active
Carbon Filter lightly with a vacuum cleaner without re-
moving from the main unit.
NOTE
• The Active Carbon Filter is damaged easily. Do not
force the nozzle of a vacuum cleaner against the Ac-
tive Carbon Filter or wash it with water. The True HEPA
Filter should never be washed or cleaned.
Filter Support
CARE AND MAINTENANCE
To maintain optimum performance of this air purifier, please clean the unit including
the sensor and filters periodically.
When cleaning the unit, be sure to unplug the power cord, and never handle the plug
with wet hands. Electrical shock and/or bodily injury may occur as a result.
MAIN UNIT
To prevent dirt or stains on the main unit, clean as often as necessary. If stains are allowed to
remain, they may become difficult to remove.
Wipe with a dry, soft cloth
For stubborn stains or dirt, use a soft cloth dampened with warm water.
Do not use volatile fluids
Benzene, paint thinner, polishing powder, etc., may damage the surface.
Do not use detergents
Detergent ingredients may damage the unit.
Keep the unit away from water
ODOR SENSOR
The sensitivity of the sensor will become
unstable if the odor sensor is dirty or
blocked. Remove dust from the surfaces
of the sensor openings using a vacuum
cleaner.
Odor Sensor
E-15

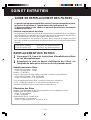
FILTER REPLACEMENT GUIDELINES
The replacement period differs depending on the room environment, the
usage hours and location of Air Purifier.
If dust or odor persists, replace the filters.
Guide for filter replacement timing
•The following filter life and replacement period is based on the condition of smoking
10 cigarettes per day, reducing the dust collection/deodorization power to half com-
pared with that of new filters.
We recommend replacing the filters more frequently if the product is used in a condi-
tion significantly more severe than normal household use.
•True HEPA Filter About 2 years after opening
•Active Carbon Filter About 2 years after opening
REPLACING THE FILTERS
1
See page E-10,11 for directions on how to install the filters when
replacing.
2
Fill in the usage start date of the filters on the Date Label, which
can be found on the back side of the Front Panel.
Replacement Filters
•True HEPA Filter: 1 unit
•Active Carbon Filter: 1 unit
Model: FZ-N25HFU
In case you need either a True HEPA Filter or an Active Carbon Filter only:
•True HEPA Filter: PFIL-A071KKEZ
•Active Carbon Filter: PFIL-A052KKEZ
For replacement filters contact Sharp for information
(U.S.A.) 1-800-BE-SHARP or website at www.sharpusa.com
(Canada) (905)568-7140 or website at www.sharp.ca
Disposal of Filters
Please dispose of replaced filters according to the local disposal laws and regulations.
True HEPA Filter materials:
• Filter: Polypropylene
• Frame: Polyester
Active Carbon Filter Materials:
•Deodorizer: Activated charcoal
•Net: Polypropylene 60% Polyester 40%
E-16
CARE AND MAINTENANCE

ENGLISH
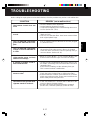
TROUBLESHOOTING
E-17
Before calling for repair, please review the list below, since the problem may not be a unit malfunction.
SYMPTOM
REMEDY (not a malfunction)
The Remote Control does not
work
• Have the batteries been depleted?
• Are the batteries inserted correctly?
• Is a fluorescent lighting in the room flickering due to serv-
ice life? (Refer to E-7,E-9)
Odors and smoke are not re-
moved
• Clean the filters if they appear to be heavily soiled.
(Refer to E-15)
• Check to see that the filters have been removed from
their original plastic bags.
The CLEAN-SIGN Light lights
green even when the air is im-
pure
• The air could be impure at the time the unit was plugged
in. (Refer to E-13)
The CLEAN-SIGN Light lights
orange or red even when the air
is clean
• The sensitivity of the sensor becomes unstable when
the opening of the odor sensor is dirty or is clogged.
Clean the dust around the sensor opening using a
vacuum cleaner. (Refer to E-15)
•When in Clean Mode ( or Ion Control Mode), the
Plasmacluster Indicator Light color will not change.
A clicking or ticking sound is
heard from the unit
• Clicking sound is emitted when the unit is in the Ion Con-
trol Mode, and ticking sound is emitted when the unit is
generating ions.
If the sound is irritating, set the unit away from you.
This is normal and not a malfunction.
The discharged air has an
aroma or odor.
• Check to see if the filters are heavily soiled.
Check the Active Carbon Filter or replace the filters.
• Plasmacluster Air Purifiers emit small traces of ozone
which may produce an odor. These ozone emissions are
below safety levels set by the FDA.
The Plasmacluster Indicator
Light remains green (or blue)
and does not change
The unit does not operate when
cigarette smoke is in the air.
• Is the unit installed in a location that is difficult for the
sensor to detect cigarette smoke?
• Are the odor sensor openings blocked or clogged?
(In this case, clean the openings.) (Refer to E-15)

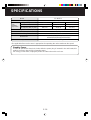
SPECIFICATIONS
E-18
Model
Power supply
Fan Speed Adjustment
Rated Power
Fan Speed CFM (m
3
/min.)
Applicable Floor Surface
CADR
(Dust/Smoke/Pollen)
Cord Length
Dimensions
Weight
Fan
Speed
Operation
120V / 60Hz
128 sq.ft.* (11.8m
2
)
96 / 83 / 94
8.3 ft (2.5m)
16-1/2 in.(W)x5-15/16 in.(D)x16-5/8 in(H)
420mm(W)x151mm(D)x422mm(H)
9.9 lbs (4.5kg)
HIGH
49 W
88 (2.5)
LOW
28 W
46 (1.3)
SILENT
22 W
25 (0.7)
* The applicable floor surface area is appropriate for operating the unit at maximum fan speed.
Standby Power
In order to operate the electrical circuits while the power plug is inserted in the wall outlet, this
product consumes about 1.5W of standby power.
For energy conservation, unplug the power cord when the unit is not in use.
FP-N25CX
La page est en cours de chargement...
La page est en cours de chargement...
La page est en cours de chargement...
La page est en cours de chargement...
La page est en cours de chargement...
La page est en cours de chargement...
La page est en cours de chargement...
La page est en cours de chargement...
La page est en cours de chargement...
La page est en cours de chargement...
La page est en cours de chargement...
La page est en cours de chargement...
La page est en cours de chargement...
La page est en cours de chargement...
La page est en cours de chargement...
La page est en cours de chargement...
La page est en cours de chargement...
La page est en cours de chargement...
-
 1
1
-
 2
2
-
 3
3
-
 4
4
-
 5
5
-
 6
6
-
 7
7
-
 8
8
-
 9
9
-
 10
10
-
 11
11
-
 12
12
-
 13
13
-
 14
14
-
 15
15
-
 16
16
-
 17
17
-
 18
18
-
 19
19
-
 20
20
-
 21
21
-
 22
22
-
 23
23
-
 24
24
-
 25
25
-
 26
26
-
 27
27
-
 28
28
-
 29
29
-
 30
30
-
 31
31
-
 32
32
-
 33
33
-
 34
34
-
 35
35
-
 36
36
-
 37
37
-
 38
38


Sharp FP-N25CX Manuel utilisateur
- Catégorie
- Purificateurs d'air
- Taper
- Manuel utilisateur
- Ce manuel convient également à
dans d''autres langues
- English: Sharp FP-N25CX User manual
Documents connexes
Autres documents
-
Coway AP-0510IH Le manuel du propriétaire
-
Coway AP-1512HH Owner's Instructions Manual
-
Coway AP-1012GH Owner's Instructions Manual
-
-
HoMedics AP-25 TotalClean Air Purifier Le manuel du propriétaire
-
LG PS-N550WP Le manuel du propriétaire
-
 TEQOYA 15207880 Mode d'emploi
-
Winix D360 Le manuel du propriétaire
-
 TEQOYA 15207890 Mode d'emploi
-
Moneual MA-800 Le manuel du propriétaire

