Weston 07-3101-W-A Mode d'emploi
- Catégorie
- Trancheuses
- Taper
- Mode d'emploi

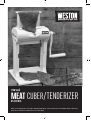
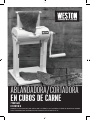
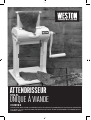
MEAT CUBER/TENDERIZER
07-3101-W-A
manual
DUE TO CONSTANT FACTORY IMPROVEMENTS, THE PRODUCT PICTURED MIGHT DIFFER
SLIGHTLY FROM THE PRODUCT IN THIS BOX.

TABLE OF CONTENTS / ÍNDICE / TABLE DES MATIÈRES
2
IMPORTANT SAFEGUARDS
COMPONENT LIST
CLEANING INSTRUCTIONS
ASSEMBLY
DIRECTIONS FOR USE
FOOD SAFETY
WARRANTY INFORMATION
SALVAGUARDIAS IMPORTANTES
LISTA DE COMPONENTES
INSTRUCCIONES DE LIMPIEZA
INSTRUCCIONES DE MONTAJE
INSTRUCCIONES DE USO
SEGURIDAD DE LOS ALIMENTOS
INFORMACIÓN DE GARANTÍA WESTON
PRÉCAUTIONS IMPORTANTES
DESCRIPTION DE LA PIÈCE
INSTRUCTIONS DE DÉMONTAGE ET D’ENTRETIEN
INSTRUCTIONS D’ASSEMBLAGE
MODE D’EMPLOI
SÉCURITÉ ALIMENTAIRE
INFORMATION SUR LA GARANTIE
3
4-5
6
6-7
8
9
10
12
14-15
16
16-17
18
19
20
22
24-25
26
26-27
28
29
30

1. Read all instructions.
2. NEVER REACH INTO the Tenderizer/Jerky Slicer. Doing so could cause
serious injury. ALWAYS USE THE PROVIDED TONGS.
3. KEEP FINGERS CLEAR OF THE BLADES AT ALL TIMES. Failure to do so
may result in personal injury. The Cutting Blades/Blade Assembly is very sharp.
Wear Kevlar, cut-resistant gloves (Sold Separately) when handling the Blades.
4. DO NOT press or push meat into the Chute with your ngers or any other
object. Doing so may cause personal injury and/or damage to the unit.
5. NEVER use ngers to scrape food away from the Tenderizer/Jerky Slicer while
in operation. SEVERE INJURY MAY RESULT.
6. DO NOT push the Tongs or other utensils into the Blades.
7. NEVER LEAVE THE Tenderizer/Jerky Slicer UNATTENDED. Close
supervision is necessary when any appliance is used near children. This
appliance is NOT to be used by children.
8. NEVER use any accessories or parts from other manufacturers. Doing so will
VOID YOUR WARRANTY.
9. Thoroughly clean all parts that will come into contact with food before using
the Tenderizer/Jerky Slicer. Wash all parts by hand and dry thoroughly.
Protective/cut-resistant gloves are recommended whenever handling the
Blades.
10. DO NOT attempt to tenderize or slice meat with bones or other hard items.
Damage to the machine will occur.
11. TIE BACK loose hair and clothing, and roll up long sleeves before operating
the Tenderizer/Jerky Slicer. REMOVE ties, rings, watches, bracelets, or other
jewelry before operating.
12. DO NOT use the Tenderizer/Jerky Slicer while under the inuence of drugs,
medications or alcohol.
SAVE THESE INSTRUCTIONS
3
ENGLISH INSTRUCTIONS
IMPORTANT SAFEGUARDS
When using electrical appliances, basic safety precautions should always
be followed to reduce the risk of re, electric shock, and/or injury to persons,
including the following:

4
ENGLISH INSTRUCTIONS
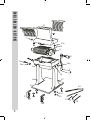
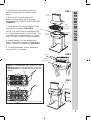
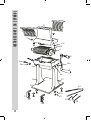
1
2
3
4
5
6
7
8
9
10
12
11
13
16
15
14
17
18
15
16
19
15a
16a
15a
16a

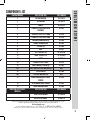
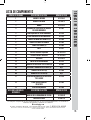
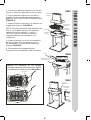
COMPONENT LIST
DIAGRAM NUMBER PART DESCRIPTION PART NUMBER
1 BOTTOM HOUSING 07-3184-A
2 TOP HOUSING 07-3181-A
3 HANDLE 07-3125-A
4 STAINLESS STEEL BLADE RACK
ASSEMBLY
07-3103
5 STAINLESS STEEL LEFT COMB 07-3119
6 STAINLESS STEEL RIGHT COMB 07-3118
7 HOUSING THUMBSCREW (2) 07-3166
8 HANDLE THUMBSCREW 07-3145
9 C-CLAMP (2) 07-3105
10 BASE 07-3111
11 LEFT SUPPORT LEG 07-3179-L-A
12 RIGHT SUPPORT LEG 07-3179-R-A
13 CHUTE 07-3182-A
14 STAINLESS STEEL TONGS 07-3151
15 CHUTE AND BASE SCREW (6) 07-3183
15A CHUTE AND BASE LOCK WASHERS (6) N/A
16 LEG SCREW (4) 07-3180
16A LEG LOCK WASHERS (4) N/A
17 ALLEN WRENCH/CHUTE & BASE
SCREWS
07-3178
18 ALLEN WRENCH/LEG SCREWS 07-3185
19 ALLEN WRENCH/BLADES 07-3186
ADDITIONAL ACCESSORIES
AVAILABLE
PART DESCRIPTION PART NUMBER
JERKY SLICER BLADES 07-3302-W
MOTOR ATTACHMENT 01-0103-W
If any components of this unit are broken, the unit does not operate properly or you
need a replacement instruction manual, visit us on the web at
WestonSupply.com
Or call Weston Brands, LLC Toll Free at 1-800-814-4895
Monday thru Friday 8:00am-5:00pm ET. Outside the U.S. call 001-216-901-6801
5
ENGLISH INSTRUCTIONS

6
ENGLISH INSTRUCTIONS
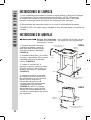
CLEANING INSTRUCTIONS
1. Thoroughly wash all parts in soapy water. Rinse with clean water. Dry all parts
immediately. NOTE: DO NOT immerse the Blade Assembly in sudsy water where
they cannot be seen. To prevent injury, keep the Blade Assembly visible at all
times.
2. Coat all metal parts with a food grade silicone spray.
HELPFUL HINT: A long, skinny brush is helpful when cleaning the Blade
Assembly.
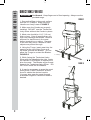
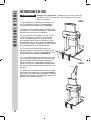
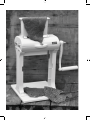
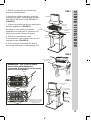
ASSEMBLY INSTRUCTIONS
1. Connect the Left and Right Legs
to the Base using the provided Allen
Wrench and 4 Base Screws and Lock
Washers. FIGURE A
2. Using an Allen Wrench and 4 Leg
Screws and Lock Washers, attach
the Left and Right Legs to the Lower
Housing. FIGURE A
3. Install the Chute to the Top
Housing using an Allen Wrench
and the 2 Chute Screws and Lock
Washers. FIGURE B
4. Insert the Blade Assembly into the
Lower Housing, guiding the Drive Shaft
into the journals. Make sure the gears
and the blades of the Blade Assembly
are properly meshed together and
resting in the journals (FIGURE C).
NOTE: The Tenderizer Blade is a
2-piece set. The Jerky Slicer Blade is a
single piece (sold separately).
Chute
Top
Housing
FIGURE A
FIGURE B
Chute Screws (2) &
Lock Washers (2)
Allen
Wrench
Legs
Lower
Housing
Base
Base Screws (4)
and Lock Washers (4)
Leg Screws (4) &
Lock Washers (4)
Allen
Wrench
Allen
Wrench
Cut Hazard. Blades are sharp, use care when handling. The
use of cut-resistant gloves is suggested.
w WARNING

7
ENGLISH INSTRUCTIONS
Blade
Assembly
Drive Shaft
5. Position the Top Housing onto the
Lower Housing and line up the screw
holes.
6. Secure the Top Housing to the
Lower Housing using the 2 Housing
Thumbscrews. DO NOT OVERTIGHTEN!
FIGURE D
7. Insert the Left Comb and Right Comb
into the Top Housing. FIGURE D
NOTE: The Left Comb is marked with an
“L” on the upper portion of the Comb. The
Top Housing is marked with an “L Comb”
and “R Comb” to aid in Comb installation.
8. Install Handle onto the Blade Drive
Shaft. Secure the Handle to Drive Shaft
with the Handle Thumbscrew. FIGURE E
9. To change Blades, follow “Assembly
Instructions” as outlined.
FIGURE C
Lower
Housing
Top
Housing
FIGURE D
Housing
Thumbscrews (2)
FIGURE E
Handle
Handle
Thumbscrew
Drive Shaft
Journals
Gears
NOTE: Periodically the gears on the
Blades need to be tightened. Use the
Allen Wrench to tighten the screw on the
gears.
Gears
Journals
Combs
Jerky blades sold separately

8
ENGLISH INSTRUCTIONS
DIRECTIONS FOR USE
1. Secure the Base to the work surface
with the 2 C-Clamps. Make sure the
Handle can freely rotate. FIGURE F
2. Make sure the Combs are properly
installed. DO NOT use the Tenderizer/
Jerky Slicer without the Combs in place.
3. Meat cuts should be 1
1
/4” (3.2 cm)
thick or less. Cuts of meat that are too
thick may damage the Blades. Remove
all bones or hard items in the meat
before tenderizing or cubing. Damage
to the unit may occur if bones or hard
objects are pushed through.
4. Using the Tongs, insert meat into the
opening at the top of the Chute until
the meat contacts the Blades. Do not
allow the Tongs to contact the Blades.
FIGURE G
5. While facing the Tenderizer/Jerky
Slicer with the Handle to the right, rotate
the Handle CLOCKWISE to tenderize or
slice the meat. The Blades will pull meat
through the Tenderizer/Jerky Slicer. DO
NOT force meat into the Blades.
6. It may be necessary to pass the meat
through the Cuber/Tenderizer several
times to obtain the desired results.
You may also pass the meat through
at different angles if a different result is
desired.
FIGURE F
Base
C-Clamps
FIGURE G
Tongs
Cut Hazard. Keep fingers out of feed opening. Always use the
provided tongs.
w CAUTION

9
ENGLISH INSTRUCTIONS
There are basic rules to follow when handling food.
They are COOK, SEPARATE, CLEAN, and CHILL.
COOK
It’s crucial to cook food to a safe internal temperature to destroy bacteria that is present.
The safety of hamburgers and other foods made with ground meat has been receiving a lot
of attention lately, and with good reason. When meat is ground, the bacteria present on the
surface is mixed throughout the ground mixture. If this ground meat is not cooked to at least
160
o
F to 165
o
F (71
o
C to 74
o
C), bacteria will not be destroyed and there’s a good chance you
will get sick.
Solid pieces of meat like steaks and chops don’t have dangerous bacteria like E. coli on the
inside, so they can be served more rare. Still, any beef cut should be cooked to an internal
temperature of at least 145
o
F (63
o
C) (medium rare). The safe temperature for poultry is 165
o
F
(75
o
C) and solid cuts of pork should be cooked to 145
o
F (63
o
C).
SEPARATE
Foods that will be eaten uncooked and foods that will be cooked before eating MUST
ALWAYS be separated. Cross-contamination occurs when raw meats or eggs come in
contact with foods that will be eaten uncooked. This is a major source of food poisoning.
Always double-wrap raw meats and place them on the lowest shelf in the refrigerator so
there is no way juices can drip onto fresh produce. Then use the raw meats within 1-2 days
of purchase, or freeze for longer storage. Defrost frozen meats in the refrigerator, not on the
counter.
When grilling or cooking raw meats or sh, make sure to place the cooked meat on a clean
platter. Don’t use the same platter you used to carry the food out to the grill. Wash the utensils
used in grilling after the food is turned for the last time on the grill, as well as spatulas and
spoons used for stir-frying or turning meat as it cooks.
Make sure to wash your hands after handling raw meats or raw eggs. Washing hands with
soap and water, or using a pre-moistened antibacterial towelette is absolutely necessary after
you have touched raw meat or raw eggs. Not washing hands and surfaces while cooking is a
major cause of cross-contamination.
CLEAN
Wash your hands and work surfaces frequently when you are cooking. Washing with soap
and warm water for at least 15 seconds, then dry with a paper towel.
CHILL
Chilling food is very important. The danger zone where bacteria multiply is between 40
o
F and
140
o
F (4
o
C and 6
o
C). Your refrigerator should be set to 40
o
F (4
o
C) or below; your freezer should
be 0
o
F (-17
o
C) or below. Simple rule: serve hot foods hot, cold foods cold. Use chang dishes
or hot plates to keep food hot while serving. Use ice water baths to keep cold foods cold. Never
let any food sit at room temperature for more than 2 hours - 1 hour if the ambient temperature
is 90
o
F (32
o
C) or above. When packing for a picnic, make sure the foods are already chilled
when they go into the insulated hamper. The hamper won’t chill food - it just keeps food cold
when properly packed with ice. Hot cooked foods should be placed in shallow containers and
immediately refrigerated so they cool rapidly. Make sure to cover foods after they are cool.
NOTE: Special considerations must be made when using venison or other wild game, since it
can become heavily contaminated during eld dressing. Venison is often held at temperatures
that could potentially allow bacteria to grow, such as when it is being transported. Refer to
the USDA Meat and Poultry Department for further questions or information on meat and
food safety.
FOOD SAFETY

ONE-YEAR LIMITED WARRANTY
This warranty applies to products purchased and used in the U.S. and Canada. This is the only
express warranty for this product and is in lieu of any other warranty or condition.
This product is warranted to be free from defects in material and workmanship for a period of
one (1) year from the date of original purchase. During this period, your exclusive remedy is
repair or replacement of this product or any component found to be defective, at our option. If
the product or component is no longer available, we will replace with a similar one of equal or
greater value.
This warranty does not cover unauthorized repairs or service to products, products sold “as-
is” by retailers, glass, filters, wear from normal use, use not in conformity with the printed
directions, or damage to the product resulting from accident, alteration, abuse, or misuse.
This warranty extends only to the original consumer purchaser or gift recipient and is not
transferable. Keep the original sales receipt, as proof of purchase is required to make a
warranty claim. This warranty is void if the product is subjected to any voltage and waveform
other than as specified on the rating label (e.g., 120V ~ 60 Hz).
We exclude all claims for special, incidental and consequential damages caused by breach of
express or implied warranty. All liability is limited to the amount of the purchase price. Every
implied warranty, including any statutory warranty or condition of merchantability or
fitness for a particular purpose, is disclaimed except to the extent prohibited by law, in
which case such warranty or condition is limited to the duration of this written warranty.
This warranty gives you specific legal rights. You may have other legal rights that vary
depending on where you live. Some states or provinces do not allow limitations on implied
warranties or special, incidental, or consequential damages, so the foregoing limitations may
not apply to you.
To make a warranty claim, do not return this appliance to the store. Please call 1.800.814.4895
(001.216.901.6801 outside the US) or visit WestonSupply.com. For faster service, locate the
model, type, and series numbers on your appliance.
10

ABLANDADORA/CORTADORA
EN CUBOS DE CARNE
07-3101-W-A
manual
DEBIDO A CONSTANTES MEJORAS EN LA FÁBRICA, EL PRODUCTO QUE SE MUESTRA PUEDE
SER LIGERAMENTE DIFERENTE DEL PRODUCTO EN ESTA CAJA.

1. Lea todas las instrucciones.
2. NUNCA META LA MANO EN el Ablandador/Rebanador de cecina. Hacerlo
podría causarle lesiones graves. USE SIEMPRE LAS PINZAS QUE SE
ADJUNTAN.
3. MANTENGA LOS DEDOS LEJOS DE LAS NAVAJAS EN TODO MOMENTO.
No hacerlo puede causar lesiones. El conjunto de navajas y navajas de corte
es muy loso. Use guantes de Kevlar resistentes a los cortes (se venden por
separado) al manejar las navajas.
4. NO presione ni empuje la carne en el vertedero con los dedos o algún otro
objeto. Hacerlo puede causarle lesiones y daños en el aparato.
5. NUNCA use los dedos para raspar el alimento del ablandador/rebanador de
cecina mientras esté en funcionamiento. PUEDEN PRODUCIRSE LESIONES
GRAVES.
6. NO empuje las pinzas or other ni otros utensilios en las navajas
7. NUNCA DEJE SIN SUPERVISIÓN EL ablandador/rebanador de cecina. Es
necesaria la supervisión cercana cuando se use cualquier aparato cerca de
niños. Este aparato NO DEBE ser usado por niños.
8. NUNCA use accesorios o partes de otros fabricantes. Hacerlo ANULA LA
GARANTÍA.
9. Limpie cuidadosamente todas las partes que entren en contacto con los
alimentos antes de usar el ablandador/rebanador de cecina. Lave a mano
todas las partes y séquelas bien. Se recomienda usar guantes protectores y
resistentes a los cortes de para manipular las cuchillas.
10. NO trate de ablandar o rebanar carne con hueso u otras partes duras. Eso
dañaría la máquina.
11. RECÓJASE el pelo suelto y la ropa y enróllese las mangas antes de manejar
el ablandador/rebanador de cecina. QUÍTESE la corbata, anillos, relojes,
brazaletes y demás joyería antes de manejarlo.
12. NO USE el ablandador/rebanador de cecina bajo los efectos de drogas,
medicamentos o alcohol.
¡GUARDE ESTAS INSTRUCCIONES!
12
INSTRUCCIONES EN ESPAÑOL
SALVAGUARDIAS IMPORTANTES
Cuando utilice artefactos eléctricos, siempre deben seguirse precauciones de
seguridad básicas a n de reducir el riesgo de incendio, descarga eléctrica, y/o
lesiones a personas, incluyendo las siguientes:


1
2
3
4
5
6
7
8
9
10
12
11
13
16
15
14
17
18
15
16
19
15a
16a
15a
16a
14
INSTRUCCIONES EN ESPAÑOL

LISTA DE COMPONENTES
NÚMERO DE DIAGRAMA DESCRIPCIÓN DE LA PIEZA NÚMERO DE PIEZA
1 GABINETE INFERIOR 07-3184-A
2 GABINETE SUPERIOR 07-3181-A
3 MANGO 07-3125-A
4 CONJUNTO DE LA REJILLAS DE NAVAJAS
DE ACERO INOXIDABLE
07-3103
5 PEINE IZQUIERDO DE ACERO INOXIDABLE 07-3119
6 PEINE DERECHO DE ACERO INOXIDABLE 07-3118
7 TORNILLO DE MANO DEL GABINETE (2) 07-3166
8 TORNILLO DE MANO DEL MANGO 07-3145
9 TORNILLO DE BANCO (2) 07-3105
10 BASE 07-3111
11 PATA DE SOPORTE IZQUIERDA 07-3179-L-A
12 PATA DE SOPORTE DERECHA 07-3179-R-A
13 VERTEDOR 07-3182-A
14 PINZAS DE ACERO INOXIDABLE 07-3151
15 TORNILLO DEL VERTEDOR Y DE LA BASE (6) 07-3183
15A VERTEDOR Y ARANDELAS DE LA BASE (6) N/A
16 TORNILLO DE LA PATA (4) 07-3180
16A ARANDELAS DE LA PATA (4) N/A
17 LLAVE ALLEN/TORNILLOS DEL VERTEDOR
Y DE LA BASE
07-3178
18 LLAVE ALLEN/TORNILLOS
DE LA PATA
07-3185
19 LLAVE ALLEN/NAVAJAS 07-3186
ACCESORIOS ADICIONALES
DISPONIBLES
DESCRIPCIÓN DE LA PIEZA NÚMERO DE PIEZA
NAVAJAS DE LA REBANADORA DE CECINA 07-3302-W
MOTOR ACCESORIO 01-0103-W
Si cualquier componente de esta unidad está roto, si no funciona debidamente, o si necesita un
instructivo de repuesto, visítenos en la Web en
WestonSupply.com
O llame a Weston Brands, LLC larga distancia sin costo 1-800-814-4895
De lunes a viernes, de 8:00 am a 5:00 pm tiempo del ET. Fuera de Estados Unidos llame
al 001-216-901-6801
15
INSTRUCCIONES EN ESPAÑOL

INSTRUCCIONES DE LIMPIEZA
1. Lave cuidadosamente todas las partes en agua caliente y jabonosa. Enjuague
con agua limpia. Seque todas las piezas de inmediato. NOTA: NO sumerja
el conjunto de navajas en agua jabonosa donde no pueda verlo. Para evitar
lesiones, mantenga visible el conjunto de navajas en todo momento.
2. Revista todas las partes de metal con un rocío de silicona para alimentos.
CONSEJO ÚTIL: Un cepillo largo y delgado es muy útil para limpiar el conjunto de
navajas.
INSTRUCCIONES DE MONTAJE
1. Conecte las patas izquierda
y derecha a la base, usando la
llave Allen que se proporciona y
4 tornillos de base y arandelas.
FIGURA A
2. Usando la llave Allen y 4 tornillos
de pata y 4 arandelas, je las patas
izquierda y derecha al gabinete
inferior. FIGURA A
3. Instale el vertedor en el
gabinete superior usando la Allen
Wrench and the 2 llave Allen y 2
tornillos de vertedor y arandelas.
FIGURA B
4. Inserte el conjunto de navajas
en el gabinete inferior guiando el
eje de trasmisión en los cojinetes.
Revise que los engranes y
las navajas del conjunto de
navajas estén bien acomodados
y apoyados en los cojinetes
(FIGURA C). NOTA: La navaja
ablandadora es un juego de dos
piezas. La navaja rebanadora de
cecina es una sola pieza (se vende
por separado).
FIGURA A
FIGURA B
16
INSTRUCCIONES EN ESPAÑOL
Vertedor
Gabinete
superior
Tornillos del vertedor (2)
y arandelas (2)
Llave
Allen
Patas
Gabinete
inferior
Base
Tornillos de la base (4)
y arandelas (4)
Tornillos de pata (4)
y arandelas (4)
Llave
Allen
Llave
Allen
Peligro de Cortaduras. Las cuchillas son filosas, tenga
cuidado al manipularlas. Se sugiere el uso de guantes
resistentes a cortes.
w ADVERTENCIA

FIGURA C
FIGURA D
FIGURA E
17
INSTRUCCIONES EN ESPAÑOL
Conjunto de
navajas
Eje de
transmisión
5. Coloque el gabinete superior encima del
inferior y alinee los agujeros de los tornillos.
6. Fije el gabinete superior en el inferior
usando los dos tornillos de mano para el
gabinete. ¡NO LOS APRIETE EN EXCESO!
FIGURA D
7. Inserte el peine izquierdo y el derecho en
el gabinete superior. FIGURA D
NOTA: El peine izquierdo está marcado con
una “L” en la parte superior. El gabinete
superior tiene las marcas “L Comb” y
“R Comb” (peine izquierdo y derecho,
respectivamente) para ayudar en su
instalación.
8. Instale el mango en el eje de trasmisión
de las navajas. Fije el mango en el eje
de trasmisión con el tornillo de mano del
mango. FIGURA E
9. Para cambiar las navajas siga las
“Instrucciones de ensamble” como se indica.
Gabinete
inferior
Gabinete
superior
Tornillos de mano
del gabinete (2)
Mango
Tornillo de
mano del
mango
Eje de
transmisión
Cojinetes
Engranes
NOTA: Los engranes de las navajas
necesitan apretarse periódicamente. Apriete
el tornillo de los engranes con la llave Allen.
Engranes
Cojinetes
Peines

INSTRUCCIONES DE USO
1. Fije la base a la supercie de trabajo con
los dos tornillos de banco. Revise que el
mango pueda girar libremente. FIGURA F
2. Revise que los peines estén debidamente
instalados. NO use el ablandador y rebanador
de cecina sin los peines instalados.
3. Los cortes de carne deben ser de 3.2 cm
(1
1
/4”) de grosor o menos. Los cortes de
carne demasiado gruesos pueden dañar
las navajas. Quite todos los huesos y otras
piezas duras de la carne antes de ablandarla
o cortarla en cubos. El aparato puede dañarse
si le empujan huesos u objetos duros.
4. Con las pinzas inserte la carne en la
abertura superior del vertedero hasta que la
carne toque las navajas. No permita que las
pinzas toquen las navajas. FIGURA G
5. Con la ablandadora/rebanadora de cecina
con el mango a la derecha, gire el mango en
sentido de las manecillas para ablandar o
rebanar la carne. Las navajas empujan a la
carne a través de la ablandadora/rebanadora
de cecina. NO meta a fuerzas la carne en las
navajas.
6. Puede ser necesario pasar la carne varias
veces por la cortadora en cubos/ablandadora
para lograr los resultados deseados. También
puede pasar la carne en diferentes ángulos si
desea un resultado diferente.
FIGURA F
Base
Tornillo
de
banco
FIGURA G
Pinzas
18
INSTRUCCIONES EN ESPAÑOL
Peligro de Cortaduras. Mantenga los dedos fuera de
la abertura de alimentación. Utilice siempre las pinzas
proporcionadas.
w PRECAUCIÓN

19
INSTRUCCIONES EN ESPAÑOL
Hay que seguir ciertas reglas básicas al manejar alimentos.
Las reglas son COCINAR, SEPARAR, LIMPIAR y ENFRIAR.
COCINAR
Es muy importante cocinar los alimentos a una temperatura interna que destruya cualquier
bacteria que esté presente. Últimamente se ha puesto mucha atención en la higiene de
las hamburguesas y otros alimentos elaborados con carne molida y con razón. Cuando se
muele la carne, las bacterias presentes en la supercie se revuelven en toda la mezcla de la
carne molida. Si la carne molida no se cuece a por lo menos 71°C a 74°C (160°F - 165°F),
no se destruyen las bacterias y hay una buena posibilidad de enfermarse.
Las piezas de carne sólida, como los letes y las chuletas, no tienen en su interior bacterias
peligrosas como le E. coli, por lo que pueden servirse menos cocidas. Aun así, cualquier
corte de vacuno debe cocinarse a una temperatura interna de por lo menos 63°C (145°F)
(medio cocido). La temperatura recomendable para las aves es de 75°C (165°F) y los cortes
sólidos de carne de puerco deben cocinarse a 71°C (160°F).
SEPARAR
SIEMPRE DEBE separar los alimentos que se comen crudos y los que se vayan a cocer
antes de comerse. La contaminación cruzada se presenta cuando la carne o los huevos
crudos entran en contacto con alimentos que se van a consumir sin cocimiento. Ésta es una
importante causa de intoxicaciones. Siempre use una doble envoltura para la carne cruda
y colóquela en la repisa más baja del refrigerador, para que no haya manera de que su
jugo gotee en las verduras frescas. Use la carne cruda 1 o 2 días después de comprarla, o
congélela para guardarla más tiempo. Descongele la carne congelada en el refrigerador, no
en el mesón de la cocina.
Cuando ase o cocine carne o pescado crudo, coloque la carne ya cocida en un platón
limpio. No use el mismo platón que usó para llevar la carne al asador. Lave los utensilios
usados en el asador después de haber volteado los alimentos por última vez, así como las
cucharas y espátulas usadas para freír o para voltear la carne al estarla cocinando.
No olvide lavarse las manos después de manejar carne o huevos crudos. Es absolutamente
necesario lavarse las manos con agua y jabón o usar una toallita húmeda antibacteriana
después de tocar carne o huevos crudos. No lavarse las manos o las supercies cuando se
cocina es una causa importante de contaminación cruzada.
LIMPIAR
Lávese las manos y las supercies de trabajo con frecuencia mientras esté cocinando.
Lávese con agua tibia y jabón durante por lo menos 15 segundos; después séquese con
una toalla de papel.
ENFRIAR
Es muy importante enfriar los alimentos. La zona de peligro para la multiplicación de
bacterias está entre los 4 °C y 60 °C (40 °F - 140 °F). El refrigerador debe estar a 4 °C (40
°F) o menos; el congelador debe estar a -17 °C (0 °F) o menos. Regla básica: sirva calientes
los alimentos calientes y sirva fríos los alimentos fríos. Use platos calientes para mantener
caliente la comida a la hora de servirla. Use baños de agua con hielo para mantener fría
la comida fría. Nunca deje ningún alimento a temperatura ambiente por más de 2 horas;
o por más de 1 hora si la temperatura ambiente es de 32 °C (90 °F) o superior. Cuando
empaque para un picnic, asegúrese de que la comida ya esté fría cuando la meta en la
canasta aislada. La canasta no enfría la comida; sólo la mantiene fría si está debidamente
empacada con hielo. Los alimentos cocidos calientes deben colocarse en recipientes bajos
y refrigerarse de inmediato para que se enfríen rápidamente. No olvide cubrir los alimentos
una vez que se enfríen..
NOTA: Debe tener especial consideración al usar venado y otra carne de caza, ya que
puede contaminarse durante la preparación de campo. El venado suele mantenerse a
temperaturas que podrían permitir el crecimiento de bacterias, como cuando se transporta.
Consulte con el Departamento de Carnes y Aves de la USDA si tiene más preguntas o
quiere más información sobre higiene de carne y alimentos.
SEGURIDAD DE LOS ALIMENTOS

GARANTÍA LIMITADA DE UN AÑO
Esta garantía se aplica a los productos que se compran y utilizan en EE. UU. y Canadá.
Esta es la única garantía expresa para este producto, y se otorga en lugar de cualquier
otra garantía o condición.
Se garantiza que este producto está libre de defectos de materiales y de mano de obra
por un período de un (1) año desde la fecha de la compra inicial. Durante este período,
su exclusiva compensación es la reparación o el reemplazo de este producto o cualquier
componente que resulte defectuoso, a nuestra elección. Si un producto o componente ya
no está disponible, lo reemplazaremos con otro comparable de igual o mayor valor.
Esta garantía no cubre reparaciones ni servicios no autorizados, productos vendidos por
minoristas “en el estado en que se encuentran”, vidrios, filtros, desgaste por uso normal,
uso no conforme con las instrucciones impresas, o daños al producto como resultado de
un accidente, alteración, abuso o uso indebido. Esta garantía se aplica solo al consumidor
que es el comprador original o quien recibe el regalo, y es intransferible. Conserve el
recibo original de compra, ya que necesitará el comprobante de compra para cualquier
reclamo bajo la garantía. Esta garantía es nula si el producto es sometido a cualquier
voltaje o forma de onda que difieran de lo especificado en la etiqueta de clasificación (por
ej. 120 V ~ 60 Hz).
Excluimos todo reclamo por daños especiales, incidentales y consecuentes causados
por la violación de la garantía expresa o implícita. Cualquier posible responsabilidad por
daños se limita al monto del precio de compra. Se renuncia a toda garantía implícita,
incluida cualquier garantía reglamentaria o condición de comercialización o
de adecuación a un propósito específico, excepto en los casos en que la ley lo
prohíbe, en donde tal garantía o condición está limitada a la duración de esta
garantía escrita.
Esta garantía limitada le otorga a usted derechos legales específicos. Usted puede
tener otros derechos legales que variarán según el lugar donde viva. Algunos estados
o provincias no permiten limitaciones en cuanto a las garantías implícitas, o a daños
especiales, incidentales o consecuentes, por lo que las limitaciones anteriores pueden no
aplicarse.
Para hacer un reclamo de garantía, no devuelva el aparato a la tienda. Por favor llame
1.800.814.4895 (001.216.901.6801) fuera de los EE ¡Visite WestonSupply. com. Para un
servicio más rápido, localice el modelo, tipo y número de serie de su aparato.
20
La page est en cours de chargement...
La page est en cours de chargement...
La page est en cours de chargement...
La page est en cours de chargement...
La page est en cours de chargement...
La page est en cours de chargement...
La page est en cours de chargement...
La page est en cours de chargement...
La page est en cours de chargement...
La page est en cours de chargement...
La page est en cours de chargement...
La page est en cours de chargement...
-
 1
1
-
 2
2
-
 3
3
-
 4
4
-
 5
5
-
 6
6
-
 7
7
-
 8
8
-
 9
9
-
 10
10
-
 11
11
-
 12
12
-
 13
13
-
 14
14
-
 15
15
-
 16
16
-
 17
17
-
 18
18
-
 19
19
-
 20
20
-
 21
21
-
 22
22
-
 23
23
-
 24
24
-
 25
25
-
 26
26
-
 27
27
-
 28
28
-
 29
29
-
 30
30
-
 31
31
-
 32
32


Weston 07-3101-W-A Mode d'emploi
- Catégorie
- Trancheuses
- Taper
- Mode d'emploi
dans d''autres langues
- English: Weston 07-3101-W-A User guide
- español: Weston 07-3101-W-A Guía del usuario
- português: Weston 07-3101-W-A Guia de usuario
Documents connexes
-
Weston 07-3101-W-A Manuel utilisateur
-
-
-
-
-
-
-
-
-
Weston 01-0008-W Le manuel du propriétaire

