La page est en cours de chargement...

5581500COM
5DrawerDresser
B345581500COM0
THISINSTRUCTIONBO OKLETCONTAINS
IMPORTANT
SAFETYINFORMATION.PLEASEREADANDKEEPFORFUTUREREFERENCE.
FollowAmeriwoodHome
Tube
You
DateofPurchase___/___/___
LotNumber:
DoNotReturnThisProduct!
Contactourcustomerserviceteamforhelpfirst.
Call:1‐800‐489‐3351(tollfree)
Monday‐Friday9am‐5pmCST
Visit:www.ameriwoodhome.com
AssemblyDifficultyMeter
Easy
Tough
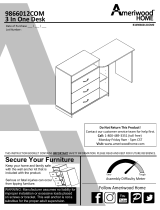
SecureYourFurniture
Keepyourhomeandfamilysafe
withthewallanchorkitthatis
includedwiththeproduct.
Seriousorfatalcrushinginjuriescan
occurfromtippingfurniture.
WARNING:Manufacturerassumesnoliability
forimproperinstallationorexcessiveloads
placedonscrewsorbracket.Thiswallanchor
isnotasubstituteforproperadultsupervision.

ContactUs!
HelpfulHints
2
ameriwoodhome.com
DoNOTreturnthisproduct!
Contactourfriendlycustomerserviceteamfirstforhelp.
Callus!
1‐800‐489‐3351
Monday‐Friday
9am‐5pmCST
Visitameriwoodhome.comtoviewthe
limitedwarrantyvalidintheU.S.andCanada.
AssemblyTips
‐Openyouritemintheareayouplantokeepittoavoidexcessivehea vylifting.
‐Identify,sortandcountthe partsbeforeattemptingassembly.
‐Compressiondowelsarelightlytappedinwithahammer.
‐Slidesarelabeledwitha
R
(right)and
L
(left)forproperplacement.
‐MakesuretoalwaysfacethepointonthetopoftheCamLocktowardsthe
outeredge.
‐Useallthenailsprovidedforthebackpanelandspreadthemoutequally.
‐Backpanelmustbeusedtomakesureyourunitissturdy.
‐Do
NOTuseharshchemicalsorabrasivecleanersonthisitem.
‐Neverpush,pull,ordragyourfurniture.
Tube
You
Tube
You
PEOPLENEEDEDFORASSEMBLY:1‐2
ESTIMATEDASSEMBLYTIME:2‐3HOURS

3
ameriwoodhome.com
BeforeYouStart
Q
u
i
c
k
T
i
p
A
s
s
e
m
b
l
y
CamLockFasteningSystem
ThisCamLockFasteningSystem willbeusedthroughouttheassemblyprocess.
1
3
2
4
Tube
You
Readthrougheachstepcarefullyandfollowtheproperorder
Separateandcountallyourpartsandhardware
Giveyourselfenoughroomfortheassemblyprocess
Havethefollowingtools:FlatHeadScrewdriver,#2PhillipsHead
ScrewdriverandHammer
Caution:Ifusingapowerdrillorpowerscrewdriverforscr ewing,
pleasebeawaretoslowdownandstopwhenscrewistight.
Failuretodosomayresultinstrippingthescrew.

4
ameriwoodhome.com
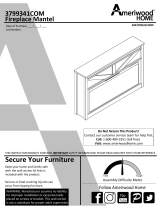
BoardIdentification
Notactualsize
LeftPanel
35581340010
Bottom
35581340040
FrontBaseRail
35581340060
LeftBaseRail
35581340080
Top
35581340030
x4
Support
35581340050
BackBaseRail
35581000070
RightPanel
35581340020
RightBaseRail
35581340090
x2
FrontVerticalMolding
35581340100
x2
RearVerticalMolding
35581340110
x5
DrawerBrace
35538000121
UpperDrawerFront
35581333130
x5
DrawerBottom
39991340071310D
x2
FrontRail
35581340170
x4
DrawerFront
35581333140
x4
SideMolding
35581340160
x2
UpperSideMolding
35581340180
UpperFrontMolding
35581340190
A
B
C
D
E
F
G
H
I
J
K
L
M
N
O
P
Q
R
S

5
ameriwoodhome.com
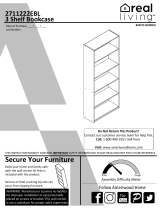
BoardIdentification
Notactualsize
BackPanel
K558100000
Thispieceispaperboard
construction.Itisnotmade
fromwood,butisrequired
fortheassemblyofyour
unit.
x5
DrawerBack
39991167070350B
x10
DrawerSide
39991167346200C
T
DWR
BACK
DWR
SIDE
DWR
BACK
DWR
BACK
DWR
SIDE
DWR
SIDE
DWR
SIDE
DWR
SIDE
N
M
L
L
O
O
T
Upper Drawer
A
B
C
D
E
E
E
E
F
H
I
J
J
K
K
P
P
P
P
Q
Q
R
S

6
ameriwoodhome.com
PartList
ActualSize
10
3
11
4
2
5
1
6
7
8
12
(x60)
#A12120
#8x7/16"panhead
(x50)
#A11080
#6x7/16"flathead
(x8)
#A21660
wooddowel
(x25)
#A22610
cambolt
(x25)
#A22620
camlock
(x4)
#A22910
connectorbolt
(x4)
#A22920
connector
(x10)
#A53600
anglebracket
(x36)
#A21110
nail
(x5)
#A21520
compressiondowel
(x10)
#A17250
8‐32x5/8"truss
(x30)
#A21970
drivefastener
(x4)
#A23030
confirmatscrew
(x10)
#A13020
#8x1‐1/2"pan
head
(x24)
#A12950
#8x1‐1/8"flat
head
13
14
(x4)
#A21550
wooddowel
9
17
15

7
ameriwoodhome.com
PartList
LeftCabinetMember
RightCabinetMember
LeftDrawerMember
RightDrawerMember
(x5)
#A56750
drawer slide pkg.
18b
18c
18d
18a
#A84050
safetybracketkit
(x10)
#A54520
drawerbracket
19a
19b
19c
19d
(x5)
#A50875
handle
20
21

8
ameriwoodhome.com
STEP
1
(x8)
#A12950
finishededge
15
15
15
15
15
15
15
A
J
K
Usingscrews(15),attachthefrontverticalmolding(J)andrear
verticalmolding(K)totheleftpanel(A).
Pleasebesuretoscrewintothesurfaceofthefrontvertical
moldingwiththepilotholes.
Donotfullytightenthescrewsuntilnextstepiscompleted.
Pilotholeinfront
verticalmolding.
15
15

9
ameriwoodhome.com
STEP2
(x4)
#A12950
Usingscrews(15),attachthesidemoldings(P)totheleftpanel
(A).
Nowtightenthescrewsthatwereleftloseintheprevious
step.
P
P
P
K
J
A
Note:Thesidemolding(P)hasanextraholeinit.Thisisa
referencehole.Thisistoindicatethatthisisthefrontend
ofthesidemolding.
frontend
frontend
15
15
15
15
frontend

10
ameriwoodhome.com
STEP3
4
(x2)
#A22620
(x4)
#A22610
(x15)
#A11080
18a
(x5)
#A56750
marked with a "L"
1
1
2
2
18a
4
2
2
2
1
18a
18a
18a
18a
18a
A
J
Proper orientation of CAM LOCK
Tip
Assembly
Quick

11
ameriwoodhome.com
STEP
4
Usingscrews(15),attachthefrontverticalmolding(J)andrear
verticalmolding(K)totherightpanel(B).
Pleasebesuretoscrewintothesurfaceofthefrontvertical
moldingwiththepilotholes.
Donotfullytightenthescrewsuntilnextstepiscompleted.
Pilotholeinfront
verticalmolding.
finishededge
15
15
15
15
15
15
15
J
K
B
(x8)
#A12950
15
15

12
ameriwoodhome.com
STEP
5
Usingscrews(15),attachthesidemoldings(P)totherightpanel
(B).Nowtightenthescrewsthatwereleftloseintheprevious
step.
Note:Thesidemolding(P)hasanextraholeinit.Thisisa
referencehole.Thisistoindicatethatthisisthefrontend
ofthesidemolding.
(x4)
#A12950
B
J
K
P
P
P
15
15
frontend
frontend
15
15
frontend

13
ameriwoodhome.com
STEP
6
Proper orientation of CAM LOCK
Tip
Assembly
Quick
1
2
4
2
1
(x2)
#A22620
(x4)
#A22610
(x15)
#A11080
(x5)
#A56750
marked with a "R"
18b
1
2
2
2
18b
18b
18b
18b
18b
18b
4
B
J

14
ameriwoodhome.com
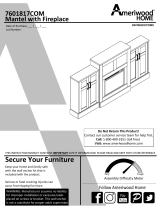
STEP
7
14
17
(x10)
#A13020
(x4)
#A21550
14
14
14
14
14
14
14
14
17
17
C
R
R
S
flatedge
flatedge
Insertfourlongwooddowels(17)intothelargerholes
inthetop(C).Pressthetwouppersidemoldings(R)
ontothewooddowels(17)andpressuntilseatedonto
thetop(C).Fastentothetop(C)withscrews(14)as
shown.Positiontheupperfrontmolding(S)as
shown
andattachwithscrews(14)asshown.
finishededge
Besuretousetheholesshown.

15
ameriwoodhome.com
STEP8
5
8
19b
19a
(x4)
#A22610
(x6)
#A12120
(x3)
#A53600
#A84050
safetybracketkit
2
2
2
2
2
5
5
8
19a
19b
sideview
C
Q
S
Donottightenthisscrew.

16
ameriwoodhome.com
STEP9
Proper orientation of CAM LOCK
Tip
Assembly
Quick
1
1
3
(x8)
#A22620
(x8)
#A21660
1
3
3
E
x4

17
ameriwoodhome.com
STEP10
Youwillneedtotaptheconnector(7)
withahammertofullyinsert.Besure
theconnectorispositionedasshown
beforetappingintohole.
Proper orientation of CAM LOCK
Tip
Assembly
Quick
1
2
(x4)
#A22620
(x4)
#A22610
(x4)
#A22920
7
1
1
2
7
7
7
7
2
2
H
I

18
ameriwoodhome.com
STEP
11
1
5
8
(x2)
#A12120
(x2)
#A53600
(x4)
#A22620
1
1
5
8
Proper orientation of CAM LOCK
Tip
Assembly
Quick
G

19
ameriwoodhome.com
STEP12
8
5
2
(x2)
#A12120
(x2)
#A53600
finishededge
(x4)
#A22610
2
8
5
2
F

20
ameriwoodhome.com
STEP13
6
(x4)
#A22910
6
6
6
6
finishededge
rawsurface
D
Besuretouseholesclosesttotheedge.
1/50