Toro Canadian Decal Kit, 2007 and After Lawn Mower Guide d'installation
- Taper
- Guide d'installation

Form No. 3357-705 Rev A
Canadian Decal Kit
For 2007 and After Toro Lawn Mower with Briggs and
Stratton Engine
Model No. 114-1584
Installation Instructions
Installation
Loose Parts
Use the chart below to verify that all parts have been shipped.
Step
Description
Qty.
Use
1
Decals
4
Install the decals.
Note: Visit www .T oro .com and do wnload the F renc h Operator’ s Manual that cor responds to the model
and serial n umber of the product on whic h this kit is installed.
Step
1
Installing the Decals
Parts needed for this step:
4
Decals
Procedure
Install the decals in the positions indicated in the
table belo w . Place eac h Canadian decal directly
o v er the cor responding US English decal.
Install eac h decal as follo ws:
1. T horoughly clean the area where y ou will
install the decal.
2. Dampen the area with w ater or mildly soapy
w ater .
3. P eel the decal from the bac king and install it in
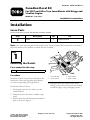
place as sho wn in Figure 1 .
Figure 1
1. Decal 104-7908 3. Decal 94-8072
2. Decal 112-8759 4. Decal 112-8867
4. Squeeg ee across the surface of the decal,
star ting at the center of the decal and w orking
to w ard the edg es , using o v erlapping strok es .
© 2007—The Toro® Company
8111 Lyndale Avenue South
Bloomington, MN 55420
Register at www.Toro.com. Original Instructions (EN)
Printed in the USA.
All Rights Reserved

Location
US English Canadian
On the back
right-hand
corner on top
of the mower
housing
105-6838
94-8072
On the left hand
side of the rear
door
No Decal
104-7908
On the rear door
105-1295
112-8759
On the left rear
of the housing
112-8868
112-8867
2

Form No. 3357 -705 Rev A
Trousse d'autocollants pour le Canada
Pour tondeuse Toro équipée d'un moteur Briggs and
Stratton à partir de 2007
N° de modèle 108 -8179
Instructions d'installation
Mise en service
Pièces détachées
Reportez -vous au tableau ci -dessous pour vérier si toutes les pièces ont été expédiées.
Étape
Description
Qté
Utilisation
1
Autocollants
4
Pose des autocollants.
Remarque: R endez -v ous sur le www .T oro .com et téléc harg ez, le manuel de l’utilisateur en français
cor respondant au modèle et au n uméro de série du produit por tant ces autocollants .
1
Pose des autocollants
Pièces nécessaires pour cette
opération :
4
Autocollants
Procédure
Collez les autocollants aux emplacements indiqués
dans le tableau ci -dessous . R ecouvrez directement
les autocollants anglais a v ec les autocollants
canadiens cor respondants .
Placez c haque autocollant comme suit :
1. Netto yez soigneusement la surface a v ant
d'apposer l'autocollant.
2. Humidifiez la surface a v ec de l'eau pure ou
légèrement sa v onneuse .
3. Ôtez la pellicule de protection au dos de
l'autocollant, puis placez l'autocollant à
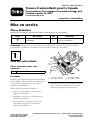
l'endroit prévu ( Figure 1 ).
Figure 1
1. Autocollant 104 -7908 3. Autocollant 94 -8072
2. Autocollant 112 -8759 4. Autocollant 112 -8867
4. Aplatissez la surface de l'autocollant du centre
v ers les bords pour éliminer les bulles d'air .
Empiétez légèrement à c haque passag e .
© 2007—The Toro® Company
8111 Lyndale Avenue South
Bloomington, MN 55420
Enregistrez votre produit à www.Toro.com
Traduction du texte d'origine (FR)
Imprimé aux États -Unis
Tous droits réservés

Emplacement
Anglais Canadien
En haut du carter
de tondeuse,
dans le coin
arrière droit
105 -6838
94 -8072
Sur le côté
gauche du volet
arrière
Pas d'autocollant
104 -7908
Sur le volet
arrière
105 -1295
112 -8759
En haut du carter
de tondeuse,
dans le coin
arrière gauche
112 -8868
112 -8867
2
-
 1
1
-
 2
2
-
 3
3
-
 4
4


Toro Canadian Decal Kit, 2007 and After Lawn Mower Guide d'installation
- Taper
- Guide d'installation
dans d''autres langues
Documents connexes
-
Toro Canadian Decal Kit, 2006 Lawn Mower Guide d'installation
-
-
-
-
-
-
-
Toro Super Recycler Lawn Mower Manuel utilisateur