ETS SolarForce 652V Manuel utilisateur
- Catégorie
- Solariums
- Taper
- Manuel utilisateur


25809-02A
Introduction - 1
Congratulations on your purchase of this
technologically advanced sun tanning unit.
It has been designed to provide years of
dependable service for you.
Please read all the instructions in this booklet
before installing and using the unit. Always be
sure to observe all safety precautions.
Safety Information . . . . . . . . . . . . . . . . . . . . . . . . . . . . . . .2
Installation . . . . . . . . . . . . . . . . . . . . . . . . . . . . . . . . . . . .4
Pre-Installation Planning . . . . . . . . . . . . . . . . . . . . . . .4
Unpacking and Inspection . . . . . . . . . . . . . . . . . . . . .5
Tools Required . . . . . . . . . . . . . . . . . . . . . . . . . . . . . .5
Hardware Inventory . . . . . . . . . . . . . . . . . . . . . . . . . .6
Assembly Procedures . . . . . . . . . . . . . . . . . . . . . . . . .7
Adjusting Hinges . . . . . . . . . . . . . . . . . . . . . . . . . . .25
Electrical Connections . . . . . . . . . . . . . . . . . . . . . . .26
Remote Connections . . . . . . . . . . . . . . . . . . . . . . . . .27
Operation . . . . . . . . . . . . . . . . . . . . . . . . . . . . . . . . . . . .29
Before You Tan . . . . . . . . . . . . . . . . . . . . . . . . . . . . .29
Exposure Times . . . . . . . . . . . . . . . . . . . . . . . . . . . . .29
Tanning Position . . . . . . . . . . . . . . . . . . . . . . . . . . . .29
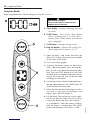
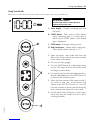
Using Your Booth . . . . . . . . . . . . . . . . . . . . . . . . . . .30
Care and Maintenance . . . . . . . . . . . . . . . . . . . . . . . . . . .32
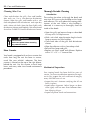
Cleaning After Use . . . . . . . . . . . . . . . . . . . . . . . . . .32
Hour Counter . . . . . . . . . . . . . . . . . . . . . . . . . . . . . .32
Thorough Periodic Cleaning . . . . . . . . . . . . . . . . . . .32
Mechanical Inspection . . . . . . . . . . . . . . . . . . . . . . .32
Lamp and Grill Maintenance . . . . . . . . . . . . . . . . . . .33
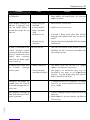
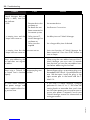
Troubleshooting . . . . . . . . . . . . . . . . . . . . . . . . . . . . . . . .36
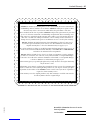
Limited Warranty . . . . . . . . . . . . . . . . . . . . . . . . . . . . . . .41
Contents

25809-02A
2 - Safety Information
Ultraviolet radiation. Follow instructions.Avoid overexposure. As with natural sunlight, overexposure can
cause eye and skin injury and allergic reactions. Repeated exposure may cause premature aging of the
skin and skin cancer. WEAR PROTECTIVE EYEWEAR; FAILURE TO MAY RESULT IN SEVERE BURNS OR LONGTERM
INJURY TO THE EYES. Medications or cosmetics may increase your sensitivity to the ultraviolet radiation. Consult physician
before using sunlamp if you are using medications or have a history of skin problems or believe yourself especially sensitive
to sunlight. If you do not tan in the sun, you are unlikely to tan from the use of this product. Children, the elderly, or fair skinned
people who always burn easily and either never tan or tan minimally should not use this equipment.
For a uniform tan, center yourself within the booth. Other positions may result in overexposure to parts of your body. Do not
use without wire grills in place. Untanned persons should not tan on consecutive days during their first week of tanning.
Never tan more than once a day. Tanning normally appears after the first few sessions and maximizes after approximately
four weeks. Tan once or twice per week thereafter to maintain appearance. Persons already having a base tan may begin
at advanced levels corresponding to the extent of their base tan.
New lamps emit approximately 10% more ultraviolet radiation during the first 50 hours of operation. Recommended tanning
times should therefore be reduced by approximately 10% during that period.
WARNING: • Read the instructions booklet before using this sunlamp product. • All persons in the room should wear pro-
tective eyewear when lamps are on. Recommended eyewear: provided eyeshields or equivalent eyewear as defined under
21 CFR 1040.20. Other types of eyewear may not provide adequate protection. Failure to use protective eyewear may result
in severe burns or other eye injury. If discomfort develops, discontinue use and consult a physician.
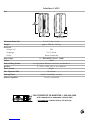
ONLY THE FOLLOWING LAMPS HAVE BEEN CERTIFIED FOR USE IN THE SOLARFORCE 652V:
BRONZING SUN™ Wolff® Model BS71-T12-160W VS-R BI-PIN
THIS EQUIPMENT MUST BE EARTH GROUNDED.
This product is in conformity with performance standards for sun lamp products under 21 CFR PART
1040.20 and ANSI/UL Standard 482. Certified to CAN/CSA Standard C22.2 NO. 224.
LABELING NOTICE: Labels are affixed on all systems to inform the user of possible dangers. Regulations are stated in 21 CFR, Section 1040.20,
and require that all products manufactured after September 8, 1986 which use sunlamps must display the following:
DISCONNECT POWER BEFORE ATTEMPTING TO CLEAN, RELAMP,
OR ENGAGE IN THE MAINTENANCE OF THIS PRODUCT.
88465
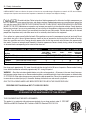
RECOMMENDED EXPOSURE TIMES IN MINUTES MAXIMUM EXPOSURE TIME IS 10 MINUTES
Level 1/Week 1 Level 2Level 3Level 4
Subsequent
Skin Type: 1st-3rd Sessions Maximum
ISensitive Skin (Burns easily and severely and does not tan.) NOT RECOMMENDED FOR TANNING
II Light (Burns easily and severely and tans minimally.) 246810
III Normal (Burns moderately and tans average.) 3 5 7 10 10
IV Dark (Burns minimally, tans easily and above average.) 4 6 8 10 10
DANGER

25809-02A
Renseignements sur la Sécurité - 3
Rayonnement ultraviolet.Veuillez suivre les instructions. Évitez une exposition excessive; tout comme
pour les rayons du soleil, une exposition excessive peut causer des blessures aux yeux et à la peau
et provoquer des réactions allergiques. Une exposition répétée peut causer le vieillissement prématuré de la peau et provo-
quer le cancer de la peau. PORTEZ DES LUNETTES PROTECTRICES: LE NON-RESPECT DE CETTE CONSIGNE DE
SÉCURITÉ PEUT ENTRAÎNER DE GRAVES BRÛLURES OU DES LÉSIONS OCULAIRES À LONG TERME. Les médica-
ments ou les produits cosmétiques peuvent augmenter votre sensibilité au rayonnement ultraviolet. Consultez un médecin
avant d’utiliser la lampe solaire si vous prenez des médicaments, si vous souffrez d’une maladie cutanée ou si vous croyez
être particulièrement sensible aux rayons du soleil. Si vous ne bronzez pas au soleil, il est peu probable que vous bronz-
erez sous une lampe solaire. Les enfants, les personnes âgées et les personnes qui ont une peau claire qui brûle facile-
ment, ne bronze jamais ou alors très peu, ne devraient pas utiliser cette lampe.
Pour un bronzage uniforme, placez-vous au centre du compartiment. Un mauvais alignement peut causer une exposition
excessive de certaines parties du corps. N’utilisez pas la lampe sans les grilles en fil métallique. La première semaine de
bronzage, les personnes qui n’ont pas un hâle initial ne doivent pas se faire bronzer tous les jours. Ne vous faites jamais
bronzer plus d’une fois par jour. Le bronzage commence normalement à apparaître après les premières séances : il atteint
son apogée au bout d’environ quatre semaines. Les personnes qui ont déjà un teint hâlé peuvent commencer à des
niveaux plus élevés, selon l’importance de leur hâle initial.
Les lampes neuves émettent approximativement 10 % de plus de rayons ultraviolets au cours des 50 premières heures de
fonctionnement. Le temps de bronzage doit donc êatre réduit d’environ 10 % pendant cette période.
AVERTISSEMENT : • Lisez le livret d’instructions avant d’utiliser cette lampe solaire. • Les autres personnes présentes
dans la pièce doivent aussi porter des lunettes protectrices lorsque les lampes sont allumées. Coquilles de protection pour
les yeux recommandées: Les coquilles de protection fournies ou l’équivalent, tel que le stipule le document 21 CFR
1040.20. Les autres types de lunettes protectrices peuvent ne pas assurer une protection adéquate. Utilisé sans lunettes
protectrices, ce produit peut causer des brûlures ou lésions oculaires graves. Si vous souffrez d’un malaise, arrêtez l’utili-
sation et consultez un médecin.
SEULES LES LAMPES INDIQUÉES CI-DESSOUS ONT ÉTÉ HOMOLOGUÉES POUR CET ÉQUIPEMENT:
BRONZING SUN™ Wolff® Modèle BS71-T12-160W VS-R BI-PIN
Cet équipement doit être mis à la terre.
Ce produit est conforme aux normes de rendement pour les lampes solaires dans le documents 21
CFR, partie 1040.20 , ANSI/UL 482 , CAN/CSA C22.2 N° 224.
Débrancher l’alimentation électrique avant de nettoyer l’appareil ,
d’en faire l’entretien ou de changer les lampes.
88465
DANGER
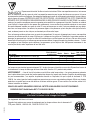
TEMPS D’EXPOSITION RECOMMANDÉ EN MINUTES LE TEMPS D’EXPOSITION MAXIMAL EST DE 10 MINUTES
Élevé 1/Semaine 1 Élevé 2 Élevé 3 Élevé 4 Sem. suivantes
Type de peau: 1st-3rd Sessions Temps maximal
IPeau sensible (brûle facilement et ne bronze pas) NON RECOMMANDÉ
II Peau claire (brûle facilement et bronze très peu) 2 468 10
III Peau normale (brûle et bronze de façon modérée) 3571010
IV Peau foncée (brûle très peu, bronze plus facilement que la moyenne) 4681010

25809-02A
4 - Pre-Installation Planning
Pre-Installation Planning
Before your booth is installed, you should observe the following considerations.
DANGER
Shock hazard.
Disconnect power before
servicing.
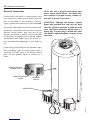
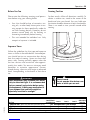
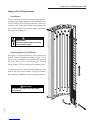
Air from the room is used to cool the unit.
Maximum ambient room temperature
should be 80°F. Place your booth no closer
than 6” from walls. Make sure nothing
obstructs the airflow into or out of the fan
openings. A poorly ventilated room may
cause the unit to become hot and cause
discomfort to the user.
CAUTION
Use of a voltage source above 230V AC
(with unit running) may prevent proper oper-
ation of the unit and could cause damage
and void the warranty.
CAUTION
• The SolarForce® 652V requires a dedicated
circuit capable of providing 70A, 1-phase
service (2 wire plus ground) at 220VAC. This
unit must be hardwired directly to a junction
box on a dedicated circuit. We recommend
connection by a professional electrician.
Consult local and/or national codes for proper
circuit breaker and wire gauge.
• IMPORTANT! Operating voltage must be
below 230V AC or may require a Buck
Booster.
Always wear protective eyewear when unit
is on.
Failure to may result in severe burns or
longterm injury to the eyes.
WARNING

25809-02A
Unpacking and Inspection - 5
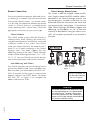
Unpacking and Inspection
The SolarForce® 652V arrives in eight boxes. For
ease of assembly, after inspection leave everything
in its original box until called for in the assembly
instructions.
Open each box and inspect the contents to make
sure they are free from any visible damage. Report
the extent of any damage to the transportation
company.
Note! The cartons are reusable. You may wish to
save them for future use.
As you unpack your boxes you should find the fol-
lowing:
• Right Module (box 1)
• Bag containing necessary assembly hard-
ware, and safety goggles (box 1)
• Left Module (box 2)
• Right Door (box 3)
• Left Door (box 4)
• Dome and ceiling assembly (box 5)
• Two blower assemblies (box 6)
• Base (box 7)
• Two Long Interior Handles (eighth box)
• Control Extrusion with keypad (eighth box)
Record the serial number of the Right Module in
the area provided at the back of this manual. This
information will be required if you ever need to
call customer service.
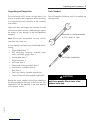
Tools Needed
You will need the following tools to assemble the
tanning booth.
Wrenches or ratchet wrenches
in 5/16” and 1/2” sizes
#2 Phillips screwdriver
Proper assembly of your booth requires at
least three people. Plan to have a few
helpers assist you.
CAUTION

25809-02A
6 - Hardware Inventory
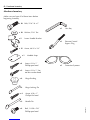
Hardware Inventory
Make sure you have all of these items before
beginning assembly.
x 10 Bolt, 5/16”-18 x 1”
x 10 Washer, 5/16” flat
x 2 Lower Handle Bracket
x 12 Screw, #8-32 x 3/4”
x 1 Module Strap
x 4 Screw, #10 x 1”
Phillips pan head
x 2 Screw, #10 x 1” slot-
ted hex washer head
x 4 Hinge Bushing
x 4 Hinge Locking Pin
x 4 Screw, #10 x 1”
Phillips flat head
x 2 Handle Pin
x 4 Bolt, 1/4-20 x 5/8”
Phillips pan head
x 1 Hex Key
x 1 Remote Control
Bypass Plug
x 1 Protective Eyewear


25809-02A
8 - Assembly Procedures
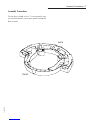
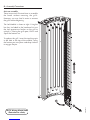
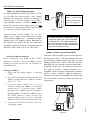
Note on assembly:
These instructions illustrate how to assemble
the booth without removing the grills.
However, you may find it easier to remove
the grills before beginning.
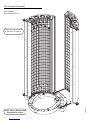
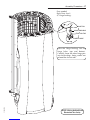
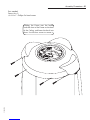
The Left Module is shown at right. Using the
hex key (included in the hardware kit) turn
the four quarter-turn latches on the grill to
unlock it. 1Swing the grill open, 2lift it and
3pull the bottom out.
To replace the grill, insert the top hinge pin
in the hole at the top of the module, swing
the bottom pin into place and drop it down
to engage the pin.
NOTE: Wiring deleted from
illustration for clarity.


25809-02A
10 - Assembly Procedures
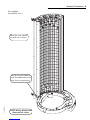
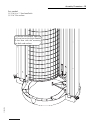
Parts needed:
(5) 5/16-18 x 1” Hex-head bolts
(5) 5/16” Flat washers
Open the grill:
Using the hex key (in hardware kit)
turn the four latches on the grill to
unlock it. Swing the grill open.
Secure the Left Module to the Base
with the five bolts and washers in the
slotted holes. (one hole not visible in
illustration because of grill)
2
1

25809-02A
Assembly Procedures - 11
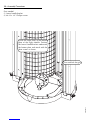
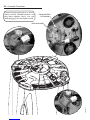
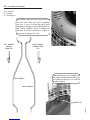
Parts needed:
(1) Lower handle bracket
(3) #8-32 x 3/4” Phillips pan-head thread cutting screws
Locate the three holes in the bottom
plate of the Left Module. Position the
Lower Handle Bracket underneath
the bottom plate and attach with the
three screws as shown.
Close and lock the grill.


25809-02A
16 - Assembly Procedures
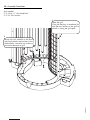
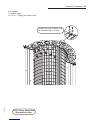
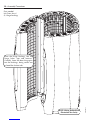
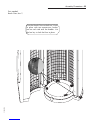
Parts needed:
Control Extrusion (box 1)
(2) #10 x 1” Phillips pan head screws
(2) #10 x 1” slotted hex washer head
screws
NOTE: Wiring and grills deleted
from illustration for clarity.
Feed the cable from the
Control Extrusion through the
hole between the modules).
1
Press the Control Extrusion into
place and secure the top with the
pan head screws.
2
Secure the bottom of the
extrusion with the hex head
screws. Use a 5/16” wrench
or ratchet.
3

25809-02A
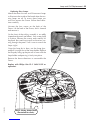
Assembly Procedures - 17
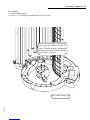
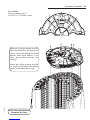
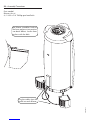
Parts needed:
Right Door (box3)
(2) Hinge bushings
Place the Hinge Bushings into the
hinge holes (top and bottom).
Carefully lower the door hinge pins
into the bushings, being careful not
to bend the friction tabs.
NOTE: Wiring deleted from
illustration for clarity.
LOWER HINGE
FRICTION TAB
HINGE BUSHING
HINGE PIN

La page charge ...
La page charge ...
La page charge ...
La page charge ...
La page charge ...
La page charge ...
La page charge ...
La page charge ...
La page charge ...
La page charge ...
La page charge ...
La page charge ...
La page charge ...
La page charge ...
La page charge ...
La page charge ...
La page charge ...
La page charge ...
La page charge ...
La page charge ...
La page charge ...
La page charge ...
La page charge ...
La page charge ...
-
 1
1
-
 2
2
-
 3
3
-
 4
4
-
 5
5
-
 6
6
-
 7
7
-
 8
8
-
 9
9
-
 10
10
-
 11
11
-
 12
12
-
 13
13
-
 14
14
-
 15
15
-
 16
16
-
 17
17
-
 18
18
-
 19
19
-
 20
20
-
 21
21
-
 22
22
-
 23
23
-
 24
24
-
 25
25
-
 26
26
-
 27
27
-
 28
28
-
 29
29
-
 30
30
-
 31
31
-
 32
32
-
 33
33
-
 34
34
-
 35
35
-
 36
36
-
 37
37
-
 38
38
-
 39
39
-
 40
40
-
 41
41
-
 42
42
-
 43
43
-
 44
44


ETS SolarForce 652V Manuel utilisateur
- Catégorie
- Solariums
- Taper
- Manuel utilisateur
dans d''autres langues
- English: ETS SolarForce 652V User manual
Autres documents
-
 ProCom Heating PP125FAV-C Manuel utilisateur
-
KBL K6S-K7S Serie Mode d'emploi
-
ProCom Heating PP40FA-C Manuel utilisateur
-
AOG Portable Grill L-Series Manuel utilisateur
-
-
-
NOMA Hayden 3-Reversible Blade 6-Speed Le manuel du propriétaire
-
Pioneer DJM-5000 Manuel utilisateur
-
Denon DN-X400 Le manuel du propriétaire
-
