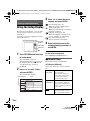
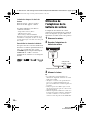
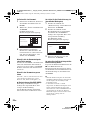
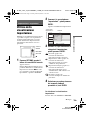
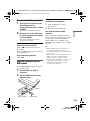
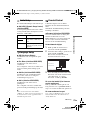
Sony dvp fx730 Le manuel du propriétaire
- Catégorie
- Lecteurs DVD
- Taper
- Le manuel du propriétaire
Ce manuel convient également à

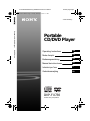
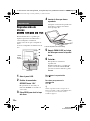
DVP-FX730Portable CD/DVD Player
E:\DTP\20090202\730_FM\GB\01US01COV-CEK.fm master page=right
Operating Instructions
Mode d'emploi
Bedienungsanleitung
Manual de instrucciones
Istruzioni per l'uso
Gebruiksaanwijzing
GB
FR
DE
ES
IT
NL
4-126-490-21(1)
DVP-FX730
© 2009 Sony Corporation
Portable
CD/DVD Player
01US01COV-CEK.fm Page 1 Tuesday, February 3, 2009 5:37 PM

master page=left
DVP-FX730
4-126-490-11(1)
C:\Documents and Settings\Kate_zhang\Desktop\730_FM\GB\01US01WAR-CEK.fm
2
GB
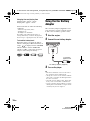
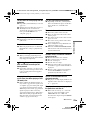
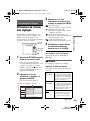
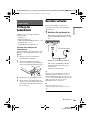
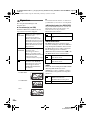
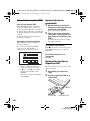
WARNING
To reduce the risk of fire or
electric shock, do not
expose this apparatus to
rain or moisture.
To avoid electrical shock,
do not open the cabinet.
Refer servicing to qualified
personnel only.
The mains lead must be
changed only at a qualified
service shop.
Batteries or batteries
installed apparatus shall
not be exposed to
excessive heat such as
sunshine, fire or the like.
This label is located on the
bottom of the unit.
This appliance is classified as a
CLASS 1 LASER product. The
CLASS 1 LASER PRODUCT
MARKING is located on the
bottom of the unit.
CAUTION
• The use of optical instruments
with this product will increase
eye hazard. As the laser beam
used in this CD/DVD player is
harmful to eyes, do not attempt
to disassemble the cabinet.
Refer servicing to qualified
personnel only.
• Danger of explosion if battery
is incorrectly replaced. Replace
only with the same or
equivalent type.
Disposal of Old Electrical &
Electronic Equipment
(Applicable in the European
Union and other European
countries with separate collection
systems)
This symbol on the product or on
its packaging indicates that this
product shall not be treated as
household waste. Instead it shall
be handed over to the applicable
collection point for the recycling
of electrical and electronic
equipment. By ensuring this
product is disposed of correctly,
you will help prevent potential
negative consequences for the
environment and human health,
which could otherwise be caused
by inappropriate waste handling
of this product. The recycling of
materials will help to conserve
natural resources. For more
detailed information about
recycling of this product, please
contact your local Civic Office,
your household waste disposal
service or the shop where you
purchased the product.
Disposal of waste batteries
(applicable in the European
Union and other European
countries with separate collection
systems)
This symbol on the battery or on
the packaging indicates that the
battery provided with this
product shall not be treated as
household waste.
On certain batteries this symbol
might be used in combination
with a chemical symbol. The
chemical symbols for mercury
(Hg) or lead (Pb) are added if the
battery contains more than
0.0005% mercury or 0.004%
lead.
By ensuring these batteries are
disposed of correctly, you will
help prevent potentially negative
consequences for the
environment and human health
which could otherwise be caused
by inappropriate waste handling
of the battery. The recycling of
the materials will help to
conserve natural resources.
In case of products that for
safety, performance or data
integrity reasons require a
permanent connection with an
incorporated battery, this battery
should be replaced by qualified
service staff only.
To ensure that the battery will be
treated properly, hand over the
product at end-of-life to the
applicable collection point for the
recycling of electrical and
electronic equipment.
For all other batteries, please
view the section on how to
remove the battery from the
product safely. Hand the battery
over to the applicable collection
point for the recycling of waste
batteries.
For more detailed information
about recycling of this product or
battery, please contact your local
Civic Office, your household
waste disposal service or the
shop where you purchased the
product.
Do not take apart or remodel the
player. Doing so can result in
electric shock. Consult your
nearest Sony dealer or Sony
Service Center for exchange of
rechargeable batteries, internal
checks or repair.
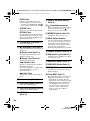
Precautions
• Install this system so that the
mains lead can be unplugged
from the wall socket
01US01COV.book Page 2 Friday, February 13, 2009 5:04 PM

DVP-FX730
4-126-490-11(1)
master page=rightC:\Documents and Settings\Kate_zhang\Desktop\730_FM\GB\01US01WAR-CEK.fm
3
GB
GB
immediately in the event of
trouble.
• The player is not disconnected
from the AC power source
(mains) as long as it is
connected to the wall outlet,
even if the player itself has
been turned off.
• To prevent fire or shock
hazard, do not place objects
filled with liquids, such as
vases, on the apparatus.
• Excessive sound pressure from
earphones and headphones can
cause hearing loss.
The manufacturer of this product
is Sony Corporation, 1-7-1
Konan Minato-ku Tokyo, 108-
0075 Japan. The Authorized
Representative for EMC and
product safety is Sony
Deutschland GmbH, Hedelfinger
Strasse 61, 70327 Stuttgart,
Germany. For any service or
guarantee matters please refer to
the addresses given in separate
service or guarantee documents.
If you have any questions or
problems concerning your
player, please consult your
nearest Sony dealer.
Copyrights, licencing and
trademarks
• This product incorporates
copyright protection
technology that is protected by
U.S. patents and other
intellectual property rights.
Use of this copyright
protection technology must be
authorized by Macrovision,
and is intended for home and
other limited viewing uses only
unless otherwise authorized by
Macrovision. Reverse
engineering or disassembly is
prohibited.
• Manufactured under licence
from Dolby Laboratories.
Dolby and the double-D
symbol are trademarks of
Dolby Laboratories.
• “DVD+RW,” “DVD-RW,”
“DVD+R,” “DVD+R DL,”
“DVD-R,” “DVD VIDEO,”
and “CD” logos are
trademarks.
• MPEG Layer-3 audio coding
technology and patents
licensed from Fraunhofer IIS
and Thomson.
• DivX, DivX Certified, and
associated logos are
trademarks of DivX, Inc. and
are used under licence.
• THIS PRODUCT IS
LICENSED UNDER THE
MPEG-4 VISUAL PATENT
PORTFOLIO LICENSE FOR
THE PERSONAL AND NON-
COMMERCIAL USE OF A
CONSUMER FOR
DECODING VIDEO IN
COMPLIANCE WITH THE
MPEG-4 VISUAL
STANDARD (“MPEG-4
VIDEO”) THAT WAS
ENCODED BY A
CONSUMER ENGAGED IN
A PERSONAL AND NON-
COMMERCIAL ACTIVITY
AND/OR WAS OBTAINED
FROM A VIDEO PROVIDER
LICENSED BY MPEG LA TO
PROVIDE MPEG-4 VIDEO.
NO LICENSE IS GRANTED
OR SHALL BE IMPLIED
FOR ANY OTHER USE.
ADDITIONAL
INFORMATION
INCLUDING THAT
RELATING TO
PROMOTIONAL,
INTERNAL AND
COMMERCIAL USES AND
LICENSING MAY BE
OBTAINED FROM MPEG
LA, LLC. SEE HTTP://
WWW.MPEGLA.COM
About this manual
• In this manual, “disc” is used as
a general reference for the
DVDs or CDs unless otherwise
specified by the text or
illustrations.
• Icons, such as , listed at
the top of each explanation
indicate what kind of media
can be used with the function
being explained.
For details, see “Playable
Media” (page 27).
• NEED-to-know information
(to prevent incorrect operation)
is listed under the
b icon.
NICE-to-know information
(tips and other useful
information) is listed under the
z icon.
IMPORTANT NOTICE
Caution: This player is capable
of holding a still video image
or on-screen display image on
your television screen
indefinitely. If you leave the
still video image or on-screen
display image displayed on
your TV for an extended period
of time you risk permanent
damage to your television
screen. Plasma display panel
televisions and projection
televisions are susceptible to
this.
01US01COV.book Page 3 Friday, February 13, 2009 5:04 PM

master page=left
DVP-FX730
4-126-490-11(1)
C:\Documents and Settings\Kate_zhang\Desktop\730_FM\GB\01US01COV-
CEKTOC.fm
4
GB
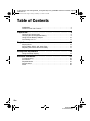
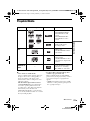
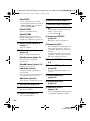
Table of Contents
WARNING . . . . . . . . . . . . . . . . . . . . . . . . . . . . . . . . . . . . . . . . . . . . . . 2
Guide to Parts and Controls . . . . . . . . . . . . . . . . . . . . . . . . . . . . . . . . . 5
Preparations . . . . . . . . . . . . . . . . . . . . . . . . . . . . . . . . . . . . 9
Checking the Accessories . . . . . . . . . . . . . . . . . . . . . . . . . . . . . . . . . . 9
Charging the Rechargeable Battery . . . . . . . . . . . . . . . . . . . . . . . . . . . 9
Using the Car Battery Adaptor . . . . . . . . . . . . . . . . . . . . . . . . . . . . . . 10
Connecting to a TV . . . . . . . . . . . . . . . . . . . . . . . . . . . . . . . . . . . . . . . 11
Playback . . . . . . . . . . . . . . . . . . . . . . . . . . . . . . . . . . . . . .12
Playing Discs . . . . . . . . . . . . . . . . . . . . . . . . . . . . . . . . . . . . . . . . . . . 12
Playing MP3, JPEG, and Video Files . . . . . . . . . . . . . . . . . . . . . . . . . 15
Adjusting the Picture Size and Quality
. . . . . . . . . . . . . . . . . . . . . . . . 17
Settings and Adjustments . . . . . . . . . . . . . . . . . . . . . . . . . . .18
Using the Setup Display . . . . . . . . . . . . . . . . . . . . . . . . . . . . . . . . . . . 18
Additional Information . . . . . . . . . . . . . . . . . . . . . . . . . . . . .22
Troubleshooting . . . . . . . . . . . . . . . . . . . . . . . . . . . . . . . . . . . . . . . . . 22
Precautions . . . . . . . . . . . . . . . . . . . . . . . . . . . . . . . . . . . . . . . . . . . . . 24
Playable Media . . . . . . . . . . . . . . . . . . . . . . . . . . . . . . . . . . . . . . . . . . 27
Specifications . . . . . . . . . . . . . . . . . . . . . . . . . . . . . . . . . . . . . . . . . . . 29
Index . . . . . . . . . . . . . . . . . . . . . . . . . . . . . . . . . . . . . . . . . . . . . . . . . . 30
01US01COV.book Page 4 Friday, February 13, 2009 5:04 PM

DVP-FX730
4-126-490-11(1)
master page=Right_2C:\Documents and Settings\Kate_zhang\Desktop\730_FM\GB\01US02WAR-CEK.fm
5
GB
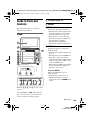
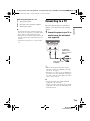
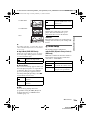
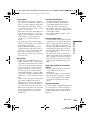
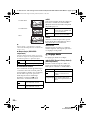
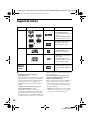
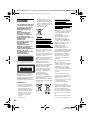
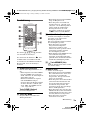
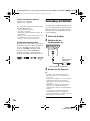
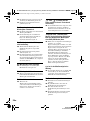
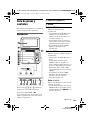
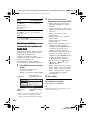
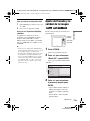
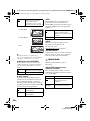
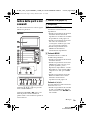
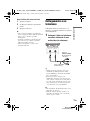
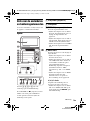
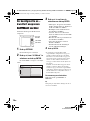
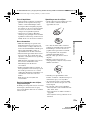
Guide to Parts and
Controls
For more information, see the pages
indicated in parentheses.
Player
Buttons C D E and F are also on the
remote.
The VOLUME+ and N (play) buttons
have a tactile dot. Use the tactile dot as a
reference when operating the player.
A LCD panel (page 12)
B Speaker
C DISPLAY button
Displays the playback information.
• When playing a DVD: Displays the
playback information and changes
the playback mode. See page 14.
• When playing a CD or video file:
Each time you press the button, the
time information switches.
• When playing a VIDEO CD:
Displays the playback information.
D MENU button
Displays the menu or changes the
playback mode.
• When playing a DVD: Displays the
menu.
• When playing a CD or VIDEO CD:
Each time you press the button,
switches Repeat Play, Random Play,
and Play. (Only when “PBC” is set to
“Off” for VIDEO CD.)
• When playing a JPEG file: Displays
the list of thumbnails and plays a
slideshow. See page 16.
C/X/x/c button
Moves the highlight to select a
displayed item.
• When playing a DVD or CD or
VIDEO CD: C/c on the player
works as the same as m/Mon the
remote.
INPUT
DISPLAY MENU
RETURN
OPEN
PUSH CLOSE
OPTIONS
ENTER
VOLUME
POWER CHARGE
DC IN 9.5V
VIDEO OUTAUDIO OUT
A
PHONES
B
OPERATE
ONOFF
,Continued
01US01COV.book Page 5 Friday, February 13, 2009 5:04 PM

master page=Left_2
DVP-FX730
4-126-490-11(1)
C:\Documents and Settings\Kate_zhang\Desktop\730_FM\GB\01US02WAR-CEK.fm
6
GB
ENTER button
Enters the selected item.
• When playing a DVD or CD or
VIDEO CD: ENTER on the player
works as the same as N.
RETURN button
Returns to the previous display.
OPTIONS button
Displays the menu for adjusting the
LCD screen (page 17) and using the
setup display (page 18).
E VOLUME (sound volume) +/–
button
Adjusts the volume.
F N (play) button (page 12)
Starts or re-starts playback.
X (pause) button (page 12)
Pauses or re-starts playback.
x (stop) button (page 12)
Stops playback.
. (previous) button
Skips to the beginning of the current
chapter/track/scene.
To go to the beginning of the previous
chapter/track/scene, press twice.
> (next) button
Skips to the next chapter/track/scene.
G Disc Lid (page 12)
H OPEN button (page 12)
Opens the disc lid.
I PUSH CLOSE (page 12)
Closes the disc lid.
J POWER indicator (page 12)
K CHARGE indicator (page 9)
L (remote sensor)
When operating by the remote, point it
at the remote sensor .
M OPERATE switch (page 12)
Turns the player on or off.
N HOLD switch
To avoid accidental button operation
of the player, set the HOLD switch to
the direction of the arrow.
All the buttons on the player are
locked, while the buttons on the
remote remain operable.
O PHONES (headphone) jack A, B
P USB jack (type A) (page 16)
Connect a USB device to this jack.
Q AUDIO OUT jack (page 11)
R VIDEO OUT jack (page 11)
S DC IN 9.5V jack (page 9, 10)
Connect the AC power adaptor or car
battery adaptor.
T INPUT button (page 16)
Each time you press the button, the
LCD screen image switches as
follows:
• disc mode (default): When playing
an inserted disc.
• USB mode: When playing DATA
files on a connected USB device.
Appears “USB” on the LCD panel
when you select this mode.
01US01COV.book Page 6 Friday, February 13, 2009 5:04 PM

DVP-FX730
4-126-490-11(1)
master page=Right_2C:\Documents and Settings\Kate_zhang\Desktop\730_FM\GB\01US02WAR-CEK.fm
7
GB
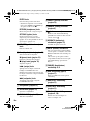
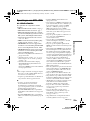
Remote
Buttons C D E and F are also on the
player.
The number 5,
N and AUDIO buttons
have a tactile dot.
U Number buttons
Enters the title/chapter numbers, etc.
• When playing a DVD VIDEO or CD
or VIDEO CD: Search directly by
entering the title/chapter/track
number using the number buttons,
and press ENTER.
To switch a title or chapter, press C/
c. (Only when “PBC” is set to “Off”
for VIDEO CD.)
CLEAR button
Clears the entry field.
V TOP MENU button
Displays the menu or changes the
playback mode.
• When playing a DVD VIDEO:
Displays the top menu.
• When playing a DVD VR: Switches
between “Original” and “Play List”
on the disc created Playlist. During
playback, you cannot switch. Press
x twice, and press TOP MENU.
W m/M (scan/slow) buttons
Fast reverses/ fast forwards when
pressed during playback.
Press repeatedly to change the speed.
• When playing a DVD: Slow
reverses/ slow forwards when
pressed during pause. Press
repeatedly to change the speed.
• When playing a VIDEO CD or video
file: Slow forwards when pressed
during pause. Press repeatedly to
change the speed.
X ADVANCE button
Briefly fast forwards the current scene
(DVD only).
Y AUDIO button
Changes the audio signal.
• When playing a DVD VIDEO: Each
time you press the button, the
language of the sound track
switches. Depending on the disc, the
choice of language varies.
• When playing a DVD VR: Each time
you press the button, the type of
sound tracks recorded on a disc
switches between main, sub and
main/sub sound.
123
456
78
0
9
,Continued
01US01COV.book Page 7 Friday, February 13, 2009 5:04 PM

master page=Left_2
DVP-FX730
4-126-490-11(1)
C:\Documents and Settings\Kate_zhang\Desktop\730_FM\GB\01US02WAR-CEK.fm
8
GB
• When playing a CD or VIDEO CD:
Each time you press the button, the
mode switches between stereo and
monaural (left/right).
• When playing a DivX video file:
Each time you press the button, the
audio signal switches. If “No Audio”
appears, the player does not support
the audio signal.
SUBTITLE button
Changes the subtitle.
• When playing a DVD: Each time
you press the button, the subtitle
switches. Depending on the disc, the
choice of language varies.
• When playing a DivX video file:
Press the button during playback.
Press X/x and ENTER while
displaying subtitle information.
ANGLE button
Changes the angle. When “ ”
(Angle Mark) appears, you can change
angles. Depending on the disc, you
may not be able to change the angle
(DVD VIDEO only).
01US01COV.book Page 8 Friday, February 13, 2009 5:04 PM

DVP-FX730
4-126-490-11(1)
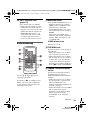
Preparations
master page=rightC:\Documents and Settings\Kate_zhang\Desktop\730_FM\GB\01US04GET-CEK.fm
9
GB
Preparations
Checking the
Accessories
Check that you have the following items:
• AC power adaptor (1)
• Car battery adaptor (1)
• Audio/video cord (mini plug × 2 y
phono plug × 3) (1)
• Remote (with battery) (1)
To replace the remote battery
When the battery becomes depleted,
operation is not possible. Change the
battery.
1 Prepare a new battery (lithium battery
CR2025).
2 Pull out the battery holder (2) while
pressing the lock lever (1).
3 Remove the old battery.
4 Insert the new battery in the battery
holder with the 3 side up and then
push the holder until it clicks.
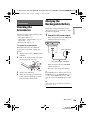
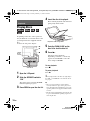
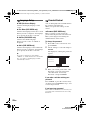
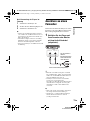
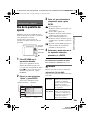
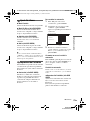
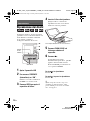
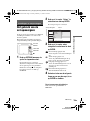
Charging the
Rechargeable Battery
Charge the rechargeable battery before
using the player for the first time, or when
the battery is depleted.
1 Connect the AC power adaptor.
When charging begins, the CHARGE
indicator lights up in orange.
When charging ends, the CHARGE
indicator lights off.
Disconnect the AC power adaptor.
z
If the POWER indicator lights up instead of the
CHARGE indicator, the OPERATE switch is set
to “ON.” Set the OPERATE switch to “OFF,”
and make sure that the CHARGE indicator lights
up.
b
Charge the battery in an ambient temperature of
between 5 to 35 °C.
DC IN 9.5V
VIDEO OUTAUDIO OUT
A
PHONES
B
OPERATE
ONOFF
DC IN 9.5V
AC power Adaptor (supplied)
To a wall outlet
,Continued
01US01COV.book Page 9 Friday, February 13, 2009 5:04 PM

master page=left
DVP-FX730
4-126-490-11(1)
C:\Documents and Settings\Kate_zhang\Desktop\730_FM\GB\01US04GET-CEK.fm
10
GB
Charging time and playing time
Charging time: approx. 5 hours
Playing time: approx. 5 hours
Times indicated are under the following
conditions:
– Moderate temperature (20°C)
– Headphone use
– Backlight set to minimum
Depending on the ambient temperature or
rechargeable battery condition, charging time
may be longer, or playing time may be reduced.
To check the battery level
When the player is stopped, the battery
indicator is displayed. When the battery is
empty, is displayed or the CHARGE
indicator flashes. Set the OPERATE
switch to “OFF,” connect the AC power
adaptor, and recharge the battery.
Using the Car Battery
Adaptor
The car battery adaptor (supplied) is for a
12V car battery, negative earth (do not use
it with a 24V car battery, positive earth).
1 Start the engine.
2 Connect the car battery adaptor.
3 Turn on the player.
b
• The driver should not connect or disconnect
the car battery adaptor while driving.
• Arrange the cord so as not to interfere with the
driver. Also, do not place the LCD panel where
the driver can watch.
• Clean the cigarette lighter socket. If it is dirty,
it may cause contact failure or malfunction.
• Use the car battery adaptor with the car engine
running. If it is used with the car engine off, the
car battery may become depleted.
Full Empty
DC IN 9.5V
VIDEO OUTAUDIO OUT
A
PHONES
BONOFF
OPERATE
DC IN 9.5V
To cigarette
lighter socket
Car battery adaptor (supplied)
01US01COV.book Page 10 Friday, February 13, 2009 5:04 PM

DVP-FX730
4-126-490-11(1)
Preparations
master page=rightC:\Documents and Settings\Kate_zhang\Desktop\730_FM\GB\01US04GET-CEK.fm
11
GB
After using the player in a car
1 Turn off the player.
2 Disconnect the car battery adaptor.
3 Turn off the engine.
b
• Do not disconnect the car battery adaptor or
turn off the car engine before you turn off the
player. Doing so may damage the player.
• Disconnect the car battery adaptor after use. If
it is left connected, the car battery may become
depleted.
• Do not leave the player or accessories in the
car.
Connecting to a TV
By connecting the player to your TV or
monitor, you can increase your viewing
options.
1 Connect the player to your TV or
monitor using the audio/video
cord (supplied).
z
• When you play back a disc after enjoying
images by “USB,” press INPUT to select the
disc mode. See page 6
• The player can connect to an AV amplifier in
the same way as a TV. Although connecting is
the same as a TV, the yellow plug of the audio/
video cord is not used.
b
• Refer to the instructions supplied with the
equipment to be connected.
• Before connecting, turn off the player and the
equipment to be connected, then unplug from
their wall sockets.
DC IN 9.5V
VIDEO OUTAUDIO OUT
A
PHONES
B
OPERATE
ONOFF
VIDEO OUTAUDIO OUT
To AUDIO/
VIDEO input
jacks of a TV or
monitor
Audio/video cord
(supplied)
01US01COV.book Page 11 Friday, February 13, 2009 5:04 PM

master page=left
DVP-FX730
4-126-490-11(1)
C:\Documents and Settings\Kate_zhang\Desktop\730_FM\GB\01US05PLY1-CEK.fm
12
GB
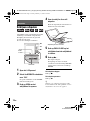
Playback
Playing Discs
Depending on the disc, some operations
may be different or restricted. Refer to the
operating instructions supplied with the
disc.
Connect the AC power adaptor.
1 Open the LCD panel.
2 Slide the OPERATE switch to
“ON.”
The player turns on and the POWER
indicator lights up in green.
3 Press OPEN to open the disc lid.
4 Insert the disc to be played.
Place with the playback side down and
push gently until it clicks.
5 Push the PUSH CLOSE on the
disc lid to shut the disc lid.
6 Press N.
The player starts playback.
Depending on the disc, a menu may
appear. Press C/X/x/c to select the
item, and press ENTER.
To stop playback
Press x.
To pause playback
Press X.
z
When you play back a disc after enjoying images
by “USB,” press INPUT to select the disc mode.
See page 6.
b
• Discs created on DVD recorders must be
correctly finalised to play on the player. For
more information about finalising, refer to the
operating instructions supplied with the DVD
recorder.
• The disc may be still spinning when the disc lid
is opened. Wait until the spinning stops before
removing the disc.
INPUT
DISPLAY MENU
RETURN
OPEN
PUSH CLOSE
OPTIONS
ENTER
VOLUME
HOLD
OPERATE
ONOFF
x
N
OPEN
PUSH
CLOSE
OPERATE
X
Playback side facing down
01US01COV.book Page 12 Friday, February 13, 2009 5:04 PM

DVP-FX730
4-126-490-11(1)
master page=rightC:\Documents and Settings\Kate_zhang\Desktop\730_FM\GB\01US05PLY1-CEK.fm
Playback
13
GB
Notes on the screen saver
• A screen saver image appears when you
leave the player in pause or stop mode
without operation for more than 15
minutes. The image disappears when you
press N. For the setup of “Screen
Saver,” see page 19.
• The player goes to standby, 15 minutes
after starting the screen saver function.
Press N to come out of standby mode.
To resume playback from the point
where you stopped the disc (Resume
Play)
When you press N again after you stop
playback, the player starts playback from
the point when you pressed x.
z
• To play from the beginning of the disc, press
x twice, and press N.
• When turning power on again after power off,
resume play starts automatically.
b
• Depending on the stop point, Resume play
may not start from exactly the same point.
• The resume point is cleared when:
– you turn off the player (including standby
mode) for DVD (VR mode).
– you open the disc lid.
– you press INPUT.
To play VIDEO CDs with PBC Functions
(PBC Playback)
PBC (Playback Control) allows you to
play VIDEO CDs interactively using a
menu. When you start playing a VIDEO
CD with PBC functions, the menu appears.
Select an item using the number buttons on
the remote, and press ENTER. Then,
follow the instructions in the menu (press
N when “Press SELECT.” appears).
About various playback operations
*
1
DVD VIDEO only
*
2
only when “PBC” is set to “Off.”
To Operation
Change the LCD
picture size
Press OPTIONS to
select “LCD Mode”
(page 17).
Display the DVD
menu
Press MENU (page 5)
or TOP MENU
(page 7).
Check the DVD
playback
information
Press DISPLAY
(page 14).
Play DVDs*
1
repeatedly
(Repeat Play)
Press DISPLAY to
select “Repeat”
(page 14).
Play DVDs in
fast reverse or
fast forward
(Scan Play)
Press C/c repeatedly on
the player to select the
speed (page 5).
Switch between
original and
Playlist in DVD
(VR mode)
Press TOP MENU
repeatedly (page 7).
Check the CD or
VIDEO CD
playback
information
Press DISPLAY
(page 5).
Play CDs or
VIDEO CDs*
2
repeatedly
(Repeat Play)
Press MENU
repeatedly (page 5).
Play CDs or
VIDEO CDs*
2
randomly
(Random Play)
Press MENU
repeatedly (page 5).
,Continued
01US01COV.book Page 13 Friday, February 13, 2009 5:04 PM

master page=left
DVP-FX730
4-126-490-11(1)
C:\Documents and Settings\Kate_zhang\Desktop\730_FM\GB\01US05PLY1-CEK.fm
14
GB
Using the Playback
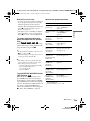
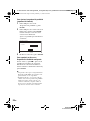
Information Display
While playing a DVD, you can check the
current playback information. The
playback information display also allows
you to set a title/chapter or change sound/
subtitle, and so on.
When entering the numbers, operate the
number buttons on the remote.
1 Press DISPLAY while playing a
DVD.
The current playback information
appears.
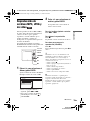
Example: When playing a DVD
VIDEO
* When a DVD (VR mode) is played, “PL”
(playlist) or “ORG” (original) is displayed
next to the title number.
2 Press X/x to select items and press
ENTER.
• Title: Select the title number by
pressing X/x or number buttons.
• Chapter: Select the chapter number
by pressing X/x or number buttons.
• Audio: Select the sound by pressing
X/x.
• Subtitle: Select the subtitle by
pressing X/x.
• Angle: Select the angle by pressing
X/x.
• T.Time: Time appears while playing
a title. “00:00:00” will appear by
pressing ENTER. Enter the desired
time code by pressing the number
buttons.
• C.Time: Time appears while playing
a chapter. “00:00:00” will appear by
pressing ENTER. Enter the desired
time code by pressing the number
buttons.
• Repeat: Select “ Chapter,” “
Title,” “ All,” or “Off” by
pressing X/x.
• Time Disp.: “Title Elapsed” is
displayed. Select “Title Elapsed,”
“Title Remain,” “Chapter Elapsed,”
or “Chapter Remain” by pressing
X/x.
3 Press ENTER.
To turn off the display
Press DISPLAY or RETURN.
b
Depending on the disc, you may not be able to
set some items.
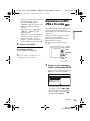
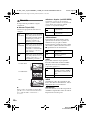
Menu
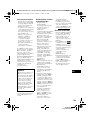
Title
Chapter
Audio
Subtitle
02/07
03/20
02 2CH DOLBY DIGITAL English
01 English
Title Elapsed 00:12:01
Current playback
information*
Items
Elapsed or remaining timeBattery status
01US01COV.book Page 14 Friday, February 13, 2009 5:04 PM

DVP-FX730
4-126-490-11(1)
master page=rightC:\Documents and Settings\Kate_zhang\Desktop\730_FM\GB\01US05PLY1-CEK.fm
Playback
15
GB
Playing MP3, JPEG,
and Video Files
You can play MP3, JPEG, and video files.
For details on playable files, see “Playable
Media” (page 27).
When you set a DATA media, a list of
albums appears.
DATA CDs recorded in KODAK Picture
CD format automatically start playing
when inserted.
1 Press X/x to select the album,
and press ENTER.
The list of files in the album appears.
Example: The list of MP3 files
• To go to the next or previous page,
press > or ..
• To return to the list of albums, press
X/x to select and press ENTER.
2 Press X/x to select the file, and
press ENTER.
Playback starts from the selected file.
To go to the next or previous file
Press > or ..
To stop playback
Press x.
The display will return to the list of files.
To pause playback (MP3 only)
Press X.
To restart playback, press X again.
z
If the number of viewing times is preset, you can
play the DivX video files as many times as the
preset number. The following occurrences will
be counted as one time:
– when x is pressed.
– when the player turned off (including standby
mode).
– when the disc lid is opened.
– when another file is played.
– When INPUT is pressed.
– when the USB device is disconnected.
b
Depending on the file, playback may take time to
start or may not be able to start. For details on
playable files, see “Playable Media” (page 27).
Selecting a JPEG file
To rotate a JPEG image
Press C/X/x/c while viewing the image
file. Rotate every file.
c: Rotates the image 90 degrees
clockwise.
C: Rotates the image 90 degrees counter
clockwise.
X: Reverses the image vertically (up and
down).
x: Reverses the image horizontally (left
and right).
INPUT
DISPLAY MENU
RETURN
OPEN
PUSH CLOSE
OPTIONS
ENTER
VOLUME
MENU
x
C/X/x/c
ENTER
X
N
./>
. .
MY BEST
Dir:001
03 Wing
02 Fire
01 Stardust
,Continued
01US01COV.book Page 15 Friday, February 13, 2009 5:04 PM

master page=left
DVP-FX730
4-126-490-11(1)
C:\Documents and Settings\Kate_zhang\Desktop\730_FM\GB\01US05PLY1-CEK.fm
16
GB
To display the list of thumbnails
Press MENU when an image file is
displayed.
The image files in the album appear in 12
sub-screens with the displayed file in the
lead.
• To go to the previous or next list of
thumbnails, select “bPrev” or
“NextB” at the bottom of the screen,
and press ENTER.
• To exit the list of thumbnails, press
MENU.
Playing a Slide Show
1 While displaying the image file you
want to start a slideshow, press
MENU.
The list of thumbnails appears.
2 Press C/X/x/c to select “Slide
Show” at the bottom of the screen,
and press ENTER.
A slideshow starts from the displayed
file.
To stop slideshow
Press x to return to the list of files.
Press MENU to return to the list of
thumbnails.
To pause slideshow
Press X.
Playing data on a USB device
You can playback DATA files on a USB
device.
1 Press INPUT to select “USB”.
2 Connect a USB device to the USB
jack.
To disconnect a USB device
1 Press INPUT to deselect of “USB”.
2 Disconnect the USB device.
About supported Sony USB devices
The following Sony USB Memory Stick
reader/writer and USB flash drive “Micro
Vault” are supported: MSAC-US40,
USM-J series, USM-JX series, USM-J/B
series, USM-L series, and USM-LX series.
b
• Do not disconnect the USB device while its
access indicator is flashing. Doing so may
cause data corruption or loss of data.
• USB devices which can connect to the player
are flash memory and multiple card readers.
Other devices (digital still camera, USB hub,
etc.) cannot be connected. When an
unsupported device is connected, an error
message appears.
1234
5678
910
Slide Show
11 12
Prev Next
OPERATE
OFF
ON
HOLD
A PHONES B
AUDIO
VIDEO
IN/OUT
DC IN 9.5V
INPUT
DISPLAY
MENU
RETURN
OPTION
ENTER
VOLUME
INPUT
USB device
USB jack
01US01COV.book Page 16 Friday, February 13, 2009 5:04 PM

DVP-FX730
4-126-490-11(1)
master page=rightC:\Documents and Settings\Kate_zhang\Desktop\730_FM\GB\01US05PLY1-CEK.fm
Playback
17
GB
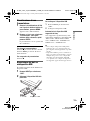
Adjusting the Picture
Size and Quality
You can adjust the picture displayed on the
LCD screen.
1 Press OPTIONS.
The menu display appears.
2 Press X/x to select “LCD
Mode” and press ENTER.
The “LCD Mode” display appears.
3 Press X/x to select items and
press ENTER.
• LCD Aspect: Change the picture size.
Select “Normal” or “Full” by pressing
X
/
x
*.
• Backlight: Adjust the brightness by
pressing C
/
c.
• Contrast: Adjust the difference
between light and dark areas by
pressing C
/
c.
• Hue: Adjust the red and green colour
balance by pressing C
/
c.
• Color: Adjust the richness of colours
by pressing C
/
c.
• Default: Return all settings to the
factory defaults.
4 Press ENTER.
* In “Normal,” pictures are displayed in their
original configuration, retaining the aspect
ratio. 4:3 pictures are displayed with black
bands on both sides of the screen. 4:3 letter box
pictures are displayed with bands on all sides
of the screen.
In “Full,” pictures are adjusted to fill the entire
screen. 16:9 pictures are displayed in their
original configuration. (Black band recorded
in a 16:9 picture cannot be erased.) 4:3 pictures
appear stretched.
To turn off the menu display
Press OPTIONS or RETURN twice.
b
Depending on the disc, the screen size you can
select differs.
INPUT
DISPLAY MENU
RETURN
OPEN
PUSH CLOSE
OPTIONS
ENTER
VOLUME
C/X/x/c
ENTER
OPTIONS
RETURN
ENTER RETURN
LCD Mode
Contrast
LCD Aspect
Hue
10
Backlight 10
Full
0
10Color
Select: Cancel:
Default
items
01US01COV.book Page 17 Friday, February 13, 2009 5:04 PM

master page=left
DVP-FX730
4-126-490-11(1)
C:\Documents and Settings\Kate_zhang\Desktop\730_FM\GB\01US07ADV4-CEK.fm
18
GB
Settings and Adjustments
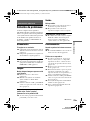
Using the Setup Display
By using the setup display, you can make
various settings to items such as picture
and sound.
Some discs have stored playback settings,
which take priority.
1 Press OPTIONS when the player
is in stop mode.
The menu display appears.
During Resume Play, you cannot use
the setup display. Press x twice to
clear Resume Play, and press
OPTIONS.
2 Press X/x to select “Setup,”
and press ENTER.
The setup display appears.
3 Press X/x to select the setup
category and press ENTER.
: General Setup (page 18)
Makes the player-related settings.
: Audio Setup (page 19)
Makes the audio settings according to
playback conditions.
: Language Setup (page 20)
Makes the language settings for the
on-screen display or sound track.
: Parental Control (page 20)
Sets the parental control limit.
4 Select and adjust each of the
following items by pressing X/x
and ENTER.
To turn off the setup display
Press OPTIONS or RETURN twice.
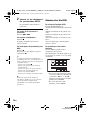
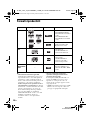
General Setup
The default settings are underlined.
◆ TV Display (DVD only)
Selects the aspect ratio of the connected
TV.
INPUT
DISPLAY MENU
RETURN
OPEN
PUSH CLOSE
OPTIONS
ENTER
VOLUME
C/X/x/c
ENTER
OPTIONS
x
RETURN
ENTER RETURN
General Setup
TV Display
Angle Mark
16 : 9
On
OnScreen Saver
Select: Cancel:
OnPBC
DivX
Default
setup category items
4:3
Pan Scan
Select this when you connect
a 4:3 screen TV.
Automatically displays a
wide picture on the entire
screen and cuts off the
portions that do not fit.
4:3
Letter Box
Select this when you connect
a 4:3 screen TV. Displays a
wide picture with bands on
the upper and lower portions
of the screen.
16:9
Select this when you connect
a wide-screen TV or a TV
with a wide mode function.
01US01COV.book Page 18 Friday, February 13, 2009 5:04 PM

DVP-FX730
4-126-490-11(1)
master page=rightC:\Documents and Settings\Kate_zhang\Desktop\730_FM\GB\01US07ADV4-CEK.fm
Settings and Adjustments
19
GB
b
Depending on the disc, “4:3 Letter Box” may be
selected automatically instead of “4:3 Pan Scan”
or vice versa.
◆ Angle Mark (DVD VIDEO only)
Displays the angle mark when you can change
the viewing angles during playback of DVDs
recorded with multi-angles.
◆ Screen Saver
The screen saver image appears when you
leave the player in pause or stop mode for
15 minutes. The screen saver will help
prevent your display equipment from
becoming damaged (ghosting). Press N
to turn off the screen saver.
◆ PBC
You can enjoy playing interactive
programmes using the PBC (Playback
Control) function of a VIDEO CD if
available (page 13).
◆ DivX
Displays the registration code for the
player. For more information, go to
http://www.divx.com
on the Internet.
◆ Default
Each function returns to its original factory
settings. Note that all of your settings will
be lost.
Audio Setup
The default setting is underlined.
◆ Audio DRC (Dynamic Range Control)
(DVD only)
Makes the sound clear when the volume is
turned down when playing a DVD that
conforms to “Audio DRC.”
On Display the angle mark.
Off Hide the angle mark.
On
Activates the screen saver
function.
Off Deactivates the screen saver
function.
16:9
4:3 Letter Box
4:3 Pan Scan
On By the PBC function, you can
play back VIDEO CDs via the
menu screen.
Off Turn off the PBC function.
Standard Standard sound.
TV Mode
Makes low sounds clear even
if you turn the volume down.
Wide Range Gives you the feeling of
being at a live performance.
,Continued
01US01COV.book Page 19 Friday, February 13, 2009 5:04 PM

master page=left
DVP-FX730
4-126-490-11(1)
C:\Documents and Settings\Kate_zhang\Desktop\730_FM\GB\01US07ADV4-CEK.fm
20
GB
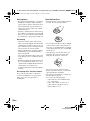
Language Setup
◆ OSD (On-Screen Display)
Switches the display language on the
screen.
◆ Disc Menu (DVD VIDEO only)
Switches the language for the disc’s menu.
When you select “Original,” the language
given priority in the disc is selected.
◆ Subtitle (DVD VIDEO only)
Switches the subtitle language.
When you select “Off,” no subtitle is
displayed.
◆ Audio (DVD VIDEO only)
Switches the language of the sound track.
When you select “Original,” the language
given priority in the disc is selected.
b
If you select a language in “Disc Menu,”
“Subtitle,” or “Audio” that is not recorded on the
disc, one of the recorded languages will be
automatically selected.
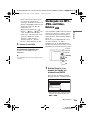
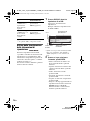
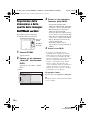
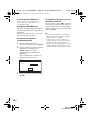
Parental Control
You can limit playback of a DVD that has
the parental control function.
When you operate this setting, use the
remote.
◆ Password (DVD VIDEO only)
Enter or change a password. Set the
password for the parental control function.
Enter your 4-digit password using the
number buttons on the remote.
To change the password
1 Press X/x to select “Password,” and
press ENTER.
2 Check “Change” is selected and press
ENTER.
The display for entering the password
appears.
3 Enter your current password in “Old
Password,” your new password in
“New Password” and “Verify
Password,” and press ENTER.
If you make a mistake entering your
password
Press CLEAR, or press C to return one by
one before pressing ENTER in step 3, and
re-enter the password.
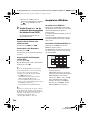
If you forget your password
Enter “1369” in “Old Password,” and enter your
new password in “New Password” and “Verify
Password.”
ENTER
Parental Control
Verify Password
Old Password
New Password
Enter password, then press .
OK
01US01COV.book Page 20 Friday, February 13, 2009 5:04 PM
La page est en cours de chargement...
La page est en cours de chargement...
La page est en cours de chargement...
La page est en cours de chargement...
La page est en cours de chargement...
La page est en cours de chargement...
La page est en cours de chargement...
La page est en cours de chargement...
La page est en cours de chargement...
La page est en cours de chargement...
La page est en cours de chargement...
La page est en cours de chargement...
La page est en cours de chargement...
La page est en cours de chargement...
La page est en cours de chargement...
La page est en cours de chargement...
La page est en cours de chargement...
La page est en cours de chargement...
La page est en cours de chargement...
La page est en cours de chargement...
La page est en cours de chargement...
La page est en cours de chargement...
La page est en cours de chargement...
La page est en cours de chargement...
La page est en cours de chargement...
La page est en cours de chargement...
La page est en cours de chargement...
La page est en cours de chargement...
La page est en cours de chargement...
La page est en cours de chargement...
La page est en cours de chargement...
La page est en cours de chargement...
La page est en cours de chargement...
La page est en cours de chargement...
La page est en cours de chargement...
La page est en cours de chargement...
La page est en cours de chargement...
La page est en cours de chargement...
La page est en cours de chargement...
La page est en cours de chargement...
La page est en cours de chargement...
La page est en cours de chargement...
La page est en cours de chargement...
La page est en cours de chargement...
La page est en cours de chargement...
La page est en cours de chargement...
La page est en cours de chargement...
La page est en cours de chargement...
La page est en cours de chargement...
La page est en cours de chargement...
La page est en cours de chargement...
La page est en cours de chargement...
La page est en cours de chargement...
La page est en cours de chargement...
La page est en cours de chargement...
La page est en cours de chargement...
La page est en cours de chargement...
La page est en cours de chargement...
La page est en cours de chargement...
La page est en cours de chargement...
La page est en cours de chargement...
La page est en cours de chargement...
La page est en cours de chargement...
La page est en cours de chargement...
La page est en cours de chargement...
La page est en cours de chargement...
La page est en cours de chargement...
La page est en cours de chargement...
La page est en cours de chargement...
La page est en cours de chargement...
La page est en cours de chargement...
La page est en cours de chargement...
La page est en cours de chargement...
La page est en cours de chargement...
La page est en cours de chargement...
La page est en cours de chargement...
La page est en cours de chargement...
La page est en cours de chargement...
La page est en cours de chargement...
La page est en cours de chargement...
La page est en cours de chargement...
La page est en cours de chargement...
La page est en cours de chargement...
La page est en cours de chargement...
La page est en cours de chargement...
La page est en cours de chargement...
La page est en cours de chargement...
La page est en cours de chargement...
La page est en cours de chargement...
La page est en cours de chargement...
La page est en cours de chargement...
La page est en cours de chargement...
La page est en cours de chargement...
La page est en cours de chargement...
La page est en cours de chargement...
La page est en cours de chargement...
La page est en cours de chargement...
La page est en cours de chargement...
La page est en cours de chargement...
La page est en cours de chargement...
La page est en cours de chargement...
La page est en cours de chargement...
La page est en cours de chargement...
La page est en cours de chargement...
La page est en cours de chargement...
La page est en cours de chargement...
La page est en cours de chargement...
La page est en cours de chargement...
La page est en cours de chargement...
La page est en cours de chargement...
La page est en cours de chargement...
La page est en cours de chargement...
La page est en cours de chargement...
La page est en cours de chargement...
La page est en cours de chargement...
La page est en cours de chargement...
La page est en cours de chargement...
La page est en cours de chargement...
La page est en cours de chargement...
La page est en cours de chargement...
La page est en cours de chargement...
La page est en cours de chargement...
La page est en cours de chargement...
La page est en cours de chargement...
La page est en cours de chargement...
La page est en cours de chargement...
La page est en cours de chargement...
La page est en cours de chargement...
La page est en cours de chargement...
La page est en cours de chargement...
La page est en cours de chargement...
La page est en cours de chargement...
La page est en cours de chargement...
La page est en cours de chargement...
La page est en cours de chargement...
La page est en cours de chargement...
La page est en cours de chargement...
La page est en cours de chargement...
La page est en cours de chargement...
La page est en cours de chargement...
La page est en cours de chargement...
La page est en cours de chargement...
La page est en cours de chargement...
La page est en cours de chargement...
La page est en cours de chargement...
La page est en cours de chargement...
La page est en cours de chargement...
La page est en cours de chargement...
La page est en cours de chargement...
La page est en cours de chargement...
La page est en cours de chargement...
La page est en cours de chargement...
La page est en cours de chargement...
La page est en cours de chargement...
La page est en cours de chargement...
La page est en cours de chargement...
La page est en cours de chargement...
La page est en cours de chargement...
La page est en cours de chargement...
La page est en cours de chargement...
La page est en cours de chargement...
La page est en cours de chargement...
La page est en cours de chargement...
La page est en cours de chargement...
-
 1
1
-
 2
2
-
 3
3
-
 4
4
-
 5
5
-
 6
6
-
 7
7
-
 8
8
-
 9
9
-
 10
10
-
 11
11
-
 12
12
-
 13
13
-
 14
14
-
 15
15
-
 16
16
-
 17
17
-
 18
18
-
 19
19
-
 20
20
-
 21
21
-
 22
22
-
 23
23
-
 24
24
-
 25
25
-
 26
26
-
 27
27
-
 28
28
-
 29
29
-
 30
30
-
 31
31
-
 32
32
-
 33
33
-
 34
34
-
 35
35
-
 36
36
-
 37
37
-
 38
38
-
 39
39
-
 40
40
-
 41
41
-
 42
42
-
 43
43
-
 44
44
-
 45
45
-
 46
46
-
 47
47
-
 48
48
-
 49
49
-
 50
50
-
 51
51
-
 52
52
-
 53
53
-
 54
54
-
 55
55
-
 56
56
-
 57
57
-
 58
58
-
 59
59
-
 60
60
-
 61
61
-
 62
62
-
 63
63
-
 64
64
-
 65
65
-
 66
66
-
 67
67
-
 68
68
-
 69
69
-
 70
70
-
 71
71
-
 72
72
-
 73
73
-
 74
74
-
 75
75
-
 76
76
-
 77
77
-
 78
78
-
 79
79
-
 80
80
-
 81
81
-
 82
82
-
 83
83
-
 84
84
-
 85
85
-
 86
86
-
 87
87
-
 88
88
-
 89
89
-
 90
90
-
 91
91
-
 92
92
-
 93
93
-
 94
94
-
 95
95
-
 96
96
-
 97
97
-
 98
98
-
 99
99
-
 100
100
-
 101
101
-
 102
102
-
 103
103
-
 104
104
-
 105
105
-
 106
106
-
 107
107
-
 108
108
-
 109
109
-
 110
110
-
 111
111
-
 112
112
-
 113
113
-
 114
114
-
 115
115
-
 116
116
-
 117
117
-
 118
118
-
 119
119
-
 120
120
-
 121
121
-
 122
122
-
 123
123
-
 124
124
-
 125
125
-
 126
126
-
 127
127
-
 128
128
-
 129
129
-
 130
130
-
 131
131
-
 132
132
-
 133
133
-
 134
134
-
 135
135
-
 136
136
-
 137
137
-
 138
138
-
 139
139
-
 140
140
-
 141
141
-
 142
142
-
 143
143
-
 144
144
-
 145
145
-
 146
146
-
 147
147
-
 148
148
-
 149
149
-
 150
150
-
 151
151
-
 152
152
-
 153
153
-
 154
154
-
 155
155
-
 156
156
-
 157
157
-
 158
158
-
 159
159
-
 160
160
-
 161
161
-
 162
162
-
 163
163
-
 164
164
-
 165
165
-
 166
166
-
 167
167
-
 168
168
-
 169
169
-
 170
170
-
 171
171
-
 172
172
-
 173
173
-
 174
174
-
 175
175
-
 176
176
-
 177
177
-
 178
178
-
 179
179
-
 180
180
-
 181
181
-
 182
182
-
 183
183
-
 184
184


Sony dvp fx730 Le manuel du propriétaire
- Catégorie
- Lecteurs DVD
- Taper
- Le manuel du propriétaire
- Ce manuel convient également à
dans d''autres langues
- italiano: Sony dvp fx730 Manuale del proprietario
- English: Sony dvp fx730 Owner's manual
- español: Sony dvp fx730 El manual del propietario
- Deutsch: Sony dvp fx730 Bedienungsanleitung
- Nederlands: Sony dvp fx730 de handleiding
Documents connexes
-
Sony DVP-FX770 Le manuel du propriétaire
-
Sony DVP FX750 Manuel utilisateur
-
-
-
Sony DVP-FX935 Mode d'emploi
-
Sony DVP-FX740DTB Mode d'emploi
-
Sony dvp fx875b Le manuel du propriétaire
-
Sony DVP-FX740DT Le manuel du propriétaire
-
-