
All products are trademarks of Nostalgia Products LLC.
Worldwide design & utility patented or patents pending.
© 2016 Nostalgia Products LLC.
www.nostalgiaproducts.com
(rev. 06/07/16 SN)

CCM200
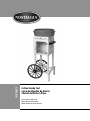
Cotton Candy Cart
Carro de Algodón de Azúcar
Chariot de Barbe à Papa
Instruction Manual
Manuel d'Instruction
Manual de la Instrucción


ENGLISH
2
Make every day a party!
Visit www.nostalgiaproducts.com for more fun products.
CONTENTS
SAFETY . . . . . . . . . . . . . . . . . . . . . . . . . . . . . . . . . . . . . . . . . 2
IMPORTANT SAFEGUARDS . . . . . . . . . . . . . . . . . . . . . . . . . . . . . 3
ADDITIONAL IMPORTANT SAFEGUARDS . . . . . . . . . . . . . . . . . . . . 3
INTRODUCTION . . . . . . . . . . . . . . . . . . . . . . . . . . . . . . . . . . . . 4
PARTS & ASSEMBLY . . . . . . . . . . . . . . . . . . . . . . . . . . . . . . . . . . 5
HOW TO OPERATE . . . . . . . . . . . . . . . . . . . . . . . . . . . . . . . . . . 11
HELPFUL TIPS . . . . . . . . . . . . . . . . . . . . . . . . . . . . . . . . . . . . . 12
CLEANING & MAINTENANCE . . . . . . . . . . . . . . . . . . . . . . . . . . . 13
RECIPES . . . . . . . . . . . . . . . . . . . . . . . . . . . . . . . . . . . . . . . . . 13
RETURNS & WARRANTY . . . . . . . . . . . . . . . . . . . . . . . . . . . . . . . 14
SAFETY
Appliance Specications:
120 Volts, 60 Hz, 450 Watts, ETL & CETL Approved
THIS PRODUCT IS FOR USE IN 120V AC OUTLET ONLY.
Refer to www.nostalgiaproducts.com/user-manuals/ for the most updated manual.
Your safety and the safety of others is very important.
We have provided many important safety messages in this manual and
on your appliance. Always read and obey all safety messages.
This is the safety alert symbol.
This symbol alerts you to potential hazards that
can serious injury to you and others.
All safety messages will follow the safety alert symbol.
All safety messages will tell you what the potential hazard is, tell you how to reduce the
chance of injury, and tell you what can happen if the instructions are not followed.

ENGLISH
3
IMPORTANT SAFEGUARDS
A person who has not read and understood all operating and safety instructions
is not qualied to operate this appliance. All users of this appliance must read and
understand this Instruction Manual before operating or cleaning this appliance.
When using electrical appliances, basic safety precautions
should always be followed, including:
1. Read all instructions before operating this appliance.
2. DO NOT TOUCH the hot surfaces. Use handles or knobs.
3. This appliance is NOT A TOY.
4. Unsupervised young children and cognitively challenged
individuals should never operate this appliance.
5. Close supervision is necessary when any appliance is used by or near children.
6. To protect against electrical shock do not immerse cord, plug
or any part of this unit in water or other liquids.
7. Unplug from outlet when not in use, before removing parts and before cleaning.
Allow to cool before putting on or taking o any parts, and before cleaning.
8. DO NOT operate any appliance with a damaged cord or plug, or after the appliance
malfunctions, or if the appliance has been damaged in any manner. Return the
appliance to the nearest repair shop for examination, repair or adjustment.
9. The manufacturer does not recommend the use of accessory attachments other than
what is provided by the manufacturer. Use of attachments may cause injuries.
10. DO NOT use the appliance for other than its intended use.
11. DO NOT use outdoors. FOR HOUSEHOLD USE ONLY.
12. DO NOT place on or near a hot gas or electric burner, or in a heated oven.
13. DO NOT put in dishwasher.
14. DO NOT let cord hang over edge of table or counter, or touch not surfaces.
15. NEVER leave unit unattended while in use or when plugged into an outlet.
16. Extreme caution must be used when moving an appliance containing hot food.
17. Always attach plug to appliance rst, then plug cord in the wall outlet. To
disconnect, turn any control to "o," then remove plug from wall outlet.
ADDITIONAL IMPORTANT SAFEGUARDS
Operating Safety Precautions
1. Ensure the Extractor Head is securely in place before use. Failure to do so may result in injury.
2. Check inside of the Heating Element, located beneath the Extractor
Head, for foreign objects before switching to ON position.
3. CAUTION: The Extractor Head rotates at high speeds. Always keep jewelry, long hair, hands
and face a safe distance away from the machine while in use to avoid possible injury.
4. NEVER put ngers on or near the Extractor Head or Heating
Element while machine is on or while it is still hot.
5. NEVER pour sugar directly into the Heating Element. Sugar
is FLAMMABLE and may result in smoke or re.

ENGLISH
4
6. NEVER overll or use more than the directed amount of sugar in the Extractor
Head. Overlling may cause the sugar to y from the Extractor Head.
7. DO NOT pour water or any other liquid into the Extractor Head.
8. Heating Element will get hot. Avoid contact until fully cooled.
9. This unit must be on a level surface to operate properly.
10. NEVER use a scouring pad on the unit.
Instructions for the Electrical Cord and Plug
1. This appliance has a polarized plug (one blade is wider than the other). To reduce the
risk of electrical shock, this plug is intended to t into a polarized outlet only one way.
If the plug does not t fully into the outlet, reverse the plug. If it still does not t,
contact a qualied electrician. Do not attempt to modify the plug in any way.
2. A short power supply cord is provided to reduce the risk resulting
from becoming entangled or tripping over a long cord.
3. If a long detachable power-supply cord or extension cord is used:
• Extension cords can be used if care is exercised in their use.
• The marked electrical rating of the cord or extension cord should
be at least as great as the electrical rating of the appliance.
• When using a longer cord or extension cord, make sure that
the cord does not drape over a countertop or tabletop where
it can be pulled on or tripped over unintentionally.
4. The manufacturer does not recommend using this machine in countries that do
not support 120V AC even if a voltage adapter, transformer, or converter is in use.
SAVE THESE INSTRUCTIONS!
INTRODUCTION
Thank you for purchasing the COTTON CANDY CART from Nostalgia™! This delightful
product is fun for the whole family and brings out the kid in everyone. Simply pour
ossing sugar or hard candies into the center receptacle and start spinning colorful,
tasty treats. Instantly gatherings are transformed into carnivals and party time!
• Works with ossing sugar, hard candies, and sugar-free hard candies
• Full size 36" tall
• Pull handle for easy transportation
• Includes 2 reusable plastic cotton candy cones, sugar scoop, and extractor head
• Storage compartment for supplies

ENGLISH
5
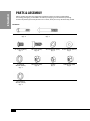
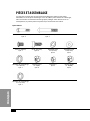
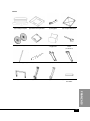
PARTS & ASSEMBLY
Please ensure that you have removed all of the hardware and parts listed before
discarding packaging. In our eorts to reduce packaging, we maximize the packing
material to protect your new purchase. As a result, small parts may not be readily visible.
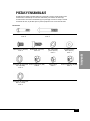
Hardware
#7 Locking
Washer (6mm)
Qty. 2
#8 Nut Cap (M8)
Qty. 4
#9 Nut
Qty. 2
#10 Nut Cap (M6)
Qty. 2
#3 Screw (10mm)
Qty. 2
#4 Screw (8mm)
Qty. 22
#5 Flat Washer (8mm)
Qty. 2
#6 Flat Washer (6mm)
Qty. 2
#11 Locking
Washer (3mm)
Qty. 2
#1 Bolt (55mm)
Qty. 4
#2 Bolt (65mm)
Qty. 2

ENGLISH
6
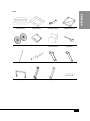
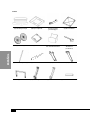
Parts
(A) Main Unit
(O) Back Cross Bar
(B) Top Cover
(C) Push Handle (D) Bottom Plate
(E) Wheel (2)
(F) Door
(G) Storage
Compartment
(H) Sugar Scoop
(15 grams)
(I) Support Bar (4)
(J) Screw Driver (K1) Wrench
(K2) Wrench
(L) Legs
(M) Left Bar (N) Right Bar

ENGLISH
7
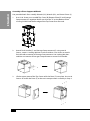
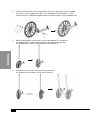
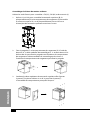
Assembly of Base Support & Wheels
Use provided tools for assembly: Wrench (K1), Wrench (K2), and Screw Driver (J).
1. Use 12 #4 Screws to assemble Top Cover (B), Bottom Plate (D) and Storage
Compartment (G) together. Make sure that the "X" on the Bottom Plate
is facing DOWN and the at edge of the Top Cover faces forward.
2. Attach Push Handle (C) and Storage Compartment (G) using two #3
Screws, two #11 Locking Washers and two #9 Nuts. Use Screws to attach
Push Handle to exterior of Storage Compartment. Use Locking Washers
and Nuts on interior of Storage Compartment to secure Push Handle.
3. Lift the upper piece of the Top Cover to t the Door (F) into place. Use six #4
Screws to attach the Door (F) to the main compartment assembly in Step 2.

ENGLISH
8
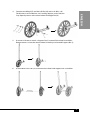
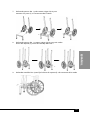
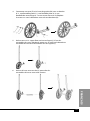
4. Connect one Wheel (E) and the Left Bar (M) with a #2 Bolt, a #5
Flat Washer, a #6 Flat Washer, a #7 Locking Washer, and a #10 Nut
Cap. Repeat process with second wheel and Right Bar (N).
5. Use one #4 Screw to attach a Support Bar (I) to one of the wheel assemblies.
Repeat process using the second wheel assembly and second Support Bar (I).
6. Use the Back Cross Bar (O) to connect the wheel and support bar assemblies.

ENGLISH
9
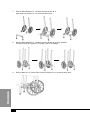
7. Use two #1 Bolts and two #8 Nut Caps to connect
the Legs (L) to the wheel structure.
8. Use two #1 Bolts and two #8 Nut Caps to attach both
Support Bars (I) to Step 7 assembly.
9. Use two #4 Screws to attach the Support Bar (I) to the wheel structure.

ENGLISH
10
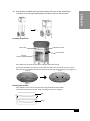
10. Attach the assembled Storage Compartment (G) parts to the wheels/legs
assembly. Push Storage Compartment (G) down until it is t into place.
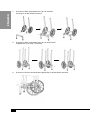
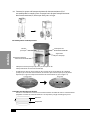
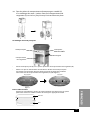
Assembly of Main Unit
• Place Main Unit (A) onto the top of the Storage Compartment (B).
• Ensure that the two inserting pins underneath the Main Unit (A) line up correctly so that
Main Unit (A) can be locked under the beam of the Storage Compartment (C) (see gure 1).
Attaching Rim to Bowl
Align the four arrows located on the outer edge of the Rim with the four
small holes located on the outer edge or the Bowl, then press together.
ON/OFF Switch
Push Handle
Storage
Compartment
Main Unit
Rim
Bowl
gure 1
unlocked locked

ENGLISH
11
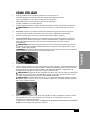
HOW TO OPERATE
1. First, nd a stable surface near an electrical outlet before starting. Make sure the cord
is away from any water source. It is acceptable to use an extension cord if needed.
2. Check to make sure the unit is in the OFF position, then plug into an electrical outlet.
3. Next, make sure the Extractor Head is in place and fully secured.
CAUTION: DO NOT add sugar or operate unit without Extractor Head in place.
4. Turn unit to ON position and Extractor Head will begin to spin. Allow unit to
heat for at least 10 minutes before adding ossing sugar or hard candy.
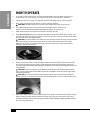
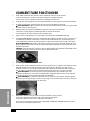
5. After allowing the unit to heat for 10 minutes, turn the unit OFF.
6. Place no more than two pieces of hard candy or one scoop of avored sugar (1 tbsp.) into
the Extractor Head. If using hard candies, make sure they are evenly placed on either side of
the Extractor Head (see image below).
CAUTION: Do not overll or use more than the directed amount of sugar in the Extractor
Head. Overlling may clog the unit or cause the sugar to y from the Extractor Head.
TIP: For best results, we recommend crushing hard candies into smaller pieces before
placing in the Extractor Head.
7. Switch the unit to the ON position.
8. When you see the cotton candy web begin, hold the cone horizontally over the Extractor
Head to begin collecting the cotton candy. Rotate the cone with your ngers while you
move the cone side to side above the bowl, making sure to collect all the cotton candy (see
image below).
CAUTION: Make sure cotton candy webbing does not fall into the Heating Element as
sugar is ammable. Turn the unit o and allow to cool before removing fallen sugars from
the Heating Element.
CAUTION: The Extractor Head rotates at high speeds. Always keep jewelry, long hair,
hands and face a safe distance away from the machine while in use to avoid possible injury.
9. Repeat the above steps to make more cotton candy. Make sure the Extractor Head is empty
before adding another measure of hard candy or ossing sugar into the Extractor Head.
By following these instructions, using your HARD CANDY COTTON CANDY MAKER will be a
fun and tasty experience!

ENGLISH
12
HELPFUL TIPS
USING THE COTTON CANDY CART
The COTTON CANDY CART can be used with or without the trolley cart on a countertop or
table. Simply turn the Lock Screws on the sides of the cart to detach the Main Unit from
the Storage Compartment and place on a dry, level surface near an electrical outlet.
TEXTURE
If your cotton candy is not ossing properly or is coming out with
a brittle, “Easter grass” texture, follow these instructions:
• Only put in 1-2 hard candies at a time
• Make sure the candies are evenly placed on either side of the Extractor Head.
• For best results, break candies up before use.
• The faster the Extractor Head spins, the better the result.
CLOGGING
If your unit is producing very little cotton candy, your Extractor Head may be clogged
with sugar. In this case, turn the unit o and wait for the Extractor Head to stop spinning.
Then use a wooden spoon to tap the Extractor Head to help loosen the sugar.
Also, ensure you are using the best sugar for this unit. Some
commercial ossing sugars are not made for this unit. For best results,
use Nostalgia brand cotton candy ossing sugar and kits.
The following hard candies (sugar & sugar-free) work best:
• Fruit Flavors
• Crème
• Root Beer
• Peppermint
• Cinnamon
• Coee
• Other Assorted Bulk Bag Hard Candy Flavors
The following candies DO NOT work:
• Caramel
• Butterscotch
• Ball-shaped candies
• Candies with hard sugar shells
• Gummy or chewy candies
• Sugar-pressed candies
• Instant drink mix packets with citric acid

ENGLISH
13
CLEANING & MAINTENANCE
Your HARD CANDY COTTON CANDY MAKER disassembles for easy cleaning.
1. Make sure the unit is unplugged and has had time to cool down before cleaning.
2. After cooling, remove the Extractor Head by rmly gripping both sides and pulling straight
up. UNLOCK bowl by turning clockwise and lifting. Wash both in warm water, rinse and dry.
3. Use a clean, slightly damp, non-abrasive sponge or non-abrasive cloth
to wipe down the outside of the unit, along with the area around the
heating element. Wipe with a non-abrasive towel to dry.
WARNING: NEVER use as abrasive sponge, scouring pad or steel wool on this unit.
CAUTION: DO NOT clean any part of this unit in a
dishwasher. DO NOT immerse unit in water.
4. Any other servicing should be performed by an authorized service representative.
RECIPES
Use a variety of hard candies to create sweet & delicious cotton candy.
Try these fun avor combinations:
Root Beer Float:
Root Beer + Vanilla Crème
Caramel Apple:
Apple + Caramel Crème
Chocolate Covered Cherry:
Cherry + Chocolate Crème
Chocolate Covered Strawberry:
Strawberry + Chocolate Crème
Big Berry:
Strawberry + Cherry + Raspberry candies
Cinnamon Crème:
Cinnamon + Vanilla Crème
Feel free to mix and match candies to invent new avors. Imagine
the variety of avors you can make and the fun you’ll have!

ENGLISH
14
RETURNS & WARRANTY
SHOULD YOUR UNIT NOT WORK OR IF DAMAGED WHEN YOU FIRST TAKE IT OUT OF
THE BOX, PLEASE RETURN IT TO THE PLACE OF PURCHASE IMMEDIATELY.
COTTON CANDY CART / CCM200
Should you have any questions, please contact us via email or at the customer service number listed
below between the hours of 8:00 AM and 5:00 PM, Monday through Friday, Central Standard Time.
Distributed by:
Nostalgia Products LLC
1471 Partnership Dr.
Green Bay, WI 54304-5685
Customer Service
Phone: (920) 347-9122
Web: www.nostalgiaproducts.com
Customer Service Inquiry
To submit a Customer Service inquiry, go to www.nostalgiaproducts.com and ll
out the Customer Service Inquiry form and click the Submit button.
A representative will contact you as soon as possible.
Product Warranty Terms
Nostalgia Products LLC (the “Company”) hereby warrants that for a period of one (1) year from the
date of original purchase, this product will be free of defects in material and workmanship under
normal home use, provided that the product is operated and maintained in accordance with the
operating instructions. As the sole and exclusive remedy under this warranty, the Company will
at its discretion either repair or replace the product found to be defective, or issue a refund on the
product during the warranty period. This warranty is only available to the original retail purchaser of
the product from the date of initial retail purchase, and is only valid with the original sales receipt, as
proof of purchase date is required to obtain warranty benets. All warranty claims must be brought
to the attention of the Company within the warranty period and no later than 30 days of the failure
to perform. This warranty does not cover normal wear or damage caused by shipping, mishandling,
misuse, accident, alteration, improper replacement parts, or other than ordinary household use.
You may be required to return the product (with shipping prepaid by you) for inspection and
evaluation. Return shipping costs are not refundable. The Company is not responsible for returns
damaged or lost in transit. Unless otherwise specically permitted by the operating instructions, this
warranty applies to indoor household use only. In order to obtain service under this warranty, please
contact the Company at the telephone number listed above or by lling out the Customer Service
Inquiry Form located at www.nostalgiaproducts.com. Warranty valid only in USA and Canada.
This warranty is in lieu of all other warranties, expressed or implied, including warranties of
merchantability and tness for a particular purpose, which are hereby excluded to the extent
permitted by law. In no event shall the Company be liable for any indirect, incidental, consequential,
or special damages arising out of or in connection with this product or the use thereof. Some
states, provinces or jurisdictions do not permit the exclusion or limitation of incidental or
consequential damages, so the foregoing exclusion or limitation may not apply to you.
This warranty does not apply to re-manufactured merchandise.
Please read the operating instructions carefully. Failure to comply
with the operating instructions will void this warranty.
For more information, visit us online at www.nostalgiaproducts.com.
Like us on Facebook at www.facebook.com/NostalgiaElectrics.
Follow our boards on Pinterest at www.pinterest.com/nostalgiaelctrx.
Tweet along with us on Twitter at www.twitter.com/NostalgiaElctrx.

15
ESPAÑOL
15
¡Que cada día sea una esta!
Visite www.nostalgiaproducts.com para
productos más divertidos.
CONTENIDO
SEGURIDAD . . . . . . . . . . . . . . . . . . . . . . . . . . . . . . . . . . . . . . 15
SALVAGUARDIAS IMPORTANTES . . . . . . . . . . . . . . . . . . . . . . . . . 16
SALVAGUARDIAS IMPORTANTES ADICIONALES . . . . . . . . . . . . . . . . 16
INTRODUCCIÓN . . . . . . . . . . . . . . . . . . . . . . . . . . . . . . . . . . . . 17
PIEZAS Y ENSAMBLAJE . . . . . . . . . . . . . . . . . . . . . . . . . . . . . . . 18
CÓMO UTILIZAR . . . . . . . . . . . . . . . . . . . . . . . . . . . . . . . . . . . . 24
CONSEJOS ÚTILES . . . . . . . . . . . . . . . . . . . . . . . . . . . . . . . . . . 25
LIMPIEZA Y MANTENIMIENTO . . . . . . . . . . . . . . . . . . . . . . . . . . . 26
RECETAS . . . . . . . . . . . . . . . . . . . . . . . . . . . . . . . . . . . . . . . . . 26
DEVOLUCIONES Y GARANTÍA . . . . . . . . . . . . . . . . . . . . . . . . . . . 27
SEGURIDAD
Especicaciones del aparato:
120 Voltios, 60 Hz, 450 vatios, Aprobación ETL & CETL
ESTE PRODUCTO SÓLO DEBE USARSE CON UN TOMACORRIENTE DE 120V AC.
Visite www.nostalgiaproducts.com/user-manuals/ para ver el manual más actualizado.
Su seguridad y la seguridad de los demás es muy importante.
Hemos dado muchos mensajes de seguridad importantes en este manual y en
el aparato. Siempre lea y cumpla con todos los mensajes de seguridad.
Este es el símbolo de alerta de seguridad.
Este símbolo le avisa de los peligros potenciales
que pueden matar o herir a otros.
Todos los mensajes de seguridad seguirán al símbolo de alerta de seguridad.
Todos los mensajes de seguridad le indicarán qué tanto es el peligro potencial, cómo
reducir la posibilidad de lesiones, y qué puede suceder si no se siguen las instrucciones.

16
ESPAÑOL
16
SALVAGUARDIAS IMPORTANTES
Una persona que no haya leído y comprendido todas las instrucciones
de uso y seguridad no está calicada para utilizar este aparato. Todos
los usuarios de este dispositivo deben leer y comprender este Manual
de instrucciones antes de utilizar o limpiar este aparato.
Cuando utiliza aparatos eléctricos, siempre se deben seguir algunas
medidas básicas de seguridad que incluyen las siguientes:
1. Lea todas las instrucciones antes de utilizar este aparato.
2. NO TOQUE las supercies calientes. Use agarraderas o mangos.
3. Este aparato NO ES UN JUGUETE.
4. Los niños pequeños sin supervisión y las personas con limitación
cognitiva nunca deben utilizar este aparato.
5. Una supervisión estricta se requiere cuando un aparato se use por niños o cerca de ellos.
6. Como medida de protección contra el riesgo de descarga eléctrica, no sumerja el
cable, los enchufes ni ninguna otra parte de la unidad en agua ni en otros líquidos.
7. Desconéctelo del tomacorriente cuando no esté en uso, antes de
retirar piezas y antes de la limpieza. Déjelo enfriar antes de colocar
o retirar cualquiera de las piezas, y antes de la limpieza.
8. NO utilice ningún aparato con el cable o el enchufe dañados, ni si el aparato
tiene desperfectos o SI se ha dañado de cualquier manera. Devolver el
aparato al taller de reparación más cercano para su reparación o ajuste.
9. El fabricante no recomienda el uso de otros aditamentos o accesorios diferentes a los
proporcionados por el fabricante. El uso de accesorios puede provocar lesiones.
10. NO utilice el aparato para otros usos que no haya sido diseñado.
11. NO utilice el aparato al aire libre. SOLO PARA USO DOMÉSTICO.
12. NO lo coloque sobre o cerca de una hornilla eléctrica o gas caliente, o en un horno caliente.
13. NO lo coloque en un lavavajillas.
14. NO permita que el cable cuelgue sobre el borde de la mesa o
del mostrador, ni que toque supercies calientes.
15. NUNCA deje la unidad desatendida mientras esté en uso o
cuando esté enchufada a una toma de corriente.
16. Debe ser extremadamente cuidadoso al mover cualquier aparato con comida caliente.
17. Siempre conecte primero el enchufe al aparato, luego enchufe el cable
a la toma de corriente. Para desconectar, mueva todos los controles
a “apagar” y luego retire el enchufe del tomacorriente.
SALVAGUARDIAS IMPORTANTES ADICIONALES
Precauciones de seguridad operativa
1. Asegúrese de que la cabeza del extractor esté rmemente en su
lugar antes de usar. No hacerlo puede causar lesiones.
2. Revise el interior del elemento de calefacción que está debajo de la
cabeza, por si hay objetos extraños antes de ENCENDERLO.
3. PRECAUCIÓN: La cabeza del extractor gira a alta velocidad. Mantenga
siempre las joyas, el cabello largo, las manos y la cara a una distancia segura

17
ESPAÑOL
17
de la máquina mientras se utilice para evitar posibles lesiones.
4. NUNCA sitúe los dedos sobre o cerca de la cabeza del extractor o el elemento de
calefacción mientras que la máquina está encendida o si todavía está caliente.
5. NUNCA vierta el azúcar directamente en el elemento de calefacción.
El azúcar es INFLAMABLE y puede provocar fuego o humo.
6. NUNCA llene en exceso ni utilice más de la cantidad de azúcar indicada en la cabeza del
extractor. El sobrellenado puede causar que el azúcar vuele desde la cabeza del extractor.
7. NO vierta agua ni ningún otro líquido en la cabeza del extractor.
8. El elemento de calentamiento alcanzará una gran temperatura.
Evite el contacto hasta que se enfríe.
9. Esta unidad debe estar en una supercie nivelada para que funcione bien.
10. No utilice NUNCA un estropajo en el aparato.
Instrucciones para el cable eléctrico y el enchufe
1. Este aparato tiene una patita polarizada (un patita más ancha que la otra). Para
reducir el riesgo de descarga eléctrica, este enchufe está diseñado para entrar en el
tomacorriente polarizado solo en una posición. Si el enchufe no entra completamente
en el tomacorriente, invierta el enchufe. Si aún así no entra, comuníquese con un
electricista calicado. No trate de modicar el enchufe de ninguna manera.
2. Un cable de alimentación corto se provee para reducir el riesgo
resultante de enredarse o tropezarse con un cable largo.
3. Si se utiliza un cable alargador o un cable de alimentación más largo:
• Unos cables de extensión se pueden utilizar si se tiene cuidado con su uso.
• Las características nominales del grupo de cables o del cable de
extensión deben ser al menos iguales a las del aparato.
• Cuando se utiliza un cable largo o cable de extensión, asegúrese de
que el cable no sobresalga de la encimera ni una mesa ya que se
puede halar o tropezarse con el cable involuntariamente.
4. El fabricante no recomienda el uso de esta máquina en países que no admiten 120V
CA incluso si se está usando un adaptador, transformador o convertidor de voltaje.
¡GUARDE ESTAS INSTRUCCIONES!
INTRODUCCIÓN
¡Gracias por comprar el CARRO DE ALGODÓN DE AZÚCAR de Nostalgia™! Este
maravilloso producto es divertido para toda la familia y resalta el niño que
tenemos todos. Simplemente vierta azúcar para algodones o caramelos duros
en el receptáculo central y empiece a a crear coloridas y sabrosas delicias.
¡Las reuniones se instantáneamente transforman en carnavales y esta!
• Funciona con azúcar para algodones, caramelos duros y caramelos duros sin azúcar
• 36" de altura total
• Con agarradera para fácil transporte
• Incluye 2 conos de plástico reutilizables para caramelo,
un cucharón de azúcar y cabeza del extractor
• Compartimiento de almacenamiento para suministros

18
ESPAÑOL
18
PIEZAS Y ENSAMBLAJE
Asegúrese de haber extraído todos los accesorios y piezas enumeradas antes
de desechar el embalaje. En nuestros esfuerzos para reducir el embalaje,
maximizamos el material de embalaje para proteger su nueva compra. Como
resultado de eso, es posible que las piezas pequeñas no se vean fácilmente.
Accesorios
Arandela de seguridad
No. 7 (6 mm)
Cant. 2
Tuerca ciega No. 8 (M8)
Cant. 4
Tuerca No. 9
Cant. 2
Tuerca ciega No. 10 (M6)
Cant. 2
Tornillo No. 3 (10 mm)
Cant. 2
Tornillo No. 4 (8 mm)
Cant. 22
No. 5 Arandela
plana (8 mm)
Cant. 2
Arandela plana
No. 6 (6 mm)
Cant. 2
Arandela de seguridad
No. 11 (3 mm)
Cant. 2
Perno No. 1 (55 mm)
Cant. 4
Perno No. 2 (65 mm)
Cant. 2
La page est en cours de chargement...
La page est en cours de chargement...
La page est en cours de chargement...
La page est en cours de chargement...
La page est en cours de chargement...
La page est en cours de chargement...
La page est en cours de chargement...
La page est en cours de chargement...
La page est en cours de chargement...
La page est en cours de chargement...
La page est en cours de chargement...
La page est en cours de chargement...
La page est en cours de chargement...
La page est en cours de chargement...
La page est en cours de chargement...
La page est en cours de chargement...
La page est en cours de chargement...
La page est en cours de chargement...
La page est en cours de chargement...
La page est en cours de chargement...
La page est en cours de chargement...
La page est en cours de chargement...
La page est en cours de chargement...
-
 1
1
-
 2
2
-
 3
3
-
 4
4
-
 5
5
-
 6
6
-
 7
7
-
 8
8
-
 9
9
-
 10
10
-
 11
11
-
 12
12
-
 13
13
-
 14
14
-
 15
15
-
 16
16
-
 17
17
-
 18
18
-
 19
19
-
 20
20
-
 21
21
-
 22
22
-
 23
23
-
 24
24
-
 25
25
-
 26
26
-
 27
27
-
 28
28
-
 29
29
-
 30
30
-
 31
31
-
 32
32
-
 33
33
-
 34
34
-
 35
35
-
 36
36
-
 37
37
-
 38
38
-
 39
39
-
 40
40
-
 41
41
-
 42
42
-
 43
43


dans d''autres langues
- English: Nostalgia CCM200 User guide
- español: Nostalgia CCM200 Guía del usuario
Documents connexes
-
Nostalgia NCCRT510PK Manuel utilisateur
-
Nostalgia PCM306PRPL Mode d'emploi
-
Nostalgia PCM306AQ Mode d'emploi
-
Nostalgia PCM805PRPL Manuel utilisateur
-
-
Nostalgia Electrics PCM-805RETRORED Mode d'emploi
-
-
-
-