Danby DDW1801MWP Le manuel du propriétaire
- Catégorie
- Lave-vaisselle
- Taper
- Le manuel du propriétaire

OWNER’S USE AND CARE GUIDE
GUIDE D’UTILISATION ET D'ENTRETIEN
GUÍA DE UTILIZACIÓN Y CUIDADO PARA EL PROPIETARIO
MODEL • MODÈLE • MODELO
DANBY PRODUCTS LIMITED, ONTARIO, CANADA N1H 6Z9
DANBY PRODUCTS INC., FINDLAY, OHIO, USA 45840
2016.03.16
DISHWASHER
LAVE-VAISSELLE
LAVAPLATOS
DDW1801MWP

DO NOT RETURN THIS UNIT TO THE RETAILER
WITHOUT FURTHER INSTRUCTIONS
Dear valued customer, we hope your Danby product purchase fulfills all
your requirements. Your satisfaction is our priority!
Please contact us at our toll free consumer service number for any inquiries
you may have about your new unit.
NE PAS RETOURNER CET APPAREIL CHEZ LE
DÉTAILLANT SANS CONSIGNES SUPPLÉMENTAIRES
Cher(ère) client(e) important(e), nous espérons que votre produit Danby
répond à tous vos besoins. Votre satisfaction est notre priorité!
Veuillez nous contacter au numéro gratuit de service après-vente, si
vous avez des questions quelconques à propos de votre nouvel appareil.
NO DEVUELVA ESTA UNIDAD A LA TIENDA SIN
INSTRUCCIONES ADICIONALES
Estimado cliente, esperamos que el producto Danby que ha comprado
satisfaga completamente sus necesidades. Su satisfacción
es nuestra prioridad!
Por favor, contáctenos gratuitamente a nuestro número de Servicio al
Cliente para cualquier pregunta que tenga sobre su nuevo electrodoméstico.
1-800-263-2629
(1-800-26-DANBY)
Danby 28.08.2014

CAUTION:
Read and follow all safety rules and operating
instructions before fi rst use of this product.
PRÉCAUTION :
Veuillez lire attentivement les consignes de
sécurité et les instructions d’utilisation avant
l’utilisation initiale de ce produit.
Model • Modèle • Modelo
DDW1801MWP
PRECAUCIÓN:
Lea y observe todas las relgas de seguridad y
las instrucciones de operación antes de usar
este producto por la primera vez.
DISHWASHER
Owner’s Use and Care Guide .....................................1-12
• Welcome
• Important Safety Information
• Operation Instructions
• Care and Maintenance
• Troubleshooting
• Warranty
LAVE-VAISSELLE
Guide d’utilisation et d’entretien du propriétaire....13-24
• Bienvenue
• Consignes de sécurité importantes
• Consignes d’utilisation
• Soins et entretien
• Dépannage
• Garantie
LAVAPLATOS
Guía de utilización y cuidado para el propietario...25-37
• Bienvenido
• Información importante sobre seguridad
• Instrucciones de funcionamiento
• Cuidado y mantenimiento
• Solución sugerida
• Garantía
CONTENTS
TABLE DES MATIÈRES
ÍNDICE

Thank you for choosing Danby
We know you’re excited. We are too! However, the more familiar you are with your new appliance, the better experience you will
have. We therefore strongly suggest that you read this Owner’s Manual before plugging in your new appliance. It contains
important operational information that will help you make full use of the technical features available in your Danby appliance. The
manual also contains information designed to enhance operating reliability and safety, as well as tips to maintaining your new
appliance so that it brings you happiness for years to come.
Please visit www.danby.com to access self-service tools, FAQs and more. Should you need additional assistance, please call
1-800-26-DANBY (1-800-263-2629).
Note: You will need the below information to obtain service under warranty.
To receive service, you must provide the original receipt.
Model Number:
Serial Number:
Date of Purchase:
NEED HELP?
Before you call for service, here are a few things you can do to help us serve you
better:
Read this Owner’s Manual:
It contains instructions to help you use and maintain your appliance properly.
If you received a damaged appliance:
Immediately contact the retailer (or builder) that sold you the appliance.
Save time and money:
Check the Troubleshooting section at the end of the guide before calling. This section
helps you solve common problems that may occur.
If you do need service, you can relax, knowing help is only a phone call away.
Tel: 1-800-26-
(1-800-263-2629)
1

Important Safety Information
Safety Precautions
• Locate sharp items (i.e. forks and knives) so that they are not likely to damage the door seal or any part of the interior
of the unit.
• Load sharp knives with the handles up to reduce the risk of injury to yourself and others (i.e. cutting yourself).
• Do not wash plastic items unless they are marked “Dishwasher Safe” or the equivalent. For plastic items that are not
marked, check the manufacturer’s recommendations.
• Do not touch the heating element during or immediately after use.
• Do not operate the dishwasher unless all enclosure panels are properly in place.
• Do not tamper with the controls.
• Do not abuse, sit on, or stand on the door or dish rack(s) of the dishwasher.
• To reduce the risk of injury, do not allow children to operate, play in or play on the dishwasher.
• Do not allow children to play around the dishwasher when opening or closing the dishwasher door.
• Remove the door to the washing compartment when removing an old dishwasher for service or if you are discarding
it.
• Do not spray water on the appliance, it may cause electric shock or failure of electrical parts.
• Use only detergent and rinse additives designed for an automatic dishwasher. Never use laundry detergent, or hand
washing detergent in your dishwasher. Keep these products out of the reach of children.
• Keep children away from the detergent and rinse aid, as well as from the open door of the dishwasher, as there could
still be some detergent left inside.
• The door should not be left open, as this could present a tripping hazard.
• During installation, the power supply must not be excessively or dangerously bent or fl attened.
• Do not operate your dishwasher unless all enclosure panels are properly in place. Open the door very carefully if the
dishwasher is operating, there is a risk of hot water spraying out.
• Do not place any heavy objects on the door when it is open, as the appliance could tip forward.
• When using your dishwasher, you should prevent plastic items from coming in contact with the heating element.
• Please ensure that all packing materials have been properly disposed.
• Use the dishwasher only for its intended function.
SAVE THESE INSTRUCTIONS!
WARNING
When loading your dishwasher, follow basic safety precautions, including the following:
• Read all instructions before using the dishwasher.
• Use the dishwasher only for its intended function (normal, household use only).
• Use only detergents or wetting agents recommended for use in a dishwasher; do not use them for hand
washing. Keep them out of the reach of children.
DANGER
Dishwasher detergent is a strong alkaline and can be extremely dangerous if swallowed; avoid contact with
skin and eyes and keep children away from the dishwasher when the door is open. Check that the detergent
receptacle is empty at the end of each wash cycle.
2

Important Safety Information
Electrical Instructions
An electrical supply of 120V AC only, 60 Hz is required. For your personal safety, the appliance must be grounded. To
minimize possible shock hazards, the unit must be plugged into a matching 3-prong (grounding type) electrical outlet. If
the power cord is damaged, it must be replaced by the manufacturer or a service professional, in order to reduce the risk
of a hazard.
SAVE THESE INSTRUCTIONS!
WARNING - HYDROGEN GAS IS EXPLOSIVE
Under certain conditions, hydrogen gas may be produced in a hot-water system that has not been used for
two (2) weeks or more. Hydrogen gas is explosive! If the hot-water system has not been used for such a
period, before using the dishwasher, turn on all hot-water faucets and let the water fl ow from each for several
minutes. This will release any accumulated hydrogen gas. As the gas is fl ammable, do not smoke or use an
open fl ame during this time.
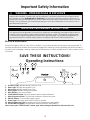
IMPORTANT GROUNDING INSTRUCTIONS
This appliance must be grounded. In the event of a malfunction or breakdown, grounding will reduce the risk
of electric shock by providing a path of least resistance for electric current. This appliance is equipped with
a cord having an equipment-grounding conductor and a grounding plug. The plug must be plugged into an
appropriate outlet that is installed and grounded in accordance with all local codes and ordinances.
3
Operating Instructions
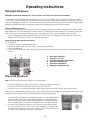
1. Pre-Rinse Light: Will fl ash during Pre-Rinse Cycle.
2. Wash Light: Will fl ash during Wash Cycle.
3. Rinse Light: Will fl ash during Rinse Cycle.
4. Drying Light: Will fl ash during Drying period.
5. Door Handle: Pull to open the door.
6. START/PAUSE Button: Press this button to start or pause dishwasher.
7. Wash Program Selector: Turn the knob clockwise to select wash cycles.
8. ON/OFF Button: To turn on/off the power supply.
9. Power Light: Illuminates when ON/OFF button is pressed.
10. Rinse Aid Warning Light: Illuminates when rinse aid dispenser needs refi lling.
11. Salt Aid Warning Light: Illuminated when softener dispenser needs refi lling.
Note: Pressing the “START/PAUSE” button again after starting the dishwasher, will pause the unit.
9
8
7
6
5
4
2
1
3 10
S
11

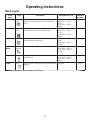
Cycle
Name
Type Description Description of Cycle Detergent
(pre/main)
NORMAL Normal
Wash
For normally soiled loads such as pots, plates,
glasses and lightly soiled pans. Standard daily
cycle.
Pre-rinse
Wash (52°C / 125°F)
Rinse
Rinse (65°C / 149°F)
Drying
4/20 gr.
INTENSIVE Intensive
Wash
For heavily soiled loads, such as pots, pans, cas-
serole dishes and dishes with dried food.
Pre-Rinse (50°C / 122°F)
Wash (55°C / 131°F)
Rinse
Rinse (65°C / 149°F)
Drying
4/20 gr.
ECONOMY Light Wash For lightly soiled loads, such as plates, glasses,
bowls and lightly soiled pans.
Wash (50°C / 122°F)
Rinse
Rinse (60°C / 140°F)
Drying
20 gr.
RAPID
WASH
Glassware
and cups
A shorter wash for lightly soiled loads. Pre-rinse
Rinse (50°C / 122°F)
Rinse (55°C / 131°F)
Drying
15 gr.
GLASS Glassware For lightly soiled loads, such as glasses, crystal
and fi ne china.
Pre-rinse
Rinse (45°C / 113°F)
Rinse (72°C / 162°F)
Drying
15 gr.
SOAK Soak Use to rinse the dishes that you plan to wash later
that day.
Pre-Rinse 15 gr.
Note: The longest wash cycle can take up to 2.5 hours.
Wash Cycles
Operating Instructions
4

Operating Instructions
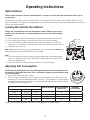
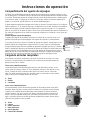
Water Softener
There are two (2) ways to reduce the water hardness, one way is by using the water softener, the other is by us-
ing detergent.
The hardness of the water varies from place to place. If hard water is used in the dishwasher, deposits will form on the
dishes and utensils. The appliance is equipped with a special softener that uses salt specifi cally designed to eliminate lime
and minerals from the water.
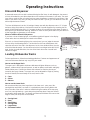
Loading the Salt into the Softener
Always use salt intended for use with dishwashers (water softening salt is recom-
mended). The salt container is located beneath the lower rack and should be fi lled
as follows:
1. Remove the lower basket and unscrew and remove the cap from the salt container.
2. If you are fi lling the container for the fi rst time, fi ll 2/3 of its volume with water.
3. Place the end of the salt fi lter (supplied) into the hole and introduce 1-2 cups (300-
600g) of salt. It is normal for a small amount of water to come out of the salt container.
4. Carefully screw on the cap.
Note: Adding salt is optional and is only needed when you have hard water, however, the
salt indicator light will remain illuminated if no salt is added.
Note:
1. If you have hard water, the salt container must be refi lled when the salt warning light
comes on. Though the salt container is fi lled, the indicator light may not black out be-
fore the salt fully dissolves.
2. If there are spills of salt, a soak program could be run to clean the spills.
Adjusting Salt Consumption
The dishwasher is designed to allow for adjusting the amount of salt consumed based on
the hardness of the water being used. This is intended to optimize and customize the level
of salt consumption.
1. Unscrew the cap from the salt container.
2. There is a ring on the container with an arrow on it (see the fi gure to the side). If necessary,
rotate the ring in the counterclockwise direction from the “-” sign toward the “+” sign, based on
the hardness of the water being used. It is recommended that adjustments should be made in
accordance with the following chart:
Contact your local water board for information on the hardness of your water supply.
Clarke Degrees °dH mmol/1
0~14 0~10 0~1.7
14~36 18~44 1.8~4.4
36~71 45~89 4.5~8.9
71 89 8.9
Water Hardness
Selector Position Salt Consumption
(gram/cycle)
Autonomy
(cycles/2kgs)
-0/
/2060
MED 40 40
+6025
5

Operating Instructions
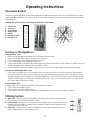
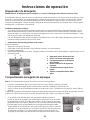
Detergent Dispenser
WARNING: Dishwasher detergent is corrosive! Take care to keep out of the reach of children.
The dispenser must be refi lled before the start of each was cycle according to the instructions provided in the “Wash
Cycles” table. Your dishwasher uses less detergent and rinse aid than conventional dishwashers. Generally, only one ta-
blespoon of detergent is needed for a normal wash load. More heavily soiled items need more detergent. Always add the
detergent just before starting the dishwasher, otherwise it could get damp and not dissolve properly.
Amount of Detergent to Use:
If your water is not that hard, you may also prevent the formation of deposits by adding detergent. The amount of deter-
gent needed can vary due to difference in water hardness. To determine the water hardness in your area, contact your
local water utility or area water softening company. The harder your water, the more detergent you may need.
• Use only detergent specifi cally made for use in dishwasher. Keep your detergent fresh and dry. Don’t put powder
detergent into the dispenser until you are ready to wash dishes.
Removing Hard Water Spots From Dishes:
Try the following:
• Run dishes through a normal wash program.
• Remove all metal dishware, such as cutlery, pans etc. from dishwasher.
• Do not add detergent.
• Pour 2 cups of vinegar into a bowl, set it face up on lower rack of dishwasher and run dishes through normal wash
program.
2
3
4
5
6
1
1. Main Wash Detergent
2. Dispenser Lid Lever
3. Pre-wash Detergent Compartment
4. Rinse Aid Level Indicator
5. Rinse Aid Compartment
6. Detergent Compartment Lid
15g 20g
Rinse Aid Dispenser
Note: Using Rinse Aid is optional, however it is recommended.
• To open the dispenser, turn the cap to the “open” (left arrow) position and lift out.
• Pour the rinse aid into the dispenser, being careful not to over fi ll.
• Replace the cap by inserting it aligned with “open” arrow and turning it to the “closed” (right arrow) position.
The rinse aid is released during the fi nal rinse to prevent water from forming droplets on your dishes that can leave spots
and streaks. It also improves drying by allowing water to “sheet” off the dishes.
• Your dishwasher is designed to use liquid rinse aids. The rinse aid dispenser is
located inside the door next to the detergent dispenser. To fi ll the dispenser,
open the cap and pour the rinse aid into the dispenser until the level indicator
turns completely black. The dispenser holds about 100 ml of liquid rinse aid.
• Be careful not to overfi ll the dispenser, this could cause over sudsing. Wipe
away any spills with a damp cloth. Don’t forget to replace the cap before you
close the dishwasher door. If you have soft water, you may not need rinse aid
as it may cause a white fi lm to develop on your dishes.
6

Rinse Aid Dispenser
A measured amount of rinse aid is released during the fi nal rinse. As with detergent, the amount
of rinse aid needed for your dishes depends on the hardness of the water in your area. Too much
rinse aid can result in later or foaming and can cause cloudiness or streaks on your dishes. If the
water in your area is very soft, you may not need rinse aid. If you do, you can dilute the rinse aid
with an equal amount of water.
The rinse aid dispenser has four (4) settings. Always start with the dispenser set on “3.” If spots
and poor drying are problems, increase the amount of rinse aid dispensed by removing the dis-
penser lid and rotating the dial to “4.” Increase the dose of rinse aid if there are drops of water or
lime spots on the dishes after washing. Reduce it if there are sticky white stains on your dishes or
a blue tinged fi lm on glassware or knife blades.
Operating Instructions
When to Refi ll the Rinse Aid Dispenser:
If you have a rinse aid warning light, a snowfl ake symbol will appear in the display
screen when the rinse aid dispenser needs to be refi lled.
If there is no rinse aid warning light on the control panel, you can judge the amount
of rinse aid by the following means. The black dot on the rinse aid dispenser indi-
cates the amount of rinse aid in the dispenser. As the rinse aid diminishes, the size
of the black dot decreases. You should never let the rinse aid get below the 1/4 full
level. As the rinse aid diminishes, the size of the black dot on the rinse aid level
indicator changes.
Full 1/4 Full(Refill)
3/4 Full Empty
1/2 Full
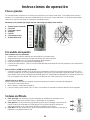
Loading Dishwasher Racks
For best performance, follow these loading guidelines. Features and appearance of
racks and silverware baskets may vary from your model.
How to use the Upper Rack:
The upper rack is designed to hold more delicate and lighter dishware, such as,
glasses, coffee and tea cups and saucers, as well as plates, small bowls and lightly
soiled shallow pans. Position the dishes and cookware so that they do not get
moved by the spray of water. The upper rack can be adjusted for height by moving
the other wheels (that are already on the rack) into the rails.
1. Cups
2. Saucer
3. Glasses
How to use the Lower Rack:
We recommend that you place large items in the lower rack - pots, pans, lids,
serving dishes and bowls, as shown. It is preferable to place serving dishes and
lids on the side of the racks in order to avoid blocking the rotation of the top spray
arm. Pots, serving bowls etc., must always be placed top down. Deep pots should
be slanted to allow water fl ow. The bottom rack features fold down tine rows so that
larger or more pots and pans can be loaded.
4. Serving Bowl
5. Bowl
6. Small Plates
7. Serving Plate
8. Large Plates
9. Silverware Basket
4
3
3
2
1
4
5
6
7
8
9
7
1
2
3
4
MAX

Silverware Basket
Silverware should be placed in the silverware basket with handles at the bottom. If the rack has side baskets, the spoons
should be loaded individually in the appropriate slots. Long utensils should be placed in the horizontal position at the front
of the upper rack.
Warning - Do not let any item extend beyond the bottom of the basket.
1. Salad Forks
2. Teaspoons
3. Soup Spoons
4. Dinner Forks
5. Knives
6. Serving Spoons
7. Serving Fork
Operating Instructions
2 4 5 1
4 5 1
2 4 5 1
-------------
2 4 5 1
4 5 1
2 4 5 4
-------------
2 4 5 7
3 5
2 3 3 1
-------------
2 3 3 1
3 3 1
2 3 6 6
Turning on the Appliance
Starting a Wash Cycle:
1. Make sure that the plug for the appliance is inserted into the wall socket.
2. Make sure that the water supply is turned on to full pressure.
3. Load the dishwasher (see “Loading Dishwasher Racks”).
4. Pour in the detergent (see “Detergent Dispenser”).
5. Turn the dial located on the right of the control panel in the clockwise direction until the number or symbol for the cycle
setting is aligned with the reference mark (see “Wash Cycles”).
6. Press the ON/OFF button, the ON/OFF light will turn on. Press the Start/Pause button, the wash cycle will begin.
Cancelling or Modifying a Wash Cycle:
• A cycle that is underway can only be modifi ed if it has only been running for a short time. Otherwise, the detergent
may have already been release and the appliance may have already drained the wash water. If this is the case, the
detergent dispenser must be refi lled (see “Detergent Dispenser”). Press the ON/OFF button and the ON light will turn
off. Select the desired cycle setting (see “Starting a Wash Cycle”). Then, turn the dishwasher back on using the ON/
OFF button and the Start/Pause button.
Forgot to Add a Dish?
A forgotten dish can be added any time before the detergent cup opens.
1. Press Start/Pause button to pause.
2. Open the door and add forgotten dish(es)
3. Close the door and press the Start/Pause button, the dishwasher will resume working after 10 seconds.
Filtering System
1. Main Filter: Food and soil particles trapped by this fi lter are pulverized by a special jet on
the lower spray arm and washed down the drain.
2. Coarse Filter: Larger items, such as pieces of bone or glass, that could clog the drain are
trapped in the coarse fi lter. To remove an item caught in this fi lter, gently squeeze the tabs
on top of this fi lter and lift it out.
3. Fine Filter: This fi lter holds soil and food residue in the sump area and prevents it from
being re-deposited on the dishes during a cycle.
8

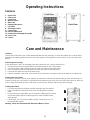
Operating Instructions
Features
1. Upper Rack
2. Spray Arms
3. Lower Rack
4. Water Softener
5. Main Filter
6. Detergent Dispenser
7. Cup Shelf
8. Silverware Basket
9. Coarse Filter
10. Rinse Aid Dispenser
11. Portable Faucet Adapter Assembly
12. Power Cord
13. Castors
Care and Maintenance
Cleaning:
To clean the control panel, use a lightly dampened cloth then dry thoroughly. To clean the exterior use a cleaner that is
appropriate for cleaning appliances. Never use sharp objects, scouring pads or harsh cleaners on any part of the dish-
washer.
Protect Against Freezing:
If your dishwasher is left in an unheated place during the winter, ask a service technician to:
1. Cut off electrical power to the dishwasher and remove fuses or trip circuit breaker.
2. Turn off the water supply and disconnect the water inlet pipe from the water valve.
3. Drain the water from the inlet pip and water valve (use a pan to catch the water).
4. Reconnect the water inlet pipe to the water valve.
5. Remove the plastic sump cover in the bottom of the tub and use a sponge to soak up the water in the rubber boot.
Cleaning the Spray Arms:
It is necessary to clean the spray arms regularly, as hard water chemicals will clog the spray arm jets and bearings. To
remove the spray arm, unscrew the nut and take out the washer on top of the spray arm and remove the arm. Wash the
arms in soapy, warm water and use a soft brush to clean the jets. Replace after rinsing them thoroughly.
Cleaning the Filters:
• For best performance and results, the fi lter assembly must be cleaned.
• Inspect the fi lters for obstructions every time the dishwasher has been
used.
• By unscrewing the coarse fi lter, you can remove the fi lter system. Remove
any food remnants and use a cleaning brush to clean the fi lters under
running water.
• Follow Steps 1 to 3 to remove the fi lter system. Follow Steps 3 to 1 to
reinstall the fi lter system.
Warning - Never run the dishwasher without the fi lters in place.
1
3
2
9
Front View
Back View

Cleaning the Door:
To clean the edge around the door, you should use only a soft, warm, damp rag. To prevent penetration of water into the
door lock and electrical components, do not use a spray cleaner of any kind. Also, never use abrasive cleaners or scour-
ing pads on the outer surfaces because they will scratch the fi nish. Some paper towels can also scratch or leave marks on
the surface.
Care and Maintenance
How to Keep your Dishwasher Running Properly
After Every Wash:
After every wash, turn off the water supply to the appliance and leave the door slightly ajar so that moisture and odors are
not trapped inside.
No Solvents or Abrasive Products:
To clean the exterior and rubber parts of the dishwasher, do not use solvents or abrasive cleaning products. Use only
a cloth and warm, soapy water. To remove spots or stains from the surface of the interior, use a cloth dampened with a
warm water and vinegar solution, or a cleaning product made specifi cally for dishwashers.
When you go on Holiday:
When you go on holiday, it is recommended that you run a wash cycle with the dishwasher empty and then remove the
plug from the socket, turn off the water supply and leave the door of the appliance slightly ajar. This will help the seals last
longer and prevent odors from forming in the appliance. Seals - One of the factors that cause odors to form in the dish-
washer is food that remains trapped in the seals. Periodic cleaning with a damp sponge will prevent this from occurring.
10

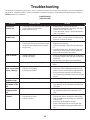
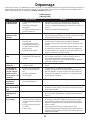
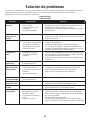
Troubleshooting
Problem Possible Cause Solution
Dishwasher
doesn’t run
• Fuse blown or circuit breaker has tripped
• Power supply is not turned on
• Water pressure is low
• Replace fuse or reset circuit breaker
• Make sure dishwasher is turned on and door is
closed. Plug in cord securely
• Check that water supply is connected and the
water is turned on
Drain pump
doesn’t stop
• Overfl ow • The system is designed to detect an overfl ow.
When it does, it shuts off the circulation pump
and turns on the drain pump
Noise • Some audible sounds are normal
• Utensils are not secure in basket / some-
thing small has dropped into the basket
• Motor hums
• Sounds from soft food shredding action and
detergent cup opening
• Ensure everything is secured in the dishwash-
er
• If you do not use often, dishwasher may hum,
remember to fi ll and pump out the appliance
every week to keep the seal moist
Suds in the tub • Improper detergent
• Spilled rinse agent
• Use only dishwasher detergent to avoid suds.
If suds are present, open the door and let suds
evaporate
• Always wipe rinse agent spills immediately
Dishes are not dry • Rinse agent dispenser is empty • Make sure that the rinse agent dispenser is
fi lled
Dishes and fl at-
ware are not clean
(spots / fi lming)
• Improper program selected / run
• Improper rack loading
• Extremely hard water
• Select a stronger program
• Make sure that the detergent dispenser and
spray arms are not blocked by large dishware
• Remove all metal utensils from dishwasher,
see “Removing Hard Water Spots from Dishes”
section
Detergent left in
dispenser cups
• Dishes blocking the detergent cups • Re-load the dishes properly
Water standing in
the bottom of the
tub
• This is normal • A small amount of clean water around the out-
let at the back of the tub keeps the water seal
lubricated
Water doesn’t
pump out of the
tub
• The drain is clogged • Make sure the kitchen sink is draining well. If
the dishwasher drains into a disposer, run it
clear
Dishwasher leaks
/ steams
• Overfi lled dispenser or rinse aid spills
• Dishwasher isn’t level
• Steam is normal
• Be careful not to overfi ll the rinse aid dispense.
Spilled rinse aid can cause over sudsing and
lead to overfl owing. Wipe away any spills with
a damp cloth
• Make sure the dishwasher is level
• Steam coming through the vent by the door
latch is normal during drying and water drain-
ing
Occasionally a problem may arise that is minor in nature and a service call may not be necessary. Use this troubleshoot-
ing guide for a possible solution. If the unit continues to operate improperly, call an authorized service depot or Danby’s
toll free number for assistance.
1-800-26-DANBY
(1-800-263-2629)
11

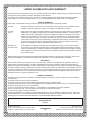
LIMITED IN-HOME APPLIANCE WARRANTY
This quality product is warranted to be free from manufacturer’s defects in material and workmanship, provided that the unit is used under the normal operating
conditions intended by the manufacturer.
This warranty is available only to the person to whom the unit was originally sold by Danby Products Limited (Canada) or Danby Products Inc. (U.S.A.) (hereafter
“Danby”) or by an authorized distributor of Danby, and is non-transferable.
TERMS OF WARRANTY
Plastic parts, are warranted for thirty (30) days only from purchase date, with no extensions provided.
First Year
During the rst twelve (12) months, any functional parts of this product found to be defective, will be repaired or replaced, at warrantor’s
option, at no charge to the ORIGINAL purchaser.
To obtain
Danby reserves the right to limit the boundaries of “In Home Service” to the proximity of an Authorized Service Depot. Any app liance
Service
requiring service outside the limited boundaries of “In Home Service” , it will be the consumer’s responsibility to transport the appliance (at
their own expense) to the original retailer (point of purchase) or a service depot for repair. See “Boundaries of In Home Serv ice” below.
Contact your dealer from whom your unit was purchased, or contact your nearest authorized Danby service depot, where service
must be performed by a qualied service technician.
If service is performed on the units by anyone other than an authorized service depot, or the unit is used for commercial appli cation, all
obligations of Danby under this warranty shall be void.
Boundaries of
If the appliance is installed in a location that is 100 kilometers (62 miles) or more from the nearest service center your unit must be
In Home Service
delivered to the nearest authorized Danby Service Depot, as service must only be performed by a technician qualied and certif ied for
warranty service by Danby. Transportation charges to and from the service location are not protected by this warranty and are t he
responsibility of the purchaser.
Nothing within this warranty shall imply that Danby will be responsible or liable for any spoilage or damage to food or other c ontents of this appliance, whether due
to any defect of the appliance, or its use, whether proper or improper.
EXCLUSIONS
Save as herein provided, Danby, there are no other warranties, conditions, representations or guarantees, express or implied, m ade or intended by Danby or its
authorized distributors and all other warranties, conditions, representations or guarantees, including any warranties, conditio ns, representations or guarantees
under any Sale of Goods Act or like legislation or statue is hereby expressly excluded. Save as herein provided, Danby shall no t be responsible for any damages
to persons or property, including the unit itself, howsoever caused or any consequential damages arising from the malfunction o f the unit and by the purchase of
the unit, the purchaser does hereby agree to indemnify and hold harmless Danby from any claim for damages to persons or propert y caused by the unit.
GENERAL PROVISIONS
No warranty or insurance herein contained or set out shall apply when damage or repair is caused by any of the following:
1) Power failure.
2) Damage in transit or when moving the appliance.
3) Improper power supply such as low voltage, defective house wiring or inadequate fuses.
4) Accident, alteration, abuse or misuse of the appliance such as inadequate air circulation in the room or abnormal operating con ditions
(extremely high or low room temperature).
5) Use for commercial or industrial purposes (ie. If the appliance is not installed in a domestic residence).
6) Fire, water damage, theft, war, riot, hostility, acts of God such as hurricanes, oods etc.
7) Service calls resulting in customer education.
8) Improper Installation (ie. Building-in of a free standing appliance or using an appliance outdoors that is not approved for out door application).
Proof of purchase date will be required for warranty claims; so, please retain bills of sale. In the event warranty service is required, present this document to our
AUTHORIZED SERVICE DEPOT.
Danby Products Limited
PO Box 1778, Guelph, Ontario, Canada N1H 6Z9
Telephone: (519) 837-0920 FAX: (519) 837-0449
Danby Products Inc.
PO Box 669, Findlay, Ohio, U.S.A. 45840
Telephone: (419) 425-8627 FAX: (419) 425-8629
04/09
1-800-263-2629
Warranty Service
In-home
If the appliance is installed in a location that is 100 kilometres (62 miles) or more from the nearest
service centre your unit must be delivered to the nearest authorized Danby Service Depot, as service
must only be performed by a technician qualified and certified for warranty service by Danby. Transpor-
tation charges to and from the service location are not protected by this warranty and are the responsi-
bility of the purchaser.
During the first twelve (12) months, any functional parts of this product found to be defective, will be
repaired or replaced, at warrantor’s option, at no charge to the ORIGINAL purchaser.
Danby reserves the right to limit the boundaries of “In Home Service” to the proximity of an Authorized
Service Depot. Any appliance requiring service outside the limited boundaries of “In Home Service” ,it
will be the consumer’s responsibility to transport the appliance (at their own expense) to the original
retailer (point of purchase) or a service depot for repair. See “Boundaries of In Home Service” below.
Contact your dealer from whom your unit was purchased, or contact your nearest authorized Danby
service depot, where service must be performed by a qualified service technician. If service is performed
on the units by anyone other than an authorized service depot, or the unit is used for commercial
application, all obligations of Danby under this warranty shall be void.
First year
To obtain
service
Boundaries of
in-home service
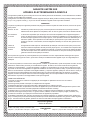
LIMITED IN-HOME APPLIANCE WARRANTY
This quality product is warranted to be free from manufacturer’s defects in material and workmanship, provided that the unit is
used under the normal operating conditions intended by the manufacturer.
This warranty is available only to the person to whom the unit was originally sold by Danby Products Limited (Canada) or
Danby Products Inc. (U.S.A.) (hereafter “Danby”) or by an authorized distributor of Danby, and is non-transferable.
TERMS OF WARRANTY
Plastic parts, are warranted for thirty (30) days only from purchase date, with no extensions provided.
Nothing within this warranty shall imply that Danby will be responsible or liable for any spoilage or damage to food or other
contents of this appliance, whether due to any defect of the appliance, or its use, whether proper or improper.
EXCLUSIONS
Save as herein provided, by Danby, there are no other warranties, conditions, representations or guarantees, express or
implied, made or intended by Danby or its authorized distributors and all other warranties, conditions, representations or
guarantees, including any warranties, conditions, representations or guarantees under any Sale of Goods Act or like legislation
or statute is hereby expressly excluded. Save as herein provided, Danby shall not be responsible for any damages to persons
or property, including the unit itself, howsoever caused or any consequential damages arising from the malfunction of the unit
and by the purchase of the unit, the purchaser does hereby agree to indemnify and hold harmless Danby from any claim for
damages to persons or property caused by the unit.
GENERAL PROVISIONS
No warranty or insurance herein contained or set out shall apply when damage or repair is caused by any of the following:
1) Power failure.
2) Damage in transit or when moving the appliance.
3) Improper power supply such as low voltage, defective house wiring or inadequate fuses.
4) Accident, alteration, abuse or misuse of the appliance such as inadequate air circulation in the room or abnormal operating
conditions (extremely high or low room temperature).
5) Use for commercial or industrial purposes (i.e., If the appliance is not installed in a domestic residence).
6) Fire, water damage, theft, war, riot, hostility, acts of God such as hurricanes, floods etc.
7) Service calls resulting in customer education.
8) Improper Installation (i.e., building-in of a free standing appliance or using an appliance outdoors that is not approved for
outdoor application). Proof of purchase date will be required for warranty claims; so, please retain bills of sale. In the event
warranty service is required, present this document to our AUTHORIZED SERVICE DEPOT.
Warranty Service
In-home
Danby Products Limited
PO Box 1778, Guelph, Ontario, Canada N1H 6Z9
Telephone: (519) 837-0920 FAX: (519) 837-0449
Danby Products Inc.
PO Box 669, Findlay, Ohio, U.S.A. 45840
Telephone: (419) 425-8627 FAX: (419) 425-8629
1-800-263-2629
07/14

Merci d’avoir choisi Danby
Nous savons que vous êtes excité. Nous sommes aussi! Cependant, le plus que vous vous familiarisez avec votre
nouvel appareil, le mieux va être votre expérience. Nous suggérons donc de lire ces instructions avant connecter votre
nouvel appareil. Ce manuel contient des informations opérationnel important qui vous aidera à faire un usage pleine de les
caractéristiques techniques disponibles dans votre appareil Danby. Le manuel contient également des informations conçu
pour améliorer la fiabilité et la sécurité de votre appareil ainsi que des conseils pour le maintien, pour vous assurez des annees
de bonheur.
Se il vous plaît visitez www.danby.com pour accéder les outils libre-service, FAQ et plus encore. Si jamais vous avez besoin
d'aide supplémentaire, s’il vous plaît appelez 1-800-26-Danby (1-800-263-2629). S’il vous plaît ayez votre facture d’achat, le
numéro de modèle, et le numéro de série près durant l'appel.
Remarque : Ces renseignements seront nécessaires si votre appareil a besoin d’entretien ou pour les demandes de
renseignements généraux. Pour bénéficier d’une opération de maintenance ou de dépannage, le reçu
original sera exigé.
Numéro de modèle :
Numéro de serie :
Date d’achat :
BESOIN D’ASSISTANCE ?
Veuillez trouver quelques conseils avant de faire appel à nos services, cela
nous aidera à mieux vous servir :
Lisez ce guide :
Il comprend des instructions pour l’utilisation et l’entretien adapté de votre
appareil.
Si votre nouvel appareil est endommagé :
Contactez immédiatement le revendeur (ou le fabricant).
Gagnez du temps et de l’argent :
Avant de faire appel à nos services, consultez à nouveau la section
« Dépannage ». Cette section vous aidera à résoudre des problèmes courants.
Si une réparation est nécessaire, ne vous inquiétez pas, la solution est au
bout du fil.
Tel: 1-800-26-
(1-800-263-2629)
13

Consignes de sécurité importantes
Précautions de sécurité
• Placez les articles pointus (c.-à-d. fourchettes ou couteau) de façon à ce qu’ils n’endommagent pas le joint
d’étanchéité de la porte.
• Chargez les couteaux pointus avec le manche vers le haut pour éviter les coupures.
• Ne lavez pas les articles de plastique à moins qu’ils ne soit indiqué comme étant « résistant au lave-vaisselle » ou
équivalent. Pour les articles de plastique qui n’ont pas cette indication, vérifi ez les recommandations du fabricant.
• Ne touchez pas à l’élément chauffant (placé sous le fi ltre) pendant ou immédiatement après l’utilisation.
• Ne faites pas fonctionner le lave-vaisselle lorsque les panneaux de fermeture ne sont pas correctement en place.
• Ne trafi quez pas les contrôles.
• Ne malmenez pas, ne vous assoyez pas ou ne vous tenez pas debout, sur la porte ou sur le panier du lave-vaisselle.
• Pour réduire les risques de blessures, ne laissez pas les enfants faire fonctionner (ou jouer dans ou sur) le lave-vais-
selle.
• Ne laissez pas les enfants jouer autour du lave-vaisselle lorsque vous ouvrez ou fermez la porte du lave-vaisselle.
• Enlevez la porte du compartiment de lavage lorsque vous mettez hors service un vieux lave-vaisselle ou lorsque vous
le jetez.
• Ne vaporisez pas d’eau sur l’appareil; cela peut causer une décharge électrique ou le dysfonctionnement des pièces
électriques.
• Utilisez uniquement des détergents et produits de rinçage conçus pour les lave-vaisselle automatiques. Ne pas
utiliser des savons, des détergents à lessive ou des détergents pour le lavage des mains dans votre lave-vaisselle.
Conservez ces produits hors de la portée des enfants.
• Conservez les détergents et les produits de rinçage hors de la portée des enfants. Conservez également les enfants
à l’écart de la porte ouverte du lave-vaisselle car il se peut qu’il y ait toujours du détergent à l’intérieur.
• La porte ne doit pas être laissée en position ouverte car il y a danger de trébucher sur celle-ci.
• Lors de l’installation, veillez à ce que le câble d’alimentation ne soit pas excessivement tordu ou aplati, de façon à
éviter tout danger.
• Ne pas faire fonctionner le lave-vaisselle lorsque tous les panneaux ne sont correctement mis en place. Si le
lave-vaisselle est en opération, usez de prudence pour ouvrir la porte. Il y a risque d’être aspergé par l’eau chaude.
• Ne pas placer des objets lourds sur le lave-vaisselle ou grimper sur la porte du lave-vaisselle lorsque celle-ci est ou-
verte. L’appareil peut basculer vers l’avant.
• Lorsque vous utilisez le lave-vaisselle, les articles en plastique ne doivent pas être en contact avec l’élément chauf-
fant.
• Disposez des matériaux d’emballage de manière appropriée.
• Ne pas tenter de modifi er les boutons de commande.
CONSERVEZ CES INSTRUCTIONS!
AVERTISSEMENT
Lorsque vous procédez au chargement du lave-vaisselle, suivez les mesures de sécurités de base, incluant
les mesures suivantes :
• Lisez toutes les instructions avant d’utiliser le lave-vaissalle.
• Utilisez le lave-vaisselle seulement pour son utilisation prévue (normale, utilisation domestique
seulement).
• Utilisez seulement des détergents ou des agents mouillants recommandés pour utilisation dans un
lave-vaisselle, ne les utilisez pas pour le lavage de mains et gardez-les hors de la portée des enfants.
DANGER
Le détergent pour lave-vaisselle est un alcalin puissante et peut être extrêmement dangereux s’il est avalé;
évitez les contacts avec la peau et les yeux et gardez les enfants loin du lave-vaisselle lorsque la porte est
ouverte. Vérifi ez que le distributeur de détergent est vide à la fi n de chaque cycle de lavage.
14

Consignes de sécurité importantes
Instructions électriques
Une prise de courant CA de 120 volts à 60 Hz est requise. Pour votre sécurité personnelle, l’appareil devrait être équipé
d’une mise à la terre. Pour minimiser les risques de décharge électrique possible, il doit être branché dans une prise
de courant qui possè de 3 lames (de type mise à la terre). Si le cordon d’alimentation est endommagé, il doit être rem-
placé par le fabricant ou un deses représentants de service ou une personne ayant les compétences nécessaires afi n de
réduire les risques de décharges électriques.
CONSERVEZ CES INSTRUCTIONS!
AVERTISSEMENT - L’HYDROGÈNE EST UN GAZ EXPLOSIF
Dans certaines conditions, de l’hydrogène peut se développer dans un circuit d’eau chaude qui n’est pas util-
isé pendant deux semaines ou plus. L’hydrogène est un gaz explosif. Lorsque le circuit d’eau chaude n’a
pas été utilisé depuis un certain temps, ouvrez tous les rovinets d’eau chaude et laissez couler l’eau pendant
plusieurs minutes avant de mettre le lave-vaisselle en marche. Toute accumulation d’hydrogène pourra ainsi
être évacuée. Le gaz étant une matière infl ammable, vous ne devez pas fumer ou utiliser une fl amme nue au
cours de cette opération.
INSTRUCTIONS DE MISE À LA TERRE IMPORTANTS
Cet appareil doit être mise à la terre. En cas de mauvais fonctionnement ou de panne, la mise à la terre réduit
les risques de choc électrique en fournissant un trajet de moindre résistance au courant électrique. Cet appa-
reil est équipé d’un cordon d’alimentation avec conducteur de mise à la terre de l’équipement et une fi che de
mise à la terre. Cette fi che doit être branchée dans une prise appropriée, installée conformément aux codes
et règlement locaux.
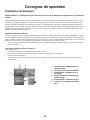
Consignes de opération
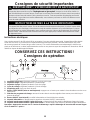
1. Voyant de pré-rinçage : clignotera pendant le cycle de pré-rinçage.
2. Voyant de lavage : clignotera pendant le cycle de lavage.
3. Voyant de rinçage : clignotera pendant le cycle de rinçage.
4. Cycle de séchage : clignotera pendant le cycle de séchage.
5. Poignée de porte : tirez pour ouvrir la porte.
6. Bouton START/PAUSE (mise en marche/pause) : appuyez sur ce bouton pour mettre le lave-vaisselle en marche ou en
mode pause
7. Sélecteur du programme de lavage : tournez le bouton dans le sens des aiguilles d’une montre pour choisir le pro-
gramme de lavage.
8. Bouton ON/OFF (marche/arrêt) : contrôle l’alimentation en électricité du lave-vaisselle.
9. Voyant d’alimentation : s’allume lorsqu’on appuie sur le bouton ON/OFF (marche/arrêt).
10. Voyant d’avertissement relatif à l’agent de rinçage : s’allume lorsqu’il faut remplir le distributeur d’agent de rinçage.
11. Voyant d’avertissement relatif à l’agent adoucissant : S’allume lorsqu’il faut remplir le distributer d’agent adoucissant.
Remarque : Appuyer de nouveau sur le « bouton de démarrage » après le démarage du lave-vaisselle causera l’appar-
eil de se mettre en « pause ».
15
9
8
7
6
5
4
2
1
3 10
S
11

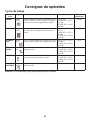
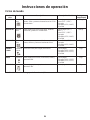
Nom du
cycle
Type Description Description du cycle Détergent
(pré/lavage)
NORMAL Lavage
normal
Pour la vaisselle normalement sale telle que cas-
seroles, assiettes, verres et poêles à frire légère-
ment sales Cycle de lavage quotidien régulier.
Pré-rinçage
Lavage (52°C / 125°F)
Rinçage
Rinçage (65°C / 149°F)
Séchage
4/20 gr.
INTENSIF Lavage
intensif
Pour la vaisselle, les casseroles et les poêles à
frire très sales sur lesquelles les aliments son
séché.
Pré-rinçage (50°C /
122°F)
Lavage (55°C / 131°F)
Rinçage
Rinçage (65°C / 149°F)
Séchage
4/20 gr.
ECONOMI-
QUE
Lavage
léger
Pour la vaisselle légèrement sale telle que verres,
assiettes, bols et poêles à frire légèrement sales.
Lavage (50°C / 122°F)
Rinçage
Rinçage (60°C / 140°F)
Séchage
20 gr.
LAVAGE
RAPIDE
Verres et
tasse
Un cycle de lavage plus court pour la vaisselle
légèrement sale.
Pré-rinçage
Rinçage (50°C / 122°F)
Rinçage (55°C / 131°F)
Séchage
15 gr.
VERRES Verres Pour la vaisselle légèrement sale telle que verres,
verres de cristal et porcelaine chinoise.
Pré-rinçage
Rinçage (50°C / 122°F)
Rinçage (55°C / 131°F)
Séchage
15 gr.
RINÇAGE
D’ATTENTE
Rinçage
d’attente
Rinçage de vaisselle qui sera lavée plus tard
dans la journée.
Pré-rinçage 15 gr.
Remarque : Le cycle de lavage le plus long peut durer jusqu’à 2,5 heures.
Cycles de levage
Consignes de opération
16

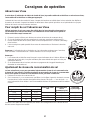
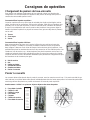
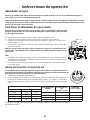
Le lave-vaisselle est conçu pour permettre l’ajustement du niveau de sel consommé selon
la dureté de l’eau utilisée. Cet élément optimise et personnalise le niveau de consommation
de sel. Pour ajuster le niveau de consommation de sel, procédez comme suit :
1. Dévissez le bouchon du contenant de sel.
2. Sur le contenant, il y a un anneau avec une fl èche (voir la fi gure à gauche). Au besoin, tournez
l’anneau dans le sens contraire des aiguilles d’une montre, du signe « - » vers le signe « + »,
selon la dureté de l’eau utilisée. Il est recommandé d’effectuer les ajustements selon le tableau
suivant :
Contactez votre offi ce des eaux régionale pour obtenir les renseignements sur la dureté de l’eau
de votre source d’approvisionnement.
Consignes de opération
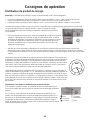
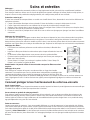
Adoucisseur d’eau
Il existe deux (2) méthodes de réduire la dureté de l’eau, la première méthode est d’utiliser un adoucisseur d’eau,
l’autre méthode est d’utiliser un détergent approprié.
La dureté de l’eau varie d’un endroit à l’autre. Lorsque de l’eau dure est utilisée dans le lave-vaisselle, des dépôts se
forment sur la vaisselle. L’appareil est doté d’un adoucisseur d’eau spécial qui utilise un sel spécialement conçu pour
éliminer de l’eau le calcuim et d’autres minéraux.
Pour remplir de sel l’adoucisseur d’eau
Utilisez tourjours du sel conçu pour être utilisé dans les lave-vaisselle uniquement (on
recommande le sel adoucisseur d’eau). Le contenant de sel est situé sous le panier in-
férieur et doit être rempli comme suit :
1. Enlevez le panier inférieur, puis dévissez et enlevez le bouchon du contenant de sel.
2. Si c’est la première fois que vous remplissez le contenant, remplissez-le d’eau au 2/3.
3. Placez le bout du fi ltre de sel (fourni) dans le trou et remplissez avec 1-2 tasses (300-600g)
de sel environ.
4. Il est normal qu’une petite quantité d’eau sorte du contenant de sel. Revissez le bouchon
avec soin.
Remarque : L’utilisation du sel est facultative et c’est nécessaire seulement avec l’eau dure,
mais la lumière « Avertissement sel » restera allumée si le sel n’est pas utilisé.
Remarque :
1. Le contenant de sel doit être rempli lorsque le voyant indicateur de sel s’allume. Même si le
contenant de sel est plein, le voyant indicateur peut rester allumé tant que le sel n’est pas
entièrement dissous.
2. Si un déversement de sel survient, exécutez un programme de rinçage d’attendre pour
dissoudre les cristaux de sel.
Ajustement du niveau de consommation de sel
Degrés Clarke °dH mmol/1
0~14 0~10 0~1,7
14~36 18~44 1,8~4,4
36~71 45~89 4,5~8,9
71 89 8,9
Dureté de l’eau
Position du sélec-
teur
Consommation
de sel
(grammes/cycle)
Autonomie
(cycles/2 kgs)
-0/
/2060
MED 40 40
+6025
17
La page est en cours de chargement...
La page est en cours de chargement...
La page est en cours de chargement...
La page est en cours de chargement...
La page est en cours de chargement...
La page est en cours de chargement...
La page est en cours de chargement...
La page est en cours de chargement...
La page est en cours de chargement...
La page est en cours de chargement...
La page est en cours de chargement...
La page est en cours de chargement...
La page est en cours de chargement...
La page est en cours de chargement...
La page est en cours de chargement...
La page est en cours de chargement...
La page est en cours de chargement...
La page est en cours de chargement...
La page est en cours de chargement...
La page est en cours de chargement...
La page est en cours de chargement...
La page est en cours de chargement...
La page est en cours de chargement...
La page est en cours de chargement...
-
 1
1
-
 2
2
-
 3
3
-
 4
4
-
 5
5
-
 6
6
-
 7
7
-
 8
8
-
 9
9
-
 10
10
-
 11
11
-
 12
12
-
 13
13
-
 14
14
-
 15
15
-
 16
16
-
 17
17
-
 18
18
-
 19
19
-
 20
20
-
 21
21
-
 22
22
-
 23
23
-
 24
24
-
 25
25
-
 26
26
-
 27
27
-
 28
28
-
 29
29
-
 30
30
-
 31
31
-
 32
32
-
 33
33
-
 34
34
-
 35
35
-
 36
36
-
 37
37
-
 38
38
-
 39
39
-
 40
40
-
 41
41
-
 42
42
-
 43
43
-
 44
44


Danby DDW1801MWP Le manuel du propriétaire
- Catégorie
- Lave-vaisselle
- Taper
- Le manuel du propriétaire
dans d''autres langues
- English: Danby DDW1801MWP Owner's manual
- español: Danby DDW1801MWP El manual del propietario
Documents connexes
-
Danby DDW1805W Manuel utilisateur
-
Danby DDW1801MW Le manuel du propriétaire
-
-
-
Danby DDW1899BLS Le manuel du propriétaire
-
-
-
Danby DDW1809W-1 Mode d'emploi
-