Korenix JetCon 1301 Series Quick Installation Manual
- Catégorie
- Commutateurs réseau
- Taper
- Quick Installation Manual

4
NO
1 2 3
4
3
2
1
Tel:+ 886-2-82193000
Fax:+886-2-82193300
Business service:sales@ko renix.com
Customer service:koreCARE @korenix.com
Series
Quick Installation Guide
Industrial Media Converter
www.korenix.comV1.0
1301
Le Convertisseur Industriel de Protocole JetCon 1301, conformément aux standards IEEE
802.3 et 802.3u, supporte 1 port 10/100Base TX plus 1 port Fibre Fast Ethernet 100FX. Le
JetCon 1301 adopte un design industriel fin et compact afin de limiter l’encombrement sur le
Rail DIN, dans les systèmes compacts. De façon à résister aux environnements difficile, le
JetCon 1301 est fabriqué dans un châssis en aluminium, et dispose d’un indice de protection
IP30.Le DIP switch 4-Pin permet de configurer le JetCon 1301 pour un fonctionnement en
mode « switch » ou en mode « convertisseur » pur. Le modèle JetCon1301 "–w" supporte un
fonctionnement dans des gammes de temperatures étendues. Pour étendre la distance du
lien, et la longueur de l’infrastructure réseau, le JetCon1301-s est équipé d’un transceiver de
forte puissance, permettant d’effectuer des laisons de 30 Kms en mode « Single » Fiber.. Il
est recommandé d’alimenter le JetCon1301 par une alimentation continue 24V (18~32V DC )
ou alterrnative 18V (18~27V AC) à travers le bloc de connexion 2-pin.
L’
entrée d’alimentation est protégée contre les inversions de polarités, afin d’éviter
d’endommager le système.
Vérification du colis
En ouvrant le colis, vous trouverez
4
Le Convertisseur JetCon1301
4
Ce guide d’installation rapide
Montage du Convertisseur
4
Montez le Clip à l’arrière du convertisseur sur le Rail DIN.
Mise à la masse du JetCon 1301
Il y a une vis de mise à la masse au dessous du JetCon1301.
Connectez cette vis à un contact de masse pour assurer la
sécurité des utilisateurs, et eviter du bruit électrique.
Câblage de l’alimentaion
1. Insérez les fils positifs et négatifs dans les bornes
V+ et V- sur le connecteur d’alimentation.Accepte des
cables 24AWG
2. Serrez fermement les vis de façon à empécher les
cables de sortir des connecteurs.
Note: les tensions d’alimentations recommandées sont 24V DC(DC18~ 32 V) ou 18VAC
(AC 18~27V)
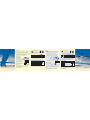
Connexion du réseau
1. Connecter le Port ETHERNET: Connecter le cable Ethernet en provenant du dispositf
connecté dans le port UTP du JetCon 1301. Le port UTP supporte la function auto MDI/MDIX
. La LED LNK / ACT s’allumera, et clignotera pour signaler la connection du port RJ-45, et
l’emission et la reception de données.
2. Connecter le Port Fibre: Connecter le port fibre sur votre JetCon 1301 à un autre
disposiitif Ethernet, en suivant le schéma ci-joint.. De mauvaises connections du cable fibre
causera un dysfonctionnement du port Ethernet.
Introduction
Anschluss für 24AWG
Kabel. JetCon1301
besitzt einen Verpolschutz
V-V+
DC24 V+ V-
Earth Ground
Pour des liens de distances différentes, le JetCon1301 est
disponible en version JetCon1301-m" pour multi-mode fibre
et "JetCon1301-s" for single-mode fibre.
La table ci-dessous illustre les specifications des transmetteurs fibres..
TxPwr(Min):Puissance émise minium TxPwr(Max):Puissance émise maximum
RxPwr(Min):Sensibilité en reception maximale RxPwr(Max):Sensibilité en réception minimale
Bilan de liaison t=Puissance émise minimum – Sensibilité en réception maximale
Note: Pour être sur que votre convertisseur fibre pourra transmettre et recevoir des données
entre 2 points, l’atténuation du câble fibre optique doit être inférieur au bilan de liaison.
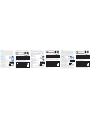
Configuration des DIP Switchs du JetCon1301
Note: Après la configuration des DIP Switches, il est nécéssaire de réinitialiser le Jetcon1301.
Service Client Korenix
KoreCARE est le centre de service gloable de Korenix Technology’s global service center,
ou notre équipe de professionnels est prète à répondre à vos questions à tous moments.
L’adresse mail du centre de service gloable de Korenix : [email protected]
!
C’est un LASER de Classe 1
Ne restez pas dans le faisceau LASER
ATTENTION
RX
TX
RX
TX
Cable Wiring(SC to SC)
RX A TX B
TX A RX B
Modul Glasfaser (um)
Lichtleiter
anschluss
We
llenlänge
(um)
TXPwr
(Min)
TxPwr
(Max)
RxPwr
(Min)
RxPwr
(Max)
Systemleistung
(dBm)
Entfernung
(km)
JetCon
1301-S
Single-Mode
8-10/125
SC 1310nm -15dBm -8dBm -34dBm 8dBm 19dBm 30km
JetCon
1301-m
Multi-Mode
50~62.5/125
SC 1310nm -20dBm -14dBm -31dBm 0dBm 11dBm 2km
Pin4
Pin3
Pin2
Pin1
4
NO
1 2 3
Pin Nr. # Status Description
Off
Set JetCon1301 in Switch converter mode.(Default)
ON
Set JetCon1301 in pure converter mode.
Off
Set Fiber port in Full duplex mode.(Default)
ON
Set Fiber port in Half duplex mode.
Off
Set RJ-45 in Auto-Negotiation mode.(Default)
ON
Set RJ-45 in 100Mbps Full Duplex mode.
Off
Disable Link Loose Forwarding function (Default)
ON
Enable Link Loose Forwarding function.
Alarm Switch
!
Introduction
V-V+
DC24 V+ V-
RX
TX
RX
TX
RX A TX B
TX A RX B
JetCon
1301-S
1310nm 19dBm 30km
JetCon
1301-m
1310nm
TXPwr
(Min)
TxPwr
(Max)
RxPwr
(Min)
RxPwr
(Max)
-15dBm -8dBm -34dBm 8dBm
-20dBm -14dBm -31dBm 0dBm 11dBm 2km
SC
SC

2. Connecting the Fiber Port: Connect the fiber port on your JetCon 1301 to another Fiber
Ethernet device, by following the figure below. Wrong connection or fiber cable type will
cause the fiber port not working properly.
3. For different link distance, the JetCon1301 provides
JetCon1301-m" for multi-mode fiber and "JetCon1301-s" for
single-mode fiber.The table below illustrates fiber transceiver specification.
TxPwr(Min):Minimum Launch Power TxPwr(Max):Maximum Launch Power
RxPwr(Min):Maximum Receive Sensitivity RxPwr(Max):Minimum Receive Sensitivity
Link Budget=Minimum Launch Power -Maximum Receive Sensitivity
Note: To ensure your fiber converter can transmit/receive data between the 2 nodes, the
attenuation of the optical fiber cable should be smaller than the fiber converter's Link Budget.
DIP Switch Settings for Alarm Relay Output
Korenix Customer Service
KoreCARE is Korenix Technology's global service center, where our professional staffs are
ready to solve your problems at any time Korenix global service center's e-mail is
This is a Class 1 Laser/LED product.
Don't stare into the Laser/LED Beam.
ATTENTION
!
JetCon 1301 Industrial Media Converter, conforming IEEE 802.3 and 802.3u standard,
supports 1 10/100Base TX plus one 100FX Fast Ethernet Fiber port. JetCon 1301 adopts
slim and compact industrial design to save rail space of compact system requirement. In
order to survive under harsh environment, JetCon 1301 chooses industrial-grade aluminum
case with IP30 standard protection.The 4-Pin DIP switch can configure JetCon 1301 to
operate in switch mode or pure converter mode. The JetCon1301 "-w" model extends support
for wide operation temperature. To extend the link distance and network infrastructure,
JetCon1301-s equips with a transceiver for large power budget for single mode fiber to reach
30KM link distance. JetCon1301 is recommended to be powered by DC24V (18~32V) or
AC18V (18~27V) from the 2-pin terminal block. The power input provides polarity reverse
protection to avoid system damage.
Package Check List
Unpack the box, you will find
4
JetCon 1301 Industrial Media Converter
4
Quick Installation Guide
Mounting the Unit
4
Din-Rail mount: Mount the din-rail clip screwed
on the rear of JetCon 1301 on the DIN rail
Grounding JetCon 1301
There is one grounding screw on the bottom side of
JetCon1301. Connect the frame grounding of JetCon1301
to the grounding surface to ensure safety and prevent noise.
Wiring the Power Inputs
1. Insert the positive and negative wires into the V+ and
V- contact on the terminal block connector.
2. Tighten the wire-clamp screws to prevent the power
wires from being loosened.
Notes: The recommended working voltage is DC24V
(DC18~ 32 V) or AC18V (AC 18~27V).
Connecting to Network
1. Connecting the Ethernet Ports:
Connect one end of an Ethernet cable into the UTP port of JetCon 1301, while the other end
is connected to the attached networking device. UTP port support auto MDI/MDIX function.
The LNK / ACT LED will turn on and flash to indicate RJ-45 port link and the packets
received and transmitted from RJ-45.
Introduction
RX
TX
RX
TX
Cable Wiring(SC to SC)
RX A TX B
TX A RX B
DC24 V+ V-
Erdung
Accept 24AWG wire.
JetCon1301 provide
polarity reverse protection
V-V+
30km
2KM
Modul Fiber (um) Connecter Wavelength(um)
TXPwr
(Min)
TxPwr
(Max)
RxPwr
(Min)
RxPwr
(Max)
LinkBudg(dBm)
Distance(km)
JetCon
1301-S
Single-Mode
8-10/125
SC 1310nm -15dBm -8dBm -34dBm 8dBm 19dBm
JetCon
1301-m
Multi-Mode
50~62.5/125
SC 1310nm -20dBm -14dBm -31dBm 0dBm 11dBm
Pin4
Pin3
Pin2
Pin1
4
NO
1 2 3
Pin Nr. # Status Description
Off
Set JetCon1301 in Switch converter mode.(Default).
ON
Set JetCon1301 in pure converter mode.
Off
Set Fiber port in Full duplex mode.(Default).
ON
Set Fiber port in Half duplex mode.
Off
Set RJ-45 in Auto-Negotiation mode.(Default).
ON
Set RJ-45 in 100Mbps Full Duplex mode.
Off
Disable Link Loose Forwarding function (Default).
ON
Enable Link Loose Forwarding function.
Alarm Switch
為適應不同的傳輸距離,JetCon1301 提供兩種選擇︰
"JetCon1301-m" 多模光纖型和"JetCon1301-s"單摸光纖型。
下表列舉了光纖傳輸的一些規格參數
TxPwr(Min): 最小發射功率電平 TxPwr(Max): 最大發射功率電平
RxPwr(Min):最小接收功率電平 RxPwr(Max): 最大接收功率電平
Link Budget (光纖傳輸能力)=Minimum Launch Power Maximum Receive Sensitivity
備注: 為確保光電轉換器能夠在2節點接收發數據,光纖線纜的信號衰減一定要小于轉換器的鏈
路預算值
JetCon1301 DIP 撥碼開關設定 (完成設定后,請重啟設備讓
新設置生效)
備注: 完成設定后,請重啟設備讓新設置生效.
Korenix 售後服務
KoreCARE 是芯惠通網路科技全球服務中心,我們專業的技術人員隨時準備解答您的疑問。
芯惠通全球服務中心 EMAIL: [email protected]
This is a Class 1 Laser/LED product.
Don't stare into the Laser/LED Beam.
ATTENTION
!
RX
TX
RX
TX
Cable Wiring(SC to SC)
RX A TX B
TX A RX B
2KM
型號 Fiber (um) 接頭 波長(um)
TXPwr
(Min)
TxPwr
(Max)
RxPwr
(Min)
RxPwr
(Max)
LinkBudg(dBm) 傳輸距離(km)
30km
JetCon
1301-S
單模
8-10/125
SC 1310nm -15dBm -8dBm -34dBm 8dBm 19dBm
JetCon
1301-m
多模
50~62.5/125
SC 1310nm -20dBm -14dBm -31dBm 0dBm 11dBm
JetCon 1301工業級光電信號轉換器,符合IEEE 802.3 和IEEE 802.3u標準,提供1個
10/100Base TX 和1個100FX界面。JetCon 1301 採用小巧的工業級外形設計,可以免除系統
安裝空間狹小的顧慮。為了適應工業現場惡劣的作業環境,JetCon 1301 密閉的鋁製外殼符合
IP30工業防護標準。JetCon 1301的4-Pin 撥碼開關可是設置JetCon 1301 採用交換機工作模式
或是單純的光電轉換器工作模式。 JetCon1301 " w"系列還能使用寬溫的工作環境。為了延長
通訊距離擴大網路覆蓋面積,JetCon1301-s 配備高功率預算的收發器,單摸光口支持最大傳
輸距離為30Km。JetCon1301 使用2-pin接線端子,建議供電範圍DC24V (18~32V) 或 AC18V
(18~27V)。JetCon1301 還具備電源極性反接保護。
產品清單
打開包裝,檢查下列配件
4
JetCon 1301 工業級信號轉換器
4
快速安裝手冊
安裝
4
導軌安裝: 將導軌夾用螺絲釘固定JetCon1301后面,
然後卡上導軌。
JetCon 1302 地線連接
在JetCon1301底部有一個地線連接螺母。
將JetCon1301地線螺母接地,可以確保設備使用安全,
並可防干擾。
電源線連接
1. 將電源線正負極插入產品底部接線端子的V+ 和V- 接腳。
2. 將線夾擰緊,防止DC電源線脫落。
備注: 建議供電範圍︰DC24V (DC18~ 32 V) 或者
AC18V (AC 18~27V)。
網路連接
1. 連接以太口:
雙絞線的一端連接JetCon 1301 RJ-45 電口,另一段連接網路設備。 RJ-45電口支持自適應
MDI/MDIX。此時LNK / ACT指示燈會亮起,信號燈閃爍表示此RJ-45 電口有數據正在傳遞。
2. 連接光口:
光纖線一端連JetCon 1301光口,另一端連接設備,如下圖所示連接模式。錯誤的連接會致使
光口不能正常工作。
導言
DC24 V+ V-
Erdung
連接24AWG 電源線,
JetCon1301 提供極性反
接保護
V-V+
Pin4
Pin3
Pin2
Pin1
4
NO
1 2 3
Pin Nr. # 狀態 描述
Off
設定 JetCon1301為交換式的光電轉換器模式 (默認)
ON
設定 JetCon1301為單純的光電轉換器模式
Off
設定光口為全雙工模式 (默認)
ON
設定光口為半雙工模式
Off
設定 RJ-45 i為自適應模式 (默認)
ON
設定RJ-45為100Mbps 全雙工模式.
Off
關閉 Link Loose Forwarding 功能 (默認)
ON
啟動 Link Loose Forwarding 功能
Alarm Switch
Einleitung
Anschluss für 24AWG
Kabel. JetCon1301
besitzt einen Verpolschutz
V-V+
Glasfaser Port nicht richtig arbeitet.
3. Für unterschiedliche Verbindungsabstände gibt es
unterschiedliche JetCon 1301, das „JetCon 1301-m" mit
Multi-Mode Glasfaser und "JetCon1301-s" mit Single-Mode Glasfaser.
Die folgende Tabelle veranschaulicht die Glasfaser Übertragungsspezifikation.
TxPwr(Min): Sendeleistung Min. TxPwr(Max): Sendeleistung Max.
RxPwr(Min): Empfangsleistung Max. RxPwr(Max): Empfangsleistung Min.
Systemleistung = Minimaler Sendeleistung – Maximaler Empfangsleistung
Bemerkung: Um sicher zu stellen, dass der Glasfaser Konverter Daten zwischen 2 Punkten
sendet bzw. empfängt, sollte die Dämpfung des Glasfaserkabels kleiner sein, als die
Systemleistung.
JetCon 1301 DIP Switch Einstellung
Bewerkung: Nach der Einstellung der DIP-Switche, führen Sie bitte ein Reboot durch, um die
neuen Einstellungen zu aktivieren.
Korenix Kunden-Service
KoreCARE ist ein globales Service Center von Korenix Technologies, in dem unser
professionelles Team jederzeit für Sie bereit steht, um Ihre Probleme schnellstmöglichst zu
lösen. Die E-Mail Adresse unseres globalen Center ist: [email protected].
!
Das ist ein Klasse1 Laser/LED Produkt.
Nicht in den Laserstrahl schauen.
Achtung
RX
TX
RX
TX
Cable Wiring(SC to SC)
RX A TX B
TX A RX B
Der industrielle Media Konverter JetCon 1301 ist an den IEEE 802.03 und und 802.3u
Standard angepasst, unterstützt ein 10/100Base TX- und einen 100FX Ethernet Glasfaser
Port. JetCon 1301 besitzt ein schlankes industrielles Design, um in einem kompakten System
einen Platz auf der Hutschiene zu finden. Schwierigen Umgebungsbedingungen ist der
JetCon 1301 durch ein industrielles Aluminiumgehäuse mit Schutzklasse IP 30 angepasst.
Mit dem 4-Pin DIP Switch kann der JetCon 1301 so eingestellt werden, dass er als Switch
oder Konverter arbeitet. Das JetCon1301 "–w" Modul unterstützt die weitere
Betriebstemperatur. Zur Erweiterung des Netzwerks und der Abstände der Verbindungen gibt
es eine Single-Mode-Ausführung für eine maximal Reichweite von 30KM. Die empfohlene
Betriebsspannung für den JetCon1301 beträgt DC 24V (18~32V) oder AC18V (18~27V) an
den 2-Pin Schraubklemmenblock. Die Spannungsversorgung ist mit einem Verpolschutz
ausgestattet, um die Beschädigung des Systems zu vermeiden.
Lieferumfang
Der Lieferumfang umfasst
4
JetCon 1301 Industrielle Media Konverter
4
Inbetriebnahme Kurzanleitung
Montage des Gerätes
4
DIN-Schiene: Zur Befestigung des JetCon1301
auf der Hutschiene den Hutschienenhalter an die Rückseite des Geräts schrauben.
Erdung des JetCon 1301
Es gibt eine Erdungsschraube an der unteren Seite vom
JetCon 1301. Für größtmögliche Sicherheit und um ein
Rauschen der Verbindung zu verhindern, verbinden Sie
die Erdungsschraube des JetCon 1301 mit der Felderdung.
Spannungsversorgung des JetCon 1301
1. Schließen Sie die Spannungsversorgung an die V+
und V- Eingänge des Schraubklemmenblocks an.
2. Ziehen Sie die Schrauben des Klemmblocks fest an,
um ein Lösen der Leitung zu verhindern.
Bemerkung: Die empfohlene Betriebsspannung beträgt
DC24V (DC18~ 32 V) oder AC18V (AC 18~27V)
Verbinden mit dem Netzwerk
1. Verbinden der Ethernet Ports:Schließen Sie eine Seite des Ethernetkabels an den UTP
Port des JetCon 1301 und die andere Seite an das Netzwerkendgerät, welches
angeschlossen werden soll. Alle UTPs Port unterstützen die Auto MDI/MDIX Funktion. Die
LNK / ACT LED ist eingeschaltet und leuchtet, um die Verbindung am RJ-45 Port und das
Senden und Empfangen von Daten über den RJ-45 Port anzuzeigen.
2. Verbinden der Glasfaser Ports:Der Anschluss der Glasfaser Ports eines JetCon 1301 an
ein anderes Glasfaser Ethernet Gerät erfolgt entsprechend der unten gezeigten Abbildung.
Eine falsche Verbindung oder das falsche Glasfaser Kabel können zur Folge haben, dass der
Modul Glasfaser (um)
Lichtleiter
anschluss
We
llenlänge
(um)
TXPwr
(Min)
TxPwr
(Max)
RxPwr
(Min)
RxPwr
(Max)
Systemleistung
(dBm)
Entfernung
(km)
JetCon
1301-S
Single-Mode
8-10/125
SC 1310nm -15dBm -8dBm -34dBm 8dBm 19dBm 30km
JetCon
1301-m
Multi-Mode
50~62.5/125
SC 1310nm -20dBm -14dBm -31dBm 0dBm 11dBm 2km
Pin4
Pin3
Pin2
Pin1
4
NO
1 2 3
Pin Nr. # Status Beschreibung
Off
Stellen JetCon1301 in Switch/Konverter Modus (Default)
ON
Stellen Sie JetCon1301 in reiner Konverter Modus
Off
Stellen Sie Glasfaser Port in Voll Duplex Modus (Default)
ON
Stellen Sie Glasfaser Port in Halb Duplex Modus ein
Off
Stellen Sie RJ-45 in Auto-Negotiation Mode ein (Default)
ON
Stellen Sie RJ-45 im 100Mbps Voll Duplex Modus ein
Off
Dis-Aktiviert Link Loose Forwarding Funktionalität (Default)
ON
Aktiviert Link Loose Forwarding Funktionalität
Alarm Switch
DC24 V+ V-
Erdung
Note: After adjusting the DIP-switch, please reboot the unit to activate the new settings.
-
 1
1
-
 2
2


Korenix JetCon 1301 Series Quick Installation Manual
- Catégorie
- Commutateurs réseau
- Taper
- Quick Installation Manual
dans d''autres langues
- English: Korenix JetCon 1301 Series
- Deutsch: Korenix JetCon 1301 Series