Broil King 9202-54 Le manuel du propriétaire
- Catégorie
- Barbecues
- Taper
- Le manuel du propriétaire
Ce manuel convient également à

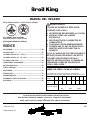
OWNER’S MANUAL
FOR USE WITH L.P. (LIQUID PETROLEUM) GAS
IN CANADA, PROPANE GAS
ANSI Z21.72-2016 / CSA 11.2-2016
BROIL KING MODEL #: 9202-54
CONTENTS
SAFETY ................................................................................ 2
INSTALLATION ............................................................ 2
L.P. GAS CYLINDER – 1Lb ................................................. 3
L.P. GAS CYLINDER – 20Lb ............................................... 4
OPD EQUIPPED CYLINDER ............................................... 5
HOSE AND REGULATOR ................................................... 5
LEAK TESTING ................................................................... 6
VENTURI TUBES ................................................................. 7
LIGHTING ............................................................................. 8
TRANSPORTING ................................................................. 9
MAINTENANCE ................................................................... 10
TROUBLESHOOTING ......................................................... 11
WARRANTY ......................................................................... 12
GUIDE DU PROPRIÉTAIRE DE BARBECUE AU
GAZ
...... 13
MANUAL DEL USUARIO DE PARRILLA A GAS ............... 25
WARNING
FIRE OR EXPLOSION HAZARD
IF YOU SMELL GAS:
1. DO NOT ATTEMPT TO LIGHT THE
APPLIANCE
2. EXTINGUISH ANY OPEN FLAME
3. DISCONNECT FROM FUEL SUPPLY
4. EVACUATE IMMEDIATELY
5. ALLOW GAS TO DISSIPATE 5 MINUTES
BEFORE RELIGHTING THE APPLIANCE
FAILURE TO FOLLOW THESE INSTRUCTIONS
COULD RESULT IN FIRE OR EXPLOSION,
WHICH COULD CAUSE PROPERTY DAMAGE,
PERSONAL INJURY OR DEATH.
READ ALL INSTRUCTIONS CAREFULLY BEFORE OPERATING YOUR GAS
STOVE.
RETAIN THESE INSTRUCTIONS FOR FUTURE
REFERENCE.
FOR ASSEMBLY INSTRUCTION, PLEASE SEE YOUR ASSEMBLY MANUAL.
OR
VISIT www.omcbbq.com TO VIEW OUR ASSEMBLY
VIDEOS
1-800-265-2150
10095-05LP REV A 01/17
info@omcbbq.com
PLEASE RECORD YOUR MODEL NUMBER,
SERIAL NUMBER AND DATE OF PURCHASE
HERE.
This information can be found on the silver and black OMC
caution sticker inside the lid of your stove.
Model
Number
-
Serial
Number
-
Date of Purchase
/
/
DD
MM
YYYY

SAFETY INSTALLATION
2
Your new OMC gas stove is a safe, convenient appliance
when assembled and used properly. As with all gas-fired
products, however, certain safeguards must be observed.
Failure to follow these safeguards may result in
serious injury or damage. If you have questions
concerning assembly or operation, consult your dealer,
gas appliance specialist, Gas Company or our direct
customer service line at 1-800-265-2150.
info@omcbbq.com
CAUTION
• FOR OUTDOOR USE ONLY.
• IF STORED INDOORS, DETACH AND LEAVE
CYLINDER OUTDOORS.
• THIS APPLIANCE MUST NOT BE OPERATED
UNATTENDED.
• SPECIAL CARE MUST BE TAKEN TO KEEP SMALL
CHILDREN AWAY FROM HEATED SURFACES.
Use caution when handling or transporting this
product. Metal edges can be hazardous. Use
appropriate gloves when lifting or handling. Before
lifting, remove side shelves, grids and grates.
PROPOSITION 65 WARNING
Handling the brass material on this product exposes you to
lead, a chemical known to the state of California to cause
cancer, birth defects or other reproductive harm. WASH
YOUR HANDS AFTER HANDLING THIS PRODUCT.
WARNING
Fuels used in gas or oil-fired appliances, and the products
of combustion of such fuels, contain chemicals known
to the State of California to cause cancer, birth
defects or other reproductive harm. “This warning is
issued pursuant to California Health and Safety Code Sec.
25249.6”
FOR YOUR SAFETY
Do not store or use gasoline or other
flammable vapors and liquids in the vicinity of
this or any other appliance.
DANGER
CARBON MONOXIDE HAZARD
THIS APPLIANCE CAN
PRODUCE CARBON MONOXIDE
WHICH HAS NO ODOR.
USING IT IN AN ENCLOSED
SPACE CAN KILL YOU.
NEVER USE THIS APPLIANCE IN
AN ENCLOSED SPACE SUCH
AS A CAMPER, TENT, CAR OR
HOME.
1. In the U.S.A., this appliance must be installed in
accordance with the local code and the relevant national
code:
ANSI Z223.1/NFPA 54 - Latest Edition National Fuel
Gas Code and Latest Local Codes where Applicable
2. In Canada, this appliance must be installed in
accordance with the local code and the relevant CSA
standards:
CSA-B149.1 Natural Gas and Propane installation
Code
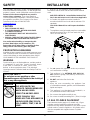
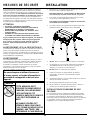
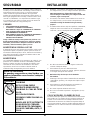
3. The appliance must be located away from combustible
surfaces by at least 76cm / 30” from each side, and
76cm / 30” from the rear.
4. Do not operate this appliance under any overhead
roof construction or foliage.
5. This appliance is for OUTDOOR USE ONLY, DO
NOT operate in garage, shed, balcony or other such
enclosed areas.
6. DO NOT restrict the flow of air to the
appliance.
7. Keep the area surrounding the appliance free
of combustible materials, gasoline, and all flammable
liquids and vapors.
8. This appliance is not intended to be installed in, or
on, recreational vehicles and/or boats.
9. Do not move the appliance while in use.
10. Do not use on tables exceeding 30 in. (76cm) in height
LP GAS CYLINDER PLACEMENT
The instructions below apply to LP models only. LP gas
cylinders must be installed according to assembly
instructions using retainer provided. Do not store a spare
cylinder under or near this appliance. All cylinders used
must be compatible with supplied means of cylinder
retention.

LP GAS CYLINDER – 1Lb
3
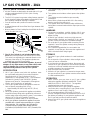
Use propane cylinders with a capacity of 14.1 oz or 16.4 oz.
You can find these tanks in the camping, hardware or
plumbing section of the store you are shopping at.
16.4oz (1.02 lbs.) 14.1oz (0.88 lbs.)
CAUTION: Use cylinders that are marked “propane
fuel” only.
NOTE: Your stove is equipped with a cylinder
supply system designed for vapor withdrawal.
While holding the regulator with one hand, push propane
cylinder into regulator and turn clockwise until tight.
WARNING: Do not use a wrench to tighten the
connection. Using a wrench could damage the
regulator coupling and could cause a leak.
SPECIFICATION
1. All LP gas cylinders used with this appliance must
be constructed and marked in accordance with the
Specifications for LP Gas Cylinders of the U.S.
Department of Transportation (D.O.T.) or the National
Standard of Canada, CAN/CSA-B339, Cylinders,
Spheres and Tubes for Transportation of Dangerous
Goods ; and Commission, as applicable.
2. The LP gas cylinder used for this appliance must not have
a capacity larger than 16.4 oz. (.5 kg). Approximately 8”
(20cm) high 3.9” (10cm) diameter.
3. The cylinder must be installed as per assembly
instructions.
STORAGE
1. Store the LP gas cylinder outdoors in a well-ventilated
place.
2. Do not store the LP gas cylinder in direct sunlight, near a
source of heat or combustion.
3. If you intend to store the stove indoors, disconnect and
remove the LP gas cylinder first. Disconnected cylinders
must have a dust cap installed and must not be stored in
a building, garage or any enclosed area.
4. Keep out of the reach of children.
5. When the LP gas cylinder is connected to the gas stove,
the gas stove and LP gas cylinder must be stored outside
in a well-ventilated place.
OPERATION
1. Never connect your gas stove to an LP gas cylinder
without the regulator provided, and NEVER TO AN
UNREGULATED LP GAS SUPPLY. The regulator
supplied with the barbecue must be used.
2. Always leak test the LP gas cylinder to regulator
connection when connecting the LP gas cylinder to the
appliance. See “Leak Testing.”
3. Do not operate appliance if the smell of LP gas is
present. Extinguish all flame and determine source of LP
gas before proceeding. Do not ignite the appliance until
the LP gas leak has been found and sealed.
4. Always shut off LP gas cylinder valve when the appliance
is not in use.

LP GAS CYLINDER – 20Lb
4
QCC®-1 QUICK CLOSING COUPLING
1. All OMC models are designed to be used with an LP gas
cylinder equipped with the QCC®-1 Quick Closing
Coupling system.
2. The QCC®-1 system incorporates safety features required
by the American National Standards Institute (ANSI) and
the Canadian Standards Steering Committee.
• Gas will not flow until a positive connection has been
made.
• A thermal element will shut off the flow of gas between 240°
and 300° F.
• When activated, a Flow Limiting Device will limit the flow of
gas to 10 cubic feet / hour.
3. The LP Gas Cylinder is not included with the Gas
Stove. Be sure to purchase one with the QCC® valve.
This valve is recognized by the external threads on the
inlet port of the valve. QCC® equipped cylinders are
available from your Gas Stove Dealer.
NOTE: Any attempt to connect the regulator, by use of
adapters or any other means, to any other valve could
result in damage, fire or injury and may negate the
important safety features in the QCC®-1 system.
SPECIFICATION
1. All LP gas cylinders used with this appliance must
be constructed and marked in accordance with the
Specifications for LP Gas Cylinders of the U.S.
Department of Transportation (D.O.T.) or the National
Standard of Canada, CAN/CSA-B339, Cylinders,
Spheres and Tubes for Transportation of Dangerous
Goods ; and Commission, as applicable
2. The LP gas cylinder used for this appliance must not
have a capacity exceeding 20 lb. (9 kg).
• Approximately 18” (46cm) high and 12” (31cm)
Diameter.
3. All LP gas cylinders used with this appliance should be
inspected at every filling and re qualified by a licensed
service outlet at the expiry date (10 years), in accordance
with the DOT (USA) and Canadian Transport
Commission (Canada) codes for LP Gas Cylinders.
4. All LP gas cylinders used with this appliance must be
provided with a shutoff valve terminating in a cylinder
valve outlet No. 510, specified in the Standard for
Compressed Gas Cylinder Valve Outlet and Inlet
Connection (USA) ANSI/CGA-V-1-1977 (Canada) CSA
B96.
5. The cylinder supply system must be arranged for vapor
withdrawal.
6. The cylinder must include a collar to protect the cylinder
valve.
7. The cylinder must be installed as per assembly
instructions.
8. Never fill the cylinder beyond 80% full. A fire causing
death or serious injury may occur.
9. The cylinder valve must include a safety relief device
having direct communication with the vapor space of the
cylinder.
HANDLING
1. Government regulations prohibit shipping full LP gas
cylinders. You must take your new cylinder to a LP gas
dealer for filling
2. A filled LP gas cylinder is under very high pressure.
Always handle carefully and transport in the upright
position. Protect the valve from accidental damage.
3. Do not tip the LP gas cylinder while connecting it to the
regulator. Fasten the cylinder securely during transport,
use and storage.
4. If the cylinder is tipped after it is connected to the
regulator, shut off the gas, disconnect the regulator and
have it checked before using it again.
STORAGE
1. Store the LP gas cylinder outdoors in a well-ventilated
place.
2. Do not store the LP gas cylinder in direct sunlight, near a
source of heat or combustion.
3. If you intend to store the stove indoors, disconnect and
remove the LP gas cylinder first. Disconnected cylinders
must have a dust cap installed and must not be stored in
a building, garage or any enclosed area.
4. Keep out of the reach of children.
5. When the LP gas cylinder is connected to the gas stove,
the gas stove and LP gas cylinder must be stored outside
in a well-ventilated place.
OPERATION
1. Never connect your gas stove to an LP gas cylinder
without the regulator provided, and NEVER TO AN
UNREGULATED LP GAS SUPPLY. The regulator
supplied with the stove must be used.
2. Always leak test the LP gas cylinder to regulator
connection when connecting the LP gas cylinder to the
appliance. See “Leak Testing.” (Page 6)
3. Do not operate appliance if the smell of LP gas is
present. Extinguish all flame and determine source of LP
gas before proceeding. Do not ignite the appliance until
the LP gas leak has been found and sealed.
4. Always shut off LP gas cylinder valve when the appliance
is not in use.

OPD EQUIPPED CYLINDER HOSE & REGULATOR
5
OVERFILL PREVENTION DEVICE
1. The standard for outdoor gas appliances, ANSI Z21.58/
CAN/CGA-1.6, requires that appliances be used with
cylinders equipped with an Overfill Prevention Device
(OPD).
2. The OPD is designed to reduce the potential for the
overfilling of propane cylinders, thus reducing the
possibility of relief valve discharges of raw propane. The
OPD causes a slower purge/fill operation. Some
consumers have been advised by filling stations that these
cylinders are “defective.” This is not a defect. Some
propane filling stations may not be aware of this device and
its effect on the purge/fill operation.
3. New OPDs coming onto the market have technology that
allows for much greater BTU outputs which will decrease
the amount of time it takes to purge a cylinder.
IDENTIFICATION
To identify these cylinders, the OPD hand wheel has been
standardized to the shape shown.
1. All models are equipped with a hose and regulator with a
QCC®-1 Quick Closing Coupling.
2. The QCC® coupling contains a magnetic Flow Limiting
Device which will limit the flow of gas should there be a leak
between the regulator and the appliance valve. This device
will activate if the cylinder valve is opened while the
appliance valves are open. Be sure the appliance valves
are off before the cylinder valve is opened to prevent
accidental activation.
3. The QCC® coupling incorporates a heat sensitive hand
wheel that will cause the back check module in the QCC®
cylinder valve to close when exposed to temperatures
between 240° and 300°F. Should this occur, do not attempt
to reconnect the hand wheel. Remove hose/regulator
assembly and replace with a new one.
4. The pressure regulator is set at 11 inches WC (water
column) and is for use with LP gas only. The hose and hose
couplings comply with CGA Standard CAN 1.83. No
modifications or substitutions should be attempted.
5. Protect the hose from dripping grease and do not allow the
hose to touch any hot surface, including the base casting
of the stove.
6. Inspect the seal in the QCC® cylinder valve when replacing
the LP gas cylinder or once per year whichever is more
frequent. Replace the seal if there is any indication of cracks,
creases, or abrasion.
7. Inspect the hose before each use. If the hose is cracked, cut,
abraded or damaged in any way, the appliance must not be
operated.
8. For repair or replacement of the hose/regulator assembly,
contact customer service.
CONNECTION
1. Be sure cylinder valve and appliance valves are “OFF.”
2. Align the small end of the hose with the regulator fitting and
turn clockwise until tight.
3. Center the nipple in the cylinder valve and hold in place.
Using other hand, turn the hand wheel clockwise until there is
a positive stop. Do not use tools. Hand tighten only. When
making the connection, hold the regulator in a parallel
with the cylinder valve, so as not to cross thread the
connection.
4. Leak test connections. See “Leak Testing.” (Page 6)
5. Refer to lighting instructions. To avoid activating the Flow
Limiting Device when lighting, open cylinder valve
slowly with the appliance valves off. If the Flow Limiting
Device is accidentally activated, turn off cylinder valve and
appliance valves, wait 10 seconds to allow the device to
reset, open cylinder valve slowly, then open the appliance
valve.
DISCONNECTION
Always close LP cylinder valve and remove coupling nut before
moving cylinder from specified operation position.

LEAK TESTING
6
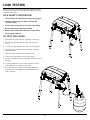
All factory-made connections have been rigorously tested
for gas leaks. However, shipping and handling may have
loosened a gas fitting.
AS A SAFETY PRECAUTION:
• Test all fittings for leaks before using your gas grill.
• Test the cylinder valve for leaks each time the
cylinder is filled.
• Test for leaks every time you connect a gas fitting.
• Do not smoke at any time while testing.
• Never test for leaks with a lit match or open flame.
• Test for leaks outdoors.
TO TEST FOR LEAKS:
1. Extinguish any open flame or cigarettes in the area.
2. Be sure that cylinder valve and gas grill valves are
“OFF.”
3. Connect LP gas cylinder. See “Hose and Regulator.”
4. Prepare a soap solution of one part water, one part
liquid detergent.
5. With a full gas cylinder, open cylinder slowly.
6. Brush the soap solution on each connection.
7. A leak is identified by a flow of bubbles from the area of
the leak.
8. If a leak is detected, close the gas cylinder “shut-off”
valve, tighten the connection and retest.
9. If the leak persists, contact your gas grill dealer for
assistance. Do not attempt to operate appliance if a
leak is present.

VENTURI TUBES
7
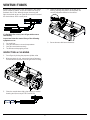
Always keep venturi tubes clean. Blockages in the venturi
tubes caused by spiders, insects and nests can cause a
flashback fire. In fact, although the gas stove may still
light, the backed up gas can ignite and cause a fire around
the venturi tubes at the control panel.
If a flashback fire occurs, turn off gas at the source
immediately
Inspect and clean the venturi if any of the following
symptoms occur:
1. You smell gas.
2. Your gas stove does not reach temperature.
3. Your gas stove heats unevenly.
4. The burners make popping noises.
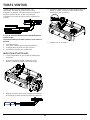
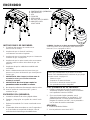
INSPECTING & CLEANING
1. Turn off gas by closing the propane cylinder valve
2. When gas stove is cool, remove the burner fasteners.
Proceed to lift the burners from the gas stove housing.
3. Clean the venturi tubes with a pipe cleaner or venturi
cleaning tool (Accessory #77310 or #18270).
4. Lower the burner into position in the gas stove
housing, making sure that the venturi tubes are
correctly aligned and fitted on the orifices.
5. Secure burners with burner fasteners.

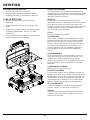
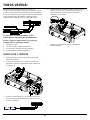
LIGHTING
8
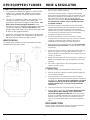
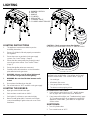
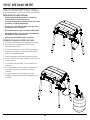
A. BURNER CONTROL
B. IGNITOR
C. HANDLE
D. CYLINDER
E. REGULATOR
F. CYLINDER VALVE
G. CYLINDER ADAPTER HOSE
LIGHTING INSTRUCTIONS
1. The appliance must be assembled as per the
assembly instructions.
2. Ensure LP cylinder is full and properly connected to
the regulator.
3. Ensure there are no gas leaks in the gas supply
system. See: “Leak Testing.” (Page 6)
4. Ensure that the venturi tubes are properly located
over the gas valve orifices. See “Venturi Tubes.”
(Page 7)
5. Ensure that ignition wires are connected.
6. Carefully review all instructions on the information
plate attached to the gas stove.
7. WARNING: Always open lid before lighting and
do not lean over gas stove while lighting.
8. WARNING: Do not close lid when burners are lit
or hot.
9. Do not place food directly on the grid.
10. Set control knobs to “OFF” and turn on the gas supply.
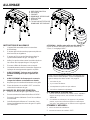
LIGHTING THE BURNER:
a. Open gas stove lid and leave open.
b. Push and turn control knob to “HIGH.”
c. Push ignitor 3 or 4 times or use match to light.
d. Burner should ignite within 5 seconds; turn off gas
source immediately if ignition does not occur in this
timeframe.
CAUTION - Check your gas stove after lighting.
All burner ports should show a 2.5cm / 1” flame on “HIGH.”
If any of the following symptoms occur there is probably a
blockage in the venturi tubes. Shut off gas at once and
clean the venturi tubes. See “Venturi Tubes.” (page 7)
1. You smell gas.
2. A flashback fire occurs.
3. Your gas grill heats unevenly.
4. The burners make popping noises.
IF BURNER DOES NOT IGNITE:
1. Push and turn control knob to “OFF.” Wait 5 minutes
then try again with control knob set at “MEDIUM.”
2. If any burner will not light, see “Troubleshooting” (page
11). If problem persists, do not attempt to operate the
appliance; contact OMC, your dealer or an approved
service center.
SHUTDOWN:
1. Turn off cylinder valve.
2. Turn control knobs to “OFF.”

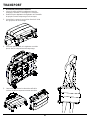
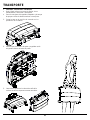
TRANSPORTING
9
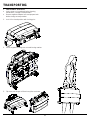
• CAUTION HOT SURFACES
• Let the stove cool completely before cleaning,
maintenance, storage or transportation.
• Remove regulator adapter hose and propane tank
before storage or transportation.
1.
Lock lid in closed position with locking pins.
2. Ensure regulator and legs are secured into leg retainer.
3. Flip stove onto hinges to lift and carry like a suitcase.

MAINTENANCE
10
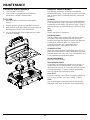
REGULAR MAINTENANCE
• CAUTION HOT SURFACES
• Let the stove cool completely before cleaning,
maintenance, storage or transportation.
TO CLEAN
1. Move stove away from flame and other ignition
sources.
2. Remove propane cylinder and regulator from stove.
3. Wipe surfaces clean with a damp soft cloth and a mild
dish detergent. DO NOT USE ABRASIVES.
4. You can disassemble some components of the stove
to assist in cleaning.
ANNUAL MAINTENANCE
The following components should be inspected and
cleaned at least once a year or after any period of storage
over 30 days to ensure optimal performance, safety and
efficiency.
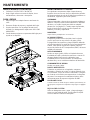
BURNERS
Remove burners and inspect for cracks and deterioration.
Clean venturi tubes using a pipe cleaner or venturi brush
to eliminate any blockages. See “Venturi Tubes.” (Page 7)
While the burners are removed, clean the interior of stove
base.
HOSE
Inspect and replace if necessary.
EXTERIOR FINISH
If white oxidation spots appear, wash the outside of the
stove with a mild soap and water solution. Rinse the
surfaces thoroughly then wipe them with a cloth dipped in
cooking oil to restore the luster. For repair of paint
scratches and scuffs, use a good quality HIGH
temperature (600°F) spray paint for touch-up.
STAINLESS STEEL
Wash with soap and water. Use stainless steel cleaner to
polish and remove stains or marks. Weathering can cause
stainless steel to turn a tan color. This is discoloration and
is not considered a manufacturing defect.
RESIN COMPONENTS
Wash with soap and water.
REPLACEMENT PARTS
If a problem is found with the regulator, hose, burner, or
control valves, do not attempt repair. See your dealer,
approved service center, or contact the factory for repairs
or replacement parts. To ensure optimum performance,
use only original OMC replacement parts.
LEAK TEST
When reconnecting a gas cylinder on propane models, be
sure to check for leaks. See “Leak Testing.” (Page 6)
GRID
Use a light detergent and water and then rinse and dry
with paper towel; never air dry grid or use a dishwasher.

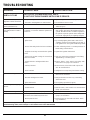
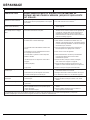
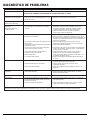
TROUBLESHOOTING
11
PROBLEM POSSIBLE CAUSE CORRECTIVE ACTION
SMELL OF GAS
SHUT OFF LP CYLINDER VALVE AT ONCE.
DO NOT USE THE APPLIANCE UNTIL LEAK IS SEALED.
Leak detected at cylinder,
regulator or other connection.
1. Regulator fitting loose.
2. Gas leak in hose/regulator or control valves.
1. Tighten fitting and “Leak Test.” (Page 6).
2. See authorized service center.
Flames Beneath Control
Panel (Flashback Fire)
1. Venturi blocked.
1. Remove burner and clean venturi. See “Venturi
Tubes” (Page 7).
Flickering Burner Flame or
Low Temperatures on HIGH
Setting
1. Excess flow safety device has been
activated in connection between cylinder and
barbecue.
1. Turn LP cylinder valve off then turn all burners to
OFF position. Disconnect the regulator from the
cylinder. Wait two minutes. Re-attach regulator to
the cylinder. Open the cylinder valve slowly. Wait
one minute. Light grill as per “Lighting” (Page 8).
Burner Not Lighting
1. Out of LP Gas.
2. Ignitor issue.
3. Excess flow safety device has been activated.
4. Regulator is not fully connected to the cylinder
valve.
5. A leak in the system causing the excess flow
device to activate.
6. Venturi blocked or misaligned with valve
orifice.
7. Orifice(s) blocked.
8. Hose is twisted.
1. Refill LP Gas Cylinder.
2. Try manually lighting burner with a match. See
“Lighting” (Page 8). If burner lights successfully, it
is an ignitor issue. See “Ignitor not Working” below
3. Follow “Flickering Flame or Low Temperatures on
HIGH setting” solution above.
4. Tighten the regulator hand wheel.
5. Leak test connections to determine loose fitting.
Tighten fitting. Leak test system.
6. Remove burner, clean venturi and realign with
valve orifice. See page 7 for assistance.
7. Remove burner, clean orifices with a pin or fine
wire. Do not drill orifices.
8. Straighten hose. Keep away from bottom casting.
Ignitor Not Working
1. Ignitor wire(s) not connected
2. Electrode misaligned on burner
3. Ignitor malfunction
1. Ensure main burner and side burner electrode
wires are all connected
2. Realign electrode and clear any surrounding
debris from area
3. See “Lighting” procedure (Page 8).
Decreasing Heat, “Popping
Sound”
1. Out of LP Gas.
2. Venturi blocked.
1. Refill LP Gas Cylinder.
2. Remove burner, clean venturi. See “Venturi Tubes”
(Page 7) for assistance.
Regulator Humming Noise
1. Cylinder valve opened too quickly.
1. Open cylinder valve slowly.
Yellow Flame
1. Some yellow flame is normal. If it is
excessive, the venturi may be blocked.
2. Burner ports blocked.
1. Remove burner, clean venturi. See “Venturi Tubes”
(page 7) for assistance.
2. Remove burner & clean with soft bristle brush
(e.g. toothbrush).
If troubleshooting fails to solve any of these or any other issues, please visit www.omcbbq.com for more information including
troubleshooting videos, tricks and tips or call customer service at 1-800-265-2150

WARRANTY
12
The OMC Warranty is effective from date of purchase and is
limited to the repair or replacement of parts at no charge
which prove to be defective under normal domestic use.
In United States and Canada replacement is FOB Factory.
In all other countries replacement is FOB OMC Distributor
(consult your Dealer for name of OMC Distributor). All other
costs are the responsibility of the owner.
This warranty is extended only to the original purchaser as
indicated on the warranty registration and applies only to
products sold at retail and only when used exclusively by the
purchaser in country where purchased. (Different types of
gas used in different countries require appropriate valves,
orifices and regulators.)
WHAT IS COVERED
Cast Aluminum Stove Excluding Paint 10 years
Burner Cast Iron 3 years
All Remaining Parts Excluding Tank 2 years
WHAT IS NOT COVERED
Any failures or operating difficulties due to accident, abuse,
misuse, alteration, misapplication, vandalism, improper
installation or improper maintenance or service, or failure to
perform normal and routine maintenance, including but not
limited to damage caused by insects within the burner tubes,
as set out in the owner’s manual.
Deterioration or damage due to severe weather conditions
such as hail, hurricanes, earthquakes or tornadoes,
discoloration due to exposure to chemicals either directly or
in the atmosphere.
Shipping or transportation costs.
Removal or re-installation costs.
Labor costs for installation and repair. Cost of service calls.
Liability for indirect, or consequential damages.
Gas stoves deemed to be used as a communal amenity or
gas stoves not directly used and maintained by the
purchaser.
REPLACEMENT PARTS
“Genuine OMC Gas Stove Parts” must always be used for
replacement. Use of any other parts will automatically nullify
the above warranty.
BURNERS
The life of OMC burners (made of stainless steel) depends
almost entirely on proper use, cleaning and maintenance.
This warranty does not cover failure due to improper use and
maintenance. For proper burner maintenance instructions
see page 10.
FREIGHT
Courtesy shipping is provided for warranty orders during the
six (6) months after the original date of purchase. After this
period, a freight charge will be applied to all warranty orders.
REGISTER YOUR STOVE
You can register your stove’s warranty online at
www.omcbbq.com or by calling 1-800-265-2150.
WARRANTY CLAIMS
All warranty is handled directly by OMC. Parts must be
returned to OMC Warranty Department, shipping charges
prepaid, accompanied by Model Number, Serial Number,
and if your stove is not registered, proof of purchase (copy of
sales slip or invoice). If inspection confirms the defect,
OMC will repair or replace such part in accordance with the
terms of the warranty.
On receipt of letter or fax (not by phone) OMC may at its
option not require part or parts to be returned.
NON AMERICAN/CANADIAN
RESIDENTS
The above warranty is administered by the OMC distributor
in your country. Contact your dealer for the name of your
OMC distributor.

MANUEL DE L’UTILISATEUR
OPÉRATION AU PROPANE LIQUIDE (LP)
AU CANADA, GAZ PROPANE
ANSI Z21.72-2016 / CSA 11.2-2016
BROIL KING MODÈLE #: 9202-54
TABLE DES MATIÈRES
MESURES DE SÉCURITÉ ................................................... 2
INSTALLATION ............................................................ 2
BONBONNE DE PROPANE LIQUIDE – 1Lb ...................... 3
BONBONNE DE PROPANE LIQUIDE – 20Lb .................... 4
BONBONNE AVEC DISPOSITIF
ANTI-DÉBORDEMENT (OPD) .............................................. 5
TUYAU ET RÉGULATEUR .................................................. 5
TEST D’ÉTANCHÉITÉ ......................................................... 6
TUBES VENTURI ................................................................. 7
ALLUMAGE ......................................................................... 8
TRANSPORTER .................................................................. 9
ENTRETIEN ......................................................................... 10
DÉPANNAGE ....................................................................... 11
GARANTIE
........................................................................... 12
AVERTISSEMENT
RISQUE D’INCENDIE OU D’EXPLOSION
EN PRÉSENCE D’UNE ODEUR DE GAZ:
1. NE PAS TENTER D’ALLUMER L’APPAREIL.
2. ÉTEINDRE TOUTE FLAME NUE;
3. DEBRANCHER L’ALIMENTATION EN
CARBURANT;
4. ÉVACUER IMMÉDIATEMENT;
5. PERMETTRE AU GAZ DE SE DISSIPER
PENDANT 5 MINUTES AVANT D’ALLUMER
À NOUVEAU L’APPAREIL.
LE NON-RESPECT DE CES INSTRUCTIONS
PEUT CAUSER UN INCENDIE OU UNE
EXPLOSION, QUI POURRAIT ENTRAÎNER
DES DOMMAGES MATÉRIELS, DES
BLESSURES OU LA MORT.
LIRE ATTENTIVEMENT CES DIRECTIVES AVANT D’UTILISER VOTRE
POÊLE
.
GARDER CES INSTRUCTIONS POUR RÉFÉRENCE
FUTURE
.
POUR LES INSTRUCTIONS D’ASSEMBLAGE, CONSULTER VOTRE MANUEL D’ASSEMBLAGE.
OU
VISITER www.omcbbq.com POUR VISIONNER NOS VIDÉOS D’ASSEMBLAGE
1-800-265-2150 FR
info@omcbbq.com
VEUILLEZ INSCRIRE LE NUMÉRO DE
MODÈLE, LE NUMÉRO DE SÉRIE ET LA DATE
D’ACHAT ICI.
Ces informations peuvent être trouvées sur l'argent et le noir
autocollant d'avertissement OMC à l'intérieur du couvercle de
votre poêle.
Numéro de
MODÈLE
-
Numéro de
série
-
Date d’achat
/
/
JJ
MM
AAAA

MESURES DE SÉCURITÉ
INSTALLATION
14
Votre nouveau poêle au gaz OMC est un appareil sécuritaire et
pratique lorsqu’il est assemblé et utilisé correctement. Toutefois,
comme tout appareil fonctionnant au gaz, certaines mesures de
sécurité s’imposent. Le non respect de ces mesures de sécurité
peut causer de sérieux dommages ou des blessures graves. Si
vous avez des questions en ce qui concerne l’assemblage ou le
fonctionnement de l’appareil, consultez votre marchand, technicien
d’appareils à gaz, compagnie de gaz ou notre service à la clientèle
au 1-800-265-2150. info@omcbbq.com
ATTENTION
• UTILISER À L’EXTÉRIEUR SEULEMENT.
• POUR L’ENTREPOSAGE INTÉRIEUR, DÉTACHER LA
BONBONNE ET LA RANGER À L’EXTÉRIEUR.
• NE PAS FAIRE FONCTIONNER CET APPAREIL SANS
SURVEILLANCE.
• PRENDRE LES PRÉCAUTIONS NÉCESSAIRES POUR
ÉLOIGNER LES ENFANTS DES SURFACES CHAUDES.
Soyez prudent lorsque vous déplacez l’appareil. Les angles de
métal peuvent être coupants. Utilisez les gants appropriés
pour soulever ou déplacer le poêle. Avant de soulever le
barbecue, retirer les tablettes latérales et les grilles de
cuisson.
AVERTISSEMENT LIÉ À LA PROPOSITION 65
La manipulation du matériel en laiton de ce produit vous expose au
plomb, un produit chimique identifié par l’État de la Californie
comme cause de cancer, de malformations congénitales et d’autres
troubles de l’appareil reproducteur. SE LAVER LES MAINS APRÈS
AVOIR MANIPULÉ CE PRODUIT.
AVERTISSEMENT
Les combustibles utilizes dans les appareils à l’huile ou au gaz et
leurs produits de combustion contiennent des produits chimiques
identifiés par l’État de la Californie comme cause de cancer,
d’anomalies congénitales et autres anomalies du système
reproducteur. “Cet avertissement est émis en vertu du California
Health and Safety Code Sec. 25249.6”
POUR VOTRE SÉCURITÉ
Ne pas entreposer ni utilizer d’essence ni
d’autres vapeurs ou liquids inflammables à
proximité de cet appareil ou de tout autre
appareil.
DANGER
MONOXYDE DE CARBONE
CETTE APPAREIL PEUT
PRODUIRE DU MONOXIDE DE
CARBONE, UN GAZ INODORE.
L’UTILISATION DE CET
APPAREIL DANS DES ESPACES
CLOS PEUT ENTRAÎNER LA
MORT.
NE JAMAIS UTILIZER CET
APPAREIL DANS UN ESPACE
CLOS COMME UN VÉHICULE DE
CAMPING, UNE TENTE, UNE
AUTOMOBILE OU UNE MAISON.
1. Aux États-Unis, cet appareil doit être installé selon les normes
locales et la norme nationale applicable:
ANSI Z223.1/NFPA 54 – Dernière édition du National Fuel
Gas Code et plus récentes normes locales, s’il y a lieu.
2. Au Canada, cet appareil doit être installé selon les normes
locales et les normes applicables de la CSA
:
CSA-B149.1 Code d’installation d’appareils fonctionnant
au Gaz Naturel ou au Propane
3. Les côtés et l’arrière de l’appareil doivent être éloignés d’un
minimum de 76cm / 30”de toute surface combustible.
4. Ne pas utiliser cet appareil sous une toiture ou un feuillage.
5. Cet appareil est conçu pour être UTILISÉ À L’EXTÉRIEUR
SEULEMENT. NE PAS UTILISER dans un garage, un
cabanon, sur un balcon ou tout endroit clos.
6. NE PAS limiter la circulation d’air à l’appareil.
7. Garder les environs de l’appareil libres de matières
combustibles, d’essence et de tout liquide et vapeur
inflammables.
8. Cet appareil n’est pas conçu pour être installé sur ou dans un
véhicule récréatif ou un bateau.
9. Ne pas bouger l’appareil lorsqu’il est en usage.
10. Ne pas utiliser sur une table excédant 30pces. (76cm) en
hauteur (pour le modèle de table seulement).
INSTALLATION DE BONBONNE DE GAZ
PROPANE
Les instructions suivantes s’appliquent seulement aux modèles
LP. Les bonbonnes de gaz propane doivent être installées selon
les instructions d’assemblage en utilisant les supports fournis.
N’entreposez jamais une bonbonne de rechange sous cet appareil
ou à proximité. Toutes les bonbonnes utilisées doivent êtres
compatibles avec le support de rétention fourni.

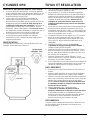
BONBONNE DE GAZ PROPANE – 1Lb
15
Utilisez des bouteilles de propane d’une capacite de
14.1 oz ou 16.4 oz. Vous pouvez trouver ces bouteilles dans
la section materiel de camping, quincaillerie, plomberie du
magasin ou vous effectuez vos achats.
16.4oz (1.02 lbs.) 14.1oz (0.88 lbs.)
MISE EN GARDE: N’utilisez que des bouteilles
portant la mention “Gaz Propane”.
REMARQUE: Votre grill á gaz est équipé d’un
dispositif d’alimetation par bouteille de gaz conçu
pourl’élimination de la vapeur.
En soulevant la bouteille, tenez la poignee la plus proche
de la bouteille de gaz d’un main, enfoncez la bouteille de
propane dans le regulateur et tournez dans le sens de
aiguilles d’une montre jusqu’a ce que cela soit serre.
AVERTISSEMENT: N’utilisez pas de cle pour
serrer le raccordement. L’utilisation d’une cle
risque d’endommager le raccord du detendeur et
d’entrainer une fuite.
SPECIFICATION
1. Toutes les bonbonnes de gaz propane utilisées avec cet
appareil doivent être fabriquées et identifiées tel
qu’indiqué dans la norme “LP gaz cylinders” du U.S.
Department of Transportation (D.O.T.) ou de la norme
nationale canadienne, CAN/CSA-B339 Bouteilles et
tubes pour le transport des marchandises dangereuses,
selon le cas.
2. La bonbonne utilisée avec cet appareil doit avoir une
capacité maximale 16.4 oz. (.5kg). Taille approximative
8po (20cm) de haut et 3.9po (10cm) de diamètre.
3. Le cylindre doit être installé conformément aux instructions
de montage.
ENTREPOSAGE
1. Conserver la bonbonne à l’extérieur, dans un endroit bien
aéré.
2. Ne pas entreposer la bonbonne en plein soleil ou près
d’une source de chaleur ou de combustion.
3. Si vous rangez votre poêle à l’intérieur, débranchez
d’abord la bonbonne. Les bonbonnes déconnectées
doivent être munies d’un bouchon anti-poussière et ne
pas être entreposées dans un bâtiment, un garage ou
tout autre espace clos.
4. Garder hors de la portée des enfants.
5. Lorsque la bonbonne est connectée au poêle, ils doivent
être entreposés à l’extérieur, dans un endroit bien aéré.
FONCTIONNEMENT
1. Ne jamais brancher votre poêle au gaz à une bonbonne
sans utiliser le régulateur fourni et JAMAIS À UNE
SOURCE DE GAZ PROPANE NON RÉGLEMENTÉE.
Vous devez utiliser le régulateur fourni avec le poêle.
2. Toujours effectuer un test d’étanchéité quand vous
connectez la bonbonne à votre appareil. Consultez “Test
d’étanchéité”.
3. Ne jamais faire fonctionner l’appareil lorsqu’il y a une
odeur de gaz propane. Éteindre toute flamme et
déterminer la source de l’odeur avant de continuer. Ne
pas allumer l’appareil avant d’avoir trouvé et scellé la
source de la fuite de propane.
4. Toujours fermer le robinet de la bonbonne quand
l’appareil n’est pas utilisé.

BONBONNE DE GAZ PROPANE – 20Lb
16
QCC®-1 RACCORD À FERMETURE RAPIDE
1. Tous les modèles de poêle au gaz OMC sont conçus pour
une utilisation avec une bonbonne de gaz propane
équipée du système QCC®-1 de raccord à fermeture
rapide.
2. Le système QCC®-1 incorpore les dispositifs de sûreté
exigés par l’American National Standards Institute (ANSI)
et le Conseil canadien des normes.
• Le gaz circule seulement si une connexion positive est
établie.
• Un élément thermo-sensible stoppe le débit du gaz entre
240° et 300° F.
• Lorsqu’activé, un limitateur de débit limite le débit du gaz à
10 pi
3
/ hr.
3. La bonbonne n’est pas fournie avec le poêle au
gaz. Procurez-vous une bonbonne munie du raccord
QCC®. Ce raccord est reconnaissable grâce au filetage
extérieur sur son orifice d’alimentation. Les bonbonnes
munies du raccord QCC® sont disponibles chez votre
détaillant de poêle.
NOTE: Toute tentative de connexion du régulateur à l’aide
d’adaptateurs ou d’autres moyens à une autre soupape
pourrait causer dommages, incendies ou blessures et annuler
les caractéristiques importantes de sécurité que procure le
système QCC®.
SPÉCIFICATIONS
1. Toutes les bonbonnes utilisées avec cet appareil doivent
être fabriquées et identifiées selon la norme Specifications
for LP gas cylinders du U.S. Department of Transportation
(D.O.T.) ou la norme CAN/CSA-B339, Bouteilles et tubes
pour le transport de marchandises dangereuses des
Normes nationales du Canada, selon le cas.
2. La capacité de la bonbonne utilisée avec cet appareil ne
doit pas excéder 20 lb (9 kg).
• Taille approximative: 18” (46 cm) de hauteur et 12”
(31cm) de diamètre.
3. Toutes les bonbonnes utilisées avec cet appareil
doivent être inspectées à chaque remplissage et
requalifiées par un distributeur autorisé à la date
d’expiration (10) ans selon les normes du DOT (É-U.) et
le l’Office des transports du Canada (Canada).
4. Toutes les bonbonnes utilisées avec cet appareil doivent
être munies d’un robinet d’arrêt se raccordant à un
robinet de réglage N° 510, tel que stipulé par les normes
«Standard for Compressed Gas Cylinder Valve Outlet
and Inlet Connection » (É.-U.) et ANSI/CGA-V-1-1977
(Canada) CSA B96.
5. Le système d’alimentation de la bonbonne doit permettre
à la vapeur de s’échapper.
6. La bonbonne doit être munie d’un rebord pour
protéger le robinet d’arrêt.
7. La bonbonne doit être installée conformément aux
instructions d’assemblage.
8. Ne jamais remplir la bonbonne à plus de 80 % pour éviter
un incendie qui pourrait causer de sérieuses blessures ou
la mort.
9. La bonbonne doit être munie d’un robinet de sûreté
et de décharge directement relié à la phase gazeuse à
l’intérieur du réservoir.
MANUTENTION
1. Les règlements gouvernementaux interdisent
l’expédition de bonbonnes de propane pleines. Vous
devez faire remplir votre nouvelle bonbonne chez un
détaillant de propane.
2. Une bonbonne de propane pleine est sous extrême
pression. Toujours la manipuler avec soin et la
transporter en position verticale. Protéger la soupape de
dommages accidentels.
3. Ne pas incliner la bonbonne lorsque vous la fixez au
régulateur. Fixez solidement la bonbonne pendant le
transport, l’utilisation et l’entreposage.
4. Si la bonbonne est inclinée après sa connexion au
régulateur, débranchez le régulateur et faites vérifier la
bonbonne avant de la réutiliser.
ENTREPOSAGE
1. Conserver la bonbonne à l’extérieur, dans un endroit bien
aéré.
2. Ne pas entreposer la bonbonne en plein soleil ou près
d’une
source de chaleur ou de combustion.
3. Si vous rangez votre poêle à l’intérieur, débranchez
d’abord la bonbonne. Les bonbonnes déconnectées
doivent être munies d’un bouchon anti-poussière et ne
pas être entreposées dans un bâtiment, un garage ou
tout autre espace clos.
4. Garder hors de la portée des enfants.
5. Lorsque la bonbonne est connectée au poêle, ils doivent
être entreposés à l’extérieur, dans un endroit bien aéré.
FONCTIONNEMENT
1. Ne jamais brancher votre poêle au gaz à une bonbonne
sans utiliser le régulateur fourni et JAMAIS À UNE
SOURCE DE GAZ PROPANE NON RÉGLEMENTÉE.
Vous devez utiliser le régulateur fourni avec le poêle.
2. Toujours effectuer un test d’étanchéité quand vous
connectez la bonbonne à votre appareil. Consultez « Test
d’étanchéité ».
3. Ne jamais faire fonctionner l’appareil lorsqu’il y a une
odeur de gaz propane. Éteindre toute flamme et
déterminer la source de l’odeur avant de continuer. Ne
pas allumer l’appareil avant d’avoir trouvé et scellé la
source de la fuite de propane.
4. Toujours fermer le robinet de la bonbonne quand
l’appareil n’est pas utilisé.

CYLINDRE OPD TUYAU ET RÉGULATEUR
17
DISPOSITIF DE PRÉVENTION DE TROP-PLEIN
1. La norme ANSI Z21.58/CAN/CGA-1.6 pour les appareils
au gaz extérieurs exige qu’ils doivent être utilisés avec une
bonbonne équipée d’un dispositif d’arrêt volumétrique ou
Overfill Prevention Device (OPD).
2. L’OPD a été conçu pour réduire la possibilité de
remplissage excessif de la bonbonne de propane,
diminuant ainsi la possibilité qu’une soupape de sûreté ne
dégage du propane brut. Avec un OPD, la purge et le
remplissage s’effectuent plus lentement. Des postes de
remplissage ont indiqué aux consommateurs que ces
bonbonnes étaient “défectueuses” Ce n’est pas le cas. Il
est possible que certains détaillants ne connaissent pas ce
dispositif et son effet sur la purge et le remplissage.
3. Les nouveaux OPD sur le marché possèdent une
technologie qui permet d’atteindre une meilleure
performance en BTU, réduisant le temps requis pour la
purge d’une bonbonne.
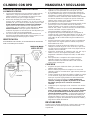
IDENTIFICATION
Pour identifier ces bonbonnes, la forme du robinet OPD est
standard, tel que démontré ci-dessous.
1. Tous les modèles sont équipés d’un régulateur avec un
raccord pour connexion rapide QCC®-1.
2. La connexion QCC possède un dispositif magnétique
limitateur de débit de gaz dans le cas d’une fuite entre le
régulateur et la soupape de l’appareil. Ce dispositif sera
activé si le robinet de la bonbonne est ouvert quand les
soupapes du poêle sont ouvertes. Assurer que les
soupapes du poêle sont fermées avant d’ouvrir le
robinet de la bonbonne pour prévenir une activation
accidentelle.
3. Le raccord QCC® est muni d’une roue thermosensible qui
fermera le module arrière de la bonbonne QCC® si la
température atteint de 240° à 300°F. Si cela se produisait,
ne tentez pas de rebrancher. Remplacer l’assemblage du
tuyau et du régulateur avec un neuf.
4. Le régulateur de pression est réglé à 11 po CE (colonne
d’eau) et convient seulement pour le gaz propane. Le
tuyau et les accouplements sont conformes à la norme
CGA CAN 1.83. Ne pas tenter de modification ou de
substitution.
5. Protéger le tuyau des graisses de cuisson qui
s’égouttent et l’éloigner de toute surface chaude, y
compris le fond du boîtier du poêle.
6. Inspecter le joint du raccord de la soupape QCC® de la
bonbonne lorsque vous remplacez la bonbonne, ou une
fois l’an, selon le plus fréquent. Remplacer le joint s’il y a
des fissures, plis ou abrasions.
7. Inspecter le tuyau avant chaque utilisation. Si vous
observez des fissures, coupures, abrasions ou tout autre
dommage, ne pas utiliser l’appareil.
8. Pour la réparation ou le remplacement de l’assemblage du
tuyau et du régulateur, communiquer avec le service à la
clientèle au 1-800-265-2150 ou info@omcbbq.com
RACCORDEMENT
1. S’assurer que le robinet de la bonbonne et le poêle sont
fermés.
2. Alignez la petite extrémité du raccord avec le régulateur
tuyau et tourner dans le sens horaire jusqu'à la butée.
3. Centrer le raccord sur le clapet de la bonbonne et tenir en
place. Avec l’autre main, tournez la roue dans le sens des
aiguilles d’une montre jusqu’au bout. Ne pas utiliser
d’outils. Serrer à la main. Lors du raccordement, tenir
le régulateur parallèle au clapet de la bonbonne pour
assurer un raccord parfait.
4. Vérifier l’étanchéité. Voir “Test d’étanchéité”
5. L’activation du limitateur de débit, ouvrez la
bonbonne lentement et vérifier que le poêle est éteint.
Si le limitateur de débit est accidentellement activé,
fermer la bonbonne et les soupapes du poêle, attendre
10 secondes, et rouvrir lentement le robinet de la
bonbonne et ensuite, les soupapes du poêle.
DÉCONNEXION
Toujours fermer le robinet de la bonbonne et enlever l’écrou
de raccordement avant de déplacer la bonbonne de sa
position d’utilisation.

TEST D’ÉTANCHÉITÉ
18
Toutes les connexions fabriquées en usine ont été
testées pour des fuites de gaz. Toutefois, à l’expédition
et à la manutention, un raccord pourrait s’être desserré.
MESURES DE PRÉCAUTION:
• Vérifier l’étanchéité de toutes les connexions
avant d’utiliser votre poêle au gaz.
• Tester la soupape de la bonbonne pour des fuites
possibles à chaque remplissage.
• Tester s’il y a des fuites à chaque fois que vous
branchez un raccord de gaz.
• Ne jamais fumer lorsque vous testez l’étanchéité.
• Ne jamais vérifier s’il y a des fuites à l’aide d’une
allumette ou d’une flamme nue.
• Effectuer le test d’étanchéité à l’extérieur.
VÉRIFICATION DES FUITES DE GAZ:
1. Éteindre toute flamme nue ou cigarette à proximité.
2. Assurer que les soupapes de la bonbonne et
l’appareil sont fermées
3. Connecter la bonbonne. Voir “Tuyau et régulateur”.
4. Préparer une solution savonneuse: parties égales
d’eau et de détergent liquide.
5. Ouvrir lentement le robinet de la bonbonne pleine.
6. Avec un pinceau, brosser la solution savonneuse sur
chaque raccord.
7. Si la solution fait des bulles, il y a une fuite à cet
endroit-là.
8. Si vous détectez une fuite, fermer le robinet de la
bonbonne, resserrer la connexion et tester à
nouveau.
9. Si la fuite persiste, communiquez avec votre
détaillant. Ne pas faire fonctionner l’appareil s’il y a
une fuite.

TUBES VENTURI
19
Toujours garder les tubes venturi propres. Les
obstructions des tubes de venturi causes par les
araignées, les insectes et les nids peuvent s’enflammer.
Même si le poêle s’allume, le gaz accumulé peut
s’enflammer au niveau des tubes venturi, du tableau de
contrôle.
S’il y a un retour de flamme, fermer immédiatement la
source de gaz.
Inspecter et nettoyer les tubes venturi si vous notez ce
qui suit:
1. Une odeur de gaz.
2. Votre poêle n’atteint pas la température désirée.
3. La température du poêle n’est pas uniforme.
4. Les brûleurs émettent des crépitements.
INSPECTION ET NETTOYAGE
1. Fermer l’alimentation en gaz à l’aide du robinet de la
bonbonne.
2. Lorsque le poêle est refroidi, enlever les vis du
brûleur. Soulever les brûleurs du fond du boîtier.
3. Nettoyer les tubes venturi avec une tige ou accessoire
de nettoyage à venturi (accessoire #77310 or #18270).
4. Replacer le brûleur dans sa position originale dans le
boîtier en veillant à ce que les tubes venturi soient
bien alignés avec les orifices.
5. Replacer les vis du brûleur.

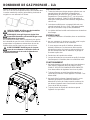
ALLUMAGE
20
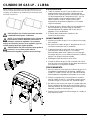
A. BRÛLEUR PRINCIPAL
B. ALLUMEUR
C. POIGNÉE
D. BONBONNE DE PROPANE
E. RÉGULATEUR
F. SOUPAPE
G. TUYAU D'ADAPTATEUR DE
BONBONNE DE PROPANE
INSTRUCTIONS D’ALLUMAGE
1. L’appareil doit assemble selon les instructions
d’assemblage.
2. S’assurer que la bonbonne de propane est pleine et
bien branchée au régulateur.
3. S’assurer qu’il n’y a pas de fuites de gaz dans le
système d’alimentation de gaz. Voir page 18.
4. Veiller à ce que les tubes venturi sont bien situés sur
les orifices des soupapes de gaz. Voir page 19.
5. S'assurer câbles de allumeurs sont connectés.
6. Lire attentivement toutes les instructions figurant sur
la plaque de renseignements apposée au poêle.
7. AVERTISSEMENT: Toujours ouvrir le boîtier
pendant l’allumage et ne pas se pencher au-
dessus.
8. AVERTISSEMENT: Ne fermez pas le couvercle
lorsque les brûleurs sont allumés ou chauds.
9. Ne placez pas la nourriture directement sur la grille.
10. Placer les boutons de contrôle à “OFF” et ouvrir le
robinet de la bonbonne de gaz.
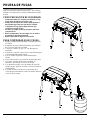
ALLUMAGE DU BRÛLEUR PRINCIPAL:
a. Ouvrir le couvercle du gril à gaz et laisser ouvert.
b. Pousser et tourner le bouton de brûleurs à “HIGH”.
c. Poussez le bouton d'allumeur 3 ou 4 fois ou utilisez
une allumette.
d. Le brûleur devrait s’allumer en 5 secondes, sinon,
fermez immédiatement la source de gaz si le poêle
ne s’allume pas.
ATTENTION – Vérifier votre poêle une fois allumé. Les
orifices du brûleur devraient produire des flammes de
2.5cm / 1” au réglage “HIGH.”
Si vous notez les problèmes suivants, il est possible que
les tubes venturi soient bloqués. Fermer immédiatement
le gaz et nettoyer les tubes venturi. Voir page 19.
1. Une odeur de gaz.
2. Il y a un retour de flamme.
3. La température du poêle n’est pas uniforme.
4. Les brûleurs émettent de crépitement.
SI LE BRÛLEUR NE S’ALLUME PAS:
1.
Pousser et tourner le bouton de contrôle à “OFF”. Attendre 5
minutes et essayer encore, avec le bouton de contrôle à
“MEDIUM.”
2. Si un brûleur ne s’allume pas, voir page 23. Si le problème
persiste, ne pas faire fonctionner l’appareil. Communiquez
avec OMC, votre détaillant ou un centre de service approuvé
.
ÉTEINDRE L’APPAREIL:
1. Fermer le robinet de la bonbonne.
2. Tournez les boutons de contrôle à “OFF.”
La page est en cours de chargement...
La page est en cours de chargement...
La page est en cours de chargement...
La page est en cours de chargement...
La page est en cours de chargement...
La page est en cours de chargement...
La page est en cours de chargement...
La page est en cours de chargement...
La page est en cours de chargement...
La page est en cours de chargement...
La page est en cours de chargement...
La page est en cours de chargement...
La page est en cours de chargement...
La page est en cours de chargement...
La page est en cours de chargement...
La page est en cours de chargement...
-
 1
1
-
 2
2
-
 3
3
-
 4
4
-
 5
5
-
 6
6
-
 7
7
-
 8
8
-
 9
9
-
 10
10
-
 11
11
-
 12
12
-
 13
13
-
 14
14
-
 15
15
-
 16
16
-
 17
17
-
 18
18
-
 19
19
-
 20
20
-
 21
21
-
 22
22
-
 23
23
-
 24
24
-
 25
25
-
 26
26
-
 27
27
-
 28
28
-
 29
29
-
 30
30
-
 31
31
-
 32
32
-
 33
33
-
 34
34
-
 35
35
-
 36
36


Broil King 9202-54 Le manuel du propriétaire
- Catégorie
- Barbecues
- Taper
- Le manuel du propriétaire
- Ce manuel convient également à
dans d''autres langues
Documents connexes
Autres documents
-
Onward Broil king Le manuel du propriétaire
-
-
-
-
-
Broil-Mate 1155-54 Le manuel du propriétaire
-
Camp Chef 150 Manuel utilisateur