Craftmade WCS-100 Smart On/Off Switch Guide d'installation
- Taper
- Guide d'installation

WCS-100 Smart
on/off Switch
Installation Guide

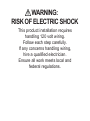
WARNING:
RISK OF ELECTRIC SHOCK
This product installation requires
handling 120 volt wiring.
Follow each step carefully.
If any concerns handling wiring,
hire a qualied electrician.
Ensure all work meets local and
federal regulations.

• Install your Craftmade Smart Switch.
• Download the Craftmade Smart app.
• Add your Craftmade Smart Switch
the Craftmade Smart app.
Simple DIY Setup
WARNING:
RISK OF ELECTRIC SHOCK

• Rating 120V AC 60Hz.
• Neutral wire required (wire is usually white or gray).
• Ground wire required (wire is usually green,
green with yellow stripe, or bare copper).
• Wi-Fi 802.11 b/g/n @ 2.4 GHZ is required.
• Works with compatible LED bulbs.
• LED up to 150 watts.
• Incandescent/Halogen up to 600 watts.
Compatibility Requirements Parts Included
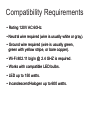
• Rating 120V AC 60Hz.
• Neutral wire required (wire is usually white or gray).
• Ground wire required (wire is usually green,
green with yellow stripe, or bare copper).
• Wi-Fi 802.11 b/g/n @ 2.4 GHZ is required.
• Works with compatible LED bulbs.
• LED up to 150 watts.
• Incandescent/Halogen up to 600 watts.
Compatibility Requirements
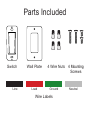
Switch Wall Plate
Wire Labels
Line GroundLoad Neutral
4 Wire Nuts 4 Mounting
Screws
Parts Included
• Rating 120V AC 60Hz.
• Neutral wire required (wire is usually white or gray).
• Ground wire required (wire is usually green,
green with yellow stripe, or bare copper).
• Wi-Fi 802.11 b/g/n @ 2.4 GHZ is required.
• Works with compatible LED bulbs.
• LED up to 150 watts.
• Incandescent/Halogen up to 600 watts.

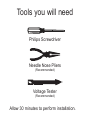
Tools you will need
Philips Screwdriver
Needle Nose Pliers
(Recommended)
Voltage Tester
(Recommended)
Allow 30 minutes to perform installation.

Step 1 - Turn off the Power!
• Turn off the power for the switch location
at the circuit breaker box.
• Test existing switch by toggling switch on/off,
ensuring the lights do not turn on.
• Now, follow these setup steps
for a single gang switch.
Tools you will need

Step 2 - Remove your old switch
1. Remove the existing wall plate
and switch from the wall.
2. Use voltage tester on the black wire to conrm
power to the switch is off (recommended)
3. Before disconnecting the wires from the wall,
label each with the provided wire labels.
a. Attention: Neutral and ground wires are
required. If you don’t have either wire, the
Craftmade Smart Switch cannot be installed.
4. Disconnect wires and remove the existing switch.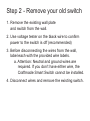
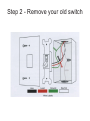
Step 2 - Remove your old switch

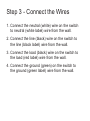
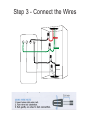
Step 3 - Connect the Wires
1. Connect the neutral (white) wire on the switch
to neutral (white label) wire from the wall.
2. Connect the line (black) wire on the switch to
the line (black label) wire from the wall.
3. Connect the load (black) wire on the switch to
the load (red label) wire from the wall.
4. Connect the ground (green) on the switch to
the ground (green label) wire from the wall.

Step 3 - Connect the Wires
Load
Ground
Neutral
Line

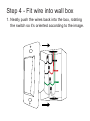
Step 4 - Fit wire into wall box
1. Neatly push the wires back into the box, rotating
the switch so it’s oriented according to the image.
Load
Ground
Neutral
Line

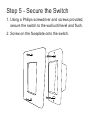
Step 5 - Secure the Switch
1. Using a Philips screwdriver and screws provided,
secure the switch to the wall until level and ush.
2. Screw on the faceplate onto the switch.

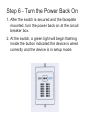
Step 6 - Turn the Power Back On
1. After the switch is secured and the faceplate
mounted, turn the power back on at the circuit
breaker box.
2. At the switch, a green light will begin ashing
inside the button indicated the device is wired
correctly and the device is in setup mode.

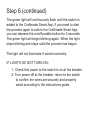
Step 6 (continued)
The green light will continuously ash until the switch is
added to the Craftmade Smart App. If you need to start
the process again to add to the Craftmade Smart App,
you can depress the on/off paddle button for 5 seconds.
The green light will begin blinking again. When the light
stops blinking and stays solid the process has begun.
The light will not illuminate if wired incorrectly.
IF LIGHTS DO NOT TURN ON:
1. Check that power to the switch is on at the breaker.
2. Turn power off at the breaker, return to the switch
to conrm the wires are securely and properly
wired according to the instructions guide.

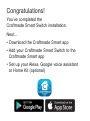
Congratulations!
You’ve completed the
Craftmade Smart Switch installation.
Next...
• Download the Craftmade Smart app
• Add your Craftmade Smart Switch to the
Craftmade Smart app
• Set up your Alexa, Google voice assistant
or Home Kit (optional)

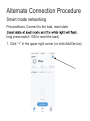
Alternate Connection Procedure
Smart mode networking
Preconditions: Connect to the load, reset state
long press switch 10S to reset the load)
1. Click “+” in the upper right corner (or click Add Device)

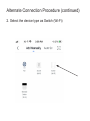
Alternate Connection Procedure (continued)
2. Select the device type as Switch (Wi-Fi)

Alternate Connection Procedure (continued)
2. Select the device type as Switch (Wi-Fi)
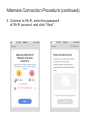
Alternate Connection Procedure (continued)
3. Connect to Wi-Fi, enter the password
of Wi-Fi account, and click “Next”.

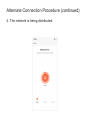
Alternate Connection Procedure (continued)
4. The network is being distributed.
La page est en cours de chargement...
La page est en cours de chargement...
La page est en cours de chargement...
La page est en cours de chargement...
La page est en cours de chargement...
La page est en cours de chargement...
La page est en cours de chargement...
La page est en cours de chargement...
-
 1
1
-
 2
2
-
 3
3
-
 4
4
-
 5
5
-
 6
6
-
 7
7
-
 8
8
-
 9
9
-
 10
10
-
 11
11
-
 12
12
-
 13
13
-
 14
14
-
 15
15
-
 16
16
-
 17
17
-
 18
18
-
 19
19
-
 20
20
-
 21
21
-
 22
22
-
 23
23
-
 24
24
-
 25
25
-
 26
26
-
 27
27
-
 28
28


Craftmade WCS-100 Smart On/Off Switch Guide d'installation
- Taper
- Guide d'installation
dans d''autres langues
Documents connexes
-
 Craftmade WCSD-100 Smart On/Off Dimmer Switch Guide d'installation
-
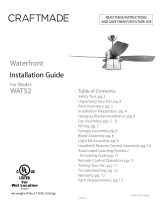 Craftmade Waterfront WAT52 Guide d'installation
-
 Craftmade UP108 Installation Instructions Manual
-
 Craftmade TS52 Manuel utilisateur
-
 Craftmade TCS Plus Installation Instructions Manual
-
 Craftmade Z8984 Installation Instructions Manual
-
 Craftmade Celestial CE52 Installation Instructions Manual
-
 Craftmade International SN52 Guide d'installation
-
 Craftmade Omni OM52 Installation Instructions Manual
-
 Craftmade Valencia VA52 Installation Instructions Manual


