Cary Audio Design SHAW DIRECT IRC600 Manuel utilisateur
- Catégorie
- Télécommandes
- Taper
- Manuel utilisateur
Ce manuel convient également à

OVERVIEW
The Shaw Direct IRC600 IR and
URC600 IR/RF Remote Controls by
Universal Electronics are our lat-
est generation universal remote
controls. Their sophisticated tech-
nology allows you to consolidate
up to three of your original home
entertainment remote controls
into one easy-to-use product.
The remote control requires
installing two (2) new AA batteries
(included) and simple program-
ming instructions to control your
TV. For best results, please read
and perform all instructions listed
here. Also, keep this guide for
future reference.
INSTALLING BATTERIES
1. Pull back the remote control’s battery
cover and remove it.
2. Insert the two (2) supplied AA batter-
ies according to the + and - marks in
the battery case.
3. Push the battery cover back into place.
4. Test the unit by pressing the power
key.
If batteries are inserted correctly, the
Red Light will blink.
NOTE: When batteries need replacement, the
remote control will stop operating. Replace the old
batteries with new AA batteries.
PROGRAMMING SAT CONTROL
Your remote control address is set at the
factory to 000 to control all of the functions
on your Motorola satellite receiver. However,
if you have more than one satellite receiver,
you may want to prevent the remote con-
trol in one room from aecting the satellite
receiver in another room. To prevent this
kind of interference, you must “pair” each
remote control with each receiver by assign-
ing a new “address” to each combination.
This “address” assignment is made using your
remote control as follows:
1.
Press the SAT button to select the
remote control's SAT mode.
2. Press the OPTIONS button to display
the Options screen on your TV.
3. On the Options Menu use the arrow
buttons and press ENTER/
OK to open the following menus. You
can also press the indicated number
on the remote control to access each
menu directly.
6 System Setup (select models only)
4 System Settings
3 Installation Settings
2 Remote Control Address.
4. Once you are on the "Remote Control
Address screen" program the remote
control using the remote control key-
pad programming sequence.
5.
Press and hold the remote controls SAT
mode key until the red lights ash at
least twice and release the SAT key.
6. Enter a new 3 Digit SAT address from
the below list using the number keys
the remote control.
7. Press ENTER/OK to save the new
address and pair the remote with your
satellite receiver.
8. Press EXIT to leave the Options menu.
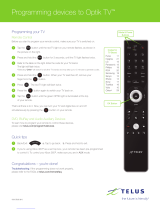
PROGRAMMING DEVICE CONTROL
The Shaw Direct IRC600 and URC600 Remote
Controls are preprogrammed to operate a
Motorola satellite receiver, a Sony TV, and
Sony DVD player. To program devices other
than the default brands, perform the follow-
ing steps; otherwise skip this section.
1.
Turn on the TV or Auxiliary device.
NOTE: Please read steps 2 to 4 completely
before proceeding. Highlight or write
down the codes and device you wish to
program before moving on to step 2.
2. Press and hold Device key (TV or AUX)
until the Red Lights ash at least twice,
then release TV or AUX.
3. Locate the code for your device in
Manufacturer’s Codes on the back of
this user guide. Brands are listed in
alphabetical order with the most popu-
lar codes listed rst.
4. Enter the rst ve-digit code for your
TV or Auxiliary Device. If you perform
this procedure correctly, the Red Light
will blink twice.
NOTE: If you enter an invalid code, the
red light will not blink when entering
the last digit and exit the programming
mode. Repeat steps 2 to 4 with a valid
code.
5. Aim the remote control at your TV or
Auxiliary Device and press Power once.
The device should turn o. If it does
not respond, repeat steps 2 to 4, trying
each code listed for your brand until
you nd one that works. If it still does not
work, try Searching For Your Code.
6. The TV or Auxiliary Device code will be
stored in the remote control and will
be automatically reprogrammed when
the batteries are changed.
TV Code:
AUX Code:
PROGRAMMING CHANNEL
CONTROL LOCK
By default, the remote control’s channel-
control capabilities are locked to the satellite
receiver. The aected keys are 0 through 9,
CH+, CH- and LAST. This guarantees that you
do not inadvertently change a channel on
your TV. However, you can de-activate this
feature to allow full access to these keys in
the TV mode.
Unlocking Channel Control
1. On the remote control, press and hold
SAT until it blinks twice.
2. Enter 9-7-3. The SAT key blinks twice
.
3. Press CH – once. The SAT key blinks
four times.
Locking Channel Control to SAT
1. On the remote control, press and hold
SAT until it blinks twice.
2. Enter 9-7-3. The SAT key blinks twice.
3.
Press CH+ one. The SAT key blinks
twice.
SEARCHING FOR YOUR CODE
If your brand of Device does not respond
to the remote control after trying all of the
codes listed, or if your brand is not listed at all,
try searching for your code.
1=TV, 2=DVD/VCR, 3=AUDIO
1. Turn on your Device.
2. Press and hold Device key (TV or AUX)
until the Red Lights ash at least twice,
then release TV or AUX.
3. Enter in 9 - 9 - 1. The Red Light will
blink twice.
4. Press Digit 1 to search for a TV, Press
Digit 2 to search for a DVD/VCR or
Press Digit 3 to search for an Audio
device.
5. While pointing the remote control at
the Device, press and release the
CH + key until the Device turns o.
(Note: You may need to press [CH+]
numerous times).
NOTE: In the search mode, the remote
control will send IR codes from its
library to the target device.
6. Press Device key (TV or AUX) once to
lock in the code. The Red Light will
blink twice.
CHECKING THE CODES
If you have set up the remote control using
the Searching For Your Code procedure, you
may need to nd out which ve-digit code
is operating your TV. Perform the following
steps after setting up your TV to nd out
which ve-digit code operates your TV.
1. Press and hold TV until the Red Light
ashes at least twice, then release TV.
2. Enter in 9 - 9 - 0. The Red Light will
blink twice.
3. To view the code for the rst digit,
press 1 once. Wait 3 seconds and
count the number of times the Red
Light blinks (e.g., 3 blinks =3) and write
down the number in the left most TV
Code box (at end of this
section).
NOTE: If a code digit is “0”, the red light will
not blink.
4. Repeat step 3 four more times for the
remaining digits. Use 2 for the second
digit, 3 for the third digit, 4 for the
fourth digit and 5 for the fth digit.
Finish writing down the code in the TV
Code boxes (at end of this section).
5. To check AUX code, repeat steps 1
through 4 using the AUX key in step 1.
6. To check SAT code, repeat steps 1
through 4 using the SAT key in step 1.
Note: When verifying the SAT Address only digits 1, 2
and 3 are required.
TV Code:
AUX Code:
CHANGING VOLUME CONTROL
On the Shaw Direct IRC600 and URC600
Remote Controls, Global Volume Lock is set
to TV, so you can control TV volume while in
the AUX, or SAT mode.
You can perform Individual Volume Unlock
on a selected device to set its volume con-
trol for independent operation.
Locking Volume to a Specic Mode.
1. Press and hold SAT until the Red Lights
blink at least twice, then release SAT.
2. Enter in 9 - 9 - 3 (The Red Light will
blink twice after the 3)
.
3. Press and release the Mode Key (TV or
AUX) to lock Volume to.
Unlocking Volume from a Specic Mode.
1. Press and hold mode key to be
unlocked (e.g. AUX) until the Red
Lights blinks at least twice, then
release the mode.
2. Enter in 9 - 9 - 3 (The Red Light will
blink twice after the 3).
3. Press and release the Volume Down
Key the Red light will ash 4 times.
USING THE MASTER POWER KEY
The Shaw Direct IRC600 and URC600
Remote Controls have a unique feature that
allows you to sequentially turn up to three
of your home entertainment devices on or
o with a single key press.
NOTE: The MASTER POWER (Power) default set-
ting is the SAT mode. If it is not programmed,
only the Satellite receiver and TV will turn on or
o. In the AUX or TV mode, pressing the Power
key will only turn on or o the selected device.
PROGRAMMING THE MASTER
POWER KEY
1. Press and hold SAT until the Red Light
blinks at least twice, then release SAT.
2. Enter in 9 - 9 - 5 The Red Light will
blink twice.
3. Press and release each mode key once
in the order that you want them in the
Master Power sequence.
4. Press and release the Power key (The
red light under SAT will ash twice).
USING THE MASTER POWER KEY
After Programming, point the remote con-
trol at your devices and press and hold the
POWER key for 1.5 seconds
Removing the Master Power Key
1. Press and hold SAT until the Red Light
blinks twice, then release SAT.
2. Enter in 9 - 9 - 5 The Red Light will
blink twice.
3. Press and release the Power key (The
red light under SAT will ash twice).
TROUBLESHOOTING
PROBLEM: Device key does not blink
when you press a key.
SOLUTION: Replace the batteries with two
(2) new AA alkaline batteries
PROBLEM: Device key blinks when you
press a key, but home enter-
tainment device does not
respond.
SOLUTION: Be sure you are aiming the
remote control at your home
entertainment device and
that you are within 15 feet of
the device you are trying to
control.
PROBLEM: The remote control does not
control home entertainment
devices or commands are not
performing properly.
SOLUTION: Try all listed codes for the
device brand being set up.
Make sure all devices can be
operated with an infrared
remote control.
ADDITIONAL INFORMATION
This product does not have any user-
serviceable parts. Opening the case, except
for the battery cover, may cause permanent
damage to your Shaw Direct IRC600 and
URC600 Remote Controls.
• For help via the Internet, visit us at:
www.shawdirect.ca
Copyright© 2010 by Universal Electronics
Inc. No part of this publication may be
reproduced, transmitted, transcribed,
stored in any retrieval system, or translated
to any language, in any form or by any
means, electronic, mechanical, magnetic,
optical, manual, or otherwise, without prior
written permission of Universal Electronics
Inc.
COMPLIANCE WITH FCC RULES
AND REGULATIONS
This equipment has been tested and found
to comply with the limits for a Class B digi-
tal device, pursuant to part 15 of the FCC
Rules. These limits are designed to provide
reasonable protection against harmful
interference in a residential installation. This
equipment generates, uses and can radiate
radio frequency energy and if not used in
accordance with the instructions, may cause
harmful interference to radio communica-
tions.
However, there is no guarantee that interfer-
ence will not occur in a particular installa-
tion. If this equipment does cause harmful
interference to radio or television reception,
the user is encouraged or try to correct the
interference by one or more of the following
measures:
• Increase or decrease the separation
between the equipment and receiver.
• Consult the dealer or an experienced
remote
control/ TV technician for help.
This equipment has been veried to com-
ply with the limits for a Class B computing
device, pursuant to FCC Rules. The user is
cautioned that changes and modications
made to the equipment without the approv-
al of manufacturer could void the user's
authority to operate this equipment.
INDUSTRY CANADA INFORMATION
Under Industry Canada regulations, this
radio transmitter may only operate using
an antenna of a type and maximum (or
lesser) gain approved for the transmitter by
Industry Canada. To reduce potential radio
interference to other users, the antenna
type and its gain should be so chosen that
the equivalent isotropically radiated power
(e.i.r.p.) is not more than that necessary for
successful communication.
This device complies with Industry Canada
licence-exempt RSS standard(s). Operation
is subject to the following two conditions:
(1) this device may not cause interference,
and (2) this device must accept any interfer-
ence, including interference that may cause
undesired operation of the device.
MANUFACTURER'S CODES
SETUP CODES FOR AUDIO
CODES DE RÉGLAGE POUR CHAÎNES
STÉRÉO
Aiwa 31405, 30189, 31388, 31641
Akai 31512
Alco 31390
Altec Lansing 32595, 32596
AMC 31077
Amphion Media 31563
AMW 31563
Anam 31609
Anthem 32220
Apex Digital 31257, 31430, 31774
Arcam 31189, 30189
Audiotronic 31189
Audiovox 31390
B & K 30820
Bose 31229, 30639, 31629, 31841, 31933
Boston Acoustics 32162
Cambridge Sound 31370
Carver 31189, 30189
Cary Audio Design 31879
Coby 31389
Curtis 31389
Daewoo 31250
Denon 32134, 31360, 32279, 32857
Elan 30647
Fisher 31801
Flextronics 31879
Gateway 31517
Halcro 31934
Harman/Kardon 30892, 30189, 31304, 31306, 32241,
32443
Hitachi 31273, 31801
iHome 32435
iLive 32013
Insignia 31030, 31077, 31751, 31893, 32126,
32169, 32175, 32472, 32474
Integra 31298, 31320, 31805
iSymphony 32018, 32258, 32442
JBL 31306
JVC 31374, 31495, 32040, 32161, 32239,
32331
Kenwood 31313, 31570, 31569
KLH 31390, 31428
Koss 31366, 31497
Krell 31837, 32463
Left Coast 30892
Lexicon 31802
LG 31293, 32197, 32284
Linn 30189
Liquid Video 31497
Marantz 30892, 31892, 32138, 31189, 31269,
30189, 31289,32114
Magnavox 31189, 31269, 30189, 31514
Mark Levinson 32405
McIntosh 31289
Micromega 31189
Mitsubishi 31393
Myryad 31189
Nakamichi 31313
NexxTech 31751
Norcent 31389, 31751
Nova 31389
Onkyo 30842, 31298, 31320, 31531, 31805,
32451
Optimus 30823, 31023
Oritron 31366, 31497
Panasonic 31308, 31518, 31275, 31288, 31316,
31548, 31633, 31763, 31764, 32221,
32452, 32967
Parasound 31934
Philco 31838
Philips 30892, 31189, 31269, 30189, 31266,
32311, 32459
Pioneer 30823, 31023, 31384, 31935
Polaroid 31508
Polk Audio 30892, 32242, 30189, 31289, 32244,
32270
Primare 31851
Proscan 31254
RCA 30823, 31023, 31609, 31254, 31390,
31511, 32041
Rio 31869
Samsung 31295, 31304, 31500, 31868
Sansui 30189
Sanyo 31469, 31801
Sherwood 31077, 31517, 31653, 31905, 32169
Sherwood New 32169
Sonic Blue 31869
Sony 31759, 31058, 31441, 31258, 31622,
31558, 31658, 31758, 31822, 31858,
32172, 32216, 32320, 32475, 32522
Stereophonics 31023
Sunre 31313
Teac 31390, 31528
Technics 31308, 31518, 31633
Thorens 31189
Thule Audio 31851
Toshiba 31788
Venturer 31390
Vizio 31517
Wards 30189
Yamaha 30176, 30376, 31176, 31276, 31331,
31375, 31376, 31476, 31815, 32061,
32455, 32467, 32471
Zenith 31293
SETUP CODES FOR DIGITAL MEDIA
CODES DE RÉGLAGE POUR
LECTEURS NUMÉRIQUES
MULTIMÉDIA
Apple 31115
B & W 32441
Denon 32502
HTI 32439
Vizio 32454
Yamaha 31797, 32021, 32458
ZVOX 32332, 32334
SETUP CODES FOR TELEVISION
CODES DE RÉGLAGE POUR TÉLÉVISEURS
Accurian 11803
Action 10873
Admiral 10463
Advent 10761, 10783, 10815, 10817, 10842
Akai 10812, 11675, 10702, 10030,
10672, 11676, 11935, 12232
Albatron 10700, 10843
Ampro 10751
AOC 10030, 11365, 11589, 11590,
12014, 12087, 12402, 12479
Aomni 11623
Apex Digital 10748, 10879, 10765, 10767,
10890, 11217, 12397
Astar 11531, 11738
Audiovox 10451, 10623, 10802, 10846,
10875, 11937, 11951, 11952
Aventura 10171
Axion 11937
Bell & Howell 10154
BenQ 11032, 11212, 11315
Boxlight 10893
Broksonic 10463, 11905, 11929, 11935, 11938
Byd:sign 11309
C & M 10700
Candle 10030
Carnivale 10030
Carver 10054
CCE 10623
Celebrity 10000
Celera 10765
Changhong 10765
Citizen 10060, 10030, 11669, 11671,
11672, 11928, 11935
Coby 11634, 12306, 12314, 12315, 12326,
12338, 12340, 12343, 12344, 12345,
12347, 12348, 12350, 12351, 12560
Commercial Solutio 11447, 10047
Crosley 10000, 10054
CTX 10700
Curtis 11326, 12352, 12466
Cytron 11326
Daewoo 10154, 10451, 11661,10623,
10661, 10672, 11928
Dell 11264, 11080, 11178, 11403, 11863
Denon 10145
Diamond Vision 11996
Digital Lifestyles 11765
Digital Projection 11750
DirecTV 11501
Disney 11665, 12152
Dream Vision 11164
Dumont 10017
Durabrand 10463, 10178, 10171, 11034, 11665
Dwin 10720, 10774
Dynex 11463, 11780, 11785, 11810, 12049,
12184
Electroband 10000
Electrograph 11755, 11623
Electrohome 10463, 11670, 11672
Element 11687, 12183
Emerson 11864, 10154, 10451, 10463, 10178,
10171, 11661, 10623, 11394, 11665,
11905, 11928, 11929, 11944, 11963
Emprex 11422, 11765
Envision 10030, 10813, 11365, 11589, 12014,
12087
Epson 10833, 10840, 11290
ESA 10812, 10171, 11944, 11963
Fisher 10154
Fujitsu 10809, 10683, 10853
Funai 10000, 10171, 11271, 11904, 11963,
11979
Gateway 11755, 11756
GE 11447, 10047, 10051, 10451,
10178, 11347, 11922, 12359
GFM 10171, 11665, 11963, 12167
Gibralter 10017, 10030
Go Video 10886, 11823
GoldStar 10178, 10030, 11926
Grundig 10683
Haier 11034, 11749, 12309
Hallmark 10178
Hanns.G 11783
Hannspree 11348, 11351, 11745, 11783
Harley Davidson 11904
Harman/Kardon 10054
Helios 10865
Hello Kitty 10451
Hewlett Packard 11494
Hisense 10748, 11314, 11660, 12098, 12355,
12419
Hitachi 11643, 11145, 10145, 11345, 11904
HP 11494
Humax 11501
Hyundai 10849, 11219, 11294
iLo 11286, 11603, 11665, 11684, 11990
Innity 10054
InFocus 11164, 12199
Insignia 11423, 11564, 10171, 12432, 12417,
12088, 12049, 12002, 11963, 11892,
11780, 11710, 11660, 11641, 11517,
11326, 11204
Inteq 10017
iRIS 12189
JBL 10054
JCB 10000
JCM 12189, 12256
Jensen 10761, 10815, 10817, 11326
JVC 10463, 10053, 10650, 10731, 11253,
11601, 11774, 11923, 12271
KDS 11498, 11687
Kenwood 10030
KLH 10765, 10767
KMDS 12278
KTV 10030
LG 11423, 10017, 11265, 10178, 10700,
10856, 11178, 11768, 11934, 11993,
12358, 12424
Lloyd's 11904
LXI 10047, 10054, 10154, 10156, 10178
MAG 11498, 11687
Magnasonic 11928
Magnavox 11454, 11866, 10054, 10051, 10030,
10706, 10802, 11198, 11254, 11365,
11525, 11904, 11931, 11944, 11963,
11990, 12372
Marantz 11454, 10054, 10030, 10704,
10855, 11154, 11398, 12447
Matsushita 10250, 10650
Maxent 11755, 10762, 11211, 11714, 11757
Megapower 10700
Megatron 10178, 10145
Memorex 10154, 10463, 10150, 10178, 11665,
11670, 11892, 11924, 11926, 11927
MGA 10150, 10178, 10030
Midland 10047, 10017, 10051
Mintek 11603, 11990
Mitsubishi 11250, 10150, 10178, 10836, 10868,
11392
Monivision 10700, 10843
MTC 10060, 10030
NAD 10156, 10178, 10866, 11156
NEC 10030, 10704, 10882, 11398, 11704,
11797
NetTV 11755, 10762
Nexus Electronics 12183
Nikko 10178, 10030
Norcent 10748, 10824, 11365, 11589,
11590, 12110
Norwood Micro 11286
NuVision 11657, 12158
Olevia 11610, 11144, 11240, 11331
Optimus 10250, 10154, 10650, 11924, 11927
Optoma 11348
Orion 10463, 11463, 11905, 11929
Panasonic 10250, 11480, 11457, 10051, 10650,
11271, 11290, 11291, 11310, 11410,
11924, 11927, 11941, 11946, 11947,
12080
PARK 12104
Petters 11523
Philco 10054, 10030, 10171, 11271, 11394,
11665, 11963
Philips 11454, 11866, 10054, 10690, 11154,
11394, 11744, 11806, 11867, 12372,
12374
Pilot 10030
Pioneer 11457, 10679, 10866, 11260, 11398
Planar 11496
Polaroid 11523, 10765, 12425, 12120, 12117,
12063, 12002, 11992, 11769, 11767,
11766, 11763, 11762, 11687, 11498,
11341, 11328, 11326, 11314, 11286,
11276, 10865
Portland 10451, 11661
Prima 10761, 10783, 10815, 10817, 11785
Princeton 10700, 10717
Prism 10051
Projectiondesign 11750, 11752
Proscan 11447, 10047, 10030, 11347, 11922,
12147, 12256
Proton 10178
Proview 11498, 11687
Pulsar 10017
Quasar 10250, 10051, 10650, 11924
RadioShack 10047, 10154, 10178, 10030, 11904
RCA 11547, 11447, 10047, 10051, 12434,
12247, 12187, 12002, 11958, 11953,
11922, 11781, 11347, 11247, 11147,
11047, 10774, 10679, 10090
Realistic 10154, 10178, 10030
RevolutionHD 11623
Runco 10017, 10030, 10603, 11292, 11398,
11629
Sampo 11755, 10030, 10762
Samsung 10812, 10060, 10702, 10178, 10030,
10650, 10766, 10814, 11060, 11575,
11959, 12051
Sansui 10463, 10171, 11409, 11670, 11892,
11904, 11929, 11935
Sanyo 10054, 10154, 10088, 10799, 10893,
11142, 12448, 12452
Sceptre 10878, 11217, 11360, 11599, 12506
Scotch 10178
Scott 10178, 11711
Sears 10047, 10054, 10154, 10156, 10178,
10171, 11904, 11926
Seleco 11351
Sharp 10818, 10688, 10689, 10851, 11602
Sherwood 11399
Signature 10054
Sole 11623, 12075, 12076
Sony 10000, 10810, 10834, 11685, 11786,
11904, 11925
Soundesign 10178
Sova 11952
Soyo 11520, 11826
Spectroniq 11498, 11687
Squareview 10171
Studio Experience 10843
SunBrite 11420, 12337
Superscan 10864, 11944
Supreme 10000
SVA 10748, 10865, 10870, 10871, 10872,
11963
Sylvania 11864, 10054, 10030, 10171, 11271,
11314, 11394, 11665, 11886, 11931,
11944, 11963
Symphonic 10171, 11394, 11904, 11944
Syntax 11610, 11144, 11240, 11331
Tatung 11286, 11756
Technics 10250, 10051
Techview 10847, 12004
Techwood 10051
Teco 11040
Teknika 10054, 10150, 10060
Telefunken 10702
Thomas 11904
TMK 10178
TNCi 10017
Toshiba 11524, 10154, 10156, 11256, 11265,
10060, 10832, 10854, 11156, 11164,
10822, 10650, 11356, 11656, 11704,
11935, 11936, 11945, 12006
TruTech 11665, 11723, 12066
TVS 10463
US Logic 11286
Vector Research 10030
Venturer 11865
Victor 10053
Vidikron 10054, 11292, 11398, 11629
Vidtech 10178
Viewsonic 11755, 10857, 10864, 10885, 11330,
11578, 11627, 11640, 11742, 12014,
12087, 12277
Viore 11684, 11811, 12104, 12352
Vistron 12142
Vizio 11758, 10864, 10885, 11756
Waycon 10156
Westinghouse 11712, 10451, 10885, 10889, 10890,
11282, 11300, 11577, 12293
White Westing. 10463, 11661, 10623
Wyse 11365
Yamaha 10030, 10769, 10833, 10839, 11526
Zenith 10000, 11423, 10047, 10017, 10463,
11265, 10178, 10030, 11145, 10145,
11661, 11904, 11929
SHAW DIRECT IRC600/
URC600 Remote Control
Télécommande IRC600/
URC600 SHAW DIRECT

SETUP CODES FOR DVD PLAYERS
CODES DE RÉGLAGE POUR LECTEURS DVD
Accurian 20675, 21416
Aiwa 20641
Akai 20695, 20770, 21089
Alco 20790
Allegro 20869
Amphion Media 20872
AMW 20872
Apex Digital 20672, 20755, 20794, 20796, 20797,
21004, 21020, 21056, 21061, 21100,
22619
Arrgo 21023
Aspire Digital 21168, 21407
Astar 21489
Audio Authority 22555
Audiovox 20790
B & K 20655, 20662
BBK 21224
Bel Canto Design 21571
Blue Parade 20571
Bose 21895
Broksonic 20695, 20868
California Audio 20490
Cinea 20831
CineVision 20876, 20833, 20869
Citizen 20695, 21277, 22116
Coby 20778, 21086, 21107, 21177, 21628
Craig 20831
Curtis Mathes 21087
CyberHome 20816, 20874, 21023, 21024, 21117,
21129, 21502, 21537
Daewoo 20784, 20705, 20833, 20869, 21169,
21172, 21234, 21242
Daytek 20872
Denon 20490, 20634, 21634, 22258
Desay 21407
DigitalMax 21738
Disney 20675, 21270
Dual 21068, 21085
Durabrand 21023, 21127
DVD2000 20521
Dynex 22255
Electrohome 22116
Emerson 20591, 20675, 20821, 21268
Enterprise 20591
ESA 20821, 21268
Fisher 20670
Funai 20675, 21268, 21334
Gateway 21073, 21077, 21158
GE 20522, 20815
GFM 20675, 21268
Go Video 20744, 20715, 20741, 20783, 20833,
20869, 21044, 21075, 21099, 21158,
21304, 21730
GoldStar 20741, 20869
Gradiente 20651
Grundig 20539, 20705
Harman/Kardon 20582, 20702, 21229
Helios 22080, 22192
Hello Kitty 20831
Hitachi 20573, 20664
Hiteker 20672
Humax 21500, 21588
iLo 21348
Insignia 20675, 21268, 22095, 22255, 22428,
22596
Integra 20571, 20627, 21634, 21769, 22147
Irradio 20646
JBL 20702
JVC 20558, 20623, 20867, 21164, 21275,
21550, 21602, 22365, 22472
Kawasaki 20790
Kenwood 20490, 20534
KLH 20790, 21020, 21149
Koss 20651
Lasonic 20798
Lenoxx 21127
LG 20591, 20741, 20869, 21602, 22135
LiteOn 21058, 21158, 21416, 21440, 21656,
21738
Loewe 20511
Logitech 22639
Magnavox 20503, 20539, 20646, 20675, 20821,
21177, 21268, 21354, 21506, 22229
Marantz 20539, 22414
McIntosh 21533, 21273
Memorex 20695, 20831, 21270, 22213
Microsoft 20522, 22083
Mintek 20839
Mitsubishi 21521, 20521
NAD 20741, 22572
NEC 20785
NexxTech 21402
Norcent 21003, 20872, 21107, 21265
Nyko 22340
Olevia 22331
Onkyo 20503, 20627, 21612, 21769,
22147, 22215
Oppo 20575, 21224, 22185, 22545
Oritron 20651
Panasonic 20490, 20503, 20632, 20703,
21579, 21641, 21762
Philco 20675
Philips 20503, 20539, 22056, 20646, 20675,
20854, 21158, 21260, 21267, 21340,
21354, 21506, 22084, 22434
PianoDisc 21024
Pioneer 20525, 20571, 20142, 20631, 20632,
21460, 21512, 21571, 22442
Polaroid 21020, 21061, 21086
Polk Audio 20539
Portland 20770
Presidian 20675, 21738
Proceed 20672
Proscan 20522
ProVision 20778
Qwestar 20651
RCA 20522, 20571, 20790, 20822, 21022,
21132, 21769, 22213, 22392
RE-BL 22555
Rio 20869
Rotel 20623, 21178
Rowa 20823
Sampo 20698, 20752
Samsung 20490, 20573, 20199, 20820, 21044,
21075, 21470, 22069, 22329, 22369,
22489, 22556
Sansui 20695
Sanyo 20670, 20695, 20873
Schneider 20646
Sensory Science 21158
Sharp 20630, 20675, 20752, 21256,
22250, 22561
Sharper Image 21117
Sherwood 20770, 21043, 21077
Sherwood New 21077
Shinsonic 20533, 20839
Sonic Blue 20869, 21099
Sony 20533, 21533, 20864, 20772, 21033,
21070, 21431, 21516, 21536, 21633
Superscan 20821
Sylvania 20675, 20821, 21268, 22194
Symphonic 20675, 20821
Teac 20790
Technics 20490, 20703
Terapin 21031
Theta Digital 20571
Tivo 21503, 21512
Toshiba 20503, 20695, 21154, 21503, 21510,
21588, 21608, 21769,22006, 22277,
22705
Urban Concepts 20503
US Logic 20839
Venturer 20790
Viore 22553
Vizio 21064, 21226, 22563
WB Electronics 22555
Xbox 20522, 22083
Yamaha 20490, 20539, 20646, 20545, 20497,
20817, 21416, 22298, 22558
YBA 20872
Zektor 21730
Zenith 20503, 20591, 20741, 20869
Zoece 21265
CODES DE RÉGLAGE POUR
Denon 22258
Insignia 20675, 22428, 22596
Integra 21769, 22147
JVC 22365
LG 20741, 21602
Magnavox 20675
Marantz 22414
Microsoft 22083
NAD 22572
Olevia 22331
Onkyo 21612, 21769, 22147
Oppo 22545
Panasonic 21641
Philips 22084, 22434
Pioneer 20142, 22442
RCA 21769
Samsung 20199
Sharp 22250, 22561
Sony 21516
Sylvania 20675, 22194
Toshiba 21769, 22705
Viore 22553
Vizio 22563
Xbox 22083
Yamaha 22298
SETUP CODES FOR VCR
CODES DE RÉGLAGE POUR
MAGNÉTOSCOPES
ABS 21972
Accurian 20000
Admiral 20048, 20209, 20479
Adventura 20000
Aiwa 20037, 20000
Alienware 21972
Allegro 20039, 21137
American High 20035
Audiovox 20037
Bell ExpressVu 21944
Bright House 22763
Broksonic 20184, 20121, 20209, 20479, 21479
Cable One 22763
Cablevision 22763
Calix 20037
Canon 20035
Carver 20081
Charter 22763
CineVision 21137
Citizen 20037, 21278
Comcast 22448, 22763
Cox 22763
Craig 20037
Crosley 20081, 20000
CyberPower 21972
Daewoo 20045, 21137, 21278
Dell 21972
Denon 20042
DirecTV 20739, 22033
Dish Network 21944
Dishpro 21944
Durabrand 20039, 20038
Dynatech 20000
Echostar 21944
Electrohome 20037, 20043
Electrophonic 20037
Emerex 20032
Emerson 20037, 20184, 20000, 20121, 20043,
20209, 20479, 2059, 21278, 21479,
21593
ESA 21137
Expressvu 21944
Fuji 20035, 20033
Funai 20000, 20593, 21593
Garrard 20000
Gateway 21972
GE 20060, 20035, 20807, 21035, 21060
GFM 21593
Go Video 20614, 21137
GOI 21944
GoldStar 20037, 20038, 21137, 21237
Gradiente 20000
Harley Davidson 20000
Harman/Kardon 20081, 20038
Headquarter 20046
Hewlett Packard 21972
Hitachi 20000, 20042, 20089, 20593
Howard Computers 21972
HP 21972
HTS 21944
Hughes Network 20042
Humax 20739
Hush 21972
iBUYPOWER 21972
Insight 22763
Instant Replay 20035
JVC 20067, 21944
KEC 20037
Kenwood 20067, 20038
Kodak 20035, 20037
LG 21037, 21137
Linksys 21972
Lloyd's 20000
LXI 20037
Magnasonic 20593, 21278
Magnavox 20035, 20039, 20081, 20000, 20149,
20563, 20593, 21593,21781
Marantz 20035, 20081
Marta 20037
Matsushita 20035, 20162, 21162
Media Center PC 21972
Mediacom 22763
MEI 20035
Memorex 20035, 20162, 20037, 20048, 20039,
20000, 20209, 20046, 20479, 21037,
21162, 21237, 21262
MGA 20043
Microsoft 21972
Mind 21972
Minolta 20042
Mitsubishi 20067, 20043, 20807
Motorola 20035, 20048, 22763
MTC 20000
Multitech 20000
NEC 20067, 20038
Nikko 20037
Niveus Media 21972
Northgate 21972
Olympus 20035
Orion 20184, 20209, 20479, 21479
Pace 22763
Panasonic 21062, 20035, 20162, 20225, 20614,
20616, 21035, 21162,21262
Pentax 20042
Philco 20035
Philips 20739, 20035, 20081, 20618,
21081, 21181
Pilot 20037
Pioneer 20067
Polk Audio 20081
Presidian 21593
Proscan 20060, 21060
Pulsar 20039
Quarter 20046
Quartz 20046
Quasar 20035, 20162, 21035, 21162
RadioShack 20000, 21037
Radix 20037
Randex 20037
RCA 20060, 20035, 20042, 20149,
20807, 20880, 21035, 21060
Realistic 20035, 20037, 20048, 20000, 20046
ReplayTV 20614, 20616
Ricavision 21972
Rio 21137
Runco 20039
Samsung 20045, 21014
Sanky 20048, 20039
Sansui 20000, 20067, 20209, 20479, 21479
Sanyo 20046
Scott 20184, 20045, 20121, 20043, 20210
Sears 20035, 20037, 20000, 20042, 20046,
21237
Sharp 20048, 20807, 20848
Shaw 22763
Signature 20035
Sonic Blue 20614, 20616, 21137
Sony 21232, 20032, 20035, 20033,
20000, 20636, 21032, 21972
Stack 9 21972
STS 20042
Suddenlink 22763
Sylvania 20035, 20081, 20000, 20043,
20593, 21593, 21781
Symphonic 20000, 20593, 21593
Systemax 21972
Tagar Systems 21972
Tashiko 20037
Teac 20000
Technics 20035, 20162
Teknika 20035, 20037, 20000
Thomas 20000
Time Warner 22763
Tivo 20739, 20618, 20636, 21996, 22448
Toshiba 20045, 20043, 20209, 20210, 20845,
21008, 21145, 21972, 21996
Totevision 20037
Touch 21972
Vector 20045
Vector Research 20038
Video Concepts 20045
Videomagic 20037
Viewsonic 21972
Villain 20000
Voodoo 21972
White West. 20209
XR-1000 20035, 20000
Yamaha 20038
Zenith 20037, 20039, 20033, 20000,
20209, 20479, 21137, 21479
ZT Group 21972
APERÇU
Les télécommandes Shaw Direct IRC600 IR
et URC600 IR/RF fabriquées par Universal
Electronics sont nos télécommandes univer-
selles de la toute dernière génération. Leur
technologie sophistiquée vous permet de
regrouper les fonctions de trois de vos télé-
commandes d’appareils de divertissement
maison en un seul produit facile à utiliser.
La télécommande requiert l’installation de
deux (2) piles AA neuves (comprises) et une
programmation simple an de faire fonction-
ner votre téléviseur. Pour obtenir les meil-
leurs résultats, veuillez lire et exécuter toutes
les instructions décrites ici. Conservez ce
guide pour référence ultérieure.
INSTALLATION DES PILES
1. Soulevez le couvercle du compartiment
des piles et retirez-le.
2. Insérez les deux (2) piles AA qui sont
fournies selon les marques « + » et « – »
à l’intérieur du compartiment des piles.
3. Remettez en place le couvercle du
compartiment des piles.
4. Eectuez une vérication en appuyant
sur la touche d’alimentation.
Si les piles sont insérées correctement,
le voyant rouge clignotera.
NOTA : Lorsque les piles doivent être remplacées, la
télécommande cesse de fonctionner. Remplacez les
piles par des piles AA neuves.
PROGRAMMATION DE LA
COMMANDE SAT
L’adresse de votre télécommande est préré-
glée par le fabricant à 000 pour command-
er toutes les fonctions de votre récepteur
de signaux de satellite Motorola. Toutefois,
si vous avez plus d’un récepteur de sig-
naux de satellite, vous voudrez peut-être
empêcher la télécommande qui se trouve
dans une pièce d’aecter le récepteur qui
se trouve dans une autre pièce. An d’éviter
ce type d’interférence, vous devez assigner
chaque télécommande à un récepteur en
attribuant une nouvelle adresse à chaque
combinaison. Vous pouvez attribuer une
adresse à l’aide de votre télécommande de
la façon suivante :
1.
Appuyez sur la touche SAT pour sélec-
tionner le mode SAT de la télécommande.
2. Appuyez sur la touche OPTIONS pour
acher l’écran Options sur votre télévi-
seur.
3. Dans le Menu Options, utilisez les
èches de délement et appuyez sur la
touche ENTER/OK pour ouvrir
les menus suivants. Vous pouvez égale-
ment appuyer sur le numéro indiqué
sur la télécommande pour avoir un
accès direct à chaque menu.
6 Conguration du système (certains
modèles seulement).
4 Réglages du système.
3 Réglages de l’installation.
2 Adresse de la télécommande.
4.
Lorsque vous arrivez à l’écran « Adresse
de la télécommande », vous pouvez pro-
grammer la télécommande à l’aide de la
séquence de programmation du clavier
de la télécommande.
5. Appuyez et maintenez appuyée la
touche SAT de la télécommande
jusqu’à ce que les voyants rouges
clignotent au moins deux fois, puis
relâchez la touche SAT.
6. Entrez une nouvelle adresse SAT à 3
chires tirée de la liste ci-dessous à
l’aide des touches numériques de la
télécommande.
7. Appuyez sur la touche ENTER/OK
pour enregistrer la nouvelle adresse
et assigner la télécommande à votre
récepteur de signaux de satellite.
8. Appuyez sur la touche EXIT pour quit-
ter le menu Options.
PROGRAMMATION DE LA
COMMANDE D’UN APPAREIL
Les télécommandes Shaw Direct IRC600 et
URC600 sont préprogrammées pour faire
fonctionner un récepteur de signaux de satel-
lite, un téléviseur Sony et un lecteur de DVD
Sony. Pour programmer la commande d’un
appareil autre que les appareils par défaut,
eectuez les étapes suivantes. Si ce n’est pas
ce que vous souhaitez, ignorez cette section
et passez à la suivante.
1.
Allumez le téléviseur ou l’appareil auxili-
aire.
NOTA : Veuillez lire entièrement les étapes
2 à 4 avant de procéder. Surlignez ou
inscrivez les codes et l’appareil que vous
souhaitez programmer avant de passer à
l’étape 2.
2. Appuyez et maintenez appuyée la tou-
che pour sélectionner l’appareil (TV ou
AUX) jusqu’à ce que les voyants rouges
clignotent au moins deux fois, puis relâ-
chez la touche TV ou AUX.
3. Localisez le code de votre appareil dans
la liste des codes des fabricants au verso
de ce guide d’utilisation. Les marques
sont inscrites par ordre alphabétique
et les codes les plus populaires sont
inscrits en premier.
4. Entrez le premier code à cinq chires
pour votre téléviseur ou appareil auxili-
aire. Si vous le faites correctement, le
voyant rouge clignotera deux fois.
NOTA : Si vous entrez un code invalide,
le voyant rouge ne clignotera pas
lorsque vous entrerez le dernier chire
et que vous quitterez le mode de pro-
grammation. Répétez les étapes 2 à 4
avec un code valide.
5. Pointez la télécommande vers le télévi-
seur ou l’appareil auxiliaire et appuyez
sur la touche d’alimentation une fois.
L’appareil devrait s’éteindre. S’il ne
répond pas, répétez les étapes 2 à 4
en essayant chacun des codes inscrits
pour votre marque jusqu’à ce que vous
en trouviez un qui fonctionne. Si cela
ne fonctionne toujours pas, essayez de
faire une Recherche de votre code.
6. Le code du téléviseur ou de l’appareil
auxiliaire sera stocké dans la télécom-
mande et il sera automatiquement
reprogrammé lorsque les piles seront
remplacées.
Code du téléviseur :
Code de l’appareil auxiliaire :
RÉGLAGE DU VERROUILLAGE DU
CONTRÔLE DES CANAUX
Par défaut, les paramètres de contrôle des
canaux de la télécommande ne sont pas
verrouillés en fonction du récepteur satellite.
Les touches concernées vont de 0 à 9, et com-
prennent également CH+, CH-, et LAST. Ainsi,
vous ne risquez pas de modier par acciden-
tellement un canal associé à votre téléviseur,
vous pouvez désactiver cette fonction pour
disposer d'un accès complet à ces fonctions
en mode TV.
Pour désactiver le verrouillage du contrôle des
canaux
1. Sur la télécommande, appuyez sur la
touché SAT et maintenez-la enfoncée
jusqu'à ce que le voyant lumineux
clignote deux fois.
2. Entrez le numéro 9 7 3 : la touche SAT
clignotera deux fois
.
3. Appuyez une fois sur la touche CH- : la
touché SAT clignotera quatre fois
Pour activer le verrouillage du contrôle des
canaux
1. Sur la télécommande, appuyez sur la
touché SAT et maintenez-la enfoncée
jusqu'à ce que le voyant lumineux
clignote deux fois.
2. Entrez le numéro 9 7 3 : la touche SAT
clignotera deux fois.
3.
Appuyez une fois sur la touche CH+ : la
touché SAT clignotera deux fois.
RECHERCHE DE VOTRE CODE
Si votre appareil ne répond pas à la télécom-
mande après avoir essayé tous les codes
inscrits ou si la marque de votre appareil n’est
pas inscrite, essayez d’eectuer une Recherche
de votre code.
1=Télé, 2=DVD/magnétoscope, 3=AUDIO
1. Allumez votre appareil.
2. Appuyez et maintenez appuyée la tou-
che pour sélectionner l’appareil (TV ou
AUX) jusqu’à ce que les voyants rouges
clignotent au moins deux fois, puis relâ-
chez la touche TV ou AUX.
3. Entrez 9 - 9 - 1. Le voyant rouge
clignotera deux fois.
4. Appuyez sur le 1 pour rechercher
un téléviseur, appuyez sur le 2 pour
rechercher un DVD/magnétoscope ou
appuyez sur le 3 pour rechercher un
appareil audio.
5. Tout en pointant la télécommande
vers l’appareil, appuyez et relâchez la
touche CH + jusqu’à ce que l’appareil
se ferme. Nota : vous devrez peut-être
appuyer sur la touche [CH+] plusieurs
fois.
NOTA : En mode Recherche, la télécom-
mande enverra des codes IR de sa bib-
liothèque vers l’appareil cible.
6. Appuyez sur la touche de sélection des
appareils (TV ou AUX) une fois pour
verrouiller le code. Le voyant rouge
clignotera deux fois
.
VÉRIFICATION DES CODES
Si vous avez conguré la télécommande en
utilisant la procédure de recherche de votre
code, vous pouvez vouloir connaître le code
à cinq chires qui fait fonctionner votre
téléviseur. Exécutez les étapes suivantes
après avoir conguré votre téléviseur an de
connaître ce code à cinq chires qui fait fonc-
tionner votre téléviseur.
1. Appuyez et maintenez appuyée la
touche TV jusqu’à ce que les voyants
rouges clignotent au moins deux fois,
puis relâchez-la.
2. Entrez 9 - 9 - 0. Le voyant rouge
clignotera deux fois.
3. Pour connaître le code : pour le premier
chire, appuyez sur 1 une fois et atten-
dez 3 secondes. Ensuite, comptez le
nombre de fois que les voyants rouges
ont clignoté (p. ex. : 3 clignotements =
3) et inscrivez le numéro dans la case à
l’extrême gauche (Code TV) à la n de
cette section.
NOTA : Si le chire du code est 0, le voyant
rouge ne clignote pas.
4. Répétez l’étape 3 quatre fois de plus
pour obtenir les chires restants. Utilisez
2 pour le deuxième chire, 3 pour le
troisième chire, 4 pour le quatrième
chire et 5 pour le cinquième. Terminez
l’inscription du code dans les cases
(Code TV) à la n de cette section
.
5. Pour vérier le code AUX, répétez les
étapes 1 à 4 en utilisant la touche AUX à
l’étape 1.
6. Pour vérier le code SAT, répétez les
étapes 1 à 4 en utilisant la touche SAT à
l’étape 1.
Nota : Lors de la vérication de l’adresse
SAT, seuls les chires 1, 2 et 3 sont requis.
Code du téléviseur :
Code de l’appareil auxiliaire :
MODIFICATION DE LA
COMMANDE DU VOLUME
Sur les télécommandes Shaw Direct IRC600 et
URC600, le verrouillage du volume est contrôlé
par le téléviseur de façon à ce que vous puissiez
contrôler le volume en mode AUX ou SAT.
Vous pouvez eectuer un déverrouillage
individuel du volume sur un appareil sélec-
tionné an de régler la commande du vo-
lume pour un fonctionnement indépendant.
Verrouillage du volume dans un mode spécique.
1. Appuyez et maintenez appuyée la
touche SAT jusqu’à ce que les voyants
rouges clignotent au moins deux fois,
puis relâchez-la.
2. Entrez 9 - 9 - 3. Le voyant rouge
clignotera deux fois après le 3
.
3. Appuyez sur la touche de mode (TV ou
AUX) et relâchez-la pour verrouiller le
volume.
Déverrouillage du volume dans un mode spécique.
1. Appuyez et maintenez appuyée la
touche du mode à déverrouiller (ex.,
AUX) jusqu’à ce que les voyants rouges
clignotent au moins deux fois, puis
relâchez-la.
2. Entrez 9 - 9 - 3. Le voyant rouge
clignotera deux fois après le 3
.
3. Appuyez sur la touche VOL vers le
bas et relâchez-la, le voyant rouge
clignotera quatre fois.
UTILISATION DE LA TOUCHE
D’ALIMENTATION GÉNÉRALE
Les télécommandes Shaw Direct IRC600
et URC600 sont dotées d’une caractéris-
tique unique leur permettant d’allumer ou
d’éteindre jusqu’à trois de vos appareils de
divertissement maison en appuyant sur une
seule touche.
NOTA : Le réglage par défaut de la TOUCHE
D’ALIMENTATION GÉNÉRALE (Alimentation) est
en mode SAT. Si la touche n’est pas program-
mée, seuls le récepteur de signaux de satellite
et le téléviseur pourront être allumés ou éteints.
En mode AUX ou TV, si vous appuyez sur la tou-
che d’alimentation, seul l’appareil sélectionné
pourra être allumé ou éteint.
PROGRAMMATION DE LA TOUCHE
D’ALIMENTATION GÉNÉRALE
1. Appuyez et maintenez appuyée la
touche SAT jusqu’à ce que les voyants
rouges clignotent au moins deux fois,
puis relâchez-la.
2. Entrez 9 - 9 - 5. Le voyant rouge
clignotera deux fois.
3. Appuyez et maintenez appuyée cha-
cune des touches de mode dans l’ordre
désiré dans la séquence d’alimentation
générale.
4. Appuyez sur la touche Alimentation et
relâchez-la, le voyant rouge sous SAT
clignotera deux fois.
UTILISATION DE LA TOUCHE
D’ALIMENTATION GÉNÉRALE
Après l’avoir programmée, pointez la télécom-
mande vers vos appareils et appuyez sur la
touche Alimentation et maintenez-la appuyée
pendant 1,5 seconde.
Suppression de la touche d’alimentation
générale:
1. Appuyez et maintenez appuyée la
touche SAT jusqu’à ce que les voyants
rouges clignotent au moins deux fois,
puis relâchez-la.
2. Entrez 9 - 9 - 5. Le voyant rouge
clignotera deux fois.
3. Appuyez sur la touche Alimentation et
relâchez-la, le voyant rouge sous SAT
clignotera deux fois.
DÉPANNAGE
PROBLÈME : La touche de l’appareil ne
clignote pas lorsque vous
appuyez sur une touche.
SOLUTION : Remplacez les piles par deux
(2) piles alcalines AA neuves.
PROBLÈME : La touche de l’appareil clignote
lorsque vous appuyez sur une
touche, mais l’appareil de diver-
tissement ne répond pas.
SOLUTION : Assurez-vous de bien pointer la
télécommande vers l’appareil
et d’être à moins de 4,5 m de
l’appareil que vous tentez de
faire fonctionner.
PROBLÈME : La télécommande ne peut pas
commander les appareils ou les
commandes ne fonctionnent
pas correctement.
SOLUTION : Essayez tous les codes inscrits
pour la marque d’appareil
que vous voulez programmer.
Assurez-vous que tous les
appareils puissent fonctionner
à l’aide d’une télécommande à
infrarouge.
INFORMATIONS
SUPPLÉMENTAIRES
Ce produit ne présente aucune pièce pou-
vant être réparée par l’utilisateur. L’ouverture
du boîtier, sauf le compartiment pour les
piles, peut causer des dommages perma-
nents à vos télécommandes Shaw Direct
IRC600 et URC600.
• Pour une assistance en ligne, rendez-vous sur le site :
www.shawdirect.ca
Copyright © Universal Electronics inc., 2010.
Tous droits réservés. Aucune partie de cette
publication ne peut être reproduite, trans-
mise, transcrite, enregistrée sur un système
de stockage ou traduite dans toute autre
langue, sous quelque forme et par quelque
moyen que ce soit, électronique, mécanique,
optique, manuel ou autre, sans l’autorisation
écrite préalable de Universal Electronics Inc.
CONFORMITÉ AUX RÈGLEMENTS
DE LA FCC
Cet appareil a subi des essais et il a été
démontré qu’il est conforme aux restrictions
pour un appareil numérique de classe B,
en vertu de la Partie 15 des règlements de
la FCC. Ces restrictions sont établies pour
procurer une protection raisonnable contre
le brouillage nuisible dans une installation
résidentielle. Cet appareil génère, utilise et
peut transmettre par rayonnement une éner-
gie radiofréquence. Par conséquent, s’il n’est
pas utilisé conformément aux directives, cet
appareil peut causer un brouillage nuisible
aux communications radio.
Toutefois, il n’existe aucune garantie que le
brouillage ne se produira pas dans une instal-
lation particulière. Si cet appareil cause du
brouillage nuisible à la réception radio ou de
télévision, l’utilisateur est encouragé à tenter
de mettre n au brouillage en utilisant l’une
ou plusieurs des mesures suivantes :
• augmenter ou réduire la distance entre
l’appareil et le récepteur.
• consulter le détaillant ou un technicien
expérimenté en télécommandes ou en
téléviseurs pour obtenir de l’aide.
Cet appareil a subi des essais et il a été
démontré qu’il est conforme aux restrictions
pour un appareil numérique de classe B en
vertu des règlements de la FCC. L’utilisateur
est avisé que les changements ou modi-
cations qui ne seraient pas expressément
approuvés par le fabricant peuvent annuler
le droit de l’utilisateur à utiliser l’appareil.
INFORMATIONS INDUSTRIE CANADA
Conformément à la réglementation
d'Industrie Canada, le présent émetteur radio
peut fonctionner avec une antenne d'un type
et d'un gain maximal (ou inférieur) approuvé
pour l'émetteur par Industrie Canada. Dans
le but de réduire les risques de brouillage
radioélectrique à l'intention des autres util-
isateurs, il faut choisir le type d'antenne et
son gain de sorte que la puissance isotrope
rayonnée équivalente (p.i.r.e.) ne dépasse pas
l'intensité nécessaire à l'établissement d'une
communication satisfaisante.
Le présent appareil est conforme aux CNR
d'Industrie Canada applicables aux appareils
radio exempts de licence. L'exploitation est
autorisée aux deux conditions suivantes : (1)
l'appareil ne doit pas produire de brouillage,
et (2) l'utilisateur de l'appareil doit accepter
tout brouillage radioélectrique subi, même si
le brouillage est susceptible d'en comprom-
ettre le fonctionnement.
MIRC600 03/13v2
-
 1
1
-
 2
2


Cary Audio Design SHAW DIRECT IRC600 Manuel utilisateur
- Catégorie
- Télécommandes
- Taper
- Manuel utilisateur
- Ce manuel convient également à
Autres documents
-
Insignia NS-L42X-10A Manuel utilisateur
-
-
-
-
-
-
 Telus Optik TV Programming Manual
-
Denon AVR-X8500H Remote Control Code
-
Shaw XR11 Starting Manual
-
Koss BT115i Manuel utilisateur
