
www.dell.com | support.dell.com
03W495A00
Dell™ PowerVault™ 22xS Systems —
Upgrading to Ultra 320 EMMs
CAUTION: A CAUTION indicates a potential for property damage, personal
injury, or death.
This document describes how to upgrade your system by removing the primary and
secondary Ultra 160 enclosure management modules (EMMs) and installing the Ultra 320
EMMs in your storage system.
A system with redundant enclosure management features two EMMs that are designated as
primary and secondary. A system with nonredundant enclosure management consists of one
EMM and one SCSI terminator card. In redundant EMM systems, replace both Ultra 160
EMMs with the Ultra 320 EMMs. In nonredundant EMM systems, replace only the Ultra
160 EMM and leave the SCSI terminator card in place.
EMMs and the SCSI terminator card are "warm-pluggable" and can be removed and installed
without shutting down the storage system, provided all I/O to the module has ceased.
NOTICE: You should perform a complete data backup before performing any hardware
changes. Otherwise, you might lose all of your data.
NOTICE: A mixture of Ultra 160 EMMs and Ultra 320 EMMs is not supported. If you replace
one Ultra 160 EMM with an Ultra 320 EMM, you must replace the other Ultra 160 EMM.
NOTE: To achieve full Ultra 320 functionality, your EMMs, hard drives, and host controller
must support Ultra 320.
NOTE: You should have the latest version of the Dell OpenManage™ Array Manager
and host server controller firmware installed on your host server before you upgrade
your system to Ultra 320 EMMs. To obtain the latest version of Array Manager and
the firmware, see the Dell Support website at support.dell.com.
Removing the Ultra 160 EMM
CAUTION: Before performing any of the procedures listed in this section, read
and follow the safety instructions in the System Information Guide that shipped
with your computer.
NOTE: In a cluster configuration, you must turn off any server nodes connected to the
storage system while you replace an EMM.
P/N 3W495 Rev. A00
April 2003
3W495eb0.fm Page 1 Monday, April 7, 2003 11:12 AM

www.dell.com | support.dell.com
1 Turn off the storage system.
This step is optional if I/O activity to the storage system has ceased.
2 Remove the host server-to-storage system cable from the EMM.
For removal instructions, see your Installation and Troubleshooting Guide.
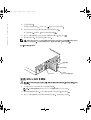
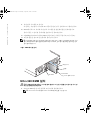
3 Using a #2 Phillips-head screwdriver, loosen the captive screw at the top of the EMM
(see Figure 1).
4 Grasp the handle of the module and pull it from the module slot.
NOTE: If you did not turn off power to the storage system in step 1, after the module
is removed from the system, the amber shelf fault light illuminates and, if enabled, an
alarm might beep until the module is replaced.
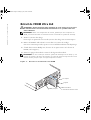
Figure 1. Removing and Installing an EMM
Installing an Ultra 320 EMM
CAUTION: Before performing any of the procedures listed in this section, read
and follow the safety instructions in the System Information Guide that shipped
with your computer.
1
Carefully insert the Ultra 320 EMM into the empty module slot.
NOTE: You can identify the Ultra 320 EMM by the SCSI Ultra 320 label on it.
captive screw
handle
secondary EMM
or SCSI terminator card
primary EMM
3W495eb0.fm Page 2 Monday, April 7, 2003 11:12 AM

www.dell.com | support.dell.com
2 Push the module to the back of the slot until it is firmly seated in the backplane
connector (see Figure 1).
3 Using a #2 Phillips-head screwdriver, tighten the captive screw at the top of the
module to secure the module to the chassis.
4 Connect the host server-to-storage system cable to the Ultra 320 EMM.
5 Replace the applicable Ultra 160 hard drives with Ultra 320 hard drives.
NOTE: The Ultra 320 enclosure supports a mixture of Ultra 160 and Ultra 320 hard
drives. In an Ultra 320 environment, the hard drives run at their respective speeds. The
hard drives are labeled Ultra 160 (Ultra 3) or Ultra 320 (Ultra 4).
6
Turn on your storage system.
For information about EMM connections and cabling, see the Installation and
Troubleshooting Guide.
____________________
Information in this document is subject to change without notice.
© 2003 Dell Computer Corporation. All rights reserved. Printed in the U.S.A.
Reproduction in any manner whatsoever without the written permission of Dell Computer Corporation is strictly
forbidden.
Trademarks used in this text: Dell, the DELL logo, Dell OpenManage, and PowerVault are trademarks of Dell Computer
Corporation.
Other trademarks and trade names may be used in this document to refer to either the entities claiming the marks and
names or their products. Dell Computer Corporation disclaims any proprietary interest in trademarks and trade names
other than its own.
3W495eb0.fm Page 3 Monday, April 7, 2003 11:12 AM

www.dell.com | support.dell.com
3W495eb0.fm Page 4 Monday, April 7, 2003 11:12 AM

www.dell.com | support.dell.com
Dell
™
PowerVault
™
22x
S
系统
—
升级至
Ultra 320 EMM
警告
警告表示存在可能导致财产损失 人身伤害或死亡的潜在危险
本说明文件介绍了如何在存储系统中卸下主和次
Ultra 160
封装管理模块
(EMM)
并安
装
Ultra 320 EMM
以便升级您的系统
附带冗余封装管理功能的系统配备了两个
EMM
分别指定为主和次管理模块 附带非
冗余封装管理功能的系统配备了一个
EMM
和一块
SCSI
终结处理卡
在冗余
EMM
系
统中
请使用
Ultra 320 EMM
更换两个
Ultra 160 EMM
在非冗余
EMM
系统中 仅需
更换
Ultra 160 EMM
SCSI
终结处理卡则保留不动
EMM
和
SCSI
终结处理卡均可
暖插拔 并且只要进出该模块的所有
I/O
均已停
止
则即使存储系统已关闭也仍然可以卸下和安装
注意
进行任何硬件更改之前 应该执行完整的数据备份 否则可能会丢失所有数据
注意 不支持混合使用 Ultra 160 EMM 和 Ultra 320 EMM 如果您用 Ultra 320 EMM 更
换一个 Ultra 160 EMM
则必须更换另一个 Ultra 160 EMM
注
要获得完整的 Ultra 320 功能 您的 EMM 硬盘驱动器和主机控制器必须支持 Ultra
320
注 将系统升级至 Ultra 320 EMM 之前 必须在主机服务器中安装最新版本的 Dell
OpenManage™ Array Manager 和主机服务器控制器固件
要获得最新版本的 Array
Manager 和固件
请浏览 Dell 支持 Web 站点 support.dell.com
卸下
Ultra 160 EMM
警告
执行本部分所述任何过程之前 请阅读并遵循计算机所附带 系统信息指南 中的
安全说明
注
在群集配置中 您必须在更换 EMM 时关闭所有连接至存储系统的服务器节点
P/N 3W495 Rev. A00
2003 年 4 月
3W495cb0.fm Page 1 Monday, April 7, 2003 11:54 AM

www.dell.com | support.dell.com
1
关闭存储系统
如果进出存储系统的
I/O
活动已停止 则可以不执行此步骤
2
从
EMM
中卸下将主机服务器连接至存储系统的电缆
有关拆卸说明 请参阅 安装与故障排除指南
3
使用
2
号梅花槽螺丝刀拧松
EMM
顶部的固定螺钉 参见图
1
4
抓住模块的手柄 将其从模块插槽中拉出
注 如果您没有在步骤 1 中关闭存储系统的电源并已从系统中卸下该模块 琥珀色的机壳
故障指示灯将会亮起
并且在装回模块之前一直响起哔声警报 如果已启用
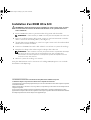
图
1
卸下和安装
EMM
安装
Ultra 320 EMM
警告
执行本部分所述任何过程之前 请阅读并遵循计算机所附带 系统信息指南 中的
安全说明
1
小心地将
Ultra 320 EMM
插入空置的模块插槽
注 您可以通过模块上的 SCSI Ultra 320 标签来识别 Ultra 320 EMM
2
将模块朝插槽背面推动 直至在底板连接器中稳定就位 参见图
1
3
使用
2
号梅花槽螺丝刀拧紧模块顶部的固定螺钉 将模块固定至机箱
固定螺钉
手柄
次 EMM
或 SCSI 终结处理卡
主 EMM
3W495cb0.fm Page 2 Monday, April 7, 2003 11:54 AM

www.dell.com | support.dell.com
4
将连接主机服务器与存储系统的电缆连接至
Ultra 320 EMM
5
将相应的
Ultra 160
硬盘驱动器更换为
Ultra 320
硬盘驱动器
注
Ultra 320 封装支持混合使用 Ultra 160 和 Ultra 320 硬盘驱动器
在 Ultra 320 环
境中
硬盘驱动器以各自的速率运行 硬盘驱动器已标记为 Ultra 160 (Ultra 3) 或
Ultra 320 (Ultra 4)
6
打开存储系统
有关
EMM
连接与布线的信息 请参阅 安装与故障排除指南
____________________
本文件中的信息如有更改 恕不另行通知
© 2003 Dell Computer Corporation
版权所有 翻印必究 美国印制
未经
Dell Computer Corporation
书面许可 不准以任何形式进行复制
本文件中使用的商标
Dell DELL
徽标
Dell OpenManage
和
PowerVault
是
Dell Computer Corporation
的
商标
本文件中述及的其它商标和产品名称是指拥有相应商标和名称的公司或其制造的产品
Dell Computer
Corporation
对其它公司的商标和产品名称不拥有任何专利权
3W495cb0.fm Page 3 Monday, April 7, 2003 11:54 AM

www.dell.com | support.dell.com
3W495cb0.fm Page 4 Monday, April 7, 2003 11:54 AM

www.dell.com | support.dell.com
Systèmes Dell™ PowerVault™ 22xS —
Installation des EMM Ultra 320
ATTENTION : Le message ATTENTION indique une situation potentiellement
dangereuse qui, si elle n'est pas évitée, peut provoquer une détérioration du
matériel ou des blessures pouvant entraîner la mort.
Ce document explique comment mettre à niveau votre système en remplaçant les modules
de gestion de boîtier Ultra 160 principal et secondaire par les modules de gestion de boîtier
Ultra 320 sur votre système de stockage.
Un système à gestion de boîtier redondant comporte deux modules de gestion de boîtiers
ou EMM (Enclosure Management Module) : un module principal et un module secondaire.
Un système à gestion de boîtier redondant se compose d'un EMM et d'une carte de
terminaison SCSI. Dans les systèmes EMM redondants, remplacez les deux EMM
Ultra 160 par les EMM Ultra 320. Dans les systèmes EMM non redondants, remplacez
uniquement l'EMM Ultra 160. Ne remplacez pas la carte de terminaison SCSI.
Les EMM et la carte de terminaison SCSI se « branchent à chaud ». Vous pouvez les retirer et
les installer sans arrêter le système de stockage, à condition que toutes les E/S du module
soient interrompues.
MISE EN GARDE : Il est recommandé d'effectuer une sauvegarde complète des données avant
tout remplacement de matériel. Dans le cas contraire, vous risquez de perdre toutes vos données.
MISE EN GARDE : Il est impossible d'utiliser conjointement des EMM Ultra 160 et des
EMM Ultra 320. Si vous remplacez un EMM Ultra 160 par un EMM Ultra 320, vous devez
également remplacer l'autre EMM Ultra 160.
REMARQUE : Pour exploiter au mieux les fonctionnalités Ultra 320, vos EMM, disques durs
et contrôleur hôte doivent prendre en charge l'environnement Ultra 320.
REMARQUE : Avant d'installer les EMM Ultra 320, installez sur votre serveur hôte
la version la plus récente de Dell OpenManage™ Array Manager et du microcode du
contrôleur du serveur hôte. Pour obtenir la version la plus récente de Array Manager
et du microcode, visitez le site Web d'assistance technique de Dell, support.dell.com.
Réf 3W495 Rév. A00
Avril 2003
3W495fb0.fm Page 1 Monday, April 7, 2003 11:06 AM

www.dell.com | support.dell.com
Retrait de l'EMM Ultra 160
ATTENTION : Avant d'exécuter toute procédure de cette section, lisez et suivez
les instructions de sécurité du Guide Informations sur le système fourni avec
votre ordinateur.
REMARQUE : Dans une configuration de cluster, pendant que vous remplacez un
EMM, vous devez éteindre les nœuds de serveur connectés au système de stockage.
1
Arrêtez le système de stockage.
Cette étape est optionnelle si les E/S du système de stockage ont été interrompues.
2 Retirez de l'EMM le câble reliant le serveur hôte au système de stockage.
Pour savoir comment procéder, reportez-vous au Guide d'installation et de dépannage.
3 À l'aide d'un tournevis Phillips n°2, desserrez la vis captive située sur le dessus de
l'EMM (voir la Figure 1).
4 Saisissez la poignée du module et retirez-la du logement du module.
REMARQUE : Si vous n'avez pas arrêté le système de stockage lors de l'étape 1, une
fois que le module a été retiré du système, un voyant de panne orange s'allume et une
alarme retentit jusqu'à ce que vous ayez remplacé le module.
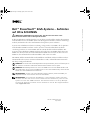
Figure 1. Retrait et installation d'un EMM
vis captive
poignée
EMM secondaire
ou carte de terminaison SCS
I
EMM principal
3W495fb0.fm Page 2 Monday, April 7, 2003 11:06 AM

www.dell.com | support.dell.com
Installation d'un EMM Ultra 320
ATTENTION : Avant d'exécuter toute procédure de cette section, lisez et suivez
les instructions de sécurité du Guide Informations sur le système fourni avec
votre ordinateur.
1
Insérez l'EMM Ultra 320 avec précaution dans le logement vide du module.
REMARQUE : À titre indicatif, un EMM Ultra 320 porte une étiquette SCSI Ultra 320.
2
Poussez le module à l'arrière du logement, jusqu'à ce qu'il soit fermement enclenché
dans le connecteur du fond de panier (voir la Figure 1).
3 À l'aide d'un tournevis Phillips n°2, serrez la vis captive située sur le dessus du module
afin de fixer le module au châssis.
4 Connectez à l'EMM Ultra 320 le câble reliant le serveur hôte au système de stockage.
5 Remplacez les disques durs Ultra 160 par les disques durs Ultra 320.
REMARQUE : Avec un boîtier Ultra 320, vous pouvez utiliser conjointement des disques
durs Ultra 160 et Ultra 320. Dans un environnement Ultra 320, les disques durs
fonctionnent à leur vitesse respective. Les disques durs portent une étiquette Ultra 160
(Ultra 3) ou Ultra 320 (Ultra 4).
6
Mettez le système de stockage sous tension.
Pour plus d'informations sur les connexions et le câblage EMM, Reportez-vous au Guide
d'installation et de dépannage.
____________________
Les informations fournies dans ce document sont susceptibles d'être modifiées sans préavis.
© 2003 Dell Computer Corporation. Tous droits réservés. Imprimé aux États-Unis.
La reproduction de ce document de quelque manière que ce soit sans l'autorisation écrite de Dell Computer Corporation
est strictement interdite.
Marques utilisées dans ce document : Dell, le logo DELL, Dell OpenManage et PowerVault sont des marques de Dell
Computer Corporation.
Tous les autres noms de marques et marques commerciales utilisés dans ce document se rapportent aux sociétés
propriétaires des marques et des noms de ces produits. Dell Computer Corporation décline tout intérêt dans l'utilisation
des marques déposées et des noms de marques ne lui appartenant pas.
3W495fb0.fm Page 3 Monday, April 7, 2003 11:06 AM

www.dell.com | support.dell.com
3W495fb0.fm Page 4 Monday, April 7, 2003 11:06 AM

www.dell.com | support.dell.com
Dell™ PowerVault™ 22xS-Systeme – Aufrüsten
auf Ultra 320-EMMs
VORSICHT: VORSICHT weist darauf hin, dass Gefahr eines Sach- oder
Personenschadens oder Lebensgefahr besteht.
In diesem Dokument wird beschrieben, wie Sie das System durch den Ausbau der primären
und sekundären Ultra 160-EMMs (Enclosure Management Modules; Gehäuseverwaltungs-
module) und Einbau der Ultra 320-EMMs in das Speichersystem aufrüsten.
Systeme mit redundanter Gehäuseverwaltung verfügen über zwei EMMs, die als primäres
und sekundäres EMM bezeichnet werden. Systeme mit nicht-redundanter Gehäuse-
verwaltung bestehen aus einem EMM und einer SCSI-Abschlusswiderstandskarte. Bei
Systemen mit redundanten EMMs tauschen Sie beide Ultra 160-EMMs durch Ultra 320-
EMMs aus. Bei Systemen mit nicht-redundanten EMMs tauschen Sie nur das Ultra 160-
EMM aus; die SCSI-Abschlusswiderstandskarte wird weiterverwendet.
Die EMMs und die SCSI-Abschlusswiderstandskarte sind "heiß steckbar" und können ohne
Herunterfahren des Systems entfernt und installiert werden, während der Datenaustausch
mit dem jeweiligen Modul ruht.
HINWEIS: Sie sollten eine vollständige Datensicherung durchführen, bevor Sie Änderungen an
der Hardware vornehmen. Anderenfalls können sämtliche Daten verloren gehen.
HINWEIS: Mischkonfigurationen aus Ultra 160-EMMs und Ultra 320-EMMs werden nicht
unterstützt. Wenn Sie ein Ultra 160-EMM durch ein Ultra 320-EMM ersetzen, müssen Sie das
zweite Ultra 160-EMM ebenfalls austauschen.
ANMERKUNG: Um alle Ultra 320-Funktionen nutzen zu können, müssen die EMMs, die
Festplatten und der Host-Controller Ultra 320 unterstützen.
ANMERKUNG: Sie sollten Dell OpenManage™ Array Manager und die Controller-
Firmware auf dem Host-Server auf die neueste Version aktualisieren, bevor Sie das
System auf Ultra 320-EMMs aufrüsten. Die aktuellste Version von Array Manager
wie auch die aktuellste Firmware-Version erhalten Sie auf der Dell Support-Website
unter support.dell.com.
Teile-Nr. 3W495 Rev. A00
April 2003
3W495gb0.fm Page 1 Monday, April 7, 2003 11:23 AM

www.dell.com | support.dell.com
Ausbauen von Ultra 160-EMMs
VORSICHT: Lesen und befolgen Sie die Sicherheitshinweise in den im Liefer-
umfang Ihres Computers enthaltenen Systeminformationen, bevor Sie die in
diesem Abschnitt genannten Schritte ausführen.
ANMERKUNG: In Clusterkonfigurationen müssen Sie während des EMM-Austauschs
alle Serverknoten abschalten, die an das Speichersystem angeschlossen sind.
1
Schalten Sie das Speichersystem ab.
Dieser Schritt ist optional, wenn die I/O-Aktivitäten des Speichersystems eingestellt
wurden.
2 Ziehen Sie das Verbindungskabel von Host-Server und Speichersystem vom EMM ab.
Die notwendigen Anweisungen zum Entfernen finden Sie in der Anleitung zur
Installation und Fehlersuche.
3 Lösen Sie mit einem Kreuzschlitz-Schraubendreher Nr. 2 die Sicherungsschraube
oben auf dem EMM (siehe Abbildung 1).
4 Halten Sie das Modul am Griff fest, und ziehen Sie es aus dem Steckplatz heraus.
ANMERKUNG: Falls Sie in Schritt 1 nicht die Stromzufuhr zum Speichersystem
abgeschaltet haben, leuchtet die gelbe Fehleranzeige auf, sobald das Modul aus dem
System entfernt wurde. Unter Umständen ertönt außerdem ein Alarmton, bis das
Modul ausgetauscht wird.
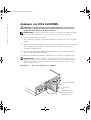
Abbildung 1. Aus- und Einbauen von EMMs
Sicherungsschraube
Handgriff
Sekundäres EMM
oder SCSI-Abschluss-
widerstandskarte
Primäres EMM
3W495gb0.fm Page 2 Monday, April 7, 2003 11:23 AM

www.dell.com | support.dell.com
Einbauen von Ultra 320-EMMs
VORSICHT: Lesen und befolgen Sie die Sicherheitshinweise in den im Liefer-
umfang Ihres Computers enthaltenen Systeminformationen, bevor Sie die in
diesem Abschnitt genannten Schritte ausführen.
1
Setzen Sie das Ultra 320-EMM vorsichtig in den leeren Modulsteckplatz ein.
ANMERKUNG: Sie erkennen das Ultra 320-EMM am Etikett mit der Aufschrift "SCSI
Ultra 320".
2
Schieben Sie das Modul in Richtung Rückseite des Steckplatzes, bis es fest im Rück-
wandanschluss sitzt (siehe Abbildung 1).
3 Ziehen Sie mit einem Kreuzschlitz-Schraubendreher Nr. 2 die Sicherungsschraube
oben auf dem Modul fest, um das Modul am Gehäuse zu befestigen.
4 Schließen Sie das Verbindungskabel von Host-Server und Speichersystem am Ultra
320-EMM an.
5 Tauschen Sie die betreffenden Ultra 160-Festplatten durch Ultra 320-Festplatten aus.
ANMERKUNG: Das Ultra 320-Gehäuse unterstützt Mischkonfigurationen aus Ultra 160-
und Ultra 320-Festplatten. In einer Ultra 320-Umgebung werden die Festplatten mit ihrer
jeweiligen Geschwindigkeit betrieben. Die Festplatten sind entweder mit "Ultra 160 (Ultra
3)" oder "Ultra 320 (Ultra 4)" beschriftet.
6
Schalten Sie das Speichersystem ein.
Weitere Informationen zur Verbindung und Verkabelung von EMMs finden Sie in der
Anleitung zur Installation und Fehlersuche.
____________________
Die in diesem Dokument enthaltenen Informationen können ohne Vorankündigung geändert werden.
© 2003 Dell Computer Corporation. Alle Rechte vorbehalten. Gedruckt in den U.S.A.
Eine Reproduktion dieses Dokuments in jeglicher Form ist nur mit vorheriger schriftlicher Genehmigung der Dell
Computer Corporation erlaubt.
Die in diesem Text verwendeten Marken Dell, Dell OpenManage und PowerVault sowie das DELL-Logo sind Marken
der Dell Computer Corporation.
Andere in diesem Dokument möglicherweise verwendete Marken und Handelsbezeichnungen sind unter Umständen
Marken und Namen der entsprechenden Firmen oder ihrer Produkte. Die Dell Computer Corporation erhebt keinen
Anspruch auf Marken und Handelsnamen mit Ausnahme ihrer eigenen.
3W495gb0.fm Page 3 Monday, April 7, 2003 11:23 AM

www.dell.com | support.dell.com
3W495gb0.fm Page 4 Monday, April 7, 2003 11:23 AM

www.dell.com | support.dell.com
Dell™ PowerVault™ 22xS システム
—
Ultra 320 EMM へのアップグレード
警告:
警告は、物的損害、けが、または死亡の原因となる可能性があることを示します。
本書では、プライマリおよびセカンダリの
Ultra 160
エンクロージャ管理モジュール
(
EMM
)をストレージシステムから取り外し、
Ultra 320 EMM
を取り付けて、システ
ムをアップグレードする方法を説明します。
冗長エンクロージャ管理のシステムには、それぞれプライマリとセカンダリに指定さ
れた
2
つの
EMM
が備わっています。非冗長エンクロージャ管理のシステムは、
1
つ
の
EMM
と
1
つの
SCSI
ターミネータカードから構成されています。冗長
EMM
シス
テムの場合は、
Ultra 160 EMM
を
2
つとも
Ultra 320 EMM
に交換します。非冗長
EMM
システムの場合は、
Ultra 160 EMM
だけを交換し、
SCSI
ターミネータカードは
そのまま残します。
EMM
と
SCSI
ターミネータカードは、ウォームプラグに対応しており、モジュールへ
のすべての
I/O
処理が停止していれば、ストレージシステムをシャットダウンするこ
となくカードの取り付け
/
取り外しが可能です。
注意:
ハードウェアの変更を行う前には、必ずデータの完全なバックアップを実行して
ください。実行しない場合、データがすべて失われる可能性があります。
注意:
Ultra 160 EMM
と
Ultra 320 EMM
の併用はサポートされていません。
1
つの
Ultra
160 EMM
を
Ultra 320 EMM
に交換した場合は、もう
1
つの
Ultra 160 EMM
も交換する必
要があります。
メモ:
Ultra 320
の機能を最大限に引き出すためには、お使いの
EMM
、ハードドライブ、
およびホストコントローラが
Ultra 320
に対応している必要があります。
メモ:
システムを
Ultra 320 EMM
にアップグレードする前に、
Dell OpenManage
™
Array
Manager
およびホストサーバコントローラファームウェアの最新バージョンをホスト
サーバにインストールしてください。
Array Manager
とファームウェアの最新バージョン
を入手するには、デルサポート
Web
サイト
support.dell.com
を参照してください。
P/N 3W495 Rev. A00
2003 年 4 月
3W495jb0.fm Page 1 Monday, April 7, 2003 12:01 PM

www.dell.com | support.dell.com
Ultra 160 EMM の取り外し
警告:
この項の手順を行う前に、コンピュータに付属の『システム情報ガイド』の安全
上の注意をよく読み、指示に従ってください。
メモ:
クラスタ構成では、
EMM
を交換する間、ストレージシステムに接続するすべ
てのサーバノードの電源を切る必要があります。
1
ストレージシステムの電源を切ります。
ストレージシステムへの
I/O
アクティビティが停止している場合は、この手順は
オプションです。
2
ホストサーバとストレージシステムをつなぐケーブルを
EMM
から取り外します。
取り外しの手順については、『
Installation and Troubleshooting Guide
』(イン
ストール
&
トラブルシューティングガイド)を参照してください。
3 #2
プラスドライバを使用して、
EMM
上部の固定ネジを緩めます(図
1
を参照)。
4
モジュールのハンドルをつかんでモジュールスロットから引き出します。
メモ:
手順
1
でストレージシステムの電源を切らなかった場合、モジュールをシス
テムから取り外すと、モジュールを交換するまで橙色のシェルフ障害ライトが点灯
し、警告音が有効になっている場合は警告音が鳴ります。
図 1. EMM の取り外しと取り付け
固定ネジ
ハンドル
セカンダリ
EM M
または
SCSI
ターミネータカード
プライマリ
EMM
3W495jb0.fm Page 2 Monday, April 7, 2003 12:01 PM

www.dell.com | support.dell.com
Ultra 320 EMM の取り付け
警告:
この項の手順を行う前に、コンピュータに付属の『システム情報ガイド』の安全
上の注意をよく読み、指示に従ってください。
1
十分に注意しながら、
Ultra 320 EMM
を空のモジュールスロットに挿入します。
メモ:
Ultra 320 EMM
は、貼付された
SCSI Ultra 320
ラベルから識別できます。
2
モジュールをスロットの奥に押し込み、バックプレーンコネクタにしっかりとは
め込みます(図
1
を参照)。
3
#2
プラスドライバを使用してモジュール上部の固定ネジを締め、モジュールを
シャーシに固定します。
4
ホストサーバとストレージシステムをつなぐケーブルを
Ultra 320 EMM
に接続
します。
5
対応する
Ultra 160
ハードドライブを
Ultra 320
ハードドライブと交換します。
メモ:
Ultra 320
エンクロージャは、
Ultra 160
ハードドライブと
Ultra 320
ハードド
ライブの併用に対応しています。
Ultra 320
環境では、各ハードドライブは各自の速
度で稼動します。各ハードドライブには、
Ultra 160
(
Ultra 3
)または
Ultra 320
(
Ultra
4
)のラベルが貼られています。
6
ストレージシステムの電源を入れます。
EMM
の接続とケーブル配線の詳細については、『
Installation and Troubleshooting
Guide
』(インストール
&
トラブルシューティングガイド)を参照してください。
____________________
ここに記載されている内容は予告なく変更されることがあります。
© 2003 すべての著作権は Dell Computer Corporation にあります。Printed in the U.S.A.
Dell Computer Corporation の書面による許可のない複写は、いかなる形態においても厳重に禁じられて
います。
本書で使用されている商標について: Dell、DELL ロゴ、Dell OpenManage、および PowerVault は Dell
Computer Corporation の商標です。
本書では、必要に応じて上記記載以外の商標および会社名が使用されている場合がありますが、これらの
商標や会社名は、一切 Dell Computer Corporation に所属するものではありません。
3W495jb0.fm Page 3 Monday, April 7, 2003 12:01 PM

www.dell.com | support.dell.com
3W495jb0.fm Page 4 Monday, April 7, 2003 12:01 PM
La page est en cours de chargement...
La page est en cours de chargement...
La page est en cours de chargement...
La page est en cours de chargement...
La page est en cours de chargement...
La page est en cours de chargement...
La page est en cours de chargement...
La page est en cours de chargement...
-
 1
1
-
 2
2
-
 3
3
-
 4
4
-
 5
5
-
 6
6
-
 7
7
-
 8
8
-
 9
9
-
 10
10
-
 11
11
-
 12
12
-
 13
13
-
 14
14
-
 15
15
-
 16
16
-
 17
17
-
 18
18
-
 19
19
-
 20
20
-
 21
21
-
 22
22
-
 23
23
-
 24
24
-
 25
25
-
 26
26
-
 27
27
-
 28
28


