
PHILIPS
h I I e
p~rsonal
I I
1.
.1
wireless
'-"
lighting
Impress
Extension/Extension
User
manual
Notice d'
emploi
Manual
de
usuario
..
l .
S/N:52888B J
HUE
senal number

Incl.
A~
B
[fil
Exel.
®-&
--
-
------
--------
--
~
®-1~
J.I
~~
2
zigbee
c..-t.rltd
ptOducl

G:,
IMPORTANT
SAFETY INSTRUCTIONS
·Product
appearance
may
vary
from
image
shown
·UL Listed
Landscape
Ughting
System This lumma1re
and
power
supply
unit
is
intended
for
installation
In
accordance
with
the
National
Electrical
Code
and
local
code
specifications
Failure
to
adhere
to
these
codes
and
instructions
may
result in serious
injury
and/or
damage
to
the
PSU
and
void
the
warranty. These
instructions
do
not
purport
to
cover
all
details
or
variations
in
equipment.
nor
to
provide
for
every
possible
contingency
related
to
installation.
operation,
maintenance,
or
mounting
situation
Should
specific
problems
occur
that
are
not
addressed
by
these
instructions,
contact
your
Sales Representative
or
distributor
for assistance.
SAVE THESE INSTRUCTIONS
for
future
reference
·Warning:
do
not
use
an
extension
cord
· The
plug
on
the
power
supply
unit
must
be
connected
to
a GFCI
protected
hooded
flush
type
cover
plate
receptacle
marked
"Wet
Location•
while
in
use
·
Protect
the
wire
by
routing
it
in
close
proximity
to
the
light
fitting,
or
next
to
a
building
structure
such
as a
house
or
a
deck.
·The
landscape
wire
and
connector
can
also
be
hidden
under
stone
or
buried
under
grass
at
a
maximum
depth
of
6
inches
(15
2 cm).
·Phillps
recommends
a
minimum
depth
of
4
inches
when
burying
in
the
lawn
to
prevent
damage
from
aerators
or
other
lawn
plugging
equipment.
· Philips
recommends
not
to
bury
the
T-shaped
connectors.
·Do
not
submerge
lummaire
or
PSU
in
water.
·
WARNING
: Risk
of
Electric
Shock
Do
not
install
power
supply
unit
or
luminaires
within
10
feet
(3
05
m)
of
a
pool.
spa,
or
fountain
CD
MESURES DE SECURITE A RESPECTER
·L'apparence
du
produ1t
peut
differer
de
l'Image
montree
·Systeme
d'eclairage
paysager
homologue
UL
Ce lumma1re
et
bloc
d'alimentation
est
con<;u
pour
~tre
installe
conformement
au
Code
national
de
l'electricite
et
aux
specifications
des
codes
locaux.
Le
non-respect
de
ces
codes
et
instructions
peut
entrainer
des
blessures graves
et/ou
endommager
le
bloc
d'allmentation
et
annuler
la
garantIe
Ces
instructions
ne
pretendent
pas
couvnr
tous
les
details
ou
les
variations
de
l'equ1pement,
ni
fourrnr
une
eventualite
liee
a l'mstallat1on, l'operat1on.
la
maintenance
ou
la
situation
de
montage
S1
des
problemes
specifiques
se
produisent,
veulllez
contacter
votre
representant
commercial
ou
votre
distnbuteur
pour
obternr
de
l'a1de CONSERVEZ
CES INSTRUCTIONS
pour
reference
future
·Attention.
ne
pas
utillser
une
rallonge
·La
fiche
du
bloc
d'ahmentation
do1t
etre
connectee
a
un
receptacle
de
plaque
de
recouvrement
a
couvercle
a
capuchon
protege
par
GFCI
marque
"Emplacement
humide"
pendant
l'utilisat1on
·Protegez
le
fil
en
l'achemmant
a
proximite
du
lumina,re
ou
a proxim1te
d'une
structure
de
batiment
comme
une
maison
ou
un
pont
3

·Le fil
et
le
connecteur
peuvent
egalement
etre enterres sous l'
herbe
a
une
profondeur
max1male
de
6
pouces
(15.2
cm)
.
·Phillps
recommande
une
profondeur
m1rnmale
de
4
pouces
lors
de
l'enfou1ssement
dans
la
pelouse
pour
ev1ter les
dommages
causes
par
les aerateurs
ou
d'autres
equipements
de
branchage
·Philips
recommande
de
ne
pas enterrer les
connecteurs
en
forrne
de
T
·Ne
pas
submerger
le
lumina1re
ou
le
bloc
d'alimentat1on
dans
l'eau
·AVERTISSEMENT: Risque
de
choc
electnque
N'installez pas
le
bloc
d'ahmentation
ou
les
luminaires a moIns
de
10 pIeds (3.05
m)
d'une
p1scme.
un
spa
ou
.
une
fontame
4D INSTRUCCIONES DE SEGURIDAD IMPORTANTES
· La aparienc,a
del
producto
puede
vanar
de
la
imagen
mostrada
.
·Sistema
de
iluminaci6n
de
jardin hstado
por
UL. La luminaria y la
unidad
de
fuente
de
allmentaci6n
estan dIsenadas para su instalac16n
de
acuerdo
con
el
C6digo
Electrico Nac,onal
y las espec1ficaciones
del
c6d1go local. El
incumplimiento
de
estos c6d1gos e instrucciones
puede
provocar
les,ones graves
y/o
darios
a
la
fuente
de
alimentaci6n
y
anular
la garantia.
Estas instrucc1ones
no
pretenden
cubm
todos
los
detalles
o variac1ones
en
el
equipo,
rn
prever
todas
las contmgencias posibles relacionadas
con
la
1nstalaci6n,
operaci6n
.
mantenimiento
o situac16n
de
montaje
S1
se
producen
problemas
especificos
que
no
se
abordan
en
estas instrucciones.
comuniquese
con
su representante
de
ventas o d1stnbu1dor
para
obtener
ayuda
GUARDE
ESTAS
INSTRUCCIONES para referenc,a futura
·Advertenc1a:
no
use
un
cable
de
extension.
· El
enchufe
de
la
unidad
de
fuente
de
ahmentac16n
debe
es tar
conectado
a
un
receptaculo
de
placa
de
cub1erta
tipo
Flush
con
protecci6n
GFCI
marcado
como
"Ub1CaC16n
humeda"
mientras esta
en
uso
.
·Proteja
el
cable
conduciendolo
cerca
de
la
luminaria, o
junto
a la estructura
de
un
edificio
.
como
una
casa o
tejado
.
·El
cable
y
el
conector
tambien
pueden
esconderse debaJo
de
piedra
o enterrarse
bajo
el
cesped a
una
profund1dad
maxima
de
6 pulgadas (152 cm).
· Phillps recom1enda
una
profundidad
minima
de
4
pulgadas
cuando
se entierre
en
el
cesped
para evitar
darios
·Philips
recomienda
no
enterrar
los
conectores
en
forrna
de
T.
·No
sumeqa
la
luminana
o
fuente
de
alimentaci6n
en
agua
.
·ADVERTENCIA: Riesgo
de
descarga electrica
No
instate
la
fuente
de
ahmentaci6n ni las
luminarias a
menos
de
10 pies
(3
05
m)
de
una
piscina. spa o
fuente
4

0
O'IOP-O-
PHILIPS
0
HUE
senaf ru'l1ber
__
Ul,,..
S/N•XXXXXX
5

CD
0
0
8 6

0
-
-
711-
-/
/
/A
-
_,,
,,,
I
C(Q
I
"=
-
-----.J
I
I
I
I
I
I
/
I
I
I
I"'";\
'--'
0
.
.,
~~
'.L_
,-
-
♦
--I
I
,.
-
I
---
.L
I
-
_,_
- -
.J
----
/
/
--
---
...,
---
7
0 Do
not
connect
to
a rigid metallic
conduit
system
CD
Ne pas connecter a
un
systeme
de
conduit
metallique rigide
4D No
lo
conecte a un sistema
de
conductos metalicos r!gidos
0
I"'\
\...,1
0

0
0
8

0
9

0 ®
0
®
10

0
CD
PHILIP~ 91
hue:.,::
0 ?
•
www
.
philips
-
hue.com
Use
only
with
Philips
HUE
24V
==-=
SELV
LED
Power
Supply!
• A
utiliser
uniquement
avec
une
source
d'
alimentation
a
DEL
SEL
V
Philips
Hue
de
24V
==-=
!
Usar
solo
con
una
fuente
de
alimentaci6n
Philips
Hue
24V
==-=
SELV
LED!
Low Voltage system / Systeme basse tension / Sistema
de
baja tension
130V
ID
:1~
~
24V
~
"---
--tl!!IIB
__
;e_
8: _
__
_ j_
e_j
_ _ f
_e_____,
114
ft/
35 m
Max
PSU
wattage
(40W
or
95
W)
Max
.
114
ft
/
35
m
11

Signify North America Corporation
200
Franklin Square Dnve
Somerset.
NJ
08873,
USA
Signify Canada
Ltd/Signify
Canada Ltee.
281
Hlllmount Road,
Markham,
ON
Canada L6C
2S3
Questions or
Comments/
Questions
ou
commentaIres:
1-800-555
0050
lmportado
y/o
distnbuido en Mexico por:
Signify Mexico
SA.
de
C V
Av
. La Palma N° 6-Col.
La
Herradura Huixquilucan
Edo De Mexico,
C.P
. 52784, Mexico
Centro
de
contacto·
01-800
-
508-9000
©
2021
Signify Holding
All rights reserved
www.phil1ps-hue.com
17459/**/V7
4404
029
13951
Last
update
· 04/2021

PHILIPS
Signify North America Corporation
200
Franklin Square Drive
Somerset,
NJ
08873, USA
Signify Canada
Ltd/Signify
Canada Ltee.
281
Hillmount
Road.
Markham,
ON
. Canada L6C
2S3
lmportado
y/o
distribuido en Mexico
por
Signify Mexico
SA
de
C.V.
Av. La Palma N°
6-Col
San Fernando,
La
Herradura Huixqullucan
Edo. De Mexico.
C.P. 52784 -
R.F
C. PME-
620620-E84
©
2020
Signify Holding
B
al
Questions or Comments
Questions
ou
com
mentai res
1-800-555-0050
Centro
de
contacto
01-800-508-9000
www.philips.
com/lighting
www
.
philips-hue
.
com
4404
029
11882
Last
update
:
08/2020

01
02
03
00~
~-.....;....o._~-
11
19
@
27
HAX
-
35
~
llgBee"
CfMif<lp,odu<I
05
12
a
.....
~
20
~
/ I '
28
--
36
Oe
13
21
EJ
29
06
14
®-C9
®
-
□
22
30
04
07
08
09
10
15 16 17 18
318'
-
(t
......
"
F~
MAX
....
W
23 24
25
26
~
110
c~
@)
(6»
-e
+
-·-
-·-
31
32
33 34
r'1
~~
·~

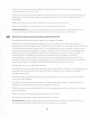
EN
-
SAFETY
INSTRUCTIONS -
PART
B
The manufacturer advises the correct use
of
Luminaires (lighting fixtures)' Therefore always
follow
these
instructions
to
ensure correct and safe installation
and
functioning
of
the luminaire and keep
it
for
future
reference.Turn
off
electrical
power
at
main fuse
or
circuit breaker box before commencing installation. maintenance
or
repair. If in
doubt.
consult a qualified electrician
or
contact
your
retail outlet. Ensure
that
you
always install the
luminaire
to
the
local electrical
code
. Certain regulations indicate
that
luminaires should be installed
by
a qualified
electrician. Observe
the
correct
color
of
the wiring before installation:
white
(N). black (L)
and
green
or
bare copper
wire (Ground). Do
not
connect this luminaire
to
a
non
-grounded electrical system. WARNING: Installing this fixture
in
a non-grounded electrical system could
allow
metal
parts
of
the luminaire
to
carry electrical current
If
any wires
or
wire connections become broken
or
loose. Under this condition, anyone coming in contact
with
the luminaire is
subject
to
electric shock which could cause injury
or
death. Always use wire nuts/connectors rated
for
the correct
gauge and number
of
wires used. CAUTION: Be certain
that
no
bare wire strands are exposed outside
of
the wire
nuts/connections
(if
applicable). Be careful
not
to
damage
or
cut
the
wire
insulation (covering) during installation.
Do
not
permit wires
to
contact any sharp edges. Do
not
remove thermal insulation pad(s). Doing so
will
result in
increased temperatures and possible risk
of
fire. Maintain Interior lighting
with
a
dry
cloth duster,
do
not
use
abrasives
or
solvents.Avoid
liquid
on
all
electrical parts. Always consider
all
the
technical specifications
of
the
luminaire.Verify
the
stated icons
on
the
identification label
on
the
luminaire
and
the Icons
that
are shown in
part
A
of
your
safety instructions. ATTENTION : Below
you
will
find
all
the explanations
with
numeric reference
to
the
icons respectively in front
of
these PART-B safety instructions. Applicable icons
to
your fixture are shown in PART-A
safety instructions.
1) This
product
should
only
be
installed indoors. 2) The
product
is suitable
for
outdoor
usage. 3)
Only
suitable
for
dry
locations. 4) Suitable
for
damp
locations. 5) Suitable
for
wet
locations.
6)
Luminaire is suitable
for
base
up
mounting
7)
Luminaire
is
suitable
for
base
down
mounting.
8)
Luminaire is suitable
for
horizontal mounting.
9)
The luminaire
Is
only
suitable
for
fixing
to
the ceiling. 10) The luminaire Is
only
suitable
for
fixing
to
the
wall
.
11)
The luminaire is suitable
for
fixing
to
the
wall and
to
the ceiling.
12)
Always observe the minimum distance
between the lamp
and
the surface being
lit
as
indicated
on
the Icon.
13)
Free air space
of
at
least 4 inches must be
kept between
top
of
shade
and
bottom
of
canopy.
14)
Immediately replace a cracked
or
broken safety glass
and
use
only
manufacturer approved parts.
15)
Strip the wire
as
indicated
in
the
diagram.
16)
Use heat-resistant cable
for
wiring
the
luminaire
into
the mains.
17)
MAX ....
W:
only
use lamps suitable
for
this luminaire and keep
within
the
maximum specified wattage.
18)
This product is
not
suitable
for
children
under
14
years.
19)
The Luminalre has a
ground conductor identified
with
green insulation
or
bare copper wire.
20)
The luminaire is
only
suitable
for
a
lamp
with
built-in
safety
or
a
low
pressure lamp. An extra safety glass is
not
necessary.
21)
The luminaire is
equipped
with
a fuse. If the luminaire
is
out
of
order after the
bulb
has been replaced,
the
internal fuse has
to
be
replaced.
If contact
with
the internal wiring can
be
made during this operation, this
should
be
done
by
a competent
electrician. 22) The luminaire can be used
with
a dimming circuit. Consult a qualified electrician
for
choosing the
right
type
(especially
important
for
low
voltage luminaires). 23) The Luminaire cannot
be
used
with
a dimming
circuit. 24) The luminaire is dimmable
with
the supplied
dimmer
ONLY. Do
not
connect
to
an
additional
dimmer.
25) The dimmability features
depend
on
the chosen lamp.
More
information
on
the
dimmability features is
available in
the
information pack provided
with
the bulb. 26) Luminaire
with
time
and
light setting options.
Minimum
and
maximum
will
be
shown in the icon
in
part
A.
27) The luminaire can
be
placed
at
a maximum
of
20ft
height. 28) To reach an
optimal
working,
you
have
to
place
the
luminaire
on
the height mentioned in
the
icon. The
maximum and minimum reach
of
the detector is also
mentioned
in
the
icon in
part
A.
29)
The
standard active range
of
vision
of
the detector covers the given degrees mentioned in
the
icon.
30)
Ensure that
you
don't
drill through
electrical wires
or
any
other
obstruction in the wall
or
ceiling during installation!
31)
This luminaire contains in some
places very
hot
parts. 32) Product
to
be
installed
by
two
people. 33) To avoid corrosion, clean
the
luminaire a
minimum
of
2 times
per
year
with
a
soft
cloth and a neutral detergent. (4 times in coastal
or
industrial areas). 34)
The
product
is
for
indoor
use
only
. Do
not
use in
wet
locations, areas directly exposed
to
water
or
outdoors
.
35) The
product
is ZigBee certified Zigbee is an open standard for
indoor
wireless communication.
All
Philips
ZigBee Certified products can be connected
with
other Philips ZigBee Certified products. 36) Bluetooth
t>
enabled
product. The Bluetooth•
word
mark and logos are registered trademarks
owned
by
Bluetooth
SIG,
Inc. and any use
of
such marks
by
Signify is under license. Other trademarks
and
trade names are those
of
their respective owners.
Hue Personal Wireless Lighting is a trademark
owned
by
Signify Holding B.V. Please go
to
www.philips-hue
.com
to
learn more
about
Hue and
how
to
use it.
This device complies
with
Part
15
of
the
FCC
Rules and
with
RSS
of
Industry Canada Operation is subject
to
the
following
two
conditions: (1) this device may
not
cause harmful interference.
and
(2) this device must accept any
interference received, including interference
that
may
cause undesired
operation
. This
equipment
has been tested
and found
to
comply
with
the limits
for
a Class B digital device. pursuant
to
part
15
of
the
FCC
Rules. These limits
are designed
to
provide reasonable protection against harmful interference in a residential installation. This device
generates. uses,
and
can radiate radio frequency energy and,
if
not
installed and used in accordance
with
the
instructions. may cause harmful interference
to
radio communications.
This Class B digital apparatus complies
with
CAN
ICES-005. This digital apparatus does
not
exceed the class B limits
for
radio-noise emissions from digital apparatus
as
set
out
in
the
Radio Interference Regulations
of
the Canadian

Department
of
Communications.
NOTICE:
Changes
or
modifications
made
to
this device
not
expressly approved
by
Signify
North
America
Corporation (USA)
and
Signify Canada Ltd/Signify Canada uee. (Canada) (collectively "Signify") may
void
the
U.S.
FCC
and Canadian authorization
to
operate this device. The advanced interface
module
complies
with
FCC
radiation
exposure
limits
set forth
for
an uncontrolled environment. This device should
be
installed
and
operated
with
a
minimum distance
of
20
centimeters
between
the
radiator and
your
body.
The manufacturer
is
not
responsible
for
any radio
or
TV interference caused
by
unauthorized modifications Ito this equipment. Such modifications could
void
the
user's
authority
to
operate
the
equipment. However, there is
no
guarantee
that
interference
will
not
occur
in
a
particular installation.
If
this device
does
cause
harmful
interference
to
radio
or
television reception, which can
be
determined
by
turning
the
device
off
and
on,
the
user is encouraged
to
try
to
correct
the
interference
by
one
or
more
of
the
following
measures: Reorient
or
relocate
the
receiving antenna. • Increase
the
separation between
the
device
and receiver. • Connect
the
device
into
an
outlet
on
a circuit different
from
that
to
which
the
receiver is connected. •
Consult
the
dealer
or
an experienced radio/television technician
for
help.
Wireless
Specification: Wireless
RF
mode
frequency band:
2400-2483.5
MHz•
Wireless comm1Unications protocol:
IEEE
802.15.4 • Operating channels Zigbee: channels
11
-
26
• Opera.ting channels Bluetooth: channels
0-39
LIMITED
WARRANTY:
Signify warrants
that
this device's hardware
components
will
be
free
from
defects
in
material
and workmanship for a period
of
two
(2) years
from
the
date
of
purchase, unless a different
period
is
stated
in
or
on
the
packaging
of
the
product. based
on
up
to
3 hours average working
time
per
day/7
days
per
week, when used as
directed
(the
•·warranty Period"). Notwithstanding
the
foregoing,
the
Warranty Period
for
all
Energy Star-certified
products is
three
(3) years from
the
date
of
purchase. This
limited
warranty
only
applies
to
the
hardware
components
contained
in
the
original packaging. This
limited
warranty
does
not
apply
to
any software. even
if
packaged
or
sold
with
the hardware components. Signify does
not
warrant
that
use
of
this device
will
be
uninterrupted
or
error-free. If this device does
not
conform
to
this
limited
warranty, Signify
will
send you,
at
its
election, a replacement device
or
refund
your
original price
upon
receipt
of
the
returned device. register receipt
and
proof
of
purchase. Please call
our
toll-free
number,
1-800-555-0050,
or
write
to
us (address indicated on
the
packaging)
to
find
out
how
to
return
the
device. This
limited
warranty
does
not
cover devices
subject
to
accident.
neglect. abuse, misuse
or
acts
of
God. REPLACEMENT
OR
REFUND
IS
YOUR
SOLE
REMEDY.
EXCEPT
TO
THE
EXTENT PROHIBITED
BY
APPLICABLE
LAW.
ANY
IMPLIED WARRANTIES
ARE
LIMITED
IN
DURATION
TO
THE
DURATION
OF
THIS
LIMITED
WARRANTY.
LIABILITY FOR INCIDENTAL
OR
CONSEQUENTIAL DAMAGES
IS
HEREBY
E:XPRE:SSE:LY
E:XCLUDE:D.
Some states
and
provinces
do
not
allow
exclusion
of
incidental
or
consequential
damages,
so
the
above limitation
or
exclusion may
not
apply
to
you. This
limited
warranty gives you specific legal
rights,
and
you
may also have
other
rights which vary
from
state
to
state and province
to
province. This
limited
warranty is subject to, and may
be
superseded by,
our
End
of
Support
policy
to
the
extent Signify decides
to
terminate
support
for this device
in
accordance
with
its End
of
Support
policy, available here:
www.philips-hue.com/endofsupportpolicy
_
Philips
and
the
Philips Shield Emblem are registered trademarks
of
Koninklijke Philips
N.V.
Alterations
in
design and
technical specifications reserved.
FR
-CONSIGNES
DES
SECURITE -
PARTIE
B
Le fabricant
decrit
l'usage
approprie
des
luminaires (appareils d'eclairage)! Par consequent. suivez toujours ces
directives
pour
assurer
une
installation
adequate
et
securitaire, ainsi
que
le
bon
fonctionnement
du
luminaire,
et
conservez-les
pour
reference ulterieure. Coupez l'alimentation electrique au boitier
de
fusibles
ou
de
disjoncteurs
principaux
avant
de
commencer l'installation. l'entretien
ou
la
reparation.
En
cas
de
toute, consultez
un
electricien
qualifie
ou
communiquez avec votre detaillant. Assurez-vous
de
toujours
installer le luminaire
conformement
au
code
electrtque en vigueur dans votre localite. Certaines reglementations exigent
que
les luminaires soient installes
par
un
electricien qualifle. Observez
la
bonne
couleur des fits avant l'installation: blanc (neutre),
noir
(alimente)
et
vert
ou
fil
de
cuivre nu (masse).
Ne
raccordez pas ce luminaire a
un
systeme electrique sans
mise
a
la
terre.
AVERTISSEMENT: !'installation
de
cet appareil d'eclalrage dans
un
systeme electrique
non
mis a
la
terre
peut
permettre aux pieces
de
metal
du
luminaire de
porter
un
courant electrique
si
l'un
des
fils
ou
l'une
des connexions
se casse
ou
devient
lache. Dans
une
telle
situation,
quiconque
entrerait en contact avec
le
luminaire subirait un
choc
electrique
pouvant
causer des blessures
et
meme ta mort. Utilisez
toujours
des
serre-fils/connecteurs convenant au
calibre
et
au
nombre
de
fils utilises.
MISE
EN GARDE: Assurez-vous qu'aucun brin
de
fil nu
n'est
expose a l'exterieur
des serre-fills/connexions (le cas echeant). Prenez soin
de
ne
pas endommager
ou
couper
la
gaine isolante
(recouvrement) des fits
pendant
l'installation. Ne laissez pas
Les
fils entrer en contact avec
des
rebords coupants.
N'enlevez
pas
Les
tampons d'isolation thermique. ll s'en suivrait
une
augmentation
de
la temperature
et
un
risque
d'incendie.
Nettoyez
l'interieur
de
l'appareil d'eclairage avec un chiffon a depoussierer, n'utilisez pas d'abrasifs
ou
de
solvants. Evitez d'utiliser des
liquides
sur toutes les pieces electriques. Tenez toujours
compte
de
toutes
Les
specifications techniques
du
luminaire. Veriliez les pictogrammes ligurant sur ['etiquette d'identincation
du
luminaire
ainsi
que
les pictogrammes presentes a
la
partie A
de
vos consignes
de
securite. ATTENTION: Vous trouverez
ci-dessous
toutes
Les
explications, precedees
d'un
numero
de
reference. relatives aux pictogrammes
et
aux
consignes dle securite
de
la partie
B.
Les pictogrammes applicables a votre appareil d'eclairage
sont
presentes dans
les consignes
de
securite
de
la
partie
A.
1)
Ce
produit
dolt
etre installe a l'interieur seulement. 2)
Ce
produit
convient a
un
usage exterieur. 3) Convient
uniquement
aux endroits
secs.
4) Convient aux endroits humides. 5) Convient aux endroits detrempes.

-
PHILIPS
I I
personal
wireless
lighting

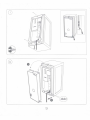
A Install Hue fixtures/
Wbulbs:
,~~~
Find
the
serial number
of
the product as indicated
~
in
the
A manual Wnte
down
the
senal number.
-
• •
+
Install your Hue fixture. then switch
it
on
Please check the A manual
Start the Hue
app and
follow
the instructions.
Go
to
the
app
setbngs
menu
.
Select Light set up
for adding your fixtures
Tap
on
the ( +) ,con
and
follow
on screen instructions
You
have
suc
c
eeded
in pairing your
Hue
fixtures
to
the
Hue
bridge
*.
S/N
____
____
__
___
_
For more information
vis1t:
www.meethue.com
• Hue bndge
not
included
in
the
box


La page est en cours de chargement...
La page est en cours de chargement...
La page est en cours de chargement...
-
 1
1
-
 2
2
-
 3
3
-
 4
4
-
 5
5
-
 6
6
-
 7
7
-
 8
8
-
 9
9
-
 10
10
-
 11
11
-
 12
12
-
 13
13
-
 14
14
-
 15
15
-
 16
16
-
 17
17
-
 18
18
-
 19
19
-
 20
20
-
 21
21
-
 22
22
-
 23
23


dans d''autres langues
- English: Philips 94545930V7 User manual
Documents connexes
-
Philips Lucca Manuel utilisateur
-
Philips 569129 Manuel utilisateur
-
Philips 9451746330 Manuel utilisateur
-
-
-
Philips 9454100448 Mode d'emploi
-
Philips 945577148 Manuel utilisateur
-
Philips 9454100248 Manuel utilisateur
-
Philips 945578526 Manuel utilisateur
-
Philips 1748830VN Manuel utilisateur