Bodet Style 5S Hospital NTP Mode d'emploi
- Catégorie
- Horloges murales
- Taper
- Mode d'emploi
Ce manuel convient également à

1
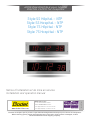
Style 5S Hôpital – NTP
Style 5S Hospital – NTP
Style 7S Hôpital - NTP
Style 7S Hospital - NTP
HORLOGE DIGITALE pour hôpital
DIGITAL CLOCK for hospitals
Notice d’installation et de mise en service
Installation and operation manual
S’assurer à réception que le produit n’a pas été endommagé durant le transport pour réserve au transporteur.
When receiving goods, please check that the item is not broken. If the product is damaged, a claim
should be addressed to the shipping company.
BODET Time & Sport
1, rue du Général de Gaulle
49340 TREMENTINES I France
Tél. support France: 02.41.71.72.99
Tel. support (intl): +33 241 71 72 33
Réf : 607796 C
www.bodet-time.com

2
EN
Table of contents
I – Initial checks 4
1.1 Unpacking the clock 4
1.2 Cleaning 4
1.3 Pre-requisites 4
II – Installation 5
2.1 Clock installation 5
2.2 Installing the keypad 8
III – Default configuration 8
IV – Basic configuration 9
4.1 Setting time/date/year 9
4.2 Manual configuration menu 9
V – Web interface 10
5.1 Home page 10
5.2 Network configuration 11
5.3 Time configuration and synchronisation 12
5.4 Parameters 14
5.5 Alarm configuration 15
5.6 System and protection 17
VI – Memory backup 18
VII – Technical specification 18
VIII – Maintenance menu 19
IX – What to do if… 20

3
FR
Table des matières
I – Vérification initiale 21
1.1 Déballage de l’horloge 19
1.2 Nettoyage 19
1.3 Pré-requis 19
II – Installation mécanique 20
2.1 Montage de l’horloge 20
2.2 Montage du pupitre 20
III – Configuration par défaut 21
IV – Configuration basique 22
4.1 Réglage Heure/Date/Année 22
4.2 Menu configuration manuelle 22
V – Configuration avancée 23
5.1 Accueil 23
5.2 Configuration réseau 24
5.3 Configuration de l’heure et synchronisation 25
5.4 Paramétrage 27
5.5 Configuration des alarmes 28
5.6 Système et protection 30
VI – Sauvegarde mémoire 31
VII – Caractéristiques techniques 31
VIII – Menu technicien 32
IX – Que faire si...? ...Vérifier. 33

4
I – Initial checks
Thank you for choosing a BODET clock.
This product has been carefully designed, adhering to ISO 9001 quality processes, to ensure your
satisfaction. We recommend that you read this manual and the general safety measures and
operating instructions carefully before handling the clock.
Retain this manual for reference for the lifespan of your clock.
The information supplied is non-binding; Bodet reserves the right to make changes to equipment,
including functional, technical and aesthetic changes or changes to colours, without notice.
Failure to observe these instructions may cause irreversible damage to the clock and
invalidate the warranty.
These instructions relate to NTP models. For other models, please refer to the corresponding
instructions.
1.1 Unpacking the clock
Carefully unpack the clock and check the contents of the package. This should include:
• Style 5S or 7S Hospital clock
• Anti-static cleaning kit
• Manual
• IMPORTANT: product identication label
An identification label is affixed to the back of the clock. Use the URL link shown to download
these instructions.
1.2 Cleaning
Use an anti-static product identical to that in the cleaning kit provided.
Never use alcohol, acetone or other solvents, which may damage your clock’s casing or glass.
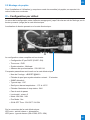
1.3 Pre-requisites
To programme the clock you must install BODET Detect software (Cf. page 7). This software
is available to download for free on the BODET website www.bodet-time.com.
Note: the BODET clock must be connected to a PoE network socket via a PoE switch or a PoE
injector. (802.3af, class 3: multicast, class 0: unicast).
Bodet recommends the following devices:
• PoE injectors: Zyxel, Tp link, D-Link, HP, Cisco, Axis, ITE Power Supply, PhiHong,
Abus, Globtek
• PoE switches: D-Link, HP, Planet, Zyxel, Cisco, NetGear, PhiHong
Select a location to install the clock, preferably away from sources of electrical interference, such
as transformers.
EN

5
EN
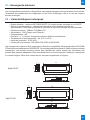
II – Installation
2.1 Clock installation
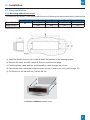
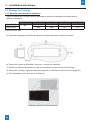
2.1.1 Mounting without back cover
According to the model of the clock make the cut-out following the dimensions listed in table below
Dimensions in mm
a) Insert the clock in the cut-out in order to mark the position of the mountig screws.
b) Remove the clock and drill 4 holes Ø 6mm to insert the wall plugs.
c) Feed the power cable and the synchronisation cable throught the cut-out
d) Connect the clock, adjust the brightness (refer to page 7) and set the time (refer to page 10).
e) Fix the clock to the wall with the 4 screws Ø4 mm
A B C D E
Style 5S OP
46
400 365 68 107
Style 7S OP 440 404 85 123
Installation without the back cover

6
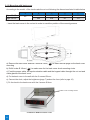
2.1.2 Mounting with back cover
According to the model of the clock make the cut-out following the dimensions listed in table below
Dimensions in mm
- Insert the back cover in the cut-out tn order to mark the position of the mountig screws.
a) Remove the back cover and drill 2 holes Ø 6 mm ( ) to insert the wall plugs.for the back cover
mounting
b) Drill 4 holes Ø 10mm ( ) to make room for the back cover clock mounting rivets.
c) Feed the power cable, the synchronisation cable and the keypad cable throught the cut-out and
cable glands of the back cover
d) Fix the back cover to the wall with the 2 screws Ø 4mm
e) Connect the clock, adjust the brightness (page 7) and set the time (refer to page 10)
f) Fix the clock to the back cover with the 4 screws Ø 4mm
A B C D E
Style 5S OP
46
400 365 68 107
Style 7S OP 440 404 85 123
Installation with the back cover
Back cover mounting screws
X
Y
X
Y
Y

7
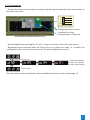
2.1.3 Connections
- Connect the electronic board (see next page) and the keypad (optional) to the terminal strip on
the back of the clock.
- Set the brightness by pressing the "S" and "+" keys on the back of the clock (see above).
- Brightness may be adjusted when the Style clock is in normal use mode, i.e. in neither the
configuration menu, nor in the set time menu. The default brightness is level 3.
The luminosity can also be adjusted via the embedded web server of the clocks (page 14)
Example of a Style 5S Hospital
Impulse synchronisation electronic board
Connector for wiring
synchronisation via impulse
Configuration keys: S and +
Connecting the keypad
T-
T+
0V
15V
Brown
White
Green
Yellow
+
Hold down for 3 seconds
+
+
+
S
End of menu
Select light intensity:
LUM 1: low intensity
LUM 4: high intensity

8
EN
2.2 Installing the keypad
To install and use the keypad (including in timer mode), refer to the instructions supplied with the
keypad.
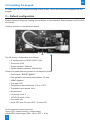
III – Default configuration
Restore factory settings by keeping the red button on the electronic board pressed until the clock
turns black.
Location of button on the electronic board:
The full factory configuration is as follows:
• IP conguration by DHCP (DHCP: ON)
• Time zone: EUR
• Synchronisation: Multicast
• Synchronisation address: 239.192.54.1
These four parameters are printed on the electronic board.
• Clock name: "BODET-@MAC"
• Pool period for unicast synchronisation: 15 mins.
• SNMP disabled
• Trap type: V2C
• Temperature alarm threshold: -5°C to +55°C
• Trap status issue period: 24 hr
• No password
• Luminosity: level 3
• 12 hr/24 hr mode: 24 hr
• Eco mode: Nor
• ON & OFF time: 23 hours OFF / 6 hours ON
On the electronic board connector:
Green LED: network activity + power supply
Yellow LED: network type (ON = 100 m, OFF = 10 m)

9
EN
IV – Basic configuration
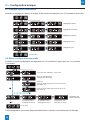
4.1 Setting time/date/year
To set time, date and year, press and hold "S" for 3 seconds.
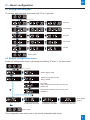
4.2 Manual configuration menu
Accss the configuration menu by pressing and holding "S" then "+" for 3 seconds.
This configuration can also be set in the clock’s embedded web server.
+
+
+
+
+ +
+
+
+
+
Set hour
Set minutes
Set year
Set month
Set day
End of menu
S
S
Hold down for 3 seconds
S
S
S
S
+
+
+
+ + +
S
S
S
S
S
S
S
Select display mode
Hold down for 3 seconds
End of menu
Displays day/month
in alternation with time
Displays time only Displays month/day
in alternation with time
Displays week number
in alternation with time
+
View display
options
Select energy-saving mode
nor by default
Eco mode:
Select looped switch-off time from 0 to 23
(default 23)
Select looped switch-on time from 0 to 23
(default 6)

10
EN
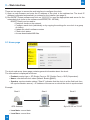
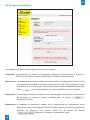
V – Web interface
There are two ways to access the web interface to configure the clock:
1) Open an web browser and enter the IP address of the clock in the address bar. The clock IP
address is allocated automatically or entered by the installer (see page 9).
2) Run BODET Detect software and click on to open the appropriate web server for the
networked clock (refer to the software instructions, ref.: 607548).
BODET Detect can be used to:
• Detect all clocks on the network
• Congure each clock (individually or by copying the settings for one clock to a group
of clocks)
• Update the clock's software version
• Check clock status
• Access downloaded MIB files
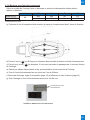
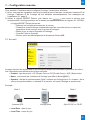
5.1 Home page
The clock web server home page contains general information about the clock.
The information is displayed as follows:
• Product: product type + SF (Single Face) or DF (Double Face) + SUP (Supervised).
• Name: user-defined clock name (default: Bodet-@MAC).
• Synchro: synchronisation status ("Strat 2" indicates that the clock is at the 2nd level from
the synchronisation source) + IP address of the server on which the clock is synchronised.
Example:
Strat 0 Strat 1 Strat 2
GPS Antenna Master clock Style 5S OP ou 7S OP
• Local date: current date.
• Local time: current time.

11
EN
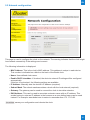
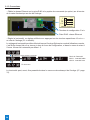
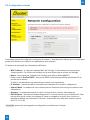
5.2 Network configuration
This page is used to configure the clock on the network. The warning indicates that the clock might
lose network connectivity if the settings are incorrect.
The following information is displayed:
• MAC Address: This is the clock’s MAC address. This address is unique to each device.
This number is indicated on a label on the back of the Bodet clock.
• Name: User-defined clock name.
• Enable DHCP checkbox: If checked, the device’s network IP settings will be configured
automatically.
If this box is unchecked, the following settings are available:
• IP Address: Manually sets the device’s IP address (required).
• Subnet Mask: The subnet mask associates a clock with the local network (required).
• Gateway: The gateway can be used to connect the clock to two data networks.
• DNS Address: This can be used to associate a domain name with an IP address. This
avoids having to enter an IP address in the browser as a user-defined name can be used
instead. For example: www.bodet.com is easier to remember than 172.17.10.88.
saves your configuration and reboots the clock.

12
EN
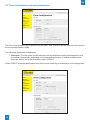
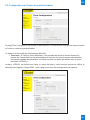
5.3 Time configuration and synchronisation
The Time Configuration page is divided into two parts. One is used to set the time zone, the other to
set the synchronisation mode.
The following information is displayed:
• Time zone: The time zone can be selected from the dropdown menu (summer/winter time
is handled automatically depending on the selected time zone). A default undened time
zone can also be set in the dropdown menu (“PROG”).
Select “PROG” in the dropdown menu to set time, month, fixed day or schedule for time changeovers:

13
EN
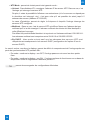
• NTP Mode: Used to select one of 3 mode types:
o Unicast: In Address IP 1, enter the IP address of the NTP server. In this case, it is the
clock that calls the NTP server.
It is also possible to set up redundancy (if the first server fails to respond, the second
is requested and so on). For this purpose up to 5 server addresses may be entered
(IP address 1/2/3/4/5).
The Periodicity field sets the frequency with which the clock requests the configured NTP
servers.
o Multicast: In this case, the NTP server broadcasts the time on the Multicast address given
to it. The Multicast address of the clients (receivers) must be the same as that on which the
server broadcasts.
By default, Bodet products transmit or receive using the Multicast address: 239.192.54.1
The Multicast addresses are included between 224.0.0.0 and 239.255.255.255.
o By DHCP: As for Unicast mode, except the NTP server addresses are automatically
retrieved via the DHCP server (option 42 enabled on the DHCP server).
The checkbox "Continue to display" is used to define how the clock should respond if NTP
synchronisation has been lost for 48 hours:
• If "Continue to display" is OFF, the clock blacks out and the colon is xed.
• If "Continue to display“ is ON, the clock continues to operate using its internal time base
and the colon ":" ceases to ash.
is used to save any settings made on this page.

14
EN
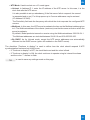
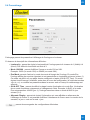
5.4 Parameters
This page is used to configure the clock display on the network.
The following information is displayed:
• Luminosity: Used to set clock brightness between 4 levels from 1 (low) to 4 (high).
Default brightness is 3.
• Mode 12H/24H: Used to display the time in 12- hour or 24-hour mode.
Example: 8:00 (in 12-hour mode) or 20:00 (in 24-hour mode).
• Eco Mode: Used to enable the clock's energy-saving mode. In Eco mode, the clock
displays the ashing colon and is set to minimum brightness (level 1). This mode is set for
a period congured below (ON & OFF Time). This mode is disabled if the user opens the
conguration menu (using the "S" and "+" keys) or changes the settings on the web server
or if the clock is rebooted.
• ON & OFF Time: Used to dene the period when Eco mode is enabled. This mode is only
enabled when the status changes. Example: if Eco mode is set at 8:30 for 8:00 (day D),
the clock switches to this mode at 8:00 on the following day (D+1).
• Alternate Display: Used to select which information is displayed in alternation with the time
display. Time display can alternate with week number, date + month or the month + date.
is used to save any settings made on this page.

15
EN
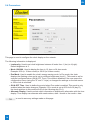
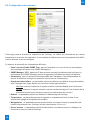
5.5 Alarm configuration
This page is used to enable clock supervision, to define the information to be transmitted and the
destination server. One or more settings can be defined and configured as alarms.
The following information is displayed:
• Enable SNMP Trap: If enabled, error messages are sent to the SNMP Manager(s)
automatically.
• SNMP Manager 1/2/3: IP addresses of servers receiving alerts from the clocks.
SNMP Manager redundancy increases the reliability of alerts.
• Community: A set of clocks dened by the user. All the clocks on the network must have
the same Community name.
• Synchronisation failure: This setting is used to detect synchronisation discrepancies with
the master clock (type Sigma) or the time server (type Netsilon).
Multicast: Alarm triggered when the multicast synchronisation is absent for at least
1hour
Unicast: Alarm triggered when the unicast synchronisation is absent for 3 times the
duration of the poll (periodicity) and at least 1 hour (allowing for the NTP server
maintenance)
• Reboot: This setting is used to detect a clock reboot.
• Temperature: This setting is used to warn that the temperature range has been exceeded
(variable temperature range).
• Manipulation: This setting is used to trigger an alert if a setting is changed manually on the
clock (using the "S" and "+" keys).

16
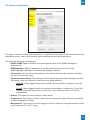
EN
Information: The errors or faults reported are minor and a visit by a maintenance
technician to correct the fault is not strictly necessary.
Warning: The errors or faults reported are significant and a visit by a maintenance technician
to correct the fault is necessary.
Critical: The errors or faults reported are serious and an urgent visit by a maintenance
technician to correct the fault is necessary.
is used to save any settings made on this page.
is used to send a trap status to all of the configured SNMP managers to ensure that
supervision is configured correctly.
• Server access: This setting is used to trigger an alert if a user connects to the web server
of the clock.
• Authentication failure: This setting is used to trigger an alert if a user sends an incorrect
ID to the web server of the clock.
• Periodic Status: This setting is used to verify that the device is still working correctly
(in case alerts are "lost"). This verication is carried out at a set frequency.

17
EN
5.6 System and protection
This page is divided into four parts as follows:
Part 1: Information panel displaying software version, time elapsed since the clock was powered on
and the date of manufacture of the product (year/week).
Part 2: A warning message to inform the user that once set, the correct password must be used to
establish the connection with the web server. To save a user name and password, enter the
information in the fields provided for this purpose. Click to store your new ID and
password.
Part 3: A warning message to inform the user that a clock reboot will cause network connectivity to
be lost when the reboot occurs. The button reboots the clock.
Part 4: A warning message to inform the user that a reboot restoring factory settings will delete all user-
defined settings and may cause the clock to lose network connectivity if there is no DHCP
server on the network. The button reboots the clock, restoring factory
settings.

18
VI – Memory backup
Style clocks have a permanent backup feature which stores all of the configuration parameters and
display settings, even in the event of prolonged power failure.
VII – Technical specifications
• Synchronisation: RFC 2030-compliant (SNTP V4), unicast and multicast mode or via DHCP.
• Synchronisation status: colon ashes if the clock is synchronised; colon steady then
blackout if a clock is not synchronised
• Network connection: 10Base-T/100Base-TX
• Power supply: PoE (Power over Ethernet)
• Power consumption: 4W
• Accuracy: ±0.1s with automatic changeover to summer/winter time
• Operating temperature: -5°C to +55°C
• Protection rating: IP54, IK03
• Standards compliance: EN 60950, EN 55022 and EN 55024
The clocks in the Style range comply with Electromagnetic Compatibility Directive 2004/108/EC and
Low Voltage Directive 2006/95/EC. These are class A products. In the domestic environment, these
products may cause radio interference, in which case the user must take the appropriate measures.
They are designed for a residential, commercial or light industrial environment. They are compliant
with the European standards in force.
EN
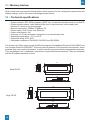
Style 5S OP
Style 7S OP
460
45
440
85
117.5
147
398
400
360
41
420
68
130
101

19
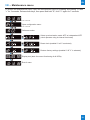
VIII – Maintenance menu
To access the maintenance menu, open the configuration menu by pressing and holding "S" then
“+” for 3 seconds. Release both keys, then press and hold "S", then "+" again for 7 seconds.
EN
+
S
S
S
S
S
S
Hold down for 3 seconds
+
+
S
Hold down for 7 seconds
+
Open configuration menu
Software version
Select synchronisation mode: NTP or independent NTP
(clock operates using its internal time base)
Reset clock (enabled if “rstY” is selected)
Restore factory settings (enabled if “dF Y” is selected)
Display test (tests for correct functioning of all LEDs)
+
+
+
End of menu

20
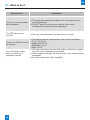
IX – What to do if…
What to do if… Check that…
There is no synchronisation
after installation.
1) The signal type sent by the master clock is the same as the
clock’s signal type.
2) The NTP server is on the same network as the slave
(IP addresses, subnet mask and gateways).
The NTP slave time is
incorrect.
1) The time zone selected on the web server is correct.
There is no DHCP server on
the network.
1) The default network configuration on the clock is as follows:
– IP: 172.17.30.110
– MASK: 255.255.0.0
– GATEWAY: 0.0.0.0
– DNS: 0.0.0.0
One of the Style clocks
does not switch on or
repeatedly reboots.
1) The maximum power from the PoE switch is sufficient to supply
all of the clocks connected to the switch.
2) Cable length is less than 100 metres (refer to the network wiring
standards).
3) All switch outputs are PoE-compatible.
ENEN
La page est en cours de chargement...
La page est en cours de chargement...
La page est en cours de chargement...
La page est en cours de chargement...
La page est en cours de chargement...
La page est en cours de chargement...
La page est en cours de chargement...
La page est en cours de chargement...
La page est en cours de chargement...
La page est en cours de chargement...
La page est en cours de chargement...
La page est en cours de chargement...
La page est en cours de chargement...
La page est en cours de chargement...
La page est en cours de chargement...
La page est en cours de chargement...
La page est en cours de chargement...
-
 1
1
-
 2
2
-
 3
3
-
 4
4
-
 5
5
-
 6
6
-
 7
7
-
 8
8
-
 9
9
-
 10
10
-
 11
11
-
 12
12
-
 13
13
-
 14
14
-
 15
15
-
 16
16
-
 17
17
-
 18
18
-
 19
19
-
 20
20
-
 21
21
-
 22
22
-
 23
23
-
 24
24
-
 25
25
-
 26
26
-
 27
27
-
 28
28
-
 29
29
-
 30
30
-
 31
31
-
 32
32
-
 33
33
-
 34
34
-
 35
35
-
 36
36
-
 37
37


Bodet Style 5S Hospital NTP Mode d'emploi
- Catégorie
- Horloges murales
- Taper
- Mode d'emploi
- Ce manuel convient également à
dans d''autres langues
Documents connexes
-
Bodet Style II Manuel utilisateur
-
Bodet Style 5 Seconde Mode d'emploi
-
-
-
-
-
-
-
-
Bodet 10 Date Mode d'emploi