Middle Atlantic Products RLNK-915R Guide de démarrage rapide
- Taper
- Guide de démarrage rapide

I-00785 Rev C
Select Series PDU with RackLink™
Quick Start Guide
Monitor | Control | Alert | Report | Analyze
Thank you for purchasing a Select Series PDU with RackLink™ product. Please read these
instructions thoroughly before installing this product.
PRODUCT FEATURES
THANK YOU
• Available in horizontal rack (RLNK-915R), half rack (RLNK-415R), compact (RLNK-215), and
vertical (RLNK-1015V and RLNK-1615V) models.
• Remotely reboot connected equipment.
• Integrated sequencing.
• Set email alerts.
• Access the following link for software downloads, firmware updates, and the Select Series PDU
with RackLink User Manual:
www.middleatlantic.com/downloads

Page 2
IMPORTANT SAFETY INSTRUCTIONS
DANGER HAZARDOUS VOLTAGE: The lightning flash with the arrowhead symbol, within an equilateral triangle is intended to alert the user to the
presence of uninsulated dangerous voltage within the product’s enclosure that may be of sufficient magnitude to constitute a risk of electric shock to
persons.
WARNING: A warning alerts you to a situation that could result in serious personal injury or death.
CAUTION: A caution alerts you to a situation that may result in minor personal injury or damage to the product and/or property.
NOTE: A note is used to highlight procedures pertaining to the installation, operation, or maintenance of the product.
• Read these instructions.
• Keep these instructions.
• Heed all warnings.
• Follow all instructions.
• Clean only with dry cloth.
• Only use attachments/accessories specified by the manufacturer.
WARNING: Failure to read, understand and follow the following information can result in serious personal injury, damage to the
equipment or voiding of the warranty. It is the responsibility of the Installer/User to ensure that this product is loaded according to
specifications.
CAUTION: The socket-outlet shall be installed near the equipment and shall be easily accessible.
CAUTION: Use indoor in dry locations only.
CAUTION: La prise de courant doit être installée près de l'équipement et doit être facilement accessible.
CAUTION: Pour être utilisé en intérieur dans un endroit sec seulement.
DANGER TENSION DANGEREUSE: Le symbole de la pointe de flèche, dans un triangle équilatéral, est destiné à alerter l'utilisateur sur la
présence de tension dangereuse non isolée dans l'enceinte du produit qui peut être d'une ampleur suffisante pour constituer un risque d'électrocu-
tion.
AVERTISSEMENT: Un avertissement vous avertit d'une situation pouvant entraîner des blessures graves ou la mort.
ATTENTION: Une attention vous avertit d'une situation pouvant entraîner des blessures mineures ou des dommages au produit et/ou à la
REMARQUE: Une remarque est utilisée pour mettre en évidence les procédures relatives à l'installation, au fonctionnement ou à l'entretien du
produit.
INSTRUCTIONS IMPORTANTES SUR LA SÉCURITÉ
• Lire ces instructions.
• Conservez ces instructions.
• Respectez tous les avertissements.
• Suivez toutes les instructions.
• Nettoyer uniquement avec un chiffon sec.
• N'utilisez que des accessoires spécifiés par le fabricant.
AVERTISSEMENT: Refus de lire, comprendre et suivre la renseignements suivants peut traduire par de graves blessures, des
dommages à l'équipement ou invalider la garantie. Il est la responsabilité de l'installateur/utilisateur de s'assurer que ce produit
est chargé conformément aux spécifications.
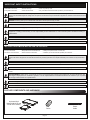
SUPPLIED COMPONENTS AND HARDWARE
HORIZONTAL MODELS (RLNK-915R AND RLNK-415R)
Horizontal Unit
(both RLNK-915R and
RLNK-415R shown)
Power
Cable
Ferrite

COMPACT MODEL (RLNK-215)
Page 3
SUPPLIED COMPONENTS AND HARDWARE
Vertical Unit
(both RLNK-1015V and
RLNK-1615V shown)
VERTICAL MODELS (RLNK-1015V AND RLNK-1615V)
Power
Cable
Ferrite
Mounting
Clip
Mounting
Clip
(4x)
10-32 Oval
Nut
(2x)
10-32 Oval
Nut
(2x)
10-32 x 1/2”
Phil. Screw
(4x)
10-32 x 1/2”
Phil. Screw
(2x)
10-12 Drywall
Anchors
(2x)
#10 x 1” Phil.
Screw
Compact
Unit
Power
Cable
Ferrite
REQUIRED TOOLS
WARNING: Use tools with caution and follow all necessary safety protocols.
AVERTISSEMENT: Utiliser des outils avec prudence et suivre tous les protocoles de sécurité
nécessaires.
• #2 Phillips Screwdriver

1. Install the mounting clips through the infinite or fixed
position holes in a Middle Atlantic Product enclosure
as shown. (FIGURE B)
2. Insert the PDU by gently tapping with the palm
of your hand.
TIP: To remove the PDU from the mounting clips,
wedge a flat head screwdriver between the side of the
PDU and clip, and gently pry the PDU from the clip as
shown. (FIGURE C)
FIGURE C
FIGURE A
FIGURE B
Infinite
Positional
Slot
Ferrite
Rackrail
Mounting
Bracket
PDU
Screwdriver
Tip
Clip
Nut
Fixed
Mounting
Position
Screw
Mounting
Clip
RACKLINK HARDWARE SETUP
Page 4
1. Install the device in the location it will
reside.
2. Plug the device into a properly
grounded AC power source.
3. Connect the device to your network
using a shielded Cat 5 cable, or
better.
4. Attach the ferrite provided (part
number: 600-01660) as close as
possible to the connector going into
your device on your shielded Cat 5
cable. (FIGURE A)
NOTE: The following hardware setup instructions apply to vertical (RLNK-1015V and RLNK-1615V) and
the compact (RLNK-215) models only.
Installing Vertical (RLNK-1015V and RLNK-1615V)
Models in an Enclosure
WARNING: For safety instructions, refer to the “Select Series PDU with RackLink User Manual” at
www.middleatlantic.com/downloads.
AVERTISSEMENT: Pour obtenir des instructions de sécurité, reportez-vous à la "Select Series PDU
with RackLink User Manual" à www.middleatlantic.com/downloads.

INSTALLING THE DEVICE DISCOVERY SOFTWARE
NETWORKING DEFAULTS
Page 5
1. Download and run the Device Discovery setup.exe file for PC or MAC from:
www.middleatlantic.com/downloads
2. Follow the steps until the Device Discovery tool launches.
3. When launched, the Device Discovery tool discovers all RackLink devices on the same
subnet.
For more information about installing the Device Discovery tool, refer to the “Select Series PDU with
RackLink User Manual” at www.middleatlantic.com/downloads, or contact support at 1-800-266-7225.
ACCESSING YOUR RACKLINK VIA THE BROWSER-BASED INTERFACE
1. Locate your device on the list shown in the Device Discovery tool and launch the
browser-based interface by clicking the corresponding Device Control button.
NOTE: The default account names and passwords for the Administrator, User, and Control Sys-
tems accounts, respectively, on your RackLink device are as follows:
For more information about using the browser-based interface, refer to the “Select Series PDU
with RackLink User Manual” at www.middleatlantic.com/downloads, or contact support at
1-800-266-7225.
The default network setup is DHCP and the default static address is 192.168.1.200.
FIGURE D
Mounting
Clip
Mounting
Holes
1. Install mounting clip into the desired location using
the outer two provided mounting holes. (FIGURE D)
2. Insert the RLNK-215 into the mounting clip.
(FIGURE C)
Installing The Compact (RLNK-215) Model in an Enclosure
RACKLINK HARDWARE SETUP
Username: admin
Password: admin
Administrator Account
Username: user
Password: user
User Account
Username: user
Password: password
Control System Account

Page 6
UPDATING RACKLINK DEVICE FIRMWARE
NOTE:
• The current firmware version installed on your RackLink appears on the lower-left of all browser-based
interface screens.
• For more information about firmware updates, refer to the “Select Series PDU with RackLink User
Manual” at www.middleatlantic.com/downloads, or contact support at 1-800-266-7225.
1. Access the latest version of the RackLink device firmware.
2. Sign in to the browser-based interface using the admin/admin account.
3. Click Menu > Firmware.
4. Click Choose File and locate the latest version of the firmware from Step 1.
5. Click Upload.
The screen indicates that it’s uploading the firmware file and eventually shows a completed
status.
6. Click Restart Unit.
The Upload Reminder pop-up appears.
7. Click Restart.
At this point, the unit will restart, install the new firmware, and return to the main page.
ALERT LED STATES
An LED labeled ALERT on your PDU indicates various states. This table explains how to interpret the
LED states.
TROUBLESHOOTING
Forgotten Password
Press the Restore Defaults button on the device. This will default the login and password to admin/ad-
min. NOTE: Pressing this button also defaults the device to using DHCP.
Cannot Access User Interface
Check to see if you can access a general webpage. Verify the green LED on your Ethernet port is lit
solid and the yellow LED is blinking.
Unit Will Not Operate After Firmware Upgrade
Contact support at 1-800-266-7225.
RackLink Not Receiving Power
Check that your power cable is securely fastened and confirm the circuit breaker on the unit is in the ON
position.
Plug another device into the same receptacle and see if the other unit receives power.
Alert LED State What It Means
Blinking Green Acquiring IP address (during startup).
Green Normal operation, IP acquired, and no alarms.
Blinking Green/Red No alarms, running on default IP (DHCP not acquired).
Blinking Red Lost IP connection.
Red Network is active, alarms present.

Page 7
WARRANTY
For warranty information, refer to http://www.middleatlantic.com/company/about-us.aspx#warranty
Corporate Headquarters
Corporate Voice: 973-839-1011 - Fax: 973-839-1976 / International Voice: +1 973-839-8821 -
Fax: +1 973-839-4982
www.middleatlantic.com - [email protected]
Middle Atlantic Canada
Voice: 613-836-2501 - Fax: 613-836-2690 / ca.middleatlantic.com -
Factory Distribution
USA: NJ - CA - IL Canada: ON - BC
At Middle Atlantic Products we are always listening. Your comments are welcome.
Middle Atlantic Products is an ISO 9001 and ISO 14001 Registered Company.

-
 1
1
-
 2
2
-
 3
3
-
 4
4
-
 5
5
-
 6
6
-
 7
7
-
 8
8


Middle Atlantic Products RLNK-915R Guide de démarrage rapide
- Taper
- Guide de démarrage rapide
dans d''autres langues
Documents connexes
-
Middle Atlantic Products RackLink RLNK-215 Manuel utilisateur
-
-
-
-
-
-
-
-
Middle Atlantic Products UPS-1000R-8IP Manuel utilisateur
