Sub-Zero DW2450 Manuel utilisateur
- Catégorie
- Lave-vaisselle
- Taper
- Manuel utilisateur
Ce manuel convient également à

DISHWASHER
USE AND CARE GUIDE
CLEANING, MAINTENANCE, AND MORE

2
|
Cove Customer Care 800.222.7820
Contents
3 Safety Precautions
4 Dishwasher Features
5 Dishwasher Operation
15 Care Recommendations
17 Troubleshooting
19 Cove Warranty
COVE DISHWASHER
Customer Care
The model and serial number are printed on the enclosed
product registration card. Both numbers are also listed on
the product rating plate. Refer to page 4 for rating plate
location. For warranty purposes, you will also need the date
of installation and name of your authorized Cove dealer.
Record this information below for future reference.
SERVICE INFORMATION
Model Number
Serial Number
Date of Installation
Certied Service Name
Certied Service Number
Authorized Dealer
Dealer Number
If your product ever needs attention, be sure to use a
Cove Factory Certied Service provider recommended by
our Customer Care Center, or select one from our list of
providers available at coveappliance.com/locator. All
Factory Certied Service providers are carefully selected
and thoroughly trained by us.
Important Note
To ensure this product is installed and operated as safely
and efciently as possible, take note of the following types
of highlighted information throughout this guide:
IMPORTANT NOTE highlights information that is especially
important.
CAUTION indicates a situation where minor injury or product
damage may occur if instructions are not followed.
WARNING states a hazard that may cause serious injury or
death if precautions are not followed.
IMPORTANT NOTE: Throughout this guide, dimensions in
parentheses are millimeters unless otherwise specied.

coveappliance.com
|
3
SAFETY PRECAUTIONS
• Under certain conditions, hydrogen gas may be
produced in a hot water system that has not been
used for two or more weeks. HYDROGEN GAS
IS EXPLOSIVE. If the hot water system has not
been used for two or more weeks, before using the
dishwasher, turn on all hot water faucets and let
the water ow from each for several minutes. This
releases any accumulated hydrogen gas. As the
gas is ammable, do not smoke or use an open
ame during this time.
• Only wash cycles with the Sani Rinse option
selected have been designed to meet the NSF/
ANSI 184 performance standard for soil removal
and sanitization efcacy. There is no intention,
either directly or indirectly, that all cycles on a certi-
ed machine have passed the sanitization perfor-
mance test.
• Remove the door to the washing compartment
when removing an old dishwasher from service or
discarding it.
• Any opening into the adjacent cabinet must meet
the following: the longest dimension of the opening
shall not be more than 1
1
/2" (38).
WARNING
PROPOSITION 65 FOR CALIFORNIA RESIDENTS
Cancer and Reproductive Harm—
www.P65Warnings.ca.gov
WARNING
DANGEROUS VOLTAGE.
SAVE THESE INSTRUCTIONS
IMPORTANT INSTRUCTIONS
IMPORTANT SAFETY INSTRUCTIONS
WARNING
When using your dishwasher, follow basic precau-
tions, including the following:
• Read all instructions before using the dishwasher.
• Use the dishwasher only for its intended function.
• Certied residential dishwashers are not intended
for licensed food establishments.
• Use only detergents or wetting agents recom-
mended for use in a dishwasher and keep them out
of the reach of children.
• When loading items to be washed, locate sharp
items so they are not likely to damage the door
seal, and load sharp knives with the handles up to
reduce the risk of injuries.
• Do not wash plastic items unless they are
marked “dishwasher safe” or the equivalent. For
unmarked plastic items, check the manufacturer’s
recommendations.
• Do not touch the heating element during or imme-
diately after use.
• Do not tamper with controls.
• Do not operate your dishwasher unless all enclo-
sure panels are properly in place.
• Do not abuse, sit on, or stand on the door or dish
rack of the dishwasher.
• To avoid a tripping hazard, do not leave the dish-
washer door open.
• To reduce the risk of injury, do not allow children to
play in or on a dishwasher.

4
|
Cove Customer Care 800.222.7820
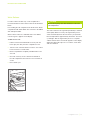
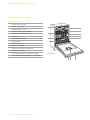
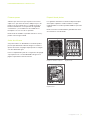
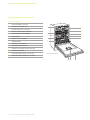
Dishwasher Features
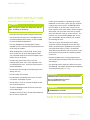
FEATURES
1
Product Rating Plate
2
Hidden Control Panel
3
Control Panel Display
4
Removable Upper Silverware Rack
5
Height-Adjustable Middle Rack
6
Lower Rack
7
Fold-Down Tine Adjustment
8
Fold-Down Shelf
9
Stemware Cradle
10
Middle Spray Arm
11
Detergent/Rinse Aid Dispenser
12
LED Lit Interior
13
Status Light (right side, below door)
14
Lower Rack Utensil Baskets (not shown)
DISHWASHER FEATURES
Cove dishwasher
4
12
1
7
3 11 2
5
6
10
8
9
14

coveappliance.com
|
5
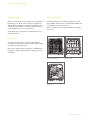
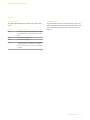
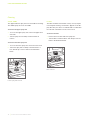
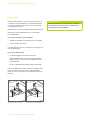
DISHWASHER OPERATION
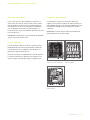
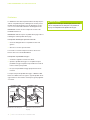
Plate Arrangement
The illustrations below show typical arrangement for the
upper, middle, and lower racks. The adjustable middle rack
was AHAM tested in the top position.
NOTE: The spray arms must rotate freely before starting a
wash cycle.
Upper silverware rack
Middle rack
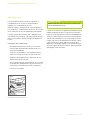
Getting Started
We know you are eager to start using your Cove dishwasher,
but before you do, please take some time to read this use
and care guide. It will be to your benet to familiarize your-
self with the safety practices, features, operation, and care
recommendations of your Cove dishwasher.
NOTE: Every unit is tested prior to shipment and may con-
tain residual water.
Prior to Use
For softener models only, use the test strip provided to
determine the water hardness. Refer to User Setup on page
9 to adjust the hardness setting.
Fill the salt compartment with water prior to adding salt for
the rst time. Refer to Water Softener on page 15 for more
information.
Lower rack

6
|
Cove Customer Care 800.222.7820
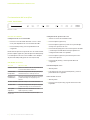
Dishwasher Operation
CONTROL PANEL
WASH CYCLES
Setting a wash cycle:
1 Touch the desired wash cycle or touch Cycles+
multiple times to scroll to the desired wash cycle.
2 Touch Start and close the door within 4 seconds.
NOTE: To incorporate a cycle option to the wash cycle,
touch Options before touching Start. Refer to Cycle Options.
To change the cycle after touching Start, touch Cancel.
CYCLE OPTIONS
OPTION DESCRIPTION
Delay Start Delays the start of the wash cycle by 1–12
hours in 1-hour increments.
High Temp Wash Increases the main wash water temperature
and extends the cycle time by 10 minutes.
Sani Rinse* Increases the rinse water temperature and
extends the rinse time by 15 minutes.
Extended Dry Extends the dry time by 30 minutes.
Extra Dry Increases the rinse water temperature and
extends the dry time by 30 minutes.
Top Racks Only Directs wash functions to upper and middle
racks only.
*Sanitizes per NSF/ANSI standard 184 for residential dishwashers.
Control panel
DISHWASHER OPERATION
Setting cycle options:
1 Select the desired wash cycle.
2 Touch Options.
3 Touch Options multiple times to scroll through cycle
options.
4 Touch Enter to select the desired option and continue
to touch Enter until the desired setting appears on the
display.
5 Touch Options again to select additional options.
6 Touch Start and close the door within 4 seconds.
To interrupt a cycle:
1 Open the door.
2 To restart the cycle, touch Start and close the door
within 4 seconds.
To cancel a cycle:
1 Open the door.
2 Touch Cancel and follow the instructions on the display.

coveappliance.com
|
7
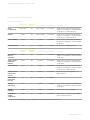
DISHWASHER OPERATION
Dishwasher Operation
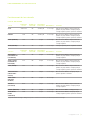
WASH CYCLES
CYCLE CYCLE TIME* DRY TIME WATER USAGE DETERGENT** OPTIONS
AUTO 2:07 to 3:55 :40 4.0 to 8.4 gal 2 tbsp Delay Start, High Temp Wash, Sani Rinse,
Extended Dry, Extra Dry, Top Racks Only
NORMAL 2:40 :40 3.0 to 8.3 gal 2 tbsp Delay Start, High Temp Wash, Sani Rinse,
Extended Dry, Extra Dry, Top Racks Only
HEAVY 3:25 :40 7.3 gal 2 tbsp Delay Start, High Temp Wash, Sani Rinse,
Extended Dry, Extra Dry
QUICK*** :58 :10 3.3 gal
1
/2 tbsp Extra Dry, Top Racks Only
CYCLES+ CYCLE TIME* DRY TIME WATER USAGE DETERGENT** OPTIONS
POTS & PANS 3:55 :40 8.4 gal 2 tbsp Delay Start, High Temp Wash, Sani Rinse,
Extended Dry, Extra Dry
SOAK & SCRUB 5:35 :40 8.5 gal 2 tbsp Delay Start, High Temp Wash, Sani Rinse,
Extended Dry, Extra Dry
LIGHT*** 1:53 :15 3.0 gal 2 tbsp Delay Start, High Temp Wash, Sani Rinse,
Extended Dry, Extra Dry, Top Racks Only
CHINA/CRYSTAL 1:58 :40 3.0 gal
1
/2 tbsp Delay Start, Extended Dry, Top Racks Only
RINSE/HOLD :15 :00 2.2 gal 0 tbsp
PLASTICS 2:32 :45 3.0 gal 1 tbsp Delay Start, High Temp Wash, Sani Rinse,
Extended Dry, Extra Dry
ENERGY 2:08 :40 2.9 gal 2 tbsp Delay Start, Extended Dry
EXTRA QUIET 2:50 :40 4.4 gal 2 tbsp Delay Start, Extended Dry, Extra Dry, Top
Racks Only
*Includes dry time. **Powdered detergent. ***Shortened cycle time impacts drying performance.

8
|
Cove Customer Care 800.222.7820
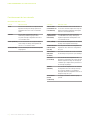
CYCLES+ DESCRIPTION
POTS & PANS For heavily soiled pots, pans, and casserole
dishes. Increases wash time and slightly
increases water temperature and
consumption.
SOAK & SCRUB For the most heavily soiled dishes.
Signicantly increases wash time and
slightly increases water temperature and
consumption.
LIGHT For very lightly soiled dishes. Reduces wash
time and temperature.
CHINA/CRYSTAL For temperature sensitive and lightly soiled
dishes. Decreases cycle temperatures.
RINSE/HOLD For all soil levels. Rinses and holds dishes for
a future wash cycle.
PLASTICS For heavily to lightly soiled dishes. Increases
nal rinse water temperature and increases
drying fan time to increase plastic drying
performance.
ENERGY For regularly soiled dishes. Decreases
water temperature and extends cycle time
to reduce energy consumption. Decreases
water temperature and extends cycle time.
EXTRA QUIET For lightly soiled dishes. Reduces pump
speeds.
Dishwasher Operation
CYCLE DESCRIPTION
CYCLE DESCRIPTION
AUTO For all soil levels. Automatically adjusts to the
optimal wash time, water temperature, and
water consumption.
NORMAL For normally soiled dishes from typical daily
use. Average wash time, water temperature
and water consumption.
HEAVY For heavily soiled dishes. Slightly increases
wash time, water temperature, and water
consumption.
QUICK For lightly soiled dishes. Reduces overall wash
time.
DISHWASHER OPERATION

coveappliance.com
|
9
DISHWASHER OPERATION
Dishwasher Operation
USER SETUP
The user setup feature allows the user to select preferences
as listed in the chart below.
USER OPTIONS
Language Select language.
Water Hardness Adjust water hardness setting.
Connect? Turn connect on or off.*
Tone Level Adjust tone level.
Notication Turn end-of-cycle chime on or off.
Scroll Rate Adjust display scroll rate.
Display Contrast Adjust display contrast.
Display Brightness Adjust display brightness.
Floor Light Adjust status light brightness.
Rinse Aid Dosing Adjust amount of rinse aid dispensed.
Showroom Mode For showroom use only.
Reset All Restore factory settings.
*To connect to the Sub-Zero Group Owners App, connect must be turned on.
Setting user options:
1 Touch Cancel twice.
2 Touch and hold Options for approximately 3 seconds
until “User Set Up” appears on the display.
3 Touch Options multiple times to scroll to the desired
option.
4 Touch Enter to scroll or to select the desired setting.
5 Touch Cancel to exit user setup.
WATER HARDNESS
For water softener models only, use the test strip provided
and the chart below to determine the appropriate water
hardness setting. Refer to the chart below to determine the
water hardness setting.
SETTING HARDNESS
0 (Default) 0–4 gpg
1 5–6 gpg
2 7–8 gpg
3 9–11 gpg
4 12–13 gpg
5 14–15 gpg
6 16–17 gpg
7 18–19 gpg
8 20–22 gpg
9 23–24 gpg
10 25+ gpg

10
|
Cove Customer Care 800.222.7820
DISHWASHER OPERATION
Child Lock
The child lock feature prevents unwanted control panel
operation. The lock feature will remain on even after a power
outage.
To turn the child lock feature on or off:
1 To turn on, touch and hold Heavy for approximately 10
seconds until “Child Lock: On” appears on the display.
“Locked” will appear on the display until the child lock is
turned off.
2 To turn off, touch and hold Heavy for approximately 10
seconds until “Child Lock: Off” appears on the display.
IMPORTANT NOTE: Child lock and Sabbath feature cannot
be turned on at the same time.
Sabbath
This appliance is certied by Star-K to meet strict religious
regulations in conjunction with specic instructions found
on www.star-k.org.
The Sabbath feature will remain on even after a power
outage.
To turn the Sabbath feature on or off:
1 To turn on, touch and hold Quick for approximately
10 seconds until “Sabbath” appears on the display.
“Sabbath” will appear on the display until the Sabbath
feature is turned off.
2 To turn off, touch and hold Quick for approximately
10 seconds until “Sabbath Off” appears on the display.
IMPORTANT NOTE: Child lock and Sabbath feature cannot
be turned on at the same time.

coveappliance.com
|
11
DISHWASHER OPERATION
Lights
STATUS LIGHT
The status light will illuminate to indicate the status of the
cycle.
LIGHT CYCLE STATUS
Blue A delayed start has been selected. Touch Start
each time the door is opened prior to the start
time.
Red The cycle has started.
Green The cycle is complete.
No Light The door was not closed within 4 seconds after
touching Start, the cycle has been complete
for more than two hours, or the door has been
opened.
INTERIOR LIGHT
The interior lights will turn on when the door is open. The
lights remain on for 10 minutes, dim after 10 minutes, and
turn off after 15 minutes. Any door movement turns the
lights on.

12
|
Cove Customer Care 800.222.7820
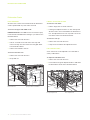
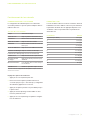
DISHWASHER OPERATION
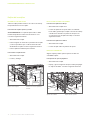
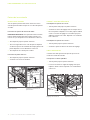
HEIGHT-ADJUSTABLE RACK
To move the rack down:
1 Pull the empty rack out to full extension.
2 Lift the green adjustment levers on each side up and
allow the rack to move downward to the desired loca-
tion. The adjustment levers are only used to move the
rack down. Refer to the illustration below.
To move the rack up:
1 Pull the rack out to full extension.
2 Lift up on the rack above the adjustment levers.
FOLD-DOWN TINES
Some of the tines can be adjusted to accommodate a
variety of dinnerware.
To adjust the fold-down tines:
1 Pull the rack out to full extension.
2 Push and turn the green adjustment tabs to fold down
the desired tines. Refer to the illustration below.
ADJUSTMENT
LEVER
ADJUSTMENT
TA B
ADJUSTMENT
LEVER
ADJUSTMENT
TA B
Height adjustment
Tine adjustment
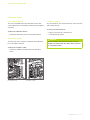
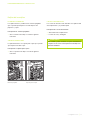
Dishwasher Racks
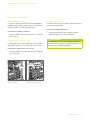
RACK REMOVAL
All of the racks can be removed. If desired, the dishwasher
can be operated with any of the racks removed.
To remove the upper and middle racks:
IMPORTANT NOTE: If the middle rack is removed, the spray
nozzle must be installed before starting a cycle. Refer to the
illustration below.
1 Pull the rack out to full extension.
2 Pull out on the tab on the side of the rack clips and
remove the clips from the end of each rack glide. Refer
to the illustration below.
3 Pull the rack forward to remove.
To remove the lower rack:
1 Pull the rack out to full extension.
2 Lift up and out.
TA B
SPRAY
NOZZLE
Rack removal
Spray nozzle installation

coveappliance.com
|
13
UTENSIL BASKETS
The utensil baskets are located at the front of the lower rack
and can be removed.
To remove the utensil baskets:
1 Pull the lower rack out to full extension.
2 Lift the basket up and out.
WARNING
Knives and other utensils with sharp points must be
loaded in the baskets with their points down or placed
in a horizontal position.
DISHWASHER OPERATION
Dishwasher Racks
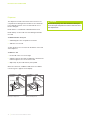
FOLD-DOWN SHELVES
The lower and middle racks have fold-down shelves that
can be adjusted to accommodate smaller items and support
stemware.
To adjust the fold-down shelves:
1 Rotate the shelf down. Refer to the illustration below.
STEMWARE CRADLE
The lower rack has a stemware cradle that can be adjusted
to accommodate stemware.
To adjust the stemware cradle:
1 Rotate the cradle downward. Refer to the illustration
below.
FOLD-DOWN
SHELF
WINE GLASS
HOLDER
STEMWARE
CRADLE
Fold-down shelf
Stemware cradle

14
|
Cove Customer Care 800.222.7820
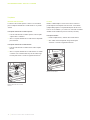
Dispenser
The dispenser located on the interior of the door has one
compartment for detergent and another for rinse aid. Refer
to the illustrations below. Cove recommends the use of
Finish
®
detergent.
NOTE: Finish
®
is a trademark of Reckitt Benckiser N.V.
NOTE: Always use rinse aid even if the detergent includes
rinse aid.
To add dishwasher detergent:
1 Add detergent to the compartment on the left.
2 Slide the cover closed.
To open the door once closed, touch the button on the side
of the dispenser.
To add rinse aid:
1 Lift the tab of the cover on the right.
2 Add rinse aid. The rinse aid compartment is full when the
indicator appears the color of the rinse aid.
3 Wipe away any rinse aid that may have spilled.
When rinse aid is low, “Add Rinse Aid. Enter once added,
Cancel to ignore.” appears on the display.
DETERGENT
BUTTON
INDICATOR
RINSE AID
Detergent dispenser
Rinse aid dispenser
DISHWASHER OPERATION
CAUTION
Do not add anything other than dishwasher detergent
to the detergent compartment and rinse aid to the rinse
aid compartment.

coveappliance.com
|
15
Water Softener
For water softener models only, a salt compartment is
located at the bottom of the interior. Refer to the illustration
below.
Prior to lling the salt compartment for the rst time, ll the
compartment with water. Water does not have to be added
with subsequent rells.
When softener salt is low, “Add Salt. Enter once added,
Cancel to ignore.” appears on the display.
To add softener salt:
1 Pull the lower rack forward and if necessary, turn the
lower spray arm away from the compartment cover.
2 Turn the cover counterclockwise to remove. It is normal
for the reservoir to contain water.
3 Fill the compartment completely with dishwasher soft-
ener salt.
4 Once full, clean any excess salt from the threads of
the salt compartment, then turn the cover clockwise to
secure.
5 Run a Quick cycle.
SOFTENER SALT
COMPARTMENT
Softener salt compartment
DISHWASHER OPERATION
CAUTION
Do not add anything other than dishwasher salt to the
salt compartment.
The water softener must regenerate periodically to maintain
water quality. When necessary, the regeneration process
starts automatically before the next wash cycle (excludes
Rinse/Hold) and lasts approximately 20 minutes. The wash
cycle begins after the regeneration process is complete.
“Water softener active. Press Start” appears on the display
during the regeneration process. To continue, touch Start
and close the door.

16
|
Cove Customer Care 800.222.7820
CARE RECOMMENDATIONS
FILTER
The lter should be cleaned often. Heavy use may require
more frequent cleaning. “Clean Filter.” appears on the dis-
play after 30 cycles. This is a reminder and is not based on
the soil level of the lter. To reset, touch Cancel.
To remove the lter:
1 Remove the lower rack and lower spray arm.
2 Turn the lter counterclockwise, then lift up to remove.
Refer to the illustration below.
Cleaning
SPRAY ARMS
The upper and lower spray arms are removable for cleaning.
The middle spray arm is not removable.
To remove the upper spray arm:
1 To access the upper spray arm, remove the upper silver-
ware rack.
2 Turn the spray arm assembly counterclockwise to
remove.
To remove the lower spray arm:
1 To access the lower spray arm, remove the lower rack.
2 Turn lower spray arm assembly counterclockwise
1
/8
turn, then lift up to remove. Refer to the illustration
below.
Filter removal
Lower spray arm removal

coveappliance.com
|
17
CARE RECOMMENDATIONS
Care Recommendations
CLEANING
Stainless steel Use a nonabrasive stainless steel cleaner and apply with a soft lint-free cloth. To bring out the natural
luster, lightly wipe surface with a water-dampened microber cloth followed by a dry polishing chamois.
Always follow the grain of stainless steel.
Control panel Wipe with a damp cloth.
Dishwasher racks Refer to page 12 for removal. Wipe with a damp cloth.
Interior Wipe interior, door edge, and rubber seal with a damp cloth. If necessary, spray household cleaner on the
cloth. Do not spray directly on the door. Use a dishwasher cleaner (follow the instructions on the package)
or place 1 cup of vinegar and 2 tbsp of baking soda in a container on the middle rack and run a Heavy
wash cycle.
Spray arms Refer to page 16 for removal. Place under running water and use a paper clip or similar to remove debris
from holes.
Filter Refer to page 16 for removal. Clean with soap and water. For hard-to-remove soils or calcium deposits,
use a soft brush. Do not use a wire brush or scouring pad.
Gasket Wipe with a damp cloth. Use warm soapy water and a toothbrush. If mold or mildew are present, spray
with 3% hydrogen peroxide.

18
|
Cove Customer Care 800.222.7820
Sub-Zero, Sub-Zero & Design, Sub-Zero & Snowake Design, Dual Refrigeration, The Living Kitchen, Great American Kitchens The Fine Art of Kitchen Design, Wolf, Wolf &
Design, Wolf Gourmet, W & Design, red colored knobs, Cove, and Cove & Design are registered trademarks and service marks of Sub-Zero Group, Inc. and its subsidiaries.
All other trademarks are property of their respective owners in the United States and other countries.
TROUBLESHOOTING
Troubleshooting
OPERATION
Dishwasher does not operate.
• Verify power is on.
• Verify electrical power to dishwasher and home circuit
breaker is on.
• Verify the child lock, Sabbath feature, and showroom
mode are not turned on.
Dishes are not clean after the wash cycle.
• Verify hot water supply.
• Verify spray arms turn freely by turning by hand.
• Verify dishes are not placed too close together and cups
and bowls are face-down and are not nested.
• Contact Cove Customer Care at 800-222-7820 for
recommendations.
Dishes are not dry after the wash cycle.
• Verify there is rinse aid in the dispenser (even if the
detergent includes rinse aid).
• Select a wash cycle other than Quick or Light, which
have limited dry time.
• Turn on Extra Dry and/or Extended Dry. Refer to Cycle
Options on page 6.
• Increase the rinse aid dosing. Refer to User Setup on
page 9.
Excess moisture on the tub at the end of the wash cycle.
• Verify there is rinse aid in the dispenser (even if the
detergent includes rinse aid).
“Check manual, Code #800140” appears on the display.
• Verify the drain is clear and free of debris.
• Verify drain line is not kinked.
“Check manual, Code #560186 or #560187” appears on
the display.
• Verify water supply is in the on position.
• Verify water supply line is not kinked.
“Call Service, Code #600148", #600149, or #600151”
appears on the display.
• Contact Cove Factory Certied Service.
SERVICE
• Maintain the quality built into your product by contacting
Cove Factory Certied Service. For the name of the
nearest Cove Factory Certied Service, check the con-
tact and support section of our website, coveappliance.
com, or call Cove Customer Care at 800-222-7820.
• When contacting service, you will need the model and
serial number of your product. Both numbers are listed
on the product rating plate. Refer to page 4 for rating
plate location.
• For warranty purposes, you will also need the date of
installation and name of your authorized Cove dealer.
This information should be recorded on page 2 of this
guide.

Cove Appliance Residential Limited Warranty
FOR RESIDENTIAL USE
FULL FIVE YEAR WARRANTY*
For ve years from the date of original installation, this Cove Appliance product warranty covers all parts
and labor to repair or replace, under normal residential use, any part of the product that proves to be
defective in materials or workmanship. All service provided by Cove Appliance under the above warranty
must be performed by Cove factory certied service, unless otherwise specied by Cove Appliance, Inc.
Service will be provided during normal business hours.
LIMITED LIFETIME WARRANTY
For the life of the product, Cove Appliance will repair or replace the following parts that prove to be defec-
tive in materials or workmanship: stainless steel tub and door liner (excludes surface corrosion, scratches,
discoloration, weather and atmospheric related staining and minor surface rust and oxidation). If the owner
uses Cove factory certied service, the service provider will repair or replace these parts with the owner
paying for all other costs, including labor. If the owner uses non-certied service, the owner must contact
Cove Appliance, Inc. (using the information below) to receive repaired or replacement parts. Cove Appliance
will not reimburse the owner for parts purchased from non-certied service or other sources.
TERMS APPLICABLE TO EACH WARRANTY
The warranty applies only to products installed for normal residential use. The warranty applies only to
products installed in any one of the fty states of the United States, the District of Columbia or the ten
provinces of Canada. This warranty does not cover any parts or labor to correct any defect caused by
negligence, accident or improper use, maintenance, installation, service or repair.
THE REMEDIES DESCRIBED ABOVE FOR EACH WARRANTY ARE THE ONLY ONES THAT COVE APPLIANCE,
INC. WILL PROVIDE, EITHER UNDER THIS WARRANTY OR UNDER ANY WARRANTY ARISING BY OPERATION
OF LAW. COVE APPLIANCE, INC. WILL NOT BE RESPONSIBLE FOR ANY CONSEQUENTIAL OR INCIDEN-
TAL DAMAGES ARISING FROM THE BREACH OF THIS WARRANTY OR ANY OTHER WARRANTY, WHETHER
EXPRESS, IMPLIED OR STATUTORY.
Some states do not allow the exclusion or limitation of incidental or consequential damages, so the above
limitation or exclusion may not apply to you. This warranty gives you specic legal rights and you may also
have other legal rights that vary from state to state.
To receive parts and/or service and the name of Cove factory certied service nearest you, contact Cove
Appliance, Inc., P.O. Box 44848, Madison, WI 53744; check the contact & support section of our website,
coveappliance.com, email us at [email protected] or call 800-222-7820.
*Stainless steel (doors, panels, handles, product frames and interior surfaces) are covered by a limited
60-day parts and labor warranty for cosmetic defects.

2
|
Atención al cliente de Cove 800.222.7820
Contenido
3 Precauciones de seguridad
4 Características del lavavajillas
5 Funcionamiento del lavavajillas
15 Recomendaciones para el cuidado
17 Resolución de problemas
19 Garantía Cove
LAVAVAJILLAS COVE
Atención al cliente
El modelo y número de serie están impresos en la tarjeta
de registro del producto adjunta. Ambos números también
aparecen en la placa de datos del producto. Consulte la
página 4 para encontrar la placa de datos. Para nes de la
garantía, usted también necesitará la fecha de instalación
y el nombre de su distribuidor autorizado Cove. Guarde la
siguiente información para futuras referencias.
INFORMACIÓN DE SERVICIO
Número de modelo
Número de serie
Fecha de la instalación
Nombre de servicio certicado
Número de servicio certicado
Distribuidor autorizado
Número de distribuidor
Si su producto alguna vez necesita servicio, asegúrese de
acudir a un proveedor de Servicios certicados de fábrica
de Cove y recomendado por nuestro Centro de atención
al cliente o seleccione uno de nuestra lista de proveedores
en coveappliance.com/locator. Todos los proveedores de
servicios certicados son cuidadosamente seleccionados y
rigurosamente capacitados por nosotros.
Aviso importante
Para garantizar que este producto se instale y opere de
la forma más segura y eciente posible, tome nota de los
siguientes tipos de información resaltada en este manual:
AVISO IMPORTANTE señala la información que es especial-
mente importante.
PRECAUCIÓN indica una situación en la que se pueden
sufrir heridas leves o provocar daños al producto si no se
siguen las instrucciones.
ADVERTENCIA indica peligro de que se produzcan heridas
graves o incluso la muerte si no se siguen las precauciones.
AVISO IMPORTANTE: En toda esta guía, las dimensiones
entre paréntesis son milímetros, a menos que se especi-
que lo contrario.
La page est en cours de chargement...
La page est en cours de chargement...
La page est en cours de chargement...
La page est en cours de chargement...
La page est en cours de chargement...
La page est en cours de chargement...
La page est en cours de chargement...
La page est en cours de chargement...
La page est en cours de chargement...
La page est en cours de chargement...
La page est en cours de chargement...
La page est en cours de chargement...
La page est en cours de chargement...
La page est en cours de chargement...
La page est en cours de chargement...
La page est en cours de chargement...
La page est en cours de chargement...
La page est en cours de chargement...
La page est en cours de chargement...
La page est en cours de chargement...
La page est en cours de chargement...
La page est en cours de chargement...
La page est en cours de chargement...
La page est en cours de chargement...
La page est en cours de chargement...
La page est en cours de chargement...
La page est en cours de chargement...
La page est en cours de chargement...
La page est en cours de chargement...
La page est en cours de chargement...
La page est en cours de chargement...
La page est en cours de chargement...
La page est en cours de chargement...
La page est en cours de chargement...
La page est en cours de chargement...
La page est en cours de chargement...
-
 1
1
-
 2
2
-
 3
3
-
 4
4
-
 5
5
-
 6
6
-
 7
7
-
 8
8
-
 9
9
-
 10
10
-
 11
11
-
 12
12
-
 13
13
-
 14
14
-
 15
15
-
 16
16
-
 17
17
-
 18
18
-
 19
19
-
 20
20
-
 21
21
-
 22
22
-
 23
23
-
 24
24
-
 25
25
-
 26
26
-
 27
27
-
 28
28
-
 29
29
-
 30
30
-
 31
31
-
 32
32
-
 33
33
-
 34
34
-
 35
35
-
 36
36
-
 37
37
-
 38
38
-
 39
39
-
 40
40
-
 41
41
-
 42
42
-
 43
43
-
 44
44
-
 45
45
-
 46
46
-
 47
47
-
 48
48
-
 49
49
-
 50
50
-
 51
51
-
 52
52
-
 53
53
-
 54
54
-
 55
55
-
 56
56


Sub-Zero DW2450 Manuel utilisateur
- Catégorie
- Lave-vaisselle
- Taper
- Manuel utilisateur
- Ce manuel convient également à
dans d''autres langues
- English: Sub-Zero DW2450 User manual
- español: Sub-Zero DW2450 Manual de usuario