iLive ITPW891B Manuel utilisateur
- Catégorie
- Équipement musical supplémentaire
- Taper
- Manuel utilisateur
Ce manuel convient également à

USER’S GUIDE
V:1433-0214-11
For the most up-to-date version of this User’s Guide, go to www.ilive.net
ITPW891B / SW311B
Sound Bar with Wireless Subwoofer for Any TV

iLive2
WARNING: Lithium batteries, like all rechargeable batteries
are recyclable and should be recycled or disposed of in
normal household waste. Contact your local government
for disposal or recycling practices in your area. They should
never be incinerated since they might explode.
WARNING: Shock hazard - Do Not Open.
AVIS: RISQUE DE CHOC ÉLECTRIQUE - NE PAS OUVRIR
Mains Plug or Direct plug-in adapter is used as disconnect
device and it should remain readily operable during
intended use. In order to disconnect the apparatus from the
mains completely, the Mains Plug or Direct plug-in adapter
should be disconnected from the mains socket outlet
completely.
La che d’alimentation ou adaptateur de courant est utilisé
comme dispositif de déconnexion et doit rester accessible
pendant l’utilisation. Pour mettre l’appareil hors tension, la
che ou adaptateur de courant doit être débranché de la prise
de courant.
Do not mix old and new batteries.
Do not mix alkaline, standard (carbon-zinc), or rechargeable
(ni-cad, ni-mh, etc) batteries.
No mezcle baterías viejas y nuevas.
No mezcle baterías alcalinas, estándar (carbono-zinc) o
recargables (ni-cad, ni-mh, etc.).
CAUTION: TO PREVENT ELECTRIC SHOCK, MATCH WIDE
BLADE OF PLUG TO WIDE SLOT, FULLY INSERT.
WARNING: To reduce the risk of re or electric shock, do
not expose this apparatus to rain or moisture.
AVERTISSEMENT: Pour réduire le risque d’incendie ou de
choc électrique, ne pas exposer cet appareil sous la pluie et
l’humidité.
CAUTION: Use of any controls or adjustments or
performance of procedures other than those herein
specied may result in hazardous radiation exposure.
WARNING: Changes or modications to this unit not
expressly approved by the party responsible for compliance
could void the user’s authority to operate the equipment.
WARNING: Do not place the unit on top of any soft, porous,
or sensitive surfaces to avoid damaging the surface. Use a
protective barrier between the unit and surface to protect
the surface.
WARNING: Use of this unit near uorescent lighting may
cause interference regarding use of the remote. If the unit is
displaying erratic behavior move away from any uorescent
lighting, as it may be the cause.
CAUTION: Danger of explosion if battery is incorrectly
replaced. Replace only with the same or equivalent type.
PRÉCAUTION: Danger d’explosion si les piles sont remplacées
de façon incorrect. Remplacer les piles seulement par le même
type de pile ou l’équivalent.
WARNING: There is a danger of explosion if you attempt
to charge standard Alkaline batteries in the unit. Only use
rechargeable NiMH batteries.
WARNING: The battery, batteries, and battery pack shall
not be exposed to excessive heat such as sunshine, re, or
the like.
The lightning ash with arrowhead symbol, within
an equilateral triangle, is intended to alert the user
to the presence of uninsulated "dangerous voltage"
within the product's enclosure that may be of
sufcient magnitude to constitute a risk of electric
shock to persons.
WARNING: TO REDUCE THE RISK OF
ELECTRIC SHOCK, DO NOT REMOVE
COVER (OR BACK). NO USER-
SERVICEABLE PARTS INSIDE. REFER
SERVICING TO QUALIFIED SERVICE
PERSONNEL.
ATTENTION
RISQUE D' ÉLECTROCUTION
NE PAS OUVRIR
CAUTION
RISK OF ELECTRIC SHOCK
DO NOT OPEN
The exclamation point within an equilateral triangle
is intended to alert the user to the presence of
important operating and maintenance (servicing)
instructions in the literature accompanying the
appliance.
Warnings and Precautions

Customer Support: 1-888-999-4215 iLive 3
13. Unplug this apparatus during lightning storms or when
unused for long periods of time.
14. Refer all servicing to qualied service personnel.
Servicing is required when the apparatus has been
damaged in any way, such as power-supply cord or
plug is damaged, liquid has been spilled or objects
have fallen into the apparatus, the apparatus has been
exposed to rain or moisture, does not operate normally,
or has been dropped.
1. Read these Instructions.
2. Keep these Instructions.
3. Heed all Warnings.
4. Follow all instructions.
5. Do not use this apparatus near water.
6. Clean only with a dry cloth.
7. Do not block any ventilation openings. Install in
accordance with the manufacturer’s instructions.
8. Do not install near any heat sources such as radiators,
heat registers, stoves, or other apparatus (including
ampliers) that produce heat.
9. Do not defeat the safety purpose of the polarized or
grounding - type plug. A polarized plug has two blades
with one wider than the other. A grounding type plug
has two blades and a third grounding prong. The wide
blade or the third prong are provided for your safety.
When the provided plug does not t into your outlet,
consult an electrician for replacement of the obsolete
outlet.
10. Protect the power cord from being walked on or
pinched particularly at plugs, convenience receptacles,
and the point where they exit from the apparatus.
11. Only use attachments/accessories specied by the
manufacturer.
12.
This symbol indicates that this product
incorporates double insulation between
hazardous mains voltage and user
accessible parts.
Use only with a cart, stand, tripod,
bracket, or table specied by the
manufacturer, or sold with the apparatus.
When a cart is used, use caution when
moving the cart/apparatus combination to
avoid injury from tip-over.
Important Safety Instructions
Special note: When placing your unit on a lacquered or
natural nish, protect your furniture with a cloth or other
protective material.
WARNING: Changes or modications to this unit not expressly
approved by the party responsible for compliance could void the
user’s authority to operate the equipment.
NOTE: This equipment has been tested and found to comply with
the limits for a Class B digital device, pursuant to Part 15 of the FCC
Rules. These limits are designed to provide reasonable protection
against harmful interference in a residential installation. This
equipment generates, uses, and can radiate radio frequency energy
and, if not installed and used in accordance with the instructions,
may cause harmful interference to radio communications. However,
there is no guarantee that interference will not occur in a particular
installation. If this equipment does cause harmful interference to
radio or television reception, which can be determined by turning
the equipment off and on, the user is encouraged to try to correct the
interference by one or more of the following measures:
• Reorient or relocate the receiving antenna.
• Increase the separation between the equipment and receiver.
• Connect the equipment into an outlet on a circuit different from
that to which the receiver is connected.
• Consult the dealer or an experienced radio/TV technician for help.
The apparatus shall not be exposed to dripping or
splashing and that no objects lled with liquids, such as
vases, shall be placed on apparatus.
L’appareil ne doit pas être exposé aux écoulements ou aux
éclaboussures et aucun objet ne contenant de liquide, tel
qu’un vase, ne doit être placé sur l’objet.
Battery shall not be exposed to excessive heat such as
sunshine, re or the like.
Les piles ne doivent pas être exposées à de forte chaleur,
tel qu’à la lumière du soleil, au feu ou autres choses de
semblable.
Caution marking is located at the rear or back of the
apparatus.
Attention marquage est situé à l’arrière ou à l’arrière de
l’appareil
The marking information is located at the rear or back of
apparatus.
Les informations de marquage est situé à l’arrière ou à
l’arrière de l’appareil.
FCC Warnings
Additional Warnings

iLive4
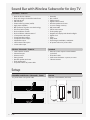
Sound Bar with Wireless Subwoofer for Any TV
ı Made for iPod and iPhone
ı Plays and charges docked iPod and iPhone
ı App-enhanced
ı FM radio (PLL)
ı Station memory presets (20 FM)
ı High power amplier
ı BBE
®
professional-grade sound technology
ı Enhanced audio quality
ı iPod and iPhone controls
ı iPod and iPhone authentication IC
ı 2 Composite video inputs
ı Composite video output
ı Component video output
ı SubWoofer output
ı 2 RCA stereo audio inputs
ı 3.5mm audio input
ı Preset EQ
ı Bass controls
ı Treble controls
ı Digital volume control
ı Wooden speaker enclosures
ı Last user settings memory
ı Wall mountable
ı Full-function remote
ı Cloth speaker grill
ı Negative LCD display with white backlight
ı Digital clock
ı Timer
ı Sleep Timer
ı Dual voltage: 220V/50Hz, 120V/60Hz
ı AC power: built-in AC power cable
ı 2.4Ghz wireless receiver
ı Subwoofer input
ı Volume control
ı Pairing button
ı Wooden speaker enclosure
ı Cloth speaker grill
ı AC power: built-in AC power cable
ı Remote control: requires 2 AAA batteries
(included)
ı RCA video cable
ı Wall-mount hardware: 2 spacers, 4 screws
ı FM wire antenna
Sound Bar - Features
Wireless Subwoofer - Features
Included
Setup
AC power: built-in AC power cable Requires 2 AAA batteries (included)
FM ANT
Pr
OUT
R
COMPENTENT OUT VIDEO
AUDIO IN
SW OUT
Y
Pb
IN
L
RESET
AC 120V/60Hz
FM ANT
Pr
OUT
R
COMPENTENT OUT VIDEO
AUDIO IN
SW OUT
Y
Pb
IN
L
RESET
AC 120V/60Hz
Sound Bar and Wireless Subwoofer - Power Remote

Customer Support: 1-888-999-4215 iLive 5
Table of Contents
Warnings and Precautions . . . . . . . . . . . . . . . . . . . . . . . . . . . . . . . . . . . . . . . . . . . . . . . . . . . . . . . . . . . . . . . . . . . . . . . . . . . . 2
Important Safety Instructions . . . . . . . . . . . . . . . . . . . . . . . . . . . . . . . . . . . . . . . . . . . . . . . . . . . . . . . . . . . . . . . . . . . . . . . . . 3
Sound Bar with Wireless Subwoofer for Any TV . . . . . . . . . . . . . . . . . . . . . . . . . . . . . . . . . . . . . . . . . . . . . . . . . . . . . . . . . 4
Setup . . . . . . . . . . . . . . . . . . . . . . . . . . . . . . . . . . . . . . . . . . . . . . . . . . . . . . . . . . . . . . . . . . . . . . . . . . . . . . . . . . . . . . . . . . . . . . . . 4
Table of Contents . . . . . . . . . . . . . . . . . . . . . . . . . . . . . . . . . . . . . . . . . . . . . . . . . . . . . . . . . . . . . . . . . . . . . . . . . . . . . . . . . . . . . 5
Introduction . . . . . . . . . . . . . . . . . . . . . . . . . . . . . . . . . . . . . . . . . . . . . . . . . . . . . . . . . . . . . . . . . . . . . . . . . . . . . . . . . . . . . . . . . 6
iPod and iPhone . . . . . . . . . . . . . . . . . . . . . . . . . . . . . . . . . . . . . . . . . . . . . . . . . . . . . . . . . . . . . . . . . . . . . . . . . . . . . . . . . . . . . . 8
App . . . . . . . . . . . . . . . . . . . . . . . . . . . . . . . . . . . . . . . . . . . . . . . . . . . . . . . . . . . . . . . . . . . . . . . . . . . . . . . . . . . . . . . . . . . . . . . . . 9
FM Radio, Clock, Sleep Timer, and Timer . . . . . . . . . . . . . . . . . . . . . . . . . . . . . . . . . . . . . . . . . . . . . . . . . . . . . . . . . . . . . . 10
Wireless Subwoofer Setup . . . . . . . . . . . . . . . . . . . . . . . . . . . . . . . . . . . . . . . . . . . . . . . . . . . . . . . . . . . . . . . . . . . . . . . . . . . 11
Basic Connectivity . . . . . . . . . . . . . . . . . . . . . . . . . . . . . . . . . . . . . . . . . . . . . . . . . . . . . . . . . . . . . . . . . . . . . . . . . . . . . . . . . . . 12
Video and Audio Inputs/Outputs . . . . . . . . . . . . . . . . . . . . . . . . . . . . . . . . . . . . . . . . . . . . . . . . . . . . . . . . . . . . . . . . . . . . . 13
BBE Professional Audio Modes . . . . . . . . . . . . . . . . . . . . . . . . . . . . . . . . . . . . . . . . . . . . . . . . . . . . . . . . . . . . . . . . . . . . . . . 14
Mounting to a Wall . . . . . . . . . . . . . . . . . . . . . . . . . . . . . . . . . . . . . . . . . . . . . . . . . . . . . . . . . . . . . . . . . . . . . . . . . . . . . . . . . . 15
Company Information . . . . . . . . . . . . . . . . . . . . . . . . . . . . . . . . . . . . . . . . . . . . . . . . . . . . . . . . . . . . . . . . . . . . . . . . . . . . . . . 16

iLive6
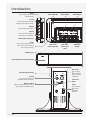
Introduction
Power
Press to power the sound
bar o and on.
Source
Press to switch between FM,
iPod, Aux, AV, and Line modes.
Volume
Press to adjust the volume.
Pairing
Press to pair the sound bar
with a wireless subwoofer.
3.5mm Audio Input (Line)
Reset
Press using a paperclip or like
object to reset the sound bar
to it’s original settings.
Stability Lever
Soft Touch Dock for iPod and iPhone
Power/Pairing Indicator
Pairing
Press to pair the wireless
subwoofer to the sound bar.
Wireless/Sub-In
Adjust to switch between wireless
input and the Subwoofer Input.
POWER
SOURCE
VOLUME
PAIRING
LINE IN
THIS DEVICE COMPLIES WITH PART 15 OF THE FCC RULES AND DHHS
STANDARDS 21 CFR SUBCHAPTER J. AT DATE OF MANUFACTURED.
OPERATION IS SUBJECT TO THE FOLLOWING TWO CONDITIONS:
1) THIS DEVICE MAY NOT CAUSE HARMFUL INTERFERENCE, AND
2) THIS DEVICE MUST ACCEPT ANY INTERFERENCE RECEIVED,
INCLUDING INTERFERENCE THAT MAY CAUSE UNDESIRED OPERATION.
MIN MAX
ON
OFF
BASS LEVEL
SUB-IN
SUB-INWIRELESS
Subwoofer
Output
Composite
Video Output
Component
Video Output
Composite
Video Input (AV)
RCA Stereo
Audio Input
(Aux)
RCA Stereo
Audio Input (AV)
Bass Level
Turn to adjust
the bass output
on the wireless
subwoofer.
Subwoofer
Input
Power
Press to power
the wireless
subwoofer
o or on.

Customer Support: 1-888-999-4215 iLive 7
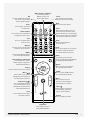
SOURCE
VIDEO
SLEEP
EQ
DISPLAY
VOLUME
MENU
MUTE
SHUFFLE
REPEAT
MO/ST
MEMORY
LIVE
CLOCK
TIMERMOVIE
USER TREBLE BASS
MUSIC
BBE
LEVEL
T
U
N
I
N
G
T
U
N
I
N
G
EQ
Press to switch between Rock,
Pop, Classic, Jazz, and Flat
preset equalizer modes.
Power
Press to power the sound
bar o and on.
Treble and Bass
Press and use the levels buttons
to adjust the treble or bass.
User
Press to set custom treble
and bass levels.
Memory
Press to save the current radio
station to a preset channel.
MO/ST
Press to switch between Mono
and Stereo FM radio modes.
Album, Chapter, and Playlist
Press to adjust the current
album, chapter, or playlist on
a docked iPod or iPhone.
Display
Press to view the time on the display.
Menu ( )
Press to move up and down
through menus on an iPod or
the iPod app on an iPhone.
Skip/Search ( )
Press to skip between tracks
or press and hold to search
through the current track on
a docked iPod or iPhone.
Level
In user mode, press to adjust
the treble and bass.
Source
Press to switch between FM,
iPod, Aux, AV, and Line modes.
Mute
Press to mute the volume.
Timer
With the power o, press to set a
timer to turn the sound bar on to
iPod or FM mode at a specied time.
With the power o, press and hold to
activate or deactivate the set timer.
Clock
With the power o, press
to set the clock.
Sleep
Press repeatedly to set a sleep timer
to turn the sound bar o after a
set amount of time has passed.
Video
In AV mode, press to switch
between Component Video Output
and Composite Video Output.
Repeat
Press to set the repeat options
on a docked iPod or iPhone.
Shue
Press to set the shue options
on a docked iPod or iPhone.
Menu
Press to switch between
menus on a docked iPod or
the iPod app on an iPhone.
Select ( )
Press to make selections on
a docked iPod or the iPod
app on a docked iPhone.
Volume
Press to adjust the volume.
BBE Live, Music, and Movie
Press to switch to the
BBE Live, Music, and
Movie audio modes.
Play/Pause
Press to play or pause a
docked iPod or iPhone.

iLive8
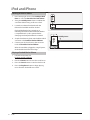
iPod and iPhone
1. Press the top right corner of the Soft Eject iPod
Door to access the Dock for iPod and iPhone.
2. Swing the Stability Lever down to stabilize the
sound bar while docking an iPhone or iPod.
3. Locate the numbered bracket that ts the
iPhone/iPod model that will be docked.
Each included bracket has a number on it,
indicating which iPhone/iPod model that bracket
is compatible with. See the separate bracket
chart page to identify which bracket is needed.
4. Snap the bracket into place over the iPhone/iPod
connector in the Dock for iPod and iPhone.
5. Connect your iPod or iPhone to the connector
inside the Dock for iPod and iPhone.
When the sound bar is plugged in, using AC power,
the docked iPod or iPhone will charge.
1. Follow the instructions for
Docking an iPod or iPhone.
2. Press the Power button to turn the sound bar on.
3. Press the Source button to switch to iPod mode.
4. Press the Play/Pause button to begin playing
music from the docked iPhone or iPod.
Docking an iPod or iPhone
Playing a Docked iPod or iPhone
Stability Lever

Customer Support: 1-888-999-4215 iLive 9
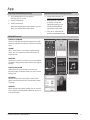
App
1. Go to the App Store on your iPhone,
iPod touch, or on iTunes.
2. Search for MIP659D
3. Download the App.
When downloading directly from iTunes, sync the
app to your iPod or iPhone from iTunes.
1. Follow the instructions for
Docking an iPod or iPhone.
2. Once the iPod or iPhone
is docked a screen will
appear prompting you to
download the MIP659D
app from the App Store.
3. Press Yes to automatically
download the MIP659D app.
Manually Downloading the App Automatically Downloading the App
CLOCK & CALENDAR
The clock and calendar will automatically sync with
the time on the iPod or iPhone, so there’s no need to
set it.
ALARM
Add as many alarms as you like using the settings
menu. You can set them to wake to iPod music or
Nature Sounds.
WEATHER
Type in your location and view your current weather
conditions along with the time on the home page of
the app.
PHOTO SLIDE SHOW
Select photos that are already on your iPod or
iPhone and play a slideshow with your music in the
background.
FM RADIO
While docked on the bar speaker, use the Dock +
App to tune the FM radio and save FM radio station
as presets.
SOURCES
When docked with the bar speaker you can use the
Dock + App to switch between FM Radio, iPod, and
Line Input modes.
MIP659D Features

iLive10
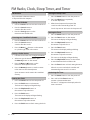
1. Press the Power button to turn the power o.
2. Press the Clock button on the remote.
The hour on the display will begin blinking.
3. Press the Skip/Search buttons on
the remote to adjust the hour.
4. Press the Clock button.
The minute on the display will begin blinking.
5. Press the Skip/Search buttons on
the remote to adjust the minute.
6. Press the Clock button to nish setting the clock.
1. Press the Power button to turn the power on.
2. Press the Sleep button repeatedly
to set the sleep timer.
3. After the set sleep time has expired, the
sound bar will automatically power o.
Set the sleep time to “00” to turn the sleep timer o.
1. Press the Power button to turn the power o.
2. Press the Timer button on the remote.
The hour on the display will begin blinking.
3. Press the Skip/Search buttons on
the remote to adjust the hour.
4. Press the Timer button.
The minute on the display will begin blinking.
5. Press the Skip/Search buttons on
the remote to adjust the minute.
The source on the display will begin blinking.
6. Press the Skip/Search buttons on the remote
to switch between iPod and FM modes.
7. Press the Timer button to nish setting the timer.
After the set time is reached, the sound bar will
automatically power on to the set source.
1. Press the Power button to turn the power o.
2. Press and hold the Timer button to
activate or deactivate the timer.
The letter “T” will appear on the display when the
timer is activated.
Setting the Clock
Setting the Sleep Timer
Setting the Timer
Activating the Timer
FM Radio, Clock, Sleep Timer, and Timer
Adjust the built-in FM wire antenna
to improve FM radio reception.
1. Press the Power button to turn the sound bar on.
2. Press the Source button to
switch to FM radio mode.
3. Press the Tuning buttons on the
remote to tune the FM radio.
1. Press the Power button to turn the sound bar on.
2. Press the Source button to
switch to FM radio mode.
3. Press the Menu ( ) buttons on the remote
to cycle through saved radio stations.
1. Follow the instructions for Tuning the FM Radio.
2. After tuning to the desired station, press
the Memory button on the remote.
3. Press the Menu ( ) buttons on the
remote to select a preset channel.
4. Press the Memory button to save the current
radio station to the selected preset.
Up to 20 stations can be saved to the sound bar’s
memory.
FM Antenna
Tuning the FM Radio
Listening to a Saved Radio Station
Saving a Radio Station

Customer Support: 1-888-999-4215 iLive 11
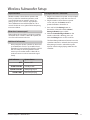
Wireless Subwoofer Setup
While the wireless subwoofer was paired at the
factory to allow for immediate operation, it will
occasionally become un-paired in transit. Un-
pairing can also occur in day-to-day operation
due to dierent environmental inuences. This is
normal. Should this occur, please follow the pairing
instructions below.
1. Plug the sound bar into a power source and press
the Power button to power the sound bar on.
2. Plug the wireless subwoofer into a power
source and press the Power switch to
power the wireless subwoofer on.
3. Press and hold the Pairing button on
the wireless subwoofer until the Power/
Pairing Indicator begins to blink.
4. While the Power/Pairing Indicator on the
wireless subwoofer is blinking, press and
hold the Pairing button on the sound bar.
The Power/Pairing Indicator will remain lit once the
sound bar and wireless subwoofer has been paired.
After pairing, the wireless subwoofer may take
up to 30 seconds to begin playing audio from the
sound bar.
Pairing allows the sound bar to recognize a wireless
subwoofer. Once a wireless subwoofer is paired, the
sound bar will transmit audio to it.
• Once paired, the wireless speaker can be moved
up to 200ft (line-of-site) or up to 90ft (indoors)
depending on environmental conditions. Should
the sound drop or become garbled it will be
necessary to move the wireless subwoofer to
another location in order to receive the signal
clearly.
Important Note Pairing the Wireless Subwoofer
What does it mean to pair?
Additional Information
Link Indicator System Status
OFF Powered o
SLOW FLASHES Standby mode
QUICK FLASHES Attempting to pair
SOLID LIGHT Paired and playing

iLive12
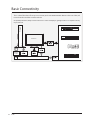
DVD PLAYER
DIGITAL CABLE or SATELLITE TUNER
VCR
GAMING CONSOLE
WIRELESS
SUBWOOFER
TELEVISION
WIRELESS
AUDIO
Basic Connectivity
This is a basic ow chart of how you can connect your home entertainment devices to the sound bar, and
in turn how the sound bar connects to them.
For optimal performance, always connect video sources such as a DVD players, gaming consoles or set-top boxes directly
to your television.

Customer Support: 1-888-999-4215 iLive 13
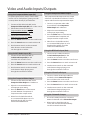
Video and Audio Inputs/Outputs
For optimal performance, always connect video
sources such as a DVD players, gaming consoles
or set-top boxes directly to your television.
1. Connect an RCA cable (included) to the
Composite Video Input (AV) and a video source.
2. Follow the instructions for Using a
Composite Video Output or Using
the Component Video Output
3. Follow the instructions for Using
the RCA Audio Inputs (AV).
4. Press the Power button to turn the sound bar on.
5. Press the Source button to switch to AV mode.
6. Use the native controls on the connected
video device to control video that
runs through the sound bar.
1. Connect an RCA cable (included) to the
Composite Video Output and a television.
2. Adjust the connected television
to the proper input setting.
3. Press the Video button on the remote
to switch between Composite and
Component video output modes.
4. Video from a docked iPhone/iPod,
or a connected DVD player can now
be played through the sound bar
to the connected television.
The Component Video Output will only output
video from a docked iPod or iPhone. It cannot
output video from the composite video input.
1. Connect a component video cable
(not included) to the Component
Video Output and a television.
2. Adjust the connected television
to the proper input setting.
3. Press the Video button on the remote
to switch between Composite and
Component video output modes.
4. Video from a docked iPhone/iPod,
or a connected DVD player can now
be played through the sound bar
to the connected television.
Using the Composite Video Input (AV)
Using the Composite Video Output
Using the Component Video Output
1. Connect a 3.5mm Audio Input cable (not
included) to the 3.5mm Audio Input on
the sound bar and an audio source.
2. Press the Power button to turn the sound bar on.
3. Press the Source button to switch to Line mode.
4. Use the native controls on the connected
audio device to begin playing music
through the connected sound bar.
1. Use an RCA cable (included) to connect an
external subwoofer to the Subwoofer Output.
2. When audio is played through any
source, the sound bar will automatically
use the connected subwoofer.
1. Connect an RCA cable (included) to
the RCA Audio Input (AV) on the
sound bar and an audio source.
2. Press the Power button to turn the sound bar on.
3. Press the Source button to switch to AV mode.
4. Use the native controls on the connected
audio device to begin playing music
through the connected sound bar.
1. Connect an RCA cable (included) to
the RCA Audio Input (Aux) on the
sound bar and an audio source.
2. Press the Power button to turn the sound bar on.
3. Press the Source button to switch to Aux mode.
4. Use the native controls on the connected
audio device to begin playing music
through the connected sound bar.
Using the 3.5mm Audio Input
Using the Subwoofer Output
Using the RCA Audio Input (AV)
Using the RCA Audio Input (Aux)

iLive14
Professional Audio Modes
Your favorite programming becomes more vibrant
and engaging as BBE Live reveals all the detail and
character of voices, ambient sounds and music --
even at low volume. Experience live sports and video
games like you’ve never heard them before. Imagine
hearing the crack of a bat, the shriek of a race car,
the ricochet of gunre with BBE Live -- it’s like being
there!
Press the BBE Live, Music, and Movie buttons on the
remote to switch between BBE Live, Music, and Movie
audio modes.
Imagine what it sounds like to be on stage or in the
studio with your favorite musical artist -- hearing
and feeling the raw emotion of vocals, the crunch
of guitars, the impact of percussion. BBE music
integrates the same professional, proprietary
harmonic restoration technology used in renown
concert halls and recording studios to restore lost
details of compressed music -- for sound quality
closer than ever before to the original performance.
With BBE Movie, you’ll nally get audio quality that’s
on par with today’s HD picture quality. From massive
explosions to the faintest whisper, today’s 3D movies
feature more complex soundelds than ever before.
That’s why BBE Movie incorporates proprietary BBE
HD-3D Sound technology to reveal more of the delth
and space engineered into the audio mix. Whether
it’s the latest blockbuster or a favorite classic, BBE
Movie reveals sonic details you may never have
heard before.
Live
Using BBE Professional Audio Modes
Music
Movies

Customer Support: 1-888-999-4215 iLive 15
Mounting to a Wall
We recommend having this sound bar professionally
mounted.
The included spacers should be used at your
discretion to extend the face of the sound bar
farther from the wall. These are typically used when
mounting the sound bar under a television, and the
face of the sound bar needs to be ush with the face
of the television.
1. Use the Tape Measure to decide how high
you’d like to hang the sound bar on the wall.
2. The sound bar must be hung within
6 feet of an AC power outlet for the
attached AC power cable to reach.
3. Use the Stud Finder to locate 2 parallel wooden
studs to screw the mounting brackets into.
4. Mark the wall at the center of the
studs using the Pencil.
5. Line the Level up on both of your marks to
make sure they are level. If they’re not, adjust
the marks as needed to make them level.
6. After you’ve double checked your markings, drill
through the top hole on both mounting brackets
directly into the marks you’ve made on the wall.
7. If you are using the brackets only and no
spacers, use the included short screws. If you
are using any of the spacers or combination
of the spacers, use the long screws.
8. Use the Level to level each of the hanging
brackets, then drill the second screw into the
bottom hole on both mounting brackets.
9. Slide the sound bar onto the mounting brackets,
and make sure there is a rm and stable
connection before letting go of the sound bar.
10. Finally, use the Level to conrm
that the sound bar is level.
• Manual or Power Screwdriver
• Stud Finder
• Pencil
• Tape Measure
• Level
• (2) Wall Mount Brackets
• (4) Long Screws
• (2) 1/2” Spacers
• (2) 3/4” Spacers
Important Notes
Getting Started
Required Tools
Included Hardware
16”
ITPW891B
ITPW891B
screws
studs
mounting
bracket
spacer

Copyright © 2011 Digital Products International (DPI, Inc.) | All other trademarks appearing herein are the property of their respective owners.
Specications are subject to change without notice
To download this User’s Guide in English, Spanish, or
French, visit the support section at www.ilive.net.
Para transferir esta guía de usuario en inglés,
español, o francés, visite la sección de la ayuda en
www.ilive.net.
Pour télécharger ce guide de l’utilisateur en anglais,
espagnol, ou français, visitez la section de soutien
chez www.ilive.net.
Phone: 1-888-999-4215
Email: [email protected]
Parts Email: partsinf[email protected]
Website: www.ilive.net
International Support
Contact Information
Company Information
-
 1
1
-
 2
2
-
 3
3
-
 4
4
-
 5
5
-
 6
6
-
 7
7
-
 8
8
-
 9
9
-
 10
10
-
 11
11
-
 12
12
-
 13
13
-
 14
14
-
 15
15
-
 16
16


iLive ITPW891B Manuel utilisateur
- Catégorie
- Équipement musical supplémentaire
- Taper
- Manuel utilisateur
- Ce manuel convient également à
dans d''autres langues
- English: iLive ITPW891B User manual
Documents connexes
Autres documents
-
Yamaha RX-V767 Le manuel du propriétaire
-
Yamaha RX-V667 Le manuel du propriétaire
-
Yamaha RX-V567 Le manuel du propriétaire
-
Yamaha RX-V467 Le manuel du propriétaire
-
Yamaha RX-A700 Le manuel du propriétaire
-
Yamaha RX-V1067 Le manuel du propriétaire
-
-
-
Boston Acoustics iDS-3 plus Le manuel du propriétaire