
1
Profil 960 Clock indoor
Horloge Profil 960 intérieure
ANALOGUE CLOCKS indoor
HORLOGES ANALOGIQUES intérieures
NTP Receiver
Réceptrice NTP
Installation and operation manual
Manuel d’installation et de mise en service
When receiving goods please check nothing is broken otherwise make a claim near shipping company.
S’assurer à réception que le produit n’a pas été endommagé durant le transport pour réserve au transporteur.
Réf : 607924 E
www.bodet-time.com
BODET Time & Sport
1, rue du Général de Gaulle
49340 TREMENTINES I France
Tél. support France: 02.41.71.72.99
Tel. support (intl): +33 241 71 72 33

2
EN
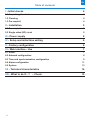
Table of contents
I - Initial checks 4
1.1 Unpacking the clock 4
1.2 Cleaning 4
1.3 Pre-requisit 4
II - Installation 5
2.1 Pre-requisit 5
2.2 Single sided (SF) clock 5
III - Power supply 6
IV - Setup and initial time setting 6
V - Factory configuration 6
VI - Web interface - Use 7
6.1 Home 7
6.2 Network configuration 8
6.3 Time and synchronisation configuration 9
6.4 Alarm configuration 11
6.5 System 13
VII - Technical characteristics 14
VIII - What to do if…? ... Check. 15

3
FR
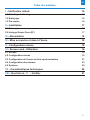
Table des matières
I - Vérification initiale 16
1.1 Déballage de l’horloge 16
1.2 Nettoyage 16
1.3 Pré-requis 16
II - Installation 17
2.1 Pré-requis 17
2.2 Horloge Simple Face (SF) 17
III - Alimentation 18
IV - Mise en service et mise à l’heure 18
V - Configuration réseau 18
VI - Serveur web - Utilisation 19
6.1 Accueil 19
6.2 Configuration réseau 19
6.3 Configuration de l’heure et de la synchronisation 21
6.4 Configuration des alarmes 23
6.5 Système 25
VII - Caractéristiques techniques 26
VIII - Que faire si...? ...Vérifier. 27

4
I - Initial checks
Thank you for choosing a BODET clock.
This product has been carefully designed for your satisfaction, using ISO 9001 quality processes.
We recommend that you read this manual carefully before handling the clock.
Retain this manual for reference throughout the operating life of your clock.
Using the clock in a manner not according to these instructions may cause irreversible
damage to the clock and invalidate the product guarantee.
These instructions relate to «NTP» models. For other models please see the corresponding
instructions.
1.1 Unpacking the clock
Carefully unpack the clock and check the contents of the package. This should include:
– the Profil 960 clock and this manual,
– an antistatic cleaning kit,
Version: inside the clock is a product label stating the version of the clock:
NTP = the clock is a receiver controlled by a master clock or an NTP server.
1.2 Cleaning
Use an antistatic product identical to that supplied. Never use alcohol, acetone or other solvents
which may damage your clock’s casing or glass.
1.3 Pre-requisit
For the commisioning of the clocks you must install «BODET Detect». This software is available
on BODET web site www.bodet-time.com as a free download.
Note: the Ethernet network connection to which the Bodet clock is connected must be PoE, the
power being supplied by a PoE switch or a PoE injector.
Bodet recommends the following devices:
■ PoE injectors: Zyxel, Tp link, D-Link, HP, Cisco, Axis, ITE Power Supply, PhiHong, Abus,
Globtek.
■ PoE switches: D-Link, HP, Planet, Zyxel, Cisco, NetGear, PhiHong.
EN

5
II - Installation
2.1 Pre-requisit
Choose a location where to install the clock, preferably away from sources of electrical interference,
such as transformers.
Installation and maintenance of this equipment must be carried out by qualified personnel.
The clock is connected to the Ethernet (PoE) data network. The equipment must be installed in
compliance with standard 802.3af, class 3.
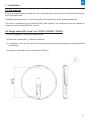
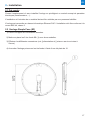
2.2 Single sided (SF) clock / ref.: 933D11, 933D21, 933D31
1) Drill the support to the required dimensions.
2) Place the 2 screws Ø6 (1) with their washers.
3) If necessary, carry out the various connections (see chapter power supply and setup and initial
time setting).
4) Hang the clock and screw it with a size 10 at key.
EN

6
III - Power supply
NTP clocks are synchronized and powered by the Ethernet network (PoE).
IV - Setup and initial time setting
1) Connect the Ethernet network on the RJ45 connector (A).
■ Ethernet cable category: 5 minimum or 6.
The type of synchronisation will have to be programmed in pages webserver of the clock. Find
the MAC address (B) which will be useful during the detection of the clock on the software Bodet
Detect to reappoint it.
2) Meaning of LEDs indicators on the RJ45 connector :
■ The green LED is on when the clock is powered on.
■ The yellow LED is blinking once per second when the clock is synchronised.
■ The yellow LED is blinking fast for 5 s then switching o for 3s when the clock is not
synchronised or no more synchronised for 1 hour.
■ The yellow LED is permanently switched on when you make a localization of the clock since
the software Bodet Detect.
V - Factory configuration
The default conguration is as follows:
■ IP conguration by DHCP.
■ Time zone: EUR.
■ Multicast synchronisation.
■ Synchronisation adress: 239.192.54.1.
A reminder of this conguration is printed on the back of the product.
The full factory conguration is as follows:
■ Clock name: «BODET-@MAC».
■ IP conguration by DHCP.
■ Time zone: EUR.
■ Multicast synchronisation.
■ Synchronisation address: 239.192.54.1.
■ Pool period for unicast synchronisation: 15 mins.
■ SNMP disabled.
■ Trap type: V2C.
■ Temperature alarm threshold: –5°C to +55°C.
■ Trap status sending interval: 24H.
■ No password.
EN

7
EN
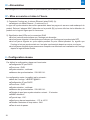
VI - Web interface - Use
There are two ways to access the web interface:
1/ Open your web browser and enter the IP address of the clock in the address bar.
2/ Using the «BODET Detect», click on the Web browser button to open the web interface (refer to
software instructions, 607548).
The BODET Detect software lets you:
- detect all the clocks present on the network,
- individually set the parameter of each clock or copy the parameter of one clock toward a group
of clocks,
- update the clock software,
- check the clock status
- access the download of the MIB files.
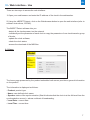
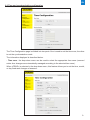
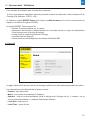
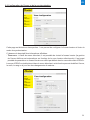
6.1 Home
The home page presented by the product embedded web server provides a general information
on the product.
The information is displayed as follows:
- Product: product type.
- Name: user-defined clock name.
- Synchro: status of the synchronisation (Strat 4 indicates that the clock is at the 4th level from the
synchronisation source) + adress multicast of broadcasting.
- Local Date : current date.
- Local Time : current time.

8
EN
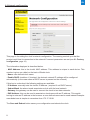
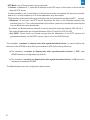
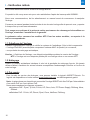
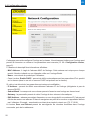
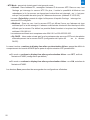
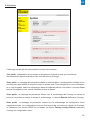
6.2 Network configuration
This page is for setting the clock’s network configuration. The warning reminds you that the
product could lose its connection to the network if incorrect parameters are set (see III - Factory
configuration, page 16)
The information displayed is described below:
- MAC Address: this is the clock’s MAC address. This address is unique to each device. This
number is given on a label on the back of Bodet clock.
- Name: user-defined clock name.
- Enable DHCP checkbox: if checked, the device’s network IP settings will be configured
automatically (in the case where a DHCP server is present on the network).
If this box is unchecked, the following settings are available:
- IP Address: manually sets the clock’s IP address. (required if not DHCP server).
- Subnet Mask: the subnet mask associates a clock with the local network.
- Gateway: the gateway can be used to connect the clock to two data networks.
- DNS Address: this can be used to associate a clock name with an IP address. This avoids
having to enter an IP address in the browser: a user-defined name can be used instead.Example:
www.bodet.com is simpler to remember than 172.17.10.88.
The Save and Reboot button saves your configuration and reboots the clock.

9
EN
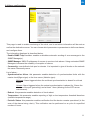
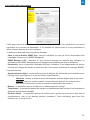
6.3 Time and synchronisation configuration
The Time Configuration page is divided into two parts. One is used to set the time zone, the other
to set the synchronisation mode.
The information displayed is described below:
- Time zone : the drop-down menu can be used to select the appropriate time zone (summer/
winter time changes are automatically managed according to the selected time zone).
When «PROG» is selected in the drop down menu, this feature allows you to set the time, month,
or day fixed rank changes of seasons:

10
EN
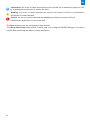
- NTP Mode: one of three modes may be selected:
o Unicast: In Address IP 1, enter the IP address of the NTP server. In this case it is the clock that
calls the NTP server.
It is also possible to set up redundancy (if the first server does not respond, the second is queried,
and so on): for this purpose up to 5 server addresses may be entered.
The Periodicity field sets the frequency with which the clock queries the configured NTP servers.
o Multicast: In this case, the NTP server broadcast the time on the multicast address that
was that given to it. The multicast address of the clients (reveivers) must be the same that the
one on which the server broadcasts.
By default, the Bodet products transmit or receive using the multicast address: 239.192.54.1
The multicast addresses are included between 224.0.0.0 and 239.255.255.255.
o By DHCP: Same mode as Unicast except that the addresses of the NTP servers are
gatherautomatically via the DHCP server (option 42 on the DHCP server).
The checkbox «continue to display time after synchronisation failure» is used to define the
behavior of the AFNOR output after synchronisation NTP failure during 48 hours :
■ The checkbox «continue to display time after synchronisation failure» in OFF, stop
AFNOR emission (configuration by default).
■ The checkbox «continue to display time after synchronisation failure» in ON, the clock
continues to broadcast AFNOR.
The Save buttons save the configuration data entered.

11
EN
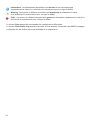
6.4 Alarm configuration
This page is used to enable monitoring of the clock, and to set which information will be sent as
well as the destination server. You can choose which parameter or parameters to define as alarms,
and configure them.
The information displayed is described below:
- Enable SNMP Trap checkbox: enables or disables automatic sending of error messages to the
SNMP Manager(s).
- SNMP Manager 1/2/3: IP addresses of servers to receive clock alarms. Using redundant SNMP
Managers increases the reliability of reception of alarms.
- Community: user-defined clock pool or domain. It is important to give all clocks on the network
the same Community name.
List of alarm :
- Synchronisation failure: this parameter enables detection of synchronisation faults with the
master clock(Sigma type) or the time server (Netsilon type):
Multicast: Alarm triggered when the multicast synchronisation is absent for at least
1hour.
Unicast: Alarm triggered when the unicast synchronisation is absent for 3 times the
duration of the poll (periodicity) and at least 1 hour (allowing for the NTP server
maintenance).
- Reboot: this parameter enables detection of clock reboot.
- Temperature: this parameter enables reporting of high or low temperature threshold breaches
(variable temperature range).
- Periodic Status: this parameter enables verification that the device remains operational (in the
case of the alarms being «lost»). This verification can be performed on a cycle of a specified
number of hours.

12
EN
Information: the errors or faults reported are minor and do not in themselves require a visit
by a maintenance technician to correct the fault.
Warning: the errors or faults reported are serious and require a visit by a maintenance
technician to correct the fault.
Critical: the errors or faults reported are serious and require a prompt visit by a
maintenance technician to correct the fault.
The Save button saves the configuration data entered.
The Send status trap button sends a status trap to all configured SNMP Managers in order to
confirm that monitoring has been correctly configured.

13
EN
6.5 System
This page is divided into four parts as follows:
1st part: information panel displaying the software version and the elapsed time since the
microphone was powered on.
2nd part: a warning message reminds you that once a password is set, a connection can only be
established with the product’s web interface by entering the correct password (max 16 characters).
Enter a username and a password in the appropriate fields. To save the new username and
password, click on Save.
3rd part: a warning message reminds you that rebooting the microphone will cause the network
connection to be lost until the product has fully rebooted. The Reboot button reboots the product.
4th part: a warning message reminds you that rebooting the product with the factory configuration
will erase any settings you have made and may cause the equipment to lose its connection to the
network if there is no DHCP server. The Factory config.+Reboot button reboots the product with
the factory configuration.

14
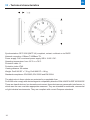
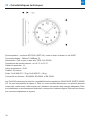
VII - Technical characteristics
Synchronisation: RFC 2030 (SNTP V4) compliant, unicast, multicast or via DHCP.
Network connection: 10Base-T/100Base-TX.
Power supply: PoE or external power supply SELV 12-35 V DC.
Operating temperature: from -25°C to +70°C.
Protection class: III.
Protection index: IP40.
Viewing distance: 60 metres
Weight: Profil 960 SF = 7,5 kg; Profil 960 DF = 18 kg.
Standards compliance: EN 60950, EN 55022 and EN 55024.
The electronics in these clocks are protected by a resettable fuse.
Profil 960 units comply with electromagnetic compatibility directive 2004/108/CE & DBT 2005/95/CE
These are class A devices. In a domestic environment, these devices may cause radio interference, in
which case the user must take appropriate measures. They are intended for residential, commercial
or light industrial environments. They are compliant with current European standards.
EN

15
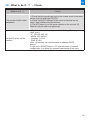
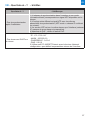
VIII - What to do if…? ... Check.
What to do if…? ... Check
- No synchronisation after
installation
1) Check that the signal type sent by the master clock is the same
as the clock’s signal type (IE NTP).
2) Check that the IP address of the server is identical on the
clock’s web interface and the receiver.
3) The NTP server is on the same network as the receiver (IP
address, subnet mask and gateways).
No DHCP server on the
network
1) By default the interface takes on the following IP setting
(after 3min):
- IP: 192.192.223.100
- MASK: 255.255.0.0
- Gateway: 0.0.0.0
- DNS: 0.0.0.0
(After 15 minutes, the interface asks an address DHCP
server).
2) Use soft « BODET Detect « PC with the button « Network
conguration « to dene the network parameters of the clock.
EN

16
I - Vérification initiale
Nous vous remercions d’avoir choisi une horloge BODET.
Ce produit a été conçu avec soin pour votre satisfaction d’après les bases qualité ISO9001.
Nous vous recommandons, de lire attentivement ce manuel avant de commencer à manipuler
l’horloge.
Conserver ce manuel pendant toute la durée de vie de votre horloge afin de pouvoir vous y reporter
à chaque fois que cela sera nécessaire.
Tout usage non conforme à la présente notice peut causer des dommages irréversibles sur
l’horloge, et entraîne l’annulation de la garantie.
La présente notice concerne les modèles NTP. Pour les autres modèles, se reporter à la
notice correspondante.
1.1 Déballage de l’horloge
Déballer soigneusement l’horloge et vérifier le contenu de l’emballage. Celui-ci doit comprendre :
– l’horloge Profil 960 (avec étiquette comportant l’adresse MAC du produit) et ce manuel,
– une pochette de nettoyage antistatique,
Version : à l’intérieur de l’horloge, une étiquette signalétique précise le version de l’horloge :
NTP = l’horloge est une réceptrice pilotée par une horloge mère ou un serveur NTP.
1.2 Nettoyage
Utiliser un produit antistatique identique à celui de la pochette de nettoyage fournie. Ne jamais
utiliser d’alcool, d’acétone ou autres solvants susceptibles d’endommager le boîtier et la vitre de
votre horloge.
1.3 Pré-requis
Pour la mise en service des horloges, vous pourrez installer le logiciel «BODET Detect». Ce
logiciel est disponible sur le site internet www.bodet-time.com, en téléchargement gratuit.
Note : la prise réseau sur laquelle est connectée l’horloge BODET doit être PoE par l’intermédiaire
d’un switch PoE ou d’un injecteur PoE.
Nous recommandons les marques suivantes :
■Injecteurs PoE : Zyxel, Tp Link, D-Link, HP, Cisco, Axis, ITE Power Supply, PhiHong, Abus,
Globtek.
■Switches PoE : D-Link, HP, Planet, Zyxel, Cisco, NetGear, PhiHong.
FR

17
II - Installation
2.1 Pré-requis
Choisir l’emplacement où sera installée l’horloge en privilégiant un endroit exempt de parasites
électriques (transformateur, ...).
L’installation et l’entretien de ce matériel doivent être réalisés par une personne habilitée.
L’horloge est raccordée au réseau informatique Ethernet PoE. L’installation doit être conforme à la
norme 802.3af, classe 3.
2.2 Horloge Simple Face (SF)
1) Percer le support aux dimensions données.
2) Mettre en place les 2 tire-fonds Ø6 (1) avec leurs rondelles.
3) Eectuer les diérentes connexions (voir § alimentation et § mise en service et mise à
l’heure).
4) Accrocher l’horloge puis serrer les tire-fonds à l’aide d’une clé plate de 10.
FR

18
III - Alimentation
Les horloges NTP sont alimentées et synchronisées par le réseau Ethernet (PoE).
IV - Mise en service et mise à l’heure
1) Connecter l’horloge sur le réseau Ethernet (prise RJ45) (A).
■Catégorie du câble Ethernet : 5 minimum ou 6.
Le type de synchronisation devra être paramètré dans les pages du serveur web embarqué du
produit. Relever l’adresse MAC (étiquette sur le produit (B)) qui sera utile lors de la détection du
produit sur le logiciel Sigma pour le renommer.
2) Signication des LEDs sur le connecteur RJ45
■La Led verte allumée indique que l’horloge est alimentée.
■ La Led jaune clignote à la seconde pour indiquer que l’horloge est synchronisée NTP.
■ La Led jaune clignote en cycle rapide pendant 5s puis s’éteint pendant 3s, signie que
l’horloge n’est pas synchronisée ou n’est plus synchronisée depuis au moins une heure.
■ La Led jaune est allumée en permanence lorsque vous effectuez une localisation de l’horloge
depuis le logiciel Bodet Detect.
V - Configuration réseau
Par défaut la conguration réseau est la suivante :
■Conguration IP par DHCP.
■Time zone : EUR.
■Synchronisation : multicast.
■Adresse de synchronisation : 239.192.54.1.
La configuration usine (complète) est la suivante :
■Nom de l’horloge : «BODET-@MAC».
■Conguration IP par DHCP.
■Time zone : EUR.
■Synchronisation : multicast.
■Adresse de synchronisation : 239.192.54.1.
■Période de pool pour synchronisation unicast : 15 minutes.
■SNMP désactivé.
■Type de trap : V2C.
■Seuil pour alarme température : -5°C à +55°C.
■Période d’émission du trap status : 24H.
■Pas de mot de passe.
FR

19
FR
VI - Serveur web - Utilisation
Pour accéder à l’interface web, il existe deux solutions :
1) Ouvrir une page du navigateur internet puis dans la barre de recherche, entrer l’adresse IP de
l’horloge (Par exemple : 192.0.1.128).
2) Utiliser le logiciel BODET Detect puis cliquer sur Web browser pour ouvrir le serveur web (se
reporter à la notice du logiciel, 607548).
Le logiciel BODET Detect permet de :
- détecter l’horloge présente sur le réseau,
- paramétrer les horloges (indépendament les unes des autres ou copier les paramètres
d’une horloge vers un groupe d’horloge),
- mettre à jour la version logicielle de l’horloge,
- contrôler l’état de l’horloge,
- donner accès au téléchargement de la base de fichiers MIB.
6.1 Accueil
La page d’accueil du serveur web d’une horloge synthétise les informations générales de celle-ci.
Les informations sont affichées de la façon suivante :
- Product : type de produit .
- Name : nom donné au produit par l’utilisateur.
- Synchro : état de la synchronisation (Strat 4 indique que l’horloge est à 4 « niveaux » de la
source de synchronisation) + adresse multicast de diffusion.
- Local Date : date du jour.
- Local Time : heure du jour.

20
FR
6.2 Configuration réseau
Cette page permet de configurer l’horloge sur le réseau. L’avertissement indique que l’horloge peut
perdre la connexion au réseau si les paramètres sont mauvais (Cf. III - Configuration réseau,
page 5).
Ci-dessous le descriptif des informations affichées :
- MAC Address : il s’agit de l’adresse MAC de l’horloge. Cette adresse est unique pour chaque
produit. Numéro indiqué sur une étiquette collée sur l’horloge Bodet.
- Name : nom donné au produit par l’utilisateur.
- Case à cocher Enable DHCP : permet de définir automatiquement les paramètres IP du produit
sur le réseau (dans le cas où un serveur DHCP est présent sur le réseau).
Si celle-ci est décochée, les paramètres suivants sont modifiables :
- IP Address : permet de définir manuellement l’adresse IP de l’horloge (obligatoire si pas de
serveur DHCP).
- Subnet Mask : le masque de sous réseau permet d’associer une horloge au réseau local.
- Gateway : la passerelle permet de relier l’horloge à deux réseaux informatiques.
- DNS Address : adresse permettant d’associer un nom de produit à une adresse IP. Cela permet
d’éviter de rentrer une adresse IP dans le navigateur au profit d’un numéro ou appellation définie
par l’utilisateur. Exemple : www.bodet.com étant plus simple à retenir que 172.17.10.88.
Le bouton Save and Reboot permet de sauvegarder les données modifiées dans l’horloge
concernée, puis de le redémarrer.
La page est en cours de chargement...
La page est en cours de chargement...
La page est en cours de chargement...
La page est en cours de chargement...
La page est en cours de chargement...
La page est en cours de chargement...
La page est en cours de chargement...
La page est en cours de chargement...
-
 1
1
-
 2
2
-
 3
3
-
 4
4
-
 5
5
-
 6
6
-
 7
7
-
 8
8
-
 9
9
-
 10
10
-
 11
11
-
 12
12
-
 13
13
-
 14
14
-
 15
15
-
 16
16
-
 17
17
-
 18
18
-
 19
19
-
 20
20
-
 21
21
-
 22
22
-
 23
23
-
 24
24
-
 25
25
-
 26
26
-
 27
27
-
 28
28


Bodet 933D11 Mode d'emploi
- Taper
- Mode d'emploi
- Ce manuel convient également à
dans d''autres langues
- English: Bodet 933D11 Operating instructions
Documents connexes
-
Bodet Profil 940 Mode d'emploi
-
-
-
-
-
-
-
Bodet Style II Manuel utilisateur
-
-
Bodet 10 Date Mode d'emploi