
Instructions for use
Instruções de uso
Instrucciones de uso
Notice d’utilisation
Cat. I3+
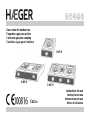
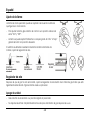
Gas cooker for outdoor use
Fogareiro a gás para ar livre
Cocina de gas para camping
Cuisinière à gaz pour l’extérieur
1-N5-H
2-N5-H
3-N5-H


For your safety, please read carefully the user manual before using
Para sua segurança, leia atentamente este manual antes de começar a usar
Para su seguridad, por favor lea este manual antes de usar
Pour votre sécurité, s’il vous plaît lice ce manuel avant d’utiliser
Use this unit only outdoors or in well ventilated areas
Use este aparelho somente ao ar livre ou em locais bem arejados.
Use este producto solo en aire libre o en lugares bien ventilados.
Utiliser cet appareil uniquement à l’extérieur ou dans des zones bien ventilées


GB
1
Dear customer
Thank you for having chosen a HÆGER product.
The HÆGER products have been produced to think about the welfare of the consumer privileging the most raised
standards of quality, functionality and assign. We are sure you will be happy with this appliance.
We assume that the user is familiar with the common procedures of handling household appliances.
Before using the appliance for the first time please read carefully and thoroughly through these operating instructions
and the safety advice, completely familiarising yourself with the appliance. Retain these instructions for future
reference and pass them on to whoever might acquire the appliance at a future date.
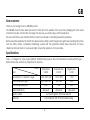
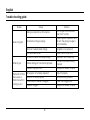
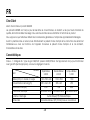
Specifications
Class – 1; Category I3+; Type of gas: G30/G31; 28-30/37mbar pressure. This unit is intended to operate with LPG gas
(Butane/Propane), without any adjustment in advance.
Model
Item
Triple Burner
3-N5-H
Double Burner
2-N5-H
Single Burner
1-N5-H
Burner(mm) d = double S = single
110d + 90d + 40s
110d + 90d
110d
Gas Consumption (g/h)
290 + 265 + 50
290 + 265
290
Total rating power(kW)
8,33
7,68
4,28
Thermal efficiency
Above 65
Above 65
Above 65
Ignition system
Automatic ignition (PZT) Piezo-electric
GAS inlet
Inner Diameter 3/8” (9.5mm) Rubber tubing

English
2
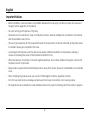
Important Notices
Before installation, make sure there is compatibility between the local supply conditions (nature and pressure of
the gas) and the regulation of the device.
This unit is set for gas LPG (Butane / Propane).
The device is not connected to a flue of combustion products. Must be installed and connected in accordance
with the installation rules in force.
The use of gas appliances for food preparation leads to the production of heat and humidity at the place where
it is installed. Ensure good ventilation of this site.
A prolonged and intensive use of the device may require additional ventilation, for example by opening a
window or increasing the power of the mechanical ventilator if any.
When the device is connected, it can reach high temperatures. Do not allow children coming into contact with
the device and its components.
Keep curtains, papers and other flammable products away from the unit. Never put combustibles on or inside the
stove.
When checking for gas leaks never use any kind of flame lighter, matches, cigarettes or similar.
Do not move when the stove is being used because it can loosen connections and cause a gas leak.
This appliance must be installed in a well ventilated place for its proper functioning and for the safety of peoples.

English
3
Special Precautions
1. Do not use the gas other than the type specified on the label attached.
2. The unit is to be used for cooking only. To prevent any accidents, do not dry towels, clothes etc. over it.
3. Avoid covering the flame with a plate or putting any inflammable materials such as paper or clothes around
the unit.
4. Use it in a well-ventilated room but not facing against any draught.
5. Do not use a vinyl hose. It is liable to be softened by heat. Use only a rubber tubing.
6. Do not use a warn-out rubber tubing, as it may be cranked and is not sufficiently elastic at both ends. Such
tubing is liable to cause gas leakage.
7. Ensure that the rubber tubing does not touch part of the unit nor lies under near it.
8. While in use do not go out or go to bed. Be sure to turn off the ignition knob and the stopcock of the cylinder
after use. When going to bed or going out, be doubly sure that they are turned off.
9. If abnormal combustion is observed while in use, turn off the stopcock at once and examine the unit referring to
the "Trouble Shooting Guide"
10. Avoid touching the burner trivet, tray etc, immediately after use or while in use.
11. If a gas leak is found, turn off the stopcock, open all the windows and call your dealer to repair it refrain from
turning electric switch on or off lighting match, or using a lighter on any other equipment which could ignite the
gas.
12. If the cooker is used with an inferior or damaged regulator, an abnormal gas pressure will be applied on the gas
cooker, thus causing incomplete combustion or other troubles with the gas cooker. Use a suitable gas regulator
in consultation with your gas dealer.
13. If your suspect the unit is faulty, do not use it but call your dealer.

English
4
Commissioning
The device should be placed on a stable desk/support safeguarding the following conditions:
The desk/support should be firm and level and withstand high temperatures.
The device should be placed at least 15cm from the
side walls.
There should be no obstacles or any mobile device
and over a distance of less than 100cm.
Choose a well ventilated location to allow for a
proper functioning of equipment and safety.

English
5
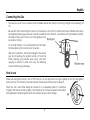
Connecting the Gas
The device was set to be connected with a flexible rubber tube (hose) and having a length not exceeding 125
cm.
Be sure that after connecting the hose it is not creased or is in contact or near the hot zones. Whether the tube or
the regulator/reducing gas pressure should be certified and marked in accordance with applicable standards.
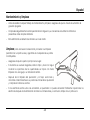
The fixing of the pipe to the unit and the gearbox must
be done by clamps.
For a better fixation it is recommended that first heats
the tube dipping it for one minute in hot water.
After the connections, check the leakage of the whole
gas circuit retaining the ignition buttons off and the
bottle reducing gas pressure knob open, and then
applying a mixture of water and soap. The blistering
means that there is gas leakage.
How to use
Make sure the ignition button is set to "OFF" then turn on the stopcock of the gas cylinder at full. Push the ignition
button and turn it to the left until a clicks is heard. Make sure that the burner has been lit.
When the unit is used after being left unused for a considerable period, it sometimes
happens that the burner fails to ignite. This is because air has been trapped in the rubber
tubing. Repeat turning the ignition knob a few times until gas comes through.

English
6
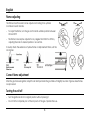
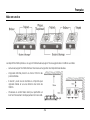
Flame adjusting
The flame of each burner can be adjusted according to he symbols
contained in each handle.
To adjust the flame, turn the gas control knob suitable position between
ON and OFF.
The flame can easily be adjusted to any degree from HIGH to LOW by
adjusting the knob to desired position in one action.
If visually check the existence of yellow flame or displacement flame, set the
air damper.
Correct flame adjustment
After the gas has been ignited, adjust the air damper inside the gas table until slightly rounded. Vigorous blue flames
are produced.
Turning the unit off
Turn the ignition knob to its original position without pressing it.
Do not fall to completely turn of the stopcock of the gas cylinder after use.

English
7
Maintenance and Cleaning
Before performing any maintenance and cleaning, make sure that the gas supply valve is off.
Regularly check the leakage of the hose and its connections replacing it whenever it is deteriorated or present
before the date indicated.
This check should be made at least once a year.
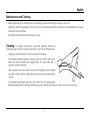
Cleaning: for proper conservation, should be regularly carried out
cleaning using a soft cloth and warm water on any of its constituent parts.
Make sure that the burned and its lid are placed correctly.
If the flames become irregular, remove cover and wash it with water.
When the burner nozzles get clogged with dirt, wipe them with a
needle or similar instrument.
After washing the burner and lid, dry them thoroughly and place them
correctly in their positions. Light the burner and make sure the flame is
normal.
If the ignition electrodes are dirty, the burner may not ignite easily.
Inspect the electrodes carefully after removing all containers and if they are dirty, clean with a dry cloth.

English
8
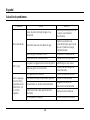
Trouble-shooting guide
Trouble
Cause
Solution
Does not ignite
Main gas stopcock is not turned on
Turn off gas cock once and
then turn it on fully
Air remains in the gas piping
Repeat ignition operation until
all air in the piping is purged
out completely
Bento or crushed rubber tubing
Straighten it or replace it
Dirty piezo-electrode
Clean it with a day cloth
Smell of gas
Cracks or holes in the rubber tubing
Replace it with a new one
Rubber tubing not connected properly
Connect the rubber tubing
properly
Failure of the gas cook
Request the dealer to repair
Flame lifts off from
the burners in
flash back with a
roaring sound
Air supply is not properly adjusted
Adjust it properly
Burner is not titled properly
Fix burner body properly
Flame outlet of burner is clogged
Clean the clogged part
Nozzle is clogged
Request the dealer to repair

English
9
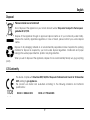
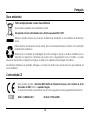
Disposal
Please consider our environment
Do not dispose of the appliance in your normal domestic waste. This product is subject to the European
guideline 2012/19/EC.
Dispose of the appliance through an approved disposal centre or at your community waste facility.
Observe the currently applicable regulations. In case of doubt, please contact your waste disposal
centre.
Dispose of all packaging materials in an environmentally responsible manner. Separate the packing
materials for disposal as required by your local waste disposal regulations. Cardboards and paper
belong in the waste paper collection, plastic in recycling collection.
When you wish to dispose of the appliance, dispose it in an environmentally friendly way (e.g. recycling
plant).
CE Conformity
This device complies with Directive 2009/142/CE of European Parliament and Council of 30 November
2009, relating to gas appliances.
The product was tested and evaluated according to the following standards and technical
specifications:
EN 30-1-1:2008+A3:2013 EN 30-2-1:1998+A2:2005
1008
312

PT
10
Estimado Cliente
Obrigado por ter escolhido um produto HÆGER.
Os produtos HÆGER foram concebidos a pensar no bem-estar do consumidor, privilegiando os mais elevados
padrões de qualidade, funcionalidade e designe. Estamos certos da sua satisfação pela aquisição deste produto.
Partimos do princípio que o utilizador possui conhecimentos gerais sobre o manuseamento com electrodomésticos.
Antes da primeira utilização, leia cuidadosa e totalmente estas instruções de utilização e de segurança e familiarize-
se com as funções do aparelho. Guarde estas instruções e, se necessário, entregue-as a terceiros.
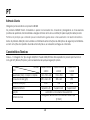
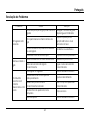
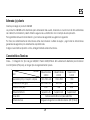
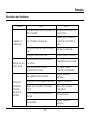
Características Técnicas
Classe – 1; Categoria: I3+; Tipo de gás: G30/G31; Pressão 28-30/37mbar. Este aparelho foi previsto para funcionar
com gás GPL (Butano/Propano), sem necessidade de qualquer regulação prévia.
Modelo
Item
3 Queimadores
3-N5-H
2 Queimadores
2-N5-H
1Queimador
1-N5-H
Queimador (mm) d =duplo S =simples
110d + 90d + 40s
110d + 90d
110d
Consumo do Gás (g/h)
290 + 265 + 50
290 + 265
290
Potência Total (kw)
8,33
7,68
4,28
Eficiência Térmica
Superior a 65
Superior a 65
Superior a 65
Ignição
Automática com sistema Piezo-eléctrico
Entrada do Gás
Mangueira de borracha com diâmetro interno 3/8”
(9.5mm)

Português
11
Avisos Importantes
Antes da instalação, assegure-se que existe compatibilidade entre as condições de distribuição local (natureza
e pressão do gás) e a regulação do aparelho.
Este aparelho está regulado para gás GPL (Butano/Propano).
O aparelho não é ligado a uma conduta de evacuação dos produtos de combustão. Deve ser instalado e
ligado de acordo com as regras de instalação em vigor.
A utilização de aparelhos a gás para preparação de alimentos conduz à produção de calor e humidade, no
local onde está instalado. Assegure um bom arejamento desse local.
Uma utilização intensiva e prolongada do aparelho, pode necessitar de arejamento suplementar, por exemplo
abrindo uma janela, ou aumentando a potência do ventilador mecânico se existir.
Quando o aparelho está ligado, pode atingir temperaturas elevadas. Evite que as crianças entrem em contacto
com o aparelho e seus componentes.
Mantenha as cortinas, papéis e outros produtos inflamáveis fora do alcance do aparelho. Nunca coloque
produtos combustíveis no ou dentro do fogareiro.
Quando verificar fugas de gás nunca utilize nenhum tipo de chama com isqueiro, fósforos, cigarro ou outros
similares.
Não mova o fogão quando estiver a ser usado pois pode desprender as ligações e provocar uma fuga de gás.
Este aparelho deverá ser instalado em local bem arejado quer para o seu bom funcionamento, quer para a
segurança das pessoas.

Português
12
Precauções especiais
1. Não utilize gás diferente do tipo especificado na chapa.
2. O aparelho é para ser usado somente para cozinhar. Para evitar acidentes, não seque toalhas, roupas, etc.
sobre ou ao redor do aparelho.
3. Evite cobrir a chama com um prato ou colocar qualquer material inflamável, como por exemplo papel ou
roupa ao redor do aparelho.
4. Use-o em locais bem arejados, mas afastados de correntes de ar.
5. Não use tubo de vinil pois pode amolecer devido ao calor. Use apenas tubo flexível de borracha.
6. Nunca use tubo de borracha desgastada, pois pode quebrar e não é suficientemente elástico nas
extremidades. Tais tubos são susceptíveis de provocar fugas de gás.
7. Certifique-se que o tubo de borracha depois de instalado não toque em partes quentes, nem está sob o
aparelho.
8. Quando a aparelho está em uso, não o deixe sem supervisão. Certifique-se que desligou o botão da ignição
e a válvula da botija após o uso. Quando for deitar ou sair, verifique duplamente que o fogareiro bem como
a botija estão desligados.
9. Se durante o uso observar uma combustão anormal, desligue imediatamente a torneira, e examine o
aparelho seguindo as indicações do capítulo "Resolução de Problemas".
10. Evite tocar nas tampas e nos tripés do queimador imediatamente após o uso.
11. Se verificar uma fuga de gás, feche a torneira de segurança e abra todas as janelas para arejar. Chame um
técnico para verificar e corrigir a anomalia. Evite ligar e desligar os interruptores de luz, o isqueiro ou outros
equipamentos que possam inflamar o gás.
12. Se o aparelho for usado com regulador de pressão danificado, será aplicada uma pressão de gás anormal
causando assim uma combustão incompleta ou outros problemas. Utilize um regulador de pressão de gás
apropriado de acordo com os conselhos do seu fornecedor de gás.
13. Se suspeitar que o aparelho está com defeito, não o use, chame antes um técnico qualificado.

Português
13
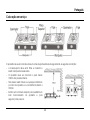
Colocação em serviço
O aparelho deve ser colocado sobre uma mesa/suporte estável salvaguardando as seguintes condições:
A mesa/suporte deve estar firme e nivelada e
resistir a temperaturas elevadas.
O aparelho deve ser colocado a pelo menos
150mm das paredes laterais.
Não devem existir móveis ou quaisquer obstáculos
por cima do aparelho e a uma distância inferior a
100 mm.
Escolha um local bem arejado para possibilitar um
bom funcionamento do aparelho e para
segurança das pessoas.

Português
14
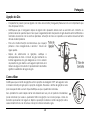
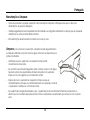
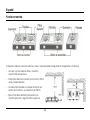
Ligação do Gás
O aparelho foi previsto para ser ligado com tubo de borracha (mangueira) flexível e com um comprimento que
não ultrapasse 125 cm.
Certifique-se que a mangueira depois de ligada não apresenta dobras nem se encontra em contacto ou
próximo de zonas quentes. Quer o tubo quer o regulador/redutor de pressão do gás deverão estar certificados e
marcados de acordo com as normas aplicáveis. A fixação do tubo ao aparelho e ao redutor deverá ser feita
através de abraçadeiras.
Para uma melhor fixação recomenda-se que aqueça
primeiro o tubo mergulhando-o durante 1 minuto em
água quente.
Depois de efectuadas as ligações, verifique a
estanquidade de todo o circuito de gás mantendo os
botões reguladores do gás desligados e com o redutor
de pressão do gás aberto e em seguida aplicando uma
mistura de água com sabão. O aparecimento de bolhas
significa a existência de fugas de gás.
Como utilizar
Certifique-se que o botão de ignição está na posição de desligado "OFF", em seguida, rode
a torneira da botija do gás para a posição de ligado. Pressione o botão de ignição e rode
para a esquerda até ouvir um clique Certifique-se que o queimador acendeu.
Se o aparelho for usado depois de ter sido deixado sem uso por um período considerável,
pode acontecer por vezes o queimador falhar na ignição. Isso ocorre porque o tubo de
borracha pode estar com algum ar. Repita a operação rodando o botão de ignição várias
vezes até retirar todo o ar do tubo e começar a circular somente o gás.

Português
15
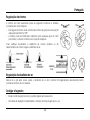
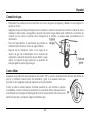
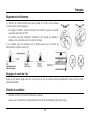
Regulação da chama
A chama de cada queimador pode ser regulada conforme os símbolos
constantes em cada manípulo.
Para regular a chama, rode o botão de controlo de gás para uma posição
adequada entre"ON" e "OFF".
A chama pode ser facilmente adaptada para qualquer grau de "alta"
para "baixa", rodando o botão para a posição desejada.
Caso verifique visualmente a existência de chama amarela ou de
deslocamento de chama, regule o abafador de ar.
Regulação do abafador de ar
Depois de o gás estar aceso, ajuste o abafador de ar até a chama ficar ligeiramente arredondada. Serão
produzidas chamas de cor azulada.
Desligar o fogareiro
Rode o botão de ignição para a posição original sem pressioná-lo.
Não deixe de desligar completamente a torneira da botija de gás após o uso.

Português
16
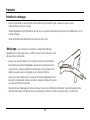
Manutenção e Limpeza
Antes de proceder a qualquer operação de manutenção e limpeza, certifique-se de que a válvula de
alimentação do gás está desligada.
Verifique regularmente a estanquidade do tubo flexível e suas ligações substituindo-o sempre que se apresente
deteriorado ou antes da data limite indicada.
Esta verificação deverá ser feita no mínimo uma vez por ano.
Limpeza: para uma boa conservação, deverá proceder regularmente à
sua limpeza utilizando um pano macio e água morna em qualquer das suas
partes constituintes.
Certifique-se que o queimado e a respectiva tampa estão
correctamente colocados.
Se as chamas se tornarem irregulares, retire a tampa e lave-a com água.
Quando os bicos dos queimadores ficarem entupidos com sujidades,
limpe-os com uma agulha ou um instrumento similar.
Depois de lavar o queimador e a respectiva tampa, seque-as
completamente e coloque-as correctamente em suas posições. Acenda
o queimador e verifique se a chama é normal.
Se os eléctrodos de ignição estiverem sujos, o queimador pode não inflamar facilmente. Inspeccione os
eléctrodos com cuidado depois de remover todos os recipientes e se estiverem sujos, limpe-os com um pano
seco.
La page est en cours de chargement...
La page est en cours de chargement...
La page est en cours de chargement...
La page est en cours de chargement...
La page est en cours de chargement...
La page est en cours de chargement...
La page est en cours de chargement...
La page est en cours de chargement...
La page est en cours de chargement...
La page est en cours de chargement...
La page est en cours de chargement...
La page est en cours de chargement...
La page est en cours de chargement...
La page est en cours de chargement...
La page est en cours de chargement...
La page est en cours de chargement...
La page est en cours de chargement...
La page est en cours de chargement...
La page est en cours de chargement...
La page est en cours de chargement...
La page est en cours de chargement...
La page est en cours de chargement...
-
 1
1
-
 2
2
-
 3
3
-
 4
4
-
 5
5
-
 6
6
-
 7
7
-
 8
8
-
 9
9
-
 10
10
-
 11
11
-
 12
12
-
 13
13
-
 14
14
-
 15
15
-
 16
16
-
 17
17
-
 18
18
-
 19
19
-
 20
20
-
 21
21
-
 22
22
-
 23
23
-
 24
24
-
 25
25
-
 26
26
-
 27
27
-
 28
28
-
 29
29
-
 30
30
-
 31
31
-
 32
32
-
 33
33
-
 34
34
-
 35
35
-
 36
36
-
 37
37
-
 38
38
-
 39
39
-
 40
40
-
 41
41
-
 42
42


dans d''autres langues
- English: HAEGER 1-N5-H User manual
- español: HAEGER 1-N5-H Manual de usuario
- português: HAEGER 1-N5-H Manual do usuário