
LCD monitor
K192WL

LCD Monitor Quick Setup Guide
English
Acer LCD Monitor Quick Start Guide (QSG)
Important safety instructions
Please read the following instructions carefully.
1. To clean the LCD monitor screen: Be sure that your monitor is electrically rated to operate with the AC power available in your
location.
• Turn off the LCD monitor and unplug the power cord.
• Spray a non-solvent cleaning solution onto a rag and clean the screen gently.
2. Do not place the LCD monitor near a window. Exposing the monitor to rain, moisture or sunlight can severely damage it.
3. Do not apply pressure to the LCD screen. Excessive pressure may cause permanent damage to the display.
4. Do not remove the cover or attempt to service this unit yourself. An authorized technician should perform servicing of any
nature.
5. Store the LCD monitor in a room with a temperature of -20° to 60° C (-4° to140° F). Storing the LCD monitor outside this range
may result in permanent damage.
6. Immediately unplug your monitor and call an authorized technician if any of the following circumstances occur:
• Monitor-to-PC signal cable is frayed or damaged.
• Liquid spills onto the LCD monitor or the monitor is exposed to rain.
• The LCD monitor or case is damaged.
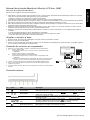
Attaching the monitor to the base
1. Remove the monitor base from the packaging and place it on a stable and level workspace.
2. Remove the monitor from the packaging.
3. Align the release button at the buttom of the monitor with the corresponding slot at the bottom of the base. A clicking sound
signifies that the monitor has been securely attached to the base.
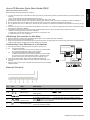
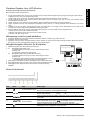
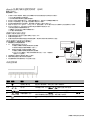
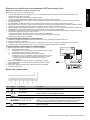
Connecting Your Monitor to a Computer
1. Turn off your monitor and unplug your computer’s power cord.
2. 2-1 Connect Video Cable
a. Make sure both the monitor and computer are powered-OFF.
b. Connect the VGA video cable to the computer.
2-2 Connect Digital Cable (Only Dual-input model)
a. Make sure both the monitor and computer are powered-OFF.
b. Connect one end of the 24-pin DVI cable to the back of the
monitor and connect the other end to the computer's port.
3. Connect the Audio Cable. (Only Audio-Input Model) (Optional)
4. Insert the monitor power cable into the power port at the back of the
monitor.
5. Plug the power cords of your computer and your monitor into a nearby
electrical outlet.
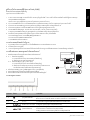
External Controls
No. Icon Item Description
1, 2
Power button/
indicator
Turns the monitor on/off.
Blue indicates power on. Amber indicates standby/power saving mode.
3, 4 Minus / plus
If the OSD is active, press the Minus or Plus button to toggle between the
OSD options.
5 OSD functions Press to view the OSD. Press again to enter a selection in the OSD.
6
Auto adjust
button / exit
If the OSD is active, press Auto to exit the OSD. Once the OSD is inactive,
press Auto and the monitor will automatically optimize the display position,
focus, and clock of your display.
7 Empowering key
Press the Empowering Key to open the Acer eColor Management OSD and
access the scenario modes.
AUDIO IN
VGA IN
DVI-D IN
DVI
D-Sub
AUDIO IN
VGA IN
DVI-D IN
/

LCD Monitor Quick Setup Guide
English
Regulations and safety notices
FCC notice
This device has been tested and found to comply with the limits for a Class B digital device pursuant to Part 15
of the FCC rules. These limits are designed to provide reasonable protection against harmful interference in a
residential installation. This device generates, uses, and can radiate radio frequency energy and, if not installed
and used in accordance with the instructions, may cause harmful interference to radio communications.
However, there is no guarantee that interference will not occur in a particular installation. If this device does
cause harmful interference to radio or television reception, which can be determined by turning the device off
and on, the user is encouraged to try to correct the interference by one or more of the following measures:
Reorient or relocate the receiving antenna.
Increase the separation between the device and receiver.
Connect the device into an outlet on a circuit different from that to which the receiver is connected.
Consult the dealer or an experienced radio/television technician for help.
CE declaration of Conformity
Hereby, Acer Inc., declares that this LCD monitor is in compliance with the essential requirements and other
relevant provisions of EMC Directive 2004/108/EC, Low Voltage Directive 2006/95/EC, and RoHS Directive 2011/
65/EU and Directive 2009/125/EC with regard to establishing a framework for the setting of ecodesign
requirements for energy-related product.
Notice: Shielded cables
All connections to other computing devices must be made using shielded cables to maintain compliance with
EMC regulations.
Notice: Peripheral devices
Only peripherals (input/output devices, terminals, printers, etc.) certified to comply with the Class B limits may
be attached to this equipment. Operation with non-certified peripherals is likely to result in interference to
radio and TV reception.
Caution
Changes or modifications not expressly approved by the manufacturer could void the user authority, which is
granted by the Federal Communications Commission, to operate this product.
Operation conditions
This device complies with Part 15 of the FCC Rules. Operation is subject to the following two conditions: (1) this
device may not cause harmful interference, and (2) this device must accept any interference received, including
interference that may cause undesired operation.
Notice: Canadian users
This Class B digital apparatus complies with Canadian ICES-003.
Remarque à l'intention des utilisateurs canadiens
Cet appareil numérique de la classe B est conforme a la norme NMB-003 du Canada.
Disposal of Waste Equipment by Users in Private Household in the European Union
This symbol on the product or on its packaging indicates that this product must not be disposed of
with your other household waste. Instead, it is your responsibility to dispose of your waste
equipment by handing it over to a designated collection point for the recycling of waste electrical
and electronic equipment. The separate collection and recycling of your waste equipment at the
time of disposal will help to conserve natural resources and ensure that it is recycled in a manner
that protects human health and the environment. For more information about where you can
drop off your waste equipment for recycling, please contact your local city office, your household
waste disposal service or the shop where you purchased the product.

¤ÙèÁ×Í¡ÒÃμÑ駤èÒÍÂèÒ§àÃçǢͧ¨ÍÀÒ¾ LCD
ä·Â
¤ÙèÁ×Í¡ÒÃãªé§Ò¹¨ÍáÍÅ«Õ´Õ Acer ©ºÑºÂèÍ (QSG)
¤Óá¹Ð¹Ó´éÒ¹¤ÇÒÁ»ÅÍ´ÀÑ·ÕèÊÓ¤Ñ−
¡ÃسÒÍèÒ¹¤Óá¹Ð¹ÓμèÍ仹ÕéÍÂèÒ§¶Õè¶éǹ
1. ¡Ò÷ӤÇÒÁÊÐÍÒ´¨ÍáÍÅ«Õ´Õ: μÃǨÊͺãËéá¹èã¨ÇèÒ¨ÍÀÒ¾ÃкآéÍÁÙÅ´éҹ俿éÒ ÇèÒÊÒÁÒöãªé§Ò¹ä´é¡Ñºáç´Ñ¹ä¿¿éÒ AC ·ÕèãªéÍÂÙèã¹»ÃÐà·È¢Í§¤Ø³
• »Ô´¨ÍáÍÅ«Õ´ÕáÅжʹ»ÅÑê¡ä¿ÍÍ¡
• ©Õ´¹éÓÂÒ·Ó¤ÇÒÁÊÐÍÒ´·ÕèäÁèãªèÊÒÃÅÐÅÒÂŧº¹¼éÒáÅÐàªç´·Ó¤ÇÒÁÊÐÍҴ˹éÒ¨ÍàºÒæ
2. ÍÂèÒÇÒ§¨ÍáÍÅ«Õ´ÕäÇéã¡Åé˹éÒμèÒ§ ¡ÒÃãËé¨ÍÊÑÁ¼ÑʡѺ¹éÓ½¹ ¤ÇÒÁª×é¹ËÃ×ÍáʧᴴÊÒÁÒöÊÃéÒ§¤ÇÒÁàÊÕÂËÒÂÍÂèÒ§Ãعáç¡ÑºË¹éÒ¨Íä´é
3. ÍÂèÒÍÍ¡áç¡´º¹¨ÍáÍÅ«Õ´Õ¡Òö١áç¡´ÁÒ¡à¡Ô¹ä»ÍÒ¨·ÓãËéà¡Ô´¤ÇÒÁàÊÕÂËÒ·ÕèäÁèÍÒ¨«èÍÁá«Áä´é¡ÑºË¹éÒ¨Í
4. ÍÂèҶʹ½Ò¤ÃͺËÃ×;ÂÒÂÒÁá¡é䢨ÍáÍÅ«Õ´Õ´éÇÂμ¹àͧ ãËéªèÒ§¼ÙéàªÕèÂǪÒ−à»ç¹¼Ù
é´Óà¹Ô¹¡ÒÃá¡éä¢
5. à¡çº¨ÍáÍÅ«Õ´Õã¹Ëéͧ·ÕèÁÕÍسËÀÙÁÔ -20
°C
¶Ö§ 60
°C
ͧÈÒà«Åà«ÕÂÊ (-4
°F
¶Ö§ 140
°F
ͧÈÒ¿Òàùäιì)
¡ÒÃà¡çºÃÑ¡ÉÒ¨ÍáÍūմչ͡à˹×ͨҡªèǧÍسËÀÙÁԴѧ¡ÅèÒÇÍÒ¨Ê觼ÅàÊÕÂËÒ·ÕèäÁèÍÒ¨«èÍÁá«Áä´é¡ÑºË¹éÒ¨Í
6. ¶Í´»ÅÑê¡Ë¹éҨͧ͢¤Ø³·Ñ¹·ÕáÅÐãËéªèÒ§¼ÙéàªÕèÂǪÒ−·Ó¡ÒÃá¡éä¢ËÒ¡ÁÕʶҹ¡Òóìã´æ μèÍ仹Õéà¡Ô´¢Öé¹
• ÊÒÂà¤àºÔÅÊè§ÊÑ−−Ò³ÃÐËÇèÒ§¨ÍáÍūմաѺ¾Õ«ÕËÅØ´ÅØèÂËÃ×ÍàÊÕÂËÒÂ
• ¢Í§àËÅÇˡô¨ÍáÍÅ«Õ´ÕËÃ×ͨÍÊÑÁ¼ÑʡѺ¹éÓ½¹
• ¨ÍáÍÅ«Õ´ÕËÃ×ÍμÑÇà¤Ã×èͧ¢Í§¨ÍàÊÕÂËÒÂ
¡ÒûÃСͺÁ͹ÔàμÍÃìà¢éҡѺ°Ò¹
1. ¹Ó°Ò¹Á͹ÔàμÍÃìÍÍ¡¨Ò¡ºÃèØÀѳ±ìáÅÐÇÒ§äÇ麹¾×é¹·Õè·ÕèÁÕÊà¶ÕÂÃáÅÐÃÒºàÃÕºà¾×èÍàμÃÕÂÁ¡ÒûÃСͺ
2. ¹ÓÁ͹ÔàμÍÃìÍÍ¡¨Ò¡ºÃèØÀѳ±ì
3. ÇÒ§μÓá˹觻ØèÁ»Å´°Ò¹·Õè´éÒ¹ÅèÒ§¢Í§Á͹ÔàμÍÃìãËéμç¡Ñºªèͧ·Õè´éÒ¹ÅèÒ§¢Í§°Ò¹ËÒ¡ä´éÂÔ¹àÊÕ§¤ÅÔ¡áÊ´§ÇèÒÁ͹ÔàμÍÃìμÔ´¡Ñº°Ò¹á¹è¹´ÕáÅéÇ
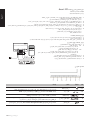
¡ÒÃàª×èÍÁμèͨÍÀÒ¾¢Í§¤Ø³à¢éҡѺ¤ÍÁ¾ÔÇàμÍÃì
1. »Ô´à¤Ã×èͧ¤ÍÁ¾ÔÇàμÍÃì¢Í§¤Ø³áÅéǶʹÊÒÂ俢ͧà¤Ã×èͧ¤ÍÁ¾ÔÇàμÍÃì
2. 2-1 àª×èÍÁμèÍÊÒÂà¤àºÔÅÇÔ´ÕâÍ
a. μÃǨÊͺãËéá¹èã¨ÇèÒ·Ñ駨ÍÀÒ¾áÅФÍÁ¾ÔÇàμÍÃì»Ô´à¤Ã×èͧÍÂÙè
b. àª×èÍÁμèÍÊÒÂà¤àºÔÅ VGA ä»Âѧ¤ÍÁ¾ÔÇàμÍÃì
2-2 àª×èÍÁμèÍÊÒ´ԨÔμÍÅ (੾ÒÐÃØè¹ Dual-input)
a. μÃǨÊͺãËéá¹èã¨ÇèÒ·Ñ駨ÍÀÒ¾áÅФÍÁ¾ÔÇàμÍÃì»Ô´à¤ÃÍ×è§ÍÂÙè
b. àª×èÍÁμèÍ»ÅÒ´éҹ˹Ö觢ͧÊÒÂà¤àºÔÅ DVI 24 ¾Ô¹à¢éҡѺ´éÒ¹ËÅѧ¢Í§¨ÍÀÒ¾
áÅÐàª×èÍÁμèÍ»ÅÒÂÍÕ¡´éҹ˹Öè§ä»Âѧ¾ÍÃìμ¢Í§¤ÍÁ¾ÔÇàμÍÃì
3. àª×èÍÁμèÍÊÒÂà¤àºÔÅàÊÕ§ (੾ÒÐÃØè¹·Õ
èÁÕÍÔ¹¾ØμàÊÕ§à·èÒ¹Ñé¹) (ÍØ»¡Ã³ì«×éÍà¾ÔèÁ)
4. àÊÕºÊÒÂä¿Á͹ÔàμÍÃìà¢éҡѺ¾ÍÃìμÊÒÂä¿·Õè´éÒ¹ËÅѧ¢Í§Á͹ÔàμÍÃì
5. àÊÕºÊÒÂ俢ͧ¤ÍÁ¾ÔÇàμÍÃìáÅÐÁ͹ÔàμÍÃì¢Í§¤Ø³à¢éҡѺàμéÒàÊÕº俿éÒ·ÕèÍÂÙèã¡Åé
¡ÒäǺ¤ØÁÀÒ¹͡
ËÁÒÂàÅ¢ äͤ͹ ÃÒ¡Òà ÃÒÂÅÐàÍÕ´
1, 2 »ØèÁ/−Åѡɳìà»Ô´à¤Ã×èͧ
à»Ô´/»Ô´¨ÍÀÒ¾
ÊÕ¹éÓà§Ô¹ ËÁÒ¤ÇÒÁÇèÒà»Ô´à¤Ã×èͧ ÊÕàËÅ×ͧ ËÁÒ¶֧âËÁ ´Êáμ¹´ìºÒÂ/¡ÒûÃÐËÂÑ´¾Åѧ§Ò¹
3, 4 ź/ºÇ¡ ËÒ¡ OSD à»Ô´ãªé§Ò¹ÍÂÙèãËé¡´»ØèÁźËÃ×ͺǡà¾×èÍÊÅѺÃÐËÇèÒ§μÑÑÇàÅ×Í¡ OSD
5¿Ñ§¡ìªÑ蹡Ò÷ӧҹ¢Í§ OSD ¡´à¾×èÍ´Ù OSD ¡´ÍÕ¡¤ÃÑé§à¾×èÍ·Ó¡ÒÃàÅ×Í¡μÑÑÇàÅ×Í¡ã¹ OSD
6»ØèÁ»ÃѺÍÑμâ¹ÁÑμÔÔ/ÍÍ¡
ËÒ¡ OSD à»Ô´ãªé§Ò¹ÍÂÙèãËé¡´ Auto à¾×èÍÍÍ¡¨Ò¡ OSD àÁ×èÍ OSD ¹Ñé¹»Ô´¡ÒÃãªé§Ò¹ÍÂÙèãËé¡´ Auto
áÅéǨÍáÊ´§¼Å¨Ð·Ó¡ÒûÃѺ¤èÒμÓá˹觡ÒÃáÊ´§¼Å â¿¡ÑÊ
áÅÐÊÑ−−Ò³¹ÒÌԡҢͧ¨ÍáÊ´§¼Å¢Í§¤Ø³¹Ñé¹ãËéàËÁÒÐÊÁ·ÕèÊØ´â´ÂÍÑμâ¹ÁÑμÔ
AUDIO IN
VGA IN
DVI-D IN
DVI
D-Sub
AUDIO IN
VGA IN
DVI-D IN
/

¤ÙèÁ×Í¡ÒÃμÑ駤èÒÍÂèÒ§àÃçǢͧ¨ÍÀÒ¾ LCD
ä·Â
¡®¢éͺѧ¤ÑºáÅлÃСÒÈ´éÒ¹¤ÇÒÁ»ÅÍ´ÀÑÂ
»ÃСÒÈ FCC
ÍØ»¡Ã³ì¹Õéä´éÃѺ¡Ò÷´Êͺ áÅоºÇèÒÊÍ´¤Åéͧ¡Ñº¢éͨӡѴÊÓËÃѺÍØ»¡Ã³ì´Ô¨ÔμÍŤÅÒÊ B «Öè§μç¡ÑºÊèǹ·Õè 15 ¢Í§¡®¢éͺѧ¤Ñº FCC ¢éÍ
¨Ó¡Ñ´àËÅèÒ¹Õéä´éÃѺ¡ÒÃÍ͡Ẻ à¾×èÍãËé¡Òûéͧ¡Ñ¹·ÕèÊÁàËμØÊÁ¼ÅμèÍ¡ÒÃú¡Ç¹·Õèà»ç¹ ÍѹμÃÒÂ㹡ÒÃμÔ´μÑ駺ÃÔàdz·Õè¾Ñ¡ÍÒÈÑ ÍØ»¡Ã³ì¹ÕéÊÃéÒ§ ãªé
áÅÐÊÒÁÒöá¼èÃѧÊÕ¾Åѧ§Ò¹¤ÇÒÁ¶ÕèÇÔ·ÂØ áÅжéÒäÁèä´é μÔ´μÑé§áÅÐãªéμÒÁ·ÕèÃкØã¹¢Ñé¹μ͹¡ÒÃãªé§Ò¹ ÍÒ¨¡èÍãËéà¡Ô´¡ÒÃú¡Ç¹·Õèà»ç¹ÍѹμÃÒ μèÍ¡ÒÃÊ×èÍÊÒ÷ҧÇÔ·ÂØ
ÍÂèÒ§äáçμÒÁ äÁè
ÁÕ¡ÒÃÃѺ»ÃСѹÇèÒ ¡ÒÃú¡Ç¹¨ÐäÁèà¡Ô´¢Öé¹ã¹¡ÒÃμÔ´μÑé§áºº¾ÔàÈÉ ¶éÒÍØ»¡Ã³ìà»ç¹ÊÒàËμØ ãËéà¡Ô´¡ÒÃú¡Ç¹·Õèà»ç¹ÍѹμÃÒ μèÍ¡ÒÃÃѺ¤Å×è¹ÇÔ·ÂØ
áÅÐâ·Ã·ÑÈ¹ì «Öè§ÊÒÁÒöÃкØä´éâ´Â¡ÒûԴáÅÐà»Ô´ÍØ»¡Ã³ì ¼Ùéãªé¤ÇþÂÒÂÒÁá¡é䢡ÒÃú¡Ç¹â´ÂãªéÇÔ¸Õ¡ÒÃ˹Öè§ËÃ×Í ËÅÒÂÇÔ¸Õ¡ÒÃμèÍ仹ÕéÃèÇÁ¡Ñ¹:
»ÃѺ·ÔÈ·Ò§ ËÃ×Íà»ÅÕè¹μÓá˹è§àÊÒÍÒ¡ÒÈÃѺÊÑ−−Ò³
à¾ÔèÁÃÐÂÐËèÒ§ÃÐËÇèÒ§ÍØ»¡Ã³ìáÅÐà¤Ã×èͧÃѺ
àª×èÍÁμèÍÍØ»¡Ã³ìã¹àμéÒàÊÕº俿éÒ·ÕèÁÕǧ¨Ãáμ¡μèÒ§¨Ò¡·Õèãªéàª×èÍÁμè͡Ѻà¤Ã×èͧÃѺÊÑ−−Ò³
»ÃÖ¡ÉÒμÑÇá·¹¨Ó˹èÒ ËÃ×ͪèҧ෤¹Ô¤ÇÔ·ÂØ/â·Ã·Ñȹì·ÕèÁÕ»ÃÐʺ¡Òóìà¾×èͤ͢ÇÒÁªèÇÂàËÅ×Í
¤íÒàμ×͹ : ÊÒ·ÕèÁÕ©¹Ç¹ËØéÁ
¡ÒÃàª×èÍÁμèÍ·Ñé§ËÁ´ä»ÂѧÍØ»¡Ã³ì¤ÍÁ¾ÔÇàμÍÃìÍ×è¹ μéͧ·Óâ´ÂãªéÊÒÂà¤àºÔÅ·ÕèÁÕ©¹Ç¹ËØéÁ à¾×èÍÃÑ¡ÉÒ¤ÇÒÁ ÊÍ´¤Åéͧ¡Ñº¡®¢éͺѧ¤Ñº EMC
¤íÒàμ×͹ : ÍØ»¡Ã³ìμè;èǧ
¤Ø³ÊÒÁÒöμèÍ੾ÒÐÍØ»¡Ã³ìμè;èǧ (ÍØ»¡Ã³ìÍÔ¹¾Øμ/àÍÒμì¾Øμ, à·ÍÃìÁÔ¹ÑÅ, à¤Ã×èͧ¾ÔÁ¾ì, ÏÅÏ) ·Õèä´éÃѺ¡ÒÃÃѺÃͧ μÒÁ¢éÍ¡Ó˹´¤ÅÒÊ B à¢éҡѺÍØ»¡Ã³ì¹Õéà·èÒ¹Ñé¹
¡Ò÷ӧҹ¡ÑºÍØ»¡Ã³ìμè;èǧ·ÕèäÁèä´éÃѺ¡ÒÃÃѺÃͧÁÑ¡à»ç¹¼ÅãËéà¡Ô´¡ÒÃú¡Ç¹¡Ñº¡ÒÃÃѺÊÑ−−Ò³ÇÔ·ÂØáÅÐ TV
¢éͤÇÃÃÐÇѧ
¡ÒÃà»ÅÕè¹á»Å§ ËÃ×Í´Ñ´á»Å§ã´æ ·ÕèäÁèä´éÃѺ¡ÒÃÃѺÃͧÍÂèÒ§ªÑ´á¨é§¨Ò¡¼Ùé¼ÅÔμ ÍÒ¨·ÓãËéÊÔ·¸Ôì㹡ÒÃãªé¼ÅÔμÀѳ±ì¹Õé¢Í§¼Ùéãªé «Öè§ä´éÃѺ¨Ò¡
¤³Ð¡ÃÃÁ¡ÒáÒÃÊ×èÍÊÒÃáË觪ÒμÔ¶×Íà»ç¹âÁ¦Ð
à§×è͹䢡Ò÷íÒ§Ò¹
ÍØ»¡Ã³ì¹ÕéÊÍ´¤Åéͧ¡ÑºÊèǹ·Õè 15 ¢Í§¡®¢éͺѧ¤Ñº FCC ¡Ò÷ӧҹà»ç¹ä»μÒÁà§×è͹ä¢Êͧ¢éÍμèÍ仹Õé: (1) ÍØ»¡Ã³ì¹ÕéμéͧäÁè¡èÍãËéà¡Ô´¡Òà ú¡Ç¹·Õèà»ç¹ÍѹμÃÒ áÅÐ
(2) ÍØ»¡Ã³ì¹Õéμéͧ·¹μèÍ¡ÒÃú¡Ç¹·Õèä´éÃѺ ÃÇÁ·Ñé§ ¡ÒÃú¡Ç¹·ÕèÍÒ¨¡èÍãËéà¡Ô´¡Ò÷ӧҹ·ÕèäÁè¾Ö§»ÃÐʧ¤ì ¤íÒàμ×͹ : ¼Ùéãªé§Ò¹ã¹á¤¹Ò´Ò
ÍØ»¡Ã³ì´Ô¨ÔμÍŤÅÒÊ B ¹Õé ÊÍ´¤Åéͧ¡ÑºÁÒμðҹ ICES-003 ¢Í§á¤¹Ò´Ò
Remarque l'intention des utilisateurs canadiens
Cet appareil numerique de la classe B est conforme a la norme NMB-003 du Canada.
¡ÒáíҨѴËÅÍ´ä¿
¡Ò÷Ôé§ÍØ»¡Ã³ì·ÕèàÊÕÂáÅéÇâ´Â¼Ùéãªé·ÑèÇä»ÀÒÂ㹺éÒ¹ÊèǹμÑÇã¹ÊËÀÒ¾ÂØâû
ÊÑ−Åѡɳì¹Õ麹¼ÅÔμÀѳ±ìËÃ×ͺ¹¡ÅèͧºÃèؼÅÔμÀѳ±ì à»ç¹¡ÒÃÃкØÇèÒμéͧäÁè·Ô駼ÅÔμÀѳ±ì¹Õé»Ð»¹¡Ñº¢Í§àÊÕ·ÑèÇä»ÀÒÂ㹺éÒ¹
¤Ø³ÁÕ˹éÒ·ÕèÃѺ¼Ô´ªÍºã¹¡Ò÷Ôé§ÍØ»¡Ã³ì·ÕèàÊÕÂáÅéÇâ´Â¡ÒùÓä»Êè§Âѧ¨Ø´à¡çºÃǺÃÇÁ·Õè¡Ó˹´äÇé ÊÓËÃѺ¡ÒÃÃÕä«à¤ÔÅÍØ»¡Ã³ìä¿¿éÒ
áÅÐÍÔàÅç¡·Ã͹ԡÊì·ÕèàÊÕÂáÅéÇ ¡ÒÃà¡çºá¡¨Ò¡¡Ñ¹ áÅСÒÃÃÕä«à¤ÔÅÍØ»¡Ã³ì·ÕèàÊÕÂáÅéÇã¹¢³Ð·Õè·Ôé§ ¨ÐªèÇÂ͹ØÃÑ¡Éì·ÃѾÂҡøÃÃÁªÒμÔ
áÅЪèÇÂãËéá¹èã¨ÇèÒÍØ»¡Ã³ì¶Ù¡¹Óä»ÃÕä«à¤ÔÅã¹ÅѡɳзÕèªèÇ»éͧ¡Ñ¹ÊØ¢ÀÒ¾¢Í§Á¹Ø
ÉÂìáÅÐÊÔè§áÇ´ÅéÍÁ ÊÓËÃѺ¢éÍÁÙÅà¾ÔèÁàμÔÁà¡ÕèÂÇ
¡ÑºÊ¶Ò¹·Õè«Ö觤سÊÒÁÒö¹ÓÍØ»¡Ã³ì·ÕèàÊÕÂáÅéÇä»·Ôé§à¾×èÍ·Ó¡ÒÃÃÕä«à¤ÔÅ â»Ã´μÔ´μèÍÊӹѡ§Ò¹·éͧ¶Ôè¹ ã¹»ÃÐà·È¢Í§¤Ø³, ºÃÔ¡ÒÃ
à¡çº¢Í§àÊÕÂÀÒÂ㹺éÒ¹¢Í§¤Ø³ ËÃ×ÍÃéÒ¹¤éÒ·Õè¤Ø³«×éͼÅÔμÀѳ±ìÁÒ
7»ØèÁ Empowering ¡´»ØèÁ Empowering à¾×èÍà»Ô´ OSD ¢Í§ Acer eColor Management áÅéÇà¢éÒãªé§Ò¹âËÁ´ÀÒ¾¨ÓÅͧ
ËÁÒÂàÅ¢ äͤ͹ ÃÒ¡Òà ÃÒÂÅÐàÍÕ´

Monitor LCD - Petunjuk Singkat Pemasangan
Bahasa Indonesia
Panduan Ringkas Acer LCD Monitor
Petunjuk penting tentang keselamatan
Baca petunjuk berikut dengan cermat.
1. Untuk membersihkan layar monitor LCD: Pastikan monitor dioperasikan dengan daya AC yang sesuai dengan tempat Anda.
• Matikan monitor LCD, lalu lepaskan kabel daya.
• Semprotkan cairan pembersih yang lembut pada kain, kemudian bersihkan layar secara perlahan.
2. Jangan letakkan monitor LCD di dekat jendela. Membiarkan monitor terkena hujan, uap air, atau sinar matahari dapat
menyebabkan kerusakan fatal.
3. Jangan tekan layar LCD Tekanan yang berlebihan dapat menyebabkan kerusakan permanen pada layar.
4. Jangan lepaskan penutup atau berupaya memperbaiki sendiri monitor ini. Setiap perbaikan harus dilakukan oleh teknisi
resmi.
5. Letakkan monitor LCD dalam ruangan dengan suhu -20º hingga 60º C (-4º hingga 140º F). Meletakkan monitor LCD di luar
rentang suhu tersebut dapat menyebabkan kerusakan permanen.
6. Segera lepaskan sambungan monitor, kemudian hubungi teknisi resmi jika terjadi kondisi sebagai berikut:
• Kabel sinyal monitor ke PC terbakar atau rusak.
• Monitor LCD terkena cairan atau atau monitor terkena hujan.
• Monitor LCD atau casing rusak.
Memasang monitor pada dudukan
1. Keluarkan dudukan monitor dari kemasan, kemudian letakkan di tempat yang stabil dan rata.
2. Keluarkan monitor dari kemasan.
3. Sejajarkan tombol pelepas di bagian bawah monitor dengan slot yang sesuai di bagian bawah dudukan. Bunyi klik akan ter-
dengar jika monitor telah terpasang dengan kencang pada dudukan.
Menghubungkan Monitor ke Komputer
1. Matikan komputer dan cabut kabel daya komputer.
2. 2-1 Menghubungkan kabel video
a. Pastikan bahwa power layar monitor dan komputer dalam
keadaan mati.
b. Hubungkan kabel video ke komputer.
2-2 Menghubungkan kabel DVI (Model Dual-Input)
a. Pastikan bahwa power layar monitor dan komputer dalam
keadaan mati.
b. Hubungkan ujung kabel DVI 24-pin ke bagian belakang moni tor
dan hubungkan ujung lainnya ke port DVI komputer.
3. Sambungkan Kabel Audio. (Hanya untuk Model-Input-Audio) (Opsional)
4. Sambungkan kabel daya monitor ke port daya di bagian belakang monitor.
5. Sambungkan kabel daya komputer dan monitor ke stopkontak yang
terdekat.
Kontrol eksternal
NO. Ikon Item Keterangan
1, 2
Tombol/indikator daya
Menghidupkan dan mematikan monitor. Biru menunjukkan daya hidup
Kuning menunjukkan mode siaga/hemat daya.
3, 4 Minus / plus
Jika OSD aktif, tekan tombol Minus atau Plus untuk menggantiganti
pilihan OSD tersebut.
5
Fungsi OSD
Tekan untuk melihat fungsi OSD. Tekan lagi untuk memasukkan pilihan
pada OSD.
6
Tombol Pengaturan
Otomatis/Keluar
Jika OSD (Menu Pada Layar) aktif, tekan Auto untuk keluar dari OSD.
Setelah OSD tidak aktif, tekan Auto dan monitor secara otomatis akan
mengoptimalkan posisi tampilan, fokus, dan jam tampilan.
7
Empowering Key
Tekan tombol Empowering Key untuk membuka OSD Acer eColor
Management dan mengakses mode skenario.
AUDIO IN
VGA IN
DVI-D IN
DVI
D-Sub
AUDIO IN
VGA IN
DVI-D IN
/

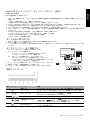
LCD モニタ - クイックセットアップガイド
日本語
Acer LCD モニタ クイック ・セットアップガイド (QSG)
安全の た め の注意
以下の注意事項 を よ く お読み く だ さ い。
1. LCD モ ニ タ を掃除す る に は : モ ニ タ が、 お住 ま い の地域で利用可能な AC 電源 で作動す る た め に、 電気的に定格 さ れ て い る こ とを
確認 し ま す。
• LCD モニタの電源をオフにして、電源コードを抜きます。
• 溶剤の含 ま れ て い な い洗剤を 柔 ら か い 布 に ス プ レ ー し 、 画面を そ っ と 拭 い て く だ さ い。
2. LCD モニタは窓の近くに置かないでく ださい。 直射日光や雨、 湿気な ど に当て ま す と 、 破損 も し く は故障す る 恐れ が あ り ま す。
3. LCD 画面に 圧力 を か け な い で く だ さ い 。 過重な圧力は デ ィ ス プ レ イ を 傷 つ け る 恐れ が あ り ま す。
4. カバーを取り外したり、内部を修正したりしないで く ださい。 修理は、 す べ て 弊社 に 依頼 し て く だ さ い 。
5. LCD モニタは-20°C ~ 60°C の温度の場所で保管し て く だ さ い。 こ の範囲以外の場所 で の 保管は、 モ ニ タ を 永久的 に 破損 さ せ る 恐
れがあ り ます。
6. 次の い ず れ か の 状況 が見 ら れ る 場合は、 モ ニ タ の電源 を 切 り 、 弊社 に ご連絡 く だ さ い。
• モニタから PC へのシグナルケーブルがすり減っていた り、 破損している場合。
• LCD モ ニ タ に液体が流れ込ん だ り 、 モ ニ タ が雨に 濡れ た 場合。
• LCD モ ニ タ や ケ ー ス が破損 し た場合。
モニタを台に取り付ける
1. 段ボ ー ル の 箱か ら モ ニ タ の台 を 取 り 出 し 、 安定 し た水平な作業場所に置い て く だ さ い。
2. 段ボー ルの箱か ら モ ニ タ を取 り出し ま す。
3. モ ニ タ下部の リ リ ー ス ボ タ ン を ベー ス下部の対応する ス ロ ッ ト に合わせます。 モニタが台にしっかり取り付けられると、ク リ ッ ク音
がします。
モニタをコンピュータに接続する
1. コンピュータをオフにして、電源コードを外してください。
2. 2-1 ビデオケーブルそを接続します。
a. モニターとコンピューターの電源を必ず切ってください。
b. ビデオケーブルをコンピューターに接続します。
2-2 DVI ケ ー ブ ル そ を 接続 し ま す。 (デ ュ ア ル 入力 モ デ ル)
a. モニターとコンピューターの電源を必ず切ってください。
b. 24 ピン DVI ケーブルの一方の端をモニタ背面に接続し、 も う一方の
端を コ ン ピ ュ ー タ の DVI ポートに接続します。
3. オーデ ィ オケーブルを接続します (オーディ オ入力モデルの み) (オプシ ョ ン)
4. 電源ケ ー ブ ル を モ ニ タ 背面の電源ポ ー ト に 挿入 し ま す。
5. コンピュータとモニタの電源コードを、近くのコンセントに差し込みます。
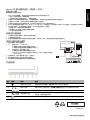
外部 コ ン ト ロ ー ル
番号 アイコン アイテム 説明
1、 2
電源ボ タ ン /
インジケータ
モニタををオンまたはオフにします。 青い点灯は電源がオンであることを
示します。オレンジ色の点灯は、スタンバイ/ 省電力モ ー ド を 示 し ま す。
3、 4 マイナス / プラス
OSD が有効に な っ て い る 場合、 マイナスまたはプラスボタンを押すと、
OSD オプショ ンを切り替えることができます。
5
OSD 機能 OSD が表示さ れま す。 も う 一度押す と 、 OSD の選択に入 り ま す。
6
自動調整ボ タ ン / 終了
OSD が有効に な っ て いる と き に、 自動 を押す と OSD を終了し ます。 OSD
が無効の と き に自動 を 押す と 、 モ ニ タ は自動的に デ ィ ス プ レ イ 位置、
フォーカス、 ディスプレイのクロックを最適化します。
7
Empowering キー
Empowering キーを押して Acer eColor Management OSD を開き、 シナ
リオモードを選択します。
AUDIO IN
VGA IN
DVI-D IN
DVI
D-Sub
AUDIO IN
VGA IN
DVI-D IN
/

LCD Monitor Quick Setup Guide
English
Acer LCD Monitor Quick Start Guide (QSG)
Important safety instructions
Please read the following instructions carefully.
1. To clean the LCD monitor screen: Be sure that your monitor is electrically rated to operate with the AC power available in your
location.
• Turn off the LCD monitor and unplug the power cord.
• Spray a non-solvent cleaning solution onto a rag and clean the screen gently.
2. Do not place the LCD monitor near a window. Exposing the monitor to rain, moisture or sunlight can severely damage it.
3. Do not apply pressure to the LCD screen. Excessive pressure may cause permanent damage to the display.
4. Do not remove the cover or attempt to service this unit yourself. An authorized technician should perform servicing of any
nature.
5. Store the LCD monitor in a room with a temperature of -20° to 60° C (-4° to140° F). Storing the LCD monitor outside this range
may result in permanent damage.
6. Immediately unplug your monitor and call an authorized technician if any of the following circumstances occur:
• Monitor-to-PC signal cable is frayed or damaged.
• Liquid spills onto the LCD monitor or the monitor is exposed to rain.
• The LCD monitor or case is damaged.
Attaching the monitor to the base
1. Remove the monitor base from the packaging and place it on a stable and level workspace.
2. Remove the monitor from the packaging.
3. Align the release button at the buttom of the monitor with the corresponding slot at the bottom of the base. A clicking sound
signifies that the monitor has been securely attached to the base.
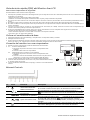
Connecting Your Monitor to a Computer
1. Turn off your monitor and unplug your computer’s power cord.
2. 2-1 Connect Video Cable
a. Make sure both the monitor and computer are powered-OFF.
b. Connect the VGA video cable to the computer.
2-2 Connect Digital Cable (Only Dual-input model)
a. Make sure both the monitor and computer are powered-OFF.
b. Connect one end of the 24-pin DVI cable to the back of the
monitor and connect the other end to the computer's port.
3. Connect the Audio Cable. (Only Audio-Input Model) (Optional)
4. Insert the monitor power cable into the power port at the back of the
monitor.
5. Plug the power cords of your computer and your monitor into a nearby
electrical outlet.
External Controls
No. Icon Item Description
1, 2
Power button/
indicator
Turns the monitor on/off.
Blue indicates power on. Amber indicates standby/power saving mode.
3, 4 Minus / plus
If the OSD is active, press the Minus or Plus button to toggle between the
OSD options.
5 OSD functions Press to view the OSD. Press again to enter a selection in the OSD.
6
Auto adjust
button / exit
If the OSD is active, press Auto to exit the OSD. Once the OSD is inactive,
press Auto and the monitor will automatically optimize the display position,
focus, and clock of your display.
7 Empowering key
Press the Empowering Key to open the Acer eColor Management OSD and
access the scenario modes.
AUDIO IN
VGA IN
DVI-D IN
DVI
D-Sub
AUDIO IN
VGA IN
DVI-D IN
/

LCD Monitor Quick Setup Guide
English
Regulations and safety notices
FCC notice
This device has been tested and found to comply with the limits for a Class B digital device pursuant to Part 15
of the FCC rules. These limits are designed to provide reasonable protection against harmful interference in a
residential installation. This device generates, uses, and can radiate radio frequency energy and, if not installed
and used in accordance with the instructions, may cause harmful interference to radio communications.
However, there is no guarantee that interference will not occur in a particular installation. If this device does
cause harmful interference to radio or television reception, which can be determined by turning the device off
and on, the user is encouraged to try to correct the interference by one or more of the following measures:
Reorient or relocate the receiving antenna.
Increase the separation between the device and receiver.
Connect the device into an outlet on a circuit different from that to which the receiver is connected.
Consult the dealer or an experienced radio/television technician for help.
CE declaration of Conformity
Hereby, Acer Inc., declares that this LCD monitor is in compliance with the essential requirements and other
relevant provisions of EMC Directive 2004/108/EC, Low Voltage Directive 2006/95/EC, and RoHS Directive 2011/
65/EU and Directive 2009/125/EC with regard to establishing a framework for the setting of ecodesign
requirements for energy-related product.
Notice: Shielded cables
All connections to other computing devices must be made using shielded cables to maintain compliance with
EMC regulations.
Notice: Peripheral devices
Only peripherals (input/output devices, terminals, printers, etc.) certified to comply with the Class B limits may
be attached to this equipment. Operation with non-certified peripherals is likely to result in interference to
radio and TV reception.
Caution
Changes or modifications not expressly approved by the manufacturer could void the user authority, which is
granted by the Federal Communications Commission, to operate this product.
Operation conditions
This device complies with Part 15 of the FCC Rules. Operation is subject to the following two conditions: (1) this
device may not cause harmful interference, and (2) this device must accept any interference received, including
interference that may cause undesired operation.
Notice: Canadian users
This Class B digital apparatus complies with Canadian ICES-003.
Remarque à l'intention des utilisateurs canadiens
Cet appareil numérique de la classe B est conforme a la norme NMB-003 du Canada.
Disposal of Waste Equipment by Users in Private Household in the European Union
This symbol on the product or on its packaging indicates that this product must not be disposed of
with your other household waste. Instead, it is your responsibility to dispose of your waste
equipment by handing it over to a designated collection point for the recycling of waste electrical
and electronic equipment. The separate collection and recycling of your waste equipment at the
time of disposal will help to conserve natural resources and ensure that it is recycled in a manner
that protects human health and the environment. For more information about where you can
drop off your waste equipment for recycling, please contact your local city office, your household
waste disposal service or the shop where you purchased the product.

液晶显示器快速安装指南
简体中文
Acer LCD 显示器快速入门指南 (QSG)
重要的安全须知
请仔细阅读下面的使用说明
1. 清洁 LCD 显示器屏幕:首先确认使用的电源线符合你所使用的地区标准。
• 关闭 LCD 显示器电源,拔掉电源线。
• 将非溶解性清洁液喷洒到抹布上,轻轻擦拭屏幕。
2. 不要将 LCD 显示器放置在窗户附近。显示器遭受雨淋、受潮或阳光直接照射时可能导致严重损坏。
3. 不要按压 LCD 屏幕。过分用力按压可能导致显示屏永久性损坏。
4. 不要卸下机盖或尝试自行维修本机器。应由经过授权的技术人员执行各种维修任务 。
5. 将 LCD 显示器存放在温度为 -20° C 到 60° C (-4° F 到 140° F)的房间内。在此范围之外存放 LCD 显示器时,可能导致永久性损坏。
6. 若出现下列情形,应立即拔掉显示器电源,并与经过授权的技术人员联系:
• 显示器与 PC 之间的信号线磨损或损坏。
• 液体溅到 LCD 显示器上或者显示器遭受雨淋。
• LCD 显示器或机壳损坏。
安装显示器底座
1. 从包装中取出显示器底座,将其放在平稳的台面上 。
2. 从包装中取出显示器。
3. 将显示器底部的释放钮对准底座底部相应的插槽。听到咔哒一声时,表明显示器已牢固安装到底座上。
将显示器连接计算机
1. 关闭计算器,并拔下电源线。
2. 2-1 连接信号线 ( D-SUB Cable )
a. 请确定显示器与电脑的电源都已经关闭。
b. 请将信号线连接到电脑的图像显示卡接口上。
2-2 连接数字线 (仅限双输入型号)
a. 请确定显示器与电脑的电源都已经关闭。
b. 将 24pin DVI 缆线的一端接到显示器的后方,将另一 端连接到计算机
的 DVI 端口上。
3. 连接音频线 (仅限于音频输入型号)(选配件)
4. 将显示器电源线插入显示器背面的电源端口。
5. 将计算机和显示器的电源线插入旁边的电源插座。
外部控制
MU.T0C00.004
4J.2DF01.031
编号 图标 项目 描述
1, 2
电源开关 / 指示灯
打开或关闭显示器的电源。
蓝色表示已打开电源。橘黄色表示处于待机 / 节能模式。
3, 4
减号 / 加号 如果 OSD 处于活动状态,按减号或加号按钮可在 OSD 选项中进行切换。
5
OSD 功能 按下时查看 OSD。再按一次进入 OSD 中的选择项。
6
自动调整 / 退出
显示 OSD 时,按自动退出 OSD。若未显示 OSD,按自动时显示器自动优化显
示位置、聚焦和显示时钟。
7
Empowering 键按Empowering 键打开 Acer eColor Management OSD 并进入方案模式。
AUDIO IN
VGA IN
DVI-D IN
DVI
D-Sub
AUDIO IN
VGA IN
DVI-D IN
/

液晶显示器快速安装指南
简体中文
监管和安全声明
FCC 声明
经测试,本设备符合 FCC 规则第 15 部分对 B 类数字设备的限制规定。这些限制用于提供合理的保护措施,以防 该设备在住宅区安装时产
生有害干扰。本设备产生、使用并辐射射频能量,如果未遵照说明进行安装和使用,可能 会对无线电通信产生干扰。
但也不能保证在特定的安装中不会产生干扰的问题。如果本设备确实对无线电或电视接收造成干扰 (可以通过开关 设备来确定),建议用
户采取以下一种或多种措施排除干扰:
• 重新调整接收天线的方向或位置。
• 增大本设备与接收器的间距。
• 将设备电源连接到不同于接收器所连接到的电路的电源插座上。
• 咨询经销商或有经验的无线电 / 电视机技术人员以获取帮助。
注意:屏蔽电缆
所有到其它计算设备的连接都必须使用屏蔽电缆,以便符合 EMC 法规的要求。
注意:外设
只有经过认证,符合 B 类限制的外设 (输入 / 输出设备、终端、打印机等)才可连接到本设备。使用未认证的外设 可能会造成无线电和电
视接收的干扰。
注意
任何未经制造商明确批准的改动或修改,都可能使用户丧失由联邦通讯委员会赋予的操作本产品之权利。
操作条件
本设备符合 FCC 规则第 15 部分。操作符合以下两个条件:(1)本设备不会造成有害干扰,(2)本设备必须能够承 受收到的干扰,包括
任何可能会造成操作异常的干扰。
注意:加拿大用户
本 B 数字设备符合 Canadian ICES-003 的规范。
Remarque l'intention des utilisateurs canadiens
Cet appareil numrique de la classe B est conforme a la norme NMB-003 du Canada
《废弃电器电子产品回收处理管理条例》提示性说明
为了更好地关爱及保护地球,当用户不再需要此产品或产品寿命终止时,请遵守国家废弃电器电子产品回收处理相关法律法规,将其交给
当地具有国家认可的回收处理资质的厂商进行回收处理。
欧盟地区家庭用户废旧设备的废弃
产品或其包装上的此符号表示该产品不得与其它家庭垃圾一起废弃。废弃废旧设备时,您有责任将其送交专门回收废旧电
气和电子设备的回收点。废弃时分类收集和回收废旧设备有助于节省自然资源,确保以保护人类健康和环境的方式进行回
收利用。有关废旧设备回收点的详细信息,请与您当地的市政机构、家庭垃圾处理服务机构或产品的销售店联系。

液晶显示器快速安装指南
简体中文
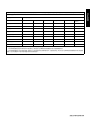
依据中国 《电子信息产品污染控制管理办法》,简称 《管理办法》或 《China RoHS》之规定,列出 宏碁电子信息产品中可能含有的有毒或有害物质的名称及含量于以下表格中。
显示器 (液晶及 CRT)
零部件名称
有毒有害物质或元素
铅(Pb) 汞(Hg) 镉(Cd)
六价铬 (Cr
6+
)
多溴联苯 (PBB)
多溴二苯醚
(PBDE)
金属结构件
X O O O O O
塑料结构件
O O O O O O
电路板组件 *
X O O O O O
液晶显示屏 / 灯管
X X O O O O
CRT 显示屏 / 灯管
X O O O O O
电源模块
X O O O O O
电源线
O O O O O O
外部信号连接线
X O O O O O
喇叭
X O O O O O
*:电路板组件包括印刷电路板及其构成的零部件,如电阻、电容、集成电路、连接器等
○ :表示该有毒有害物质在该部件所有均质材料中的含量均在 《电子信息产品中有毒有害物质的限量要求标准》规定的限量要求以下
× :表示该有毒有害物质至少存在於该部件的某一均质材料中 , 是因为目前业界还没有的可替代技术 , 以致含量虽然超出 《电子信 息产品中有毒有害物质的限量要求标准》规定的限
量要求;但仍然符合欧盟 RoHS 指令所容许的豁外条款及电池指令的要求 .

液晶顯示器快速設定說明書
繁體中文
Acer LCD 顯示器快速使用指南 (QSG)
重要安全指示
請謹慎閱讀下方指示。
1. 欲清潔 LCD 顯示器螢幕:請確定您的液晶顯示器所使用的電源適合您當地的交流電源。
• 將 LCD 顯示器關閉並拔除電源線。
• 將非溶劑清潔液噴於軟布並輕輕擦拭螢幕。
2. 請勿將 LCD 顯示器置於窗戶附近。 使顯示器暴露於雨水、潮濕或日光會嚴重損害顯示器。
3. 請勿使 LCD 螢幕受壓。 過大的壓力可能對顯示器造成永久損害。
4. 請勿移除機殼或嘗試自行維修裝置, 應由專業合格的維修人員執行維修工作。
5. 請將 LCD 存放於 -20°C 至 60°C (-4°F 至 140° F)溫度的房間。 將 LCD 顯示其存放於此範圍外之處可能導致永久損害。
6. 若任何下列情況發生,請立即拔除您的顯示器並聯絡專業合格的維修人員。
• 顯示器至電腦的訊號線磨損或毀壞。
• 液體濺到 LCD 顯示器上或顯示器暴露於雨水。
• LCD 顯示器或機殼損壞。
將顯示器安裝於底座
1. 將顯示器底座自包裝中取出並置於穩固且平坦的工作台。
2. 將顯示器自包裝中取出。
3. 將顯示器底部的釋放鍵對齊底座底部對應的插槽。 喀拉聲代表顯示器已穩固地裝上底座。
將液晶顯示器連接到電腦上
1. 關閉電腦並拔除電腦的電源線。
2. 2-1 連接視訊線 (D-SUB Cable)
a. 請確定液晶顯示器與電腦的電源都已經關閉。
b. 請將視訊線連接到電腦圖像顯示卡接口上。
2-2 連接數位訊號線 ( 僅適用於雙重輸入機型 )
a. 請確定液晶顯示器與電腦的電源都已經關閉。
b. 將 24 pin DVI 纜線的一端連接到液晶顯示器的後方, 將另一端連接到
電腦的 DVI 連接埠上。
3. 連接音訊線 ( 僅適用於音訊輸入機型 ) ( 選用 )
4. 將顯示器電源線插入顯示器背後的電源埠。
5. 將您電腦與顯示器的電源線插入附近的電力插座。
外部控制項
編號 圖示 項目 說明
1, 2
電源鍵 / 指示燈
開啟 / 關閉監視器。
藍色表示電源開啟。琥珀色表示待機 / 省電模式。
3, 4
減 / 加如果啟動 OSD,按下 Minus 或 Plus 鍵即可切換 OSD 選項。
5
OSD 功能 按下即可檢視 OSD。 再次按下即可進入 OSD 中的選項。
6
自動調整鍵 / 退出
如果啟動 OSD,按下 AUTO 即可退出 OSD。 一旦關閉 OSD,按下 AUTO 顯示
器即可自動最佳化顯示的位置、焦距及顯示的時脈。
7
Empowering 鍵
按下 Empowering 鍵即可開啟 Acer eColor Management OSD 並存取場景模
式。
AUDIO IN
VGA IN
DVI-D IN
DVI
D-Sub
AUDIO IN
VGA IN
DVI-D IN
/

液晶顯示器快速設定說明書
繁體中文
法規和安全性公告
FCC 公告
本裝置經過測試,並符合美國聯邦通訊委員會 (FCC)規則第 15 部份中有關 B 類數位裝置的規定。這些限制旨在對居民住宅安裝提供合
理的保護,以防有害干擾。本裝置產生並使用射頻能量,如果沒有依照指示安裝和使用,可能會對無線電通訊造成有害干擾。
然而,我們不能保證在特定環境中安裝本裝置不會帶來任何干擾。如果本裝置已對無線電或電視接收造成有害干擾,使用者可透過以下一
種或多種措施來改善干擾狀況:
• 重新調整收訊天線的方向或位置。
• 增加本裝置和接收器之間的距離。
• 將本裝置的插頭連接到與接收器不同的電源插座上。
• 尋求經銷商或有經驗的無線電 / 電視技術人員的協助。
公告:屏蔽纜線
所有連接皆使用屏蔽纜線以確保符合 EMC 條例的規定。
公告:週邊裝置
本設備僅能安裝符合 Class B 限制的合格週邊裝置 (輸入 / 輸出裝置、端子、印表機等)。使用不合格的週邊裝置可能對收音機和電視訊號
的接收產生干擾。
小心
未經製造商明確許可的改裝會導致使用者喪失聯邦通訊委員會授予使用者操作本產品的權利。
操作條件
本裝置符合 FCC 規則第 15 部份的規定。操作程序受限於以下兩個條件:(1)本裝置不得產生有害干擾,且 (2)本裝置必須承受任何接
收到的干擾,包括可能導致意外操作的干擾。
公告: 加拿大使用者
本 B 級數位裝置符合加拿大 ICES-003 法規的要求。
Remarque l'intention des utilisateurs canadiens
Cet appareil numrique de la classe B est conforme a la norme NMB-003 du Canada.
歐盟地區家庭使用者對廢棄設備的處置
產品或包裝上貼有此符號表示本產品必須與其他的家庭廢棄物分開處理。 此外,您必須負責將廢棄設備交付至指定的收集
處,以回收廢棄的電子電機設備。 分類集中並回收廢棄設備將有助於維護天然資源,並確保設備的回收方式不會危害人體
健康及環境。 如需廢棄設備回收處理地點的詳細資訊,請洽詢當地的辦公室、家庭廢棄物處理中心或購買產品的店家。

LCD Monitor Quick Setup Guide
English
Acer LCD Monitor Quick Start Guide (QSG)
Important safety instructions
Please read the following instructions carefully.
1. To clean the LCD monitor screen: Be sure that your monitor is electrically rated to operate with the AC power available in your
location.
• Turn off the LCD monitor and unplug the power cord.
• Spray a non-solvent cleaning solution onto a rag and clean the screen gently.
2. Do not place the LCD monitor near a window. Exposing the monitor to rain, moisture or sunlight can severely damage it.
3. Do not apply pressure to the LCD screen. Excessive pressure may cause permanent damage to the display.
4. Do not remove the cover or attempt to service this unit yourself. An authorized technician should perform servicing of any
nature.
5. Store the LCD monitor in a room with a temperature of -20° to 60° C (-4° to140° F). Storing the LCD monitor outside this range
may result in permanent damage.
6. Immediately unplug your monitor and call an authorized technician if any of the following circumstances occur:
• Monitor-to-PC signal cable is frayed or damaged.
• Liquid spills onto the LCD monitor or the monitor is exposed to rain.
• The LCD monitor or case is damaged.
Attaching the monitor to the base
1. Remove the monitor base from the packaging and place it on a stable and level workspace.
2. Remove the monitor from the packaging.
3. Align the release button at the buttom of the monitor with the corresponding slot at the bottom of the base. A clicking sound
signifies that the monitor has been securely attached to the base.
Connecting Your Monitor to a Computer
1. Turn off your monitor and unplug your computer’s power cord.
2. 2-1 Connect Video Cable
a. Make sure both the monitor and computer are powered-OFF.
b. Connect the VGA video cable to the computer.
2-2 Connect Digital Cable (Only Dual-input model)
a. Make sure both the monitor and computer are powered-OFF.
b. Connect one end of the 24-pin DVI cable to the back of the
monitor and connect the other end to the computer's port.
3. Connect the Audio Cable. (Only Audio-Input Model) (Optional)
4. Insert the monitor power cable into the power port at the back of the
monitor.
5. Plug the power cords of your computer and your monitor into a nearby
electrical outlet.
External Controls
No. Icon Item Description
1, 2
Power button/
indicator
Turns the monitor on/off.
Blue indicates power on. Amber indicates standby/power saving mode.
3, 4 Minus / plus
If the OSD is active, press the Minus or Plus button to toggle between the
OSD options.
5 OSD functions Press to view the OSD. Press again to enter a selection in the OSD.
6
Auto adjust
button / exit
If the OSD is active, press Auto to exit the OSD. Once the OSD is inactive,
press Auto and the monitor will automatically optimize the display position,
focus, and clock of your display.
7 Empowering key
Press the Empowering Key to open the Acer eColor Management OSD and
access the scenario modes.
AUDIO IN
VGA IN
DVI-D IN
DVI
D-Sub
AUDIO IN
VGA IN
DVI-D IN
/

LCD Monitor Quick Setup Guide
English
Regulations and safety notices
FCC notice
This device has been tested and found to comply with the limits for a Class B digital device pursuant to Part 15
of the FCC rules. These limits are designed to provide reasonable protection against harmful interference in a
residential installation. This device generates, uses, and can radiate radio frequency energy and, if not installed
and used in accordance with the instructions, may cause harmful interference to radio communications.
However, there is no guarantee that interference will not occur in a particular installation. If this device does
cause harmful interference to radio or television reception, which can be determined by turning the device off
and on, the user is encouraged to try to correct the interference by one or more of the following measures:
Reorient or relocate the receiving antenna.
Increase the separation between the device and receiver.
Connect the device into an outlet on a circuit different from that to which the receiver is connected.
Consult the dealer or an experienced radio/television technician for help.
CE declaration of Conformity
Hereby, Acer Inc., declares that this LCD monitor is in compliance with the essential requirements and other
relevant provisions of EMC Directive 2004/108/EC, Low Voltage Directive 2006/95/EC, and RoHS Directive 2011/
65/EU and Directive 2009/125/EC with regard to establishing a framework for the setting of ecodesign
requirements for energy-related product.
Notice: Shielded cables
All connections to other computing devices must be made using shielded cables to maintain compliance with
EMC regulations.
Notice: Peripheral devices
Only peripherals (input/output devices, terminals, printers, etc.) certified to comply with the Class B limits may
be attached to this equipment. Operation with non-certified peripherals is likely to result in interference to
radio and TV reception.
Caution
Changes or modifications not expressly approved by the manufacturer could void the user authority, which is
granted by the Federal Communications Commission, to operate this product.
Operation conditions
This device complies with Part 15 of the FCC Rules. Operation is subject to the following two conditions: (1) this
device may not cause harmful interference, and (2) this device must accept any interference received, including
interference that may cause undesired operation.
Notice: Canadian users
This Class B digital apparatus complies with Canadian ICES-003.
Remarque à l'intention des utilisateurs canadiens
Cet appareil numérique de la classe B est conforme a la norme NMB-003 du Canada.
Disposal of Waste Equipment by Users in Private Household in the European Union
This symbol on the product or on its packaging indicates that this product must not be disposed of
with your other household waste. Instead, it is your responsibility to dispose of your waste
equipment by handing it over to a designated collection point for the recycling of waste electrical
and electronic equipment. The separate collection and recycling of your waste equipment at the
time of disposal will help to conserve natural resources and ensure that it is recycled in a manner
that protects human health and the environment. For more information about where you can
drop off your waste equipment for recycling, please contact your local city office, your household
waste disposal service or the shop where you purchased the product.

Guía de instalación rápida del monitor LCD
Español
Guía de inicio rápido (QSG) del Monitor Acer LCD
Instrucciones importantes de seguridad
Lea detenidamente estas instrucciones de seguridad.
1. Para limpiar la pantalla del monitor LCD: Asegúrese de que el voltaje del monitor sea el adecuado para funcionar con la alimentación CA
disponible en su ubicación.
• Apague el monitor y desconecte el cable prolongador.
• Pulverice una solución de limpieza no disolvente sobre un paño y limpie suavemente la pantalla.
2. No coloque el monitor LCD cerca de una ventana. Exponer el monitor a la lluvia, la humedad o la luz solar directa podría dañarlo severa-
mente.
3. No aplique presión sobre la superficie del monitor LCD. Una presión excesiva podría causar daños permanentes sobre la pantalla.
4. No retire la cubierta ni intente reparar el monitor personalmente. Las reparaciones de cualquier naturaleza deberán ser realizadas por un
técnico autorizado.
5. Conserve el monitor LCD en una sala con una temperatura de -20º a 60ºC (-4º a 140ºF). Conservar el monitor LCD a temperaturas que
excedan estos límites podría provocar daños permanentes.
6. Desconecte inmediatamente su monitor y llame a un técnico autorizado si concurre cualquiera de las siguientes circunstancias:
• El cable de señal del monitor al PC está quemado o dañado.
• Se ha derramado líquido en el monitor LCD o el monitor se ha expuesto a la lluvia.
• El monitor LCD o su carcasa están dañados.
Colocar el monitor sobre la base
1. Extraiga la base del monitor del embalaje y colóquela sobre una superficie estable y nivelada.
2. Extraiga el monitor de la caja.
3. Alinee el botón de liberación situado en la parte inferior del monitor con las ranuras correspondientes situadas en la parte inferior de la
base. Si escucha un 'clic', significa que el monitor ha quedado colocado firmemente sobre la base.
Conexión del monitor con una computadora
1. Apague el monitor y desenchufe el cable de alimentación del ordenador.
2. 2-1 Conexión del Cable Video
a. Asegúrese de que tanto el monitor como la computadora estén
apagado.
b. Conecte el cable video a la computadora.
2-2 Cable Digital (Sólo en modelos con entrada dual)
a. Asegúrese de que tanto el monitor como la computadora estén
apagado.
b. Conecte un extremo del cable DVI de 24 contanctos a la parte trasera
del monitor y conecte el otro extremo al puerto DVI del equipo.
3. Conecte el cable de audio (Sólo modelo con entrada de audio) (Opcional)
4. Inserte el cable de alimentación del monitor en el puerto de alimentación situado
en la parte trasera del monitor.
5. Conecte los cables de alimentación de su equipo y su monitor a una toma eléctrica
cercana.
External Controls
Nº Icono Elemento Descripción
1, 2
Interruptor de
alimentación/Indicador
LED de alimentación
Para encender o apagar el monitor.
Se enciende cuando el interruptor de alimentación está encendido.
3, 4 Menos/Más
Si la visualización en pantalla está activa, pulse los botones Menos o
Más para alternar las diferentes opciones de visualización en pantalla.
5
Funciones de
visualización en pantalla
Pulse este botón para activar el menú OSD.
6 Ajuste automático / Salir
Si el menú OSD está activo, pulse Auto para salir de él. Una vez inactivo
el menú OSD, pulse el botón Auto para que el monitor optimice
automáticamente la posición de la pantalla, el enfoque y el reloj de su
pantalla.
7 Empowering (Encender)
Cuando el menú OSD está apagado, pulse este botón para abrir el OSD
Acer eColor Management y acceder a los modos de escenario.
AUDIO IN
VGA IN
DVI-D IN
DVI
D-Sub
AUDIO IN
VGA IN
DVI-D IN
/

Guía de instalación rápida del monitor LCD
Español
Avisos de Seguridad y Mantenimiento
Aviso FCC
Este equipo ha sido probado y se considera que cumple con los límites para un dispositivo digital de Clase B, según la sección 15 de las
Normativas FCC. Estos límites están diseñados para proporcionar una protección adecuada contra interferencias dañinas en una instalación
residencial. Este equipo genera, usa y puede irradiar energía con frecuencias de radio y, si no se instala y usa de acuerdo con las instrucciones,
puede causar interferencias dañinas para las comunicaciones de radio.
Sin embargo, no hay ninguna garantía de que estas interferencias no ocurran en una instalación particular. Si este equipo causa interferencias
en la recepción de radio o telev isión, lo que puede determinarse encendiendo y apagando el dispositivo, se anima al usuario a intentar
corregir las interferencias mediante uno o más de los siguientes métodos.
• Reoriente o recoloque la antena receptora.
• Aumente la distancia entre el equipo y el receptor.
• Conecte el equipo a una toma de corriente de un circuito diferente del circuito al que está conectado el receptor.
• Consulte con su vendedor o con un técnico de radio/TV ex perimentado para recibir ayuda.
Declaración de Conformidad CE
Por la presente, Acer Inc. declara que este monitor LCD satisface los requisitos fundamentales y demás disposiciones relacionadas de la
Directiva EMC 2004/108/EC, la Directiva de baja tensión 2006/95/EC, la Directiva RoHS 2011/65/EU y la Directiva 2009/125/EC sobre la
instauración de un marco para el establecimiento de requisitos de diseño ecológico aplicables a los productos relacionados con la energía.
Aviso: Cables blindados
Todas las conexiones a otros dispositivos informáticos deben realiz arse mediante cables blindados para mantener el cumplimiento de las
normativas EMC.
Aviso: Dispositivos Periféricos
Sólo pueden conectarse a este equipo los periféricos (de entrada/salida, terminales, impresoras, etc) con certificación de cumplimiento con los
límites de Clase B. Es probable que el uso de periféricos no certificados resulte en interferencias en la recepción de radio y TV.
Precaución
Los cambios o modificaciones que no hayan sido aprobados ex presamente por el fabricante podrían invalidar la autoridad del usuario para
usar este producto. Esto está aprobado por la Comisión Federal de Comunicaciones.
Condiciones de uso
Este dispositivo cumple con la Sección 15 de las Normas FCC. Su uso está sujeto a las siguientes dos condiciones. (1) Este dispositivo no debe
causar interferencias dañinas, y (2) este dispositivo debe aceptar cualquier interferencia recibida, incluyendo interferencias que puedan causar
un funcionamiento no deseado.
Aviso: Usuarios canadienses
Este aparato digital Clase B cumple con el ICES -003 Canadiense.
Remarque l'intention des utilisateurs canadiens
Cet appareil numérique de la classe B est conforme à la norme NMB-003 du Canada.
Desecho de equipos eléctricos y electrónicos por parte de usuarios en
viviendas particulares de la Unión Europea
Este símbolo en el producto o en su embalaje indica que el producto no deberá ser desechado junto con los otros residuos de
la vivienda. En cambio, es su responsabilidad deshacerse del equipo depositándolo en un punto de recolección designado
para el reciclaje de desechos eléctricos y electrónicos. La recolección por separado y el reciclaje de los desechos eléctricos y
electrónicos ayudarán a conservar los recursos naturales y a garantizar que serán reciclados de forma que se proteja la salud
humana y el medio ambiente. Para obtener más información acerca de los lugares de recolección de los desechos eléctricos y
electrónicos para su reciclaje, póngase en contacto la oficina municipal local, con el servicio de desecho de residuos
domésticos o con el negocio en donde adquirió el producto.

Guide de démarrage rapide du moniteur LCD
Français
Guide de démarrage rapide du moniteur LCD Acer
Importantes instructions de sécurité
Veuillez lire attentivement les instructions suivantes.
1. Pour nettoyer l’écran du moniteur LCD : Assurez-vous que votre moniteur est dans la bonne norme électrique d’alimentation
CA disponible dans votre région.
• Éteignez le moniteur LCD et débranchez le cordon d’alimentation.
• Vaporisez une solution de nettoyage sans solvant sur un chiffon et essuyez doucement l’écran.
2. Ne placez pas le moniteur LCD près d’une fenêtre. L’exposition du moniteur à la pluie, l’humidité ou la lumière de soleil peut
l’endommager sérieusement.
3. N’appliquez pas de pression sur l’écran LCD. Une pression excessive peut endommager de façon permanente l’écran.
4. N’enlevez pas le couvercle et n’essayez pas de réparer l’unité vous-même. Seul un technicien agrée est habilité à effectuer des
réparations.
5. Stockez l’écran LCD dans une pièce dont la température est comprise entre -20° et 60°C (-4° et 140°F). Stocker le moniteur LCD
dans un environnement dont les températures sont hors plage, peut l’endommager de façon permanente.
6. Débranchez immédiatement votre moniteur et appelez un technicien agrée dans les situations suivantes :
• Le câble signal reliant le moniteur au PC est éraillé ou endommagé.
• Du liquide a coulé sur le moniteur LCD ou le moniteur a été exposé à la pluie.
• Le moniteur LCD ou le bâti est endommagé.
Fixation du moniteur à la base
1. Sortez la base du moniteur de l’emballage et placez-la sur un plan de travail stable et de niveau.
2. Sortez le moniteur de l’emballage.
3. Alignez le bouton de libération au bas du moniteur avec la fente correspondante au bas de la base. Un ‘clic’ signifie que la fix-
ation du moniteur sur la base est correcte.
Connecter votre moniteur à un ordinateur
1. Éteignez votre ordinateur et débranchez le câble d’alimentation de votre
ordinateur.
2. 2-1 Connectez le Câble Vidéo
a. Assurez-vous que le moniteur et l’ordinateur soient bien éteints.
b. Connectez le câble vidéo à l’ordinateur.
2-2 Connectez le Câble numérique (Modéle Double entrée uniquement)
a. Assurez-vous que le moniteur et l’ordinateur soient bien éteints.
b. Connectez l’une des extrémités du câble DVI 24 broches sur l’arriére du
moniteur et connectez l’autre extrémité sur le port DVI de l’ordinateur.
3. Branchez le câble audio (Modèle avec une entrée audio seulement) (Optionnel).
4. Insérez le câble d’alimentation du moniteur dans le port alimentation, à l’arrière
du moniteur.
5. Branchez les cordons d’alimentation de votre ordinateur et de votre moniteur
dans la prise de courant la plus proche.
Commande externe
N° Icône Élément Description
1, 2
Bouton/Témoin
d’alimentation
Pour allumer ou éteindre le moniteur.
Bleu indique qu’il est allumé. Orange indique qu’il est en mode veille/économie
d’énergie.
3, 4
Moins/Plus
Si le menu OSD est actif, appuyez le bouton Moins ou Plus pour basculer entre les
options du menu OSD.
5
Fonctions OSD
Appuyez pour afficher le menu OSD. Appuyez à nouveau pour entrer une sélection
dans le menu OSD.
6
Bouton de réglage
automatique/Quitter
Si le menu OSD est actif, appuyez Auto pour quitter le menu OSD. Lorsque le menu
OSD est inactif, appuyez Auto et le moniteur optimisera automatiquement la
position de l’affichage, la mise au point et l’horloge de votre affichage.
7
Touche Empowering
Appuyez la « touche Empowering » pour ouvrir le menu OSD de Acer eColor
Management et accéder aux modes de scénario.
AUDIO IN
VGA IN
DVI-D IN
DVI
D-Sub
AUDIO IN
VGA IN
DVI-D IN
/

Guide de démarrage rapide du moniteur LCD
Français
Réglementations et avis de sécurité
Avis FCC
Cet appareil a fait l’objet de tests et répond aux limites prévues pour un appareil numérique de classe B conformément à la Partie
B des réglementations FCC. Ces limites ont été définies de façon à garantir une protection raisonnable contre les interférences
nocives dans une installation résidentielle. Cet appareil génère, utilise et peut émettre une énergie de radiofréquence. Si son
installation et son utilisation ne sont pas conformes aux instructions, il peut générer des interférences nocives pour les
communications radio.
L’absence d’interférence dans une installation particulière n’est cependant pas garantie. Si cet appareil génère une interférence
gênante pour la réception de radiocommunications ou d’ondes télévisées, ce qu’il est possible de déterminer en mettant hors
tension puis à nouveau sous tension l’appareil, l’utilisateur est encouragé à corriger l’interférence en appliquant une ou plusieurs
des mesures suivantes :
• Réorienter ou déplacer l’antenne de réception.
• Éloigner l’appareil du récepteur.
• Brancher l’appareil à une prise appartenant à un circuit différent de celui où est branché le récepteur.
• Consulter le fournisseur ou un technicien spécialisé en radio émission et en télévision pour obtenir de l’aide.
Déclaration de conformité CE
Par la présente, Acer Inc. déclare que cet écran LDC est conforme aux principales exigences et autresdispositions pertinentes de la
Directive CEM 2004/108/CE ; de la Directive Basse tension 2006/95/CE, de la Directive RoHS 2011/65/EU et la Directive 2009/125/CE
établissant un cadre pour la fixation d’exigences en matiére d’écoconception applicables aux produits liés à l’energie.
Avis : câbles blindés
Pour répondre aux réglementations CEM, tous les branchements avec d’autres appareils informatiques doivent être réalisés avec
des câbles blindés.
Avis : appareils périphériques
Seuls les périphériques (appareils d’entrée/de sortie, terminaux, imprimantes, etc.) certifiés conformes aux limites de la Classe B,
peuvent être branchés à cet équipement. L’utilisation de périphériques non certifiés peut générer des interférences sur la
réception des radiocommunications et des ondes télévisées.
Attention
Toute modification n’ayant pas fait l’objet d’une autorisation explicite du fabricant, annihile l’autorité de l’utilisateur, accordée
par la Commission Fédérale des Communications, à faire fonctionner ce produit.
Conditions de fonctionnement
Cet appareil est conforme à la Partie 15 des Réglementations FCC. Son fonctionnement est soumis aux deux conditions suivantes :
(1) cet appareil ne doit pas générer d’interférences nocives, et (2) cet appareil doit accepter les interférences reçues, y compris les
interférences qui pourraient provoquer un fonctionnement non désiré.
Avis : utilisateurs canadiens
Cet appareil numérique de classe B est conforme à la norme ICES-003 du Canada.
Remarque l'intention des utilisateurs canadiens
Cet appareil numérique de la classe B est conforme à la norme NMB-003 du Canada.
Élimination des appareils mis au rebut par les ménages dans l’Union
européenne
Le symbole apposé sur ce produit ou sur son emballage indique que ce produit ne doit pas être jeté avec les
déchets ménagers ordinaires. Il est de votre responsabilité de mettre au rebut vos appareils en les déposant dans
les centres de collecte publique désignés pour le recyclage des équipements électriques et électroniques. La
collecte et le recyclage de vos appareils mis au rebut indépendamment du reste des déchets contribue à la
préservation des ressources naturelles et garantit que ces appareils seront recyclés dans le respect de la santé
humaine et de l’environnement. Pour obtenir plus d’informations sur les centres de collecte et de recyclage des
appareils mis au rebut, veuillez contacter les autorités locales de votre région, les services de collecte des ordures
ménagères ou le magasin dans lequel vous avez acheté ce produit.
La page est en cours de chargement...
La page est en cours de chargement...
La page est en cours de chargement...
La page est en cours de chargement...
La page est en cours de chargement...
La page est en cours de chargement...
La page est en cours de chargement...
La page est en cours de chargement...
La page est en cours de chargement...
La page est en cours de chargement...
La page est en cours de chargement...
La page est en cours de chargement...
-
 1
1
-
 2
2
-
 3
3
-
 4
4
-
 5
5
-
 6
6
-
 7
7
-
 8
8
-
 9
9
-
 10
10
-
 11
11
-
 12
12
-
 13
13
-
 14
14
-
 15
15
-
 16
16
-
 17
17
-
 18
18
-
 19
19
-
 20
20
-
 21
21
-
 22
22
-
 23
23
-
 24
24
-
 25
25
-
 26
26
-
 27
27
-
 28
28
-
 29
29
-
 30
30
-
 31
31
-
 32
32


dans d''autres langues
- English: Acer K192WL Owner's manual
- español: Acer K192WL El manual del propietario