Sangean Electronics DT-120 Manuel utilisateur
- Catégorie
- Radios
- Taper
- Manuel utilisateur
Ce manuel convient également à

DT-120/180V
Operating instruction
Mode d’emploi
Instruccions de manejo
Gebruiksaanwijzing
Bedienungsanleitung
GB
F
E
NL
D
FM-stereo/AM/TV (DT-180V) Digital Personal Receiver
PDR Poste récepteur stéréo Radio FM/AM/TV (DT-180V)
FM-stereo/AM/TV (DT-180V) Digital Personal Receiver
Receptor Digital Personal FM-estéreo/AM/TV (DT-180V)
FM-stereo/AM/TV (DT-180V) Digitalempfänger

1

2
GB
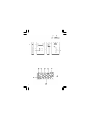
Controls
LCD display
Band selection
DBB (Deep Bass Booster) On/Off
Tuning Control
Stereo/Mono switch
Power On/Off
Volume Control
Lock Switch
Battery Compartment
Memory button
Earphone Jack
Display
Selected Band
90 minutes auto shut off
System lock
FM stereo indicator
Battery power indicator
Memory presets
DBB on
Frequency
1
2
3
5
7
9
11
4
6
8
10
A
E
F
D
H
C
G
B

3
Battery Installation
Battery cover is located on the back of the
unit. Slide the cover in the direction of the
arrow to gain access to the battery
compartment. Insert one AAA (UM-4) battery
into the compartment. Make sure that the
battery is positioned in accordance with the
indicated diagram. Replace cover.
Note:
1. You can always monitor the battery power
from LCD display battery icon.
When battery power becomes very low
and unable to operate the radio,
low battery indicator will flash together
with an “ E “ appears on the LCD display.
The radio will be shut off.
2. Make sure to replace the battery within
3 minutes. This will prevent any memory
presets from being lost during the battery
replacement.

4
GB
Antenna/Earphone
Insert the earphone into the earphone jack.
The cord connecting the earphone to the
receiver acts as an antenna during FM and TV
(DT-180V) audio reception and should be
extended as much as possible to increase
the sensitivity.
A built-in ferrite bar antenna is provided for
AM reception and it is only necessary to
rotate the radio for maximum signal strength
during AM listening.
Important Note:
The radio will be auto shut off within
10 seconds when you unplug the earphone
from earphone jack for battery power saving.
Volume Control
Using the volume control knobs to adjust
volume level. Display will show the changes
when you operate the volume control.

5
Tuning the radio
Band
Frequency
Antenna
Band
Frequency
Antenna
Band
Frequency
Antenna
AM
DT-120 522 - 1629 kHz (9 kHz)
DT-120 520 - 1710 kHz (10 kHz)
DT-180V 522 - 1629 kHz (9 kHz)
DT-180V 520 - 1710 kHz (10 kHz)
Internal/Rotate radio for bes
reception
FM
87.50 - 108 MHz
External/Make sure the earphone
in plugged into earphone jack
TV
TV channels 2-13 (DT-180V)
External/Make sure the earphone
is plugged into earphone jack

6
GB
90 Minutes auto shut off device
For saving battery power, this radio is
designed to auto shut off after 90 minutes
operation, LCD display shows .
For continuous listening if necessary,
pressing Power On/Off button for more than
2 seconds until LCD display disappears.
Scan Tuning
Turn on the radio, select required band by
pressing Band Selection button.
Press and hold down the Tuning Control
buttons for more than half a second and
release the button to commence Scan
Tuning. The radio will scan and stop
automatically when a station is found.

7
Manual tuning
Turn on the radio, select required band by
pressing Band Selection button.
Desired station may be selected by pressing
the Tuning Control buttons intermittently until
the desired station is reached.
Or pressing and holding the Tuning Control
until the desired station is reached.
Memory Tuning (Station Preset)
Turn on the radio by pressing Power On/Off
button. Select required band by pressing
Band Selection button. Tune to the desired
station using the Scan or Manual tuning
described above. When the desired station is
reached, press and hold Memory button for
more than 2 seconds until display M x stop
flashing followed with a beep (via earphone).
It will replace previous memory station.
You may store 5 memory stations each band
(AM, FMI, FMII and TV).

GB
8
Recall memory stations
Turn on the radio, select required band then
simply press and release Memory station
button. LCD display will show Memory preset
and radio frequency.
Stereo/Mono switch
The radio is designed to receive FM stereo
broadcastings. For weak FM station,
switch Stereo/Mono to Mono position.
LCD display Stereo icon will disappear.

9
Change AM band tuning step
For Northern American countries and some
South American countries, AM tuning step is
10 kHz. On other countries is 9 kHz.
To change AM band tuning step, please follow
below steps.
1. Change the AM band tuning step from
9 kHz to 10 kHz When radio is OFF,
press and hold Tuning UP button then
switch on radio by pressing Power On/Off
button until LCD display flashes 10 and
then 520, indicating AM step has been
changed to 10 kHz tuning step.
2. Change the AM band tuning step from
10 kHz to 9 kHz When radio is OFF,
press and hold Tuning DOWN button then
switch on radio by pressing Power On/Off
until LCD display flashes 9 and then 522,
indicating AM step has been changed to
9 kHz tuning step.
Note:
To change AM step will erase all the AM
Memory preset stations.

GB
10
System Lock
To prevent accidental changing of any of the
radio settings. Switch the Lock switch to
Lock position. LCD display lock icon will
appear. To release, simply switch the Lock
switch to its opposite position, LCD display
lock icon will disappear.
It’s important to make sure Lock switch is in
its off position when radio is to be operated,
as radio is completely inoperative until Lock
Switch is released.

11
Specifications
Battery: 1 x AAA (LR03, UM-4)
Frequency Coverage:
FM: 87.50 – 108 MHz
AM:
522 – 1629 kHz ( DT-120 9 kHz)
520 – 1710 kHz ( DT-120 10 kHz)
522 – 1629 kHz (DT-180V 9 kHz)
520 – 1710 kHz (DT-180V 10 kHz)
TV: 2 – 13 channel (DT-180V)
Output Power: 1.0 mW + 1.0 mW
Earphone Jack: 3.5 mm diameter (stereo)
The company reserves the right to amend
the specifications without notice.

12
If at any time in the future you should need to
dispose of this product please note that:
Waste electrical products should not be disposed
of with household waste. Please recycle where
facilities exist. Check with your Local
Authority or retailer for recycling advice.
(Waste Electrical and Electronic Equipment
Directive)
GB

13

F
14
Commandes
Affichage LCD
Sélecteur de bandes
DBB (Activateur basses profondes) On/Off
Commande syntoniseur
Sélecteur Stéréo/Mono
Mise sous tension On/Off
Réglage volume
Verrouillage
Compartiment à pile
Touche mémoire
Prise écouteurs
Affichage
Bande sélectionnée
Arrêt automatique 90 minutes
Verrouillage système
Voyant Stéréo FM
Voyant de charge pile
Préréglages mémoires
DBB On
Fréquence
1
2
3
5
7
9
11
4
6
8
10
A
E
F
D
H
C
G
B

15
Installation de la pile
Le couvercle du compartiment à pile se
trouve au dos de l’appareil. Faites glisser
le couvercle dans le sens de la flèche afin
d’accéder au compartiment à pile.
Insérez une pile AAA dans le compartiment.
Faites attention à insérer la pile,
comme indiqué sur le schéma.
Refermez le couvercle.
Note:
1. Vous pouvez à tout moment contrôler le
niveau de charge de la pile grâce à l’icône
affichée sur l’écran LCD. Quand le niveau
de la pile est si faible qu’il empêche le bon
fonctionnement de la radio, le voyant
clignote et la lettre “E” apparaît sur
l’écran LCD. La radio s’arrête.
2. Veillez à remplacer la pile dans un délai
de 3 minutes. Ceci afin d’éviter de perdre
les réglages mémorisés au moment du
remplacement de la pile.

F
16
Antenne/Ecouteurs
Branchez les écouteurs dans la prise prévue
à cet effet. Le câble de raccordement des
écouteurs fait office d’antenne pour la
réception audio FM et TV (DT-180V).
Vous devez le déplier le plus possible afin
d’optimiser son efficacité.
Une antenne métallique est intégrée pour la
réception AM. Vous devez la faire pivoter en
cours de réception AM pour obtenir un
meilleur signal.
Remarque importante:
Afin d’économiser la pile, la radio est arrêtée
automatiquement 10 secondes après que les
écouteurs aient été débranchés.
Réglage du volume
Utilisez le bouton de réglage du volume
pour régler le niveau sonore. L’écran affiche
les modifications quand vous effectuez le
réglage du volume.

17
Recherche radio
Bande
Fréquence
Antenne
Bande
Fréquence
Antenne
Bande
Fréquence
Antenne
AM
DT-120 522 - 1629 kHz (9kHz)
DT-120 520 - 1710 kHz (10kHz)
DT-180V 522 - 1629 kHz (9kHz)
DT-180V 520 - 1710 kHz (10kHz)
Intégrée/Tournez la radio pour un
fonctionnement optimum
FM
87.50 - 108 MHz
Externe/Assurez-vous que les
écouteurs soient correctement
branchés
TV
Canaux TV 2-13 (DT-180V)
Externe/Assurez-vous que les
écouteurs soient correctement
branchés.

F
18
Arrêt automatique 90 minutes
Afin d’économiser la pile, cette radio est
conçue pour s’éteindre automatiquement
après 90 minutes de fonctionnement.
L’écran LCD affiche .
Pour que l’écoute ne soit pas interrompue,
appuyez plus de 2 secondes sur le bouton
de mise sous tension On/Off jusqu’à ce
que l’icône disparaisse.
Recherche de stations
Allumez la radio, sélectionnez la bande
désirée en appuyant sur le bouton de
sélection de bande. Appuyez et maintenez
enfoncés plus d’une demie secondes les
boutons de commandes du syntoniseur pour
démarrer la recherche. La radio parcourt les
fréquences et s’arrête automatiquement
quand elle détecte une station.

19
Recherche manuelle
Allumez la radio, sélectionnez la bande
désirée en appuyant sur le bouton de
sélection de bandes. Vous pouvez
sélectionner la station voulue en appuyant
sur les boutons de commande du
syntoniseur par intermittence jusqu’à avoir
atteint la station voulue, ou en appuyant et
maintenant enfoncés les boutons de
commande du syntoniseur jusqu’à avoir
atteint la station recherchée.
Mémorisation syntoniseur
(Présélection des stations)
Allumez la radio en appuyant sur le bouton
de mise sous tension On/Off. Sélectionnez
la bande voulue en appuyant sur le bouton de
sélection de bande. Allez jusqu’à la station
voulue en utilisant la recherche automatique
ou manuelle comme décrit ci-dessus. Une
fois la station voulue atteinte, appuyez et
maintenez enfoncé le bouton Mémoire plus
de deux secondes jusqu’à ce que l’affichage
M x cesse de clignoter et qu’un signal
sonore retentisse (dans les écouteurs).
La précédente station mémorisée est
remplacée.
La page est en cours de chargement...
La page est en cours de chargement...
La page est en cours de chargement...
La page est en cours de chargement...
La page est en cours de chargement...
La page est en cours de chargement...
La page est en cours de chargement...
La page est en cours de chargement...
La page est en cours de chargement...
La page est en cours de chargement...
La page est en cours de chargement...
La page est en cours de chargement...
La page est en cours de chargement...
La page est en cours de chargement...
La page est en cours de chargement...
La page est en cours de chargement...
La page est en cours de chargement...
La page est en cours de chargement...
La page est en cours de chargement...
La page est en cours de chargement...
La page est en cours de chargement...
La page est en cours de chargement...
La page est en cours de chargement...
La page est en cours de chargement...
La page est en cours de chargement...
La page est en cours de chargement...
La page est en cours de chargement...
La page est en cours de chargement...
La page est en cours de chargement...
La page est en cours de chargement...
La page est en cours de chargement...
La page est en cours de chargement...
La page est en cours de chargement...
La page est en cours de chargement...
La page est en cours de chargement...
La page est en cours de chargement...
La page est en cours de chargement...
La page est en cours de chargement...
La page est en cours de chargement...
La page est en cours de chargement...
La page est en cours de chargement...
La page est en cours de chargement...
La page est en cours de chargement...
-
 1
1
-
 2
2
-
 3
3
-
 4
4
-
 5
5
-
 6
6
-
 7
7
-
 8
8
-
 9
9
-
 10
10
-
 11
11
-
 12
12
-
 13
13
-
 14
14
-
 15
15
-
 16
16
-
 17
17
-
 18
18
-
 19
19
-
 20
20
-
 21
21
-
 22
22
-
 23
23
-
 24
24
-
 25
25
-
 26
26
-
 27
27
-
 28
28
-
 29
29
-
 30
30
-
 31
31
-
 32
32
-
 33
33
-
 34
34
-
 35
35
-
 36
36
-
 37
37
-
 38
38
-
 39
39
-
 40
40
-
 41
41
-
 42
42
-
 43
43
-
 44
44
-
 45
45
-
 46
46
-
 47
47
-
 48
48
-
 49
49
-
 50
50
-
 51
51
-
 52
52
-
 53
53
-
 54
54
-
 55
55
-
 56
56
-
 57
57
-
 58
58
-
 59
59
-
 60
60
-
 61
61
-
 62
62
-
 63
63


Sangean Electronics DT-120 Manuel utilisateur
- Catégorie
- Radios
- Taper
- Manuel utilisateur
- Ce manuel convient également à
dans d''autres langues
- español: Sangean Electronics DT-120 Manual de usuario
- Deutsch: Sangean Electronics DT-120 Benutzerhandbuch
- Nederlands: Sangean Electronics DT-120 Handleiding
Documents connexes


Autres documents
-
Sangean DT-120CL Le manuel du propriétaire
-
Sangean DT-120 Manuel utilisateur
-
-
-
Sangean PR-D5 Le manuel du propriétaire
-
Sangean DT-250 Manuel utilisateur
-
-
-
-
Metabo RC 14.4-18 Le manuel du propriétaire