GE CDW9380N20SS Le manuel du propriétaire
- Catégorie
- Lave-vaisselle
- Taper
- Le manuel du propriétaire
Ce manuel convient également à

ge.com
F--
oL__
LJj
{!1
Safety Instructions .......... 2,3
Operating Instructions
Care and Cleaning ................ 15
Control Panel and Settings ....... 4-7
Flashing Displag Lights .............. 7
Loading Place Settings ............ 14
Loading the Racks ............. 12-14
Using the Dishwasher ........... 8-11
Troubleshooting Tips ..... 16-18
Consumer Support
Consumer Support ................ 24
Product Registration ........... 19, 20
Warranty ......................... 23
CDW9000 Series
PDW8000 Series
PDW9000 Series
Write the model and serial
numbers here:
Model #
Serial #
Youcan find them on the tub wail
just insidethe dooE
165D4 700P36 7 49-55042 10-07 JR

IMPORTANT SAFETY INFORMATION.
READ ALL INSTRUCTIONS BEFORE USING --
SAVE THESEINSTRUCTIONS
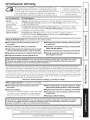
WARNING!
For gour safety, the information in this manual must be followed to minimize the risk of fire
or explosion, electric shock, end to prevent property damage, personal injury, or death.
_l I S
WARNING! WATERHEATERSAFETY
Under certain conditions, hydrogen gas may be produced in a water heater that has not been used
'__ _ for two weeks or more. HYDROGEN GAS IS EXPLOSIVE.
Ifthe hot water has not been usedfor two weeks or more, prevent the possibility of damage or injury
by turning on all hot water faucets and allow them to run for several minutes. Dothis before usingang
electricalappliance which isconnected to the hot water system.This simple procedure will allow any built-
up hgdrogen gas to escape.Sincethe gas isflammable, do notsmoke or usean open flame or appliance
during this process.
%
PROPERINSTALLATIONAND MAINTENANCE
This dishwasher must be properly installed and located in accordance with the Installation
Instructions before it is used. If gou did not receive on Installation Instructions sheet with
gout dishwasher, gou con receive one bg visiting our website at ge.com.
• Connect to a grounded metal, permanent wiring
system; or run an equipment-grounding
conductor with the circuit conductors and
connect to the equipment-grounding terminal
or lead of the appliance.
• Improper connection of the equipment-grounding
conductor can resultin a risk of electricshock.
Checkwith a qualified electrician or service
representative if you are in doubt whether the
appliance isproperly grounded.
• Disposeof discarded appliances and shipping
or packing material properly.
• Donot attempt to repair or replace any part
of your dishwasher unlessit isspecifically
recommended in this manual. All other servicing
should be referredto a qualified technician.
• To minimizethe possibility of electric shock,
disconnect this appliance from the power supply
beforeattempting any maintenance.
NOTE:Tuming thedishwasher offdoesnot
disconnect the appliancefrom thepower supplg.
Werecommend havingo qualified technician
serviceyour appliance.
CAUTION: Topreventminorinjurgorpropertgdamage
• Contentswashed in Anti-bacterial mode, if
available,mag be hot to the touch. Usecare
before handling.
• Usinga detergent that is
not specifically designed
for dishwashers will cause
the dishwasher to fill with
suds.
• If your dishwasher is connected to a
wall switch, ensure that the switch is
on prior to use.
• On dishwasherswith electronic
controls, if you choose to turn the wall
switch off between wash cgcles,allow
5-10 secondsafter turning the switch on before
touching START/RESETto allow the control to
reboot.
• Non-Dishware Items:Donot wash items such
aselectronic air cleanerfilters, furnace filters and
paint brushes in your dishwasheEDamage to
dishwasher and discoloration or staining of
dishwasher mag result.
• Closesupervisionis necessary ifthis appliance
isused bg or near children.
• Load light, plastic items so theg will not
become dislodged and drop to the bottom
of the dishwasher-theg might come into
contact with the heating element and be
damaged.

ge.com
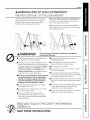
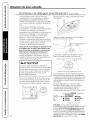
WARNING! RISK OF CHILD ENTRAPMENT
PROPER DISPOSAL OF THE DISHWASHER
Junked or abandoned dishwashers are dangerous...
evenif they will sit for 'just a few days/' If Souare
getting rid of sour old dishwasher,pleasefollow
the instructions to help prevent accidents.
Before You Throw Away Your Old Dishwasher
Take off the door of the washing compartment or
remove the door latch (as shown).
NOTE: CDW9000 Series and PDW9200-PDW9900
Series models also have a latch screw which must be
removed (Step 1) as shown.
Screw
(on some
models)
WARNING!
When using your dishwasher, follow basic precautions,
including the following:
• Usethis appliance onlg for its intended purpose
as described in this Owner's Manual.
• Use onlg powder,tabs, liquid detergents or rinse
agents recommended for usein a dishwasher and
keepthem out of the reach of children.Cascade®,
Cascade ®Complete and Electrasol ®Automatic
Dishwashing Detergents, and Jet-Dru ®and
Cascade Crustal Clear_ rinse agents have been
approved for use in all GE dishwashers,
• Do not mix any chlorine bleach-based automatic
dishwashing detergent with any dishwashing
detergent containing enzymes as this could
cause the detergents to congeal and lead to
blockage of the SmartDispense TMsystem.
• Locate sharp items so that they are not likely
to damage the door seal.
• Load sharp knives with the handles up to reduce
the riskof cut-type injuries.
• Do not wash plastic items unless marked
dishwasher safe or the equivalent. For plastic
items not so marked, check the manufacturer's
recommendations.
• Donot touch the heating element during or
immediatelg after use.
• Donot operate gout dishwasher unlessall
enclosure panels are properlg in place.
• Donot tamper with controls.
• Donot abuse,sit on or stand on the door or dish
rack ofthe dishwashen
• Donot allow children to plag around dishwasher
when opening or closing door due to the possibilitg
of small fingers being pinched in doon
• Donot discarda dishwasherwithout first removing
the door of the washing compartment or the door
latch.
• Donot storeor usecombustible materials, gasoline
or other flammable vapors and liquids in the
vicinitg of this or ang other appliance.
• Donot allow children to plag with, on or insidethis
appliance or ang discarded appliance.
READAND FOLLOW THISSAFETYINFORMATION
CAREFULLY.
SAVETHESE INSTRUCTIONS

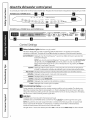
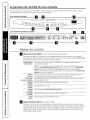
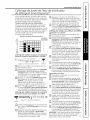
About the dishwasher control panel.
Youcanlocateyourmodelnumberonthetubwalljustinsidethedoor.Throughoutthismanual,featuresandappearancemayvaryfromgoutmodel.
li 0 0
PDW9200 Series-PDW9900 Series and CDWgO00 Series
ENHANCEMENTS STATUS --
_u_ @ tO_DETER_EICT®DRYIN6
_ss @ SENSING ® SANITIZED
H_Dr_
_oRas_ @ W,_HING • OLE_N
El 0 El
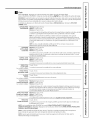
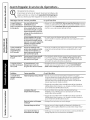
Control Settings
O Status Indicator Lights (Indicatorsvary by models)
TheStatusdisplaytells you what ishappening while the dishwasherisin operation and may flash,
indicating a malfunction.Thelightswill come ONindicating the sequenceof thedishwasheroperation.
LOWDETERGENTDisplayedwhen the SmartDispenseTM needsto be refilledwith liquid or gelautomatic
dishwasherdetergent.
NOTE:Ifyou are not usingSmartDispenseTM and you want to tum the LOWDETERGENT
LEDlightoff, presstheADDEDHEATpad 5times within 3 seconds.Youwillhear 3
beeps;then the lightwill go off.Youcan turn the light back on bg pressingtheADDED
HEATpad Stimes within 3 seconds.
SENSINGDisplagedwhilethe CleanSensorTM ismeasuring the amount of soiland temperature
of wateEThedishwasherwilladjust the selectedcgcleto achieveoptimal performance.
ADD-A-DISH Displaged during prewash, indicating that dishes added now will still be cleaned.
WASHING Displagedduring prewash,main wash and rinseperiods.
RINSING Displayed during rinseperiods.
DRYING Displayedduring HEATEDDRY.
SANITIZED Displagedwhen cgde hasmet sanitizationconditions.
CLEAN Displagedwhen a wash cgde iscomplete.
O Time Remaining Display (onsomemodels)
Duringoperation,the displagshowsthe minutes remaininguntil the cycleiscomplete.Thedisplagmay
adjust the remainingtime while the Sensinglightison.Thetime displayedat the start of eachcycle may
change from the factory setting asthe unit customizesitselfto home use.Duringa delay start, the display
will show hoursof time remaining untilthe cycle starts.
_lSelections
PDWGO00Series:Pressthepad for thedesiredwash cycle.
CDWgO00Seriesand PDWgO00Series:UsetheArrow Podsf_ _ to scrollthrough thewash cycles.
NOTE:All cgcletimes and water usageinformation contained in the following sectionare approximate
values.Actual resultswilldepend on severalfactors,includingbut not limited to inlettemperature,
householdwater pressureand amount ofsoilin thewash wateE
Thelight above or nextto the selectedpad will beONto indicate which WASHCYCLEhasbeen selected.

ge.com
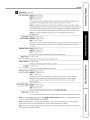
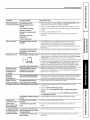
Selections (continued)
ANTI-BACTERIAHeavg 8.8gal.,!05 rain.
Medium 7.5gal.,95 rain.
Light 6.3gal.,85 rain.
Thiscgcle raisesthe water temperature in the final rinseto sanitizegout dishware.The
cgcle lengthwillvarg depending on the temperature of gout inletwatec
NOTE:TheAnti-Bacteriacgcleismonitored for sanitization requirements.Ifthe cgcleis
interrupted during or after the main wash portionor ifthe incoming water temperature is
solow that adequate water heatingcannot be achieved,the sanitizingconditionsmag
notbe met. Inthese cases,the sanitizedlightwill not illuminate at theendof the cgcle.
NOTE:NSF-certifiedresidentialdishwashersare not intendedfor licensedfood
establishments.
Heavg !0.0 gal.,B0 rain.
Medium 8.8gal.,70 rain.
Light 7.5gal.,60 rain.
Thiscgcle ismeant for heavilgsoileddishesor cookwarewith dried-on or baked-onsoils.
Thiscgcle mag not remove burned-on foods. Evergdagdishesare safeto be used in
this cgcle.
Heavg 8.8gal.,70 rain.
Medium 7.5gal.,60 rain.
Light 5.0gal., 50 rain.
Thiscgcle isfor mediumiheavilg soileddishes and glassware.
7.5gal.,35 rain.
Thiscgcle isfor evergdag dishesand glassware.
7.5gal.,35 rain.
Thiscgcle isfor lightlg soiledchina and crgstal.
7.5gal.,30 rain.
Thiscgcle isspecificallg designed for glasses.
Heavg 8.8gal., !20 rain.
Medium 7.5gal.,:!_05rain.
Light 5.0gal.,90 rain.
Thelonger time for this cgcle includes a built-in drging portion that isspecificallg
designedto reduce the risk of melting plastic items and improve plasticdrging.
Forremoving redtomato-based stains,GErecommends the useof Cascade®
PlasticBoosterTM.
Heavg 8.2gal.,70 min.
Medium 7.0gal.,60 min.
Light 4.6gal., 50 min.
Thiscgcle washes lightlg soileddishes on the upper rack onlg.
2.5gal., 10 min.
Forrinsing partial loadsthat will be washed late[ Donot usedetergent with this cgcle.
COOKWARE
{POTS& PANS)
NORMAL WASH
SPEED CYCLE
(on some models)
CHINA CRYSTAL
GLASSES
(onsome models)
PLASTICS CYCLE
(on some models)
SINGLE RACK WASH
(on some models)
RINSEONLY
NOTE: On the PDW8000 Series models, the CHINA CRYSTAL/PLASTICS selector is o toggle pad, push pad
to switch between CHINA CRYSTALand PLASTICS.
NOTE: This dishwasher is equipped with CleonSensoF '_ with automatic temperature control, therefore,
cgde length and time may vorg depending on soil and water temperature conditions.
NOTE: Only the Anti-Bacteria cycle has been designed to meet the requirements of Section 6, NSF 18/4 for
soil removal and sanitizotion efficacy.

About the dishwasher control panel.
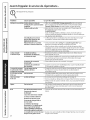
_l_ Enhancements
ADDED HEAT
{EXTRA HOT WASH)
Thelight above the selected pad will be ONto indicate which ENHANCEMENThasbeenselected.
DELAYHOURS Youcan delay the start of a wash cycle for up to 24 hours (dependingon model).Press
the DELAYSTARTpad to choosethe number of hours you want to delay the start of
the cycle; then pressSTART/RESET.
PDW8000 Series:Themachine will count down and start automatically at the
correct time.
CDW9000 Seriesand PDW9000 Series:After closing the door,the machine will count
down and automatically start at the correct time.
NOTE:Tocancel the DELAYSTARTselection beforethe cycle begins, repeatedly press
the DELAYSTARTpad until the display isblank.
When selected,the cycle will run longer with heating element on to improve both wash
and dry performance.
NOTE:Cannot be selectedwith RINSEONLYcycle.
PREWASH Forusewith heavily soiledand/or dried-on, baked-on soils.Thisoption MUSTbe
(on some models) selectedPRIORto starting the cycle. Thisoption adds !5 minutes to the cycle time.
NOTE:Cannot be selectedwith RINSEONLYcycle.
HEATEDDRY Shuts offthe drying heat option.Disheswill air dry naturally (PDW8900Series)or
Light Off fan dry (PDW9200-PDW9900Seriesand CDW9000Series)to save energy.
HEATEDDRY Turnsthe heater onfor fast drying. Thiswill extend the total cycle time by iS minutes
LightOn for the ANTI-BACTERIALcycle,38 minutesfor the NORMAL,SINGLERACKWASH
and COOt(WAREcycles,8 minutes for the SPEEDcycle, !5 minutes for the
PLASTICScycle and 30 minutesfor all othercycles.
NOTE:Cannot be selectedwith RINSEONLYcycle.
LOCK Youcan lock the controls to prevent any selections from being made. Or you can lock
_1 the controls after you have started a cycle.
Children cannot accidentallg start dishwasher bg touching pads with this option
selected.
Tounlock the dishwasher controls, pressand hold the HEATEDDRYpad for 3 seconds.
Thelight above the lock pad will turn off.To lock the dishwasher,pressand hold the
HEATEDDRYpad for 3 seconds.The light above the LOCKpad will turn on.
RESETTochange a cycle after washing starts...
PDW8000Series:Touchthe START/RESETpad to cancelthe cycle.TheSTART/RESETlight
will flash while the water ispumped out if needed.This takes approximately 2 minutes.
PDW9000 Series:Openthe door slowly to prevent splash-out. Touchthe START/RESET
pad to cancel the cycle. If the START/RESETlight isflashing, closethe door untilthe
water pumps out (thistakes approximately 2 minutes)and the light stopsflashing.
When the light stopsflashing,the dishwashercan be reprogrammed and restarted.
_ Start
PDW8000 Series
Closeand latch the dishwasher door and selectthe cycle and desiredenhancements.Touchthe
START/RESETpadto beginthe cycle.Water fill beginsimmediately, and approximately 80 secondslater
the wash action begins.
When the dishwasher door isfully closed and latched,the control panel lights will display the last settings
you selected.If you don't want to change any of the settings,simply touch the START/RESETpad to
begin the cycle.
If the door isclose&the indicator lightswill turn off ifthe START/RESETpad isnot selectedwithin 5 minutes.
Toactivate the display,open and closethe door or pressany pad.

ge.com
_ Start (continued)
D
PDW9000Series
After selectingthe cycle and desiredenhancements, touch the START/RESETpad to ready the
dishwasher to begin the cycle. Closethe door to start the cycle or begin the DELAVSTARTcountdown.
When the cycle starts, the water fill begins and approximately 60 secondslater the wash action begins.
The dishwasherwill always display your last selection and enhancements. If you don't want to change
the settings,simply touch the START/RESETpad to ready the dishwasher and closethe door to begin
the cycle.
Also,if a power failure occurs NORMALand HEATEDDRYwill automatically be programmed. Hake any
new selectionsand touch the START/RESETpad to beginthe new cgcle.
When the door isopened,the indicator lightswill turn off ifthe START/RESETpad is not selectedwithin
5 minutes.Toactivate the displag, open and close the door or touch ang pad.
Clean
PDW8000Series
TheCLEANlight is illuminated when the selected cgcle and enhancements are complete. Thelight will
stag ONuntil a pad is pressedor the door isopened and then closed.
PDW9200Series-PDW9900 Seriesand CDW9000Series
TheCLEANlight is illuminated and a double beep willsound when the selected cgcle and enhancements
are complete. You mag remove the dishes at ang time.The high-efficiencg fan will run quietly for 30
minutesto 4 hours (depending on selected cgcle)after the CLEANlight is illuminated to continue drying
the dishes.Thefan can be turned off bg opening the door and pressingang kegpad.
ALL MODELS:Toturn off the audible end-of-cgcle signal (or re-activate it ifit was previously tumed off),
pressthe HEATEDDRYpad 5 times within 3 seconds.A triple beep will sound to indicate the end-of-cgcle
beepoption has been toggled.
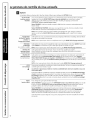
Flashingdisplay lights.
Status Indicator Lights What It Means
START/RESET
Cgclehasbeen interrupted bg pressingthe START/RESETpad,or there
hasbeen o power failure. Light will stop flashing after the dishwasher
automatically drains out the water.Thedishwasher will restart if the
interruption was the result of o power failure.
Recommended dishwasher products.
GErecommends the following products for usein its
dishwashers:
• For your manual detergent dispenser,Cascade®
and ElectrasoF powder, liquidor gel automatic
dishwasher detergents are approved.
• For your SmartDispenseTM Detergent Dispenser,use
only the recommended detergents listedon page
10of this manual,
• Jet Dry ®or Cascade Crystal Clear®rinseagents
to remove spots and prevent new film buildup on
your dishes,glasses,flatware, cookware and
plastic. Using rinseagent also improves drg
performance.
• Cascade®Plastic BoosterTM to remove red staining
insidegour dishwasher that can come from some
tomato-based foods.
• Cerama Brgte®StainlessSteelAppliance Cleaner
to clean the exterior stainlesssteel panel of GEand
ProfileTM dishwashers (forstainlesssteel exterior
models only).

Using the dishwasher.
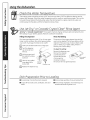
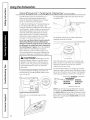
Check the Water Temperature
The entering water should be at least J20°F and not more than 150°F for effective cleaning and to
prevent dish damage. Check the water temperature with a candy or meat thermometer. Turn on the
hot water faucet nearest the dishwasher, place the thermometer in a gloss and let the water run
continuously into the glass until the temperature stops rising.
Use ®or Cascade Cr_jstal Clear®Rinse Agent
Jet-Dry ®or Cascade Crystal Clear ¢ rinse agent improves drying, removes spots and prevents new
film buildup on your dishes, glosses, flatware, cool<ware and plastic.
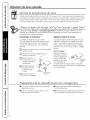
Filling the Dispenser Rinse Aid Setting
The rinse agent dispenser holds ].5 oz. of rinse agent.
Under normal conditions, this will last approximately
one month. Try to keep it full, but do not overfill.
[] Make sure the dishwasher door is fully open.
'2] Turn the dispenser
cap to the left and
lift it out.
F1Add rinse agent until
the indicator window
looks full.
[] Cleanup any spilled
rinseagent with a Indicator t
damp cloth, window Dispenser cap
Theamount of rinseagent releasedinto the final
wash can be adjusted.Thefactory setting isat the
midpoint. If there are ringsof calcium (hardwater)
spots on dishes,try a higher setting. If there is
foaming, usea lower setting.
TOadjust the setting:
Removethe dispenser cap;
then turn the adjuster
counterclockwise to
increasethe amount
jent
of rinseagent or adjuster
clockwiseto reduce
the amount of rinseagent dispensed.
E] Replacethe dispenser cap.
Dish Preparation Prior to Loading
• No prerinsing of normal food soilisrequired. • Removelarge quantities of any remaining food.
• Scrapeoff hard soils,bones,toothpicks, skinsand • Removeleafy vegetables,meat trimmings and
seeds, excessiveamounts of grease or oil.

ge.com
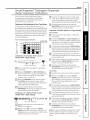
Monuol Detergent Dispenser
Yourdishwashercomesequippedwithan automaticliquid Forheavilysoiledloads,usea bitmoredetergent.Forwater
dishwasherdetergentdispenser(SmartDispenseTM) and a temperaturesabove140%,usea bitlessdetergent.
manualdispenser.Youcanuseeitherofthesedispensers
butdon'tusebothatthesametime.
Hedium Hedium E×tremely
Soft Soft Hard Hard
SmartDispense T"
MAINWASH
HOnUQI Detergent
Dispenser
Forheodlysoiledfoods,usethePotsondPonsor HeovyWash
cycle.
Thecoverofthemanualdispenserwillopenduringthe
washcycle.IfyouareusingSmartDispenseTM, leavethe
coverofthemanualdispenseropenbeforestartingthe
cycle.
Forthemanualdispenser,Cascade®and Electrasol®
AutomaticDishwashingDetergentshavebeenapproved.
Youmayusepowder,liquid,gelortabletsinthisdispenserIt
isimportanttokeeppowdereddetergentsandtabletsfresh
anddrysothey don'tloseeffectiveness.Therefore,do not
putdetergentintothemanualdispenseruntilyouare ready
to washdishes.
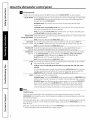
Filling Manual Detergent Dispenser
Theamountofdetergentto usedependsonwhetheryour
waterishardor soft.Withhardwater,youneedextra
detergent.Withsoftwater,youneedlessdetergent.
Protectyourdishesanddishwasherbycontactingyour
waterdepartmentand askinghowhardyourwateris.
TwelveormoregrainsisextremelyhardwaterAwater
softenerisrecommended.Withoutit, limecanbuildupin
thewatervalve,whichcouldstickwhileopenandcause
flooding.Toomuchdetergentwithsoftwatercancausea
permanentcloudinessofglassware,calledetching.
Usetheinformationinthetablebelowasa guideto
determinetheamountofautomaticdishwasherdetergent
to placeinthedispenserYoumay usepowder,liquid,gel
ortabletsinthisdispenser
Whenusingautomaticdishwashingdetergenttablets,
simplyplaceonetabletinthemainwashsectionandclose
the cover
Number
of Grains Detergent Cups to Fill
Lessthan 4 Fillcup to soft line (1/3 full)
4 to 8 Fillcup to medium soft line (2/3full)
8 to 12 Fillcup to medium hard line
(completely full)
Greater Fillboth main wash cup
than 12 and pre wash cup
DO NOTUSEHAND DISHDETERGENT
m
m
NOTE:Usingadetergentthatisnotspedficallbtdesigned
fordishwasherswillcausethedishwasherto fillwith suds.
Duringoperation,thesesudswdspilloutofthedishwasher
vents,coveringthekitchenfloorandmakingthefloorwet.
Becausesomanydetergentcontainerslookalike,storethe
dishwasherdetergentina separatespacefromall other
cleaners.Showanyonewho mayusethedishwasherthe
correctdetergentandwhereitisstored.
Whiletherewillbe nolastingdamagetothedishwasher,
yourdisheswillnotgetcleanusinga dishwashing
detergentthat isnotformulatedto workwithdishwashers.

Using the dishwasher.
SmartDispense TMDetergent Dispenser (somemodels;
This dishwasher may haveSmartDispenseTM, a Aim the detergent bottle at the opening in the door
feature which automatically dispensesliquid and begin to fill.
automatic dishwasher detergent into each cgcle
based on soil level and water hardness.
To utilize the SmartDispense TM Detergent Dispenser,
it must first be filled. Although any liquid or gel
automatic dishwashing detergent can be used in the
SmartDispense TM system, all liquid or gel automatic
dishwashing detergents are not the same. Most
automatic dishwashing detergents are chlorine
bleach-based (such as Cascade ® or Electrasol ®)
while others contain enzymes (such as Cascade
Complete ®or Electrasol ®Advanced TM Gel).
Do not mix ang chlorine bleach-bused automatic
dishwashing detergent with any dishwashing
detergent containing enzymes as this could cause
the detergents to congeal and lead to blockage of
the SmartDispense TM system. Check the detergent
label to determine if the detergent is chlorine
bleach-based or one that contains enzymes. It is
recommended that the same type of detergent be
used when refilling your SmartDispense TM system.
CAUTION! Absolutely do not add
powder detergent, tablets or any liquid soap or
detergent normally usedfor washing handsor
dishesin a sink.Only useliquid or gel detergent
specifically designedfor usein an automatic
dishwashe.
Toopen the dispenserfor filling, pushdown and
turn the blue cap counterclockwise untilthe cap is
loose.Lift cap off.
The dispenserwill hold 45 ozof liquid dishwasher
detergent (standard sizebottle).
Turn clockwise.
When full,replace the cap and turn clockwise until
tight to ensure no water enters the SmartDispenseTM
dispense, If residueis left on the door,itwill be
washed off in the next cycle.
An indicator light will turn on to notify you when the
dispenser needsto be filled again.After filling, the light
will not turn off until the door isclosed.A full dispenser
will last approximately i month for the average use.
STATUS
Light will SmartOispense
turn on _ 0 LOWBETERGENT0 DRYING
when 0 SENSING • SANmZED
time to
refill _ WASHING ® CLEAN
Setthe door at a comfortable angle to fill the
dispense.
(appearancemagvarg)
NOTE: Ifyou are not using SmartDispense TM and you
want to turn the LOW DETERGENTLEDlight off, press
the ADDED HEAT pad 5 times within 3 seconds. You will
hear 3 beeps; then the light will go off. You can turn the
light back on by pressing the ADDED HEAT pad 5 times
within 3 seconds.
10

ge.com
SmartDispense TMDetergent Dispenser
Water Hardness Calibration
Priorto the first use,the dishwasher needsto
be calibrated for water hardness.Pleasefollow
directions below to calibrate the dishwasherto
the hardnessof gour tap wateE
Determine the Hardness of Your Tap Water
In the bag that contained these instructions, gou
should find a water hardness test strip package.Read
the instructions on the package,remove the test strip
and follow the instructions to determine the hardness
levelof gour tap wateEYouwill usethis information to
calibrate gour dishwasher to dispensethe optimal
amount of detergent.
Waterhardnessteststrip indication
SOFT
0 RED
1 RED
2 RED
3 RED
4 RED
HARD
Value to Enter
into Dishwasher
I I I I I I I I I 1
3
Calibration of 12-Button Front-Control
Models With 3-Digit Display
Press at the same time. Display
r_ Closeand latch the door (lightson,dishwasher
not running).
171 Pressthe COOKWAREand DELAYHOURSpads
at the same time for 3 seconds.Thedisplag will
show a number from i to 5.Thisisthe water
hardness value currentlg set.
1-31Pressthe COOKWAREpad to raisethe value or
the NORMALpad to lowerthe value. Setthe
water hardnessvalue to the number determined
with the test strip and table above.
14--IOncethe water hardness isset, the
press
START/RESETpad to save the setting and return
the dishwasher to normal operation.
Calibration of 7-Button Front-Contro!
Models With 3-Digit Display
/ T
Displag Press at the same time.
r_ Open the door and touch a pad (otherthan
START)to turn lights on.
1-21Pressthe "Up" (_ Arrow Padand DELAY
HOURSpad at the same time for 3 seconds.The
displagwill show a number from i to 5.This isthe
water hardnessvalue currentlg set.
r-3-1Pressthe "Up" fix5Arrow Padto raisethe value
or the "Down" EE)Arrow Padto lowerthe value.
Setthe water hardnessvalueto the number
determined with the test strip and table atthe left.
E] Oncethe water hardness isset, the
press
START/RESETpad to save the setting and return
the dishwasher to normal operation.
Calibration of Models Without a 3-D(git Display
Front controls
[] Close and latch the door (lights on, dishwasher
not running).
r-21 Press the COOKWARE and DELAYHOURS pads
together for 3 seconds. Alllights will light up and
gou willhear i to 5 beeps. The number of beeps
indicates the current hardness value.
r-31 To change the setting, press the DELAYHOURS
pad the number of times that corresponds to the
water hardness value determined at the left. The
control willbeep each time gou press the pad.
Once finished pressing the pad, gou will hear a
confirmation with beeps for the number of times
gou pressed the pad.
[] Ifthe number of beeps is not what gou desire,
start pressing the DELAYHOURS pad again to
reenter a new water hardness level.
1-61Once the water hardness is set, the
press
START/RESET pad to save the setting and return
the dishwasher to normal operation.
Top controls
]Open the door and touch a pad to turn lights on.
[] Pressthe "Up" _ Arrow Pad and DELAY
HOURSpad at the same time for 3 seconds.All
lights will light up and gou will hear i to 5 beeps.
The number of beepsindicates the current
hardness value.
[-3-]To change the setting, pressthe DELAYHOURS
pad the number of times that corresponds to the
water hardnessvalue determined at the left.The
control will beep each time gou pressthe pad.
[_ Oncefinished pressingthe pad, gou will hear a
confirmation with beepsfor the number of times
gou pressedthe pad.
[_ If the number of beepsisnot what gou desire,
start pressingthe DELAYHOURSpad again to
reenter a new water hardness level.
[_] Oncethe water hardness isset, pressthe
START/RESETpad to save the setting and return
the dishwasher to normal operation.
NOTE:Youshould recalibrate the dishwasher control
if water conditions change; for example,if a water
softener sgstem isadded or removed from gour
home. 11

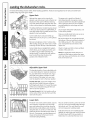
Loading the dishwasher racks.
For best dishwoshing results, follow these loading guidelines. Features and appearance of racks and silverware
baskets may vary from gout model.
Upper Rack
Although the upper rack isprimarily for
glasses,cups and saucers,pots and pans can
beplaced in this rack for effective cleaning.
Cupsand glassesfit best along the sides.This
isalso a secure place for dishwasher plastics.
Theutility shelf (somemodels)may be placed
in the up or down position to add flexibility.A
wine glass holder (some models)secureswine
glassesfor best washability.
Somemodels have contoured metal cup
shelvesthat can secure up to 12wine glasses
(asshown).
Becausewine glassescome in various sizes,
after loading,slowly push in the rack to make
surethey will clearthe top of the dishwasher.
Somemodels have an Angled Back System,
which allows you to angle your dishes,such
as coffee mugs,for better cleaning and
quicker drying. To position the tines, pullthe
leverforward then drop the tines into
position,then releasethe lever.
Theupper rack isgood for all kindsof
odd-shaped utensils.Saucepans,mixing
bowls and other items should be placed face
down. Fold-down tines (onsome models)
provide flexibility for extra-large and hard-
to-fit items.
Securelarger dishwasher-safe plastics over
2 tines when possible.
Make suresmall plastic items are secure so
they can't fall onto the heater.
Be surethat itemsdo not protrude through
the bottom of the rack and block rotation of
the middle spray arm.This could result in
poor wash performance for items in the
upper rack.
Checkto make surethat no items will block
rotation ofthe wash arm.
NOTE:TheSingle RackWash selection,on
models with this feature, washesthe upper
rack only. If you usethis feature, do not load
items in the lower rack.
IIt/l/J(
I II II II II If II /I II II II
Adjustable Upper Rack
Thestandard position of your adjustable rack
is"up" which allows for maximum clearance
for your taller items in the lower rack. If you
havetaller wine glasses,tumblers or other
items to placein the upper rack,you may
want to adjust the rack to the lower position.
Tolower the reck, support the weight of the
rackwith your hands asshown and press
bothfinger pads about 1/4" toward the inside
of the rack asindicated and guide the rack
down to its lower position.
Toraise the rack to the "up" position,pull up
on the center ofthe rack sideframe until the
rack locksinto place.
12
Lower Rock
Thelower rack isbest usedfor plates,saucers
and cookware. Large items such as broiler
pansand baking racks shouldgo along the
left-hand side.Load platters, pots and bowls
along the sides,in corners or in the back.The
soiledsideof items shouldface the center of
the rack. If necessary,oversizedglassesand
mugs can be placed in the lower rack to
maximize loading flexibility.
Also,be careful not to let a portion of an item
such asa pot or dish handle extend through
the bottom rack.Thiscould block the wash
arm and cause poor washing results.
Fold-down tines (on some models)provide
flexibility for extra-large and hard-to-fit items.
Thetines may be left in the up position or
folded down to customize the lower rack.

Shower Nozzle Service
Part Number WD12X10134
Press thumb
tab out Remove end cap
ge.com
Removing the Upper Rack
Your new dishwasher hasthe capability to
wash extra large items in the lower rack.This
isaccomplished by removing the upper rack
and installing a nozzleoverthe port that
normally supplieswater to the upper rack.
Thenozzleis not included with your
dishwasher,but is availablefor purchase from
GE.CallGEat 1.800.626.2002or go to the GE
website ge.com and request NozzleSpray
Asm,part number WD12X10134.
Customersin Canada can order on-line at
geappliances.ca 24 hoursevery day, or by
phone at 1.800.661.1616during normal
businesshours.
NOTE:Do not usethe SINGLERACKWASH
cgcle (some models)with this feature. Single
RackWash cycle isfor upper rack wash onlg.
Therecommended cgcle for lower rack onlg
use isthe COOKWAREcgcle.
NOTE:Nozzlemust be in placewith upper
rack removed.If not installed properly, poor
wash performance and noisewill result.
Toremove the upper rack:
['_ Pressthumb tab out and remove the
front end caps on each sideof the rail.
r_ pull the rack straight out and off the rails.
r_ Replacethe end caps.
[] Pushthe rails allthe way back into the
dishwasheE
F_ Slidethe shower nozzleattachment over
the spout.
"Shower nozzle
attachment
[] Then fillthe lower rack and begin
your cycle.
NOTE:Don't forget to remove the shower
nozzleattachment before you replacethe
upper rack.
One-piece basket Ion some models)
Three-piece basket Ion some models)
Don't let any
item extend
through bottom.
Silverware Basket
Toload flatware, simply pushthe adjustable
handle to either side(on some models).Put
flatware in the removable basket with fork
and knife handles up to protect your hands.
Placespoons in the basket with handles
down. Mix knives,forks and spoons sothey
don't nesttogethen Distribute evenly. Small
plastic items, such as measuring spoons and
lidsfrom small containers should go in the
bottom of the silverware basketwith the
silverware on top.
Theone-piece silverware basket(on some
models) can be placed in the front, right side
or back of the lower rack.
A variety of options is available regarding
the three-piece silverware basket(on some
models) in your dishwasheEThecomplete
basket isdesignedto fit on the right sideof
the lower rack.Additionally, each end of
the basket is removable to add loading
flexibility to accommodate flatware and
lower rack capacity needs.
Thelidsof both end and middle baskets (on
some models)can be closedto contain small
items. Long items can be placed on the utility
shelf in the upper rack.
tt it
To remove end baskets, grasp the
basket at opposite corners and
slide apart.
13

Loading the dishwasher racks.
Extra Rack Features (onsomemodels)
Cutlery Tray
Thecutlers trag holds up to 4 large knifes
such as a carver,chef's knives,bread knife,
etc.,that aretoo tall to fit in the silverware
basket.
Hookthe trag onto the rear of the upper rack.
Lag the knivesbetween the guides
{asshown).
These tines fold down
Bowl Tines
Thespecial large-bowl tines in the lower rack
add fle×ibilitgto sour loading pattern. Theg
are useful for serving bowls or other large
bowls.
Tousethe bowl tines,fold down the
2 rows of flex tines in front of the bowl
tines and load bowls just as gou would
in the upper rack.
Large-bowl tines
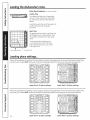
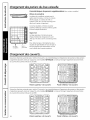
Loadingplacesettings...
Follow these guidelines for loading 10 place settings. Features and appearance of racks and silverware baskets may
vary from gout model. NOTE:Silverware should be individuoll9 loaded into the slots on the silverware basket lid.
Upper Rack--lO place settings Lower Rack--lO place settings
Follow these guidelines for loading 12 place settings. Features and appearance of rocks and silverware baskets may
vary from gout model. NOTE:Silverware should be individuall9 loaded into the slots on the silverware basket lid.
14
Upper Rack--12 place settings Lower Rack--12 place settings

Caring for the dishwasher, gecom
Cleaning the Exterior Door Panel
Beforecleaning the front panel,make
sure gou know what tgpe of panel gou have.
Referto the last two lettersof gour model
numbeEYoucan locate gour model number
on the left-hand tub walljust insidethe dooE
If gour model number ends with BB,CC,WW,
SAor BG,then gou have a PaintedDoor
panel. If gour model number endswith SS,
then gou have a StainlessSteelDoor panel.If
gour model number ends with CS,then gou
have a CleanSteelpanel.
Follow the instructions below for cleaning the
door panel for gour specific model.
Pointed Door Panel (modelnumbers ending
in BB-block, CC-bisque,WW-White, SA-silver
metallic or BG-grophite block)
Use a clean, soft, lightlg dampened cloth,
then drg thoroughlg. Youmag also usea
good appliance wax or polish.
Stainless SteelDoor Panel (modelnumbers
ending in SS)
Thestainlesssteel panels can be cleaned
with StainlessSteelMagic or a similar product
usinga clean, soft cloth. Do not useappliance
wax, polish,bleach or products containing
chlorine on StainlessSteeldoors.
Youcan order StainlessSteelMagic
#WXJOXJ5through GEParts bg calling
800.626.2002.
CleanSteel Door Panel (model numbers
ending in CS)
Use a clean, soft, lightlg dampened cloth,
then drg thoroughlg. Do not use appliance
wax, polish or any chemical agent on
CleanSteel doors.
Do not wipe the dishwasher with a soiled
dish cloth or wet towel. Thesemag leave
o residue. Do not use scouring pods or
powdered cleaners because these products
con scratch the finish.
Stainless Steel Interior-Tub and Inner Door
Thestainlesssteel usedto make the
dishwasher tub and inner door provides
the highest reliability available in a GE
dishwasher.If the dishwasher tub or inner
door should be scratched or dented during
normal use,they will not rust or corrode.
Thesesurface blemisheswill not affect
their function or durability.
Cleaning the Control Panel
Toclean the control panel,usea lightly
dampened cloth.Then drg thoroughly.
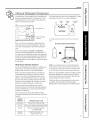
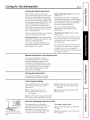
Protect Against Freezing
If your dishwasher is left in an unheated
place during the winter,ask a service
technician to:
r_cut off electrical power to the
dishwasher.Removefusesor trip
circuit breaker.
[-_ Turnoff the water supply and disconnect
the water inlet linefrom the water valve.
r_ Drainwater from the water inlet line
and water valve.(Usea pan to catch
the water.)
F] Reconnectthe water inlet line to the
water valve.
. _. i .,rl -
A,rgap _ '- :dI_--_
Check the air gap any time
yourdishwasherisn'tdraining
well.
Does Your Dishwasher Have an Air Gap?
An air gap protects your dishwasher
against water backing up into it if a drain
clogs.Theair gap isnot a part of the
dishwasher.It is not covered by your
warranty. Not all plumbing codes require
air gaps,so you may not have one.
The air gap is easg to clean.
[] Turn off the dishwasher and lift offthe
cover.
r-_] Remove the plastic cap and clean with
a toothpick.
15

Before you call for service...
Troubleshooting Tips
Save time and money! Review the charts on the following
pages, or visit ge.com. You may not need to call for service.
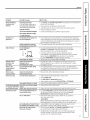
Error Messages Possible Causes What To Do
START/RESETstatus You have pressed the
indicator light flashing START/RESETpad while the
dishwasher is running. This will
cancel the cgcle. The light will
stop flashing after the dishwasher
drains (about 90 seconds).
• PresstheSTART/RESETpadonluonetimetostartthedishwasher.Whenthe
dishwasherisrunning,onlupresstheSTART/RESETpadif Uouwishtocancel
(reset)thecucle.
Powerto thedishwasherwas
turnedoff whileacgclewas
runningand powerhasjust been
restoredto thedishwasher.The
blinkinglights indicatethat the
dishwasherisdrainingwater
inside.
• Thelightwillstopflashingafterthedishwasherdrainsoutthewater.Anew
cuclewillstartautomaticalluwhenthedrainends.
Dishwasher BEEPS
once every 30 seconds
Thisisa reminderthat gour
dishwasherdoor hasbeenleft
openduringoperation.It will
continuebeepinguntil gouclose
thedoor.
• Closeandlatchthedoorafteropeningit mid-cucle.Beepingwillstopand
dishwasherwillcompletecucle.
Beeping at the end
of the cycle
This is normal. The dishwasher
will beep twice at the end of
the cgcle.
• Toturnoffthedoublebeepindicator(orre-activateitifitwas previouslu
turnedoff),presstheHEATEDDRYpad5timeswithin3 seconds.Atriple
beepwillsoundtoindicatetheend-of-cuclebeepoptionhasbeenturned
on oroff.
Low Detergent
Light ON
SmartDispense TM has less than • Fillthe SmurtDispenseTM reservoir with liquiddishwasher detergent. After
10 cgcles worth of detergent filling the reservoir,the LOW DETERGENTlightwill turn OFFoncethe
left in the dishwasher, door is closed.
Problem
Dishesandflatware
not clean
Possible Causes Whet ToDo
Lowinletwater temperature • Hake sure inletwater temperature iscorrect (seepage 8).Turn on the hot
water faucet nearest the dishwasher; let run until the water temperature
stops rising.Then start the dishwasher and turn offthe faucet. Thisensures
the entering water is hot.
• TrUnottousethedishwasherwhenhotwaterisbeingusedelsewhere
inthehouse;forexample,whendoinglaundryorwhena familymember
isusingtheshower.
Water pressure istemporarilg low • Turn on afaucet. Iswater coming out more slowly than usual?Ifso,wait
until pressure is normal before using your dishwashen
• Try not to use the dishwasher when hot water isbeing used elsewhere
in the house;for example,when doing laundry orwhen a family member
isusing the shower.
Air gap or disposer is clogged • Cleanthe air gap or flush the disposer.
Improper rack loading • Hake sure large dishware does not blockthe detergent dispenser or the
wash arms. Seethe Loadingthe dishwasher rocks section.
No air gap or high drain loop • Verify that you have an air gap or a high drain loop. Referto the
Installation Instructions.
16

ge.com
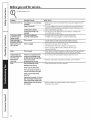
Problem Possible Causes What To Do
Spotsandfilming
onglassesand
flatware
Cloudiness on
glassware
Sudsin thetub
Detergent left in
dispenser cups
oron door
Water in the
SmartDispense"
dispenser
Blackor gray
markson dishes
Dishesdon'tdry
Extremelyhardwater
Lowinletwatertemperature
Overloadingthedishwasher
Improperloading
Oldor damppowderdetergent
Rinseagentdispenserempty
Toolittle detergent
Combinationofsoftwater and
too muchdetergent
Water temperatureentering
the dishwasherexceeds150°F
Correctdetergent
wasn'tused
Rinseagentwasspilled
Dishesare blockingthe
detergentcupor
SmartDispenseT"outlet
Capnot tightenedafter filling
the dispenser
Aluminumutensilshave
rubbedagainstdishes
Lowinletwater temperature
Rinseagentdispenserisempty
ControlpanelrespondedDoorlatch may not beproperlg
toinputsbutdishwasherseated
neverfilledwith water Water valvemagbeturnedoff
Stainedtubinterior Sometomato-basedfoodscan
causereddishstains
• UseJet-Dry®orCascadeCrystalCleaPrinseagentstoremovespotsand
prevent new filmbuildup.
• Hake sure water temperature isat least 120°F.
• Loaddishwasher as shown in the LoadingPlaceSettings section.
• Hake sure detergent isfresh.
• Ifwater isextremelg hard,a softener mag be required.
Teaorcoffee stains
• Thisiscalledetchingandispermanent.Topreventthisfrom happening,
uselessdetergentif SouhavesoftwatenWashglasswareintheshortest
cgclethatwillgetthemclean.Recalibratethe SmartDispenseTnsgstemif
youareusingit. Seepages9and !!.
• Thiscouldbeetching.Lowerthewaterheatertemperature.
• Useonlgautomaticdishwasherdetergentstoavoidsudsing.
Cascade®andElec¢rasol®AutomaticDishwashingDetergents
havebeenapprovedforuseinallGEdishwashers.
• Toremovesudsfromthetub,openthedishwasherandlet
sudsdissipate.Closeandlatchthedishwasherdoor Pumpoutwater
bgtouchingtheSTART/RESETpadonce;then30secondslater,
touchtheSTART/RESETpadagain.Repeatif necessary.
• Alwayswipeup rinseagentspillsimmediately.
• Repositionthedishes,sothewaterfromthelowersprayarmcan
flushthedetergentcupor outletfromtheSmartDispenseTM system.
Seepages13and 14.
• Useaturkegbasterto removeasmuchwateraspossiblefromthe
SmartDispense_ dispenserand refillitasnormal.Besureto tightenthe
capfullsto preventwaterfromenteringthedispenser
Removemarkswitha mild,abrasivecleaner
®
®
o
Anoverallyelloworbrownfilm can •
becausedbyirondepositsinwater
White film on insidesurface- •
hard water minerals
®
Hakesureinletwatertemperatureisat least120°R
SelectHEATEDDRY.
• UsePREWASHorADDEDHEAToptions.
• Selecta highercycle,suchasANTI-BACTERIAor COOKWARE.
• Checktherinseagentdispenserandfillasrequired.
• Hakesurethedoorisfirmlyclosed.
Hakesurewatervalve(usuallglocatedunderthesink)isturnedon.
UseoftheRINSEONLYcgcleafteraddingthedishtothe load
candecreasethelevelofstaining.GErecommendsCascade®
PlasticBoosterto helpremovethesetypesofstains.
Removethestainbghand,usinga solutionof 1/2cupbleach
and3 cupswarmwater
WARNING
Beforecleaninginterior,wait atleast20 minutesaftera cgcleforthe
heatingelementsto cooldown.Failuretodosocanresultin burns.
Aspecialfilterinthewatersupplylineistheonlywagto correct
thisproblem.Contacta watersoftenercompany.
GErecommends Jet-Dry®or Cascade Crystal CleaPto help
prevent hard water mineraldeposits fromforming.
Rundishwasherwithcitricacidto removemineraldeposits.Citric
acid(Partnumber:WD3gX151)canbeorderedthroughGEParts.
Seebackcoverfororderinginformation.
17

Before you call for service...
Troubleshooting Tips
Problem Possible Causes What To Do
Dishwasherwon't run
• ReplacefuseorresetcircuitbreakenRemoveanuotherappliancesfrom
the circuit.
• Insomeinstallations,thepowertothedishwasherisprovidedthrougha
wallswitch,oftenlocatednextto thedisposerswitch.Hakesureitison.
Controlpanelislocked • Unlockcontrolpanel.Seepage6.
Controlpanelneedsto be • Turnoff powertothedishwasher(circuitbreakerorwallswitch)for
rebooted 30seconds;thenturn backon.
Controlpanellights Timetoolongbetween • Eachpadmustbetouchedwithin5minutesoftheothers.
gooffwhen you're touchingof selectedpads Torelight,touchanupadagain,orunlockandrelatchdoon
settingcontrols
Waterstandingin Thisisnormal • Asmallamountofcleanwateraroundtheoutletonthetub
thebottomof thetub bottomatthe backofthetub keepsthepumpseallubricated.
Waterwon't pump Drainisclogged • If Uouhaveanair gap,cleanit.Seepage15.
outof thetub • Ifthedishwasherdrainsintoa disposer,rundisposerclean
• Checktoseeifuourkitchensinkisdrainingwell.If not,you
mauneeda plumben
Steam Thisisnormal • Warm,moistaircomesthroughthevent buthedoorlatchduringdrying
andwhenwaterisbeingpumpedout.Thisisnecessarufordruing.
Sanitizedlight does Thedoorwasopenedand the • Donotinterruptthecucleanutimeduringoraftermainwash.
notilluminateat the cyclewasinterrupted during
endofthecycle or after the mainwashportion
(Anti-Bacteria Theincomingwater • Raisethewaterheatertemperatureto between120°Fand140°E
cyde only) temperaturewastoo low
Noise Normaloperatingsounds • Theseareallnormal.Noactionisrequired.
Detergentcupopening
Water enteringdishwasher
Themotor stopsand starts at
varioustimesduringthecycle
Drainpumpsoundsduring
pumpout
Dryingfanrunning for2-4 hours
offer CLEANlight isilluminated
(TopControlPanelmodelsonly)
Rattlingdisheswhenthe spray
arm rotates
Fuseisblownor circuitbreaker
istripped
Poweristurned off
• Hakesuredishesareproperlgloaded.SeetheLoodingthe
dishwasherrackssection.
18

GE Service Protection Plus'"
GE, a name recognized worldwide for quality and dependability, offers you
Service Protection Plus_'-comprehensive protection on all your appliances-
No Matter What Brand!
Benefits Include:
• Backed bg GE
• All brands covered
• Unlimited service calls
• All parts and labor costs included
• No out-of-pocket expenses
• No hidden deductibles
• One 800 number to call
We'll Cover Ang
Appliance. Angwhere.
Angtime.*
You will be completely satisfied with our service protection or you mug request your money back
on the remaining value of your contract. No questions asked. It's that simple.
Protect your refrigerator, dishwasher, washer and dryer, range, TV,VCRand much more-any brand!
Plusthere's no extra charge for emergency service and low monthly financing is available. Even icemaker
coverage and food spoilage protection is offered. You can rest easy, knowing that all your valuable household
products are protected against expensive repairs.
Place your confidence in GEand call us for more information in the U.S.
toll-free at800.626.2224 and in Canada, toll-free at888.261.2133.
*All brands covered, up to 20 gears old, in the continental US
_Cut here
Please place in envelope and mail to:
Generol Electric Compong
Warranty Registration Department
RO. Box 32150
Louisville, KY 40232-2150
19

Consumer Product Ownership Registration
Dear Customer:
Thank you for purchasing our product and thank you for placing your confidence in us.
We are proud to have you as a customer!
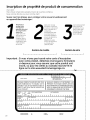
Follow these three steps to protect your new appliance investment:
Complete and mail
your Consumer
Product Ownership
Registration today.
Have the peace of
mind of knowing we
can contact you in
the unlikely event of a
safety modification.
After mailing the
registration below, store
this document in a safe
place. It contains
information you will need
should you require
service. Our service
number is 800.GE.CARES
(800.432.2737) in the U.S.
and 800.361.3400
in Canada.
Model Number
Read your Owner's
Hanual carefully.
It will help you
operate your new
appliance properly.
Serial Number
I I I I I I I
Important: If gou did not get a registration card with gour product, detach
and return the form below to ensure that gour product is registered,
or register online at ge.com. Canadian consumers, please use the
mail-in card on page 19 in the French Language section.
._,,_ Cut here
Consumer
Product Ownership Registration
Model Number Serial Number
I,,,,,, , , , , , I I , , , , , ,
Mc Ms. Mrsi Missi
FirstI I Lastl
Name I I I I I I I I I Name I I I I I I I I I I I I
Street IAddress l I I I I I I I I I I I I I I I I I I I I I I I I
Apt.# I I I I I I I I I E-mailAddress*
zipI
DitylI, I I I I, I I I I I I I statel, 1 Dode'' ' I I
Date Placed
i.u_ol, I I , I I , I phone
Numberl I, I-I,, I-I,,, I
Month Day Year
GE Consumer & Industrial
Appliances
General Electric Company
Louisville, KY40225
ge.com
* Please provide your e-mail address to receive, via e-mail, discounts, special offers and other important
communications from GE Appliances (GEA).
Check here if you do not want to receive communications from GEA's carefully selected partners.
FAILURE TO COMPLETE AND RETURN THIS CARD DOES NOT DIMINISH YOUR
WARRANTY RIGHTS.
For information about GEA's privacy and data usage policy, go to ge.com and click on "Privacy Policy"
or call 800.626.2224.
20
La page est en cours de chargement...
La page est en cours de chargement...
La page est en cours de chargement...
La page est en cours de chargement...
La page est en cours de chargement...
La page est en cours de chargement...
La page est en cours de chargement...
La page est en cours de chargement...
La page est en cours de chargement...
La page est en cours de chargement...
La page est en cours de chargement...
La page est en cours de chargement...
La page est en cours de chargement...
La page est en cours de chargement...
La page est en cours de chargement...
La page est en cours de chargement...
La page est en cours de chargement...
La page est en cours de chargement...
La page est en cours de chargement...
La page est en cours de chargement...
La page est en cours de chargement...
La page est en cours de chargement...
La page est en cours de chargement...
La page est en cours de chargement...
La page est en cours de chargement...
La page est en cours de chargement...
La page est en cours de chargement...
La page est en cours de chargement...
-
 1
1
-
 2
2
-
 3
3
-
 4
4
-
 5
5
-
 6
6
-
 7
7
-
 8
8
-
 9
9
-
 10
10
-
 11
11
-
 12
12
-
 13
13
-
 14
14
-
 15
15
-
 16
16
-
 17
17
-
 18
18
-
 19
19
-
 20
20
-
 21
21
-
 22
22
-
 23
23
-
 24
24
-
 25
25
-
 26
26
-
 27
27
-
 28
28
-
 29
29
-
 30
30
-
 31
31
-
 32
32
-
 33
33
-
 34
34
-
 35
35
-
 36
36
-
 37
37
-
 38
38
-
 39
39
-
 40
40
-
 41
41
-
 42
42
-
 43
43
-
 44
44
-
 45
45
-
 46
46
-
 47
47
-
 48
48


GE CDW9380N20SS Le manuel du propriétaire
- Catégorie
- Lave-vaisselle
- Taper
- Le manuel du propriétaire
- Ce manuel convient également à
dans d''autres langues
- English: GE CDW9380N20SS Owner's manual
Documents connexes
-
GE Profile PDW8600JCC Manuel utilisateur
-
GE PDW 8800 Manuel utilisateur
-
GE Profile PDWF480PSS Manuel utilisateur
-
-
-
-
-
-
-
GE PDWF400P00WW Le manuel du propriétaire
