1
PV500-56 03/19
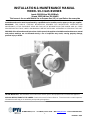
INSTALLATION & MAINTENANCE MANUAL
MODEL SU-3 GAS BURNER
Inputs 199,000 thru 399,000 Btu/h
(Inputs 58.32 kW thru 116.94 kW)
This burner is for use with Natural Gas or Propane Gas (LP), as specified on the name plate
Installation and service must be performed by a qualified service installer, service agency or the gas supplier.
IMPORTANT: THIS MANUAL CONTAINS INFORMATION REQUIRED FOR INSTALLATION, OPERATION AND
MAINTENANCE OF THIS EQUIPMENT. READ AND FOLLOW THE INFORMATION IN THIS MANUAL AND ALL OTHER
PROVIDED INSTRUCTIONS, LABELS AND MARKINGS BEFORE INSTALLING, OPERATING OR SERVICING THIS UNIT.
WARNING: If the information and instructions in this manual, the appliance installation and maintenance manual
and product markings are not followed exactly, a fire or explosion may result, causing property damage,
personal injury or death.
TO THE INSTALLER: After installation, these instructions must be given to the equipment user or left near the appliance.
SPECIAL INSTRUCTIONS TO THE OWNER: Retain this manual for future reference. These instructions contain important
information that will help you in maintaining and operating this appliance.
PVI INDUSTRIES, LLC - Fort Worth, Texas 76111 - Web www.pvi.com - Phone 1-800-433-5654

2
PV500-56 03/19
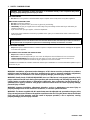
TABLE OF CONTENTS
1. Safety Considerations
2. Codes
3. Electrical Specifications
4. Combustion and Ventilation Air
4.1 Equipment Located in Confined Spaces
4.2 Maximum Allowed Remote Combustion Air Inlet Length
4.3 Vertical or Horizontal Remote Air Duct Termination
4.4 Remote Air Consideration for Combined Remote Air Ducting
5. Venting
6. Gas Supply and Piping
6.1 Gas Train and Controls Certification
6.2 Gas Control Trains
6.3 Inlet Pressure
6.4 Manifold Pressure
6.5 Gas Service and Pipe Capacity
6.6 Gas Piping to Burner
6.7 Appliance Isolation During Gas Supply Piping Pressure
7. Sequence of Operation
8. Burner Operation
9. Electrode & Flame Sensor Positioning
10. Burner Setup and Adjustment
10.1 Commissioning Checklist
10.2 Adjusting Burner Using Combustion Analyzer
10.3 Adjusting Burner Head
10.4 Burner Operation Record
11. Maintenance Instructions
12. Troubleshooting
13. Materials List

3
PV500-56 03/19
1. SAFETY CONSIDERATIONS
WARNING: Installation, adjustment and maintenance of this burner must be performed in accordance
with this manual and with local codes by a qualified service agency. Improper installation, adjustment,
alteration, service or maintenance can result in property damage, personal injury or death.
WARNING: Deadly levels of CARBON MONOXIDE can occur if the burner is not properly operating. Verify
proper carbon monoxide levels during first operation and commissioning and following any burner, gas
supply, heater or venting change or adjustment. Additionally, have combustion checked annually by a
qualified service agency. Failure to verify proper carbon monoxide levels can result in property damage,
personal injury or death.
WARNING: Improper installation, adjustment, alteration, service or maintenance can cause injury or
property damage. Refer to this manual for assistance, or consult a qualified installer.
WARNING: The burner supplied with this water heater must be adjusted and operated on the gas, at the
firing rate and pressures shown on the appliance and burner decals. Firing this burner above the allowed
firing rate will void the warranty, and may result in improper operation, a fire or explosion, causing
property damage, personal injury or death.
WARNING: If the information in these instructions is not followed exactly, a fire or explosion may result,
causing property damage, personal injury or death.
FOR YOUR SAFETY
Do not store or use gasoline or other flammable vapors or liquids in the vicinity of this or any other appliance.
WHAT TO DO IF YOU SMELL GAS
Do not try to light any appliance.
Do not touch any electric switch; do not use any phone in your building.
Immediately call your gas supplier from a location away from your building and the smell of gas. Follow the gas
supplier's instructions.
If you cannot reach your gas supplier, call the fire department.
Seasonal or annual combustion check-out by a qualified service agency is recommended to enable continued safe and
efficient operation.
POUR VOTRE SECURITE
• Ne pas entreposer ni utiliser d’essence ni d’autres vapeurs ou liquides inflammables dans le voisinage de cet appareil
ou de tout autre appareil.
QUE FAIRE SI VOUS SENTEZ UNE ODEUR DE GAZ
• Ne pas tenter d’allumer d’appareils.
• Ne touchez à aucun interrupteur. Ne pas vous servir des téléphones dans le bâtiment où vous vous trouvez.
• Appeler immédiatement votre fournisseur de gaz depuis un voisin. Suivez les instructions du fournisseur.
• Si vous ne pouvez rejoindre le fournisseur de gaz, appelez le service des incendies.
L’installation et l´installation et l’entretien doivent être assurés par un installateur ou un service d’entretien qualifie ou par le
fournisseur de gaz.
AVERTISSEMENT: Assurez-vous de bien suivre les instructions données dans cette notice pour réduire au minimum
le risque d’incendie ou d’explosion ou pour éviter tout dommage matériel, toute blessure ou la mort.

4
PV500-56 03/19
2. CODES
The water heater and burner must be installed in accordance with those installation regulations in force in the
local area where the installation is to be made. Authorities having jurisdiction must be consulted before
installation is made. In the absence of such requirements, the installation shall be in accordance with the
instructions in this manual, the water heater Installation and Maintenance manual, appliance markings and
supplemental instructions and in compliance with the Standard for Installation of Domestic Gas Conversion
Burners and the latest edition of the National Fuel Gas Code, ANSI Z223.1. Where required by the Canadian
authority having jurisdiction, the equipment must be installed in accordance with the latest edition of the
Installation Code for Gas Burner Appliances and Equipment CAN/CSA B149.1 and/or B149.2 and applicable
Provincial Regulations.
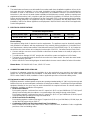
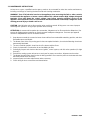
3. ELECTRICAL SPECIFICATIONS
Electric Wiring
See appliance rating decal for electrical service requirements. The appliance must be electrically supplied
and grounded in accordance with the requirements of the authority having jurisdiction or in the absence of
such requirements, with the latest edition of the National Electrical Code ANSI/NFPA No. 70. In Canada, the
electrical service must conform to local electrical codes and/or CSA C22.1, Canadian Electrical Code, Part 1.
Connect multi-pin connector at end of flexible conduit from the water heater to the multi-pin plug on the
burner control box.
To avoid serious damage, DO NOT energize the unit until the system and appliance is full of water.
The burner is grounded through the electrical connection to the water heater. Be certain the water heater
has been properly grounded.
Refer to the burner control wiring diagram located inside the burner control cabinet for further information.
Blower Motor - 120 Volt/ 60 Hz/1 Phase, 1/6 HP PSC motor.
4. COMBUSTION AND VENTILATION AIR
Provisions for adequate combustion and ventilation air to the mechanical room must be in accordance with
Section 5.3 “Air for Combustion and Ventilation” of the latest edition of the National Fuel Gas Code, ANSI
Z223.1 and/or CAN/CSA B149, Installation Codes or applicable provisions of the local building codes.
4.1 Equipment Located in Confined Spaces
Equipment located in confined spaces requires two openings installed within 12” (30.5 cm) from the top and
bottom of the room to assure adequate combustion air and proper ventilation. The total input of all gas utilization
equipment installed in the room must be used to determine the required minimum air volume needed for
combustion, ventilation and dilution of flue gasses.
All Air From Outdoors:
Each opening requires a minimum free area of 1 square inch (6.45 cm
2
)
per 4000 Btu/hr (1.17 kW) input if
directly communicating with the outdoors or communicating to the outdoors through vertical ducts.
Each opening requires a minimum free area of 1 square inch (6.45 cm
2
)
per 2000 Btu/hr (0.59 kW) input if
communicating with the outdoors through horizontal ducts.
All Air From Inside The Building:
Each opening requires a minimum free area of 1 square inch
(6.45 cm
2
)
per 1000 Btu/hr (0.29 kW) input, but
not less than 100 square inches (0.06 m
2)
.
Combination Of Air From The Indoors And From The Outdoors:
Refer to National Fuel Gas Code, ANSI Z223.1 and/or CAN/CSA B149, Installation Codes or applicable
provisions of the local building codes.
SU-3 Electrical Specifications
Primary Electric Input
Secondary Electric Input
Total Watts
Total Amps
120 Volt, 60 Hz, 1 Ph
24 Volts
150 Max
3 or less

5
PV500-56 03/19
WARNING: Adequate clean combustion air must be provided to the appliance. Under no circumstances
should the appliance ever be under a negative pressure. Particular care should be taken when exhaust
fans, compressors, air handling units, etc. may rob air from the appliance. The combustion air supply
must be completely free of any chemical or fumes, which may be corrosive to the appliance. Some
common chemical fumes to avoid are fluorocarbons and other halogenated compounds, most
commonly present as refrigerants or solvents, such as Freon, trichloroethylene, perchlorethylene,
chlorine, etc. These chemicals, when in contact with the equipment or when burned, form acids which
quickly attack the tubes, flue collector, stack and other appliance and auxiliary equipment. The result
of inadequate clean combustion air or negative pressure can be premature unwarranted product failure
or unsafe operation producing carbon monoxide that could escape into the building. Exposure to
carbon monoxide can lead to injury or death.
4.2 Maximum Allowed Remote Combustion Air Inlet Length (Equivalent Length)
Burners are suitable for use with an optional outside combustion air intake system that may be routed either
horizontally or vertically using a field obtained 3” by 4” (7.62 cm by 10.16 cm) increaser and 4 inch (10.16 cm)
sealed plastic or metal pipe, extending up to 100 equivalent feet (30.48 equivalent meters). Larger pipe may
be used to extend the equivalent length, if the pressure drop is not increased. A UL, ETL, ULC or CSA listed
vent cap must be applied to the terminus of the air intake system. The terminus may be either horizontal (from
sidewall) or vertical above roof.
The Listed air intake vent termination cap MUST be attached to the remote combustion air vent termination to
adequately protect the combustion air inlet from wind and weather. A UL Listed air intake termination cap is
available from PVI Industries and may have shipped with the water heater and burner as a purchased option.
4.3 Vertical or Horizontal Remote Air Duct Termination
Air inlet and exhaust vents should terminate in the same wind pressure area whenever possible.
Air inlet must be located no less than 3 feet (0.91m) below the exhaust terminal if they are within 10 feet
(3.05 m) of each other.
If terminating through the roof, the air inlet must terminate at least 12 inches (0.3 m) above roof level and
at least 12 inches (0.3 m) above snow levels.
If terminating through a sidewall, the air inlet must terminate at least 12 inches (0.3 m) above grade and/or
at least 12 inches (0.3 m) above normal snow levels.

6
PV500-56 03/19
4.4 Remote Air Consideration for Combined Remote Air Ducting
When remote air ducting is used, each water heater burner MUST have separate combustion air intake piping.
5. VENTING
For appliances connecting to gas vents or chimneys, vent installation and vent size must be in accordance
with Part 7, "Venting of Equipment," of the latest edition of the National Fuel Gas Code, ANSI Z223.1, using
the “FAN” rating or, in Canada, Section 7, “Venting Systems and Air Supply for Appliances” of the latest edition
of the CAN/CSA B149 Installation Codes, or applicable provisions of the local building codes.
Suitable for use with Category I (non-positive vent static pressure, with a gas vent gas temperature that
avoids excessive condensate production in the vent) Type B gas vent systems with 1” (2.54 cm) minimum
clearance or Type L vent systems.
Vent should not be sized based only upon vent connection diameter at the burner.
Locate units as close as possible to chimney or gas vent. For conventionally vented installations, the
connection from the vent to the stack or vent termination outside the building must be made with listed Type
“B” double wall (or equivalent) vent connectors and must be direct as possible with no reduction in diameter.
Support horizontal portions of the venting system to prevent sagging. Horizontal runs must slope upwards
not less than 1/4 inch per foot (21 mm/m) from the appliance to the vent terminal. Follow manufacturer’s
instructions.
Do not connect vent connectors serving this Category I, natural/negative draft vented, appliance to any
portion of a mechanical draft system operating under positive pressure.
Vent pressure must be between -.02" to -.06" W.C. (- 0.005 kPa to - 0.015 kPa) (Negative Pressure).
A barometric damper (draft control) is supplied for use on conventional vented installations. A properly
installed and adjusted barometric damper helps stabilize draft and regulate high updraft. Conventional
vented multiple unit installations with combined venting require barometric dampers to regulate draft at
each unit. Adjust the barometric damper to 0.04 inches water column (0.01 kPa) updraft. Follow the
barometric damper manufacturer’s installation instructions.
A listed vent terminal suitable for Category I products must be installed to adequately protect the gas vent
from wind and weather.
The vent terminal must extend at least 3 ft (.09 m) above the highest point where it passes through the roof
of a building and at least 2 ft (.06 m) higher than any portion of a building within a horizontal distance of 10
ft. (3.0 m).
The vent cap must terminate at least 3 feet (0.91 m) above any forced air inlet within 10 feet (3.05 m); 4
feet (1.22 m) below, 4 feet (1.22 m) horizontally from or 1 foot (0.3 m) above any door, window or gravity
air inlet to the building; 1 foot (0.3 m) above grade, 1 foot (0.3 m) above normal snow levels and shall
terminate at least 7 feet (2.13 m) above grade when located adjacent to public walkways or gathering areas.
The vent terminal must not be installed closer than 3 feet (0.91 m) from an inside corner of an L-shaped
structure.
6. GAS SUPPLY AND PIPING
Verify that the type of gas specified on rating plate is supplied to the unit. This unit is orificed for operation up
to 2000 feet (610 m) altitude. Appliance Btu/h (kW) output derates 4% per 1000 feet (305 m) elevation above
sea level. Consult Factory for installations above 2000 feet ((610 m) elevation.
6.1 Gas Train and Controls Certification - NOTE: The gas train and controls assembly provided on this unit
have been tested under the applicable American National Standard to comply with safety and performance
criteria such as proper ignition, combustion and safety shutdown operation.
6.2 Gas Control Trains - All models include gas control trains with the following components: main manual shutoff
valve, two safety shutoff valves and pressure regulator. These components may be separate or two or more
may be combined in a common housing.

7
PV500-56 03/19
CAUTION: Do not adjust or remove any screws or bolts on gas train control components which are sealed
with a red or blue colored compound. Doing so will void all approvals and warranties.
6.3 Inlet Pressure - Measure at the inlet pressure at the inlet pressure tap located on the upstream side (side
away from burner) on the top of the combination gas valve. The inlet pressure must remain within the minimum
and maximum values while the unit is at rest and while the unit is operating at maximum firing rate.
6.4 Manifold Pressure - Measure the manifold pressure at the manifold pressure tap located on top of the silver
elbow attached to the burner head. The rated manifold pressure appears on the burner data label located on
side of the burner control panel and is duplicated on the decal located near the front of the water heater.
6.5 Gas Service and Pipe Capacity - Before connecting the burner to the gas supply, insure that the gas pipes
and service meter are large enough to permit the additional load of the gas burner. (See Pipe Capacity Table)
Pipe Capacity for Natural Gas Table*(x 1,000 Btu/h’s)
Pipe Length**
Nominal diameter of pipe in inches
1”
1 ¼”
1 ½”
2”
15’
345
750
30’
241
535
850
45’
199
435
700
60’
173
380
610
75’
155
345
545
90’
141
310
490
105’
131
285
450
920
120’
120
270
380
850
150’
109
242
300
780
180’
100
225
225
720
* Using 0.6 Specific Gravity Gas and a Pressure Drop of 0.3” of Water Column
Multiplier for Propane: 1.57
** Each 90
0
elbow counts as 3’ for the purpose of these calculations
Pipe Capacity Example:
There is 75 feet of 1¼” pipe from the meter to the burner and there are 5 elbows.
(5 elbows X 3’) + 75’ pipe = 15’ + 75’ = 90’ of effective pipe length.
The maximum Btu/h that can be fired is 310,000 Btu/h. (See Pipe Capacity Table)
6.6 Gas Piping to Burner
All Piping Must Conform To Local Codes. Use black steel pipe and malleable iron fittings (do not use cast
iron parts) with a suitable pipe dope which is resistant to liquefied petroleum gases.
Safe operation of unit requires adequate gas supply with the required static and dynamic (flow) pressures.
Actual piping selection depends on many variables that must be carefully considered by the gas piping
system designer.
Do not select gas pipe sizes based only on the supplied tables. These tables are for use by the gas piping
system designer as a reference in checking pipe size selections.
The required gas pipe size may be larger than pipe connection size to the burner.
It is advisable to run a separate gas line from the meter to the gas burner to avoid pressure drops.
Installation of a union is suggested for ease of service.
Install a manual main gas shutoff valve, as specified by Code, approximately 6 feet (1.8 m) away from unit.
A sediment trap (drip leg) MUST be provided in the inlet of the gas connection to the unit.
6.7 Appliance Isolation During Gas Supply Piping Pressure
WARNING: The gas valve must not be subjected to more than ½” psig (3.45 kPa). Subjecting the gas
valve to pressure above ½” psig (3.45 kPa) can damage the valve and can cause gas leaks or loss of
gas control, which can result in property damage, personal injury or death.
INLET PRESSURE
NAT. GAS
LP
Maximum Static Pressure (Inches-Water Column)
10.5" (2.62 kPa)
13" (3.24 kPa)
Minimum Flow Pressure (Inches-Water Column)
4.5" (1.21 kPa)
8" (1.99 kPa)

8
PV500-56 03/19
The burner must be isolated during gas leak tests. The burner and its combination gas valve must be
disconnected from the gas supply piping system during any pressure testing of that system at test pressures
in excess of ½” psig (3.45 kPa). The appliance must be isolated from the gas supply piping by closing its
individual manual shut off valve using the gas control knob on top of burner combination valve during any
pressure testing of the gas supply piping system at test pressures equal to or less than ½” psig (3.45 kPa).
Gas Burner Piping
(Piping upstream of burner combination gas valve supplied by others)
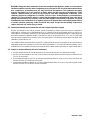
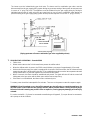
7. SEQUENCE OF OPERATION – Fenwal #35-66
Limits close.
Blower motor starts as the 24 Volt transformer powers the airflow switch.
When the airflow switch is proven, the 35-66 control initiates a pre-purge of approximately 15 seconds.
At the end of the pre-purge, the spark is energized for 4 seconds. At the same time, the 24 Volt transformer
powers the gas valve, allowing the fuel to flow. (The combination gas valve contains two separate automatic
safety shutoff valves, a pressure regulator and a manual shutoff valve)
Within 4 seconds, the flame should be established and proved. The spark will shut off and the control will
hold power to the gas valve until the limits open and the burner stops firing.
If the flame is not established, the blower motor continuously runs.
To restart, power should be interrupted for five minutes. Then turn on the power to start this sequence again.
WARNING: Should overheat occur, shut off the manual gas shut off valve to control the appliance. Do
not shut off the control switch to the pump or blower, which provides burner cooling and post purge.
Failure to follow this warning may result in a fire or explosion, causing property damage, personal injury
or death.
En cas de surchauffe : (1) fermez la commande manuelle de gaz à l'appareil, (2) ne pas fermer la commande
de la pompe ou de la soufflerie.
THIS IS NOT PART OF
THE SU-3 BURNER
SU-3 GAS BURNER

9
PV500-56 03/19
1” (2.54 cm)
8. BURNER OPERATION
Before placing the burner in service, a qualified installer, service agency or the gas supplier must perform
installation and service. All piping must conform with local codes.
Do not try to light the burner by hand.
Lighting Instructions
1. Set the thermostat to the lowest temperature.
2. The control knob on the gas valve should be in the “OFF” position for at least five minutes.
3. Rotate the control knob counter-clockwise to the “ON” position and set the thermostat to the desired
temperature settings. The burner will energize on call for heat.
Reset, If Flame Lockout Occurs
1. Turn the thermostat off or turn the main power off.
2. Wait five minutes.
3. Return thermostat to the desired setting or turn the main power on.
To Shut the Burner Off
1. Set the thermostat to the lowest temperature.
2. Turn off all electrical power to the appliance if service is to be performed.
3. Rotate the control knob on the gas valve to the “OFF” position.
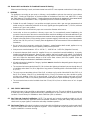
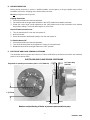
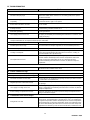
9. ELECTRODE AND FLAME SENSOR POSITIONING
Two electrodes act as a sparker and a flame rod. Flame rectification by this flame rod monitors the continued
presence of the burner flame.
ELECTRODE AND FLAME SENSOR POSITIONING
Number and positioning of holes in pressure plate (head) may vary.
5/8” (1.59 cm)
Projection of ceramic past retention plate = 3/16” (0.48 cm)
1/8” Spark Gap
(1.59 cm)

10
PV500-56 03/19
10. BURNER SETUP AND ADJUSTMENT
WARNING: The burner supplied with this water heater has been factory adjusted to operate on the type
gas, gas pressure, manifold pressure and firing rate identified on the burner data decal and must be
verified after installation and adjusted as required to obtain those values. Firing this burner above the
burner decal specified firing rate will void the warranty, and may result in improper operation, a fire or
explosion, or dangerous carbon monoxide, causing property damage, personal injury or death.
See the burner and water heater data decals for the proper firing rate, gas pressure requirements and other
important information.
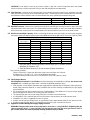
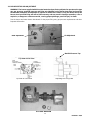
Top View of Gas Valve Adjusting the Firing Rate
SU3 Gas Manifold
Manifold Pressure Tap
Air Adjustment
Head Adjustment
Top View of Gas Valve

11
PV500-56 03/19
10.1 Commissioning Checklist
1. Be sure the water heater tank is filled with water before commissioning the burner.
2. Check the combustion air, venting and gas supply complies with the Section 4, “Combustion and Ventilation
Air”, Section 5, “Venting”, and Section 6 “Gas Supply and Piping”.
3. Check burner wiring.
Check that 120VAC is coming into the burner.
Check that the burner is properly grounded using a ground wire.
Check the polarity to the burner is correct. (To check polarity: Set a multimeter to VAC. Touch L1 to
one of the probe tips and ground to the other. If a voltage between 110 and 125 is shown then it has
the correct polarity; if any other reading is shown, then check the L2 wire. If the L2 wire shows a voltage
between 110 and 125 is shown then the polarity to the burner is reversed.)
4. Check that the orifice is installed. All SU-3 burners, except natural gas burners with inputs above 199,000
btuh (58.32 kW), have an orifice installed in the burner’s gas pipe union. If the required orifice is missing,
contact PVI for a proper size replacement.
5. Install monometers at the inlet pressure tap and manifold pressure tap on the burner.
Check the gas pressure at the gas valve inlet pressure tap (line pressure). This pressure must be within
the minimum and maximum gas pressures printed on the burner data decal, both when the burner is
firing and when it is not firing. If the pressure drops and then surges back up, double check the piping,
because it means the gas supply is probably undersized.
Record the static incoming gas pressure. When the burner lights off, record the running incoming gas
pressure; the incoming gas pressure must never be above or below the minimum and maximum
pressures shown on the burner information decal, whether the burner is firing or not.
Check the manifold pressure at the manifold pressure tap located on top of the silver elbow attached
to the burner head. Note: When checking manifold pressure, do not subtract burner housing
pressure during valve-on delay (pre-purge).
10.2 Adjusting Burner Using Combustion Analyzer
While the burner is firing and with a combustion analyzer sampling flue products in the vent near the burner,
adjust the gas pressure regulator as required to match the manifold pressure shown on the burner data
decal. If adjustments need to be made, remove the cap screw and adjust the pressure regulator. Screwing
the regulator clockwise will increase the manifold pressure and counter-clockwise will decrease the
manifold pressure. Note that a slight turn of the adjustment screw can result in a very large change
in manifold pressure.
Adjust the air shutter as necessary to obtain a CO2 reading between 8% and 9.5% for Natural gas and
9.5% to 10.5% for LP gas (O2 between 4.5% and 7.0%). Carbon monoxide levels should be below 200
ppm (less than 100 ppm is preferred). If air shutter adjustment is needed, rotate the air adjustment screw
clockwise to open the air shutter or counter-clockwise to close the air shutter. Changing the air shutter
setting will require the manifold pressure to be readjusted to match the pressure shown on the burner
information decal.
Continue to adjust the burner’s gas regulator and air shutter until the manifold pressure matches the value
shown on the burner data decal and CO2 (or O2) and Carbon Monoxide is within the range specified above.
10.3 Adjusting Burner Head
Do not change the factory setting of the burner head, except as directed in Section 12, Troubleshooting.
If directed to change the burner head position number, with the burner firing and with a combustion analyzer
inserted in the flue and a manometer attached to the manifold pressure tap, use an allen wrench to rotate
the head adjustment screw clockwise to increase the burner head position number or rotate counter-
clockwise to decrease the burner head position number. Changing the burner head position will require the
manifold pressure to be readjusted to match the pressure shown on the burner data decal. Then follow the
instructions contained in section 10.2, Adjusting Burner Using Combustion Analyzer.

12
PV500-56 03/19
10.4 Burner Operation Record
Note: if any adjustments are made, it is important to recheck the manifold pressure and combustion
analysis. Check the following readings in the vent above the flue collector and below the barometric
damper.
BURNER OPERATION: Record the Readings at Steady State
Incoming Static Gas Pressure = “W.C. (kPa) (see burner data decal for range)
Incoming Flow Gas Pressure = “W.C. (kPa) (see burner data decal for range)
Manifold Gas Pressure = “W.C. (kPa) (see burner data decal for specified pressure)
CO2 % = (8% to 9.5% for Natural gas) (target 8.5%)
(9.5% to 10.5% for LP gas) (target 10.0%)
O2 % = (7.0% to 4.5%)
Carbon Monoxide (CO) in PPM = (should not exceed 200PPM) (target <100PPM)
NOx in PPM (If necessary)
Stack Temperature – Gross
0
F (300
0
F minimum, 500
0
F maximum)(149
0
C to 260
0
C)
Room Temperature
0
F (
0
C)
Draft (should be - 0.02 “W.C. to - 0.06 “W.C.)(- 0.005 kPa to - 0.015 kPa) (target - 0.04”
W.C.) (- 0.01 kPa)
High Gas Pressure Switch Setting (if equipped)
Low Gas Pressure Switch Setting (if equipped)
Head Setting Number
Air Shutter Setting Number
Running Motor Amps and Volts
Stored Water Temperature
0
F (
0
C)
Vent Diameter

13
PV500-56 03/19
11. MAINTENANCE INSTRUCTIONS
At least once a year, a qualified service agency needs to be contracted for other than routine maintenance,
including such things as checking the burner head and checking combustion.
WARNING: Turn off all electrical service to the appliance when accessing the limit or other controls
located inside the appliance or burner control cabinet. This cabinet contains High Voltage wiring and
terminals. Close and fasten the control cabinet cover before restoring electrical service to the
appliance. If the electrical service is not turned off and these terminals are touched, a dangerous shock
causing personal injury or death could occur.
CAUTION: Label all wires prior to disconnection when servicing controls. Wiring errors can cause improper
and dangerous operation. Verify proper operation after servicing.
ATTENTION: Au moment de l'entretien des commandes, étiquetez tous les fils avant de les débrancher. Des
erreurs de câblage peuvent entraîner un fonctionnement inadéquat et dangereux. S'assurer que l'appareil
fonctionne adéquatement une fois l'entretien terminé.
1. Keep the area around the conversion burner clear and free from combustible materials, gasoline, and other
flammable vapors and liquids.
2. The blower motor is the only moving part. It does not require lubrication, since the ball bearings have been
permanently lubricated.
3. The user should do periodic visual checks of the burner and the flame.
4. Check for obstruction of combustion air and ventilating air flow.
5. Periodically inspect and checkout the burner ignition, control system, and fuel valve operation (for tight
close-off).
6. Examine the venting system at least once each year for proper connections, alignment and corrosion.
7. The blower inlet will collect dust from the air during operation. Disconnect the power to the heater and clean
the blower wheel when necessary.
8. Inspect all parts and make replacements when necessary.
9. Check wiring for loose connections and burned wires.

14
PV500-56 03/19
12. TROUBLESHOOTING
Condition
Solutions
1. Burner motor runs and:
No flame after pre-purge
Check 24V feed to airflow switch & after airflow switch to control. Fix or
replace the airflow switch. If there is no secondary power, then replace
the 24V transformer.
No flame, faulty ignition transformer or spark
separately
Check ignition transformer output from Fenwal control and check for
cracked electrode or gap. Fix or replace.
Burner locks out after 4 seconds
First, check ionization electrode, ionization cable (for cracks) and boot.
Fix as needed.
Polarity reversed
Check power feed for reversed polarity following instructions in the
Commissioning Checklist, Section 10.1.
Bad earth grounding
Fix the ground wire.
Gas supply pressure is too low
Check the gas supply regulator and adjust to proper pressure, check that
gas piping is adequately sized following the instructions in Section 6, Gas
Supply and Piping.
2. Pulsation – * Follow the instructions in Section 10, Burner Setup and Adjustment and using a combustion analyzer,
readjust combustion air as required to obtain proper combustion.
Gas pressure is too high.
Use manometer and readjust the inlet pressure. *
Manifold pressure too high
Use manometer and readjust regulator for correct manifold pressure.*
Burner is dirty
Clean burner.
Venting is inadequate
Adjust barometric damper, clear flue and cap of foreign materials or
correct vent system following the instructions in Section 5, Venting, to
provide draft within the specified range.
Misadjusted burner head
First correct by steps above, if still pulsating, adjust to a lower head
position number. Manifold pressure must be readjusted to match that
shown on the burner information decal and combustion must be
rechecked following the instructions in Section 10, Burner Setup and
Adjustment.
3. Burner locks out
Ionization current is too low
Check current. Minimum 0.8 micro amps. Check position of ionization
electrode and the condition of the cable.
4. The CO content is too high
Excess air is too low or possibly too high
Adjust air shutter.
The gas holes in pressure plate are clogged
Clean them.
The fresh air intakes are too small
Increase the size of combustion air openings to those specified in Section
4, Combustion and Ventilation Air.
Negative pressure in mechanical room
Remove source of negative pressure and/or increase size of combustion
air openings.
Gas supply is too high or too low
Check the gas supply regulator adjust to proper pressure, check that gas
piping is adequately sized following the instructions in Section 10, Burner
Setup and Adjustment.
Burner settings or adjustment incorrect
Follow the instructions in Section 10, Burner Setup and Adjustment and
using a combustion analyzer.
5. Condensation in the heat exchanger
Firing Rate is too low
Check burner combustion. If combustion is in range, increase firing rate
so the gross stack temperature is at least 350
o
F (177
o
C) by adjusting to
a higher head position number. Manifold pressure must be readjusted to
match that shown on the burner information decal and combustion must
be rechecked following the instructions in Section 10, Burner Setup and
Adjustment. If allowed by code and vent manufacturer, insulate the vent.

15
PV500-56 03/19
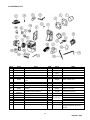
13. MATERIALS LIST
ITEM
Part #
PART
ITEM
Part #
PART
1
118916
Blast Tube
14
119167
Ionization Cable
2
101329
Flange Gasket
15
101630
Ignition Transformer
3
101306
Adjustable Flange
15A
5734 & (2)
5315
Ignition Cable for 2260-TWO
4
118941
Front piece - Housing
16
118936
Cover Plate - Air Regulation
5
119183
Rear piece - Housing
16A
118937
Cover Plate - Nozzle Line
6
110195
Fan Wheel -133 mm (199, 270,
300)
17
118938
Scale - Nozzle Line
6A
119166
Fan Wheel -146 mm (399 only)
17A
118939
Scale -Air Regulation
7
106419
1/6 HP PSC Blower motor
18
107552
24 Volt Transformer
8
119181
Shielding Plate Housing
19
102785
Safety Control
8A
119165
Plate for Cone (399 only. Not
shown)
20
118929
Plastic Cover Plate
9
101315
&101041
Outside Air Boot (optional)
21
118918
Screw (Long Special)
9A
118930
Silencer
22
110995
Airflow Switch
10
118917
Air Regulation Plate
23
119186 Assy
Ignition Electrode
11
118921
Air Damper
24
Flame Rod
12
118922
Air Regulation Adjustment screw
25
Retention head
13
118935
Adjustment Screw – Nozzle Line
26
5928
Union
27
102415
Gas Valve
-
Gas Orifice (varies by model , gas
& input) Located in union (not
shown)

-
 1
1
-
 2
2
-
 3
3
-
 4
4
-
 5
5
-
 6
6
-
 7
7
-
 8
8
-
 9
9
-
 10
10
-
 11
11
-
 12
12
-
 13
13
-
 14
14
-
 15
15
-
 16
16