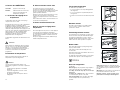
Electrolux SC291 Manuel utilisateur
- Catégorie
- Congélateurs
- Taper
- Manuel utilisateur

K ühlschrank / refrigerateur / fridge / frigorifero
GEBRAUCHSANWEISUNGEN
MODE D’EMPLOI
INSTRUCTION BOOK
LIBRETTO ISTRUZIONI
2223 384-61
SC 291
I
F
D
GB

11
AVERTISSEMENTS ET CONSEILS IMPORTANTS
Il est très important que cette notice d’utilisation soit gardée avec l’appareil pour toute future
consultation. Si cet appareil devait être vendu ou transféré à une autre personne, assurez-vous que la
notice d’utilisation suive l’appareil, de façon à ce que le nouvel utilisateur puisse être informé du
fonctionnement de celui-ci et des avertissements relatifs.
Si cet appareil, muni de fermeture magnétique, doit être employé pour en remplacer un autre avec une
fermeture à ressort, nous vous conseillons de rendre celle-ci inutilisable avant de mettre l’ancien
appareil de côté. Cela dans le but d’éviter que des enfants puissent s’y renfermer et se mettre ainsi en
danger de mort. Ces avertissements sont donnés pour votre sûreté et pour celle d’autrui. Nous vous
prions donc de bien vouloir les lire attentivement avant d’installer et d’utiliser l’appareil.
Sécurité
• Cet appareil a été conçu pour être utilisé par des
adultes. Veillez donc à ce que les enfants n’y
touchent pas ou qu’ils ne l’utilisent pas comme
un jouet.
• Débranchez toujours la prise de courant avant de
procéder au nettoyage intérieur et extérieur de
l’appareil et au remplacement de la lampe
d’éclairage (pour les appareils qui en sont
équipés).
• Ne consommez pas certains produits tels que les
bâtonnets glacés dès leur sortie de l’appareil; la
température très basse à laquelle ils se trouvent
peut provoquer des brûlures.
• Cet appareil est lourd. Faites attention lors du
déplacement.
• Faites très attention lorsque vous déplacez
l’appareil afin de ne pas endommager des
parties du circuit de réfrigérant et ainsi
d’éviter le risque de fuites de liquide.
• L’appareil ne doit pas être situé à proximité
de radiateurs ou cuisinières à gaz.
• Evitez une exposition prolongée de l’appareil
aux rayons solaires.
• II doit y avoir une circulation d’air suffisante à
la partie arrière de l’appareil et il faut éviter
tout endommagement du circuit réfrigérant.
• Seulement pour congélateurs (sauf modèles
encastrés): un emplacement optimal est la
cave.
• Ne pas mettre d’instruments électriques à
l’intérieur de l’appareil.
Service/Réparation
• Une éventuelle modification à l’installation
électrique de votre maison qui devait être néces-
saire pour l’installation de l’appareil ne devra être
effectuée que par du personnel qualifié.
• Il est dangereux de modifier ou d’essayer de
modifier les caractéristiques de cet appareil.
• Cet appareil contient des hydrocarbures dans
son circuit de réfrigérant; I’entretien et la
recharge ne doivent donc être effectués que par du
personnel autorisé.
• En cas de panne, n’essayez pas de réparer
l’appareil vous-même. Les réparations effectuées
par du personnel non qualifié peuvent provoquer
des dommages. Contactez le Service Après-Vente
le plus proche et n’exigez que des pièces
détachées originales.
Installation
• Assurez-vous, après avoir installé l’appareil, que
celuici ne repose pas sur le câble d’alimentation.
Important: en cas de dommage au câble
d’alimentation, il faudra le remplacer avec un câble
spécial ou un ensemble disponibles chez le
fabricant ou le service technique après-vente.
• L’appareil se réchauffe sensibilment au niveau du
condenseur et du compresseur. Veillez à ce que l’air
circule librement tout autour de l’appareil. Une
ventilation insuffisante entraìnerait un mauvais
fonctionnement et des dommages sur l’appareil.
Suivez les instructions données pour l’installation.
• A cause du système de transport, l’huile contenue
dans le compresseur pourrait s’écouler dans le
circuit réfrigérant. Attendez 2 heures au moins
avant de brancher l’appareil pour permettre à l’huile
de refluer dans le compresseur.
Utilisation
• Les réfrigérateurs et/ou congélateurs ménagers
sont destinés uniquement à la conservation et/ou
congélation des aliments et des boissons.
• Pour le bon fonctionnement de votre appareil, la
température ambiante du local doit être comprise
entre +18°C et +43°C (Classe T); +18°C et +38°C
(Classe ST); +16°C et +32°C (Classe N); +10°C et
+32°C (Classe SN); La classe d’appartenance est
indiquée sur la plaque signalétique.
ATTENTION: En dehors des températures
ambiantes indiquées par la classe climatique
d’appartenance de ce produit, il est obligatoire de
respecter les indications suivantes: lorsque la
température ambiante descend sous la valeur
26
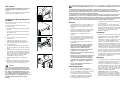
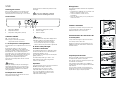
Changing the opening direction of
the doors
Before carrying out any operations, remove the plug
from the power socket.
To change the opening direction of the door,
proceed as follows:
1. pull off the ventilation grille (D) which is clipped
into place;
2. remove the bottom hinge (E) by unscrewing its
three fixing screws;
3. remove the door, releasing it from the upper pin
(G);
4. unscrew the upper pin (G) and refit it on the
opposite side;
5. remove the two plugs of the door (where
available), discovering the holes for the hinge
pins, assemble them on the opposite side;
6. reassemble the door;
7. using a 10 mm spanner, unscrew the hinge pin
(E) and reassemble it on the opposite side of the
hinge;
9. reassemble the lower hinge (E) on the opposite
side, using the screws previously removed; insert
the hole cover (G) on the lower hinge. Slide the
hole cover (F) out of the ventilation grille (D) by
pushing it in the direction of the arrow and
reassemble it on the opposite side;
9. refit the ventilation grille (D), clipping it into
place.
10.Dismantle the handle and reassemble it on the
opposite side. Cover the holes left open with the
plugs contained in the documentation pack.
Warning:
After having reversed the opening direction of
the doors check that all the screws are properly
tightened and that the magnetic seal adheres to
the cabinet. If the ambient temperature is cold
(i.e. in Winter), the gasket may not fit perfectly to
the cabinet. In that case, wait for the natural
fitting of the gasket or accelerate this process by
heating up the part involved with a normal
hairdrier.
G
F
F
D
F
F
E
E
Rear spacers
In the bag with the documentation, there are two
spacers which must be fitted in the two top
corners.
Slacken the screws and insert the spacer under the
screw head, then re-tighten the screws.
D594

12
Renseignements pour l’Élimination des
Matériaux d’emballage
Tous les matériaux et les accessoires utilisés pour
emballer nos grands électroménagers, sauf ceux qui
sont en bois recyclables et peuvent donc se
récupérer.
Voici ce que nous vous conseillons:
• Déposez les emballages en papier, en carton et
en carton ondulé aux endroits prévus pour le
ramassage de ce genre de matériau.
• Mettez les piéces en plastique dans les
conteneurs prévus à cet effet. Si ce genre de
conteneurs n’existent pas encore à l’endroit où
vous habitez, vous pouvez éliminer les matériaux
en question en les mettant dans les ordures
ménagères.
Pour les emballages de matières plastiques
recyclables, par example:
Les exemples reportent les symboles suivants:
PE pour polyéthylène** 02 = ^ PE-HD; 04 = ^ PE-LD
PP pour le polypropylène
PS pour le polystyrène
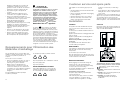
PIÉCES EN MATIÈRE PLASTIQUE
Pour faciliter l’élimination et :ou le recyclage des
matériaux, la plupart des pièces de l’appareil ont
une contremarque qui en facilite l’indentification.
PS
SAN
ABS
02**
PE
05
PP
06
PS
minimum, la température de conservation du
compartiment congélateur peut ne pas être
garantie; il est donc conseillé de consommer les
produits que ce dernier contient au plus vite.
• Un produit décongelé ne doit jamais être
recongelé.
• Suivez les indications du fabricant pour la
conservation et/ou congélation des aliments.
• Dans tous les appareils de réfrigération et
congélation il y a des surfaces qui se couvrent de
givre. Suivant le modèle, ce givre peut être
éliminé automatiquement (dégivrage
automatique) ou bien manuellement.
• N’essayez jamais d’enlever le givre avec un objet
métallique, vous risqueriez d’endommager
irréparablement l’évaporateur. N’employez pour
cela que la spatule en plastique livrée avec
l’appareil.
• De même, ne décollez jamais les bacs à glace
avec un couteau ou tout autre objet tranchant.
• Ne placez ni bouteilles ni boîtes de boissons
gazeuses dans le congélateur/compartiment à
basse température, elles pourraient exploser.
Protection de
l’environnement
Cet appareil ne contient pas, dans son circuit de
réfrigérant et ses matières isolantes, de gaz
réfrigérant nocif à la couche d’ozone. L’appareil
ne doit pas être mis au rebut avec les ordures
ménagères et la ferraille. Il faut éviter d’endom-
mager le circuit de réfrigérant, surtout à l’arrière
de l’appareil, près de l’échangeur thermique.
Vous pouvez vous renseigner sur les centres de
ramassage auprès de votre bureau municipal.
Les matériaux utilisés dans cet appareil
identifiés par le symbole sont recyclables.
Elimination des vieux appareils
Le symbole sur le produit ou son emballage
indique que ce produit ne peut être traité comme
déchet ménager. Il doit plutôt être remis au point de
ramassage concerné, se chargeant du recyclage du
matériel électrique et électronique. En vous assurant
que ce produit est éliminé correctement, vous
favorisez la prévention des conséquences négatives
pour l’environnement et la santé humaine qui, sinon,
seraient le résultat d’un traitement inapproprié des
déchets de ce produit. Pour obtenir plus de détails
sur le recyclage de ce produit, veuillez prendre
contact avec le bureau municipal de votre région,
votre service d’élimination des déchets ménagers ou
le magasin où vous avez acheté le produit.
25
Customer service and spare parts
If the appliance is not functioning properly, check
that:
• the plug is firmly in the wall socket and the mains
power switch is on;
• there is an electricity supply (find out by plugging
in another appliance);
• the thermostat knob is in the correct position.
• If there are water drops on the bottom of the
cabinet, check that the defrost water drain
opening is not obstructed (see “Defrosting”
section).
• If your appliance is still not working properly after
making the above checks, contact the nearest
service centre.
To obtain fast service, it is essential that when you
apply for it you specify the model and serial number
of your appliance which can be found on the
guarantee certificate or on the rating plate located
inside the appliance, on the bottom left-hand side.
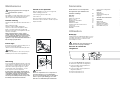
Installation
Location
The appliance should be installed well away from
sources of heat such as radiators, boilers, direct
sunlight etc.
For safety reasons, minimum ventilation must be as
shown in Fig.
Appliance positioned under overhanging kitchen wall
units (see Fig. A).
Appliance positioned without overhanging kitchen
wall units (see Fig. B).
Attention: keep ventilation openings clear of
obstruction.
Two adjustable feet at the cabinet base allow
accurate levelling of the appliance.
100 mm10 mm
10 mm
A
B
NP007
Shelf holders
Your appliance is equipped with shelf retainers that
make it possible to secure the shelves during
transportation.
To remove them proceed as follows:
Move the shelf retainers in the direction of the arrow,
raise the shelf from the rear and push it forward until
it is freed and remove the retainers.
A
C
B
ATTENTION!
It must be possible to disconnect the appliance from
the mains power supply; the plug must therefore be
easily accessible after installation.
Electrical connection
Before plugging in, ensure that the voltage and
frequency shown on the serial number plate
correspond to your domestic power supply. Voltage
can vary by ±6% of the rated voltage.
For operation with different voltages, a suitably sized
auto-transformer must be used.
The appliance must be earthed.
The power supply cable plug is provided with a
contact for this purpose.
If the domestic power supply socket is not earthed,
connect the appliance to a separate earth in
compliance with current regulations, consulting a
specialist technician.
The Manufacturer declines all responsibility if
the above safety precautions are not observed.
This appliance complies with the following
E.E.C. Directives:
- 87/308 EEC of 2/6/87 relative to radio interference
suppression.
- 73/23 EEC of 19.2.73 (Low Voltage Directive) and
subsequent modifications;
- 89/336 EEC of 3.5.89 (Electromagnetic
Compatibility Directive) and subsequent
modifications.

13
Sommaire
Avertissements et conseils importants 11
Renseignements pour l’élimination des
matériaux d’emballage 12
Utilisation 13
Nettoyage 13
Tableau de commande 13
Mise en service 14
Réglage de la température 14
Réfrigération 15
Tablettes amovibles 15
Positionnement des balconnets de la
contre-porte 15
Clayette port bouteille 15
Conseils 16
Conseils pour la réfrigération 16
Entretien 16
Nettoyage 16
Arrêt prolongé 16
Changement de l’ampoule 16
Dégivrage 17
Anomalie de fonctionnement 17
Installation 18
Emplacement 18
Arrêts pour tablettes 18
Branchement électrique 18
Entretoises postérieures 19
Réversibilité de la porte 19
Nettoyage
L’appareil étant convenablement installé, nous vous
conseillons de le nettoyer soigneusement avec de
l’eau tiède savonneuse, pour enlever l’odeur
caractéristique de «neuf».
N’utilisez pas de produits abrasifs, de
poudre à récurer ni d’éponge métallique.
Utilisation
Panneau de contrôle du
réfrigérateur
BAFEDC
A. Touche ALLUMÉ/ÉTEINT du réfrigérateur
B. Indicateur de température du réfrigérateur
C. Touche de réglage de la température du
réfrigérateur (augmenter)
D. Touche de réglage de la température du
réfrigérateur (abaisser)
E. Témoin fonction Action Cool
F. Touche fonction Action Cool
24
Defrosting
Frost is automatically eliminated from the evaporator
of the refrigerator compartment every time the motor
compressor stops, during normal use. The defrost
water drains out through a trough into a special
container at the back of the appliance, over the
motor compressor, where it evaporates.
It is important to periodically clean the defrost
water drain hole in the middle of the refrigerator
compartment channel to prevent the water
overflowing and dripping onto the food inside.
Use the special cleaner provided, which you will
find already inserted into the drain hole.
D037
Interior light
If it becomes necessary to replace the lamp, press on
the rear hook and at the same time
slide the cover in the direction indicated by the arrow.
Attention:
Replace the lamp with one of the same power (the
maximum power is shown on the light diffuser).
Maintenance
Unplug the appliance before carrying out
any maintenance operation.
Warning
This appliance contains hydrocarbons in its cooling
unit; maintenance and recharging must therefore
only be carried out by authorized technicians.
Periodic cleaning
Clean the inside with warm water and bicarbonate of
soda.
Rinse and dry thoroughly.
Clean the condenser (black grill) and the
compressor at the back of the appliance with a
brush or a vacuum cleaner. This operation will
improve the performance of the appliance and save
electricity consumption.
Many proprietary kitchen surface cleaners
contain chemicals that can attack/damage the
plastics used in this appliance. For this reason it
is recommended that the outer casing of this
appliance is only cleaned with warm water with a
little washing-up liquid added.
Periods of non-operation
When the appliance is not in use for long periods,
take the following precautions:
remove the plug from the wall socket;
remove all food;
defrost and clean the interior and all accessories;
leave the door ajar to allow air to circulate to prevent
unpleasant smells.
Important:
Never use sharp metal tools to scrape off frost
from the evaporator as you could damage it.
Do not use a maechanical device or any artificial
means to speed up the thawing process other
than those recommended by the manufacturer.

14
A.Touche ALLUMÉ/ÉTEINT
ALLUMÉ:
appuyer sur la touche (A).
ÉTEINT: maintenir enfoncée la touche (A)
jusqu'à ce que l'indicateur de
température s'éteignent.
C - D. Touches de réglage de la
température
La température peut être réglée sur une plage
comprise entre +2°C et +8°C.
En appuyant sur la touche (C ou D), la température
programmée clignote sur l'indicateur (B). La
modification du réglage de température est possible
uniquement alors que l'indicateur clignote. Pour
obtenir une température plus élevée, appuyer sur la
touche (C), pour obtenir une température plus basse
appuyer sur la touche (D). L'indicateur affiche
pendant quelques secondes la température
programmée et affiche ensuite à nouveau la
température interne du réfrigérateur.
La température programmé est atteinte dans les 24
heures.
Attention !
Durant la phase de stabilisation après la première
mise en service, il est possible que la température
affichée ne corresponde pas à la température
programmée, la température affichée pouvant en
l'occurrence être inférieure à la température
programmée.
B. Indicateur de température
Durant le fonctionnement normal est affichée la
température moyenne du réfrigérateur.
Attention!
Un écart entre la température affichée et la
température programmée est normal, en particulier
lorsque:
- la température programmée a été modifiée
depuis peu,
- la porte du réfrigérateur est restée ouverte
pendant un certain temps,
- des aliments chauds ont été placés dans le
réfrigérateur.
E.Témoin fonction Action Cool
La fonction Action Cool a pour effet de faire
fonctionner le réfrigérateur au maximum de sa
puissance. Il est recommandé d'utiliser cette fonction
lorsque sont introduites dans le réfrigérateur de
grandes quantités d'aliments.
Appuyer sur la touche de la fonction Action Cool (F).
Le témoin de la fonction Action Cool (E) doit
s'allumer. La température interne est alors abaissée
à +2°C.
Au bout de 6 heures environ, la fonction Action Cool
se désactive automatiquement.
F.Touche fonction Action Cool
Mise en service et réglage de la
température
Raccorder l'appareil à une prise de courant. Appuyer
sur la touche (A) pour allumer le réfrigérateur.
Le réfrigérateur est programmé sur une température
de +5°C. Cette température est atteinte au bout de
quelques heures.
Dès que le réfrigérateur est allumé, l'indicateur (B)
affiche la température interne.
23
Positioning the door shelves
To permit storage of food packages of various sizes,
the door shelves can be placed at different heights.
To make these adjustments proceed as follows:
Gradually pull the shelf in the direction of the arrows
until it comes free, then reposition as required.
Movable shelves
The walls of the refrigerator are equipped with a
series of runners so that the shelves can be
positioned as desired.
D338
Hints
Hints for refrigeration
Useful hints:
Meat (all types): wrap in polythene bags and place
on the glass shelf above the vegetable drawer.
For safety, store in this way only one or two days
at the most.
Cooked foods, cold dishes, etc..: these should be
covered and may be placed on any shelf.
Fruit and vegetables: these should be thoroughly
cleaned and placed in the special drawer(s)
provided.
Butter and cheese: these should be placed in
special airtight containers or wrapped in aluminium
foil or polythene bags to exclude as much air as
possible.
Milk bottles: these should have a cap and should
be stored in the bottle rack on the door.
Bananas, potatoes, onions and garlic, if not
packed, must not be kept in the refrigerator.
Bottle holder
Place the bottles (with the opening facing front) in
the pre-positioned shelf.
If the shelf is positioned horizontally, place only
closed bottles.
This bottle holder shelf can be tilted in order to store
previously opened bottles.
To obtain this result, pull the shelf up so it can rotate
upwards and be placed on the next higher level.
Fresh food refrigeration
To obtain the best performance:
• do not store warm food or evaporating liquids in
the refrigerator;
• do cover or wrap the food, particularly if it has a
strong flavour.
• Position food so that air can circulate freely round
it.

15
Réfrigération
Pour obtenir le meilleur rendement du compartiment
réfrigérateur:
• n’introduisez pas d’aliments encore chauds ou de
liquides en évaporation dans la cuve;
• couvrez les aliments, surtout s’ils sont
aromatiques;
• placez les denrées de façon à ce que l'air puisse
circuler tout autour.
Positionnement des balconnets de
la contre-porte
Il est possible de changer de place les balconnets.
A cet effet procédez comme suit:
Dégagez les balconnets en agissant dans le sens
indiqué par les flèches. Remontez les balconnets à
la hauteur désirée.
Tablettes amovibles
Les glissières se trouvant sur les parois de la cuve
vous permettent de positionner les tablettes à
différentes hauteurs, selon vos besoins.
D338
Clayette porte bouteille
Placez les bouteilles (ouverture vers l’avant) dans
les emplacements prévus de la clayette.
Si la clayette est placée à l’horizontal, ne placez que
des bouteilles non entamées.
Cette clayette porte bouteilles a la possibilité de
s’incliner afin de favoriser le rangement de bouteilles
déjà entamées.
Pour cela, tirez la clayette vers l’avant jusqu’à ce
qu’elle puisse pivoter vers le haut afin de glisser la
clayette dans le support clayette supérieur.
22
Cleaning the interior
Before using the appliance for the first time, wash
the interior and all internal accessories with luke-
warm water and some neutral soap so as to remove
USE
Control Panel
BAFEDC
A Fridge button ON/OFF
B Temperature indicator
C Temperature setting button (warmest)
A. Button ON/OFF
ON: Press the button (A).
OFF: Keep press the button (A) until the
temperautre indicator switched off.
C - D. Temperature setting buttons
The temperature can be adjusted between +2°C and
+8°C.
By pressing the button (C or D), the current
temperature setting flashes on the indicator. It is
possible to modify the setting temperature only with
flashed indicator. To set a warmer temperature,
press button (C). To set a colder temperature, press
button (D). The indicator display the newly selected
temperature for a few seconds and then shows
again the inside compartment temperature.
The newly selected-temperature must be reached
after 24 hours.
Attention!
During the stability period by the first starting the
temperature displayed can not correspond to the
setting temperature. During this time it is possible
that the temperature displayed is lower than the
setting temperature.
B.Temperature indicator
During normal functioning the indicator shows the
temperature inside the fridge.
Attention!
Difference between the temperature displayed and
temperature setting is normal. Especially when:
- a new setting has recently been selected
- the door has been left open for a long time
- warm food has been placed in the compartment
E. Action Cool pilot light
F. Action Cool button
The maximum performance is obtained by setting
the Auto fresh function. It’s recommended when
loading large quantities of food.
Press the Action Cool button (F).The relevant pilot
light (E) switches on.
The internal temperature goes down to +2°C.
After about 6 hours the supercooling function
switches off automatically.
the typical smell of a brand-new product, then dry
thoroughly.
Do not use detergents or abrasive
powders, as these will damage the finish.
D Temperature setting button (coldest)
E Action Cool light
F Action Cool button
Operation
Insert the plug in the power socket. Press the button
ON/OFF (A). The fridge is switched on.
The fridge is pre-set to run at +5°C. This
temperature will be reached in a few hours.
As soon as the appliance is switched on the
temperature indicator (B) shows the current
temperaure inside the fridge.

16
Arrêt prolongé
Lorsque l'appareil doit rester à l'arrêt pendant un
certain temps, prenez les précautions suivantes:
débranchez la prise de courant;
videz l'appareil;
dégivrez-le et nettoyez-le à fond;
laissez les portes entrouvertes pour faire circuler de
l'air, de façon à éviter les mauvaises odeurs.
Entretien
Débranchez l’appareil avant toute
opération.
Attention
Cet appareil contient des hydrocarbures dans son
circuit de réfrigération; l’entretien et la recharge ne
doivent donc être effectués que par du personnel
autorisé.
Nettoyage
N'utilisez jamais des objets métalliques pour
nettoyer l'appareil; vous risquez de l'endommager.
A l'occasion d'un dégivrage complet, lavez I'intérieur
avec de l'eau tiède et du bicarbonate, rincez et
séchez soigneusement.
Lavez la carrosserie avec de l'eau tiède
savonneuse. Passez de temps en temps un produit
à polir.
Dépoussiérez le condenseur situé à l'arrière de
l'appareil à l'aide d'une brosse ou d'un aspirateur.
Une accumulation de poussière risquerait de
diminuer le rendement de l'appareil.
De nombreux détergents spécifiques pour les
surfaces de cuisine contiennent des agents
chimiques pouvant corroder/endommager les
parties en plastique de cet appareil. Il est donc
recommandé de ne laver le revêtement extérieur
de cet appareil qu’avec de l’eau chaude et un
petit peu de détergent liquide pour assiettes.
Conseils
Conseils pour la réfrigération
Où placer les denrées?
Viande (de toutes sortes): enveloppez-la dans des
sachets en plastique et placez-la sur la tablette en
verre au-dessus du(des) bac(s) à légumes.
La période de conservation est de 1 à 2 jours au
maximum.
Aliments cuits, plats froids, etc.: placez-les, bien
couverts, sur une clayette.
Fruits et légumes: bac(s) à légumes (une fois
nettoyés).
Beurre et fromage: enveloppez-les soigneusement
dans des feuilles d’aluminium ou de polyéthylène et
mettez-les dans les casiers appropriés.
Lait en bouteille: à placer dans l’un des balconnets
de la contreporte.
Bananes, pommes de terre, oignon et ail ne
doivent pas être placés dans le réfrigérateur,
s’ils ne sont pas conditionnés.
Changement de l’ampoule
Appuyez sur l’enclichetage arrière et en même temps
retirez le couvercle dans le sens de la flèche.
Remplacez-la par un modèle semblable (La
puissance maximale est indiquée sur le diffuseur).
21
Contents
Warnings 20
Use 22
Cleaning the interior 22
Control panel 22
Operation 22
Fresh food refrigeration 23
Movable shelves 23
Positioning the door shelves 23
Positioning the door shelves 23
Bottle holder 23
Hints 23
Hints for refrigeration 23
Maintenance 24
Periodic cleaning 24
Periods of no operation 24
Interior light 24
Defrosting 24
Customer service and spare parts 25
Installation 25
Location 25
Shelf holders 25
Electrical connection 25
Rear spacers 26
Changing the opening direction of the doors 26
which may cause it to explode, resulting in
damage to the appliance. Do not use a
mechanical device or any artificial means to
speed up the thawing process other than those
recommended by the manufacturer. Never use
metal objects for cleaning your appliance as it
may get damaged.
Installation
• During normal operation, the condenser and
compressor at the back of the appliance heat up
considerably. For safety reasons, minimum
ventilation must be as shown in the instructions.
Attention: keep ventilation openings clear of
obstruction.
• Care must be taken to ensure that the appliance
does not stand on the electrical supply cable.
Important: if the supply cord is damaged, it must
be replaced by a special cord or assembly availa-
ble from the manufacturer or its service agent.
• If the appliance is transported horizontally, it is
possible that the oil contained in the compressor
flows in the refrigerant circuit. It is advisable to
wait at least two hours before connecting the
appliance to allow the oil to flow back in the
compressor.
• There are working parts in this product which
heat up. Always ensure that there is adequate
ventilation as a failure to do this will result in
component failure and possible food loss. See
installation instructions.
• Parts which heat up should not be exposed.
Wherever possible the back of the product should
be against a wall.
Environment Protection
This appliance does not contain gasses which
could damage the ozone layer, in either its
refrigerant circuit or insulation materials.The
appliance shall not be discarded together with
the urban refuse and rubbish. Avoid damaging
the cooling unit, especially at the rear near the
heat exchanger. Information on your local
disposal sites may be obtained from municipal
authorities.The materials used on this appliance
marked by the symbol are recyclable.
Disposal of old Appliances
The symbol on the product or on its packaging
indicates that this product may not be treated as
household waste. Instead it shall be handed over to
the applicable collection point for the recycling of
electrical and electronic equipment. By ensuring this
product is disposed of correctly, you will help prevent
potential negative consequences for the
environment and human health, which could
otherwise be caused by inappropriate waste
handling of this product. For more detailed
information about recycling of this product, please
contact your local city office, your household waste
disposal service or the shop where you purchased
the product.

17
Dégivrage
Le dégivrage du compartiment réfrigérateur
s’effectue automatiquement, à chaque arrêt du
compresseur. L’eau de dégivrage est évacuée dans
un bac situé à l’arrière de l’appareil où elle
s’évapore.
Nous recommandons de nettoyer
périodiquement l’orifice d’écoulement de l’eau
de dégivrage se trouvant dans la partie centrale
de la gouttière du compartiment réfrigérateur
afin d’éviter que l’eau, en débordant, ne coule
sur les denrées stockées dans la cuve. Utilisez à
cet effet le bâtonnet se trouvant dans l’orifice.
Important:
Pour cette opération n’utilisez jamais d’objet
métallique qui risquerait de détériorer l’appareil.
N’utilisez jamais de dispositifs mécaniques ou
autres moyens artificiels pour accélérer le
dégivrage, à part ceux préconisés.
D037
Anomalie de fonctionnement
Si l'appareil marche mal, il faut contrôler
• si la fiche est bien branchée à la prise de courant
et si l'interrupteur est éteint;
• s'il n'y a pas de panne de courant;
• si les commandes sont bien dans la bonne
position;
• s'il y a des traces d'eau au fond du compartiment
et si l'orifice d'écoulement de l'eau de dégivrage
est bouché (voir chapitre “Dégivrage”).
Une fois que tous ces contrôles ont été effectués, si
l'anomalie de fonctionnement persiste, adressez-
vous au Service Après-Vente le plus proche.
Pour que l'intervention soit plus rapide, au
moment de l'appel, il vaut mieux indiquer le code
du modèle et le numéro d'immatriculation, qui se
trouvent sur le certificat de garantie ou sur la
plaque d'immatriculation placée à l'intérieur de
l'appareil, à gauche et en bas.
20
WARNINGS
It is most important that this instruction book should be retained with the appliance for future
reference. Should the appliance be sold or transferred to another owner, or should you move house
and leave the appliance, always ensure that the book is supplied with the appliance in order that the
new owner can be acquainted with the functioning of the appliance and the relevant warnings.
If this appliance featuring magnetic door seals is to replace an older appliance having a spring lock
(latch) on the door or lid, be sure to make that spring lock unusable before you discard the old
appliance. This will prevent it from becoming a death-trap for a child.
These warnings are provided in the interest of safety.You must read them carefully before installing or
using the appliance.
General Safety
• This appliance is designed to be operated by
adults. Children should not be allowed to tamper
with the controls or play with the product.
• It is dangerous to alter the specifications or
modify this product in any way.
• Before any cleaning or maintenance work is
carried out, be sure to switch off and unplug the
appliance.
• This appliance is heavy. Care should be taken
when moving it
• Ice lollies can cause frost burns if consumed
straight from the appliance.
• Take utmost care when handling your
appliance so as not to cause any damages to
the cooling unit with consequent possible
fluid leakages.
• The appliance must not be located close to
radiators or gas cookers.
• Avoid prolonged exposure of the appliance to
direct sunlight.
• There must be adequate ventilation round the
back of the appliance and any damage to the
refrigerant circuit must be avoided.
• For freezers only (except built-in models): an
ideal location is the cellar or basement.
• Do not use other electrical appliances (such
as ice cream makers) inside of refrigerating
appliances.
Service/Repair
• Any electrical work required to install this
appliance should be carried out by a qualified
electrician or competent person
• This product should be serviced by an authorized
Service Centre, and only genuine spare parts
should be used.
• Under no circumstances should you attempt to
repair the appliance yourself. Repairs carried out
by inexperienced persons may cause injury or
more serious malfunctioning. Refer to your local
Service Centre, and always insist on genuine
spare parts.
• This appliance contains hydrocarbons in its
cooling unit; maintenance and recharging must
therefore only be carried out by authorized
technicians.
Use
• The domestic refrigerators and freezers are
designed to be used specifically for the storage
of edible foodstuffs only.
• Best performance is obtained with ambient
temperature between +18°C and +43°C (class T);
+18°C and +38°C (class ST); +16°C and +32°C
(class N); +10°C and +32°C (class SN). The
class of your appliance is shown on its rating
plate.
Warning: when the ambient temperature is not
included within the range indicated for the class
of this appliance, the following instructions must
be observed: when the ambient temperature
drops below the minimum level, the storage
temperature in the freezer compartment cannot
be guaranteed; therefore it is advisable to use the
food stored as soon as possible.
• Frozen food must not be re-frozen once it has
been thawed out.
• Manufacturers’ storage recommendations should
be strictly adhered to. Refer to relevant
instructions.
• The inner lining of the appliance consists of
channels through which the refrigerant passes. If
these should be punctured this would damage
the appliance beyond repair and cause food loss.
DO NOT USE SHARP INSTRUMENTS to scrape
off frost or ice. Frost may be removed by using
the scraper provided. Under no circumstances
should solid ice be forced off the liner. Solid ice
should be allowed to thaw when defrosting the
appliance.
• Do not place carbonated or fizzy drinks in the
freezer as it creates pressure on the container,
-
 1
1
-
 2
2
-
 3
3
-
 4
4
-
 5
5
-
 6
6
-
 7
7
-
 8
8


Electrolux SC291 Manuel utilisateur
- Catégorie
- Congélateurs
- Taper
- Manuel utilisateur
dans d''autres langues
- English: Electrolux SC291 User manual
Documents connexes
Autres documents
-
Aeg-Electrolux S72398KA6 Manuel utilisateur
-
-
Aeg-Electrolux S72385-KA Manuel utilisateur
-
AEG S73600CSM0 Manuel utilisateur
-
-
-
-
AEG S74000CSM0 Manuel utilisateur
-