Yamaha Studio Manager Guide d'installation
- Catégorie
- Logiciel
- Taper
- Guide d'installation
Ce manuel convient également à

E
Studio Manager
for//
/
Installation Guide
Keep This Manual For Future Reference.

2
Studio Manager for DM2000/DM1000/02R96/01V96—Installation Guide
Important Information
Special Notices
•The software and this owner’s manual are the exclusive copyrights of Yamaha Corporation.
•Use of the software and this manual is governed by the Software Licensing Agreement which
the purchaser fully agrees to upon breaking the seal of the software packaging. (Careful-
lyread the agreement at the end of this manual before installing the software.)
•Copying of the software or reproduction of this manual in whole or in part by any means is
expressly forbidden without the written consent of the manufacturer.
•Yamaha makes no representations or warranties with regard to the use of the software and
documentation and cannot be held responsible for the results of the use of this manual and
the software.
•This disc is a CD-ROM. Do not attempt to play the disc on an audio CD player. Doing so
may result in irreparable damage to your audio CD player.
•Copying of the commercially available music sequence data and/or digital audio files is
strictly prohibited except for your personal use.
•The screen displays as illustrated in this owner’s manual are for instructional purposes, and
may appear somewhat different from the screens which appear on your computer.
•Future upgrades of application and system software and any changes in specifications and
functions will be announced separately.
Trademarks
Adobe, Acrobat, and Reader are registered trademarks of Adobe Systems Incorporated.
Apple, AppleTalk, and Macintosh are registered trademarks of Apple Computer, Inc.
Microsoft and Windows are registered trademarks of Microsoft Corporation. OMS is a reg-
istered trademark of Opcode Systems, Inc. Pentium and Celeron are registered trademarks
of Intel Corporation. PowerPC is a registered trademark of International Business
Machines Corporation. SmartMedia is a trademark of Toshiba America, Inc. All other
trademarks are the property of their respective holders and are hereby acknowledged.
Copyright
No part of the Studio Manager software or its documentation may be reproduced or dis-
tributed in any form or by any means without the prior written authorization of Yamaha
Corporation.
© 2003 Yamaha Corporation. All rights reserved.
Yamaha Web Site
Information about Studio Manager, related products, and other Yamaha professional audio
equipment is available on the Yamaha Professional Audio Web site at:
http://www.yamahaproaudio.com/
* Specifications and descriptions in this owner’s manual are for information purposes only.
Yamaha Corp. reserves the right to change or modify products or specifications at any
time without prior notice. Since specifications, equipment or options may not be the
same in every locale, please check with your Yamaha dealer.

3
Studio Manager for DM2000/DM1000/02R96/01V96—Installation Guide
Contents
1 Getting Started . . . . . . . . . . . . . . . . . . . . . . . . . . . . 4
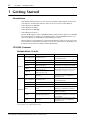
Introduction . . . . . . . . . . . . . . . . . . . . . . . . . . . . . . . . . . . . . . . . . . . . . . . . . . . . . . . . . 4
CD-ROM Contents . . . . . . . . . . . . . . . . . . . . . . . . . . . . . . . . . . . . . . . . . . . . . . . . . . . 4
Windows System Requirements . . . . . . . . . . . . . . . . . . . . . . . . . . . . . . . . . . . . . . . . 5
Macintosh System Requirements . . . . . . . . . . . . . . . . . . . . . . . . . . . . . . . . . . . . . . . . 6
System Hookup . . . . . . . . . . . . . . . . . . . . . . . . . . . . . . . . . . . . . . . . . . . . . . . . . . . . . . 7
Configuring Your Yamaha Mixing Console . . . . . . . . . . . . . . . . . . . . . . . . . . . . . . . 7
2 Windows Installation . . . . . . . . . . . . . . . . . . . . . . . . 8
Acrobat Reader . . . . . . . . . . . . . . . . . . . . . . . . . . . . . . . . . . . . . . . . . . . . . . . . . . . . . . 8
USB MIDI Driver . . . . . . . . . . . . . . . . . . . . . . . . . . . . . . . . . . . . . . . . . . . . . . . . . . . . 8
Yamaha CBX Driver (DM2000/02R96 only) . . . . . . . . . . . . . . . . . . . . . . . . . . . . . 15
Studio Manager . . . . . . . . . . . . . . . . . . . . . . . . . . . . . . . . . . . . . . . . . . . . . . . . . . . . . 15
Card Filer (DM2000 only) . . . . . . . . . . . . . . . . . . . . . . . . . . . . . . . . . . . . . . . . . . . . 15
3 Macintosh Installation . . . . . . . . . . . . . . . . . . . . . . 16
Acrobat Reader . . . . . . . . . . . . . . . . . . . . . . . . . . . . . . . . . . . . . . . . . . . . . . . . . . . . . 16
OMS (Open Music System) . . . . . . . . . . . . . . . . . . . . . . . . . . . . . . . . . . . . . . . . . . . 16
USB MIDI Driver . . . . . . . . . . . . . . . . . . . . . . . . . . . . . . . . . . . . . . . . . . . . . . . . . . . 17
Studio Manager . . . . . . . . . . . . . . . . . . . . . . . . . . . . . . . . . . . . . . . . . . . . . . . . . . . . . 18
Card Filer (DM2000 only) . . . . . . . . . . . . . . . . . . . . . . . . . . . . . . . . . . . . . . . . . . . . 18
Setting Up OMS . . . . . . . . . . . . . . . . . . . . . . . . . . . . . . . . . . . . . . . . . . . . . . . . . . . . . 19
4 Getting Started . . . . . . . . . . . . . . . . . . . . . . . . . . . 20
Starting Studio Manager . . . . . . . . . . . . . . . . . . . . . . . . . . . . . . . . . . . . . . . . . . . . . . 20
Quitting Studio Manager . . . . . . . . . . . . . . . . . . . . . . . . . . . . . . . . . . . . . . . . . . . . . 20
Specifying the MIDI Port (DM1000/01V96 & Windows only) . . . . . . . . . . . . . . 20
Configuring Studio Manager . . . . . . . . . . . . . . . . . . . . . . . . . . . . . . . . . . . . . . . . . . 21
Synchronizing Studio Manager . . . . . . . . . . . . . . . . . . . . . . . . . . . . . . . . . . . . . . . . 22
Working with Sessions . . . . . . . . . . . . . . . . . . . . . . . . . . . . . . . . . . . . . . . . . . . . . . . 23
5 Troubleshooting . . . . . . . . . . . . . . . . . . . . . . . . . . 24

4
Chapter 1—Getting Started
Studio Manager for DM2000/DM1000/02R96/01V96—Installation Guide
1 Getting Started
Introduction
With Yamaha Studio Manager you can control your Yamaha digital mixing console from
your Windows or Macintosh computer. There are four versions of Studio Manager:
•Studio Manager for DM2000
•Studio Manager for 02R96
•Studio Manager for DM1000
•Studio Manager for 01V96
The CD-ROM supplied with the DM2000 or 02R96 contains
Studio Manager for DM2000
and
Studio Manager for 02R96
. The CD-ROM supplied with the DM1000 or 01V96 con-
tains
Studio Manager for DM1000
and
Studio Manager for 01V96
.
This
Installation Guide
explains how to install Studio Manager and the necessary driver soft-
ware for Windows and Macintosh computers. The owner’s manual for Studio Manager can
be found on the included CD-ROM (Acrobat PDF format).
CD-ROM Contents
DM2000/02R96 CD-ROM
Folder Software Description
Windows
Acroread\English
Acrobat Reader
1,
2
1. For information on using this software, refer to the PDF manual after installation.
2. This software is not supported by Yamaha.
Adobe Acrobat Reader software for view-
ing the PDF manuals.
SM_\DM2000
Studio Manager for DM2000
1
Yamaha Studio Manager for DM2000
SM_\02R96
Studio Manager for 02R96
1
Yamaha Studio Manager for 02R96
Mididrv_ Yamaha CBX Driver
Yamaha serial driver. Necessary if you are
connecting to a serial port on your PC.
USBdrv_
Yamaha USB MIDI Driver
(Windows 98, Me)
Yamaha USB driver. Necessary if you are
connecting to a USB port on your PC.
USBdrv2k_
Yamaha USB MIDI Driver
(Windows 2000, XP)
Card_
Card Filer
1
Yamaha utility for transferring and man-
aging data stored on the DM2000’s
SmartMedia card.
Macintosh
Acroread\English
Acrobat Reader
,1, 2
Adobe Acrobat Reader software for view-
ing the PDF manuals.
SM_\DM2000
Studio Manager for DM2000
1
Yamaha Studio Manager for DM2000
SM_\02R96
Studio Manager for 02R96
1
Yamaha Studio Manager for 02R96
OMS_
Open Music System (OMS)
2.3.8
1, 2
Opcode driver software for use with MIDI
applications on Macintosh computers.
OMS Setup for YAMAHA
OMS studio setup files for use with the
DM2000 and 02R96.
USBdrv_ YAMAHA USB MIDI Driver
Yamaha USB driver. Necessary if you are
connecting to a USB port on your Macin-
tosh computer.
Card_
Card Filer
1
Yamaha utility for transferring and man-
aging data stored on the DM2000’s
SmartMedia card.

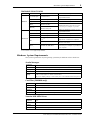
Windows System Requirements
5
Studio Manager for DM2000/DM1000/02R96/01V96—Installation Guide
DM1000/01V96 CD-ROM
Windows System Requirements
The system requirements of your operating system may be different to those listed here.
Studio Manager
Card Filer (DM2000 only)
Yamaha USB MIDI Driver
Folder Software Description
Windows
Acroread\English
Acrobat Reader
1,
2
1. For information on using this software, refer to the PDF manual after installation.
2. This software is not supported by Yamaha.
Adobe Acrobat Reader software for view-
ing the PDF manuals.
SM_\DM1000
Studio Manager for DM1000
1
Yamaha Studio Manager for DM1000
SM_\01V96
Studio Manager for 01V96
1
Yamaha Studio Manager for 01V96
USBdrv_
Yamaha USB MIDI Driver
(Windows 98, Me)
Yamaha USB driver. Necessary if you are
connecting to a USB port on your PC.
USBdrv2k_
Yamaha USB MIDI Driver
(Windows 2000, XP)
Macintosh
Acroread\English
Acrobat Reader
,1, 2
Adobe Acrobat Reader software for view-
ing the PDF manuals.
SM_\DM1000
Studio Manager for DM1000
1
Yamaha Studio Manager for DM1000
SM_\01V96
Studio Manager for 01V96
1
Yamaha Studio Manager for 01V96
OMS_
Open Music System (OMS)
2.3.8
1, 2
Opcode driver software for use with MIDI
applications on Macintosh computers.
OMS Setup for YAMAHA
OMS studio setup files for use with the
DM1000 and 01V96.
USBdrv_ YAMAHA USB MIDI Driver
Yamaha USB driver. Necessary if you are
connecting to a USB port on your Macin-
tosh computer.
Computer
A PC with a 433 MHz or faster Intel Pentium or Celeron family processor
OS
Windows 98SE, Me, 2000, XP Home Edition, XP Professional
Memory
128 MB or more
Hard Disk
20 MB or more of free space
Display
1024 x 768 pixels, 256 colors or higher
1280 x 1024, High Color 16-bit recommended
(If you use display settings of 1024 x 768, turn on the Task Bar’s Auto-hide option.)
Computer
A PC with a 100 MHz or faster Intel Pentium or Celeron family processor
OS
Windows 95, 98, 98SE, Me, NT4.0, 2000, XP Home Edition, XP Professional
Memory
8 MB or more
Hard Disk
2 MB or more of free space
Display
800 x 600 pixels, 256 colors or higher
Computer
A PC with a 166 MHz or faster Intel Pentium or Celeron family processor and a USB
port
OS
Windows 98, 98SE, Me, 2000, XP Home Edition, XP Professional
Memory
32 MB or more
Hard Disk
2 MB or more of free space

6
Chapter 1—Getting Started
Studio Manager for DM2000/DM1000/02R96/01V96—Installation Guide
Yamaha CBX Driver (DM2000/02R96 only)
System requirements for software not listed here can be found on the CD-ROM.
Macintosh System Requirements
The system requirements of your operating system may be different to those listed here.
Studio Manager
Card Filer (DM2000 only)
Yamaha USB MIDI Driver
System requirements for software not listed here can be found on the CD-ROM.
OS
Windows 95, 98, 98SE, Me, NT4.0, 2000, XP Home Edition, XP Professional
Computer
A Macintosh G3/233 MHz or better and a USB port
OS
Mac OS 8.6 to 9.2.2 (Mac OS X not supported)
Memory
120 MB or more of free memory (Virtual memory must be turned off)
Hard Disk
7 MB or more
Display
1024 x 768 pixels, 256 colors or higher
1280 x 1024, 32,000 colors recommended
Other
OMS 2.3.3 or later
Note: If you are using a PowerBook on battery power, open the Energy Save control panel,
and in Advanced Settings, Additional Power Savings, turn off Allow processor cycling.
Computer
A Macintosh computer with a PowerPC processor or better
OS
Mac OS 7.5 to 9.2.2 (Mac OS X not supported)
Memory
8 MB or more of free memory
Hard Disk
6 MB or more
Display
800 x 600 pixels, 256 colors or higher
Computer
A Macintosh computer with a PowerPC processor or better and a USB port
OS
Mac OS 8.6 to 9.2.2 (Mac OS X not supported)
Memory
64 MB or more (recommended: 128 MB or more)
Hard Disk
2 MB or more

System Hookup
7
Studio Manager for DM2000/DM1000/02R96/01V96—Installation Guide
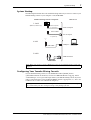
System Hookup
The following illustration shows the available hookup methods you can use to connect your
Yamaha mixing console to your computer: serial, USB, MIDI.
Configuring Your Yamaha Mixing Console
On your Yamaha mixing console, use the DISPLAY ACCESS [SETUP] button
([DIO/SETUP button on the 01V96) to locate the MIDI/TO HOST Setup page. Under
“Studio Manager,” select a port and assign an ID to your Yamaha mixing console. If you are
using a serial connection, set the TO HOST SERIAL options as appropriate (i.e., “PC-2” for
a Windows PC, or “Mac” for a Macintosh computer).
Note: Before you connect to serial or MIDI ports, turn off your Yamaha mixing console and
computer.
Warning: Do not set the TO HOST SERIAL option to “Mac” while your Yamaha mixing con-
sole is connected to your PC’s serial port. Doing so may damage your PC.
USB cable
(Yamaha CCJ-Mac
or equivalent)
(Yamaha CCJ-PC2
or equivalent)
USB port
Serial cable
Mac serial port
PC serial port
Yamaha mixing console rear panel Mac or PC
MIDI interface
MIDI cables
3. MIDI
2. USB
1. Serial
(DM2000/02R96 only)
TO HOST
USB
INOUT

8
Chapter 2—Windows Installation
Studio Manager for DM2000/DM1000/02R96/01V96—Installation Guide
2 Windows Installation
Acrobat Reader
To view the PDF manuals included on the CD-ROM, you need to install the Adobe Acrobat
Reader software. If you already have this software installed, skip this section.
1
Start your computer and Windows, and then insert the included CD-ROM
into your computer’s CD-ROM drive.
2
Double-click the “Acroread_” folder on the CD-ROM.
This folder contains Acrobat software in several languages.
3
Double-click the folder of the language you want to install.
4
Double-click “ar***enu.exe.”
(“***” indicates the software version.)
5
Follow the on-screen instructions to install the software.
For instructions on using Acrobat Reader, choose Reader Help from Acrobat Reader’s Help
menu.
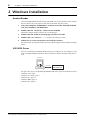
USB MIDI Driver
If you are connecting your Yamaha mixing console to a USB port on your computer, you’ll
need to install the Yamaha USB driver. If you already have this driver installed, skip this sec-
tion.
The procedure you use for installing the Yamaha USB driver depends on which version of
Windows you’re using:
•Windows 98 & 98SE—page 9
•Windows Me—page 12
•Windows 2000—page 13
•Windows XP—page 14
Studio
Manager
DM2000/02R96
DM1000/01V96
Computer
USB cable
Driver

USB MIDI Driver
9
Studio Manager for DM2000/DM1000/02R96/01V96—Installation Guide
Windows 98 & 98SE
1
Start your computer and Windows, and then insert the included CD-ROM
into your computer’s CD-ROM drive.
2
Turn off your Yamaha mixing console, and then use a USB cable to connect
its USB TO HOST port to a USB port on your computer.
3
Turn on your Yamaha mixing console.
The Add New Hardware Wizard appears. If it doesn’t appear, try disconnecting and recon-
necting the USB cable. Alternatively, open the Add New Hardware control panel.
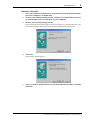
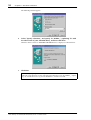
4
Click Next.
The following window appears.
5 Select “Search for the best driver for your device (Recommended),” and then
click Next.

10 Chapter 2—Windows Installation
Studio Manager for DM2000/DM1000/02R96/01V96—Installation Guide
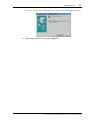
The following window appears.
6 Select “Specify a location,” and specify “D:\USBdrv_” (replacing “D” with
the drive letter of your CD-ROM drive), and then click Next.
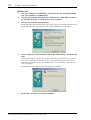
When the driver is located, “YAMAHA USB MIDI Driver” is displayed, as shown below.
7 Click Next.
Note: You may be prompted to insert your Windows CD-ROM. Do not insert it! Click OK,
and in the “Copy files from” section of the subsequent dialog box, enter “D:\USBdrv_” (replac-
ing “D” with the drive letter of your CD-ROM drive), and then click OK.

USB MIDI Driver 11
Studio Manager for DM2000/DM1000/02R96/01V96—Installation Guide
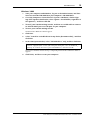
The driver is installed, and the following window appears when the installation is complete.
8 Click Finish, and then restart your computer.

12 Chapter 2—Windows Installation
Studio Manager for DM2000/DM1000/02R96/01V96—Installation Guide
Windows Me
1 Start your computer and Windows, and then insert the included CD-ROM
into your computer’s CD-ROM drive.
2 Turn off your Yamaha mixing console, and then use a USB cable to connect
its USB TO HOST port to a USB port on your computer.
3 Turn on your Yamaha mixing console.
The Add New Hardware Wizard appears. If it doesn’t appear, try disconnecting and recon-
necting the USB cable. Alternatively, open the Add New Hardware control panel.
4 Select “Automatic search for a better driver (Recommended),” and then click
Next.
Windows Me should be able to locate the driver automatically, in which case you can pro-
ceed to Step 5. If the driver cannot be located, select “Specify the location of the driver
(Advanced),” click Next, specify your CD-ROM drive (e.g., D:\USBdrv_), and then con-
tinue as prompted.
The following window appears when the installation is complete.
5 Click Finish, and then restart your computer.

USB MIDI Driver 13
Studio Manager for DM2000/DM1000/02R96/01V96—Installation Guide
Windows 2000
1 Start your computer and Windows, log on as the Administrator, and then
insert the included CD-ROM into your computer’s CD-ROM drive.
2 Go to My Computer–>Control Panel–>System–>Hardware–>Driver Sign-
ing–>File Signature Verification, select “Ignore—Install all files, regardless of
file signature,” and then click OK.
3 Turn off your Yamaha mixing console, and then use a USB cable to connect
its USB TO HOST port to a USB port on your computer.
4 Turn on your Yamaha mixing console.
The Found New Hardware Wizard appears.
5 Click Next.
6 Select “Search for a suitable driver for my device (Recommended),” and then
click Next.
7 In the subsequent window, select “CD-ROM drives” only, and then click Next.
The driver is installed, and the message “Completing the Found New Hardware Wizard”
appears.
8 Click Finish, and then restart your computer.
Note: You may be prompted to insert your Windows CD-ROM. Do not insert it! Click OK,
and in the “Copy files from” section of the subsequent dialog box, enter “D:\USBdrv2k_”
(replacing “D” with the drive letter of your CD-ROM drive), and then click OK.

14 Chapter 2—Windows Installation
Studio Manager for DM2000/DM1000/02R96/01V96—Installation Guide
Windows XP
1 Start your computer and Windows, and then insert the included CD-ROM
into your computer’s CD-ROM drive.
2 Click the Start button, and then click Control Panel.
If the Control Panel window appears as shown below, click “Switch to Classic View” on the
left side of the window in order to see all of the control panels.
3 Go to System Hardware–>Driver signatures–>Driver signature options,
select “Ignore—Install software without asking for confirmation,” and then
click OK.
4 Click OK to close the System Properties window, and then click the Close but-
ton to close the Control Panel window.
5 Turn off your Yamaha mixing console, and then use a USB cable to connect
its USB TO HOST port to a USB port on your computer.
6 Turn on your Yamaha mixing console.
The Found New Hardware Wizard appears.
7 Select “Install software automatically (recommended) (I),” and then click
Next.
The driver is installed, and the message “Completing the Found New Hardware Wizard”
appears.
8 Click Finish, and then restart your computer.

Yamaha CBX Driver (DM2000/02R96 only) 15
Studio Manager for DM2000/DM1000/02R96/01V96—Installation Guide
Yamaha CBX Driver (DM2000/02R96 only)
If you’re connecting your Yamaha mixing console to a serial port on your computer, you’ll
need to install the Yamaha CBX driver. If you already have this driver installed, skip this sec-
tion.
1 Double-click the “Mididrv_” folder on the CD-ROM.
2 Double-click “Setup.exe.”
3 Follow the on-screen instructions to install the software.
Studio Manager
1 Double-click the “SM_” folder on the CD-ROM.
2 Double-click the “DM2000,” “02R96,” “DM1000,” or “01V96” folder as
appropriate.
3 Double-click “Setup.exe.”
4 Follow the on-screen instructions to install the software.
Card Filer (DM2000 only)
1 Double-click the “Card_” folder on the CD-ROM.
2 Double-click “Setup.exe.”
3 Follow the on-screen instructions to install the software.
For information on using Card Filer, see the “CardFilerManual.pdf.” This file is installed in
the same folder as Card Filer.

16 Chapter 3—Macintosh Installation
Studio Manager for DM2000/DM1000/02R96/01V96—Installation Guide
3 Macintosh Installation
Acrobat Reader
To view the PDF manuals included on the CD-ROM, you need to install the Adobe Acrobat
Reader software. If you already have this software installed, skip this section.
1 Start your Macintosh, and then insert the included CD-ROM into your com-
puter’s CD-ROM drive.
2 Double-click the “Acroread_” folder on the CD-ROM.
This folder contains Acrobat software in several languages.
3 Double-click the folder of the language you want to install.
4 Double-click “Reader Installer.”
(The actual name of the installer depends on the language you select.)
5 Follow the on-screen instructions to install the software.
For instructions on using Acrobat Reader, choose Reader Guide from Acrobat Reader’s Help
menu.
OMS (Open Music System)
Studio Manager requires OMS 2.3.3 or later in order to work on Macintosh computers.
OMS 2.3.8 is included on the CD-ROM. If you already have OMS 2.3.3 or later installed,
skip this section.
1 Start your Macintosh, and then insert the included CD-ROM into your com-
puter’s CD-ROM drive.
2 Double-click the “OMS_” folder on the CD-ROM.
3 Double-click “Install OMS 2.3.8.”
4 Follow the on-screen instructions to install the software.
5 When the installation is complete, click Restart.
6 Copy the “OMS_2.3_Mac.pdf” from the “OMS_” folder on the CD-ROM to
the “Opcode:OMS Applications” folder on your hard disk.
This file contains information on using and configuring OMS.
Note: Once the installation is complete, you may receive an error message warning that the
installer did not quit. In this case, choose Quit from the File menu to quit the installer, then
restart your computer.

USB MIDI Driver 17
Studio Manager for DM2000/DM1000/02R96/01V96—Installation Guide
USB MIDI Driver
If you’re connecting your Yamaha mixing console to a USB port on your computer, you’ll
need to install the Yamaha USB driver. If you already have this driver installed, skip this sec-
tion.
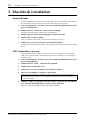
1 Start your Macintosh, and then insert the included CD-ROM into your com-
puter’s CD-ROM drive.
2 Double-click the “USBdrv_” folder on the CD-ROM.
3 Double-click “Install USB MIDI Driver.”
The Install USB MIDI Driver window appears, as shown below.
Normally there’s no need to set the Install Location, because the startup disk is selected by
default. To select another disk, click the Switch Disk button.
Although you can select a destination folder from the pop-up menu, the files are installed
in the specified disk’s System Folder regardless, so you can ignore that option.
4 Click Install, and follow the on-screen instructions to install the software.
5 When the installation is complete, click Restart.
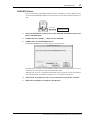
OMS
Computer
USB cable
Driver
Studio
Manager
DM2000/02R96
DM1000/01V96

18 Chapter 3—Macintosh Installation
Studio Manager for DM2000/DM1000/02R96/01V96—Installation Guide
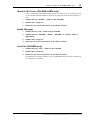
Studio Manager
1 Start your Macintosh, and then insert the included CD-ROM into your com-
puter’s CD-ROM drive.
2 Double-click the “SM_” folder on the CD-ROM.
3 Double-click the “DM2000,” “02R96,” “DM1000,” or “01V96” folder as
appropriate.
4 Double-click “Install Studio Manager.”
5 Follow the on-screen instructions to install the software.
Card Filer (DM2000 only)
1 Start your Macintosh, and then insert the included CD-ROM into your com-
puter’s CD-ROM drive.
2 Double-click the “Card_” folder on the CD-ROM.
3 Double-click “Install Card Filer.”
4 Follow the on-screen instructions to install the software.
For information on using Card Filer, see the “CardFilerManual.pdf.” This file is installed in
the same folder as Card Filer.

Setting Up OMS 19
Studio Manager for DM2000/DM1000/02R96/01V96—Installation Guide
Setting Up OMS
The “OMS Setup for YAMAHA” folder on the included CD-ROM contains OMS studio
setup files preconfigured for use with your Yamaha mixing console.
1 Turn off your Yamaha mixing console, and then use a USB cable to connect
its USB TO HOST port to a USB port on your computer.
If you are connecting to the SERIAL TO HOST port, use a serial cable to connect to the
Printer or Modem port on your computer.
2 Turn on your Yamaha mixing console.
3 Start your Macintosh, and then insert the included CD-ROM into your com-
puter’s CD-ROM drive.
4 Open the “OMS_” folder on the CD-ROM, and then open the “OMS Setup
for YAMAHA” folder.
The “DM2000/02R96” folder contains the following OMS studio setup files:
• DM2000-USB
• DM2000-Modem
• DM2000-Printer
• 02R96-USB
• 02R96-Modem
• 02R96-Printer
The “DM1000/01V96” folder contains the following OMS studio setup files:
• DM1000-USB
• 01V96-USB
5 Copy the appropriate file to your computer’s hard disk, and then double-click
it.
OMS Setup starts and the Studio Setup file window appears.
6 Choose Make Current from the File menu, and then save the setup.
After completing the above setup, your Yamaha mixing console will be the only MIDI
device in the current OMS studio setup. In order to use other MIDI devices, or to add an
additional Yamaha mixing console, you must create a new studio setup. See the
“OMS_2.3_Mac.pdf” for more information.
Note: If the AppleTalk dialog box appears, click the Turn It Off button, and then click OK on
the subsequent dialog box.
Note: If you are using Studio Manager for DM2000/02R96 and the Modem or Printer port,
go to OMS Setup Preferences and turn off “Use Apple SerialDMA driver when available.”

20 Chapter 4—Getting Started
Studio Manager for DM2000/DM1000/02R96/01V96—Installation Guide
4 Getting Started
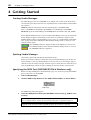
Starting Studio Manager
The following procedure uses “DM1000” as an example. The content of the menu items
selected in the procedure below may vary depending on the version number of Studio Man-
ager software.
Windows: Click the Start button and then click Programs–>(YAMAHA OPT
To ols–>)YAMAHA Studio Manager for DM1000–>Studio Manager for DM1000.
Macintosh: Open the Studio Manager for DM1000 folder and double-click “SM_DM1K.”
If your Yamaha mixing console is detected while Studio Manager starts up, the Synchroni-
zation dialog box appears, from which you can choose to transfer the settings of your
Yamaha mixing console to Studio Manager or vice versa. See “Synchronizing Studio Man-
ager” on page 22 for more information. If no Yamaha mixing console is detected, a new
Console window opens.
The ONLINE indicator is displayed while Studio Manager is connected to
your Yamaha mixing console. When no Yamaha mixing console is detected,
the OFFLINE indicator is displayed.
Quitting Studio Manager
Choose Exit (Quit on the Macintosh) from the File menu.
If there are no unsaved changes, all windows close and Studio Manager quits. If there are
unsaved changes, a message asking whether or not you want to save the changes appears.
Click Yes to save the changes and quit, click No to quit, or click Cancel to cancel the opera-
tion. Studio Manager can also be quit by clicking the Console window’s Close button.
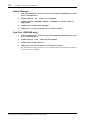
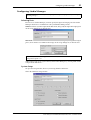
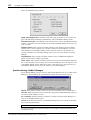
Specifying the MIDI Port (DM1000/01V96 & Windows only)
Before selecting a MIDI port in Studio Manager (page 21), you must specify which MIDI
port is connected to your DM1000.
1 Start Studio Manager.
2 Click the MIDI Setup button on the MIDI SETUP toolbar, as shown below.
The MIDI Setup dialog box appears.
3 Select the MIDI port to which your DM1000 is connected (e.g., MIDI In, Out,
or Thru).
Note: To use a MIDI port with Studio Manager, you must select it on the MIDI Setup dialog
box (as explained above) and on the System Setup dialog box, as explained on page 21.
Warning: Studio Manager does not yet support OPT (Open Plug-in Technology), so even if
it appears in the menu of an OPT compatible program, do not start it in this way.
MIDI Setup
La page charge ...
La page charge ...
La page charge ...
La page charge ...
La page charge ...
La page charge ...
La page charge ...
La page charge ...
-
 1
1
-
 2
2
-
 3
3
-
 4
4
-
 5
5
-
 6
6
-
 7
7
-
 8
8
-
 9
9
-
 10
10
-
 11
11
-
 12
12
-
 13
13
-
 14
14
-
 15
15
-
 16
16
-
 17
17
-
 18
18
-
 19
19
-
 20
20
-
 21
21
-
 22
22
-
 23
23
-
 24
24
-
 25
25
-
 26
26
-
 27
27
-
 28
28


Yamaha Studio Manager Guide d'installation
- Catégorie
- Logiciel
- Taper
- Guide d'installation
- Ce manuel convient également à
dans d''autres langues
- italiano: Yamaha Studio Manager Guida d'installazione
- English: Yamaha Studio Manager Installation guide
- español: Yamaha Studio Manager Guía de instalación
- Deutsch: Yamaha Studio Manager Installationsanleitung
- русский: Yamaha Studio Manager Инструкция по установке
- Nederlands: Yamaha Studio Manager Installatie gids
- português: Yamaha Studio Manager Guia de instalação
- dansk: Yamaha Studio Manager Installationsvejledning
- polski: Yamaha Studio Manager Instrukcja instalacji
- čeština: Yamaha Studio Manager instalační příručka
- svenska: Yamaha Studio Manager Installationsguide
- Türkçe: Yamaha Studio Manager Yükleme Rehberi
- suomi: Yamaha Studio Manager Asennusohje
- română: Yamaha Studio Manager Ghid de instalare
Documents connexes
-
Yamaha DM2000 Guide d'installation
-
Yamaha R96 Guide d'installation
-
-
-
-
-
-
Yamaha mLAN Driver Le manuel du propriétaire
-
-
Yamaha SPX2000 Le manuel du propriétaire