Maytag Jetclean MDB6650 Manuel utilisateur
- Catégorie
- Lave-vaisselle
- Taper
- Manuel utilisateur

Part No. 6 915929 A MCS Part No. 99002253

Congratulations on your choice of a Maytag Jetclean ®
dishwasher!
Before you use your new appliance, please read this
guide care_hlly. You will find instructions on the proper
operation and maintenance of your new dishwasher.
Please record the date of purchase, model, and serial
number in the spaces provided below. Model and serial
numbers can be found on the left side of the dishwasher
tub.
Date of Purchase
Model Number
Serial Number
If you have questions, write us (include your model,
serial number and phone number) or call:
Maytag Appliances Sales Company
Attn: CAIR® Center
RO. Box 2370
Cleveland, TN 37320-2370
1-800-688-9900 USA
1-800-688-2002 CANADA
1-800-688-2080 USA TTY (for deal hearing
impaired or speech impaired)
(Mon.-Fri., 8am-Spm Eastern Time)
http://www.maytag.com
important
Products with a @ label have been listed with
Unde_writer's Laboratories, Inc. - those with a CSA tag
have been listed with Canadian Standards Association.
Nevertheless, as with any other equipment using elec-
tricity and moving parts, there is a potential hazard.
Safety instructions ..................................
9. Use only detergents and rinse additives designed
for an automatic dishwasher. Never use soap,
laund_T detergent, or hand washing detergent in
your dishwasher. Keep these products out of reach
of children.
10. Do not sit, stand on or abuse the door or dish racks
of the dishwasher.
1. Read all instructions before using the dishwasher.
2. Use the dishwasher only for its intended function.
3. Disconnect electrical power to dishwasher before
attempting to se_wice.
4. To avoid electrical shock hazard, the sides and
back must be enclosed and the front panels must
be attached before electrical power is applied to
the dishwasher. Refer to the installation instruc-
tions for proper grounding procedures.
5. Connect to a properly rated, protected and sized
power supply circuit to avoid electrical overload.
6. Children should never be permitted to operate, or
play in, with, or around this dishwasher.
7. To reduce the risk of iniury when loading items m
be washed, sharp or pointed items should be
located with the handles up. Also, load sharp items
so they are not likely to damage the door seal.
8. Do not touch the heating element on the bottom of
the tub during or at the completion of a cycle. It
will be hot.
11. Under certain conditions, hydrogen gas may be
produced in a hot water system that has not been
used for two weeks or more. Hydrogen gas is"
explosi_,e. If the hot water system has not been
used for such a period, turn on all hot water
faucets and let the water flow fiom each for sev-
eral minutes. This will release aW accumulated
hydrogen gas. As the gas is flammable, do not
smoke or use an open flame during this process.
12. Do not wash plastic items unless marked "dish-
washer safe" or the equivalent. For plastic items
not so marked, check the manu*hcturer's recom-
mendations.
13. Do not tamper with controls.
14. To prevent accidental child entrapment and suffo-
cation risk, always remove the door to the washing
compartment when removing an old dishwasher
from service or discarding it.
15. Use caution when unloading the dishwasher.
Dishes will be hot if unloaded shortly after a cycle
has completed.
Say÷ Th÷s÷ nst t ons

Loading oo oo ooo ooo oooo o ooo ooo oo ooo ooo oo ooo ooo oo ooo ooo ooooo
Before You Start
• Don't Prerinse. Simply scrape off any bones or
large food particles.
• It" connected to a food waste disposer, make certain
the disposer is erupt, before starting the dish-
washel:
• Scrape off tomato-based food soils (see page 8).
• Remove certain foods (such as mustard, mayonnaise,
lemon juice, vinegar, salt or dressings) from stainless
steel flatware as soon as possible. These foods may
cause rusting and pitting if allowed to remain in contact
with the surface for an extended period of time.
General Recommendations
• Place all items in the racks so they are separated
and facing center.
• Items can be centered behind a single tine or loaded at
an angle to maximize space.
• Load items so they do not rest over the top of the wash
tower.
• Avoid blocking the upper and lower spray arms by not
allowing items to extend beyond the racks.
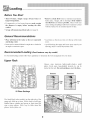
Recommended Loading (Rack features vary by model)
For best dishwashing results follow these guidelines to determine the best arrangement for your items.
Upper Rack
Glasses, cups, stemware, light-weight plastics, small
plates, bowls, pans, long-handled utensils etc. can be
loaded in this rack. Do not load glasses over the tines.
Correct Incorrect
10 Place Settings
Tine
out
Tine
in
The Stack-Rack (select models) on the right side of the
upper rack folds up or down. Fold it down m hold long-
handled knives, spatulas and spoons or short items like
cups or juice glasses. Fold it up for taller items like
glasses, bowls, plates, etc.
2

Loading (continued) ooo ooo ooo ooo ,ooo,ooo ooo ooo oooo,ooo ooo ooo ooo ,o
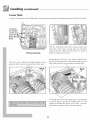
Lower Rack
A variety of la_e items such as dinner plates, mixing bowls, pots and pans and baking dishes can be loaded in this rack.
3 saucers
are loaded
on the rack
under the
Shelf
10 Place Settings
With the Stack-Rack shelf (select models) raised, thin
items like cookie sheets or pizza pans may be placed
along the left side. With the shelf down, two levels of
glasses and cups can be loaded.
Tall items such as bakeware and large platters can be
placed on the left side or across the back of this rack.
@ @
@
Back
Positioning the Fold-Away TM tines (select models) flat in
the back, left corner provides convenient loading space for
large, bulky items like pots and pans or mixing bowls.
@
@
@
@ @
@ @
@ @
@ @
@ @
@ @
@
Convertible tines in the back, right corner can be adjusted
to provide narrow spacing for loading plates or wide
spacing for loading deep bowls, pots or pans. Flip tines
up for narrow spacing or down for wider spacing.
3

÷@@@@®®@@@@@@@@@@@@@@®®@@@@@@@@@@@@@@®®@@@@@@@@@@@@@@®®@@@@@@@@@@@@@@®®@@@@@@@@@@@@@@®_
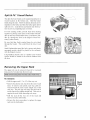
Split & Fit TM Utensil Basket
The split silve_are basket can be separated and placed in
several locations in the bottom rack. Hold the basket
firmly along the sides. Follow the unlock direction arrows
imprinted on the basket and slide the basket apart until it
splits into two. Load flatware and utensils into both sec-
tions or just one, depending upon your load.
For best cleaning results, prevent items tiom nesting
together by placing some items in the basket with han-
dles up and some with handles down. Load knives, han-
dles up, through the slots in the hinged covered sec-
tion(s) (when closed).
Be sure that thin, finely pointed items do not extend
through the basket. This could block the lower wash
arm.
Small, lightweight items like baby spoons and plastic
measuring spoons should be placed in the section(s)
with the hinged cover(s).
Long-handled utensils such as spatulas and wooden
spoons should be loaded in the sections farthest fiom
the door.
\
\
_@_@@@@_@@@@_@@@@_@@@@_@@@@_@@@@_@@@@_@@@@_@
Removing the Upper Rack
The upper rack can be removed when tall or oversized
items need to be loaded into the lower rack.
To remove:
* Roll the upper rack 1/3 to 1/2 of the way out.
*Remove the plastic rack stop from the end of each
track. To remove each plastic rack stop, push in-
ward (towards the rack) on the ridged area of the
rack stop. The rack stop will snap open and can be
easily removed by pulling straight out. Take care to
support the track while removing rack stops.
Roll the rack all the way out of the track and
remove from the dishwasher.
Reverse the above procedure to replace the upper
rack into the dishwasher.
Rack
4

Hot Water
To check the incoming water temperature, turn on the hot
water faucet nearest the dishwasher and let it run into a
glass in the sink. Place a candy thermometer in the glass
and check the temperature once it has stopped rising. If
the temperature is below 120 ° F (49 ° C), have a qualified
person raise the water heater thermostat setting.
Before starting the dishwasher, turn on the hot water
faucet and let it run until the water is hot. This assures
that the initial fill of water is hot.
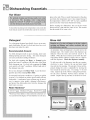
Detergent
Use a detergent designed specifically for use in an auto-
matic dishwasher. Be sure it is fresh and stored in a cool,
dry place (not under the sink).
Recommended Amount
Too little detergent results in poor cleaning, hard water
filming/spotting and poor drying. Too much detergent
can cause permanent etching/cloudiness.
For food soils requiring the Heavy or Normal cycles
and/or hard water* conditions, fill both sides of the Main
Wash detergent cup. For food soils requiring the Light
cycle and/or soft water* conditions, fill the Light side of
the detergent cup only.
Do not use detergent with Rinse Only. Leave the deter-
gent lid open when running Rinse Only.
In extremely hard water conditions (15 grains per gallon
or more*), it is difficult to achieve good results with any
dishwasher. A mechanical water softener may be neces-
sary to improve water quality, detergent effectiveness,
and protect the dishwasher parts from the damage that
hard water can cause.
Water Hardness*
[ Soft (0-3 gpg) Medium (4-9 gpg) Hard (10-12 gPg)l
*Your local water utility or state university extension ser-
vice can tell you the degree of water hardness in your area.
Rinse Aid
An automatic rinse aid dispenser is located next to the
detergent cups. The window next to the dispenser cap
indicates when the rinse aid reservoir needs to be
refilled. When the level of rinse aid is below the indi-
cator marks and the window is nearly clear, it is time to
refill the dispenser. Check the dispenser monthly.
To add rinse aid to the dispenser, turn the cap counter-
clockwise to open. Remove the cap and pour liquid
rinse aid into the opening. The amount of rinse aid dis-
pensed during the cycle is adjustable by moving the
lever inside the reservoir area. Use setting "1" for soft
water. Adjust it up to the "MAX" setting for hard water.
Set the lever anywhere between these anaounts as
needed. Replace the cap and turn it clockwise to close.
Rinse
5

Contro|s at a G|anCeoooooooooooooooooo,,,,,,,,,,oooooooooooooooo°
Cycles
Heavy Wash is for
heavily soiled dish
loads.
_oo®eeo®eeoeoooo®®ee®®eeeoooo,
Normal Wash is for
loads containing dishes
with normal amounts of
food soils.
Prewash
Prerinse
Main Wash
Prerinse
Hi-Temp Rinse
Dry
_=®e®eeeooeooomo®e
Prewash
Main Wash
Prerinse
Hi-Temp Rinse
Dry
9.8 Gal.
Light Wash is f\_r
washing lightly soiled
loads.
_oooo=o®eeeoooooooe_®®eoooooo,
Rinse Only is for
rinsing dishes being held
until the dishwasher is
full. This helps reduce
the potential for odors.
Main Wash
Prerinse
Hi-Temp Rinse
Dry
_=o®eeeeeooooomo®e
Rinse
5.8 Gal.
Options
Select Sanitize to clean and sanitize dishware with any
of the cycle choices (except Rinse Only).
Because this option adds heat and water temperature
checks to the main wash and final rinse, it can also be
selected to e]_ance washing and drying results for all
load types.
Select Heated Dry to turn on the heating element during
dry for enhanced drying results. When Heated Dry is not
selected, towel drying of some items may be necessary
and more moisture may be noticed adhering to the dish-
washer interior. With either dry option, it is normal to
notice vapor escaping from the door vent.
To drain the dishwasher and then turn it oft, press the
Drain/Off once. Press Drain/Off twice to turn the dish-
washer off without draining.
indicator Lights
The SANITIZED light illuminates at the end of the
Light, Normal or Heavy Wash cycle when the Sanitize
option has been selected and conditions have been met to
achieve sanitization.
The CLEAN light is illuminated at the end of the cycle
and remains lit until the door has been open for 30 seconds
continuously.
The DRY light is illuminated during the entire dry period
and goes out when the cycle is completed.
The WASH light is illuminated during all rinse and wash
portions of the cycle
The HEATING DELAY light illuminates when the cycle
is being extended to heat the water to proper temperature.
Delay/Resume
The Delay/Resume option can be used to automatically
start the cycle at a later time, such as during off-peak
hours for reduced energy cost or to reduce daytime heat
buildup in the home.
To Set Up a Delay:
Select the appropriate cycle and options for the load.
Press the Delay/Resume pad until the desired
amount of delay time (2, 4 or 6 hours) is selected.
The delay time will begin counting down when the
pad is released.
The DELAY HOURS indicator light will remain lit
until the delay time has counted down.
The cycle will automatically start as soon as the
delay time expires.
To Cancel a Delay:
Wait at least 2 seconds, then press the Delay/Resume pad
again. The indicator light will go out and the cycle will
start or resume immediately.
6

| Controls at a Glance (continued)ooooo,,,ooooo,,°ooooo,,oo oo,,ooo
Control Lock Option
The control touchpads can be locked to prevent unwanted
use. If this feature is activated between cycles, the dish-
washer cannot be operated until the controls are unlocked.
If desired, the controls can be locked after a cycle or delay
has started.
Setting the Control Lock:
Press the_pad for three seconds.
An indicator light above the pad will illuminate when
the controls are locked.
To Cancel:
Press the_pad for three seconds.
The indicator light will go off.
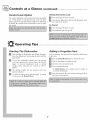
Operating Tips oooo oooo ooooo ooooo ooooo ooooo ooooo ooo
Starting The Dishwasher
After loading the dishwasher and
adding detergent,
close the dishwasher by pressing the door until the
latch clicks.
To start the dishwasher, firmly press the desired
cycle and options pads. After a pause, the fill will
begin. To prevent unplanned cycle or option
changes, these selections are "locked in" after 1
minute.
N The indicator lights for the selected cycle and
options will glow.
To cancel an option, press the pad again. To cancel
a cycle, press the Drain/Off pad.
Adding a Forgotten item
For best cleaning, the forgotten item should be added early
in the cycle.
_ Press the Delay/Resume pad or unlatch the door.
N Wait for the water circulation to stop.
_Open the door and add the item.
Close and latch the door.
If Delay/Resume was pushed, push it again to
restart the dishwasher.
_ After five seconds, the cycle resumes automatically at
the point of interruption.
7

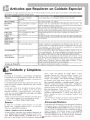
Specia| Care items oooooooooo °ooooo°ooooooooo °oooo
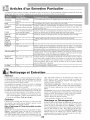
Most tableware, cookware and flatware can safely be washed in your dishwasher. If you have any doubts about an item, check
with the manufacturer.
Aluminum
.®®=®®eo®®®®moooooo®®mooq
C ast Iron
*®®aoee®®e®®=oeeooo®®=oeq
China/
Stoneware
. ®®*ee¢oo®Q®*ue¢oo®®®*ueq
Crystal
o®®=oeeo®®e®meo®eo®®®moeq
Furnace Filters
*oeseeeeeooem®®eeeooem®®q
Glass
Gold-Plated Flatware
. ®®=®®®.®®®®=®®®®.®®®,®®_
Pewter; Tin
Plastics
Stainless Steel
Sterling Silver or
Silverplate
Wooden Items
Yes, except anodized.
No
No, if antique or hand-
painted.
No, if antique or deli-
cate crystal.
Not reconnnended.
Yes
No
************************
No
Yes, top rack.
Yes
No, if has comnrercial
"darkening".
No
OQO_OOOOOOOOQ0000
High water tenrperamrc and detergents nray affect finish.
Seasoning will be removed, and iron will rust.
Always check manufacturer's recommendation bel\_re washing. Antique,
,hand:pa!n!ed,or _:x,erzthe-glaze pattyms may _ade; Gflaldleaf,nay d!sco!or; .....
Always check nranufacmrer's recomnrendation be_\)re washing. Sonre types of
2t ]jn2y .xt h ...............................
May leave a dingy deposit or stain on dishwasher interior.
Milkglass can yellow with repeated dishwasher washing.
:::::::::::::::::::::::::::::::::::::::::::::::::::::::::::::::::::::::::::::::::
Will discolor.
=o®®®®®=_e®®ooe®=e_o®®®®®ue_ooeo®O=e_®®®®®®u_e®ooo_0ue_oo®o®®=_e®®oo_®=ee®o®®®®=°
Always check manuthcmrer's reconnnendation before washing. Plastics vary
in their capacity to withstand high water tenrperamres and detergents.
Disposable plastic items are not dishwasher safe t\_rthis reason.
Run a Rinse Only cycle if not washing immediately. Prolonged contact with
foods containing salt, vinegar, nrilk products or juice could danrage finish.
Always check manuthcturer's rccomnrendation bet\_re washing. Run a Rinse
Only cycle if not washing immediately. Prolonged contact with food containing
salt, acid or sulfide (eggs, mayonnaise and seat\_od) could damage finish.
Commercial "darkening" may be removed by detergent.
Wood nray warp, crack or discolor.
Care and C|eaningoo÷÷÷÷ooo÷÷o÷÷ooo÷÷÷÷o°oo÷o÷÷ooo÷÷oo÷ooo÷÷÷÷ooo÷o
Interior
The dishwasher interior is normally self-cleaning. Periodically
check the bottoln of the dishwasher mb to see if any large parti-
cles have not gone tlm_ugh the strainer portion of the module.
Wipe the edge of the inner door liner to remove any food
soil splashes which occurred during loading.
The cdor fiom some tolnato-based food soils may occasionally
adhere to various components of the dishwasher interior, causing
temporary discoloration. To minhnize this:
, Scrape excess tomato-based I\_od soils off of dishes,
prior to loading. Do not prewash the dishes, however.
, Run the Heavy Wash cycle when washing loads con-
taining tomato-based I\_od soils.
Exterior
The front of the dishwasher can be cleaned with a soft,
damp cloth and liquid spray cleaner. Do not use abrasive
powders or cleaning pads.
Stainless Steel Care and Cleaning (select models)
Do not use a cleaning product containing chlorine bleach.
Always wipe with the grain of the stainless steel. For daily
cleaning and light soil, use a soft cloth or sponge and one
of the I\_llowing: mild detergent and water, a solution of
8
white vinegar and water, Fornnda 409 Glass and Surface
Cleaner* or a similar nmlti-surface cleaner. Rinse and dry.
To polish and to help prevent fingerprints, I\_llow with
Stainless Steel Magic Spray* (part no. 20000008)**.
For moderate to heavy soil, clean with Bon Ami*, using a
soft cloth or damp sponge. Rinse and dW. To restore luster
and to remove streaks, I\_llow with Stainless Steel Magic
Spray*.
For discoloration, wipe with Cameo Stainless Steel
Cleaner*, using a damp sponge or soft cloth. Rinse imme-
diately and dry. To restore luster and to remove streaks,
follow with Stainless Steel Magic Spray*.
*Brandnames are the trademarks of the respectivemanufacturer.
** (:all 1-800-688-8408 to order.
Storage/Me ring
Fill detergent cup with a fresh-scented dishwasher detergent
or baking soda and select the Normal Wash cycle. Allow
the dishwasher to complete the cycle. Then turn the water
supply off and &ain the dishwasher. To drain, press the
Drain/Off pad once. Operate the &ain twice to ensure most
of the water is removed. Last, disconnect the electrical
supply and prop open the door.

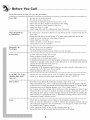
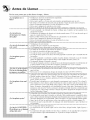
Before You Ca|| o o oo oo o o oo ooo o oo oo o ooo oo o o o ooo
Check these points to help
eQO@O_@@OOQ000_O@@
Won't Fill
,o®®®e=®®ooo®®t=oooo®_ut=oooo®m
Won't Drain/Water
in Tub Bottom
_®®®®®e=.®®®®®ooo®®®=oo®®®®=oo®
Detergent Cup
save you time and money:
OOQOOO@Oe@QQOOIDl@QOO@QQO@@@@@O@OOO@@O@@O@OOQO@O@@OOQOQO@@@@OOQOO O
Be sure door is latched securely.
• Be sure the water is turned on.
• Check that the dial/pad is properly selected for a cycle.
• Allow time for select models to drain/pause before filling.
Check your home's circuit breaker or tilse box.
Check inlet hose for a kink.
Check water valve inlet for sediment and clean if necessary.
_e®®®ouue_®®®®®®u®®e®®®o®®®®®®®®o®®e_®®®®ouu®e®®®®®®®e_®®®®ou®e_®®®®®®®g®®®®®_e=®®®®_e=®®®®_®_
• If connected to a food waste disposer, be sure the knock-out is removed from the dis-
poser inlet.
Be sure the drain hose is elevated at least 32" so water cannot siphon back into the tub.
• Check for a food obstruction in the drain or disposer.
Check drain hose for a kink.
• Check your home's circuit breaker or fuse box.
• Check that the cycle is completed.
_®®®_®®®_e®®®_®_®®_®e®_®®®®®®®®®®_®®®®®®®®_®®®®®®_®®®®=®_®®®®=®_®®®®®®_®®®®®®®®®®®®®®®®®®®_®®®®®_
Check that the cycle is completed.
9

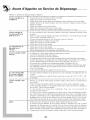
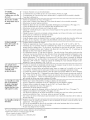
®®@@@@@@@@@@®@@@@@@_@@@@@@@@@@@@@@®@@@@@@_@@@@@@@®@@_@@@@@@@®@@_@@@_@@@®@@_@@@_@@@®@@@@_
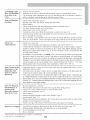
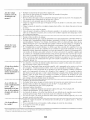
SANITIZED Light • Sanitize was not selected.
Does Not Illuminate • Sanitization can only be achieved with the Heavy, Light, or Normal Wash cycles.
at the End of the * The incoming water temperature was too low, interfering with the dishwasher's ability to
Cycle achieve adequate water heating in the allotted amount of time.
Food Soil Remains • Check water temperature./,pg. 5)
On Dishes • Run hot water at the sink before starting the dishwasher.
• Select Sanitize.
• Check water hardness and adjust detergent amount accordingly. (pg. 5)
• Use fresh detergent stored in a cool dry place.
• Select proper cycle for the soil level.
• Load items so they do not block the wash arms or center tower. (pgs. 2-3)
• Load the utensil basket with some handles up and some down to prevent nesting.
• Do not load glasses over tines.
• Prior to loading, scrape offburnt on foods and wipe the starchy fihn fiom utensils used with
pasta, rice and oatmeal. These soils require more energy than the rest of the load to clean.
Glasses Are * Always use a rinse aid.
Cloudy/Spotted • Check water temperature, incoming water should be 120-140 ° F (49-60 + C).
• Confirm that the cloudiness is removable by soaking the item in white vinegar for approx-
imately 5 minutes. If removed, the problem is due to hard water. Adjust detergent amount
being used to match water hardness (pg. 5). Be sure detergent is fresh, stored properly and
is a high quality brand.
• If cloudiness is not removable, it is etching. This is an erosion of the surface of the glassware
and can be caused by water that is too hot, from using too much detergent or by prewashing.
Detergent needs food soil to act upon. If etching has occurred, the glassware is permanently
damaged. To prevent further etching, adjust the detergent amount to match the water hardness,
stop prewashing, and be sure incoming water is not greater than 140+ F (60 ° C). Use water
heating options only when incoming water temperature is below 120 ° F (49 ° C).
Items Washed in the * Aluminum utensils or pans can leave marks when they rub against other items. Leave a
Dishwasher or the slight space between items.
Dishwasher Tub • Iron in the water can leave a yellow, brown or orange film on dishes or the dishwasher tub.
Itself are Stained/ A filter may be needed, check with a water treatment company.
Discolored * Color fiom tomato-based food soils temporarily adhere to the plastic interior components (pg.
8). If light staining has occurred, leave the door open to oxidize the stain away. For removal of
heavier stains, try a citric acid containing dishwasher cleaning product such as Glisten (paintno.
18001017)**. Change dishwasher detergent and be sure to use a dishwasher detergent that con-
tams chlorine to better fight staining.
o_®_®®_®oe®®®®®_eee®_®eee e®®eeee_®®eee®e®_ee®e®_eeee®®_e®®®_®_e_®®®®eeeee®®eeeee®®eeeee®_eeeee®_eeee®®_eeee®®_eeee®®eeeee®®eeeee_
Items Not Properly * Be sure Heated Dry is selected.
Dried/Moisture is • Water droplets may lbrm on the inner door as part of the drying process.
present on the * Always use a rinse aid like Jet Dry* or Cascade Rinse Aid*.
dishwasher interior • Check water temperature. (pg. 5)
after the dry cycle * Select Sanitize.
Increase detergent amount to match water hardness. (pg. 5)
• Load properly. (pgs. 2-3)
• Plastic and teflon items are difficult to dry because the porous surface tends to collect water
droplets. Towel drying may be necessary.
• Glasses and cups with concave bottoms hold water and require towel drying.
Dishware is Chipped * Load dishes according to instructions so they do not strike each other. (pgs. 2-3)
• Washing antique china/crystal in the dishwasher is not recommended.
Do not load glasses over the tines.
Do not overload.
B d de ks of th _1) _f!_
• Fal7 ]Tal]7_S (-Ir_ Ira l]Tap ' _ r_5 _C[il/'_ 177a171 c[_ llr_12
• * To order call 1-800-688-8408. ,I

To locate an authorized service company in your area contact the Maytag dealer f?om whom your appliance was purchased; or call Maytag
Appliances Sales Company, Maytag Customer Assistance at the nmnber listed below. Should you not receive satisfhctory warranty service,
please call or write: Maytag Appliances Sales Company
Attn: CAIR_ Center
RO. Box 2370
Cleveland, TN 37320 2370
[.S. 1-800-688-9900
CANADA 1-800-688-2002
I[.S. customers using TTY for deaf, hearing impaired or speech impaired, call 1-800-688-2080.
,VOTE: When writing about an unsolved service problem, please include the following infbnnation:
(a) Your name, ad&ess and telephone number
(b) Model number and serial number (found on the upper left comer of the tub opening) of your appliance
(c) Name and address of your dealer and the date the appliance was purchased
(d) A clear description of the problem you are having
(e) Water hardness, detergent brand and amount, water temperature, and cycle used
(f) Proof of purchase (sales receipt)
What Is Not Covered By These Warranties:
1. Conditions and damages resulting fi'om any of the fbllowing:
a. hnproper installation, delivery, or maintenance.
b. Any repair, modification, alteration or adjustment not
authorized by the manufacturer or an authorized ser-
vicer.
c. Misuse, abuse, accidents, or unreasonable use.
d. Incon'ect electric current, voltage or supply.
e. hnproper setting of any control.
2. Warranties are void if the original serial numbers have been
removed, altered, or cannot be readily determined.
3. Products purchased _br commercial or industrial use.
4. The cost of service or service call to:
a. Correct installation errors.
b. Instruct the user on proper use of the product.
c. Transport the appliance to the servicer.
5. Consequential or incidental damages sustained by any
person as a result of any breach of these wan'anties.
Some states do not allow the exclusion or limitation of
consequential or incidental damages, so the above
exclusion may not apply.
User's Guides, service manuals and parts infbm_ation are available from Maytag Appliances Sales Company, Maytag Customer Assistance.
MAYTAG , One Dependability Square • Newton, Iowa 51)208
/ll l,o.'// r/ _,_,.mayta._. cc m kitho U.S.A.

MAYIAG

Nous vous fdlicitons sur le choix d'un lave-vaisselle
Maytag Jetclean(R?!
Avant d'ufiliser ce nouvel appareil, pri_re de lire
soigneusement le prdsent guide. I1contient des consignes
sur l'exploitation et l'entretien du nouveau lave-vaisselle.
Pri_re de consigner la date d'achat, le module et le
numdro de sdrie dans les espaces fournis ci-dessous. Le
module et le numdro de sdrie se trouvent dans le gauche
de la cuve.
Date d'Achat
Numdro de Modale
Numdro de Sdrie
Pour route question, nous dcrire (inclure le module, le
numdro de sdrie et le numdro de tdldphone) ou tdld-
phoner au:
Maytag Appliances Sales Company
Attn: CAIR _Center
RO. Box 2370
Cleveland, TN 37320-2370 t_tats-Unis
1-800-688-2002 CANADA
(Lundi-vendredi, 8 h/_ 8 h, heure de l'est)
Internet : http://www.maytag.com
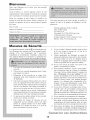
Les appareils portant le symbole @ sont homologuds par
les Laboratoires des Assureurs, Inc. Ceux portant le mono-
gramme CSA sont homologuds par l'Associafion
Canadienne de Nommlisation. Cependant, comme avec
tout appareil ufilisant de l'dlectricitd et comportant des
pi_ces mobiles, il existe touiours des possibilitds de danger.
1. Lire routes les instructions avant d'utiliser le lave-
vaisselle.
2. Utiliser le lave-vaisselle uniquement pour l'usage
pour lequel il est prdvu.
3. Ddbrancher le lave-vaisselle ou en couper l'ali-
mentation avant toute rdparation ou intervention
de ddpannage.
4. Pour dviter tout risque d'dlectrocufion, les c6tds et
le dos de l'appareil doivent _tre enclos et les pan-
neaux avant en place avant que le lave-vaisselle ne
soit mis sous tension. Vous rdfdrer au manuel de
mise en service pour une mise/_ la terre correcte.
5. Brancher l'appareil sur un circuit d'alimentation
correctement protdgd et d'une puissance nominale
suffisante pour dviter une surcharge dlectrique.
6. Ne pas laisser les enfants ufiliser le lave-vaisselle
ni jouer avec, dedans ou autour.
7. Pour rdduire les risques de blessures lots du
chargement du lave-vaisselle, placer tout objet
pointu ou coupant manche vers le haut. Veiller
dgalement /_ le charger de facon /_ ce qu'il ne
puisse pas abimer le joint de la porte.
8. Ne pas toucher l'dldment chauffant situd au fond
de la cuve durant le lavage ou /_ la fin de ce
dernier. II est alors chaud.
9. Ufiliser uniquement des ddtergents ou agents de
rincage sp@ialement con cus pour les lave-vaisselle.
Ne jamais utiliser de savon, de ddtergent pour la
lessive ni de ddtergent pour la vaisselle/_ la main.
Garder ces produits hors de portde des enfants.
10. Ne pas vous asseoir ni monter sur la porte ni les
paniers, ni autrement les abimer.
11. Dans certaines conditions, il peut y avoir produc-
tion d'hydrog_ne dans un systame de chauffage
d'eau qui n'est pas utilisd pendant 2 semaines ou
plus. L'hydrog&le est un ga_ explosiJ: Si votre
systbme de chauffage d'eau n'est pas utilisd pen-
dant une telle durde, ouvrir tousles robinets d'eau
chaude et laisser couler l'eau pendant plusieurs
minutes. Ceci dlimine route accumulation d'hy-
drogbne. Ce gaz dtant inflammable, ne pas filmer
ni utiliser de flamme vive pendant ce temps.
12. Ne pas laver d'articles en plastique dans le lave-
vaisselle, sauf s'ils sont indiquds comme pouvant
aller au lave-vaisselle. Dans le cas d'articles en
plastique ne portant pas d'indications pr@ises/_ cet
effet, se rdf&rer aux recommandations du fabricant.
13. Ne pas modifier les mdcanismes de commande.
14. Pour dviter tout risque d'enfermement et suffocation
d'un enfant, on dolt toujours ddmonter la porte du
compartiment de lavage lorsqu'on retire un vieux
lave-vaisselle du se_wice ou lorsqu'on le met au rebut.
15. Faire preuve de prudence lors du ddchargement du
lave-vaisselle. La vaisselle est bffllante lorsqu'elle est
retirde peu de temps apras que le cycle se soit terrain&
13

Chargement o oooo oooo oooo oooo oooo oooo oooo oooo oooo oooo oooo,oo
Avant de Commencer
• Ne pas pr6rincer. Il suffit de jeter os et gros morceaux
de nourriture.
* Si le lave-vaisselle s'dvacue dans un broyeur fi ddchets,
veiller h ce que celui-ci soit totalement vide avant de
mettre le lave-vaisselle en marche.
•Gratter les taches tenaces laiss6es par les aliments h
base de tomates (voir page 20).
• _;liminer certains aliments (tels que moutarde, mayon-
naise, jus de cinon, vinaigre, sel et vinaigrettes) des arti-
cles en acier inoxydable aussi rapidement que possible.
Ils peuvent attaquer le m&al s'ils restent en contact pro-
longs avec celui-ci.
Recommandations d'Ordre Genera!
• Placer les articles dans les paniers de fa_on "hce qu'ils
ne soient pas coil& les uns aux autres et les tourner
vers le centre.
* Les axticles peuvent &re centr& sur une tige de retenue ou
chmg& en biais pour tirer le meilleur patti possible de l'e-
space.
• Charger la vaisselle de fagon _t ce qu'aucun article ne
repose sur le dessus de la tourelle.
• I_viter de bloquer les bras gicleurs infdrieur et sup4rieur.
Pour cela, ne rien laisser d@asser des paniers.
Chargement Recommande (los caracteristiquos des paniors variont solon le modele)
Pour obtenir de meilleurs rdsultats, observer les prdsentes directives pore ddterminer la disposition qui convient le mieux
vos articles.
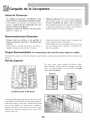
Panier Superieur
I1 peut recevoir verres, tasses, verres g pied, articles en
plastique ldger, petites assiettes, bols, casseroles, rdcipi-
ents g long manche, etc. Ne pas placer les verres sur les
tiges de retenue.
Correct Incorrect
Tige/i
I'ext6-
' rieur
Tige
I'int6-
10 Couverts
La tablette Stack-Rack (modbles sdlectionnds), du c6td droit
du panier supdrieur, se rel8ve et se rabat, permettant plus de
flexibilitd dans le chargement d'une varidtd d'articles. La
rabatn'e pour maintenir en place couteaux g long manche,
spamles et cuill8res ou encore des articles de peu de hauteur
tels que tasses ou verres _ jus de fruit. La relever pour per-
mettre de placer des articles plus hauts tels que verres, bols,
assiettes, etc.
14

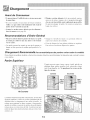
Panier Inferieur
Ce panier peut accueillir plusieurs grands articles, comme les assiettes/_ diner, les bols/_ mdlanger, les casseroles et
les plats de cuisson.
3 soucoupes
sont plac_es
darts le
panier
sous la
tablette
Stack-Rack
10 Couverts
Des articles en hauteur tels que moules /_ gfiteaux et
grands plats de service peuvent _tre placds du cStd
gauche ou/_ l'arri_re de ce panier.
@ @
@
Arri_re
Lorsque la tablette Stack-Rack (l'nodbles sdlectionnds) est
relevde, elle permet de placer des articles peu dpais tels
que plaques/_ biscuits, plats/_ pizza, etc. le long du cStd
gauche. Lorsqu'elle est rabattue, elle permet de placer
verres et tasses sur deux dtages.
Si les tiges de retenue Fold-Away TM (modbles sdlectionnds)
sont rabattues,/_ l'arri_re gauche du partier, elles laissent
un espace pratique pour les articles de grandes dimen-
sions comme les marmites ou les grandes casseroles ou
les bols/_ mdlanger. @
N
@
Arri_re
@
@@
@@@ @@
@ @@
@ @
@ @
@
Les tiges adaptables situ_es dans le coin arri_re droit sont
aiustables pour fournir un jeu dtroit pour les assiettes ou
large pour les bols profonds ou les casseroles. Orienter
les tiges vers le haut pour obtenir un jeu dtroit ou vers le
bas pour obtenir un jeu large.

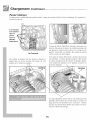
Panier a Ustensiles Split & Fit TM
II est possible de s@arer le panier /_ustensiles pour
placer chaque moitid en deux endroits distincts du
partier infdrieur. Tenir fermement le partier par les
c6tds. Suivre les fl_ches de ddverrouillage gravdes sur
le partier et glisser chaque moitid du panier jusqu'i_ ce
qu'il se s@are. Charger les ustensiles dans chaque
moitid ou dans une seule, selon leur nombre.
Pour obtenir de meilleurs rdsultats au lavage, emp_cher
les articles de se placer directement Fun sur l'autre. En
ce sens, disposer certains ustensiles la poignde vers le
baset d'autres la poignde vers le haut. Charger les
couteaux la poignde vers le haut dans les fentes du cou-
vercle articuld refermd.
S'assurer clue les articles minces et effilds ne d@assent
pas du panier, sinon ils risquent de bloquer le bras de
lavage infdrieur.
Disposer les petits articles ldgers, comme les cuillers de
bdbd et les cuillers/_ mesurer de plastique, dans la sec-
tion du couvercle articuld.
Ranger les ustensiles/_ long manche comme spamles et
cuillbres en bois dans les sections les plus dloigndes de
la porte.
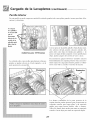
Pour Retirer ie Panier Superieur
On peut retirer le panier sup_rieur si on d_sire placer des
articles de plus grandes dimensions dans le panier du bas.
Pour retirer le panier sup6rieur:
* Faire rouler le panier vers soi jusqu'i_ ce qu'il soit
retird environ du tiers ou de la moiti&
. Pour retirer la butde en plastique installde/_ l'extrdmitd
de chaque glissi_re, pousser vers l'intdrieur (vers le
panier) sur la moulure de la butde. La butde s'ouvre
d'un coup sec; il est alors facile de l'enlever en tirant
vers sol. S'assurer de bien soutenir la glissi_re au
moment d'enlever les butdes.
* Tirer compl_tement le panier vers sol afin de le retirer
du lave-vaisselle.
* Pour remettre le partier supdrieur en place, inverser
l'ordre des instructions prdcitdes.
But6e
16

Points Essentie|So,,oooooo ,,,,,o ,,oooooo ,,,,,o ,,oooooo ,,,,,o ,,ooooo
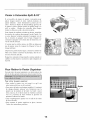
Eau Chaude
Pour varifier la temparamre de l'eau, ouvrir le robinet
d'eau chaude le plus proche du lave-vaisselle et faire
couler l'eau dans un verre, dans l'avier. Mettre un ther-
roomette/_ confiserie dans le verre, attendre clue la tern-
paramre cesse de monter et lire la temparamre indiquae.
Si l'eau est/_ une temparature infdrieure/_ 49 ° C (120 ° F),
thire ragler le thermostat de votre chauffe-eau par une
personne qualifiae.
Avant de damarrer le lave-vaisselle, ouvrir le robinet
d'eau chaude pour laisser couler l'eau jusqu'i_ ce qu'elle
devienne chaude. Ainsi, le remplissage initial se fera au
moyen d'une eau chaude.
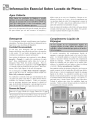
Detergent
Utiliser uniquement un datergent en poudre spacialement
con cu pour les lave-vaisselle. Utiliser dn datergent frais
et le conserver darts un endroit frais et sec (pas sous
l'avier).
Quantit6 Recommand6e
Une quantita insuffisante de datergent se traduit par un
mauvais lavage, des pellicules ou des taches d'eau dure et
un sachage inadaquat. Une quantita trop importante de
datergent entraine des agratigmues permanentes et la
nabulosita.
Dans le cas des taches laissaes par les aliments exigeant
le cycle Heavy (gros lavage) ou Normal et/ou une eau
dure*, remplir les deux moitias du distributeur principal
/_ datergent. Pour laver des taches exigeant le cycle
Light (peu sale) et/ou une eau douce*, remplir seule-
ment le cata Light (lager) du distributeur.
Ne pas utiliser de datergent avec le cycle Rinse Only
(rincage seulement). Laisser le couvercle du distributeur
ouvert lors de l'exacution du cycle Rinse Only (rincage
seulement).
Lorsque l'eau est extramement dure (15 grains par gallon
(4,4 l) ou plus*), il devient dift]cile d'obtenir de bons
rasultats, peu importe le lave-vaisselle. Un adoucisseur
d'eau macanique peut se ravaler nacessaire pour
amaliorer la qualita de l'eau et l'efficacita dn datergent
en plus de protager les piaces dn lave-vaisselle contre les
dommages causas par l'eau dure.
Duret_ de i'Eau*
lDouce (0/_ 3 gpg) Moyenne (4/_ 9 gpg) Dure (10/_ 12 gpg)
* Le service de traitement des eaux de votre localita ou
le service-conseil de l'universita de la ragion peut
mesurer le degra de dureta de l'eau.
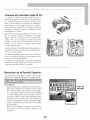
Agent de Rin age
Un distributeur automatique d'agent de tin cage se trouve
/_cata des distributeurs de datergent. La fenatre simae/_
cata du distributeur indique la quantita d'agent de
rincage dans le distributeur. Lorsque le niveau de l'agent
de tin cage se trouve sous les lnarques et que la fenatre
est presque transparente, il est temps de remplir le dis-
tributeur. V_rifier le distributeur tous les mois.
Pour ajouter de l'agent de fincage dans le distributeur,
tourner le couvercle dans le sens antihoraire pour l'ou-
vrir. Enlever le couvercle et verser l'agent de rincage
darts l'ouvermre. I1est possible de ragler la quantita d'a-
gent de rincage distribuae durant le lavage en daplacant
le levier sired /_ l'intarieur dn raservoir. Utiliser le
raglage <<1>>pour une eau douce, jusqu'au raglage
<<MAX>>pour une eau dure. Disposer le levier en tout
point entre ces deux marques, selon la quantita dasirae.
Replacer le couvercle et le tourner dans le sens horaire
pour le fermer.
Rinse
17

Les Contr6|es Bref
en ooooo oooooooooooo oooooooooooo oo
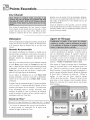
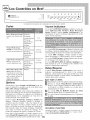
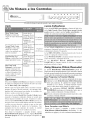
Cycles
Heavy Wash (gros lavage)
convient fila vaisselle tr_s
sale.
*ooooo=e®eeeoooooo®e_®®eoeeool
Nm'mal Wash (lavage
normal) est concu pour la
vaisselle nonnalement sale.
*oooe®ee®eeeo=eo_ooeeeeeQe=eol
Light Wash (vaisselle pen
sale) ®stconcu pour la
vaisselle ldg_rement sale
La disposition du panneau de command® peut varier selon le module.
Voyant Indicateur
Le voyant SANITIZED (st@ilis_) s'allume _ la fin des
cycles Light (pen sale), Normal et Heavv Wash (gros
lavage) lorsque l'option Sanitize (st@ilisation) a dtd
sdlectionn@ et que les conditions appropri@s de stdrili-
sation ont dtd respect@s.
37 L
(9,8 Gal.)
,Qoo®oooooo=®®*
29,52 L
(7,8 Gal.)
,Qee=eo_®o_=®®*
21,95 L
(5,8 Gal.)
Prdlavage
Prdringage
Lavage principal
Prdringage
Ringage Haute
Telnp&ature
S&hage
ooe®eeeeeIooo®®oe®
Prdlavage
Lavage principal
Prdringage
Rincage Haute
Telnp&ature
S_chage
oooe®®oeeeoooo®o_®
Lavage principal
Prdringage
Rincage Haute
Temp@ature
S_chage
®®e®®e®e®oe®®®®eee
Ringage
_®®®®®®=®ee®ooooo®®®_®®®o®oeoe ,eeooooo®®®_®®o
Rinse Only (ringage seule- 7,19 L
ment) pennet de rincer la
vaisselle qui se trouve dans (1,9 Gal.)
le lave-vaisselle en attendant
qu'il soit plein, de fagon/_
r_duire la possibilitd
d'odeurs de nourrimre.
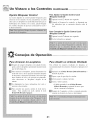
Options
S_lectionner l'option Sanitize (st@ilisation) pour net-
toyer et stdriliser la vaisselle sous le cycle ddsird (sauf
Rinse Only (ringage seuleruent).
Sdlectionner dgalement cette option pour amdliorer le
lavage et le sdchage de tousles types de chargements car
elle ajoute de la chaleur et comporte des vdrifications
suppldmentaires de la tempdrature de l'eau lots du
lavage principal et du rincage final.
Choisir l'option Heated Dry (s_chage fi chaud) pour
allumer l'dldment chauffant durant le sdchage et
amdliorer ainsi les rdsultats. Sans cette option, il sera
parfois ndcessaire d'essuyer certains articles de plas-
tique et de tdflon au moyen d'un ling® et l'intdrieur du
lave-vaisselle risque de retenir davantage l'humidit&
Avec l'une ou l'autre des options de sdchage, il est
normal de remarquer la vapeur s'dchapper de l'dvent.
Pour rider le lave-vaisselle et l'arr_ter, appuyer sur la
touche Drain/Off (vidange/arr_t). Appuyer deux fois sur
cette touche pour arr_ter le lave-vaisselle sans le rider. _
Le voyant CLEAN (nettoyage) s'allume _ la fin du cycle
de sdchage et demeure allumd jusqu'g ce que la porte ait dtd
ouverte pendant au moins 30 secondes sans interruption.
Le voyant DRY (s@hage) s'allume pendant la dur@
enti_re du s&hage et s'dteint lorsque le cycle est termin&
Le voyant WASH (lavage) s'allume dnrant routes les par-
ties de rincage et de lavage du cycle.
Le voyant HEATING DELAY (dt}lai de chauffage) s'al-
lume lorsque le cycle se prolonge pour chauffer l'eau
jusqu'_ la tempdrature appropri@.
Delay/Resume
L'option Delay/Resurue (d_lai/reprise) peut servir /_
ddmarrer automatiquement le cycle g un moment
ultdrieur, comme durant la nuit pour profiter d'un coot
d'dlectricitd moindre ou pour rdduire l'accumulation de
chaleur diurne dans la maison.
Pour regler un d6lai:
_ Sdlectio_merlecycleet les optkmsen fonctkmde la cha_e.
Presser la touche Delay/Resurue (d_lai/reprise)
jusqu'i_ ce que l'appareil indique le ddlai voulu (2, 4
ou 6 heures). Le ddlai commence/_ s'dcouler dbs le
relfichement de la touche.
N Le voyant DELAY HOURS (heures de d_lai)
demeure allumd jusqu'i_ l'expiration du ddlai.
_Le cycle d@mrre automatiquement dbs l'expiration
du ddlai.
AnnuJation d'une DeJai
Attendez au re®ins 2 secondes, appuyer ?t nouveau sur la
touche Delay/Resume (dt}lai/reprise). Le voyant s'dteint
et le cycle commence immddiatement.

Les ContrS|es en Bref {continuer)ooooo oooooooo oooooooo ooo
Option de Verrouillage des
Commandes
II est possible de verrouiller les touches de commande
pour en emp_cher l'enfoncement accidentel. Lorsque
cette fonction est activde entre les cycles, il devient
impossible de faire fonctionner le lave-vaisselle tant clue
l'on ne ddverrouille pas les commandes. Au besoin, ver-
rouiller les commandes apr_s un cycle ou apr_s le ddbut
d'un ddlai.
Verrouiiiage des Commandes:
Appuyer sur la touche _ pendant trois secondes.
NUn voyant situd au-dessus de la touche s'allume
lorsque les commandes sont verrouilldes.
Pour deverrouiiier:
sur la touche _ pendant trois secondes.
N Le voyant s'dteint.
iiiiiiiiiiiiiiiiiiiiiiiiiiiiiiiiiiiiiiii = r = = =
Consez|s d Utz|=satzOnooooo,,,,ooooooo,,,ooooooo,,,ooooooo oo
o
/Wise en /Vlarche du Lave-Vaisse//e Ajout d'un Article Oub/ie
N Une fois le lave-vaisselle chargd et le ddter_ent Pour de meilleurs rdsultats de nettoyage, aiouter l'article
aioutd, fermer le lave-vaisselle en appuyant sur la t6t au cours du cycle•
porte .iusqu_/_ ce que le verrou produise_ un <<clic >>. _ Appuyer _sur.la touche Delay/Resume,. (d_lai/reprise).
s s s ou devetromllet la porte
N Appuyer fermement _ur le_ touche: de cycle et .... •
d'options ddsirdes pour mettre le lave-vaisselle en _ Attendre que cesse leet d'eau.
marche, .(le remplissa_e_ debutera apr_s une pause),. _ Ouvrir la porte et aiouter_ l'article.
Pour ewter les changements de cycle ou d optmn _ _ .,, ,
H eermer et verroumer m porte
_mprdvus, ces sdlect_ons sont <<verromlldes>> apr_s .
une minute Si on avait enfoncd la touche Delay/Resume
" , (di_lai/reprise), l'enfoncer de nouveau pour redd-
Le voyant du cycle sdlectionnd s allume marret le lave Vaisselle.... _ __ .
Pour annuler une optmn, appuyer de nouveau sur _ Apr_s cinq secondes le cycle se poursuit automa-
la touche Pour annulet un cycle, appuyer sur la _ .... , ....
• _ tNuement la ou _l s eta_t arrete.
touche Drain/Off.
..... 19
La page est en cours de chargement...
La page est en cours de chargement...
La page est en cours de chargement...
La page est en cours de chargement...
La page est en cours de chargement...
La page est en cours de chargement...
La page est en cours de chargement...
La page est en cours de chargement...
La page est en cours de chargement...
La page est en cours de chargement...
La page est en cours de chargement...
La page est en cours de chargement...
La page est en cours de chargement...
La page est en cours de chargement...
La page est en cours de chargement...
La page est en cours de chargement...
-
 1
1
-
 2
2
-
 3
3
-
 4
4
-
 5
5
-
 6
6
-
 7
7
-
 8
8
-
 9
9
-
 10
10
-
 11
11
-
 12
12
-
 13
13
-
 14
14
-
 15
15
-
 16
16
-
 17
17
-
 18
18
-
 19
19
-
 20
20
-
 21
21
-
 22
22
-
 23
23
-
 24
24
-
 25
25
-
 26
26
-
 27
27
-
 28
28
-
 29
29
-
 30
30
-
 31
31
-
 32
32
-
 33
33
-
 34
34
-
 35
35
-
 36
36


Maytag Jetclean MDB6650 Manuel utilisateur
- Catégorie
- Lave-vaisselle
- Taper
- Manuel utilisateur
dans d''autres langues
- English: Maytag Jetclean MDB6650 User manual
- español: Maytag Jetclean MDB6650 Manual de usuario
Documents connexes
Autres documents
-
Whirlpool GU3200XTPS0 Le manuel du propriétaire
-
Whirlpool GU2400XTPT1 Le manuel du propriétaire
-
 Kenmore Elite 2214743N513 Le manuel du propriétaire
-
Electrolux EIDW5905JW0A Le manuel du propriétaire
-
 Kenmore Elite 66512769K310 Le manuel du propriétaire
-
Sears 66514792N510 Le manuel du propriétaire
-
Kenmore Elite 66512783K310 Le manuel du propriétaire
-
Kenmore Pro 66514753N512 Le manuel du propriétaire
-
Bosch SGU47M45AU/49 Guide d'installation
-
Aereco VCZ SMART Installation and Maintenance Instruction

