Panasonic NN-SD452W Le manuel du propriétaire
- Catégorie
- Micro-ondes
- Taper
- Le manuel du propriétaire
Ce manuel convient également à

Operating Instructions
Bedienungsanleitung
Gebruiksaanwijzing
Mode d’emploi
Manuale d’istruzioni
Instrucciones de funcionamiento
Instrukcja obsãugi
Bruksanvisning
Brugsanvisning
Bruksanvisning
Käyttöohjeet
Návod k obsluze
Instrucŏiuni de operare
Kezelési útmutató
Microwave Oven
Mikrowellengerät
Magnetron
Four à Micro-ondes
Forno a Microonde
Horno Microondas
Kuchenka Mikrofalowa
Kombinationsugn med Mikrovågor
Mikrobølgeovn
Mikrobølge
Mikroaaltouuni
Mikrovlnná trouba
Cuptor cu microunde
Mikrohullámú sütö
English Deutsch
Nederlands
Français Italiano Español Svenska Dansk Norsk Suomi Polski ÿesky Magyar Românã

IMPORTANT SAFETY INSTRUCTIONS: Before operating this oven, please read these instruc-
tions carefully and keep for future reference.
WICHTIGE SICHERHEITSANWEISUNGEN. Bitte sorgfältig durchlesen und zur weiteren Bezug-
nahme aufbewahren.
BELANGRIJKE VEILIGHEIDSINSTRUCTIES. Lees ze a.u.b. zorgvuldig door en bewaar ze zodat
u ze opnieuw kunt raadplegen wanneer nodig.
INSTRUCTIONS DE SÛRETÉ IMPORTANTES. Avant d’utiliser le four à micro-ondes, lisez at-
tentivement les recommandations d’utilisation et
conservez-les soigneusement.
ISTRUZIONI IMPORTANTI PER LA SICUREZZA. Leggere attentamente queste istruzioni e
conservarle per consultazioni future.
INSTRUCCIONES SOBRE SEGURIDAD IMPORTANTES. Léalas detenidamente y guárdelas
para futura referencia.
WAŦNE INSTRUKCJE BEZPIECZEķSTWA. 3rosimy o dokãadne zapoznanie siĕ z instrukcMć i
zachowanie MeM.
VIGTIGE SIKKERHEDSFORSKRIFTER. Læses omhyggeligt, og opbevares til senere brug.
VIKTIGE SIKKERHETSINSTRUKSJONER. Les nøye, og oppbevar på et trygt sted slik at du kan
slå opp ved behov.
TÄRKEITÄ TURVALLISUUSTIETOJA. Lue nämä ohMeet huolellisesti Ma säilytä ne my|hempää
tarvetta varten.
VIKTIGA SÄKERHETSANVISNINGAR. Läs igenom anvisningarna noga och spara dem f|r
framtida referens.
DŚLEæITÉ BEZPEÿNOSTNÌ POKYNY. 3ʼned uvedentm trouby do provozu si laskavė peĀlivė
pʼneĀtėte tyto pokyny a uschoveMte Me pro budouct pouçitt.
INSTRUCŎIUNI DE SIGURANŎĄ IMPORTANTE: Ínainte de utilizarea a acestui cuptor, vą rugąm
są citiŏi cu atenŏie aceste instrucŏiuni üi są le pąstraŏi pentru referinŏe ulterioare.
DŚLEæITÉ POKYNY
K BEZPEÿNOSTI. 3eĀlivė si Me prostm pʼneĀtėte a uloçte pro pʼntpadné
pouçitt.

,5
English
0TWVY[HU[ZHML[`PUZ[Y\J[PVUZ)LMVYL
VWLYH[PUN[OPZV]LUWSLHZLYLHK[OLZL
PUZ[Y\J[PVUZJHYLM\SS`HUKRLLWMVYM\[\YL
YLMLYLUJL
;OPZHWWSPHUJLJHUIL\ZLKI`JOPSKYLU
HNLKMYVT`LHYZHUKHIV]LHUKWLYZVUZ
^P[OYLK\JLKWO`ZPJHSZLUZVY`HUK
TLU[HSJHWHIPSP[PLZVYSHJRVML_WLYPLUJL
HUKRUV^SLKNLPM[OL`OH]LILLUNP]LU
Z\WLY]PZPVUVYPUZ[Y\J[PVUI`HWLYZVU
YLZWVUZPISLMVY[OLPYZHML[`JVUJLYUPUN[OL
\ZLVM[OLHWWSPHUJLPUHZHML^H`HUK
\UKLYZ[HUK[OLOHaHYKZPU]VS]LK*OPSKYLU
ZOHSSUV[WSH`^P[O[OLHWWSPHUJL*SLHUPUN
HUK\ZLYTHPU[LUHUJLZOHSSUV[ILTHKLI`
JOPSKYLU^P[OV\[Z\WLY]PZPVU
>OLU[OPZV]LUPZPUZ[HSSLKP[ZOV\SK
ILLHZ`[VPZVSH[L[OLHWWSPHUJLMYVT[OL
LSLJ[YPJP[`Z\WWS`I`W\SSPUNV\[[OLWS\NVY
VWLYH[PUNHJPYJ\P[IYLHRLY

,5
0M[OLZ\WWS`JVYKPZKHTHNLKP[T\Z[IL
YLWSHJLKI`[OLTHU\MHJ[\YLYVYP[ZZLY]PJL
HNLU[VYHZPTPSHYS`X\HSPÄLKWLYZVUPUVYKLY
[VH]VPKHOHaHYK
>HYUPUN;OLHWWSPHUJLZOV\SKIL
PUZWLJ[LKMVYKHTHNL[V[OLKVVYZLHSZ
HUKKVVYZLHSHYLHZHUKPM[OLZLHYLHZ
HYLKHTHNLK[OLHWWSPHUJLZOV\SKUV[
ILVWLYH[LK\U[PSP[OHZILLUYLWHPYLK
I`HZLY]PJL[LJOUPJPHU[YHPULKI`[OL
THU\MHJ[\YLY
>HYUPUN+VUV[H[[LTW[[V[HTWLY^P[O
VYTHRLHU`HKQ\Z[TLU[ZVYYLWHPYZ[V[OL
KVVYJVU[YVSWHULSOV\ZPUNZHML[`PU[LYSVJR
Z^P[JOLZVYHU`V[OLYWHY[VM[OLV]LU+V
UV[YLTV]L[OLV\[LYWHULSMYVT[OLV]LU
^OPJONP]LZWYV[LJ[PVUHNHPUZ[L_WVZ\YL[V
TPJYV^H]LLULYN`9LWHPYZZOV\SKVUS`ILI`
HX\HSPÄLKZLY]PJLWLYZVU
>HYUPUN+VUV[WSHJL[OPZV]LUULHYHU
LSLJ[YPJVYNHZJVVRLYYHUNL

,5
English
>HYUPUN6US`HSSV^JOPSKYLU[V\ZL[OL
V]LU^P[OV\[Z\WLY]PZPVU^OLUHKLX\H[L
PUZ[Y\J[PVUZOH]LILLUNP]LUZV[OH[[OLJOPSK
PZHISL[V\ZL[OLV]LUPUHZHML^H`HUK
\UKLYZ[HUKZ[OLOHaHYKZVMPTWYVWLY\ZL
;OPZV]LUPZPU[LUKLKMVYJV\U[LY[VWHUK
I\PS[PU\ZLVUS`0[PZUV[PU[LUKLKMVY\ZL
PUZPKLHJ\WIVHYK;OPZV]LUTH`ILI\PS[
PU[VH^HSSJHIPUL[I`\ZPUN[OLWYVWLY[YPT
RP[^OP[L55;2;>-7^OPJOTH`IL
W\YJOHZLKMYVTHSVJHS7HUHZVUPJKLHSLY
-VYJV\U[LY[VW\ZL!
(SSV^JTVMZWHJLVU[OL[VWVM[OL
V]LUJTH[[OLIHJRJTVUVULZPKL
HUK[OLV[OLYZPKLT\Z[ILVWLULKTVYL
[OHUJT
>OLUOLH[PUNMVVKPUWSHZ[PJVYWHWLY
JVU[HPULYZJOLJR[OLV]LUMYLX\LU[S`HZ
[OLZL[`WLZVMJVU[HPULYZPNUP[LPMV]LYOLH[LK

,5
0MZTVRLPZLTP[[LKVYHÄYLVJJ\YZPU[OL
V]LUWYLZZ:[VW*HUJLSI\[[VUHUKSLH]L
[OLKVVYJSVZLKPUVYKLY[VZ[PÅLHU`ÅHTLZ
+PZJVUULJ[[OLWV^LYJVYKVYZO\[VMMWV^LY
H[M\ZLVYJPYJ\P[IYLHRLYWHULS
>OLUOLH[PUNSPX\PKZLNZV\WZH\JLZ
HUKIL]LYHNLZPU`V\YV]LUV]LYOLH[PUN[OL
SPX\PKIL`VUKIVPSPUNWVPU[JHUVJJ\Y^P[OV\[
L]PKLUJLVMI\IISPUN;OPZJV\SKYLZ\S[PUH
Z\KKLUIVPSV]LYVM[OLOV[SPX\PK
;OLJVU[LU[ZVMMLLKPUNIV[[SLZHUKIHI`
MVVKQHYZHYL[VILZ[PYYLKVYZOHRLU;OL
[LTWLYH[\YLOHZ[VILJOLJRLKILMVYL
JVUZ\TW[PVU[VH]VPKI\YUZ
+VUV[JVVRLNNZPU[OLPYZOLSSZHUK^OVSL
OHYKIVPSLKLNNZI`40*96>(=,7YLZZ\YL
TH`I\PSK\WHUK[OLLNNZTH`L_WSVKL
L]LUHM[LY[OLTPJYV^H]LOLH[PUNOHZLUKLK

,5
English
*SLHU[OLPUZPKLVM[OLV]LUKVVYZLHSZHUK
KVVYZLHSHYLHZYLN\SHYS`>OLUMVVKZWSH[[LYZ
VYZWPSSLKSPX\PKZHKOLYL[V[OLV]LU^HSSZ
KVVYZLHSZHUKKVVYZLHSHYLHZ^PWLVMM^P[O
HKHTWJSV[O4PSKKL[LYNLU[TH`IL\ZLKPM
[OL`NL[]LY`KPY[`
;OL\ZLVMOHYZOKL[LYNLU[VYHIYHZP]L
PZUV[YLJVTTLUKLK+656;<:,
*644,9*0(36=,5*3,(5,9:
-HPS\YL[VTHPU[HPU[OLV]LUPUHJSLHU
JVUKP[PVUJV\SKSLHK[VKL[LYPVYH[PVUVM
Z\YMHJLZ[OH[JV\SKHMMLJ[[OLSPMLVM[OL
HWWSPHUJLHUKWVZZPIS`YLZ\S[PUHOHaHYKV\Z
ZP[\H[PVU
6US`\ZL\[LUZPSZ[OH[HYLZ\P[HISLMVY\ZLPU
TPJYV^H]LV]LUZ

,5
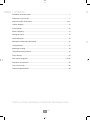
*VU[LU[Z
Installation and connection .........................................................................................7
Placement of your oven ..............................................................................................7
Important safety instructions..................................................................................8-11
Outline diagram ........................................................................................................12
Control panel ............................................................................................................13
Word Prompting ........................................................................................................14
Setting the clock .......................................................................................................15
Child safety lock .......................................................................................................15
Microwave cooking and defrosting ..........................................................................16
Using the timer .........................................................................................................17
Multistage cooking ....................................................................................................18
Using the memory function .......................................................................................19
Turbo defrost ............................................................................................................20
Auto sensor programs .........................................................................................21-23
Questions and answers ............................................................................................24
Care of your oven .....................................................................................................25
Technical speciÀcations ............................................................................................26
;OHUR`V\MVYW\YJOHZPUNH7HUHZVUPJ4PJYV^H]L6]LU

,5
English
,_HTPUL`V\YTPJYV^H]LV]LU
Unpack the oven, remove all packing
material, and examine the oven for any
damage such as dents, broken door
latches or cracks in the door. If you Ànd any
damage, notify your dealer immediately. Do
not install a damaged microwave oven.
,HY[OPUNPUZ[Y\J[PVUZ
0TWVY[HU[
THIS UNIT HAS TO BE PROPERLY
EARTHED FOR PERSONAL SAFETY.
If your AC outlet is not grounded, it is the
personal responsibility of the customer to
have it replaced with a properly grounded
wall socket.
6WLYH[PVU]VS[HNL
The voltage has to be the same as speciÀed
on the label on the oven. If a higher voltage
than speciÀed is used, it may cause a Àre or
other damages.
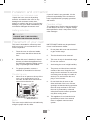
0UZ[HSSH[PVUHUKJVUULJ[PVU
This oven is intended for counter-top and
built-in use only. It is not intended for use
inside a cupboard.
1. Place the oven on a Áat and stable
surface more than 85 cm above the
Áoor.
2. When this oven is installed, it should
be easy to isolate the appliance from
the electricity supply by pulling out the
plug or operating a circuit breaker.
3. For proper operation, ensure a
sufÀcient air circulation for the oven.
*V\U[LY[VW\ZL!
a. Allow 15 cm of space on the top of the
oven, 10 cm at the back, 5 cm on
one side, and the other side must be
opened more than 40 cm.
)\PS[0U
This oven may be built into a wall cabinet by
using the proper trim kit, white
NN-TKT52WFP which may be purchased
from a local Panasonic dealer.
4. Do not place this oven near an electric
or gas cooker range.
5. The feet should not be removed.
6. This oven is only for household usage.
Do not use outdoors.
7. Avoid using the oven in high humidity.
8. The power cord should not touch the
outside of the oven. Keep the cord
away from hot surfaces. Do not let the
cord hang over the edge of a table or
work top. Do not immerse the cord,
plug or oven in water.
9. Do not block the air vents on the
sides and back of the oven. If these
openings are blocked during operation
the oven may overheat. In this case
the oven is protected by a thermal
safety device and resumes operation
only after cooling down.
10. This appliance is not intended to be
operated by means of an external
timer or separate remote-control
system.
7SHJLTLU[VM`V\YV]LU
5 cm
15 cm
10 c
m
open
counter top

,5
>(9505.
Important safety instructions
1. The door seals and seal areas should
be cleaned with a damp cloth. The
appliance should be inspected for
damage to the door seals and door
seal areas and if these areas are
damaged the appliance should not
be operated until it has been repaired
by a service technician trained by the
manufacturer.
2. Do not attempt to tamper with or
make any adjustments or repairs
to the door, control panel housing,
safety interlock switches or any other
part of the oven. Do not remove the
outer panel from the oven which
gives protection against exposure to
microwave energy. Repairs should
only be carried out by a TualiÀed
service person.
3. Do not operate this appliance if it has
a damaged CORD OR PLUG, if it is
not working properly, or if it has been
damaged or dropped. It is dangerous
for anyone other than a service
technician trained by the manufacturer
to perform repair service.
4. If the supply cord is damaged, it must
be replaced by the manufacturer or its
service agent or a similarly TualiÀed
person in order to avoid a hazard.
5. Only allow children to use the oven
without supervision when adequate
instructions have been given so that
the child is able to use the oven in a
safe way and understands the hazards
of improper use.
6. Liquids and other foods must not be
heated in sealed containers since they
are liable to explode.
7. Users are advised to avoid a
downward pressure on the microwave
oven door when in the open position.
There is a safety risk that the oven will
tilt forward.
8. This appliance is not intended for use
by persons (including childen)
with reduced sensory or mental
capabilities, or lack of experience
and knowledge unless they have
been given supervision or instruction
concerning use of the appliance by
a person responsible for their safety.
Children should be supervised to
ensure that they do not play with the
appliance.
0TWVY[HU[ZHML[`PUZ[Y\J[PVUZ

,5
English
<ZLVM`V\YV]LU
1. Do not use the oven for any reason
other than the preparation of food.
This oven is speciÀcally designed to
heat or cook food. Do not use this
oven to heat chemicals or other non-
food products.
2. Before use, check that utensils/
containers are suitable for use in
microwave ovens.
3. Do not attempt to use this microwave
oven to dry newspaper, clothing or
any other materials. They may catch
on Àre.
4. When the oven is not being used,
do not store any objects inside the
oven in case it is accidentally turned
on.
5. The appliance must not be operated
by MICROW
AVE WITHOUT FOOD IN
THE OVEN. Operation in this manner
may damage the appliance.
6. If smoke or a Àre occurs in the oven,
press Stop/Cancel button and leave
the door closed in order to stiÁe any
Áames. Disconnect the power cord,
or shut off power at fuse or circuit
breaker panel.
6]LUSPNO[
When it becomes necessary to replace the
oven light, please consult your dealer.
(JJLZZVYPLZ
The oven comes equipped with a variety of
accessories. Always follow the directions
given for use of the accessories.
.SHZZ[YH`
1. Do not operate the oven without
the roller ring and the glass tray in
place.
2. Never use another type of glass tray
than the one specially designed for
this oven.
3. If the glass tray is hot, let it cool before
cleaning or placing in water.
4. The glass tray can turn in either
direction.
5. If the food or cooking vessel on the
glass tray touches the oven walls and
stops the tray rotating, the tray will
automatically rotate in the opposite
direction. This is normal.
6. Do not cook foods directly on the glass
tray.
0TWVY[HU[ZHML[`PUZ[Y\J[PVUZ

,5
0TWVY[HU[ZHML[`PUZ[Y\J[PVUZ
9VSSLYYPUN
1. The roller ring and the oven Áoor
should be cleaned frequently to
prevent noise and build-up of
remaining food.
2. The roller ring must always be used
for cooking together with the glass
tray.
*VVRPUN[PTLZ
The cooking time depends on the
condition, temperature, amount of food
and on the type of cookware.
Begin with the minimum cooking time
to help prevent overcooking. If the
food is not sufÀciently cooked you can
always cook it for a little longer.
0TWVY[HU[
If the recommended cooking times are
exceeded the food will be spoiled and
in extreme circumstances could catch
Àre and possibly damage the interior of
the oven.
:THSSX\HU[P[PLZVMMVVKZ
Small quantities of food or foods with
low moisture content can burn, dry
out or catch on Àre if cooked too long.
If materials inside the oven should
ignite, keep the oven door closed, turn
the oven off and remove the plug from
the socket.
,NNZ
Do not cook eggs in their shells and
whole hard-boiled eggs by
MICROWAVE. Pressure may build up
and the eggs may explode, even after
the microwave heating has ended.
7PLYJPUN:RPU
Food with non porous skins, such as
potatoes, egg yolks and sausages
must be pierced before cooking by
MICROWAVE to prevent bursting.
4LH[[OLYTVTL[LY
Use a meat thermometer to check the
degree of cooking of roasts and
poultry only when the meat has been
removed from the oven. Do not use a
conventional meat thermometer in the
microwave oven because it may cause
sparking.

,5
English
3PX\PKZ
When heating liquids, e.g. soup,
sauces and beverages in your
microwave oven, overheating the
liquid beyond boiling point can occur
without evidence of bubbling. This
could result in a sudden boil over of
the hot liquid.
To prevent this possibility the following
steps should be taken:
a Avoid using straight-sided
containers with narrow necks.
b Do not overheat.
c Stir the liquid before placing the
container in the oven and again
halfway through the cooking time.
d After heating, allow it to stand
in the oven for a short time, stir
again before carefully removing
the container.
7HWLYWSHZ[PJ
When heating food in plastic or paper
containers, check the oven frequently
as these types of containers ignite if
overheated.
Do not use recycled paper products
(e.g. Kitchen Roll) unless the paper
product is labelled as safe for
microwave oven use. Recycled paper
products may contain impurities which
may cause sparks and/or Àres during
use.
Remove wire twist-ties from roasting
bags before placing the bags in the
oven.
<[LUZPSZMVPS
Do not heat any closed cans or bottles
because they might explode.
Metal containers or dishes with
metallic trim should not be used during
microwave cooking. Sparking will
occur.
If you use any aluminium foil, meat
spikes or metalware the distance
between them and the oven walls
and door should be at least 2 cm to
prevent sparking.
-LLKPUNIV[[SLZIHI`MVVKQHYZ
The top and teat or lid must be
removed from feeding bottles or baby
food jars before placing in the oven.
The contents of feeding bottles and
baby food jars are to be stirred or
shaken.
The temperature has to be checked
before consumption to avoid burns.
-HU4V[VYVWLYH[PVU
After using the oven the fan motor may
rotate for a few minutes to cool the electric
components. This is normal and you can
take out food even though the fan motor
operates. You can continue using the oven
during this time.
0TWVY[HU[ZHML[`PUZ[Y\J[PVUZ

,5
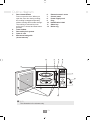
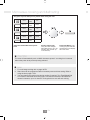
1. Door release button
Press to open the door. When you
open the oven door during cooking,
the cooking is stopped temporarily
without clearing earlier made settings.
The cooking is resumed as soon
as the door is closed and Start button
pressed.
2. Oven window
3. Door safety lock system
4. Oven air vent
5. Microwave feed guide
(do not remove)
6. External oven air vents
7. Control panel
8. Power supply cord
9. Plug
1. IdentiÀcation Label
11. Glass tray
12. Roller ring
6\[SPULKPHNYHT
1
12
2
7
3
11
10
5 6
6
4
8
9
5V[L
This illustration is for reference only.

,5
English
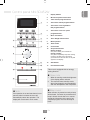
5V[L
If an operation is set and start button is not
pressed, after 6 minutes the oven will
automatically cancel the operation. The
display will revert back to clock mode.
1 Display window
2 Microwave power levels button
3 Turbo defrost programs button
4 Auto sensor reheat programs button
5 Auto sensor cook vegetables /
Àsh programs button
6 Auto sensor cook rice / pasta
programs button
7 More / less button
8 Time / Weight selection dial
9 Memory button
10 Timer button
11 Clock button
12 Stop /Cancel button:
Before Cooking:
One press clears your instructions
During Cooking:
One press temporarily stops the cooking
program. Another press cancels all
your instructions and the time of day will
appear in the display.
13 Start Button
14 Door Release button
This oven is equipped with an energy
saving function.
7SLHZLUV[L
1. When in stand-by mode the brightness
of the display will be reduced.
2. The oven will enter stand-by mode,
when Àrst plugged in and immediately
after the last operation has completed.
)LLWZV\UK
When a button is pressed correctly a beep
will be heard. If a button is pressed and no
beep is heard, the unit has not or cannot
accept the instruction. At the end of any
complete program, the oven will beep 5
times.
*VU[YVSWHULS55:+>
5
8
2
1
7
3
6
4
11
10
14
13
9
12

,5
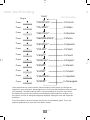
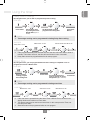
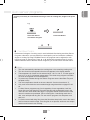
>VYK7YVTW[PUN
These models have a unique function “Word Prompting” which guides you through the
operation of your microwave. After plugging in the oven press the Start Button until you locate
your language. The default settings have no word prompting. As you press the buttons,
the display will scroll the next instruction eliminating the opportunities for mistakes. If for
any reason you wish to change the language displayed, unplug the oven and repeat this
procedure.
If the Timer Button is pressed 4 times, this will turn off the operation guide. To turn the
operation guide back on, press the Timer Button 4 times.
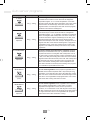
Plug-in
>VYK7YVTW[PUN
Press
"FRANCAIS" In French
Press
"ITALIANO" In Italian
Press
"NEDERLANDS" In Dutch
Press
"DEUTSCH" In German
Press
"ESPANOL" In Spanish
Press
"POLSKI" In Polish
"CESKY"
Press
In Czech
"ENGLISH"
Press
In English
"DANSK"
Press
In Danish
"SUOMI"
Press
In Finnish
"SVENSKA"
Press
In Swedish
"NORSK"
Press
In Norwegian
"88:88”

,5
English
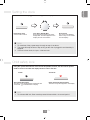
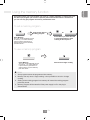
Using this system will make the oven controls inoperable; however, the door can be opened.
Child Lock can be set when the display shows a colon or the time.
Press Start three times
The time of day will disappear. Actual time will
not be lost. ‘
’ is indicated in the display.
To Set: To Cancel:
Press Stop /Cancel three times
The time of day will reappear in the display.
5V[L
1. To activate child lock, Start must be pressed 3 times within a 10 second period.
:L[[PUN[OLJSVJR
*OPSKZHML[`SVJR
When the oven is Àrst plugged in ´88:88µ appears in display window.
Press Clock once
A colon starts to blink.
5V[LZ
1. To reset time of day, repeat step 1 through to step 3, as above.
2. The clock will keep the time of day as long as the oven is plugged in and electricity is
supplied.
3. This is a 24 hour clock, ie 2 pm = 14:00 not 2:00.
Turn Time / Weight Dial.
Enter the time by turning the Time/
Weight dial. The time appears in the
display and the colon blinks.
Press Clock
The colon stops blinking.
Time of day is now locked
into the display.
*

,5
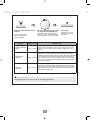
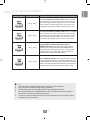
The glass tray must always be in position when using the oven.
Select the desired Microwave power
level.
5V[LZ
1. For multi-stage cooking refer to page 18 EN.
2. Stand time can be programmed after microwave power and time setting. Refer to
using the timer page 17 EN.
3. You can change the cooking time during cooking if required. Turn Time/Weight Dial
to increase or decrease the cooking time. Time can be increased / decreased in 1
minute increments, up to 10 minutes. Turning the dial to zero will end cooking.
*(<;065
The oven will automatically work on MAX microwave power if a cooking time is entered
without the power level previously being selected.
Set the cooking time
using the Time / Weight
dial (HIGH power: up to 30
minutes other powers: up
to 90 minutes)
Press Start Button. The
cooking program will start
and the time in the display
will count down.
1 Press
1000
Watts
Max
2 Presses
600
Watts
Medium
1 Press
440
Watts
Low
2 Presses
300
Watts
Simmer
1 Press
270
Watts
Defrost
2 Presses
100
Watts
Warm
4PJYV^H]LJVVRPUNHUKKLMYVZ[PUN

,5
English
<ZPUN[OL[PTLY
5V[LZ
1. Three stage cooking can be programmed including Delay Start cooking.
5V[LZ
1. Three stage cooking can be programmed including stand time.
2. If the programmed delay time exceeds one hour, the time will count down in units of
minutes. If less than one hour, the time will count down in units of seconds.
3. Delay Start cannot be programmed before an auto program.
2. If the oven door is opened during the Stand Time or Minute Timer, the time in the
display window will continue to count down.
3. This feature may also be used as a minute timer. In this case press the Timer, set
time and press Start.
4. Stand time cannot be programmed after an auto program.
By using the Timer, you are able to program Delay Start cooking.
By using the Timer, you can program Stand Time after cooking is completed or use to
program the oven as a Minute Timer.
Press Timer.
Set the desired
cooking program
and cooking time.
Set the delay time
by turning the Time/
Weight Dial (up to 9
hours).
Press Timer.
Set the desired cooking
program and cooking time.
Set desired amount of
time by turning the Time/
Weight Dial (up to 9 hours).
Press Start
Button.
Press Start.
L_HTWSL
L_HTWSL
L_HTWSL
L_HTWSL
MAX Power: 4 min
Delay Start: 1 hour
Stand Time: 5 min
MAX Power: 10 min.
MAX Power: 2 min
Simmer Power 300 W: 20 min
+LSH`:[HY[*VVRPUN
:[HUK;PTL

,5
4\S[PZ[HNLJVVRPUN
56;,
1. For 3 stage cooking, enter another cooking program before pressing start.
2. During operation, pressing Stop/Cancel once will stop the operation. Pressing Start will
re-start the programmed operation. Pressing Stop/Cancel twice will stop and clear the
programmed operation.
3. Whilst not operating, pressing Stop/Cancel will clear the selected program.
4. Auto programs can not be used with multi-stage cooking.
Example:
Press a
Microwave Power
button. To select
desired power
level.
VYZ[HNLJVVRPUN
Example: To cook at 1000 W for 2 minutes and cook food at 300 W for 3 minutes.
Press Microwave
Power once to
select 1000 W.
Press
Microwave
Power twice to
select 300 W
Set the
cooking time
to 2 minutes
using the Time/
Weight Dial
Set the
cooking time
to 3 minutes
using the Time/
Weight Dial
Press Start.
Set the cooking
time using the
Time/Weight Dial.
Press a
Microwave
Power button.
To select desired
power level.
Set the cooking
time using the
Time/Weight Dial.
Press Start.
The cooking program
will start and the time
in the display will
count down.
Example: To cook at 600 W for 5 minutes and cook food at 100 W for 4 minutes.
Press the
Microwave
Power twice to
select 600 W.
Press the
Microwave
Power twice to
select 100 W.
Set the
cooking time
to 5 minutes
using the Time/
Weight Dial
Set the
cooking time
to 4 minutes
using the Time/
Weight Dial
Press Start.
La page charge ...
La page charge ...
La page charge ...
La page charge ...
La page charge ...
La page charge ...
La page charge ...
La page charge ...
La page charge ...
-
 1
1
-
 2
2
-
 3
3
-
 4
4
-
 5
5
-
 6
6
-
 7
7
-
 8
8
-
 9
9
-
 10
10
-
 11
11
-
 12
12
-
 13
13
-
 14
14
-
 15
15
-
 16
16
-
 17
17
-
 18
18
-
 19
19
-
 20
20
-
 21
21
-
 22
22
-
 23
23
-
 24
24
-
 25
25
-
 26
26
-
 27
27
-
 28
28
-
 29
29


Panasonic NN-SD452W Le manuel du propriétaire
- Catégorie
- Micro-ondes
- Taper
- Le manuel du propriétaire
- Ce manuel convient également à
dans d''autres langues
- English: Panasonic NN-SD452W Owner's manual
Documents connexes
Autres documents
-
Nostalgia RMO4IVY Manuel utilisateur
-
 Zavor 124699 Mode d'emploi
-
 Zavor ZSELL22 Manuel utilisateur
-
 Pet Mate FISH MATE P7000 Manuel utilisateur
-
Stinger SPXM1 Guide d'installation
-
Hughes & Kettner TubeMeister 18 Head Mode d'emploi
-
Techly ICA-TR6 Manuel utilisateur
-
Meade StarPro™ AZ Le manuel du propriétaire
-
Beast BEAST7 Mode d'emploi
-


